Seiten

Samstag, 29. August 2015

Stempeleinmaleins - Ausgabe vom 29. August 2015


Hallo Ihr Lieben!
Nach unserer Sommerpause startet heute die neue Challenge beim Stempeleinmaleins. Unser Thema lautet "Herbst". Ich finde es immer wieder erstaunlich, wie viele verschiedene Anleitungen wir schon auf dem Blog haben, und manchmal fällt es mir schwer, mich für die Challenge für eine zu entscheiden. Diesmal ist es die Folienkarte geworden...

Hello everyone!
After our summer break we at Stempeleinmaleins are back today with our newest challene. The theme is fall. It's amazing how many and different styles of tutorials we have made for you so far and sometimes I am having a hard time to decide, which one to choose for my newest challenge card. For this month I picked the transparency card...

Für die Vorderseite habe ich mich für ein Motiv von Mo Manning entschieden. Die Pilzstanze und die Getreideähren sind aus dem letzten DooHickey Kit von Magnolia. Da man ja die mit Blättern bestempelte Folie noch etwas sehen sollte, habe ich mich mit Deko zurückgehalten... Ein paar Blumen und etwas Cheesecloth reichen schon.

For the front I picked this image by Mo Manning. The mushroom border and the wheet are from the last DooHickey Club Kit by Magnolia. Since I wanted to leave some of the transparency, that I stamped leaves on, seen I didn't add too many decorations... A few flowers and some cheesecloth did the job.


Das ist die geöffnete Karte. Es ist schwer, die aufgestempelten Blätter auf dem Foto sichtbar zu machen...

This is the opened card. It's hard to make the stamped on leaves visible on the picture...


Das ist die linke Innenseite. Da man durch die Folie ja die Lagen auf der anderen Seite durchsehen kann, muss man hier auf allen Seiten Deko anbringen. Sonnenblume, Ranke und Blatt sind ebenfalls von Magnolia, der Text von Noor!Design. Dass man den Vogel von der Vorderseite durchsieht, fand ich ganz lustig.
Wenn Ihr auf das Bild klickt, wird es größer und Ihr könnt die Blätter von Noor!Design erkennen. Zum Aufstempeln habe ich hellgelbes StazOn verwendet.

This is the inner left side of my card. Since you can see the different layers on the other side of the transparency you have to add something to each side of the card. Sunflower, twine and leave are by Magnolia as well, saying by Noor!Design. I thought it was funny that you are able to see the bird from the front of the card.
If you click on the picture it gets bigger and you can see the leaves by Noor!Design that I stamped on the transparency. I used light yellow StazOn to stamp them.


Auf der rechten Seite habe ich ein weiteres Label und den Kürbis von Magnolia verwendet. 

On the right side I used another label and the pumpkin by Magnolia.


Montag, 24. August 2015

Es weihnachtet sehr...


Hallo Ihr Lieben!
Habt Ihr schon mal auf den Kalender geschaut? Heute in vier Monaten ist Heilig Abend! Und das hat wohl auch die Frau des Weihnachtsmannes bemerkt und den frisch gewaschenen Anzug ihres Mannes zum Trocknen in den Wald gehängt...

Hello everyone!
Did you take a look at the calendar today? Only four more months until  Christmas Eve! Seems like also Mrs. Clause realized that and so she hung up her husband's washed suit out in the woods...

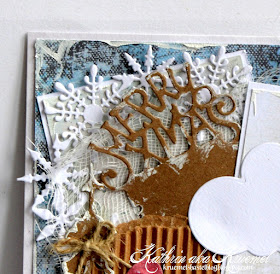
Für meine Karte habe ich Papiere aus den Papierblöcken Winter Wonderland und Vintage Textures verwendet. Etwas Wellpappe sowie Cheesecloth kamen ebenfalls zum Einsatz.

For my card I used papers from the paperblocs Winter Wonderland and Vintage Textures. I also added some corrugated paper and some cheesecloth.


Endlich konnte ich auch mal wieder den Schneeflocken-Kreis benutzen! Ich liebe es, länger nicht benutze Dinge auszugraben. Der Merry X-Mas Tag ist von Magnolia.

Finally I was able to use the snowflake circle again! I love to drag out those dies that I didn't use - or wasn't able to use - for quite some time. The Merry X-Mas Tag is by Magnolia.


Ich habe hier nicht nur den Weihnachtsmann-Anzug sondern auch die neuen Tannenbäume verwendet, die eine Lage Schnee aus Distress Crackling Paint bekommen haben.

Not only did I use the new Santa's Suit dies here but also the new Christmas Trees. Those got covered in snow made using Distress Crackling Paint.

So, genug Weihnachten für heute!
Okay, I guess that's enough christmas for this midsummer day!


Samstag, 22. August 2015

Ein Herbstgnom


Hallo Ihr Lieben!
Heute zeige ich Euch wie versprochen mein zweites Werk für den Blog von Vildastamps. Diesmal etwas näher an der aktuellen Jahreszeit, verglichen mit meiner Weihnachtstüte von gestern... Und so ist diesmal eine Herbstkarte vom Tisch gehüpft.

Hello everyone!
Today - as promised - I am sharing my second creation for Vildstamps' Blog. This time I went a little more recent in time, compared to my christmassy creation yesterday... And so I made this fall card.


Ich habe den süßen Hugging Gnome V234 ausgewählt. Der ist einfach zu süß und ich kann mir so gut vorstellen, ihn irgendwo im Wald zu treffen.
Neben den Gnom habe ich dann noch einige einzelne Pilze aus dem Miniature Mushroom Kit A6 V818 gestempelt. 

I picked this cute Hugging Gnome V234. He's such a cutie and I can so picutre him sitting somewhere between the ferns in the woods.
Next to the gnome I added a few small single mushrooms from the Miniature Mushroom Kit A6 V818.

Die Karte habe ich mit einigen Die Cuts von Magnolia verziert - alles in herbstlichen Farben. Einige der Teile, wie die Pilzköpfe und die Blätter, habe ich mit bronzefarbenem Frantage Pulver überzogen. Das schimmert so schön und passt perfekt zum Herbst. 

I decorated the card with some die cuts using Magnolia dies - all cut from fall-ish colors. A few parts, like the mushroom hats and the leaves, got covered with Frantage embossing powder. It's so beautifully shimmering in different tones.


Freitag, 21. August 2015

Eine kleine Weihnachtstüte


Hallo Ihr Lieben!
Heute ist wieder "mein Tag" auf dem Vildastamps Blog. Und als erstes Projekt habe ich diese Weihnachtstüte dekoriert. 
Um die Weihnachtszeit herum möchte man all den Alltags-Engeln danke sagen, und ich tue das am liebsten mit etwas selbstgemachten. Trotzdem muss man bei der Menge die Kirche im Dorf lassen und so muss es doch ein schnelles Werk sein. Darum ist diese Tüte entstanden. Die Tüte selbst ist bereits fertig gekauft und ich habe sie, für den Weihnachtslook, mit Schneeflocken aus dem Stempelset German Christmas Lyrics V721 bestempelt, die ich dann mit grau-blauem Embossingpulver überzogen habe.

Hello everyone!
It's my day today to post over at the Blog of Vildastamps. And as my first project I am sharing this christmas bag.
Around christmas time we think of all those angels in our daily life and want to thank them. And I love to do this with something handmade. Considered all those people that make life easier or better for us you have to keep it simple and so I made this bag. The bag itself was bought and I used some snowflakes from the German Christmas Lyrics V721 stamp set to add a christmassy look. Then I heat embossed them using a greyish-blue embossing powder.


An der Tüte habe ich dann dieses Banner befestigt. Es ist mit der Hand ausgeschnitten. Den weißen Teil habe ich mit einem der Hintergründe aus dem Stempelset Scrap and Mixedmedia Kit 1 V741 bestempelt, damit er nicht so leer aussieht. 
Befestigt habe ich ihn dann mit einem aus silbernem Glitzerpapier gestanzten Clip, an den ich neben einem kleinen weißen Stern noch ein silberfarbenes Glöckchen und eine weiße Schleife befestigt habe.

I attached this banner to the bag. I has been hand cut. I stamped one of the backgrounds from the Scrap and Mixedmedia Kit 1 V741 on the white part of the banner to make it look not so plain.
I used a clip, cut from silver glitter paper, to close the bag and attach the banner. Beside the little white star I also added a silver bell and a white bow to the clip.


Den Hauptteil des Banners bildet dieser Text - daran würden wir alle gerne glauben, oder? Ich habe ihn oval ausgestanzt und den Teil "Weihnachtskalorien" nochmal extra gestempelt, ausgeschnitten und dann mit silbernem Glitzerpapier hinterlegt extra aufgeklebt. Den Text findet Ihr im Stempelset German Christmas Lyrics 2 V805.

The main part of the banner is this saying - it says "we all know that christmas carlories don't count" and we all would so love to believe in it, right? I cut it out in an oval shape and then stamped the "Weihnachtskalorien" part again, re-attaching it with some silver glitter paper underneath. This stamp can be found in the stamp set German Christmas Lyrics 2 V805.

Morgen zeige ich Euch hier dann mein zweites Werk, und wenn Ihr es nicht erwarten könnte, dann hüpft doch später auf dem Blog von Vildastamps vorbei.

Tomorrow I am sharing my other project here. If you can't stand waiting make sure to hop over to the Vildastamps Blog later today.


Mittwoch, 12. August 2015

Urlaubspost für Euch!


Hallo Ihr Lieben!
Heute zeige ich Euch auf dem Cards und More Shop Blog dieses Tag - mit einer Flaschenpost für euch, extra im Urlaub ins Meer geworfen... ;)

Hello everyone!
Today I am sharing this tag with you over at the Cards und More Shop Blog - it comes with a message in a bottle that I threw into the sea during our vacation, for you to find it.... ;)


Als Motiv habe ich den Flaschenpost-Stempel von Noor!Design verwendet, den ich mit Copics coloriert habe.

As the image I used the bottle stamp by Noor!Design and colored it in with my Copics.


Links neben dem Motiv habe ich den Rettungsring, gestanzt aus packpapierfarbenem Cardstock, verwendet. Darauf findet sich noch eine kleine echte Flasche mit einer geheimen Botschaft darin.

On the left of the image I used the lifesaver, cut from craft paper. On top of it you can also find a small real bottle containing a secret message.


Rechts neben dem Motiv habe ich den neuen Segler-Knoten verwendet. Den finde ich genial!

To the right of the image I used the new knot die. I love this one!


Für die Karte habe ich die Shape Art Tag Schablone von Dutch Doobadoo verwendet und es/ihn - ich weiß das nie! - mit Papieren aus dem Under the Sea Papierblock überzogen. Die Ränder der Papiere sind wieder mit Distress Crackling Paint überzogen. Zwischendrin habe ich noch einen Spellbinders Rahmen verwendet und auch die Wellen-Stanze kam wieder zum Einsatz. 
Als kleinen Spezial-Effekt habe ich in den Tag ein rundes Fenster gestanzt, hinter das ich dann den Fische-Stempel, gestempelt auf klare Folie, gesetzt habe.

For the card I used the Shape Art Tag stencil by Dutch Doobadoo and covered it with papers from the Under the Sea Paperbloc. The paper's edges got some Distress Crackling Paint again. I also added a Spellbinders frame in between and also the wave border die was used again. 
As a little eyecatcher I cut a round window into the tag and put the fish background, stamped on transparency, behind it.


Für das Foto habe ich den Tag an mein Fenster gestellt, so kann man das Fenster besser erkennen. Drumherum habe ich noch einen schmalen Rahmen aus Designpapier gesetzt.

For the picture I sat the tag in front of the window in my room, so you can see the cut out area better. I also added a frame from designer's paper around the window.


Sonntag, 2. August 2015

So schmeckt der Sommer


Hallo Ihr Lieben!
Für meinen heutigen Post auf dem Cards-und-More-Shop-Blog habe ich diesen Container mit dekorierter Flasche gewerkelt. Im Sommer-Look, damit's zur Jahreszeit passt.

Hello everyone!
For my post over at Cards-und-More-Shop-Blog today I made this container with a decorated bottle. Gave it a summer look so it fits the time of year.


Die Flasche habe ich mit einem Spellbinder's Label Four beklebt und darauf - gestempelt mit einzelnen Buchstaben - einen Text angebracht. Für das "der" war leider kein Platz. ;)
Dann habe ich einen bestempelten Holzlöffel an die Flasche gebunden und einen gepunkteten Strohhalm in die Flasche gesteckt.

The bottle got a label cut using the Spellbinder's Label Four dies on which I stamped - made with single letter stamps - the saying "the taste of summer". 
Then I added a wooden spoon on which I stamped "yummy" and put a red polka dot straw into the bottle.


Den Container habe ich aus weißem Cardstock geschnitten und mit Designpapier aus dem Berry Sweet Paperbloc bezogen. Außen habe ich unter das Designpapier noch eine Lage blauen Cardstock gesetzt und Spitze rund um den Container gewickelt.

The container has been made using white cardstock and then I put designer's paper from the Berry Sweet Paperbloc on it. The outer layer got a matting from blue cardstock. I also wrapped some white lace all around the container.


Vorne habe ich ein rundes Label, hinterlegt mit einem gewellten Kreis, angebracht und darauf die Kirschen geklebt. Damit die Kirschen lecker glänzen, habe ich sie mit Glossy Accents überzogen. Etwas rote Spitze, die farblich zum Strohhalm passt, und Cheesecloth sind hier die zusätzliche Deko.

To the front I added a cut out circle, matted with a blue scalloped circle, and put the yummy cherries on it. To make the cherries shine I covered them with Glossy Accents. Some red lace, which matches the color of the straw, and some cheesecloth are the additional decorations.