Seiten

Mittwoch, 31. Januar 2018

Eine Box mit verstecktem Prinzen


Hallo Ihr Lieben!
Valentinstag steht ja auch schon wieder vor der Tür. Schon vor zwei Jahren - oder ist es sogar drei Jahre her? - habe ich einen der süßen Schokofrösche einer bekannten Schokoladenfirma für meine Mädels zum Valentinstag verpackt. Und auf dem Kulricke-Blog zeige ich heute eine weitere Variante.

Hello eveyone!
Valentine's day is only 2 weeks away. Two years ago - or was it three years already? - I wrapped one of the cute chocolate frogs from a famous chocolat brand for my daughters for Valentine's. And over at the Kulricke-Blog I am sharing another box like this today.

Für die Box habe ich die Milch-Box verwendet. Innen in die Box habe ich den Boden-Einsatz der Schokoei-Box eingesetzt, damit der Frosch auch schön oben sitzt. Und ja, der Einsatz passt auch perfekt in den Milchkarton. Aus dem Einsatz habe ich den Kreis, in dem das Ei sitzt, herausgeknipst und diesen Kreis dann gleich verwendet, um das Fenster in die Milchbox zu stanzen.

For the box I used the milk carton die. Inside I've put the layer from the chocolat egg box that usually holds the chocolate egg in place. Yes, it fits the milk carton box perfectly. The frog is now sitting on that extra layer. From that layer die I've removed the circle and used this one to cut the window into the milk carton.


Ich habe die Box mit rosafarbenem Designpapier mit kleinen Herzen beklebt und den süßen Felix Medium vorne draufgeklebt. Dem  habe ich, passend zu der Frosch-Prinz-Geschichte ein Krönchen aufgesetzt. Das ist einfach mit der Hand gemalt, ausgeschnitten und aufgeklebt. 
Im Stempelset Kleines Glück gibt es einen Text mit Schokofrosch, den ich eigentlich verwenden wollte. Aber als ich das Set dann in der Hand hatte, fiel mir der "Mit einem Kuss wird alles gut" Text auf, der mir fast besser gefiel. Ist irgendwie subtiler....
Zwei Rosen und eine Feder fanden auch noch Platz.

I've covered the box with pink designer's paper with white hearts printed on an then added Felix Medium. To make him match the frog-prince-story I've given him a crown. That was simply handdrawn, cut out and glued on.
The saying says "with a kiss everything will turn out good". In this stamp set there's also one saying "kiss me, I'm an enchanted chocolat frog" that I initally wanted to use. But then I liked this one better, it's more subtle...
Then I've added two roses and a feather.


Oben an der Box habe ich das Wort "love" aus Buchstabenperlen aufgeklebt und die Box mit einer kleinen Wäscheklammer verschlossen, an der ich ein kleines Herz und eine Schleife aus Garn befestigt habe.

To the top of the box I've added the word "love" made from flat perls with printed on letters and closed the box with a tiny clothpin to which I've attached a tiny heart and some twine.


Sonntag, 28. Januar 2018

Eine kleine Box mit Tilda


 Hallo Ihr Lieben!
Auf dem Noor!Design UK Blog zeige ich heute zur Abwechslung mal eine kleine Box. Sie ist 10 x 10 cm groß und darin befindet sich eine "quadratisch Schokolade".

Hello everyone!
Over at the Noor!Design UK Blog I am sharing a little box today. It's 10 x 10 cm in size and holds a square bar of chocolat.

Ja, ich stelle es selbst fest - sobald Magnolia im Spiel ist, packe ich gleich viel mehr Lagen auf meine Werke. Aber es macht Spaß und mir gefällt das immer noch sehr gut.
Diesmal habe ich Papiere von Mintay und Lemoncraft verwendet. Dazwischen befindet sich Spitze und eine Lage Wellpappe, die ich etwas weiß eingestrichen habe.

Yes, I already realized it myself - as soon as I use Magnolia images I am back to adding a lot more layers to my card. But it's fun and I like the look of those projects.
This time I used papers by Mintay and Lemoncraft. Between the layers there's some lace and some corrugated paper on which I've put some white Gesso.


Diese Tilda is wirklich süß - wobei ich gestehen muss, dass ich sie erst selbst colorieren musste, um das wirklich zu sehen. Der Stempel ist sicher mit Fasching im Hinterkopf designed worden. Aber so gekleidet könnte sie auch auf dem Weg zu einer extravaganten Party sein.
Ich habe sie mit Copics coloriert und das Kleid im Anschluss mit Wink of Stella zum Glitzern gebracht. 

This Tilda is a real cutie - allthough I had to color her in first to really see it. This stamp might have been designed with Mardis Gras season in mind but dressed like this she could also be on her way to a fancy party. 
She was colored in with Copics and I covered her dress with Wink of Stella to make it sparkle.


Als Dekoration war dann natürlich die Maske - und auch die Feder, die habe ich oben rechts auf der Box untergebracht - perfekt. Die Stoffblüte habe ich von einem Stück Spitze abgeschnitten und dann noch ein kleines Blümchen und eine Tulpe hinzugefügt.
Und darüber, unter die Papierlagen, habe ich noch eine echte Feder gesteckt.

For decorations the mask die - and also the feather from the same set which I've put to the top right of the box - were perfect. The fabric flowers was cut from the Liz lace. I've glued it onto the box and added a little blossom and a tulip.
And for some fanciness on my box I've used a real white feather and put it to the left half as well.


Samstag, 27. Januar 2018

Stempeleinmaleins - Ausgabe vom 27. Januar 2018


Hallo Ihr Lieben!
Heute startet beim Stempeleinmaleins die erste Challenge des Jahres, mit einem Sketch. Danach habe ich diese Geburtstagskarte gewerkelt. Meine Schwiegereltern baten mich um eine Geburtstagskarte für einen 70. Geburtstag. Der Empfänger ist Anwalt, noch berufstätig und hat sonst keine Hobbies... Na, was macht man jetzt damit? Mir fiel dieses Motiv von MoManning ein - und nachdem ich es von den Schwiegereltern habe absegnen lassen ist diese Karte entstanden.

Hello everyone!
Today  over at Stempeleinmaleins we are starting the first challenge of this new year, and again we have a  sketch for you. This time I made this birthday card. My inlaws asked me for a card for a 70th birthday. The one celebrating is a lawyer, still working and has no hobbies... Oh well, what to make? Then I remembered this digi by MoManning - and after getting the okay from my inlaws I turned it into this card.

Ich habe auf meiner Karte verschiedene Papiere von AltairArt verwendet - dabei habe ich viele Blautöne gewählt und mit braun kombiniert. Es soll ja doch nicht zu verspielt werden....
Dekoriert ist die Karte mit einer Sternenbordüre, zwei Party-Bannern sowie etwas Garn, an das ich einen Muffin-Charm gebunden habe.

I used different papers by AltairArt on my card - and went with different tones of blue that I combined with browns. I didn't want the card to become to playful...
The card is decorated with a star border, two party banners and some twine that I've tied a muffin-shaped charm to.
The saying means "birthdays are great - the more you have the longer you live".


Und hier habe ich mich das erste Mal getraut, aus einem fertig colorierten Motiv eine Form auszustanzen und etwas erhöht wieder einzusetzen. Diese Technik hat bestimmt einen Namen, aber den kenne ich nicht...
Ich gebe zu, ich habe wirklich lange überlegt, ob ich es wirklich tun soll. Aber ich bin mit dem Effekt zufrieden. So ist die 70 auf der Karte vorhanden, aber nicht extrem präsent.

And here for the first time I dared to cut out a part of a colored image and put it back in with some extra cardstock inbetween. I guess this technique has a name but I don't know it...
I have to  admit, I was really thinking about doing or not doing it. But I like the effect - the 70 is there but not the real eye catcher.


Donnerstag, 25. Januar 2018

Eine Knalltüte


Hallo Ihr Lieben!
Heute zeige ich auf dem Kulricke Blog eine im wahrsten Sinne des Wortes "durchgeknallte" Geschenkidee.

Hello everyone!
Over at the Kulricke Blog I am sharing this crazy little gift idea for a crazy friend.

Die Aufschrift verrät es schon - eine Knalltüte für eine Knalltüte. ;)

The text reads "twerp" - but in german it is put together from "bang" and "bag" (and I have no idea if this makes any sense in english or any other language). And that's what a crazy person in German is called.


Hier seht Ihr das komplette Werk. Und nein, die Idee stammt leider nicht von mir. Es ging mir wie so oft - die Idee ist eigentlich schon mehrere Jahre alt und war dann in Vergessenheit geraten. Um Silvester herum habe ich dann wieder eine gesehen - und ich dachte mir, das passt doch auch zu Fasching und somit perfekt zu den neuen Faschingsmotiven von Kulricke!

Here you see the complete bag. And no, the original idea isn't mine. It's like it happens often - the idea is quite old but I totally forgot about it. Then I saw it again around New Year's Eve - and I thought, this would also go great with parties or Mardis Gras and of course also with those new Mardis Gras images by Kulricke!

Ich habe eine normale Brotzeittüte genommen, oben etwas gekürzt, mit Konfetti gefüllt und ein kleines Stück eines Papierstrohhalms oben angeklebt, bevor ich die Tüte gut zuegeklebt habe. Durch den Strohhalm kann man sie nun aufblasen und kallen lassen, so dass es Konfetti regnet.

I used a lunch bag, filled it with confetti and glued a small piece of a paper straw to the top edge before glueing it closed. You can blow up the bag through that paper straw, burst it and a lot of confetti will come out.


Für das Wort "Knalltüte" habe ich die Alphabet-Stanzen von Kulricke benutzt. Die Strahlen sind mit der Stern mit Funken Stanze gemacht, der Text darunter am PC gedruckt und mit gelben Distress Inks farblich passend eingefärbt.

For the word I used the Alphabet dies by Kulricke, the beams are made using the Stern mit Funken die. The words on the banner - inflate, burst, party - are printed with my home printer and I used yellow Distress Inks to color that strip in.


Und hier ist "Felix Kölle". Mit der Narrenkappe sieht er selbst aus wie eine Knalltüte... Er ist mit Copics coloriert, die Text sind aus dem Stempelset #Party. Unter Felix habe ich einen Viertelkreis Designpapier gelegt, dessen Druck nicht nur farbilch passt sondern mich auch an Konfetti erinnert. Und hier habe ich auch noch den Stern, der mit den Funken zusammen ausgestanzt wird, untergebracht.

And here is "Felix Kölle" - and Kölle is the cologne-ish word for Cologne. With this funny hat he looks like a twerp - or "bang bag" himself.... He's been colored in with Copics.
Under Felix I've put a quart of a circle from designer's paper that did not only match in colors but also reminded me of confetti. And I also used the star, that gets die cut with the beams, here.


Mittwoch, 24. Januar 2018

Eine Geburtstagskarte


Hallo Ihr Lieben!
Ich bin ja nicht unbedingt eine, die bekannt dafür ist, rechtzeitig an Geburtstage zu denken. Deswegen benötige ich hin und wieder eine "nachträgliche" Geburtstagskarte. Das Gute daran war diesmal, dass ich endlich das Stempelset "Meant to Bee" von MFT eingeweiht habe. Damit ist diese Karte entstanden, die ich heute auf dem Blog von Stamping-Fairies zeige.

Hello everyone!
I am one of those that are known for missing a birthday every now and then. So sometimes I need a card for belated birthday wishes. Good thing about it this time was that I finally had a chance to ink up some stamps from the "Meant to Bee" stamp set by MFT. I used it to make this card that I am sharing over at the Stamping-Fairies Blog today.

Für die Karte habe ich erst den Honeycomb Background mit weißem Pulver auf weißen Cardstock embosst und dann mit Distress Ink Wild Honey, Fossilized Amber und Scattered Straw einen Farbverlauf darüber gewischt. Aus diesem Hintergrund habe ich mit den Stitched Hexagon Stax 12 Sechsecke ausgestanzt und so auf weißen Cardstock geklebt, dass der Farbverlauf erhalten bleibt. Diesen Cardstock habe ich dann noch gelb gemattet.

For the card I first stamped the Honeycomb Background onto white paper and heat embossed it with white embossing powder. Then I used Distress Ink Wild Honey, Fossilized Amber and Scattered Straw to ink up the white paper, starting with a dark color in one corner and getting lighter to the oposite one. Using the Stitched Hexagon Stax dies I've die cut 12 hexagons and glued them onto white paper, keeping the color changing how I created it. This white cardstock got some yellow matting then.


Als Dekoration auf meiner Karte habe ich dann den Bienenkorb und zwei Bienen abgestempelt, coloriert und ausgeschnitten. Die Bienen habe ich mit zwei Spiralen, die ich aus dünnem Draht gedreht habe, am Bienenkorb befestigt. Nun wackeln sie fröhlich wenn die Karte bewegt wird. Und weil Bienen Blumen lieben, habe ich zwei Blüten aus dem Stempelset Aloha hinter den Bienenkorb geklebt.
Zum Schluss kam noch ein auf braunen Cardstock weiß embosster und bannerförmig zugeschnittener Text quer über die Karte.

To decorate my card I've stamped the beehive and two bees, colored them in and cut them out. I used two spirals made from thin wire to attach the bees to the beehive. When the card is moved now they wiggle happily. And since bees love flowers I've added two of them from the Aloha stamp set behind the beehive.
In the end I added a saying that was heat embossed with white powder onto a banner-shaped strip of dark brown cardstock.


Dienstag, 23. Januar 2018

Und noch eine Karte zum Thema Liebe


Hallo Ihr Lieben!
Heute zeige ich eine weitere Karte, die ich vor zwei Tagen auf dem Blog von Vildastamps gepostet habe. Und auch diese ist dem Thema Liebe gewidmet.

Hello everyone!
Today I am sharing another card I've been posting two days ago over at the Vildastamps Blog. And also this one is love themed.

Ich habe die Karte angefangen und wollte eine einfache, klare Karte zum Thema Liebe machen. Naja, aber wie es manchmal so ist, hat sich das ganze verselbständigt. Irgendwie fehlte was und so kam immer mehr dazu. So 100 % zufrieden bin ich immer noch nicht, aber irgendwann muss man aufhören. 
Die Kartenbasis ist aus weißem Cardstock, darauf kam eine Lage dunkelroter Cardstock. Quer über die Karte ist breite Spitze gelegt, darauf kam ein kleineres Stück Designpapier in hellblau mit Herzendruck. Darauf habe ich dann die verschiedenen Stempel angeordnet.

I started this card with the goal to make a clean and simple love themed card. But well, how things go sometimes, it all went out of hand. I felt like something was missing and so added more and more. I still am not entirely happy with it, but you have to stop somewhere.
I used a white cardbase and put some dark red cardstock on top of it. Across the card I've put some wide lace and a piece of light blue designer's paper with a hearts print. On top of that I arranged the different stamped images I wanted to use.


Hier habe ich das größere der Posters im Hintergrund benutzt, darauf das Herz  mit dem "für immer und ewig" Text aus dem German Lyrics Stempelset, weiß embossed auf roten Cardstock" und auch einen 100 % Liebe Barcode, den ich bannerförmig zugeschnitten habe.
Die größte der Glass Bottles ist mit hellgrauer Tinte gestempelt und mit Copics coloriert. Dann habe ich einen kleinen Herz-Stempel benutzt, um die Flasche zu füllen.
Hinter all diese aufeinandergesetzten Motive habe ich noch ein paar Blumen aus dem Fantasy 2 Stempelset gesetzt. Es war ein wenig frickelig, die per Hand auszuschneiden, aber manchmal muss man eben tun, was getan werden muss.
Hinter bzw. zwischen all die Motive habe ich noch Cheesecloth und eine schmalere Spitze eingearbeitet.

Here I used the larger of the Posters in the background, added the heart with the "ever and always" text from the German Lyrics stamp set heat embossed onto red cardstock on top of it and also stamped a 100 %  love barcode and cut it in a banner shape. 
The largest of the Glass Bottles was stamped with light grey cardstock, colored in with Copics and then I used a small heart stamp to fill the bottle.
Behind all the images I've put some flowers from the Fantasy 2 stamp set. It was a bit fussy to cut them out, but sometimes you  have to do what has to be done. 
I also added a doily, some lace and cheesecloth.


Montag, 22. Januar 2018

Eine Valentinskarte


Hallo Ihr Lieben!
Ich bin wieder an der Reihe, auf dem Blog von Vildastamps zu posten. Und da der Valentinstag näher rückt, habe ich eine Karte zum Thema Liebe gemacht.

Hello everyone!
It's my turn again to post over at the Vildastamps Blog. And since Valentine's will be here before we know it I made a love themed card.

Ich habe als Basis ein Herz mit Spitzenrand gewählt und darauf eines aus weißem Cardstock geklebt. Den habe ich mit Distress Ink Weathered Wood ein wenig eingefärbt und dann den Letter Context Stempel nur auf die linke Seite aufgestempelt. Dazu kamen ein paar Tintenkleckse, für die ich Stempel aus dem Set Splats Kit verwendet habe. 

As the base I went with a heart with a lacy edge and put a regular one cut from white cardstock on top of it. This white cardstock was inked in with Distress Ink Weathered Wood a bit and then I stamped the Letter Context stamp on the left side. I also added a few ink splats from the Splats Kit.


Hauptelement ist einer der Texte aus dem German Lyrics Stempelset. Auch hier habe ich den weißen Cardstock teilweise eingefärbt und ein kleines Herz mit aufgeklebt, da mir der Text sonst zu leer aussah. Hinter den Text habe ich zuerst einen Schnörkel und dann einen Rahmen mit schnörkeligen Kanten geklebt. Damit der sich besser vom roten Herz im Hintergrund absetzt, habe ich ein wenig weißes Gesso aufgetragen.

Main element is this saying from the German Lyrics set. It says about how all flowers wither but the one that's called forget-me-not. Again I've inked up the white cardstock a bit and added a small die cut heart, it looked boring with just the text on a white panel. Behind this panel I added a die cut flourish and a frame with flourish edges. To make this pop out a bit from the red heart in the background I've added some white Gesso here.


Auf der linken Seite habe ich ein kleines Vogelhaus und dahinter einen Schmetterling aufgeklebt. Auch Spitze, Cheesecloth und ein paar Blumen haben hier Platz gefunden. Ich hatte keine Tulpeblüten und keine Nelken, aber zumindest die Rosen und Vergissmeinnicht habe ich hier aufgegriffen. 

On the left side I've added a die cut birdhouse and a butterfly underneath. There's also some lace, cheesecloth and a few flowers. I didn't have the tulips or carnations that are meant in the lyric but at least I've added the roses and forget-me-nots.


Sonntag, 21. Januar 2018

Eine Winterkarte


Hallo Ihr Lieben!
Ich wäre ja schon bereit für den Frühling - Sonne, Wärme und blühende Blumen.... Aber das dauert wohl noch ein wenig. Darum zeige ich auch heute noch eine Winterkarte auf dem Noor!Design UK Blog

Hello everyone!
I'd be ready for spring by now - sun, warmth and blooming flowers... But I know we're still in the middle of winter. And so I made another winter's card that I am sharing over at the Noor!Design UK Blog today.

Ich habe mich diesmal für eine runde Karte entschieden - eventuell mache ich auch noch einen Lollipop draus. Im Hintergrund ist ein großes Doily, darauf habe ich vorsichtshalber mal eine Rosette aus weißem Cardstock gesetzt... Und dann kamen viele Lagen verschiedener Papiere in hellem Türkis und Weiß. Wenn schon Winter, dann total. Darum habe ich nur ganz helle Farben gewählt.
Glaubt es oder nicht, bei dieser Karte bin ich ohne Cheesecloth ausgekommen! Aber ein wenig Spitze habe ich zwischen die Lagen gepackt.

I made a round card this time - I might also turn it into a lollipop flower. And since I hadn't decided that I started with a big doily in the background and put a paper rosette from white cardstock on top of it. And then I added a bunch of layers using light turquoise and white. Since I am doing winter I wanted to do it thouroughly and only picked light colors.
Believe it or not, this time I didn't use any cheesecloth! But I've put some lace between the papers.


Ich persönlich finde ja, dass sich viele Motive von Magnolia wiederholen. Aber die süße Frozen Tilda musste ich haben! Sie ist wie immer mit Copics coloriert. 
Im Hintergrund habe ich die Pine Trees von Joycrafts benutzt und noch ein paar Blumen darunter gesetzt.

Personally I think many of the images Magnolia comes out with recently are just re-doing their own images with the newer style. But this Frozen Tilda was a must have for me. Again she was colored in with Copics.
In the background I used the Pine Trees by Joycrafts and added a few flowers here.


Auf der rechten Seite der Karte habe ich unten zuerst eine der Landscapes aufgeklebt und darüber dann Blumen und einen Stern aus Birkenrinde geklebt. Damit der zu den Farben der Karte passt, habe ich ihn mit weißem Gesso "beschmiert".

On the right side of the card I added one of the landscape dies first and then put some flowers and a star from birch bark on top. To make the star match the colors of my card I've covered it with white Gesso.


Nun ja, und oben wollte ich auch noch etwas Deko haben. Hier habe ich die neue Invitation Die verwendet und durch die Schlitze hinten türkisfarbene Kordel gezogen, mit der ich die "Einladung" dann zugebunden habe. Hier habe ich dann auch noch den herzförmigen Tag zum Aufklappen mit festgebunden. Darunter kamen die Handschuhe aus einem der früheren DooHickey Club Kits.

Well, and of course I also wanted to add some decorations to the top of the card. So I used the new invitation die by Magnolia here. Through the slits in the back I've put some turquoise wax cord which I used to keep the "invitation" closed. And I also tied the heart-shaped tag - the one that can be opened - to it. Behind I've added the die cut mittens from one of the older DooHickey Club kits.


Samstag, 20. Januar 2018

Stempeleinmaleines - Ausgabe vom 20. Januar 2018


Hallo Ihr Lieben!
Heute zeigen wir Euch beim Stempeleinmaleins, wie Ihr Eure Embossingfolder noch verwenden könnt - bzw. wie Ihr Stempel und Embossen verbinden könnt.

Hello everyone!
Over at Stempeleinmaleins we are showing you another way of how to use your embossing folders - or how you can combine stamping and embossing.

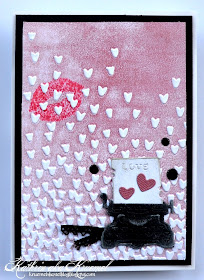
Da ja Valentinstag schon wieder näher rückt, habe ich eine Karte zum Thema Liebe gemacht. Dafür habe ich den Blütenregen-Folder von SU benutzt. Um den Folder einzufärben, habe ich Distress Ink Victorian Velvet und Aged Mahogany benutzt. Und für den Stempelabdruck - das wollte ich unbedingt auch gleich mit testen - habe ich einen Kussmund mit Candied Apple aufgestempelt. Eigentlich hätte ich gerne einen Text mit aufgebracht, aber da der Stempel ja quasi zweimal abgestempelt wird, wäre der Text spiegelverkehrt gewesen. 

Since Valentine's is coming closer I made a love themed card. I used an embossing folder by SU here and inked it up with Distress Ink Victorian Velvet and Aged Mahogany. I also wanted to use the stamping with the folder and used Candied Apple to stamp the lips. I really wanted to add a love text here but since the stamp gets stamped twice the text would have been mirrored.


Auch wenn die Karte von dem tollen Effekt, den der Folder mit der Tinte bewirkt, lebt, musste etwas Deko doch sein. Natürlich ohne all zu viel des Hintergrundes zu verdecken. Also habe ich die Schreibmaschine mit der Liebes-Botschaft aus dem Adventskalender von Magnolia benutzt. Die Schreibmaschine habe ich ein wenig mit weißer Tinte gewischt, darunter kam ein kleines Stück schwarze Spitze. Und drei schwarze Enamel Dots haben auch  noch Platz gefunden.

This cards gets it special look from the great effect ink and folder create, but I wanted some decorations. Of course without covering too much of the background. So I ued the typewriter with the love note die from Magnolia's Advent Calendar. I used some white ink on the typewriter and put a piece of black lace underneath. And to finish my card off I've added three black Enamel Dots.


Donnerstag, 18. Januar 2018

Zwei Gutscheine


Hallo Ihr Lieben!
Heute zeige ich Euch auf dem Stamping-Fairies Blog zwei Gutscheine. Unsere Mädels hatten zu Nikolaus einen Tag Skifahren in Österreich bekommen. Und das musste ja irgendwie bekannt gemacht werden...
Da zu dem Zeitpunkt bei uns im kompletten Haus die Heizung ausgefallen war und das Basteln bei eisigen Temperaturen nicht wirklich Spaß macht, musste es schnell gehen. Und so habe ich eine Karte von Francine aus dem MFT-DT gecovert.

Hello everyone!
Today I am sharing these two cards over at the Stamping-Fairies Blog. Our girls got a skiing day in Austria for St. Nick's and I needed a voucher for it...
Since our heating was out for a week when I needed the cards we had icy temperatures in our house and so crafting wasn't fun and I needed to make those quickly. And that's why I've covered the design of a card Francine from the MFT DT made.


Ich habe hellblauen Carstock gewählt und passend zugeschnitten. Dann habe ich die Radiating Rays Schablone aufgelegt und zuerst mit Distress Oxide Broken China, darüber dann Faded Jeans gewischt, die Mitte hier nur ganz leicht einfärbend. Dann habe ich die Schablone weggenommen und mit "normalen" Distress Inks Chipped Sapphire die Ränder noch dunkler gemacht. Und da das helle blau ein wenig zu sehr überdeckt war, habe ich die Schablone nochmal aufgelegt und nochmal Distress Oxide Broken China aufgetragen. Mit einem weißen Gelmarker habe ich dann ein paar Schneeflocken aufgemalt.

I started with light blue cardstock and cut it the size I wanted the card to be. Then I used the Radiating Rays stencil and colored the cardstock in using Distress Oxide Broken China first and Faded Jeans next, only adding a hint of color to the lightest area. Then I took the stencil off and used the "regular" Distress Ink Chipped Sapphire to make the edges a bit darker. And since the Broken China was covered a bit too much I've put the stencil back in place and used this one again. With a white gelly marker I added a few snowflakes.


Um die Karten ein wenig unterschiedlich zu machen, habe ich die Bären aus dem Ski-Sons Greetings Stempelset jeweils in die Skikleidung meiner Mädels gesteckt - also einmal weiße Hose, schsarze Jacke und einmal rote Hose, weiße Jacke. Die Farben für Schals und Mützen habe ich dann passend dazu gewählt. Lustigerweise sind sie hier auf den Karten genau "verkehrt herum". Als Babys hatte bei persönlichen Dingen wie Schnuller, Zahnbürsten etc. immer Pia die blaue und Natascha die rote Variante. Und diese Farbverteilung ist hängengeblieben. Bei der Skikleidung hat aber Pia die rote Hose, so dass hier die blaue Variante an Natascha und die rote an Pia ging. War auch mal nett als Abwechslung.
Auf die Jacke habe ich noch ein kleines Herz "genäht".
Den Bär habe ich dann ausgeschnitten, jeweils mittig auf die Karte geklebt, darunter zwei der Stitched Snow Drifts gesetzt und unten ein ausgestanztes Gutschein aufgeklebt. 
Ganz zum Schluss habe ich meine Szene dann auf eine weiße Kartenbasis geklebt.

To make the cards a tad bit different I've dressed the bears from the Ski-Sons Greetings stamp set in the skiing clothes my girls wear - so it 's white trousers and black jacket for the one card and red trousers and white jacket for the other one. For the scarfs and hats I just went with colors that go with the clothing. Funny thing is that the colors are switched here. When the twins were little for personal things like pacifiers or tooth brushes we always got Pia a blue and Natascha a red one. But with the ski clothes Pia has the red trousers so she got the red card and Natascha the blue one. It was a change for once.
Onto the jacket I've "swen on" a little die cut heart.
I then fussy cut the bear, glued it in the middle of my card, put two of the Stitched Snow Drifts to the bottom of my card and added a die cut "voucher". 
At the end I've glued the scenes onto white card bases.


Mittwoch, 17. Januar 2018

Ein Knallbonbon


Hallo Ihr Lieben!
Heute darf ich wieder etwas auf dem Kulricke-Blog zeigen. Ich bin ja ein richtiger Faschingsmuffel und brauche keine fünfte Jahreszeit, um lustig zu sein. Aber da es neu ganz tolle Karnevalstempel von Kulricke gibt, habe auch ich mal etwas zu diesem Thema gebastelt - ein Knallbonbon.

Hello everyone!
It's my turn to post over at the Kulricke-Blog. People in some areas here in Germany really get crazy for Mardis Gras - I am not one of them. I don't need a special season to have fun. But there are new stamps for this theme - and since Kulricke is located in Cologne which is one of the craziest towns during this time - I decided to make a box for this theme.

Das Knallbonbon ist aus braun-weiß gestreiftem Designpapier in der bekannten Art und Weise gewerkelt. Für den Text habe ich meine "tolle" Handschrift ausgepackt, denn Textstempel habe ich bei bestem Willen keinen passenden in meinem Bestand gefunden.

I used brown and white striped designer's paper and made the box in the way you surely all know. I didn't have a matching text stamp so I used my "beautiful" handwriting to write a Mardis Gras greeting to put on the box.


Hier habe ich eine bessere Aufnahme von Felix dem Clown. Er ist ja schon süß! Und wie Ihr sehen könnt, ist selbst ein Clown bei mir nicht wirklich bunt.... ;)
Die dicke rote Nase habe ich mit Glossy Accents überzogen, damit sie schön glänzt.
Und weil Luftballons auch irgendwie zum Fasching gehören, hält Felix zwei davon in der Hand.

Here I have a close-up of Felix the Clown. Well, I have to admit, he is a cutie. And as you can see, even a clown is not really colorful when I craft.... ;)
The big red nose is covered with Glossy Accents to make it shine.
And since balloons go great with Mardis Gras Felix is holding two of them.


Rings um meine Knallbonbonbox habe ich eine perforierte Linie mit eingearbeitet, an der man das Bonbon aufreißen kann. Ihr könnt dafür entweder eine Stanze nehmen, die Perforation mit der Hand oder - wie ich - mit einem speziellen Tool dafür machen.
Und ich habe es für Euch schon mal geöffnet - herausgekommen sind natürlich Bonbons und Konfetti, genau so, wie es sich für Fasching gehört!

I've added a perforated line all around my box which can be used to tear it open. You can either use a die, do it by hand or - as I did - using a special tool for it.
I also opened it up for you - and of course candies and confetti fell out of it. That's what people throw out to people during the Mardi Gras marches.


Sonntag, 14. Januar 2018

Eine romantische Karte


Hallo Ihr Lieben!
Heute zeige ich wieder ein Wer auf dem Noor!Design UK Blog. Und auch wenn ich weitere Winterkarten in Planung habe - diesmal wird es schon fast frühlingshaft.

Hello everyone!
Today I am sharing a new creation over at the Noor!Design UK Blog. And even if I have more winter cards planned - this one is a bit romantic and a tad bit spring-ish.

Für diese Karte habe ich verschiedene Papiere aus dem 12 x 12 Peony Avenue Paper Pack verwendet. Die sind toll aufeinander abgestimmt und zudem noch wunderbar romantisch. Die Blumenecke auf einem der Papiere - wobei noch mehr in der Art in der Packung enthalten sind - ist ein toller Eyecatcher und dient gleichzeitig als Dekoration.

For this card I used different papers from the 12 x 12 Peony Avenue Paper Pack. They match each other wonderfully and are also very romantic. The flower print on one of the pages - and there are more like this in the pack - also makes a great eyecatcher on the card and saves on decorations.


Auch das Ticket, das ich hier statt eines Motives verwendet habe, ist aus einem der Papiere ausgeschnitten. Darunter habe ich etwas Spitze - längs halbiert - sowie einen Blumentopf mit Lavender aus dünnem Holz platziert. Und da eine romantische Karte nicht ohne Rosen auskommt, habe ich davon auch noch drei untergebracht. Die sind lachsfarben und weiß, so sind sie nicht so aufdringlich.

Also the ticket that I used instead of an image here is cut from one of the papers. Underneath I've put some lace - cut in half lengthwise - and a flower pot filled with lavender from thin wood. And since a romantic card isn't possible without roses I've added three two-tone roses in white and salmon. That two-tone doesn't make them too intense.


Unter die obere rechte Ecke des Tickets habe ich eines der mit Spitze überzogenen Leinenherzen gesetzt und dabei darauf geachtet, dass nicht zu viel des Motives auf dem Papier überdeckt wird. Unter die Papierkante darüber - und auch links auf der Karte - habe ich noch einen Schnörkel geklebt.

Under the top right edge of the ticket I've put a cotton heart covered with lace, making sure it doesn't cover too much of the image printed on the paper underneath. And under the edge of the paper I've put a die cut flourish - and put the same under the paper on the left of the card.


Samstag, 13. Januar 2018

Stempeleinmaleins - Ausgabe vom 13. Januar 2018


Hallo Ihr Lieben!
Beim Stempeleinmaleins zeigen wir Euch heute eine kleine Coffee-to-go-Verpackung. Sie ist schnell gemacht, und manchmal braucht man ja genau das. 

Hello everyone!
Over at Stempeleinmaleins we are sharing this Coffee to go gift today. It's quickly done and sometimes that's exactly what we crafters need, right?

Meine Verpackung ist mit zwei Espresso-Portionen, einem Papierstrohhalm und einem kleinen Holzlöffel gefüllt.

My gift is filled with two portions of espresso, a paper straw and a little wooden spoon.


Geschnitten habe ich meine Verpackung aus braunem Cardstock und dann blau und weiß dekoriert. Da Kaffee - oder heiße Getränke generell - ja besonders im Winter beliebt sind, habe ich auch meine Purple Onion Design Stempel einweihen können. Ich habe die süße Eule auf dem Baumstumpf abgestempelt und dahinter einen der Tannenbäume gesetzt. Den Tannenbaum habe ich dick mit Schnee bedeckt, so dass nur wenig des Grün zu sehen ist. Dafür habe ich einfach die Schneelinien mit einem Bleistift vorgemalt und dann entsprechend grün bzw. hellblau coloriert.
Hinter dem Motiv ist eine große Tanne in weiß sowie ein schräg zugeschnittener Hintergrund, beide aus der letzten Vintage Box von Magnolia. Und weil ich auch meine DooHickey Box noch nicht eingeweiht hatte, kamen noch die Schneeflocken sowie die Girlande, die eigentlich um den Kamin gehört, zum Einsatz. 
Unten habe ich einen der Stempel aus dem Coffee To Go Stempelset von Kulricke auf ein Banner gestempelt und aufgeklebt. Eigentlich sind es sogar zwei, denn ich habe bei dem "Mach mal  Pause" Stempel einfach ein "Kaffee" eines anderen Textes dazwischengesetzt.
Mit ein wenig Spitze und Glitzersteinen dekoriert war meine Verpackung auch schon fertig.

I've cut the base from brown cardstock and then decorated it usign blues and white. Since coffee - or hot drinks in general - are very welcome in winter I also was able to use my new Purple Onion Design stamps. I used this cute owl on a tree stump and put one of the trees behind it. I've put a thick layer of snow onto the tree so there's only a little of green visible. I simply used a pen to ligthly draw the edges of the snow and then colored the tree in using greens and light blue.
Behind the image there is a large tree cut from white cardstock and a background that I've put on turned a bit. Both are from the latest Vintage Box by Magnolia. And since I also wasn't able to use my DooHickey Box yet I also used the snowflakes and the garland that originally goes around the fire place. Adding a bit of lace and a few rhinestones and my gift was done.


Donnerstag, 11. Januar 2018

Eine Schneekugelkarte


Hallo Ihr Lieben!
Heute zeige ich auf dem Kulricke-Blog diese Schneekugelkarte. Nach Weihnachten weiß man ja manchmal nicht so recht, was man thematisch als nächstes verbasteln soll. Naja, und der Winter bietet sich im Januar dann gut an. 

Hello everyone!
Over at the Kulricke-Blog I am sharing this snowglobe card today. After christmas it's always hard to decide on a new theme for crafts. But well, it's january so winter is definately a good theme.

Ich habe hierfür die neue Schneekugel Stanze verwendet. Die bietet sich auch super für eine Shaker Card an, aber ich habe mich hier mal dagegen entschieden. 
Damit die Karte geklappt werden kann, habe ich das Grundgerüst der Karte so aus doppelt gelegtem weißem Cardstock gestanzt, dass der Rand oben ein wenig übersteht. Darauf kam dann die komplette Schneekugel.

I used the new snowglobe die here. It's also great for shaker cards but here I went with a regular one.
To be able to open the card I've die cut the snowglobe from cardstock that was folded in half and with the die going over the fold in the cardstock. On top of that I've put the complete snowglobe.


In der Schneekugel habe ich eine Szene aus diversen Teilen der Schneekugel Stanzen - z. B. der Schneemann, die Tannen, der Boden und der Schneeflocken-Hintergrund - zusammengesetzt. Der Fuchs Mini wollte unbedingt im Schnee spielen gehen. Und im Hintergrund steht noch das kleinere der Häuser.

In the snowglobe I've used different dies that come with the snowglobe set - like the snowman, the trees, the grounds and the snowflake background. The small Fox wanted to go outside play in the snow. And in the background I've used the smaller one of the houses.


Die Basis der Schneekugel bietet genug Platz für einen Text. Ich habe hier einen der Texte aus dem Stempelset "Felix und seine Freunde Mini" etwas von der Position her verändert abgestempelt und augeklebt. Darunter kam etwas Cheesecloth und eine der Snowflakes 2.

The base of the snowglobe leaves enough room for a saying. Mine says "a perfect winter's day". Underneath I've put some cheesecloht and one of the snowflakes 2.