Seiten

Montag, 30. Mai 2022

Wenn ein Bayer in Rente geht...


Hallo Ihr Lieben!
 Tja, wenn ein Bayer in Rente geht, dann darf man auch mal mit Klischees spielen, oder? Und so ist diese "echt bayrische" Karte entstanden, auf der ich Euch auch gleich einen weiteren Sneak auf ein neues Stempelset aus dem Juni-Release von Stampcorner gebe.

Hello everyone!
Well, when a bavarian goes into retirement I guess it's apropriate, to make something really clichè. And so I made this "truly bavarian" card, on which I'm also giving another sneak at a new stamp set from Stampcorner's june release.

Für den Hintergrund habe ich hier einen Bogen aus dem Paper Pack 01 verwendet. Das habe ich zu einem Rechteck geschnitten, gelb gemattet und auf einen weißen Kartenrohling geklebt.
Der Text ist aus dem neuen Stempelset Rente. Eigentlich sind die Zeilen natürlich übereinander angeordnet, aber mir gefiel es so aufgeteilt auf meiner Karte besser. Eigentlich wollte ich einen ganz anderen Text des Sets verwenden, aber das ging sich designtechnisch so überhaupt nicht aus.... Also habe ich mich für diesen entschieden, ihn mit Versafine Clair Paradise auf weißen Cardstock gestempelt und per Hand ausgeschnitten. Dann habe ich die beiden Teile oben bzw. etwas später auch unten mit 3D Tape auf die Karte geklebt.

For the background I've cut a rectangle from one of the papers from the Paper Pack 01, matted it yellow and glued it onto a white note card.
The text means "all the best for your retirement" and is the already mentioned sneak. I had planned to use a different text from this set but no matter what I tried, it just didn't fit the card/image. So I picked this one and stamped it with Versafine Clair Paradise onto white cardstock and cut it out by hand. Then I glued the parts to the top and - a little later - bottom of my card using dimensionals.


Bier geht hier in Bayern natürlich immer! Also habe ich die Teile des Frothy Mugs von MFT aus weißem Cardstock gestanzt und mit Copics coloriert. Und damit der Bierkrug ein wenig wie der Pensionist aussieht, habe ich die Brille aus dem Stanzenset Stay Cool sowie einen der Schnurrbärte aus dem Mustache Trio Stanzenset, beide ebenfalls von MFT, auch aus weißem Cardstock gestanzt, mit Copics coloriert und auf den Bierkrug geklebt. In die Brille habe ich Gläser aus Folie eingesetzt, auf die ich dann die Highlights mit einem weißen Gelstift aufgemalt habe. Ich finde, der Bierschaum sieht hier beinahe aus wie eine schicke Frisur! 
Da das Bier nicht in der Luft schweben kann, habe ich aus dem dunkelbraunen Woodgrain Cardstock von LawnFawn einen Streifen geschnitten, mit einem weißen Inkpad die Struktur besser herausgebracht und diesen Streifen als Tisch verwendet.
Nun fehlte noch ein passender Hintergrund für das Motiv. Ich habe mit einer Rautenstencil und Distress Oxide Salty Ocean die Bayrische Flaggge auf weißen Cardstock gewischt, das Cardstockstück ebenfalls weiß gemattet und auf das Designpapier im Hintergrund geklebt. Darauf kam dann der Tisch und das Bier, jeweils mit unterschiedlich dickem 3D Tape aufgeklebt.
Als Deko habe ich dann noch ein paar gelb-braun irisierende Pailetten auf der Karte verteilt.

You can never go wrong with beer here in Bavaria! So I've die cut the pieces from the Frothy Mug die set by MFT from white cardstock and colored the pieces with Copics. To make the mug look a bit like the retiring person, I've die cut the glasses from the Stay Cool die set and one of the mustaches from the Mustache Trio die set, both also by MFT, from white cardstock again and used my Copics to color these as well. I've put some acetate behind the glasses and drew some reflections onto them using a white gel pen. I think, the froth looks kind of like some hair!
Since the beer couldn't float in the air, I've cut a strip from the dark brown Woodgrain Cardstock by LawnFawn, brought out the structure a bit more with a white ink pad and used this strip as some kind of desk.
Now I needed a background for the beer that fit my bavarian theme. I used a diamond stencil and Distress Oxide Salty Ocean to ink the bavarian flag onto a piece of white cardstock, then matted this piece of cardstock yellow again and glued it onto the background. On top I've attached the desk and beer mug using foam tape in two different thicknesses.
For decorations I added some yellow-brown iridescent sequins to my card.

Samstag, 28. Mai 2022

Stempeleinmaleins - Ausgabe vom 28. Mai 2022

 
Hallo Ihr Lieben!
Es gibt heute wieder einen neuen Sketch beim Stempeleinmaleins. Ich gebe zu, ich hatte schon Blumen für meine Karte ausgesucht. Aber dann habe ich beschlossen, zur Abwechslung mal was anderes zu machen. Und so ist diese fröhlich-bunte Karte entstanden. Aber keine Angst, die nächste Blumenkarte steht schon in den Startlöchern... ;)

Hello everyone!
Today we have a new sketch over at Stempeleinmaleins. I admit, I had already pulled out some flower stamps for my card. But then I decided to make something different for a change. And so I created this happy and colorful card. But don't worry, I already have my next flower-ish card done.... ;)

Hier habe ich für den Hintergrund ein Stück weißen Cardstocks mit der Sunburst Layering Stencil von PinkFresh und Distress Ink Salvaged Patina und Peacock Feathers gewischt. Dann habe ich den Hintergrund schwarz gemattet und auf einen weißen Kartenrohling geklebt.

For my background I've added this ray pattern with the Sunburst Layering Stencil by PinkFresh and Distress Ink Salvaged Patina and Peacock Feathers. Then I matted the cardstock black and glued both layers onto a white note card.


Und dann habe ich so richtig in den Farbtopf gegriffen. 
Die Farbpalette und die Pinsel sind mit dem Layering Stempelset Color my World von SunnyStudio gemacht. Ich liebe dieses Set und die tollen dreidimensionalen Motive, auch wenn das Stempeln der vielen Lagen ein wenig dauert. Ich habe sie mit den passenden Stanzen ausgestanzt und auf die Farbkleckse auf der Palette Glossy Accents aufgetragen.
Die süße Maus mit dem Pinsel passte perfekt dazu. Sie ist aus dem Be Creative Mini Stempelset von ColoradoCraft, mit Copics coloriert und per Hand ausgeschnitten.
Die Farbkleckse hinter den Motiven sind mit dem Stanzenset Paint Splats von Sizzix gemacht. Ich habe sie jeweils aus farbigem Cardstock gestanzt und an den Rändern mit passender, etwas dunkler Stempelfarbe gewischt. Für die Mini-Spritzer habe ich mir das gespart, die sind ohne gewischt zu sein mit auf die Karte geklebt.
Für die Texte auf der Karte habe ich das Stempelset Color von HoneybeeStamps verwendet. Das Wort color habe ich mit 4 verschiedenen Grüntönen auf weißen Cardstock gestempelt und dabei dem Wort einen Ombre-Look verpasst. Dann habe ich es per Hand ausgeschnitten. Da ich etwas Kontrast zwischen Wort und Hintergrund/Motive schaffen wollte, habe ich das Wort nochmal mit Versamark auf schwarzen Cardstock gestempelt und ebenfalls per Hand ausgeschnitten. Diese schwarze Lage habe ich dann leicht versetzt hinter das grün gestempelte Wort geklebt.
Die anderen beiden Teile des Textes sind mit weißem Embossingpulver auf schwarzen Cardstock embosst. Ich finde, die schwarzen Elemente auf der Karte beruhigen meine doch recht "wilde" Karte und bringen das komplette Design zusammen.

And then I really went wild with colors.
The color palette and the brushes are made with the Color My World Layering stamp set by SunnyStudio. I love this set and the three dimensional images it creates, even if stamping all those layers takes some time. I've cut the images out with the matching dies and added some Glossy Accents onto the colors on the palette.
The cute mouse with the brush just went perfectly with my theme. It's from the Be Creative Mini stamp set by ColoradoCraft, colored with Copics and fussy cut.
The big colors splats in the background are made with the Paint Splats die set by Sizzix. I've die cut them from colored cardstock and then used some matching ink to darken the edges a bit. I skipped this step with those tiny color dots and glued down those without inking them.
The text on the card is made with the Color stamp set by HoneybeeStamps. I stamped the word color with four different tones of green ink, giving the word an ombrè look, then I fussy cut it. Since I wanted some contrast between the word and the background/images I stamped the word again with Versamark ink onto black cardstock and also cut it out by hand. Then I glued this black layer behind the green stamped word, putting it a bit off to create a shadow.
The other two parts of my text are white heat embossed onto black cardstock. I think, those black elements on the card make it a bit more quiet and also bring the complete design together.

Donnerstag, 26. Mai 2022

Glück in einer Tüte - äh Tasche

 
Hallo Ihr Lieben!
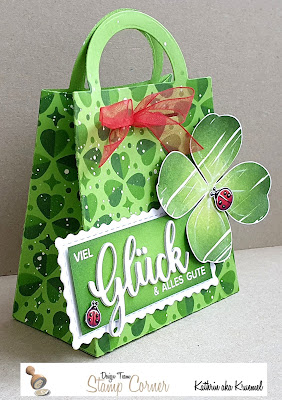
Unter den Mai-Neuheiten von Stampcorner waren auch zwei Stanzensets, und die wollten auch endlich verwendet werden. So geschehen auf dieser Tasche, die ich heute auf dem Stampcorner Blog zeige.

Hello everyone!
The may release by Stampcorner also included two die sets, and I hadn't used those yet. Until today - they are both used on this little bag, that I'm sharing over at the Stampcorner Blog today.

Momentan stehen ja recht viele Abitur- und Abschlussprüfungen an. Da kann man einen kleinen Glücksbringer immer gebrauchen. Bei mir steckt der nicht nur in der Tasche, sondern auch darauf.

At the moment many end of year test are written. So it never hurts to have a lucky charm at hand to give away. Here this lucky charm is not only put inside the bag, but also onto it.


Ich habe hier die Taschen-Stanze von Stampcorner benutzt, um die Tasche aus grünem Cardstock auszustanzen. Dann habe ich mit Distress Ink Mowed Lawn und Rustic Wilderness sowie dem Clover Background Stencilset von LawnFawn das Kleeblatt-Muster aufgewischt. Dabei habe ich den Henkel ausgespart. Naja, fast, ein paar kleine Pünktchen sind doch darauf gelandet...
Anschließend habe ich auch noch Copic Opaque White, gemischt mit einem kleinen bisschen Wasser, darüber gespritzt. Das trocknet so schnell, dass die Distress-Tinte darunter gar keine Chance hat, es zu verfärben. Deswegen nutze ich es sehr gerne auf  Distres-Produkten.
Anschließend habe ich die Tasche zusammengeklebt, durch die Schlitze oben rotes Band gezogen und zur Schleife gebunden, um die Tasche geschlossen zu halten.
Dann habe ich noch das große Kleeblatt aus dem Stempelset Glücksset vorbereitet, da ich es später als Deko auf meine Tasche aufkleben wollte. Ich habe es wieder mit Distress Ink gestempelt, diesmal aber noch Twisted Citron als hellste Farbe dazu kombiniert. Ich habe das komplette Kleeblatt in Twisted Citron gestempelt, dann von außen her etwas mehr als die Hälfte der Blätter mit Mowed Lawn eingefärbt und mit einem Blending Tool die Farbe am Übergang ein wenig verteilt und das Kleeblatt anschließend auf das hellere gestempelt. Den Schritt habe ich dann nochmal mit Rustic Wilderness wiederholt und hier nur den äußersten Rand der Blätter eingefärbt. So bekommt das Kleeblatt eine tolle Tiefe. Die weißen Linien habe ich dann mit einem weißen Gelstift aufgemalt und sofort ein wenig mit dem Finger verwischt, so dasss sie nicht so hart sind.

Here I used the bag die by Stampcorner to die cut the bag from green cardstock. Then I used Distress Ink Mowed Lawn and Rustic Wilderness as well as the Clover Background stencil set by LawnFawn to add a clover pattern all over my bag pieces. I left out the handles, well, at least I tried. A few tiny spots went on those as well.
Next I spritzed some Copic Opaque White, mixed with just a drop of water, over the cardstock. It dries so quickly, that the Distress Ink has no chance to stain the white color. That's why I love to use this white on any Distress product.
Then I put the bag together, tied some red ribbon through the slits at the top and tied it to a bow to keep the bag closed.
And then I also prepared the large clover image since I had planned to use it on my by later on. Again I stamped it with Distress Ink, but this time added Twisted Citron as my lightest color. I stamped the whole image with the Twisted Citron, then inked up a bit more than half of the leaves with the Mowed Lawn, leaving the center without this color. I used a blending tool to soften the edge of the ink on the stamp, then stamped it over the lighter image. I repeated this step with Rustic Wilderness, only inking up the edge on the outer edges of the leaves. This way the clover gets some wonderful depth. I added the white lines with a white gel pen and went over the ink with my finger before it had dried to soften those white lines a bit. 


Und dann kamen endlich die neuen Stanzen zum Einsatz. 
Mit der zweitkleinsten der A6 Wave Stanzen habe ich den Aufleger mit dem gewellten Rand aus weißem Cardstock gestanzt. 
Per Hand habe ich dann ein Rechteck aus grünem Cardstock geschnitten und zwar so, dass man den tollen gestitchten Rand innen noch sehen kann. Den grünen Cardstock habe ich an den Rändern wieder mit Mowed Lawn und Rustic Wilderness gewischt.
Für den Text habe ich das Wort Glück mit dem Viel Glück Stanzenset gestanzt - das viel hätte gestanzt zu viel Platz auf meinem Aufleger gebraucht. Ich habe es dreimal ausgestanzt, aufeinander und dann auf den Aufleger geklebt.
Ergänzt habe ich den Text dann mit verschiedenen Stempeln aus dem Stempelset Kleine Worte, die ich neben und unter dem gestanzten Glück mit weißem Embossingpulver aufembosst habe.
Den Aufleger habe ich dann auf die Tüte geklebt und oben rechts das zuvor gestempelte und inzwischen per Hand ausgeschnittene Kleeblatt mit 3D Tape darüber geklebt.
Und dann wollte ich noch einen kleinen Farbklecks auf meiner Tasche. Was passt besser zum Thema Glück und zu Kleeblättern, als Marienkäfer? Ich habe hier die beiden kleinen Käfer aus dem Stempelset Ladybug verwendet. Sie sind mit Copics coloriert, ausgeschnitten und ebenfalls mit 3D Tape auf das Kleeblatt bzw. links unten neben das gestanzte Wort Glück geklebt.

And then I finally brought out those new dies.
I used the second smallest of the A6 Wave die set to die cut the rectangle with the wavy edges from white cardstock.
I cut a slightly smaller rectangle from green cardstock to put on top of the white wavy one, making sure the great stitched lines stay visible. Then I inked up the edges of the green rectangle with Mowed Lawn and Rustic Wilderness again.
For the text I've die cut the word luck three times from white cardstock, stacked it and glued it onto the green rectangle. 
I finished my text with some tiny word stamps, that I've white heat embossed to the top left and under the die cut word directly onto the green cardstock, so now it reads "good luck and all the best". 
I glued the rectangles onto the bag and then put the now fuzzy cut clover over the top right edge with foam tape.
And then I wanted a little bit of color on my bag. What goes better with the theme of luck and clovers than ladybugs? I stamped  the two small ladybugs from the Ladybug stamp set, colored them with Copics and glued them onto the clover and to the bottom left of the die cut word, again using foam tape.

Dienstag, 24. Mai 2022

Sneak gefällig?

 
Hallo Ihr Lieben!
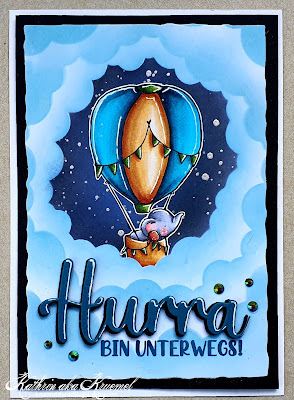
Heute habe ich eine eher einfache Karte zu zeigen, auf der ich einen Sneak auf eines der neuen Produkte, die es im Juni-Release von Stampcorner geben wird, versteckt habe. Okay, versteckt ist vielleicht nicht ganz das richtige Wort... ;)

Hello everyone!
Today I am sharing this simpler card, onto that I've hidden a sneak at one of the products, that will be available in Stampcorner's june release. Okay, hidden may not bet the right term here... ;)

Ich habe hier eine der Deckle Edge Stanzen von Stampcorner verwendet und damit den Kartenaufleger aus weißem Cardstock gestanzt. Darauf habe ich dann das "Wolkenloch" gewischt. Dafür habe ich die Through the Clouds Stencils von MFT und Distress Oxide Tumbled Glass verwendet. Ich finde den dreidimensionalen Effekt, den man damit ganz ohne Lagen aufeinander kleben zu müssen, erzielen kann, einfach klasse. Das Loch hinter den Wolken habe ich dann mit Distress Oxide Chipped Sapphire und Black Soot gewischt und silberne Metallic Watercolor bespritzt. 
Dann habe ich den weißen Kartenaufleger schwarz gemattet und auf einen weißen Kartenrohling geklebt.

Here I used one of the Deckle Edge dies by Stampcorner to die cut rectangle with uneven edges from a piece of white cardstock. Then I inked the "cloudy hole" onto it. I used the Through the Clouds stencil by MFT and Distress Oxide Tumbled Glass for it. I just love the three dimensional effect you can get with these without having to add several layers to the card. I inked up the hole in the clouds with Distress Oxide Chipped Sapphire and Black Soot and flicked some silver metallic watercolor onto the clear sky.
Then I matted my background with black cardstock and glued it onto a white note card.


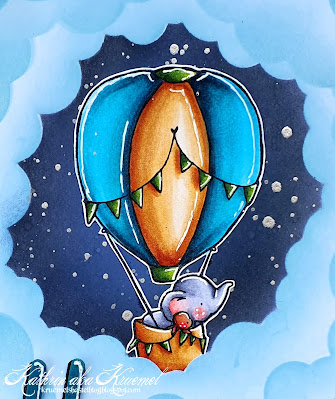
Als Motiv habe ich mich mal wieder für eines der süßen Freunde-Motive von Stampcorner entschieden. Diese Reihe ist eine meiner Lieblingsreihen, dieses Motiv ist aus dem Set Freunde 4.
Ich habe es mit Copics coloriert, die Highlights mit einem weißen Gelstift dazugemalt und das Motiv dann per Hand ausgeschnitten. Mit einem Cutter habe ich entlang der Wolken einen keinen Schlitz in den Kartenaufleger geschnitten und das untere Ende des Heißluftballonkorbs hineingesteckt. Nun sieht es so aus, als würden die beiden hinter den Wolken fliegen.

As my image I decided to go with one of the cute Freunde images by Stampcorner again. This is one of my favorite lines by them, this image is from the Freunde 4 set.
I colored it with Copics, added some highlights with a white gel pen and then cut the image out by hand. Then I used a cutter to make a slit along the cloud line and put the basket of the balloon into it. Now it looks like these two cuties are behind the clouds.


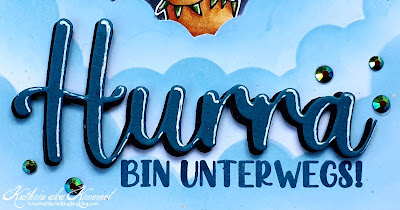
Und hier ist endlich der Sneak: die tolle Hurra-Stanze! Ich liebe Worte, die man vielseitig einsetzen kann. Hier habe ich das Wort viermal aus schwarzem und einmal aus dunkeltürkisfarbenem Cardstock gestanzt. Die schwarzen Stanzteile habe ich aufeinander geklebt und dann das türkisfarbene Hurra ein wenig versetzt als oberste Lage aufgeklebt.
Aus dem Stempelset Sausemaus habe ich einen Textstempel benutzt und ihn ebenfalls dunkeltürkis direkt auf den Wolkenhintergrund gestanzt. Darüber habe ich das Hurra aufgeklebt und drumherum noch ein paar irisierende Glitzersteine verteilt.

And here's the little sneak: this great hooray-die. I love word dies that can be used for many different occasions. I've die cut the word four times from black and once from dark turquoise colored cardstock. Then I stacked the black ones and glued the turquoise one on top, putting it a bit off to get a black shadow.
I stamped a "I'm on my way" directly onto the clouds using turquoise ink, then glued the die cut word above it. Around the text I added a few iridescent rhinestones.

Samstag, 21. Mai 2022

Stempeleinmaleins - Ausgabe vom 21. Mai 2022

 
Hallo Ihr Lieben!
Heute wird es schon wieder blumig - aber da wir Euch beim Stempeleinmaleins heute eine Vasenbox zeigen, muss das wohl auch!

Hello everyone!
Today's project is full of flowers again - but since we're sharing the tutorial for this vase box over at Stempeleinmaleins today, I guess that's just the way it has to be!

Die Vase besteht aus einer Grundbox, die mit Designpapier dekoriert ist. Ich habe die Grundbox aus türkisfarbenem Papier gewerkelt.

The vase is made from a box base that get's decorated with patterned paper. I've used turquoise cardstock to make the box base.


Die Box wird mit leicht gebogenem Designpapier dekoriert und erhält so die Vasenoptik.
Da am oberen Rand und teilweise auch durch die gebogenen Schlitze auch die Rückseite des Designpapier zu sehen ist, wollte ich natürlich doppelseitiges Papier, das auf beiden Seiten in mein Farbkonzept passt. Und da fingen die Probleme an. Ich weiß nicht, wie lange ich durch all meine doppelseitigen Designpapiere geblättert habe, um endlich ein passendes Papier zu finden, das auf der Rückseite nicht komplett andersfarbig ist! Ich habe da ja die wildesten Kombinationen in meinem Vorrat entdeckt. Schließlich kam mir dann aber dieses Papier mit dem dezenten Rosendruck auf der einen und einer fast einfarbig rosafarbenen Fläche auf der anderen Seite in die Finger. Das passte dann endlich.
Um den oberen Rand der Vase habe ich ein Stück türkis-weißes Twine gewickelt, zur Schleife gebunden und dort zwei kleine Tags angebunden. Das untere ist aus bordeauxfarbenem Cardstock gestanzt, das obere habe ich aus Vellum gestanzt und den Rand sowie den Text weiß aufembosst. 

The box is decorated with patterned paper that is bended a bit in the center and that's how the vase look gets created.
Since you can see the back of the patterned paper at the top of the box and also get glimpses of it through the slits at the bended areas I wanted to use some doublesided paper that goes with my color concept. And that's where the problems started. I can't tell how long I went through my stacks of paper unti I finally found one where the back isn't done in completly different colors! I really found the wildest combinations there in my stash. But then I came across this shee with some tiny roses on the back and a nearly solid light pink on the back.
Around the top of my vase I've tied some turquoise and white twine, tied it to a bow and tied two tags to it. The bottom one is made from burgundy colored cardstock, the top one is made from vellum. I white heat embossed the dotted edge and the text onto it.


Ich weiß, in der Anleitung ist der Deckel der Box anders dekoriert. Aber ich dachte mir, wenn sie schon Vasenbox heißt, sollte sie auch mit einem schönen Blumenstrauß "gefüllt" sein. 
Und sehr Ihr hier das rosafarbene Stück Band zwischen den beiden Rosen vorne? Das habe ich durch den Deckel gezogen, so dass die Box trotz des Blumenstraußes einfach geöffnet werden kann. Optisch verschwindet es nahezu zwischen den Blumen.

I know, in the tutorial the top of the box is decorated differently. But I thought, since this is called a vase box it should also be "filled" with a flower bouquet.
Can you see the small piece of pink twine between the two roses in the front? I've tied that through the lid of the box to make opening it easy, even with all those flowers. And it is nearly invisible between all of them.


Für die Blätter außen am Strauß habe ich die Magic Iris Tropical Leaves Add-On Stanze von LawnFawn benutzt, den Kranz aufgeschnitten und enger zusammen geklebt. So passte er erstens auf die Box und zweitens konnte ich ihn so etwas aufstellen. Die Blattspitzen habe ich dann noch nach unten gebogen.
In den Kranz habe ich dann verschiedene Blüten geklebt. Damit der Strauß etwas höher kommt, habe ich mittig auf den Boxdeckel eine kleine Styroporkugel geklebt, auf der die größte Blume sitzt. 

For the leaves around the bouquet I've used the Magic Iris Tropical Leaves Add-On die by LawnFawn, cut the wreath apart and then glued it back together a little tighter. That way it fits onto the lid and I was also able to give it a bit of dimension. Then I also bend the tips of the leaves down.
Into the wreath I've glued different flowers and blooms. To make the bouquet a bit taller I glued a small styrofoam ball onto the center of the lid and glued the biggest flower onto it.


Und so sieht die geöffnet Vasenbox aus.
Ich hatte ja durch den Deckel ein Loch gemacht und dort das Twine zum Öffnen durchgezogen. Die Enden habe ich mit Tesa fixiert und um diese unschöne Stelle zu verdecken, habe ich einfach noch ein kleines Quadrat aus dem türkisfarbenen Cardstock von innen gegen den Deckel geklebt.

And this is the opened vase box.
As mentioned I had poked a little hole into the lid of the box to tie the twine to opened it through. I fixed the ends with some tape to the back of the lid and to cover this not so pretty look I've simply cut another square from the turquoise paper and glued it to the inside/back of the lid.

Freitag, 20. Mai 2022

Mai-Challenge bei Stampcorner

 
Hallo Ihr Lieben!
Heute startet die Mai-Challenge bei Stampcorner. Und diesmal haben wir uns das Thema "Nimm 2" überlegt. Kombiniert also Stampcorner-Stempel mit Stempeln und/oder Stanzen einer anderen Firma, die es im Shop gibt. Normalerweise tut man das ja eh gerne, aber wenn es mal im Fokus steht, geht man doch etwas anders an die Sache ran. Und so ist diese Karte entstanden.

Hello everyone!
Today starts the may challenge of Stampcorner. And this time we've chosen the theme of "take 2". It's about teaming up Stampcorner stamps with stamps and/or dies of a different brand. I guess most of us do it all the time, but when it's the theme we might approach this a bit differently. And so this card was created.

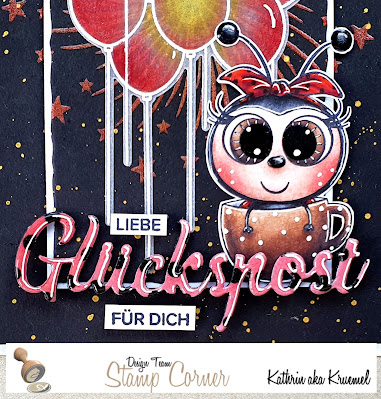
Im Hintergrund habe ich den tollen Sternen-Strahlen-Kranz aus dem Träumen Stempelset verwendet. Ich habe ihn mit weißer Stempeltinte auf schwarzen Cardstock gestempelt und dann mit Distress Glaze in Fossilized Amber, Saltwater Taffy, Crackling Campfire und Fired Brick bestreut - gelb innen und nach außen dunkler werdend. Da das ganze nicht so decken war, wie ich mir das vorgestellt hatte, habe ich den Vorgang einfach nochmal wiederholt. Anschließend habe ich goldene Metallic Watercolor über den schwarzen Cardstock gespritzt.
Mit einer der Deckle Edge Stanzen habe ich aus der Mitte des Cardstocks ein Stück herausgestanzt. Das habe ich dann weiß hinterlegt und mit 3D Tape wieder zurück an seinen Platz geklebt. Zuvor habe ich den äußeren Teil auf einen weißen Kartenrohling geklebt.

In the background I used the great star-rays-wreath from the Träumen stamp set. I've stamped it onto black cardstock with white ink, then sprinkled Distress Glaze in Fossilized Amber, Saltwater Taffy, Crackling Campfire and Fired Brick onto the white ink - yellow in the center and getting darker towards the outer circle of stars. It didn't turn out as bright as I had hoped so I simply repeated the whole process. Then I also spritzed some golden metallic watercolor over the cardstock.
I used one of the Deckle Edge dies to cut the wonky rectangle from the center of my background. I matted that white and then glued it back into place using foam tape. Before I had glued the background onto a white note card.
 

 Über den Sternenkranz kam dann dieser Luftballonstrauß. Der ist aus dem Stempelset Balloon Bouquet von MFT. Ich habe ihn mit weißem Embossingpulver auf Vellum embosst und anschließend mit der dazugehörigen Stanze ausgestanzt.
Um die Ballons zu colorieren, habe ich Polychromos verwendet und anschließend die Highlights mit einem weißen Gelpen gesetzt. Beim Colorieren habe ich mich an den Farben orientiert, die ich jeweils für den Sternenkreis verwendet habe - also auch hier von Gelb in der Mitte zu Rot im Außenbereich.

On top of the star-ray-wreath I've put this balloon bouquet. It's from the Balloon Bouquet by MFT. I've white heat embossed it onto vellum and then cut it out with the matching die.
To color the balloons I've used my Polychromos and then added the highlights with a white gel pen. When coloring the balloons I picked the same color scheme as I did for the wreath behind it - from yellow in the center to red on the outer edges.


Hauptmotiv auf der Karte ist diese süße Marienkäfer-Dame in einer Tasse. Der ist aus dem Mai-Release von Stampcorner. Ich habe ihn mit Copics coloriert. Da man die schwarzen Punkte auf der braunen Tasse nicht mehr so doll sehen konnte, habe ich sie einfach mit einem weißen Gelstift nachgemalt. Die Bommel an den Fühlern und die Nase sind mit Glossy Accents überzogen. Anschließend habe ich auch dieses Motiv ausgeschnitten.
Das Hauptwort hier ist mit der Glückspost-Stanze von Stampcorner gemacht. Ich habe das Wort ein paar Mal aus schwarzem Cardstock und für die oberste Lage aus einem der Papiere aus dem Paper Pack 02 von Stampcorner ausgestanzt. Damit es besser zum Marienkäfer passt, habe ich dann die eigentlich weißen Punkte mit einem Copicmarker schwarz eingefärbt. Außerdem habe ich auch diese Lage mit Glossy Accents überzogen.
Ich habe alle gestanzten Worte aufeinander- und dann das Wort an den unteren Rand des ausgestanzten Rechteckes auf der Karte geklebt. Dazwischen habe ich dann das süße Motiv gesetzt.
Als kleine Zusatztexte habe ich ein "hip hip hurra", ein "für dich" und das Wort liebe schwarz auf weißen Carstock gestempelt. Dann habe ich die Worte ausgeschnitten und ebenfalls mit 3D Tape auf die Karte geklebt, so dass insgesamt der Text "hip, hip, hurra, liebe Glückspost für dich" entstanden ist.

Main image on my card is this cute lady bug in a mug. It's an image from Stampcorner's may release. I colored it with Copics. Since the black dots on the mug were hardly visible on the brown mug I used a white gel pen and re-drew them. The ends of the antennas and the nose are covered with Glossy Accents. Then I've cut the image out.
The main word here means "happy mail" and is made with a die by Stampcorner. I've die cut it several times from black cardstock and used some patterned paper for my top layer. This is originally red with white dots. To make it go better with the ladybug image I used a black Copic to color the white dots black. Also the word is covered with a layer of Glossy Accents.
I stacked all of the die cut words and then glued them onto the lower edge of the rectangle, cut from the background, and then tucked the image under the word.
As subtexts I stamped a "hip, hip, hooray", a "lovely" and a "for you" with black ink onto white cardstock. I cut the words out and glued them onto the card, again using foam tape, so in the end the text means "hip, hip, hooray, lovely happy mail for you". 

Donnerstag, 19. Mai 2022

Good things are going to happen!

 
Hallo Ihr Lieben!
Heute habe ich eine weitere blumige Karte auf dem Stampcorner Blog zu zeigen. Ich liebe Magnolien, leider sind sie im Garten bereits verblüht. Aber auf meiner Karte kann ich sie wieder aufblühen lassen.

Hello everyone!
Today I am sharing another flowery card over at the Stampcorner Blog. I love magnolia blossoms, but the ones in my garden have already faded. Luckily I can make them bloom again on my card.

Für meine Karte habe ich die tolle Magnolia A2 Stanze von WhimsyStamps benutzt. Ich finde die wunderbar, und auch wenn es eher eine Hintergrundstanze ist, kann man damit auch ohne weitere Motive eine wunderschöne Karte machen. Ich habe hier aber doch noch etwas dazu kombiniert, so wirkt die Karte noch frühlingshafter.
Die besagte Magnolien-Stanze habe ich viermal aus weißem Cardstock gestanzt und die Lagen aufeinander geklebt. Die Blütenblätter und Blätter einer der gestanzten Lagen habe ich mit Copics sowie einem weißen Gelstift coloriert und dann wieder in das Muster eingeklebt. Das dauert zwar ein wenig, der Effekt ist aber klasse. Anschließend habe ich alles auf schwarzen Cardstock gesetzt, der lässt die Motive so richtig herausstechen.
Die Lagen habe ich hellgrün gemattet und anschließend alles auf einen weißen Kartenrohling geklebt.
 
For my card I used the great Magnolia A2 die by WhimsyStamps. I just love this one, and even if it's more a background stamp you can just use this to make a beautiful card. I added some additional elements to give my card even more spring vibes.
I've cut that magnolia die four times from white cardstock and stacked the die cuts on top of each other. Then I used my Copics and a white gel pen to color the petals and leaves of one of the die cut layers, then glued them back into the background. It takes some times but is so worth the effort. Then I glued everything onto some black cardstock, that makes the images really pop.
I matted the layers with some light green cardstock and then glued everything onto a white card base.
 

 Hier könnt Ihr die colorierten Blüten besser erkennen. Die Blumenmitten habe ich außerdem gelb coloriert. 
Der tolle Schmetterling ist aus dem Winged Wonders Stempelset von MFT. Ich wollte schon lange Schmetterlinge in dieser Art, da kam mir deren April-Release gerade recht.
Ich habe den Schmetterling mit dem No-Line Ink Stempelkissen von InkOn3 abgestempelt und dann den Schmetterling mit Copics coloriert. Da man an den dunkler grünen Bereichen aber das Muster des Stempels nicht mehr richtig gesehen hat, habe ich anschließend das Motiv mit dem selben Stempelkissen nochmal über die Coloration gestempelt. Zum Glück hatte ich den Stempel vorsichtshalber in meinem Stempeltool gelassen. Nun sieht man trotz No-Line Coloring alle fein detailierten Linien auf den Schmetterlingsflügeln. Anschließend habe ich den Schmetterling ausgeschnitten und im oberen Bereich auf meine Karte geklebt.

Here you get a better look at the colored petals. I also colored the flower centers in yellow.
The great butterfly image is from the Winged Wonders stamp set by MFT. I was looking for some beautiful and quite realistic butterfly stamps for quite some time now so their april release came in at the right moment.
I stamped the butterfly with the No-Line Ink stamp pad by InkOn3 and then colored it in with Copics. After I had finished the coloring the pattern of the wings wasn't visible anymore in the darker green colored areas. So I stamped the butterfly again on top of my colored image using the same ink. Luckily I had left the stamp in my stamping tool. Now you see the fine details lines in the wings even with using a no-line ink pad. Then I fuzzy cut the butterfly and glued it onto the top area of my background.


Nun fehlte noch ein Text für meine Karte. Den habe ich wieder mit einem Mix aus gestanzten Buchstaben und gestempeltem Text gemacht. 
Für das Wort smile habe ich die einzelnen Buchstaben mit einem Alphabet-Stanzenset von CraftEmotion aus hellgrünem Cardsdtock gestanzt, alles auf schwarzem Cardstock zusammengesetzt und dann so mit der Schere ausgeschnitten, dass ein schmaler schwarzer Schatten rund um die Buchstaben stehen blieb.
Der andere Text ist mit einem Stempel aus dem Wind me Up Stempelset von Tracey Hey. Ich habe ihn mit schwarzer Tinte auf zwei Streifen des hellgrünen Cardstocks verteilt und diese unter das Wort smile gesetzt.

Now I needed a text for my card. Again I created this from a mix of die cut letters and a stamped sentiment.
For the word smile I've die cut the letters from light green cardstock using an alphabet die set by CraftEmotion. Then I glued them together onto some black cardstock and cut them out with my scissors, leaving a thin black shadow around the word.
The subtext is made with a stamp from the Wind me Up stamp set by Tracey Hey. I've stamped it with black ink, divided onto two strips of the same green cardstock, then glued the strips under the word smile.


Als Deko habe ich dann noch einige goldene Pailetten auf der Karte verteilt.
Und hier kann man die Tiefe, die die Karte hat, noch einmal besser sehen.

As embellishments I've added some golden sequins to my card.
And on this picture you get a better look at the depth of this card.

Mittwoch, 18. Mai 2022

Create a Smile Moodboard Challenge


Hallo Ihr Lieben!
Heute startet eine neue Create a Smile Challenge mit einem wirklich farbenfrohen und fröhlichem Moodboard als Inspiration:
 
Hello everyone!
The new Create a Smile Challenge is starting today with a really fun and colorful moodboard as inspiration:
 

 Nun, ich denke, es ist ziemlich offensichtlich, welches Bild des Moodboards mich sofort inspiriert hat. Aber das Geburtstagsthema habe ich dann auch noch mit eingebaut.

I guess it's pretty obvious which of the pictures inspired me immediately. But I also included the birthday theme into my card.


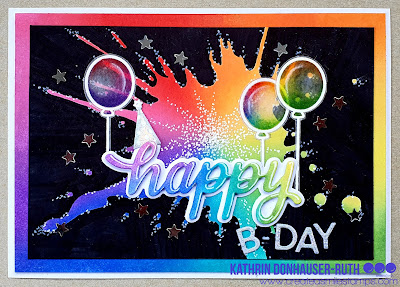
Das Bild mit der Farbexplosion in Regenbogenfarben erinnerte mich sofort an ein Holi Festival. Und ich hatte sofort eine Idee, wie ich das Bild auf eine Karte bringen könnte.
Ich habe ein Stück weißen Cardstock und die Splotch Stencil genommen und dann den Riesen-Farbklecks in Regenbogenfarben gewischt. Dafür habe ich Distress Oxide Squeezed Lemonade, Carved Pumpkin, Candied Apple, Picked Raspberry, Wilted Violet, Blueprint Sketch, Peacock Feathers und Mowed Lawn verwendet. Mit kleinen Brushes ging es auch super, den Regenbogenverlauf auf der dannn doch begrenzten Fläche hinzukriegen.
Anschließend habe ich alle noch weißen Bereiche mit einem schwarzen Copicmarker eingefärbt, das bringt die Farben besonders gut zum Leuchten.
Da die Farbexplosion auf dem Bild im Moodboard ja einige Strahlen hat, habe ich einen weißen Gelstift verwendet und in die Mitte des Farbklecks strahlenförmig kleine Punkte angeordnet. Außerdem habe ich am Rand und an den Ausläufern des Kleckses ebenfalls einige Punkte aufgemalt.
Als Hintergrund habe ich ein weiteres, etwas größeres Stück weißen Cardstock genommen und dort den Rand ebenfalls Regenbogenfarben eingefärbt, jeweils passend zur Position der Farben im Klecks. Die beiden Cardstockstücke habe ich aufeinander und dann auf einen weißen Kartenrohling geklebt.

The picture with the color explosion in rainbow colors reminded me of those Holi festivals. And I had an idea right away how to bring this picture onto a card.
I've used a piece of white cardstock and the Splotch stencil and then colored the splotch in rainbow colors. I used Distress Oxide Squeezed Lemonade, Carved Pumpkin, Candied Apple, Picked Raspberry, Wilted Violet, Blueprint Sketch, Peacock Feathers and Mowed Lawn to ink up the splotch. I used some small brushes and with those it wasn't as hard as I had expected to get the rainbow into the quite limited space. 
Then I used a black Copic marker to fill in all the areas that had remained white, the black background really makes the colors pop.
Since the color explosion on the picture in the moodboard has some kind of rays in the colors I used a white gel pen to add a lot of tiny dots to the center of the splotch, letting them turn into rays into different directions. I also added some more small dots to the edge of the splotch and the end of the splashes.
For the matting of my cardstock I took another piece of white cardstock, cut a bit larger than the one I put on the splotch, and inked up the edges, again in rainbow colors, making the positions of the colors on the matting and the splotch match. Then I glued both cardstock pieces on top of each other and onto a white note card.


Nun wollte ich noch das Geburtstagsthema mit einbringen.
Dafür habe ich die Happy Stanze verwendet und sowohl den Schatten - einmal - als auch das Wort an sich - viermal - aus weißem Cardstock gestanzt. Dann habe ich auch die oberste Lage des Wortes happy in Regenbogenfarben gewischt. Da ich zuvor die geplante Position meines Wortes festgelegt hatte, konnte ich auch hier die Farben passend zum Farbklecks aufwischen. So sind auch die Farben, die eigentlich durch den Text mit Schatten doch ziemlich verdeckt worden wären, wieder ausreichend vertreten.
Ich habe die vier Lagen des Worts aufeinander- und anschließend auf den Schatten des Wortes geklebt. Am H habe ich noch eine Partyhut mit aufgeklebt. Den habe ich aus silberfarbenem Hologramm-Cardstock mit einer der Stanzen aus dem Set Magical Frame gestanzt und mit einem weißen Gelstift einige Punkte als Deko darauf gemalt. Das sieht man auf dem Bild nur nicht wirklich gut.
Aus dem selben Cardstock habe ich noch die Buchstaben für das B-Day ausgestanzt. Dafür habe ich die Lemon Alphas Stanzen benutzt, der Bindestrich ist per Hand dazugemalt. 
Und ein paar Luftballons für die Partystimmung habe ich auch noch hinzugefügt. Dafür habe ich den Luftballon aus dem Set Verrücktes Huhn dreimal weiß auf Vellum embosst und mit einem weißen Gelpen bei einem der Ballons die Schnur verlängert. Dann habe ich Polychromos verwendet, um die Luftballons ein wenig zu colorieren. Wieder habe ich mich an der Position der Luftballons und der Farben, die sich dort in den Ballons spiegeln würden, orientiert. Der Ballon in der Mitte sollte eigentlich etwas weiter nach links, das hat mir dann aber doch nicht so gefallen. Deswegen passen die Farben hier nicht hunderprozentig zur Position. Um die Ballons aufzukleben, habe ich sie durch meine Xyron gedreht und so flächig Kleber auf die Rückseite aufgetragen. So kann auch Vellum problemlos aufgeklebt werden. Durch das Vellum kann man nach wie vor den Farbklecks darunter/dahinter sehen, was meiner Meinung nach nochmal ein toller Effekt ist.
Zum Schluss habe ich noch einige kleine, silberfarbene Pailettensterne auf dem schwarzen Bereich der Karte verteilt.

Now I wanted to include the birthday theme. 
I used the Happy die and cut the shadow once, the word itself four times from white cardstock. Then I used my Distress Oxides again to also ink up the top layer of the words in rainbow colors. Since I had already planned where I wanted my word to be I was able again to make the colors match the ones of the splotch underneath. Now also those colors, that would get covered by the word and its shadow pretty much, are showing in the rainbow theme.
I glued the four layers of the on top of each other and thenonto the shadow layer. I added a little party hat to the h. I've cut it from silver holographic cardstock using a dies from the Magical Frame die set and also added some dots to it with a white gel pen. Those don't really show on the picture.
I used the same holographic cardstock and the Lemon Alphas die set to cut the letters for the word b-day, drawing the line between the letters by hand.
I also added some balloons for a bit more of a party feeling. I've white heat embossed the balloon image from the Crazy Chicks stamp set three times onto vellum and used a white gel pen again to make the string of one of the balloons a bit longer. Then I used my Polychromos to color the ballons. Again I had already chosen the positions of the ballons and colored them in the colors that they would reflect in that position. I had planned to put the middle balloon more to the left, but didn't like that later so I moved it to the right, which meant that the colors don't match perfectly the balloon's position. To glue the balloons to my card I've run them through my Xyron and covered the complete back with glue. This way also glueing down Vellum invisibly is easy. Through the vellum you can still see the splotch behind/underneath and I think this adds a great effect.
In the end I added a few small, silver, star shaped sequins to the black areas of the card.


Und hier habe ich noch ein Bild für Euch, auf dem man den Glanz der Sterne und des Hologramm-Cardstocks besser sehen kann. 

And here I have another picture that shows the shine of the stars and the holographic cardstock a bit better.

Samstag, 14. Mai 2022

Reisekoffer Nr. 2

 
Hallo Ihr Lieben!
Meine Zwillinge hatten ja vor kurzem Geburtstag - und eine von beiden hatte sich Geld für die nächste Reise gewünscht. Da musste natürlich eine passende Verpackung her, und wieder ist es ein Reisekoffer geworden. Und den zeige ich Euch heute.

Hello everyone!
My twins celebrated their birthday a little ago - and one of them asked for money for her next travels. Of course I needed something nice to put the money in, and again I've made a suitcase box. This I'm sharing with you today.


Ich habe wieder die Kofferstanze von JM Creation verwendet, diesmal allerdings in Originalgröße. Ich habe den Koffer aus Designpapier mit hellem Karomuster gestanzt. Den Griff, den ich wieder gekürzt habe, habe ich aus schwarzem Cardstock, die Ecken und den Grut aus dunkelbraunem Cardstock gestanzt. 
Die Ränder des Koffers habe ich mit Distress Oxide Brushed Corduroy gewischt.
Am Griff habe ich wieder einen Kofferanhänger, gemacht mit einer Stanze von Magnolia, angebracht.

Again I've used the suitcase box die by JM Creation, this time cutting it in the original size. I've cut it from patterned paper with a light checked pattern. The handle, that I've made shorter again, is cut from black, the corners and the belt from dark brown cardstock.
I inked up the edges of the box with Distress Oxide Brushed Corduroy.
To the handle I've tied a tag, cut using a die by Magnolia.


Auf dem Deckel des Koffers habe ich einen kleinen Text aufgebracht. Die Worte mach und mal sind mit dem guten alten Dymo geschrieben, die Buchstaben für das Wort Urlaub habe ich aus schwarzem Cardstock mit einem Stanzenset von CCDesigns gestanzt.

Onto the top of the suitcase I've added a little text that means "let's go on vacation". I've used my good old Dymo for the first two words and die cut the letters for the word vacation from black cardstock using an alphabet die set by CCDesigns.


Innen habe ich den Koffer noch gefüttert. Dafür habe ich per Hand zwei etwas kleinere Boxen aus grau-braunem Designpapier mit Herzchen gewerkelt und die innen eingeklebt. An den Kanten der inneren Boxen habe ich jeweils oben und unten einen kleinen Schlitz eingeschnitten, durch die ich weißes Band gezogen habe.

I added some ligning to the inside of the suitcase. I've made two slightly smaller boxes by hand using a grey-ish brown patterned paper with little hearts and glued those inside the suitcase. I've cut two slits into each of the inner boxes, through which I've put some white ribbon.


Die Box ist von der Breite her ein klein wenig breiter als ein 20-Euro-Schein. Einen habe ich bereits für das Foto in den Koffer gelegt, zusammengerollt und mit einem kleinen Stück Tesa zusammengehalten. Davon haben wir dann sowohl in den Deckel als auch in das untere Teil noch so einige mehr gefüllt. Die weißen Bänder habe ich dann wie auf dem Bild zu sehen über den Scheinen zur Schleife gebunden, so dass sie alle an Ort und Stelle gehalten wurden.

This suitcase is just a tad bit wider than a 20-Euro bill. I've put one of them into the suitcase just for the photo, rolled it up and glued together with a little bit of tape. We've filled the suitcase with quite a few more of them later, putting them into both the lid and the bottom. I used the white ribbon to hold the bills in place by tying them into bows, just like shown on the picture.

Donnerstag, 12. Mai 2022

Hallo Küstenkind!

 
Hallo Ihr Lieben!
Es ist schon wieder Donnerstag, und das bedeutet, dass ich eine neue Karte auf dem Stampcorner Blog zeige. Und für die heutige Karte kam noch einmal das süße Set Matrosen Freunde 1 aus dem Mai-Release zum Einsatz. Die Tierchen sind aber auch zu goldig!

Hello everyone!
It's thursday again, and that means, I am sharing a new card over at the Stampcorner Blog today. For today's card I've again used the cute maritime critters from their may release. Those are just too cute!

Bei maritim muss ich immer an blau-weiß denken, vor allem, wenn Matrosenanzüge bzw. -kragen im Spiel sind. Ich liebe sie und trage sie sogar in meinem "gestandenen" Alter immer mal wieder, selbst zur Arbeit. Da kenne ich nichts! Und so ist auch diese Karte wieder in blau-weiß ausgefallen. Fürs nächste Mal nehme ich mir dann vor, zumindest etwas Rot mit hineinzubringen. Passt da ja auch immer super.
Ich habe hier einen Bogen schräg gestreiften Designpapiers aus dem Paper Pack 01 von Stampcorner zugeschnitten, kraftfarben gemattet und beides auf einen weißen Kartenrohling geklebt.
Mit einer Bannnerstanze habe ich aus zwei weiteren Bögen aus demselben Paper Pack kleine Banner zugeschnitten und mit einem Stück Twine aneinander "gebunden". Eine dieser so entstandenen Girlanden habe ich dann im oberen Bereich direkt auf den Hintergrund geklebt.

When it comes to maritime I always have to think of a blue and white color combination, especially when there are sailor suits or collars involved. I love those, and even in my "middle" age I still wear them every now and then, even to work. I really don't care what others think! And so I used blue and white as my color scheme for this card again, I really try to bring in a bit of red for my next creation with these stamps, red always goes great with maritime.
Here I've cut down a sheet of patterned papers with slanted stripes from one of Stampcorner's paper pads, then matted it with craft colored cardstock and glued both layers onto a white note card.
I used a banner die to cut little banners from two other sheets from the same paper pack and "tied" those together with some pieces of twine. I glued one of the garlands created this way directly in the upper area onto the background paper.


Hier könnt Ihr den süßen kleinen Otter genauer sehen. Ich dachte ja erst, es wäre ein Bär und finde, auch als solcher geht er super durch. Ist es nicht toll, wenn Motive so frei einsetzbar sind?
Ich habe den Otter mit Copics coloriert, ausgeschnitten und in einen Polaroidrahmen gesetzt. Dahinter habe ich einige Wellen, gestanzt aus hellblauem Cardstock mit einer Wellenstanze von MFT, und dunkelblauen Cardstock als Himmel gesetzt. Dann habe ich das Polaroid mit kraftfarbenem Cardstock hinterlegt und mit dünnem 3D Tape auf die Karte geklebt.
Das zweite Banner habe ich dann so im oberen Bereich der Karte aufgeklebt, dass die einzelnen Fähnchen oben auf dem Polaroidrahmen aufliegen.

Here you get a closer look at the little otter. I first thought it was a bear, and I still think it would look great colored like one. But isn't that the greatest, when images can be interpreted a bit more freely?
I've colored the otter with Copics, cut him out and glued him into a polaroid frame. Behind him I've put some waves, die cut from light blue cardstock with a wave die by MFT, and some dark blue cardstock for the sky. Then I matted the frame with craft colored cardstock and glued it onto the card with foam tape. 
I added the second garland to the upper area of the card, putting the individual banners on top of the polaroid frame.


Für den Text habe ich erst ein hallo aus dem Stempelset Kleine Worte mit Archival Ink Vintage Photo auf den Polaroidrahmen geklebt. Darunter kam ein ausgestanztes Küstenkind, gemacht mit der Küstenkind-Stanze von Stampcorner. Dafür habe ich das Wort an sich dreimal aus kraftfarbenem Cardstock gestanzt und die Teile aufeinander geklebt. Das so verstärkte Wort habe ich dann auf dunkelblauen Cardstock geklebt und mit etwas Abstand zum Wort mit der Schere ausgeschnitten um einen Schatten zu erhalten. Die Highlights auf den Buchstaben sind mit eine weißen Gelpen gemacht. Das Wort habe ich dann wieder mit dickerem 3D Tape auf die Karte geklebt und dabei den oberen Teil mit dem Polaroidrahmen überlappen lassen.
Als kleinen Untertext habe ich noch ein "du fehlst mir", ebenfalls aus dem Stempelset Kleine Worte, mit weißem Embossingpulver auf dunkelblauen Cardstock embosst, ausgeschnitten und unter dem Küstenkind auf die Karte geklebt.
Ganz zum Schluss kamen dann noch ein paar kleine hellblaue Stern-Pailetten als Deko auf die Karte. Sterne und maritim gehen doch auch immer perfekt zusammen, oder?

For the text I've first stamped the word hello with Archival Ink Vintage Photo onto the polaroid frame. Then I've die cut the word "child of the coast" three times from craft colored cardstock, stacked the words and glued them onto some dark blue cardstock. Then I used my scissors to cut it out again, creating a shadow around the word. I added some highlights with a white gel pen and then glued the word with foam tape onto the card, making the letters overlap with the polaroid frame in the upper area of the word.
As a little subtext I white heat embossed a "I miss you" onto some dark blue cardstock and glued it under the word "Küstenkind" onto the card.
In the end I added a few light blue star shaped sequins to my card. Stars and maritime are always a great combination as well, right?