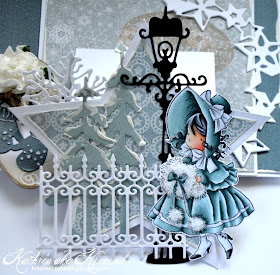
Hallo Ihr Lieben!
Nach einigen Monaten Pause gab es wieder einen SOL - und ich habe das Projekt für meinen Post auf dem Cards und More Shop Blog gewerkelt.
Hello everyone!
After a break of a few months there was finally another SOL - and I made the project for my post over at the Cards und More Shop Blog.
Wie Ihr oben auf dem Bild sehen könnt, ist es eine Art dreifach Easel Card. Ich habe die einzelnen Lagen - im Original Herzen - durch Sterne ersetzt, da ich es ja weihnachtlich wollte.
Auf dem Grundelement habe ich den Sternenkreis angebracht und durch die Schriftrolle mit Handschuhe und Blumen bleibt wird alles schön gestützt, so dass es stehen bleibt.
Alle Papiere auf meiner Karte sind aus den Papierblöcken Sea Shore und Shabby Christmas und alle wurden mal wieder mit Distress Crackling Paint bepinselt - damit habe ich übrigens auch den Schnee auf den Tannenbäumen gemacht
As you can see on the picutre above this is some kind of a triple easel card. Instead of the hearts fr.om the original tutorial I used stars for my card since I wanted it christmas-sy.
I used the star circle on the base of my card and thanks to the paper roll with mittens and flowers the front layer keeps standing up.
All papers are from the Sea Shore and the Shabby Christmas paperblocs and all of them have once again been painted with Distress Crackling Paint - that's also what I used to make the snow on the trees.
Das hier ist der vorderste Stern - mit dem süßen Mädchen von Lili of the Valley, einem meiner absoluten Lieblingsstempel. Ich mag es eben "altmodisch". Auf der Lage habe ich zusätzlich einen Zaun, eine Laterne (von Magnolia), schneebedeckte Tannenbäume und, hinter der linken Zacke, eine Schneeflocke angebracht.
Den Muff und die Bommel im Motiv habe ich mit Glasglitter überzogen.
This is the front star - with the cute girl by Lili of the Valley, one of my all-time favourite stamps. I just love this style and kind of vintage. I also added a fence, a lantern (by Magnolia), snowy trees and, behind the left side of the star, a snowflake here.
The fur on the girl's handwarmer was covered with glass glitter.
Das ist Lage Nr. 2. Der Winterschriftzug ist ebenfalls mit Glasglitter überzogen, jetzt sieht er aus wie gefroren. Außerdem habe ich hier mehr Tannenbäume, eine größere Schneeflocke, und im Hintergrund die Sternenbordüre verwendet.
This is layer # 2. The winter die cut has also been covered with glass glitter and now it looks like frozen. I also added more trees, a bigger snowflake and in the background the stars border to this layer.
Der hinterste Stern sieht so aus - mit mehr Tannen, einer Eiszapfenbordüre und über allem fliegt der Weihnachtsmann durch den Sternenkreis. Es ist übrigens sehr praktisch, dass der nicht komplett rundum geht - so konnte ich ihn super vorne anfangen und hinten enden lassen bzw. den anderen Kreis zwischen die Lagen am Boden schieben.
The background star looks like this - with more trees, an icicle border and Santa is flying through a circle of stars. It's great that this one isn't complete - so I was able to easily let it start on the front and end on the backside of my card and also put it between the layers on the stand of my card.


