Seiten

Samstag, 31. August 2019

Stempeleinmaleins - Ausgabe vom 31. August 2019


 Hallo Ihr Lieben!
Mit einer neuen Sketch-Inspiration meldet sich das Stempeleinmaleins heute aus der Sommerpause zurück. 

Hello everyone! 
Today with a new inspirational sketch Stempeleinmaleins is back from our summer break.

Die Idee zu der Karte ist mir schon länger im Kopf herumgeschwirrt, und jetzt hat der Sketch perfekt gepasst. Also konnte ich sie endlich umsetzen.
Ich habe blaues und gelbes Designpapier mit Sternendruck verwendet und dazwischen eine Lage schwarze Wellpappe geklebt, unter der sich etwas Cheesecloth befindet. Das Querelement habe ich durch zwei Filmstrips dargestellt, die perfekt zur Kamera auf meiner Karte passen.

I had the idea for this card for quite some while in  my mind and now the sketch was perfect for it. So I've finally turned it into an actual card.
I've used blue and yellow designer's paper with a stars print and put a layer of black corrugated cardstock inbetween. Underneath it I've put some cheesecloth. For the elements across the card I've picked two film strips, that go perfectly with the camera on my card.


Also Deko habe ich einige verschieden große Kreise aus Vellum aufgeklebt. Auf einem befindet sich ein aus blauem Cardstock gestanztes Smile. Außerdem habe ich ein paar blaue Enamel Accents aufgeklebt.
Und weil irgendetwas fehlte, habe ich auch noch ein paar Buchstaben auf das gelbe Designpapier gestempelt.
Für die Kamera habe ich die Picture Perfect Stanze von Cheery Lynn Designs verwendet. Sie ist mit Distress Ink ein wenig eingefärbt, um sie plastischer wirken zu lassen. Die Linse ist mit 3D Tape aufgeklebt.

For decorations I've added some circles in different sizes, cut from Vellum. Onto one I've added a die cut smile, cut from blue cardstock, as the text. I've also added a few blue Enamel Accents.
And since it felt like there was something missing, I've also stamped a few letters onto the yellow designer's paper.
For the camera I've used the Picture Perfect die by Cheery Lynn Designs. I've used some black Distress Ink to add some depth to it, the lense is glued down using dimensionals.


Jetzt heißen wir ja STEMPEL- und nicht STANZ-einmaleins. Und natürlich befindet sich auch ein gestempeltes Motiv auf meiner Karte. Es versteckt sich unter der Kamera und kann am schwarzen Tab, das unten an der Kamera sichtbar ist, herausgezogen werden.

Well, we named our tutorial blog STAMP- and not DIE CUT einmaleins. So of course there's a stamped image on my card. It's hidden underneath the camera and can be pulled out by pulling the tab you can see at the bottom of the camera.


Das Motiv steckt in einem Polaroid-Rahmen, der mit der Kamera im Set kommt. Auf den breiteren Streifen unten habe ich ein "it's your birthday" gestempelt. Das süße Küken, das aus dem Geschenk springt, ist von LawnFawn und mit Copics coloriert. Die Konfetti darum habe ich für mehr Party-Feeling dazugestempelt.

The image is put behind a polaroid frame that comes with the camera die set. Onto the wider strip at the bottom I've stamped an "it's your birthday" text. The cute chick jumping out of the gift is by LawnFawn and colored in with Copics. I've stamped the confettig around it for some more party feeling.


Freitag, 30. August 2019

Eine Matchbox zum Geburtstag


Hallo Ihr Lieben!
Kennt Ihr das? Ihr habt etwas seit längerer Zeit nicht benutzt, holt es dann für ein bestimmtes Projekt "aus der Versenkung" - und wenn es dann vor Euch liegt, kommt Euch gleich die nächste Idee damit. So ist es mir mit den Nesting Balloons Stanzen von Kulricke gegangen. Und so sind sie nicht nur auf meiner Karte von letzter Woche zu finden, sondern auch auf der, die ich heute auf dem Kulricke-Blog zeige.

Hello everyone!
You sure know where I come from - you haven't used a special product for ages, bring it out for a project and in the moment it lays in front of you you get more ideas for how to use it. Well, that's what happened to me with the Nesting Balloons dies by Kulricke. And so they were not only used for last week's card but also for the one I am sharing with you today over at Kulricke Blog.


 Ich habe hier eine Matchbox gemacht - und wollte Felix eigentlich an den Ballons fliegen lassen. Jetzt sieht es doch eher so aus, als würde er sie halten. Aber es gefällt mir trotzdem.
Ich habe hier die Matchbox 2 Stanze verwendet. Die Schublade ist aus weißem Cardstock gestanzt, für die Hülle habe ich den nachtblauen Cardstock von Faltkarten verwendet. Nur auf der Oberseite habe ich mit Distress Oxide Seedless Preserves und Wilted Violet einen Galaxie-Hintergrund aufgewischt, auf den ich dann mit der Sternen Schablone und Strukturpaste Sterne aufgetragen habe.

I've made a matchbox - and originally had planned the penguin to fly away with them. Well, not it looks more like he's holding them. But I still like it.
Here I've used the Matchbox 2 die. The drawer is cut from white cardstock, for the sleeve I've used dark blue cardstock. Using Distress Oxide Seedless Preserves and Wilted Violet I've added a galaxy background only to the top of the drawer and then used a stars stencil and modelling paste to add some stars.


Und hier sind die schon erwähnten Luftballons. Sie sind aus altgoldenem Cardstock sowie zwei verschiedenen Designpapieren, ebenfalls von Faltkarten, gestanzt und mit 3D Pads übereinander geklebt.
Quer darüber habe ich noch einen dünnen Streifen des nachtblauen Cardstocks geklebt, auf das ich weiß einen der Texte aus dem Stempelset Felix Ahoi aufembosst habe.

And here are said balloons. They were cut from yellow cardstock and two different types of designer's paper and then stacked onto each other using dimensionals.
Across the balloons I've glued a strip of dark blue cardstock onto which I've white heat embossed a "let's celebrate" saying.


An die Ballons habe ich Schnüre geklebt, die nun der kleine Felix in den Händen hält. Ich habe hier Felix Engel verwendet, den Heiligenschein wegmaskiert und ihm stattdessen den Partyhut aus dem Stempelset Hut 2 aufgesetzt. So ist er doch bestens für eine Party gewappnet!
Zum Schluss habe ich noch ein paar Wolken, gemacht mit Stanzen aus den Sets Wolken und dem Schneekugelset, aufgeklebt.

I've glued some strings to the ends of the balloons and now the penguin is holding them in his hands. Originally this is an angel penguin. I've masked off the halo and replaced it with a party hat. Now he's ready for the party to start!
In the end I've added a few small clouds to the scene.


Donnerstag, 29. August 2019

Kürbisse und Fledermäuse


 Hallo Ihr Lieben!
Die neuen Stempel von Scrapbook Forever stehen in den Startlöchern. Unter anderem wird es ein Set mit drei tollen Fledermäusen geben. Und zwei davon möchte ich Euch heute zeigen.

Hello everyone!
The new stamps by Scrapbook Forever will be available soon. Amongst them is a set with three amazing bats. And I want to show you two of them with today's card.

Fledermäuse verbinde ich ja mit Halloween - vor allem zu dieser Jahreszeit. Also habe ich eine Art von Halloweenkarte gemacht, wobei das hier doch eher auszufallen scheint...
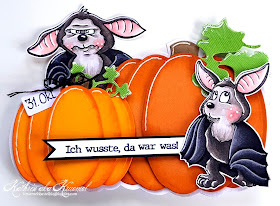
Diesmal habe ich eine Shaped Card gewerkelt und dafür die Pumpkin Nestabilities von Spellbinders verwendet. Die Kürbisse habe ich jeweils drei mal ausgestanzt, die äußeren Teile jeweils weggeschnitten und alle Ränder mit Distress Ink ein wenig eingefärbt. Nach dem Zusammenkleben mit 3D Tape erhält man so dreidimensionale Kürbisse, die ich ein wenig überlappend nebeneinander geklebt habe. Die Blätter sind Stanzen von Magnolia. An den kleineren der Kürbisse habe ich dann noch ein Tag mit einem per Hand aufgeschriebenen "31. Okt." angebunden.
Damit alles gut zusammenhält, habe ich eine weiße Mattung per Hand zugeschnitten und dahiner eine kleine Karte angebracht, die unten ebenfalls wie die Mattung geschnitten ist.

In my head bats and Halloween just belong together, especially this time of the year. So I've made som kind of Halloween card. Even if it looks like in this case there won't be any Halloween celebrations.
This time I've made a shaped card and used the Pumpkin Nestabilities by Spellbinders to create the pumpkins. I've die cut each pumpkin three times, then cut off the outer parts of two of them and used Distress Ink on the edges. After glueing them together with dimensionals I've ended up with 3D Pumpkins that I've glued next to each other, overlapping slightly. The leaves are by Magnolia. To the smaller pumpkin I've tied a tag with a handwritten "31. Okt." on it. 
To keep everything together I've hand cut a white matting and glued a small card behind that. The lower edge of the card is cut in the shape of the pumpkins as well.


Hier ist eine der Fledermäuse. Sie scheint ein wenig vergesslich zu sein, probiert aber angestrengt, sich zu erinnern. Der Text ist übrigens ebenfalls aus dem Fledermaus-Set.

Here's one of the bats. Seems like he's the forgetul type, but you can tell from the look on his face that he's trying really hard to remember. The saying means "I know, there was something I forgot".


Und hier ist die zweite Fledermaus. Ich würde sagen, das ist mal die eher weniger freundliche Sorte. Ich bin mir nicht sicher, ob sie so sauer scheint, weil die erste nicht an die Halloween-Vorbereitungen gedacht hat, oder weil sie realisiert, dass es heute Abend für sie keine Süßigkeiten zu holen geben wird.... ;)

And here's the second bat. I'd say this is one of the grumpy sort. I'm not sure if he's that angry because the other bat didn't think of preparing anything for Halloween or if it is because he just realises that there won't be any candy for him to collect that night... ;)


Mittwoch, 28. August 2019

MFT Sketch Challenge #452


 Hallo Ihr Lieben!
Heute startet auf dem MFT-Blog die Sketch Challenge #452 - die letzte für diesen Monat und somit die letzte, bei der ich als Gastdesigner teilnehmen durfte. Nochmal ganz herzlichen Dank an MFT, dass ich dabei sein durfte!
Und das ist der neue Sketch:

Hello everyone!
Over at the MFT-Blog the new Sketch Challenge #452 goes life today - it's the last one of the month and so it's also the last one I am joining the DT as a guest. Again a very huge thanks to MFT for having me this month!
And this is the new sketch:


Und da ja einige Halloweenstempel im neuen Release dabei waren, habe ich gleich noch eine Halloweenkarte gewerkelt:

And since there were a few Halloween themed stamps in the new release I made another Halloween card:

 Diesmal habe ich mich recht genau an den Sketch gehalten.
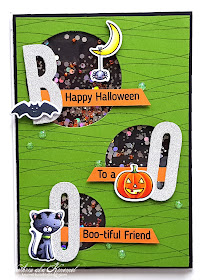
Auf ein Stück grünen Cardstock habe ich mit Jelly Bean Dye Ink den Balloon Strings Background quer aufgestempelt. Ganz nackt wollte ich den Cardstock nicht lassen, zu viel Muster wäre aber zu unruhig geworden. Der Balloon Strings Background löst das perfekt.
An den Stellen, an denen im Sketch Kreise eingezeichnet sind, habe ich mit den 1 1/4" und 1 5/8" Stanzen aus dem Circle Stax 2 und der 2 1/8" aus dem Circle Stax 1 Stanzenset Kreise aus dem grünen Cardstock gestanzt. Die Stanzen habe ich aneinander fixiert und sie in genau derselben Position auch aus schwarzem Moosgummi gestanzt. So konnte ich ganz einfach aus den Kreisen Shaker-Elemente werkeln. 
Hinterlegt ist der grüne Cardstock dann mit schwarzem Cardstock, die Kreise sind mit kleinen und etwas größeren silbernen Folien-Sechsecken und orangefarbenen Perlen gefüllt, das könnt Ihr aber gleich noch besser erkennen.

This time I've sticked pretty close to the sketch.
I've used Jelly Bean Dye Ink to stamp the Balloon Strings Background onto some green cardstock. I didn't want to leave this plain, but too much of a pattern would have overloaded the card. So the Balloon Strings Background was just perfect here.
I've die cut the 1 1/4" and 1 5/8" circles from the Circle Stax 2 set and the 2 1/8" circle from the Circle Stax 1 set from the green cardstock where the circles are drawn in the sketch. I've used some Washi to attach the circle dies to each other and was able to die cut them again in the exact spots from some black foam. That's an easy way to turn the circles into shaker elements.
I've matted the green cardstock with black cardstock, the circles are filled with small and a bit larger silver foil hexagons and orange beads. You'll be able to see those better soon.


Hier seht Ihr die Füllung besser - die holografischen größeren Sechsecke funkeln wunderbar.
Auf die ausgestanzten Kreise habe ich jeweils einen aus silbernem Glitzercardstock gestanzten Buchstaben gesetzt und so insgesamt das Wort BOO geschrieben. Für die Buchstaben habe ich die Impact Alphabet Stanzen benutzt - die haben so eine tolle Größe!
Quer über die Kreise kam jeweils ein Streifen orangefarbener Cardstock, auf den ich mit schwarzem Embossingpulver einen Text aufembosst habe. Ich habe zwei verschiedene Stempel aus dem Best Witches Stempelset kombiniert - Happy Halloween und To a BOO-tiful friend. So waren die einzelnen Texte auf den Streifen nicht so kurz.
Und Deko durfte natürlich auch nicht fehlen. Am oberen Kreis kam der Mond mit der süßen Spinne sowie die Fledermaus zum Einsatz. Die Motive sind gestempelt, mit Copics coloriert und dann mit den passenden Stanzen ausgestanzt.

Here you get a better look at the filling - those holografic bigger hexagons add a nice shimmer.
Onto the circle shakers I've added one letter each cut from silver glitter cardstock to write the word BOO. For the letters I've used the Impact Alphabet dies - they have such a great size!
Across each circle I've put a strip of orange cardstock with a black heat embossed text on it. I've used two different text stamps from the Best Witches stamp set here - Happy Halloween and To a Boo-tiful Friend. That way the individual strips didn't turn out too short.
And of course I needed some decorations! To the top circle I've added the moon with the cute spider dangling from it and the bat. The images were stamped, colored in with Copics and cut out using the matching Best Witches dies.


Der mittlere Kreis ist mit einem silbernen Glitzer-O, einem weiteren Streifen orangefarbenem Cardstock sowie einer Kürbislaterne. Ich wollte sie so aussehen lassen, als wäre die Kerze bereits angezündet. Darum habe ich Augen, Nase und Mund in hellem gelb coloriert.

The middle circle is decorated with an silver glitter O, another strip of orange cardstock and the Jack-O-Lantern. I wanted it to look like the candle inside is burning, so I've colored the eyes, nose and mouth in a light yellow.


Und auch der untere und kleinste Kreis ging natürlich nicht leer aus. Hier findet sich ein weiteres Glitzer-O und die süße Katze - wie es sich für Halloween gehört natürlich eine schwarze. Naja, dunkelgrau mit schwarzen Streifen.
Ganz zum Schluss habe ich noch ein paar Glitzer-Tropfen auf der Karte verteilt.

And of course also the smallest circle at the bottom got some decorations. Here there's another glittery O and the cute cat - a black one of course since it's Halloween. Well, okay, a dark grey one with black stripes.
In the end I've added a few glitter drops to the card.


Dienstag, 27. August 2019

Eine Geburtstagskarte


 Hallo Ihr Lieben!
Vor kurzem war ich zu einem kombinierten Geburtstag eingeladen. Ein 30. und ein 40., es handelt sich um ein (verheiratetes) Pärchen. Was macht man jetzt da als Karte? Die 70 war schon auf der Einladung enthalten, das wollte ich dann auch nicht machen. Entstanden ist dann diese Karte, die ich heute auf dem Stamping-Fairies Blog zeige. 

Hello everyone!
A little ago I was invited to a combined birthday party. A couple celebrated its 30th and 40th birthday. So, what to make as a card? The invitation already included the 70 so I didn't want to "copy" that idea. After some thinking I came up with this card that I am sharing over at the Stamping-Fairies Blog today.

Ich habe eine DinLang Karte gemacht, damit genug Platz für meine Idee war ohne es "zamgebatzelt" aussehen zu lassen. Ich habe eine weiße Grundkarte verwendet und sie mit einem kleineren Stück hellgrünen Cardstock beklebt. Darauf kam dann das wiederum ein wenig kleinere Stück dekorierter Cardstock.

I've made a long card to have enough room for my idea without it looking cramped. I've picked a white card and glued a slightly smaller piece of light green cardstock onto it. On top of that I've put the - again a tad bit smaller - decorated piece of cardstock. 


Im Hintergrund  habe ich Konfetti aufgestempelt. Da ich die Farben weder zu männlich noch zu weiblich wählen wollte, habe ich mich für eine Kombi aus dunkelbraun, grün und gold entschieden. Ich denke, das passt zu beiden Geschlechtern. Dementsprechend habe ich die Konfetti grün und gelb coloriert. 
In die Mitte der Karte habe ich ein hellgrünes Oval geklebt, auf das eine dreilagige Geburtstagstorte, gestanzt mit der Birthday Cake Stanze von MFT, kam. Die habe ich aus verschiedenen Papieren gestanzt und zusammengeklebt. Der Tortenständer ist aus goldener Spiegelfolie. Oben auf der Torte trohnt eine goldene 30. Hinter der Zahl ist noch ein großer brauner Stern aufgeklebt. Das war mir sonst zu leer da oben.

I've stamped confetti onto the background. Since I didn't want to pick any colors too male or too female I've decided to go with a dark brown, green and gold color combo. I think, that fits both genders. So matching that color combination I've colored the confetti in green and yellow.
In the middle of my card I've added a oval cut from light green cardstock. Onto that I've added a 3 tier birthday cake, cut using the Birthday Cake die by MFT. I've cut it from different papers and glued it together. The cake stand is cut from golden mirror cardstock. On top of the cake there's a golden 30. Behind those numbers I've added a brown star since it looked too plain on the top without it.


Damit der Tortenständer nicht in der Luft hängt, habe ich darunter ein Stück dunklebraune Wellpappe aufgeklebt. Auf die habe ich ein ausgestanztes happy birthday, gestanzt aus goldenem Spiegelkarton, sowie einen grünen Stern geklebt. Für das Birthday habe ich die Happy Birthday Script Stanze verwendet, das große Happy war mir dann aber irgendwie zu viel und ich habe es durch ein kleines von Recollections ersetzt.
Zum Schluss habe ich noch ein paar hellgrüne Enamel Accents auf dem Wellkarton verteilt.

Since it looked like the cake stand is floating in the air I've put a piece of dark brown corrugated cardstock under it. Onto that I've glued  a happy birthday, cut from golden mirror cardstock, and a light green star. For the Birthday I've used the Happy Birthday Script die, the big happy seemed too much for that panel so I've replaced it with a smaller one by Recollections.
In the end I've added a few light green Enamel Accents to this part of the card.

So, und wo bleibt jetzt der 40. Geburtstag, der ja auch gefeiert wurde? Kein Problem:

And how about the 40th birthday that was celebrated as well? No problem:


Zieht man am Tab unten an der Karte, verschwindet die 30 und stattdessen steht auf der Torte eine 40. Und das ist gar keine Hexerei: ich habe die Double Slider Loop Slots Stanze von MFT verwendet und dadurch einen Streifen Folie gezogen, an dem auch das Tab befestigt ist. Die 30 ist vorne am Streifen, die 40 hinten, jeweils mit einem Stück dickerer Folie verbunden, angebracht.

When you pull the tab the 30 disappears and there's a 40 on top of the cake instead. And it's no magic there: I've used the Double Slider Loop Slots die by MFT and put a piece of thin acetate through the slots, to which I've also glued the tab. The 30 is on the front of the strip, the 40 behind, both attached with the help of a strip of thicker acetate.


Und der Vollständigkeit halber habe ich auch von der Karte mit der 40 noch ein Foto für Euch.

And just to complete this post I've also taken a picture with the 40 on top of the cake.


Freitag, 23. August 2019

Heute mal maritim


Hallo Ihr Lieben!
Es ist August - also immer noch Sommer! Und da wir hier im tiefen Bayern maritim mit Sommer verbinden - obwohl das Thema generell wohl eigentlich das ganze Jahr über geht - gibt es heute von mir auf dem Stampcorner-Blog eine maritime Karte. 

Hello everyone!
It's august - so it's still summer. And since here in Bavaria we associate maritim with summer - allthough generally the theme would work all year long - I am sharing a maritim card over at the Stampcorner Blog today.

Ich liebe die Farbkombi von orange und türkis! Das hat auch das Seepferd aus dem Stempelset Watt'n Wurm erfahren dürfen (oder müssen). 
Ich habe einen Streifen orangefarbenen Cardstock auf grau-blaues Designpapier geklebt, darüber kam schräg ein Rechteck aus weißem Cardstock, dessen unteres Ende ich dann am Rand des Designpapieres abgeschnitten habe. Orange und türkis sind toll zusammen, aber bitte nicht direkt aufeinander. Daher kam mir das weiße Rechteck, das noch von einer anderen Karte auf meinem Tisch lag, genau recht. Wieder darauf habe ich dann ein Oval geklebt, auf das ich ein paar Wellen aufgewischt habe. 

I love the color combo of orange and turquoise. That's something the cute seahorse found out as well (or had to). 
I've glued a strip of orange cardstock onto some grey-blueish designer's paper, then added a rectangle cut from white cardstock, turning it and cutting of the bottom right corner alongside the designer's paper's edge. Orange and turquoise are great together, but not directly put onto each other. So the white rectangle I still had on my table from a previously made card came in handy. On top of that I've added a die cut oval that I've added some waves to using a stencil and ink.


Auf das Oval habe ich dann einige Stanzteile von verschiedenen Herstellern geklebt - eine Koralle, Blubberblasen, Seegras. Davor schwimmt nun das Seepferd - und eine Muschel steckt auch noch zwischen den Stanzteilen. Muschel und Seepferd sind mit Polychromos coloriert.
Neben das Motiv habe ich dann ein Banner geklebt, auf das ich einen der Texte aus dem Stempelset Wir Gratulieren aufgestempelt habe. So wie das Seepferd grinst, muss doch eine Kamera in der Nähe sein!
Zum Schluss kamen noch ein paar glitzernde Nuvo Drops auf die Karte.

Onto the oval I've glued some die cut pieces of different brands - there's a coral, some bubbles, sea weed. The seahorse is swimming in front of all of that - and there's even a shell tucked in between the plants. The images were colored with Polychromos.
Next to the image I've glued a banner with a "smile" saying. The way the seahorse is smiling there just has to be a camera involved.
In the end I've added a few glittery Nuvo Drops.


Donnerstag, 22. August 2019

99 Luftballons


 Hallo Ihr Lieben!
Nein, 99 Luftballons sind auf der Karte, die ich heute auf dem Kulricke-Blog zeige, nicht untergebracht. Aber mehr als zwei sind es doch geworden.

Hello everyone!
No, there aren't 99 balloons - like in the song by Nena - on the card that I'm sharing over at Kulricke-Blog today. But there are more than two.

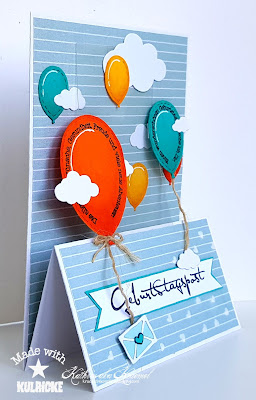
Diese Kartenart - eine Standing Z-Fold Card - haben wir Euch schon 2015 auf dem Stempeleinmaleins Blog gezeigt. Und wie das manchmal so ist, kommen sie einem irgendwann wieder in den Sinn. 
Die Karte selbst ist aus weißem Cardstock gearbeitet, das ich mit türkisgrauem Designpapier mit weißen Streifen beklebt habe. Das Papier hat einen leicht goldenen Schimmer, deswegen wirkt es ein wenig wie geprägt. Ist es aber nicht, die Kamera hat das so eingefangen.

 We at Stempeleimaleins have shared a tutorial for this type of card - a Standing Z-Fold Card - back in 2015. And sometimes it pops up in your mind after all those years.
The card itself is made from white cardstock, that I've covered with a grey-ish turquoise designer's paper with white stripes. The paper has a soft golden shimmer, that's why it looks a bit like it's dry embossed. But it isn't, the camera catched the shimmer like that.

In der Mitte befindet sich ein Folienstreifen, der die Karte stehen lässt. Auf dem Desigpapier und dem Hintergrund habe ich kleine Wolken und Luftballons aufgeklebt. Die Wolken sind aus den Stanzensets Wolken und dem Schneekugel Set. Für die Ballons habe ich die Nesting Balloons Stanzen verwendet und aus Faltkarten-Cardstock in türkis, orange und altgold gestanzt. Mit Copics habe ich noch etwas Schatten hinzugefügt, um sie plastischer wirken zu lassen. Außerdem habe ich auf zwei Texte aus dem Stempelset Nesting Balloon aufgestempelt.
An die beiden bestempelten Ballons habe ich noch Schnüre angeklebt, auf den größere auch noch eine kleine Schleife.

In the middle there's a strip of acetate that helps the card to stand freely. I've glued clouds and balloons onto the acetate and the background paper. The balloons were cut from yellow, orange and turquoise cardstock and I've used my Copics to add some shading to make them look more dimensional. I've also added birthday greetings to two of the balloons.
I've added strings to the two larger balloons and even added a bow to the largest one.


Im unteren Bereich der Karte habe ich zuerst mit der Herz-Schablone und Strukturpaste kleine Herzen aufgebracht. Dann habe ich ein Banner mit dem Text Geburtstagspost aus dem Stempelset Geburtstag #3 aufgeklebt und auch das Banner mit einer kleinen Wolke verziert.
An das untere Ende der Schnur am größten Ballon habe ich noch ein kleines Briefkuvert, verziert mit einem Herzchen, geklebt.

To the lower part of the card I've first added some hearts using a stencil and modelling paste. Then I've added a banner with a stamped on "birthday letter" and decorated it with a little cloud as well. 
To the end of the string on the largest ballon I've also glued a little envelope, decorated with a heart.


Und hier könnt Ihr die stehende Karte besser sehen. Die Ballons sind so in verschiedenen Ebenen aufgebracht, was der Karte eine tolle Tiefe verleiht.

And here you get a better look at the card standing. The balloons are now on different layers of the card which gives it some depth.


Mittwoch, 21. August 2019

MFT Sketch Challenge #451


 Hallo Ihr Lieben!
Heutet startet auf dem MFT Blog die Sketch Challenge #451. Auch hier darf ich wieder als Gast dabei sein. Bei diesem Sketch habe ich etwas mehr künstlerische Freiheit walten lassen:

Hello everyone!
Over at MFT Blog Sketch Challenge #451 starts. And also for this one I am joining the DT as a guest. With this sketch I allowed myself a bit more of creative freedom:


Ich habe den Sketch nicht nur gespiegelt, sondern auch noch ein Querlement für meinen Text und die Motive eingebaut:

Not only did I flip the sketch, I've also added an element to the bottom of the card to add my saying and images:


Hier kam nicht nur wieder das Stempelset Best Witches zum Einsatz, nein, auch das Abstract Doodle Set hatte hier in meinem Bastelzimmer Premiere. 
Auf ein Stück weißen Cardstock habe ich zuerst die flächigen Streifen mit Gravel Gray Premium Dye Ink aufgestempelt. Ich habe bewusst nicht so fest aufgedrückt, da ich die weißen Stellen toll fand. Normalerweise sind die Stempel komplett gefüllt. Darüber habe ich dann einen Streifen schwarzen Cardstock geklebt.
Auf den Streifen habe ich dann vier Rechtecke geklebt, so wie im Sketch dargestellt. Könnt Ihr das tolle Muster auf den Rechtecken erkennen? Auch dafür habe ich das Abstract Doodle Set benutzt. Ich habe den Stempel mit schwarzem Embossingpulver auf Yupo Papier embosst und dann die eingeschlossenen Bereiche mit violetter, grüner und orangefarbener Alkoholtinte eingefärbt. Nach dem Trocknen habe ich mir einen von der Größe passenden Streifen aus dem eingefärbten Motiv geschnitten, den in vier Teile geteilt und auf den schwarzen Cardstock geklebt. Nun, wer schon mal mit Alcohol Ink  gearbeitet hat, der weiß, dass die Farben eine extreme Leuchtkraft haben. Leider etwas zu viel für meine Karte. Darum habe ich einfach auf jedes Rechteck noch ein Stück Vellum geklebt, um die Farben ein wenig abzuschwächen. Sonst hätte man die süße Hexe gar nicht erkennen können!
Neben den Streifen habe ich mit Orange Zest Premium Dye Ink ein paar Sterne aufgestempelt.

Here I've not only used the Best Witches stamp set again - also the Abstract Doodle stamp set had its first use in my craftroom. 
Onto a piece of white cardstock I've first stamped the stripes using Gravel Gray Premium Dye Ink. I didn't press down the stamps too hard because I liked the dotted look. But if you want to the stamp makes a clean and fully filled image of a stroke (that's how I would describe it). Then I've glued a strip of black cardstock on top of the images.
I've glued four rectangles onto the black strip, just as shown on the sketch. Can you see the great pattern onto those rectangles? Also this was made using the Abstract Doodle stamp set. I've black heat embossed the image onto some Yupo Paper and then used green, violet and orange alcohol inks to fill in the enclosed areas. After letting it dry I've cut a strip the size I needed from the colored image and then cut that strip into four pieces. Those were glued down onto the black cardstock. Well, if you've ever used alcohol inks you know that these are very bright - too bright for my card. So I've simply glued another rectangle from Vellum, cut the same size as the ones from Yupo, on top to tone down those colors a bit. It would have been hard to see the cute witch otherwise.
Next to the strip I've stamped a few stars using Orange Zest Premium Dye Ink.


Die Hexe ist wieder mit No-Line Coloring und Polychromos coloriert. Gestempelt habe ich das Motiv mit Tickled Pink Premium Dye Ink. Ich wollte die Farben der Alcohol Inks wieder aufgreifen - und erst, als ich mit dem Colorieren fertig war, ist mir aufgefallen, dass ich gar kein Grün verwendet habe. Aber auch so ist die Hexe perfekt gekleidet für die große Spuknacht. 
Durch das obere Fenster fliegt noch eine kleine Fledermaus. Alle Motive sind übrigens aus dem Best Witches Stempelset und mit den Stanzen passend zum Set ausgestanzt. Normalerweise schneide ich ja mit der Hand aus, aber ich muss sagen, ich komme auf den Geschmack... Es geht doch so viel schneller!

The witch was again stamped with Tickled Pink Premium Dye Ink and colored with Polychromos doing the No-Line Technique. For the coloring I wanted to pick up the colors of the alcohol inks again - and only after finishing the coloring I realized that I didn't use any green. But I think like this the witch is dressed perfectly for the fun at spook night.
In the top rectangle a little bat is flying. All the images are from the Best Witches stamp set and were cut out using the dies matching the dies. Usually I do fuzzy cut my images by hand but I have to admit that using the dies is so much faster and acurate!


Und natürlich durfte ein Text auf meiner Karte nicht fehlen!
Hier kam die Little Hello Stanze zum Einsatz. Die ist eigentlich genauso wie die Sweet Hello Stanze, nur kleiner. Perfekt, wenn der Text mal nicht die Hauptrolle auf einer Karte spielen soll. Den Schatten habe ich aus schwarzem Cardstock, das Wort Hello aus grünem Cardstock gestanzt - irgendwo musste das grün ja nochmal auftauchen. 
Neben dem Hello sitzt die schwarze Katze der Hexe - auch sie ist mit No-Lines Technik coloriert. 
Unter dem aufgeklebten Hello habe ich dann noch ein Banner mit einem der Texte aus dem Stempelset Best Witches aufgeklebt. 
Es ist viel los auf der Karte, ich weiß, und trotzdem finde ich, dass sie eine Einheit bildet.

And of course my card needed a saying!
Here I've used the Little Hello die. This die is like the Sweet Hello die - just smaller. Perfect if the text isn't meant to be the main focus on the card. I've die cut the shadow from black cardstock and the word itself from green cardstock. I just had to pick up the green from the alcohol inks somewhere on my card. 
Next to the word the witche's little cat is sitting, looking at you. She's colored doing the No-Lines Technique again.
Under the glued down hello I've added a strip of cardstock with a text from the Best Witches stamp set white heat embossed onto. 
I know, there are a lot of elements on this card, but I still don't think it is too much happening here.


Dienstag, 20. August 2019

Ein Regenbogen...


 Hallo Ihr Lieben!
Heute zeige ich auf dem Stamping-Fairies Blog diese Karte, bei der ich einen der Texte aus dem Stempelset Rainbow Greetings von MFT wörtlich genommen habe.

Hello everyone!
Today I am sharing this card over at the Stamping-Fairies Blog for which I've taken one of the sayings from the Rainbow Greetings stamp set by MFT literally.

Ich habe hier für den Hintergrund hellblauen Aquarellfarbe auf Watercolor Cardstock aufgetragen. Dann wollte ich eigentlich den Tiny Hearts Background mit derselben Farbe etwas konzentrierter einfärben und die Herzen auf den einfarbigen Hintergrund abstempeln. Evtl. war die Farbe zu flüssig - auf jeden Fall sind die Herzen nicht als solche erkennbar. Also habe ich mir etwas anderes überlegt: Ich habe die Radiating Rays Schablone auf den getrockneten Hintergrund gelegt und mit dem Versamarkkissen darübergetupft - bewusst so, dass nicht überall und auch nicht überall gleichviel Tinte abgegeben wird, was dann zu dem etwas distressten Look führt. Dann habe ich mit einem weichen Pinsel goldenes Perfect Pearl aufgetragen. Das haftet dann nur an den Stellen, an denen vorher die Tinte aufgebracht wurde, und kann mit einer feinen Schicht Wasser fixiert werden. Und es glänzt einfach wunderbar!

Here I've lightly colored some watercolor paper with blue watercolor. Then I had planned to "ink up" the Tiny Heart Background with the same color, just more concentrated to get a darker shade. But that didn't work, since the hearts can't be recognized as those. So I've gone over to plan B. I've put the Radiating Rays stencil onto the dried background and used Versamark ink all over my cardstock, making sure the ink isn't everywhere and also not everywhere in the same amount. That results in the distressed like effect. Then I've used a soft brush to apply golden Perfect Pearl. That'll only stick to the areas where there's the Versamark ink and can easily be fixed by very lightly misting it with water. And it shines so beautifully!


Dekoriert habe ich meine Karte dann mit einem der Elegant Rectangle Stax Stanzen. Das habe ich aus weißem Cardstock gestanzt und schwarz gemattet. Dann habe ich mit der Clouds Stencil und Distress Oxide Tumbled Glass und Broken China Wolken aufgewischt.
Im letzten Release war ja ein toller Regenbogen, da ich aber die Once Upon a Rainbow Stanze bereits hatte, habe ich die verwendet. Der Regenbogen ist aus weißem Cardstock gestanzt und mit Distress Oxide Fossilized Amber, Spiced Marmelade und Candied Apple so eingefärbt, dass er am hinteren Ende heller ist. 
Wie schon erwähnt, hat mich einer der Texte aus dem Rainbow Greetings Stempelset auf die Idee zu dieser Karte gebracht. Und eigentlich habe ich wegen genau diesem Text das Set gekauft. Anstatt Wolken an die Enden der Regenbogen zu kleben, habe ich jeweils eines der Lots of Hearts Outlines angebracht. Die inneren Teile sind wieder mit Distress Oxide Candied Apple eingefärbt, auf die äußeren weißen Teile habe ich Unicorn Stickles aufgetragen.
Der Text ist auf schwarzen Cardstock weiß embosst, zum Banner geschnitten und aufgeklebt.
Zum Schluss kamen noch zwei Schmetterlinge aus dem Stempelset Easter Bunnies auf das Label.

I've decorated my card with one of the Elegant Rectangle Stax die cuts. It's cut from white cardstock and matted black. Then I've used the Clouds stencil and Distress Oxide Tumbled Glass and Broken China to add the clouds.
In the latest MFT release there was a beautiful rainbow die, but since I've already owned the Once Upon the Rainbow die set I've used that. The rainbow is cut from white cardstock and colored using Distress Oxide Fossilized Amber, Spiced Marmelade and Candied Apple, applying less ink to the hind end of the rainbow to get that lighter.
As mentioned before - it was one of the sayings from the Rainbow Greetings stamp set that gave me the idea for this card. And acutally that was the reason why I've bought this set. Instead of glueing clouds to the ends of the rainbows I've added two different sized hearts from the Lots of Hearts Outlines die set, cut again from white cardstock. The inner parts were again colored with Distress Oxide Candied Apple, to the white outlines I've added some Unicorn Stickles.
The saying is white heat embossed onto black cardstock, cut in a banner shape and glued onto the label.
In the end I've added two butterflies from the Easter Bunnies stamp set.


Und hier könnt Ihr den tollen Glanz der Perfect Pearls - hoffentlich - noch genau erkennen. Die Leuchtkraft ist wirklich grandios!

And here - hopefully - you can get a better look at the shine of the Perfect Pearls. It really is fabulous.


Montag, 19. August 2019

Runder Geburtstag die Zweite


Hallo Ihr Lieben!
Heute habe ich eine weitere Karte zu einem weiteren runden Geburtstag zu zeigen.  Und diesmal waren die Vorgaben sehr speziell. Es ging schon damit los, dass es einen Karte in A5 werden sollte. Die überfordern mich immer ein wenig. Weiter gönnt sich das Geburtstagskind zum runden Geburtstag eine Flusskreuzfahrt und sein Spitzname ist Schwani. Beides sollte mit untergebracht werden. Puh! Aber dann kam mir die Idee....

Hello everyone!
Today I have another card for another milestone birthday to share. And this time the things that had to be included were quite special. It started with the fact that the card should be double the size than a regular card. Well, those always scare me a bit. The one celebrating also is gifting himself with a river cruise and his nickname is "Schwani", which means "little swan". Both of these facts needed to be included in the card. OMG! But then I had an idea...

Ich habe hier Designpapier mit einem Landkartendruck schwarz gemattet und auf eine weiße A5-Karte geklebt. Das Designpapier war eigentlich weiß mit hellgrauem Druck. Das hat mir aber hier nicht wirklich gefallen, weil einfach nicht genug Kontrast da war. Also habe ich es kurzerhand mit Distress Ink Tumbled Glass eingefärbt. Darauf kam dann eine Lage Cheesecloth.

I've matted some designer's paper with a map print with black cardstock and then glued it onto that large card base. The designer's paper originally is white with a light grey print. I didn't like that on this card since there wasn't enough contrast. So I've simply used my Distress Ink Tumbled Glass to make it blue instead of white. Then I've added some cheesecloth.


Um das Thema Flusskreuzfahrt aufzugreifen, habe ich einfach ein Bullauge ausgestanzt und auf Designpapier mit Holzplanken geklebt. Das Bullauge ist aus goldenem Spiegelkarton gestanzt und ich habe rundherum Schrauben aufgeklebt. Darunter kam noch ein Seil mit Knoten von MarianneDesign. Und um den Schwan einzubauen, habe ich einfach die Sicht aus dem Bullauge auf zwei Schwäne fallen lassen. Zum Glück hatte ich das Stempelset Splendid Swans von MFT. Im Hintergrund habe ich das Scene Builder Set verwendet, um die Hügel und Bäume/Büsche aufzustempeln, das Wasser ist einfach mit Copics und weißem Gelmarker dazugemalt. Durch die Landschaft sieht es eher so aus, als wäre das Schiff auf einem Fluss und nicht auf dem Meer unterwegs. Zum Schluss habe ich mit einem schwarzen Marker noch eine Reling dazugemalt.

To bring in the river cruise theme I've die cut a porthole and glued it onto a piece of designer's paper with a plank print. The porthole was cut from golden mirror cardstock and I've added some screws around it. Under it I've added some rope with a knot by MarianneDesign. And luckily I had the Splendid Swans stamp set by MFT. So I've make it look like you're looking at two of them when you look out of the porthole. For the trees and bushes I've used the Scene Builder stamp set, the water is made just using my Copics and a white gelly marker. With the landscape in the background it looks more like the ship is out on a river instead of the open sea. In the end I've added a railing by simply drawing some lines with a black marker.


Natürlich lässt sich das Bullauge auch öffnen und man sieht etwas mehr vom Motiv dahinter.  Ich habe Folie hinter das Bullauge geklebt und einen Ring aus goldenem Spiegelkarton hinzgefügt, damit das Fenster auch von dieser Seite schön aussieht.
Über das Bullauge habe ich noch eine Girlande aufgehängt.

Of course the porthole can be opened and you can see more of the image behind it. I've glued some transparency to the back of the porthole and then added a ring, also cut from golden mirror cardstock, to make this side look nice as well.
Above the porthole I've hung a party garland.


Und weil die Karte ja so groß ist, war noch genug Platz für einen Geburtstagsgruß. 
Ich habe hier das Birthday aus der Happy Birthday to You Stanze von MFT, gestanzt aus schwarzem Cardstock, verwendet. Darüber kam ein kleines, aus goldenem Spiegelkarton gestanztes, happy von Recollections. Den Text habe ich mit 3D Tape aufgeklebt, rechts daneben kam eine große 50 und ein Anker als Deko.

And since the card is that big there was enough room for a birthday greeting. 
Here I've used the Birthday from the Happy Birthday to You die by MFT, cut from black cardstock. Above it I've added a small happy by Recollections, cut from golden mirror cardstock. The text was glued down with dimensionals. To its right I've added a big die cut 50 and an anchor for decorations.


Sonntag, 18. August 2019

Eine Karte zum Schulanfang

 
 Hallo Ihr Lieben!
Für mich ist das Thema Schule mit Ablauf des letzten Schuljahres ja endgültig abgeschlossen. Aber  natürlich gibt es auch dieses Jahr wieder viele ABC-Schützen, die aufgeregt ihrem ersten Schultag entgegenfiebern. Und für diesen Anlass habe ich diese Karte gemacht, die ich heute auf dem Kulricke Blog zeige.

Hello everyone!
With the end of the last school year I don't have any kids going to school anymore. But of course there are lots of little kids looking forward to their very first day of school this year as well. So I've made this card, that I'm sharing over at Kulricke Blog today.

Hier auf dieser Karte habe ich das erste Mal einen Floating Frame gemacht - alle bunten Vierecke wurde angeordnet, fixiert, dann wurde der Kreis aus der Mitte ausgestanzt und anschließend der Rest mit 3D Tape auf den hellblauen Cardstock geklebt.
Ich habe hier Stempel aus den Sets 123 Schule und ABC Schule verwendet. Sie sind coloriert, grün, gelb und türkis coloriert und anschließend alle einzeln ausgeschnitten.

Here I've tried the Floating Frame technique for the first time - all of those colorful rectangles were put in place, fixed with some tape, then I've die cut the circle from the middle and then attached all the individual pieces onto the light blue cardstock using dimensionals.
I've stamped those tiles with the A, B, C, 1, 2 and 3, colored them yellow, green and turquoise and then cut them out individually.


In den Ausschnitt habe ich eine in den selben Farben colorierte Schultüte geklebt. Die habe ich Felix Schule "weggenommen". Felix selbst war einfach zu wuchtig für die Karte. Dekoriert habe ich die Schultüte noch mit einer Schleife aus schwarzem Twine.
Darunter habe ich quer über den Ausschnitt ein schwarzes Banner geklebt, auf das ich "zum Schulanfang" weiß aufembosst habe.

Into the cut out I've put a first day of school cone, colored the same colors as the tiles. I've "taken away" this cone from Felix the penguin who was simply too large for my card. I've decorated the cone with a bow tied from black twine.
Underneath I've put a banner onto which I've white heat embossed a text meaning "for your first day of school".


Und hier habe ich noch versucht, den Effekt der Floating Frame Technik für Euch auf Foto zu bannen. Es sieht wirklich so aus, als würde der komplette "Rahmen" (der bei mir etwas größer ausgefallen ist) auf der Karte schwimmen.

And here I've tried to catch the effect of that Floating Frame technique. It really looks like the whole frame - that is quite large on my card - is hovering over the card.