Hallo Ihr Lieben!
Heute zeigen wir Euch beim Stempeleinmaleins das On the Edge Stamping - eine einfache Stempelidee, mit der Ihr gleich zwei Karten auf einen Schlag dekorieren könnt.
Hello everyone!
Over at Stempeleinmaleins we are sharing a tutorial for On the Edge Stamping today - an easy way of stamping. And the best thing is that you can decorate two cards at once with your stamped areas.
Ich habe wieder herbstliche Karten gestaltet.
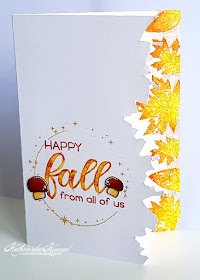
Bei der Technik hinter dieser Kartenart werden die Motive jeweils an die gleiche Stelle sowie auf der Vorder- als auch der Innenseite der Karte abgestempelt. Dank der Stempeltools kein Problem mehr. Dann wird das Motiv auf der Vorderseite der Karte mit etwas Abstand als Streifen abgeschnitten.
Bei dieser Version der Karte ist der gestempelte Streifen im inneren Teil der Karte, die Motive können bei geschlossener Karte trotzdem gesehen werden weil ja das selbe Motiv aus der Vorderseite herausgeschnitten wurde. Ich habe die tollen Herbstblätter aus dem Fall Flowers Stempelset von Clearly Besotted verarbeitet. Ich habe sie zuerst mit gelber Tinte, dann teilweise mit orangefarbener und roter Tinte abgestempelt. Anschließend habe ich die Außenlinien, jeweils ein Extra-Stempel, mit dem glitzer-goldenen Sternenstaub-Embossingpulver von Heindesign embosst.
Auf die selbe Art habe ich das "fall" gestempelt, hier habe ich die Handletter Alphabet Lowercase Stempel open und closed von Craft Emotions verwendet.
Für die anderen Textteile habe ich jeweils Teile von LawnFawn-Stempeln verwendet und sie mit dunkelroter Tinte gestempelt.
Der Sternenkreis rund um den Text ist von Scrapbook Forever und ebenfalls embosst.
Und weil ich so ganz ohne Motiv nicht auskomme, habe ich hier noch zwei Pilze aus dem Happy Hedgehogs Stempelset von MFT aufgeklebt.
Weil ich wollte, dass man die Schnittkante etwas besser sieht, habe ich rund um die Blätter noch W-Töne von Copics (W5, W2 und W0) aufgetragen.
Again I've made some fall cards.
When doing On the Edge Stamping the images get stamped onto the same place on both the outside and the inside of the card. That really isn't a problem anymore thanks to those stamping tools like Misti etc. Then the stamped images on the front get cut out as one strip, leaving some room between the stamped lines and where you cut.
On this card the stamped images are on the inside and can be seen when
the card is closed since the strip on the front got cut off. I've used the beautiful leaves from the Fall Flowers stamp set by Clearly Besotted here. First I've stamped them with yellow ink, then stamped parts of it again with orange and red ink. At last I've stamped the outlines - an individual stamp for each leave - and heat embossed those with the golden-glittery Sternenstaub embossing powder by Heindesign.
I did the same process when stamping the word fall, here using the Handletter Alphabet Lowercase stamps, both open and closed, by Craft Emotions.
For the other parts of the sayings I've used different parts of different stamps by LawnFawn.
The starry circle is by Scrapbook Forever and also golden embossed.
And since I just can't live without any image I've added two mushrooms from the Happy Hedgehog stamp set by MFT here.
Since I wanted the cutting edge around the image to pop out a bit more I've used some W-toned Copics (W5, W2 and W0) around the leaves.
Hier sieht man den Effekt der ausgeschnittenen Kante ein wenig besser - auch wenn der innere Teil der Karte doch sehr überbelichtet ist.
Here you get a better look at the effect of the cut out edge - even if the inner part of the card is totally overlighted here.
Und das ist dann die zweite Karte, auf der der von der Vorderseite ausgeschnittene Streifen verwendet wird. Damit er ein wenig besser auffällt, habe ich ihn noch dunkelbraun hinterlegt.
Blätter und Text sind hier identisch zum Innenteil der Karte gearbeitet, nur habe ich zusätzlich noch grüne Stempelfarbe mit verwendet. Und statt Pilzen und Sternenkreis kamen hier nur zwei Eicheln, auch aus dem Happy Hedgehog Stempelset, zum Einsatz.
And this is the second card that you used the strip you've cut out from the front of the card on. To make that pop out a bit more I've matted it with some dark brown cardstock.
Leaves and saying are done as described for the first card with the only difference that I've added some green ink here as well. And instead of mushrooms and the starry circle I've only added two acorns, also from the Happy Hedgehog stamp set, here.


