Seiten

Dienstag, 30. Juni 2020

Der will doch nur spielen!


Hallo Ihr Lieben!
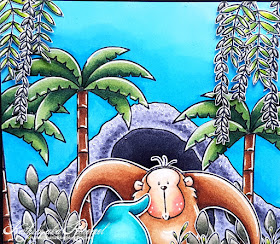
Heute zeige ich auf dem Stamping-Fairies Blog eine weitere Karte mit einem Motiv aus dem Hanging with my Gnomies Stempelset von MFT. Ich finde diesen kleinen Gnom hier ja total goldig - aber vom ersten Moment an dachte ich, er sieht so aus, als würde er vollkommen verschreckt vor etwas davonlaufen. Schreiend. Und dieser Eindruck hat mich nicht mehr losgelassen. Also habe ich in meinen anderen MFT Stempeln nach einem Motiv gesucht, vor dem er davonlaufen könnte. Nun ist es so, dass es dort nicht wirklich gefährliche Monster oder wilde Tiere gibt. Aber der Affe aus dem Sunshine and Friendship Stempelset erfüllt die Anforderungen zumindest annähernd, sobald man ihm seinen Schwimmring weggenommen hat. Und so ist diese Karte entstanden.

Hello everyone!
Over at the Stamping-Fairies Blog I am sharing another card with one of the images from the Hanging with my Gnomies stamp set by MFT. I really love this little gnomie here - but from the first look I thought he looks like he's totally scared and running from something. Screaming. And I just had to turn this idea into a card. So I went through all my MFT stamps, looking for something he could run from. Well, actually there aren't any stamp sets with scary monsters or wild animals. But the monkey from the Sunshine and Friendship stamp set actually could look a bit scary once you take away his swim ring. And that's how this card was made.


Im Hintergrund habe ich eine Szene mit Stempeln und Copics gestaltet. Der Affe brauchte eine Höhle, in der er wohnen kann. So kann man immerhin dem Gnom noch selbst die Schuld geben, dass er vom Affen verfolgt wird. Bestimmt hat er ihn in seiner Höhle aufgescheucht. Für die Höhle habe ich einfach frei Hand einen Hügel skizziert, diesen hellgrau coloriert und die Höhle mit dunklem Grau und Schwarz hineingemalt. 
Vor und neben der Höhle wachsen ein paar Palmen aus dem Penguins in Paradise Stempelset. Davor habe ich größere Pflanzen, ebenfalls aus dem Gnom-Stempelset, gepflanzt. Ein paar davon habe ich ausgeschnitten und aufgeklebt, so konnte ich sie auch ein wenig vor dem Affen platzieren. Diese Pflanzen und der Affe sind mit dünnem 3D Tape auf den Hintergrund geklebt.
Davor kam dann eine weitere Lage. Hier habe ich die Pflanzen aus dem Always Bring a Smile Stempelset mehrfach nebeneinander gestempelt und etwa in der Mitte eine Lücke gelassen, in die der Gnom passte. Die Pflanzen sind alle per Hand ausgeschnitten - ja, das hat hier dann doch gedauert -, darunter habe ich eine grüne Grasfläche gemalt. Auch diese Lage ist mit 3D Tape, diesmal dicker, aufgeklebt. 
Aus den Pflanzen der obersten Lage kommt der Gnom herausgelaufen. 
Einen passenden Text zu meiner Idee konnte ich bei bestem Willen nicht finden. Also habe ich ein "der will doch nur spielen!" am PC gedruckt. Ja, da hatte ich den klassischen Satz aller Hundebesitzer im Kopf, wenn ihr Hund wild bellend auf Dich zugerannt kommt. ;)

In the background I've created a scene using stamps and Copics. The monkey needed a cave to live in. Now we can also blame the gnome for the fact that the monkey is kind of chasing him. Pretty sure he disturbed him in his cave. For the cave I've drawn a hill free hand and colored it grey, than added the cave to its middle with dark grey and black.
In front of and next to the cave I've planted a few palms from the Penguins in Paradise stamp set. In front of those there are bigger plants, also from the gnome stamp set. I've cut out a few extras and glued those down, putting a few parts in front of the monkey. The monkey and the plants are glued to the background with thin dimensionals. 
Then I've added another layer. Here I've stamped the plants from the Always Bring a Smile stamp set several times next to each other, leaving a gap in the middle in which the gnome fits in. I've cut out all those plants by hand - yes, that took me some time here -, and added an area of green grass at the bottom. Also this layer is glued down with dimensionals but here I've used some thicker ones.
The gnome is coming out of the jungle through those plants on the top layer.
I really wasn't able to find a text stamp that fits this card. So I've printed one with my home printer. It means "he just wants to play and won't hurt you", and yes, I had that sentence in mind all dog owners tell you when their dog comes running to you, barking. ;)


Irgendwie kam mir der obere Teil der Karte im Vergleich zum unteren Teil zu nackig vor. Also habe ich hier noch ein paar Lianen herabhängen lassen. Dafür habe ich Stempel aus den Stempelsets Sunshine and Friendship sowie Splendid Swans verwendet, auch die wieder per Hand ausgeschnitten und mit dem dünneren 3D Tape aufgeklebt.

I thought the top of the card looked too plain, compaire with its bottom. So I've added a few hanging plants there. I've combined stamps from the sets Sunshine and Friendship and Splendid Swans, cut those out by hand again and used the thinner dimensionals to glue the plants to the background.


Samstag, 27. Juni 2020

Stempeleinmaleins - Ausgabe vom 27. Juni 2020


Hallo Ihr Lieben!
Es ist wieder Zeit für einen neuen Sketch beim Stempeleinmaleins. Der heutige Sketch hat mich ein wenig vor eine Herausforderung gestellt. Zuerst hatte ich nicht wirklich eine Idee - und dann konnte ich mich zwischen zweien nicht entscheiden. Es hätte sich durch die vier Rechtecke angeboten, die Karte als Fenster zu gestalten. Da war aber auch noch diese andere Idee in meinem Kopf - und die hat das Rennen dann gemacht.

Hello everyone!
It's time for a new sketch over at Stempeleinmaleins. Today's sketch was a bit of a challenge for me. At first I didn't have an idea at all - and then there were two that both were intriguing. With the four rectangles the sketch would have been great to make the card look like one window. But there was this other idea in my head - and that one won.

Ich habe hier den Breathtaking Bouquet Hintergrundstempel von SU verwendet. Ich habe ihn mit schwarzer Tinte zweimal auf weißen Cardstock gestempelt. Aus einem der Hintergründe habe ich dann die vier Rechtecke ausgestanzt. Nur auf diesen vier Fenstern habe ich das Motiv dann mit Copics schön sommerlich-bunt coloriert. Das war gar nicht so einfach - bis ich auf die glorreiche Idee kam, die Rechtecke einfach wieder in den Hintergrund einzulegen, aus dem ich sie ausgestanzt habe. So war es etwas einfacher. Naja, warum kompliziert, wenn es auch einfach geht! 
Die vier Rechtecke mit den colorierten Motivteilen habe ich dann schwarz gemattet. Auf den noch kompletten Hintergrund habe ich eine Lage Vellum geklebt, um die schwarzen Stempellinien ein wenig abzuschwächen. Darauf kamen dann die Rechtecke, und zwar so, dass das Muster im Hintergrund mit dem auf den Rechtecken wieder fortlaufend ist. 
Das Vellum habe ich minimal größer als den Hintergrund, aber etwas kleiner als den schwarzen Cardstock, mit dem ich den Hintergrund gemattet habe, zugeschnitten. Dann kam alles auf einen weißen Kartenrohling.

Here I've used the Breathtaking Bouquet background stamp by SU. I've stamped it onto two pieces of white cardstock using black ink. From one of those stamped backgrounds I've die cut four rectangles. The parts of the background only on those four rectangles were colored with Copics in happy summerish colores. That was really hard - until I got the great idea of putting the die cut pieces back into the cardstock I've die cut them from. That way it was easier to see what piece belongs to what flower. Well, there's always an easy way to do something. Then I've matted them with black cardstock. 
Onto the other background I've glued a piece of vellum to tone down the black lines a bit. Then I've glued the four rectangles with the colored images onto the vellum, making sure the pattern is exactly matching the whole image on the white cardstock. 
I've cut the vellum a tad bit larger than the white cardstock but still smaller than the black cardstock that I've used to mat the background. Then I've glued everything onto a white note card.


Mittig zwischen den Rechtecken ist im Sketch der Text eingezeichnet. Ich habe dafür die Sweet Hello Stanze von MFT benutzt. Den Schatten habe ich wieder aus Vellum, das Wort Hello an sich aus weißem Cardstock gestanzt und beides aufeinander geklebt. Auf die Karte habe ich es dann mit 3D Tape geklebt. 
Zum Schluss kamen noch ein paar klare Glitzersteine als Deko auf die Karte.

The sketch shows the area for the text in the middle of the rectangles. So I've used the Sweet Hello die by MFT and die cut the shadow of the word from vellum, the word itself from white cardstock. I've glued both pieces on top of each other and then used dimensionals to glue the text onto the card. In the end I've added a few clear rhinestones for decorations.


Freitag, 26. Juni 2020

Blumige Grüße


 Hallo Ihr Lieben!
Heute habe ich eine Karte mit Blumen für Euch. Hier kamen endlich die tollen Dahlien von Stampcorner zum Einsatz. 

Hello everyone!
Today I have a flower card to share with you. And here I've finally used those amazing dahlia images by Stampcorner.

Ich habe hier auf Yupo Paper einen Hintergrund mit Aqua Alcohol Ink und viel Blending Solution gestaltet. Dort, wo die Farbe ganz "dünn" wird, kippt das helle Türkis ins Grüne, was natürlich perfekt zu meinen Blumen passte.
Auf den fertigen Hintergrund habe ich einen Rahmen, gestanzt mit der größten der Stitched Rectangle Scalloped Frame Stanze von MFT aus weißem Cardstock, geklebt. 

Here I've created a background with Aqua Alcohol Ink and lots of Blending Solution on a piece of Yupo paper. In the areas where the color gets very "thin" it kind of changes into a light green and that goes great with my flowers.  
Onto the finished background I've glued a frame, cut from white cardstock with the largest of the Stitched Rectangle Scalloped Frame die by MFT.


Dahlien gibt es in so vielen tollen Farben - ich konnte mich nicht entscheiden und habe sie dann von gelb innen nach rot außen im Farbverlauf coloriert. Sie sind dunkler geworden, als ich eigentlich geplant hatte. Aber wie Ihr seht, seht Ihr nichts. Ich habe mal wieder No-Line Coloring gemacht und da brauchten die einzelnen Blütenblätter genug Kontrast zum Nachbarn. Ich habe mit folgenden Copics coloriert. R29, R08, YR07, YR04, Y17 und Y13. Die kleinere der Blüten habe ich unter die größere geschoben, darüber kam die Knospe. Dank des No-Line Colorings konnte ich hier den Stängel problemlos verlängern, da mir so die Verteilung auf der Karte besser gefallen hat. 
Links neben die große Blüte habe noch zwei weitere Blätter geklebt. Dafür habe ich einfach das Blatt, das nahe der Knospe ist, zwei weitere Male abgestempelt, coloriert, ausgeschnitten und aufgeklebt. Für die Blätter habe ich G29, G46, YG17, YG25, YG23 und YG03 verwendet - eigentlich meine Lieblings-Grünkombi wenn es um Pflanzen geht.
Das love ist mit einer uralten Stanze gestanzt, aber das gefiel mir hier so gut. Ich habe es aus türkisfarbenem Cardstock ausgestanzt und dahinter, leicht versetzt, eines aus schwarzem Cardstock geklebt. So sieht es nicht zu hart aus, der türkise Cardstock war aber dem Hintergrund zu ähnlich, um nur das zu verwenden.

Dahlias exist in so many amazing colors - I just couldn't go with just one color. So I've colored mine from yellow on the inside to red on the outside. As you can see - there's nothing to see, stamping lines wise. I've done some No-Line Coloring again and so I needed enough contrast between the individual leaves of the flowers. I did the coloring with Copics, using R29, R08, YR07, YR04, Y17 and Y13. I've tucked the smaller flower under the large one and added a still closed one. Thanks to the No-Line Coloring it was easy to make the stem a bit longer, I just like it better that way on my card. 
Next to the larger flower I've added two more leaves. I've simply stamped the leave next to the not yet blooming flower twice again, colored them, cut them out and glued them under the flower. For the leaves I went with G29, G46, YG17, YG25, YG23 and YG03. That's my all-time favorite green color combo when it comes to plants.
The love is made with a very old die, but I liked it so much on this card. I've die cut it once from turquoise and once from black cardstock and glued them on top of each other, making sure only a thin strip of the black cardstock shows. The turquoise cardstock was too close to the background color to be used without the black underneath but still the contrast isn't too hard like it would have been when using just the black word.


Hier habe ich den oberen Teil der Karte auch noch einmal für Euch fotografiert. Hier könnt Ihr den Hintergrund - und auch das helle Grün, zu dem die Aqua Alcohol Ink "mutiert", ganz gut sehen. 
Zum Schluss habe ich noch ein paar klare Nuvo Drops mit silbernem Glitter auf der Karte verteilt.

Here I've taken a picture of the upper part of my card. That gives you a good look at the background - and the light green the Aqua Alcohol Inks changed into. 
In the end I've added a few clear Nuvo Drops with silver glitter to my card.


Mittwoch, 24. Juni 2020

Eine Karte zur Geburt


 Hallo Ihr Lieben!
Ein Kollege meines Mannes ist zum ersten Mal Vater geworden - da musste natürlich eine passende Karte für die kleine Emilia und ihre Eltern her. Ich hatte schon lange keine Babybody-Karte mehr gemacht. Seit dem letzten Mal habe ist die Babybody-Stanze von JM-Creation bei mir eingezogen. Und die macht die Sache noch viel einfacher...

Hello everyone!
One of my husband's co-workers became a daddy for the first time - of course he needed a card to welcome little Emilia. I haven't done a onesie card in ages. Since that last time I've gotten myself the baby onesie die by JM Creation. And that makes making this card super easy.

Ich habe die Stanze einmal aus rosafarbenem Designpapier mit Herzchendruck und zweimal aus rosafarbenem Cardstock ausgestanzt. Dann habe ich ein langen Streifen weißen Cardstock etwa mittig gefalzt und 0,5 cm daneben eine zweite Falzlinie gezogen. So konnte ich für etwas Höhe sorgen, die ich später noch brauchte. Auf die Vorderseite habe ich das Stanzteil aus Designpapier geklebt und mit etwas Abstand darumherum mit der Schere bis zur Falzung geschnitten. Anschließend habe ich auch den hinteren Teil der Karte identisch zugeschnitten. 
Den Body habe ich mit dem Kragen und den Spitzenbordüren an den Ärmeln dekoriert, die Stanzen dafür kommen im Set mit der Bodystanze. Unter den Kragen habe ich noch eine kleine dunkelrote Schleife geklebt.
Um die Karte später verschließen zu können, habe ich noch den kleinsten der Stitched Kreise aus weißem Cardstock gestanzt, dort ebenfalls etwa mittig im Abstand von 0,5 cm zwei Falzungen gezogen und den hinteren Teil des Kreises innen an den Body geklebt. Auf die Rückseite des vorderen Teiles habe ich einen Magneten geklebt, der zweite Magnet ist unter dem Designpapier versteckt. Dekoriert habe ich den Halbkreis dann mit zwei kleinen rosafarbenen Knöpfen.

I've die cut the onesie once from pink designer's paper with a white heart print and twice from pink cardstock. Then I've scored a long strip of cardstock at about the half and added another score line 0,5 cm away from the first one. I will show you later why I needed this card to not fold flat. Onto the front of my white "card base" I've glued the onesie cut from designer's paper, then cut the shape of the onesie a little larger to get a white edge. Then I've cut the back identically to the front.
I've decorated the onesie with the collar and the lace borders for the arms, both dies come with the onesie die. Under the collar I've added a bow from dark red ribbon.
To be able to close the card later I've die cut a small circle from white cardstock, scored it at about the half and again 0,5 cm away. I've glued the back part of the circle to the inside of the onesie in the back, to the back of the other half of the circle I've glued a little magnet. The other one is hidden underneath the designer's paper. Then I've added two tiny buttons for decorations here.


Natürlich brauchte der Body auch eine "Applikation". Ich habe hier einen weiteren der Stitched Kreise aus weißem Cardstock gestanzt und auf die Brust des Body's geklebt. Als Motiv habe ich mich für die Fliegenpilze aus dem Stempelset Glückspilz entschieden. Sie sind mit Copics coloriert. 
Unter den Kreis habe ich den Namen Emilia aufgeklebt, gestanzt aus dunkelrotem Cardstock mit dem ABC 1 Stanzenset. Außerdem habe ich hier ein paar klare Glitzersteine aufgebracht.

Of course my onesie needed an "application". I've die cut another stitched circle and glued it onto the onesie. For the image I've picked those mushrooms, colored with Copics. 
Under the circle I've glued the name Emilia, cut from dark red cardstock. There was also room for a few clear rhinestones.


So sieht die komplette geöffnete Karte aus. Die aus rosafarbenem Cardstock gestanzten Bodies habe ich innen auf die weiße Karte geklebt.

This is the complete opened card. I've glued the onesies cut from pink cardstock to the inside of the card.


Mit einem weißen Gelmarker habe ich Nähte aufgestrichelt - übrigens auch auf der Vorderseite. Das Waschlabel habe ich mir einfach am PC selbst erstellt. 
Um eine Gutscheinkarte einschieben zu können - hier kam fürs Foto mal wieder meine alte, bereits aufgebrauchte zum Einsatz - habe ich zwei Halbkreise in die pinke Lage des unteren Kartenteils gestanzt. 
Den Text Herzlichen Glückwunsch zum habe ich mit dunkelroter Tinte gestempelt, das Wort Baby ist aus weißem Cardstock gestanzt und unter die gestempelten Worte geklebt. Auch die Baby-Stanze kommt im Set mit der Bodystanze.

I've used a white gel marker to add some stitches around the onesie - something I also did on the front. The washing instructions are generated with my homeprinter.
To be able to add a gift voucher - for the picture I've once again used that old and already used up one that I've used already several times for that purpose - I've die cut two half circles into the pink layer of the inside. 
The saying means congratulations to the birth of your baby. I've stamped the first part with dark red ink and glued a from white cardstock die cut word baby under it.


Und hier seht Ihr, warum meine Karte nicht flach zusasmmengefaltet werden durfte - es mussten ein paar pinkfarbene Babysocken hineinpassen. 0,5 cm waren fast ein bisschen knapp, da die Söckchen doch recht dick waren, aber es ging gerade noch.
Und falls Ihr Euch wundert - ja, ich habe das Motiv dann noch getauscht, bzw tauschen müssen.

And here you see why the card shouldn't fold flat - a pair of pink baby socks were meant to go into it. 0,5 cm were pretty tight since the socks were thicker than I've thought, but it worked.
And in case you're wondering - yes, I've changed the image - or had to change it.


Das Pilzmotiv war meinem Gatten doch glatt nicht genug "Baby". Also habe ich sie entfernt und durch diesen süßen Hasen auf der Wolke von Mama Elephant ersetzt. Auch dieses Motiv habe ich mit Copics coloriert, die Wolke ist mit klarem Wink of Stella überzogen.
Und weil ich schon am Ändern war, habe ich hier noch ein gebogenes Willkommen mit dunkelroter Tinte an den Kreis heran gestempelt.

According to my husband the mushroom image wasn't "baby" enough. So I've taken it off and replaced ith with this cute bunny sleeping on a cloud by Mama Elephant. Also this one was colored with Copics and I've covered the cloud with clear Wink of Stella.
And while I was doing changes I've also added a welcome, stamped with dark red ink, bending the word to make the shape match the circle.


Dienstag, 23. Juni 2020

Holy smokes!


 Hallo Ihr Lieben!
Für diese Karte, die ich heute auf dem Stamping-Fairies Blog zeige, bin ich auch mal auf den Slimline-Wagen aufgesprungen. Die sind ja derzeit total trendy - und für meine Karte hier passte das Format perfekt, brauchte ich doch Platz in die Höhe!

Hello everyone!
For this card, that I'm sharing over at the Stamping-Fairies Blog today, I've jumped onto the slimeline wagon. A lot of crafter are making this size of card at the moment - and for this card it was perfect since I needed the height of them. 

Bereits letzte Woche hatte ich ja meine "einmal pro Monat ein altes Stempelset verwenden" Vorsatz umgesetzt. Hier steigere ich das ganze nochmal, denn mir kam auch noch die Idee für diese Karte. Um Euch die einzelnen Bereiche besser zeigen zu können, habe ich drei einzelne Fotos gemacht.

Last week I've already done my "use an old stamp once a month" challenge. Here I am doing it again, using even more older stuff. The idea just popped up in my mind. 
To better show you the different parts of this card I've diveded it into three pictures.


Für den Hintergrund habe ich Distress Oxide Fossilized Amber, Worn Lipstick und Blueprint Sketch verblendet und anschließend mit Wasser besprenkelt. 
Der geniale Vulkan kommt sogar mit passendem Slidermechanismus und Feuer, ich habe ihn hier aber so eingesetzt. Es ist der Volcano von MFT. Ich habe den Vulkan selbst aus weißem Cardstock gestanzt und mit Copics coloriert. Die herablaufende Lava ist aus orangefarbenem Cardstock gestanzt und mit Distress Ink Candied Apple schattiert. 
Die Wolken sind aus grauem Cardstock gestanzt und mit Distress Oxide Hickory Smoke stellenweise abgedunkelt. 
Vor den Vulkan habe ich einen Dschungel gepflanzt. Dafür habe ich wirklich wahllos durch alle Marken Blätter aus drei verschiedenen Grüntönen von Cardstock gestanzt, ebenfalls mit Distress Ink - hier Peeled Paint, Mowed Lawn und ein wenig Gathered Twigs - schattiert und in mehreren Lagen übereinander an den Fuß des Vulkans geklebt.

For the background I've blended Distress Oxide Fossilized Amber, Worn Lipstick and Blueprint Sketch and sprinkled some water drops onto the blended colors.
This great volcano even comes with a slider and fire but here I've just used it as a die cut. This is made with the Volcano die by MFT. I've die cut the volcano from white cardstock and colored it with Copics. The lava is cut from orange cardstock and shaded with some Distress Ink Candied Apple. The clouds were cut from grey cardstock and some areas are shaded with Distress Oxide Hickory Smoke. 
In front of the volcano I've planted a jungle. I've picked different leave dies from all kind of brands and cut them from three different greens of cardstock. Then I've shaded them a bit again - here using Distress Ink Peeled Paint, Mowed Lawn and a hint of Gathered Twigs - then stacked them at the bottom of the volcano.


Vor den Dschungel kam eine Lage grünen Cardstocks. Ich habe hier den dunkelsten Cardstockton verwendet, die obere Kante mit dem Gras aus dem Mushroom Border Stanzenset von LawnFawn gestanzt und auch hier das Gras ein wenig schattiert. 
Darauf kamen drei mit der Tropical Backdrop Stanze von LawnFawn aus braunem und grünem Cardstock gestanzte und ein wenig mit Distress Ink schattierte Palmen und davor eine weitere Lage Gras. Hier habe ich den mittleren Grünton sowie eine der Grassy Hills Edges von MFT benutzt. Natürlich durfte auch hier ein wenig Schattierung nicht fehlen. 
Und dann kommt der süße Drachen, den ich unbedingt mit auf die Karte setzen wollte. Er sieht so erschrocken aus, als hätte er Angst, er hätte selbst den Vulkanausbruch verursacht. Er ist aus dem Dragons Stempelset von MFT und mit Copics coloriert. Ich wollte den Farbton annähernd an das Pink im Himmel anpassen. Naja, fast gelungen, nur ein wenig greller. Aber das schadet ihm gar nicht, finde ich. Die Flügel habe ich mit Stickles beglittert. Da ich noch ein paar ausgestanzte Blätter übrig hatte, habe ich die hinter den Drachen geklebt.

In front of the jungle I've added a layer of grass. I've used the darkest of my three green cardstocks here and the grass border from the Mushroom Border die set by LawnFawn. Then did some shading on the grass again.
On top I've planted three palms, made with the Tropical Backdrop die set by LawnFawn, cut from green and brown cardstock and again shaded with Distress Ink. Next I've added another layer of grass. This was cut from my mid-tone green with one of the Grassy Hills Edges by MFT - and again it's shaded.
Then there's this cute dragon that I really wanted to include in this card. He looks so puzzled - as if he's afraid to have anything to do with the volcano erupting. It's from the Dragons stamp set by MFT and colored with Copics. I've tried to make him match the pink in the sky. Well, I nearly made it. He just turned out a bit brighter but I think that fits him well. The wings are covered with Stickles. And since I had a few die cut leaves left I've place those behind him.


Eine Lage Gras, aus dem hellsten Grünton an Cardstock mit einer weiteren der Grassy Hills Edges gestanzt, gibt dem Drachen etwas zum Draufsitzen. Ja, schattiert habe ich es auch wieder.
Und dann durfte ein Text nicht fehlen. Ich konnte mich nicht zwischen "holy smokes" und "hey, hot stuff", beide aus dem Lava You Stempelset von MFT, entscheiden und habe einfach beide verwendet. Groß genug ist die Karte ja. Die Texte sind mit weißem Embossingpulver auf schwarzen Cardstock embosst. 
Das "hey, hot stuff" habe ich auf den oberen Teil der Karte geklebt.
Neben das "holy smokes" habe ich noch ein"you did it" aus dem You're Super Stempelset von MFT embosst, dann diesen Text bannerförmig zugeschnitten und auf die unterste/letzte Lage Gras geklebt.

Another layer of grass, cut from my lightest tone of green cardstock with another of the Grassy Hills Edges die set by MFT, give the little dragon something to sit on. Yes, I did some shading here once again. 
And then my card needed a text. I just couldn't decide between"holy smokes" and "hey, hot stuff", both from the Lava You stamp set by MFT, and then decided the card was large enough for both. They are white heat embossed onto black cardstock. The "hey, hot stuff" is glued to the top of the card.
Next to the "holy smokes" I've heat embossed a "you did it" from the You're Super stamp set by MFT, then cut this black cardstock into a banner shape and glued it onto the last layer of grass.


Samstag, 20. Juni 2020

Juni-Challenge bei Stampcorner


Hallo Ihr Lieben!
Heute startet die Juni-Challenge bei Stampcorner. Diesmal haben wir uns für das Thema Sommer entschieden. Und das passt doch perfekt - in nicht einmal einer Woche ist offizieller Sommeranfang. 

Hello everyone!
Today the june challenge over at Stampcorner is starting. For this month we've picked the theme of summer. I think it's perfect - official start of summer is just a little less than a week away.

Ich dachte mir, so ein Picknick ist da genau das richtige! Okay, es fällt ein wenig karg aus - es gibt nur Melone und selbstgemachte Limonade. ;)
Ich habe den Himmel mit Distress Oxide Tumbled Glass gewischt, der Rasen ist mit Copics per Hand gemacht. Zuvor habe ich das leicht angeschrägte Rechteckt mit einem blau-weßen Streifenmuster versehen und so die Picknickdecke gestaltet.

And I think a picnic  is just perfect for summer. Well, I know, there isn't much to choose from - there's only watermelon and homemade lemonade... ;)
I've added a soft layer of Distress Oxide Tumbled Glass to create the sky, the grass is drawn with Copics. Before I colored the grass I've added a white and blue striped pattern to a rectangle to create the picnic rug.


Jetzt ist ja eh schon nicht viel zu Essen im Angebot - und dann muss man es noch mit Ameisen teilen! Es sei ihnen vergönnt.
Ich habe aus gelbem Cardstock die Buchstaben smmer mit dem Alphabet Handlettering Lowercase (die größere Variante) ausgestanzt und aneinander geklebt. Das U habe ich durch eine Scheibe Wassermelone aus dem Happy Summer Stempelset von LawnFawn ersetzt, coloriert mit Copics. Der Krug und das Glas sind aus dem Make Lemonade Set, ebenfalls von LawnFawn. Diese beiden Motive habe ich hinter bzw. ans Ende des Wortes geklebt und dann alles auf die Picknickdecke gelegt. So wusste ich, wo ich die Ameisen stempeln musste. Ich habe sie erstmal nur auf die Picknickdecke ohne aufgeklebten Text gestempelt, dann kam der Text darauf und ich habe die Ameisen nochmal an die selbe Stelle gestempelt. So gibt es keine ausgesparten Stellen neben den erhöhten Bereichen an den Buchstaben. Wie gut, dass es inzwischen Stempeltools gibt, die das Stempeln an die selbe Stelle ganz einfach machen. 
Über die Melone habe ich dann noch ein happy gestempelt und die Melonenkerne mit einem schwarzen Glaze Pen von Sakura betont.
Ganz zum Schluss kamen noch ein paar klare Nuvo Drops mit goldenem Glitzer darin auf die Karte.

Well, there isn't much food to pick from - and then you have to share it with ants! Well, I guess I'm generous and share with them.
I've die cut the letters smmer from yellow cardstock using the Alphabet Handlettering Lowercase (the ones bigger in size) and attached them to each other. The u I've replaced with a slice of watermelon from the Happy Summer stamp set by LawnFawn, colored with Copics. The pitcher and the glass are from the Make Lemonade set, also by LawnFawn. I've glued those two images behind/to the end of the word and then put everything onto the blanket, not glueing it down yet. But know I knew where I needed to stamp the ants. I've first stamped them only onto the blanket, then glued the word down and stamped them again on top of the letters. With this I made sure not to have any white lines next to the letters where there is a difference in height. Lucky us stampers that there are stamping tools that make stamping at the same spot really easy. 
Above the melon I've stamped a happy and used a black Glaze Pen by Sakura to highlight the melon seeds.
In the end I've added a few clear Nuvo Drops with golden Glitter in them to the card.


Freitag, 19. Juni 2020

Spaß im Pool


Hallo Ihr Lieben!
Kennt Ihr das Stempelset Hitzefrei von Stampcorner? Darin sind vier süße Tiere im Schwimmring enthalten. Da es das Set derzeit als Gewinn bei der ersten Challenge in der Facebookgruppe gibt, dachte ich mir, ich zeige Euch mal ein wenig Inspiration damit. Und so ist diese Karte entstanden.

Hello everyone!
There's a cute stamp set by Stampcorner with four critters in their swim rings. Since the set is the price of the first challenge in their Facebook group I've decided to show some inspiration with it. And that's how this card came together.

Ich habe hier Designpapier verwendet, das mich an eine Wasseroberfläche erinnert hat. Um die Optik eines Pools zu erhalten, habe ich außenherum einen Rahmen aus weißem Cardstock geklebt, den ich in regelmäßigen Abständen unterteilt und ein wenig schattiert habe. Nun sieht er aus wie gekachelt.
Der Text "im Pool ist noch Platz" ist größtenteils mit dem Dymo geschrieben. Das P und L habe ich mit dem Impact Alphabet von MFT gestanzt - einmal aus türkisfarbenem, einmal aus schwarzem Cardstock und dann die Buchstaben ein wenig versetzt aufeinander geklebt. So ist zwischen dem helltürkisfarbenen Hintergrund und den Buchstaben mehr Kontrast. Die beiden O im Wort Pool habe ich durch zwei der süßen Tiere ersetzt.
Am P habe ich noch ein paar Blumen sowie eine Ranke, neben dem L einen Wasserball, alle aus dem Sunshine and Friendship Stempelset von MFT, aufgeklebt.

Here I've used designer's paper that reminded me of a water surface. To get the look of a pool I've glued a white frame around the edge of my designer's paper and handdrew a few lines, shading the areas in between. Now it looks like tiled.
The saying means "there's still room in the pool". Most of it was written with my Dymo. The P and L are die cut with the Impact Alphabet die set by MFT - once from turquoise and once from black cardstock. I've glued them on top of each other just slightly off. Now there's enough contrast between the light turquoise background and the letters. The two Os in the word pool are exchanged with two of the cute animals.
To the P I've added a few flowers and leaves, next to the L I've glued a waterball, all from the Sunshine and Friendship stamp set by MFT.


Und hier könnt Ihr die beiden Tiere besser sehen. Ich habe mich für die Schildkröte und den Bär entschieden und mit Copics coloriert. Einige von Euch kennen sicher noch die Stoff-Bademützenmit dem weißen Streifen in der Mitte. Ich musste die als Kind im Schwimmbad noch tragen. Die waren aber allemal besser als die fiesen Dinger aus Gummi. Also habe ich sie auch den beiden Tierchen gegönnt.

And here you get a better look at the animals. I went with the turtle and the bear and colored them with Copics.

Und falls Ihr den Tab am oberen Rand der Karte schon entdeckt habt, dann könnt Ihr Euch schon denken, dass dies eine interaktive Karte ist. Ihr habt recht.

In case you've spyed the tab at the top edge of the card then you've probably guessed already that this is an interactive card. And you're right.


Ich wollte die beiden sanft auf dem Wasser schaukeln lassen. Der Mechanismus ist mit der Meet in the Middle Stanze von MFT gemacht. Ich hatte zuerst viel zu kompliziert und mit einer anderen Stanze geplant, dann aber beim Herausnehmen der Stanzen das falsche Set erwischt - und dann ging es ganz einfach.

I wanted those two to float on the water. For the mechanism I've used the Meet in the Middle die set by MFT. First I was thinking way to complicated, planning this with different dies but grabbed the "wrong" die set out of my drawer - and then it was really easy.


Donnerstag, 18. Juni 2020

Eine Wasserfallkarte


Hallo Ihr Lieben!
Bei dieser Karte, die ich heute auf dem Stampcorner Blog zeige, habe ich mal keinen Stampcorner-Eigendesign-Stempel verwendet. Stattdessen kam endlich das A Bug Deal Stempelset von LawnFawn zum Einsatz. Das hatte ich mir gleich bei Erscheinen im Februar gekauft, denn ich finde es klasse. Aber immer, wenn ich es verwenden wollte, fehlte mir die zündende Idee und ich habe doch zu einem anderen Stempelset gegriffen. Jetzt ist es zum Glück so, dass LawnFawn immer ein paar Sketche zu jedem Stempelset mit veröffentlicht. Und einen davon habe ich jetzt einfach umgesetzt. So ist diese Waterfall Card entstanden. Und die würde auch perfekt zu unserer aktuellen Sommer-Challenge passen, fällt mir gerade so auf.

Hello everyone!
For this card, that I'm sharing over at the Stampcorner Blog today, I didn't use one of their own stamps. Instead I've findally used the A Bug Deal stamp set by LawnFawn.  I've bought it right after it was release back in february because I just love it. But whenever I had plans to use it I just couldn't come up with a card design and so I've used something else instead. Luckily LawnFawn is always posting some kind of sketches for each stamp set they release. So I've simply used one of those - and ended up with this waterfall card.


Für den Wasserfall-Mechanismus habe ich die Flippin' Awesome Stanze von LawnFawn verwendet. Ich habe hier wohl irgendwie die Stanzensets durcheinander gebracht, denn mein Cover für den Tab ist irgendwie größer und stammt wohl aus dem Magic Picture Changer Set. Aber das macht doch gar nichts. 

For the waterfall mechanism I've used the Flippin' Awesome die set by LawnFawn. Seems like I've mixed up two of my interactive die sets because the pull tab cover is too large. It seems to be the one from the Magic Picture Changer set. But I don't think that's a problem here.


Für den Hintergrund habe ich einen Bogen aus dem 6" x 6" Dandy Day Paperpad verwendet. Darauf habe ich ein paar kleine Wolken, Löwenzähne und etwas Gras aufgeklebt. Und wiederum darauf dann den schwarz und weiß gematteten Waterfall Mechanismus.

For the background I've used a sheet from the 6" x 6" Dandy Day paper pad. I've glued a few clouds, some lion heads and grass onto it and then the black and white mattet waterfall mechanism. 


Außerdem habe ich hier den Ast vom ersten Waterfall-Bild seitlich fortgeführt. Der passt von der Position zwar nur zum ersten Bild, das ganze war für mich aber so stimmiger.

I've also added a branch  to the left side. It's position only fits the first picture of the waterfall mechanism but the cut off branch just looked odd to me.


Hier habe ich die vier Bilder, die auf dem Waterfall Mechanismus nacheinander zu sehen sind, mal zusammengesetzt. Es zeigt quasi die Verwandlung von der Raupe zum Schmetterling. Die Motive habe ich wieder mit Copic coloriert. Den Ast mit E47, E44, E43 und E42, die Blätter mit G46, YG17, YG25 und YG03. Für den Himmel habe ich BG05, BG02, BG01 und BG000 benutzt, die Raupe und Schmetterling sind mit Y15, Y13, YG21 und Y11 coloriert. Ich habe hier sowohl auf die Raupe als auch auf den Schmetterling blaue Punkte gemacht - so kann man die Verbindung zwischen Raupe und Schmetterling auch hier sehen. Bleibt noch die Schmetterlingspuppe. Hiefür habe ich E37, E35, E31 und E30 benutzt. Die leere Puppe auf dem letzten Bild habe ich ohne E37 coloriert und anschließend mit BG000 übermalt, so dass sie halb durchsichtig wirkt.

Here I've put together the four pictures that are included in the waterfall. They show the change from a caterpillar to a butterfly. Again I've colored the images with Copics. For the branche I've used E47, E44, E43 and E42, for the leaves G46, YG17, YG25 and YG03. The sky is made with BG05, BG02 BG01 and BG000, the caterpillars and butterfly with Y15, Y13, YG21 and Y11. I've added some blue dots to both the caterpillars and the butterfly so you can see that it's the same animal, just in a different form. The cocoon is left - I went with E37, E35, E31 and E30 here. With the empty cocoon I've left out the E37 and covered it with some BG000 afterwards to make it look kind of transparent.


Das große Teil, das beim Ziehen zum Vorschein kommt, habe ich mit einem weiteren Papier aus dem Dandy Day Paper Pad beklebt. Darauf habe ich einen Text gestempelt. Der ist aus dem - inzwischen leider nicht mehr erhältlichen - Stempelset The greatest Show von MFT, aber er passte hier einfach zu perfekt. Dann habe ich hier noch eine Pusteblume aus dem Stempelset Dandy Day aufgestempelt. Ich habe dabei das "meant" abgedeckt und den Stängel der Pusteblume etwas verlängert. Die Samen habe ich mit einem weißen Gelmarker nachgemalt und zwar so, dass man die schwarzen Stempellinien trotzdem noch erkennen kann. Das gefiel mir für die Pusteblume einfach besser.

The big area that appears when the tab is pulled is covered with another paper from the Dandy Day paper pad. Then I've stamped a saying onto it. It is from the - sadly now retired - stamp set The greatest Show by MFT, but it was just perfect for my card.Then I've added a lionhead here. I've covered the "meant" and made the stem of the flower a bit longer. With a white gel marker I've re-drawn the seeds, making sure the black lines are still showing through.


Mittwoch, 17. Juni 2020

Es gibt immer wieder ein Morgen!


Hallo Ihr Lieben!
Heute zeige ich Euch ein Mini-Kärtchen in Aquarelloptik. Der tolle Baum mit Vogelhaus bot sich geradezu für Aquarellfarben an.

Hello everyone!
Today I am sharing a mini card in watercolors. The great tree with bird house by JM Creation just is perfect for watercolors.

Ich habe hier eine quadratische Grundkarte aus blauem Cardstock geschnitten, darauf kam eine der neuen Briefmarken. Im Set sind Rechtecke und Quadrate enthalten. Ihr könnt es vielleicht unten an den gestickten Linien sehen - ich habe hier durch Partial Die Cutting aus dem größten Rechteck ein Quadrat gestanzt. Das im Set enthaltene Quadrat war einfach einen Ticken zu klein, also habe ich mir so beholfen.
Passend zum so gestalteten Quadrat habe ich dann aus Aquarellpapier eines der Stitched Quadrate ausgestanzt. Darauf habe ich dann den Baum mit dem Vogelhaus abgestempelt und coloriert. Ich habe eine Mischung aus ZIG Clean Color Real Brush und den günstigen Markern von Action verwendet. Manche Farbtöne gefallen mir da echt besser. 
Das tolle an diesem Motiv ist, dass man die Blätter nicht unbedingt einzeln colorieren muss. Kleine "Blattwolken" gehen da genauso toll. Außerdem habe ich mit einem pinkfarbenem Marker noch ein paar Blüten zwischen die Blätter getupft.
Der Text ist mit blauer Tinte unten rechts auf das Mini-Kärtchen gestempelt. 
Zuerst hatte ich überlegt, noch weitere Deko wie eine Schleife oder so anzubringen, aber ich denke, so wirkt das zarte Motiv am besten. Weniger ist eben manchmal mehr.

I've cut a square card base from blue cardstock, then added a die cut stamp on top. It's a set of stamps in different sizes, containing as well squares as rectangles. Maybe you can tell from the stitched lines at the bottom that I've used a larger rectangle one to make  a square in the size needed. The largest square one was just a tad bit too small for my card so I did some partial die cutting here.
Then I've used a stitched square die  to die cut a square from watercolor paper and stamped the great tree with birdhouse on top. It's colored with a mix of ZIG Clean Color Real Brush and some cheap watercolor markers by Action. I just like some of their color tones better.
The great about this image that you don't necessarily have to color each individual leave - little "clouds of leaves" work as well. I've also used a pink marker to add some pink blossoms inbetween the leaves.
The saying means "there'll always be a tomorrow". I've stamped it with blue ink onto the bottom right of the watercolor paper.
First I had plans to add more decorations like some ribbon but then I've decided that the soft touch of the images goes best with plain. So, less is more here.


Dienstag, 16. Juni 2020

You whaled it!


Hallo Ihr Lieben!
Es gibt jeden Monat so viele tolle neue Stempel und Stanzen, die man/frau natürlich unbedingt haben muss. Dabei sind die Schränke voll. Also habe ich mir vorgenommen, mindestens einmal jeden Monat einen älteren Stempel oder eine ältere Stanze zu verwenden, natürlich gerne kombiniert mit neuerem. So eine Karte zeige ich heute auf dem Stamping-Fairies Blog.

Hello everyone!
Each month there are so many new stamps and dies we crafters need and buy - even when our drawers are full. So I've decided to use an older stamp/die at least once each month, of course combining with newer items is always good. A card with an older stamp is what I'm sharing over at the Stamping-Fairies Blog today. 

In den Tiefen meines Papiervorrates habe ich dieses türkisfarbene Designpapier mit Sternen gefunden - von wem auch immer das ist/war. Aber hier passte es perfekt als Hintergrund!

I found this turquoise designer's paper with a stars pattern in my - seemingly - endless stash of paper. I have no idea anymore who it is from but it's just the perfect background for this card.


Und hier ist der "alte" Stempel: ein dicker Wal aus dem Friends with Fins Stempelset von MFT. Ich habe die Fontäne - okay, sie ist vielleicht ein wenig mickrig - auf den Kopf montiert, das Motiv mit Copics coloriert und ausgeschnitten. 
Der Regenbogen ist dann schon wieder (fast) nagelneu - es ist der Rainbow Whimsy aus dem Mai-Release von MFT. Ich habe ihn aus verschiedenen Cardstockfarben ausgestanzt und die dann mit Copics noch ein wenig schattiert. Außerdem habe ich mit einem weißen Gelmarker ein paar Glitzer-Highlights gesetzt. Dann habe ich ihn auf den Sternenhintergrund geklebt und noch ein paar der Cute Cloud Outline Wolken hinzugefügt. 
Als nächtes habe ich türkisfarbenen Cardstock quer über die Karte geklebt, dessen oberen Rand ich mit der Wellenstanze aus dem Wiper Card Components Stanzenset von MFT gestanzt habe. Mit hellblauer Tinte habe ich noch ein paar kleine Fische aus demselben Stempelset gestempelt. Sie sind nur leicht erkennbar, aber genau das wollte ich hier. Vor diesen Cardstock, nach links versetzt, kam der Wal.
Die nächste Lage bildet dann ein Streifen aus Vellum, ebenfalls mit der Wellenstanze gestanzt und versetzt auf die türkisfarbenen Wellen aufgebracht. Da man bei Vellum den Kleber ja immer durchsieht, habe ich einfach die Enden des Streifens um die seitlichen Kanten nach hinten geknickt und auf der Rückseite des Hintergrunds festgeklebt.
Nun fehlte nur noch ein Text. Ich konnte mich nicht zwischen den beiden hier verwendeten entscheiden, also habe ich beide benutzt. Auch sie sind aus dem Friends with Fins Stempelset. Ich habe sie mit weißem Embossingpulver auf schwarzen Cardstock embosst, zugeschnitten und einen rechts auf den Regenbogen, den anderen unten rechts auf das Vellum geklebt.
Ganz zum Schluss kamen noch ein paar weiße Highlights als Schaumkronen auf die Wellenspitzen.

And here's the "old" stamp: a thick whale from the Friends with Fins stamp set by MFT. I've stamped the fontaine - okay, it is a really small one - onto its head, colored the image with Copics and cut it out.
The rainbow on the other hand is (nearly) brand new - it's the Rainbow Whimsy die from the may release by MFT. I've die cut it from different colors of cardstock and also added some shading with Copics. I've also used a white gel marker to draw a few highlights, wanting to create the look of a glittering rainbow here. Then I've glued the rainbow onto the designer's paper and added a few Cute Cloud Outline clouds.
Next I've glued a strip of turquoise cardstock across the card, the top edge was cut into a wave shape using the wave border die from the Wiper Card Components die set by MFT. With light blue ink I've stamped a few small fish from the same stamp set onto this layer. They are barely visible but that's exactly what I wanted. Onto this cardstock, put a little to the left, I've added the whale.
The next layer is made from a strip of vellum, also cut into a wave shape with the same wave border die. When putting it onto the card I've made sure that the peaks and valleys of the waves don't go on top of each other. Since you'll always see glue through the vellum I've simply folded the ends of this vellum strip over and glued them to the back of the designer's paper. 
Now all that was missing was a text. I couldn't decide between those two used here so I've simply used both. The are white heat embossed onto black cardstock. One is attached onto the top right of the rainbow, the other one to the right side of the vellum. 
In the end I've used a white gel marker to add a few highlights as foam onto the peaks of the waves.


Samstag, 13. Juni 2020

Stempeleinmaleins - Ausgabe vom 13. Juni 2020


Hallo Ihr Lieben!
Es ist wieder Stempeleinmaleins-Zeit! Heute haben wir für Euch eine Fancy Fold Card. Ja, so werden so einige Karten genannt, auf der anderen Seite ist es echt schwer, immer wieder neue Namen zu finden. So ist das hier eben eine Unterart der Gattung Fancy Fold. ;)

Hello everyone!
It's time again for Stempeleinmaleins! Today we're showing you a Fancy Fold Card. I know, there are quite a lot of cards with this name, but it's really hard to come up with a name sometimes. So this is one kind of all those Fancy Fold Cards out there. ;) 

Wie man oben schon erkennen kann, besteht diese hier aus verschiedenen Lagen. Ich habe die Grundkarte aus weißem Cardstock gearbeitet, alle Bereiche schwarz gemattet und darauf weißen Cardstock geklebt, auf den ich zuvor mit grauer Tinte das Kästchenmuster gestempelt habe. 
Als Deko habe ich mich für den Stift aus dem You Color my World Stempelset von LawnFawn entschieden. Ich wollte gerne ein Motiv, das sich über alle Lagen hinwegzieht, da fand ich die Idee mit dem Stift ganz gut. Die Stifte sind in Regenbogenfarben coloriert, ausgeschnitten und dann versetzt an den unteren Rand der Karte geklebt. Über die Stifte habe ich dann in der jeweiligen Farbe Striche gemalt und auch jeweils ein Enamel Accent in der entsprechenden Farbe aufgeklebt.
Geschlossen gehalten wird die Karte durch einen Sleeve.

As you can see on the picture above this card has different layers. I've made the card base from white cardstock, then matted all the areas black and glued some white cardstock on top of the matting. Onto the white cardstock I've stamped the grid lines with grey ink.
For decorations I went with the crayon image from the You Color my World stamp set by LawnFawn. I wanted an image that goes over all the pages and so I liked the idea with the crayon. They are colored in rainbow colors, cut out and glued to the bottom edge of the card, variing a bit in height. Above the crayons I's colored lines in the color of the pen and also glued a matching Enamel Accent next to each.
A sleeve holds the card closed.


Den Sleeve habe ich aus schwarzem Cardstock gemacht und die Vorderseite mit einem Stück weißen Cardstocks beklebt. Darauf habe ich zuerst das Wort COLOR in Regenbogenfarben aus mit dem Wild Boys Solid Stanzenset von Yvonne Creations gestanzten Buchstaben aufgeklebt. Die Highlights sind mit einem weißen Gelmarker gemacht, daneben kam noch ein pinkfarbenes Herz. Dann habe ich die restlichen Worte aufgestempelt. Ich habe dafür einen weiteren Stempel aus dem You Color my World Stempelset benutzt, das Color im Text nicht und den Rest versetzt gestempelt. 
Per Hand habe ich einen orangefarbenen Rahmen dazugemalt und hier ein paar klare Glitzersteine aufgeklebt.

I've cut the sleeve from black cardstock and glued a piece of white cardstock to the front. Then I've glued the word COLOR onto this white cardstock. The letters were cut from cardstock in different colors using the Wild Boys Solid die set by Yvonne Creations. The highlights were added with a white gel marker. I've also glued a pink heart next to the word. Then I've stamped the rest of the text onto the sleeve. I've used a saying that also comes in the You Color my World stamp set, replaced the word color in it with the die cut letters and changed the arrangement of the rest of the words while stamping them. 
I've added an orange frame here, drawn by hand, and also a few clear rhinestones.


Klappt man die schmale Lage links zur Seite, sieht meine Karte so aus. Ich habe sichergestellt, dass die Stifte immer in Regenbogenverlauf aufgeklebt sind, egal welche Lagenkombination zu sehen ist. Die Enamel Accents auf der hier mittleren Lage haben übrigens keine weiße Mitte, da hat sich das Licht so stark drin gespiegelt.

When you open the thin part on the left my card looks like this. I've made sure that the crayons are always in an rainbow order, no matter which combination of layers you're seeing. 
The  Enamel Accents on the middle layer here don't have a white center, they were reflecting the light there pretty badly.


Und das ist die komplett geöffnete Karte.

And this is card completly opened.


Auf den weißen Cardstock im größten Bereich habe ich keine Linien aufgestempelt, sondern ihn weiß gelassen. 
In den oberen Bereich habe ich noch einen Gruß aufgestempelt. Das thanks ist aus dem Big Scripty Words Stempelset von LawnFawn, der kleine Text darunter aus dem Reveal Wheel Friends and Family Sentiments Set. Das thanks ist mit türkisblauer Tinte aufgestempelt.
Im Stempelset mit den Kreiden ist auch ein kleines Gesicht enthalten, das genau in den ovalen Bereich auf den Stiften passt. Ich hatte überlegt, das in alle Stifte zu stempeln, habe ich mich dann aber dagegen entschieden. Das hätte die komplette Karte zu kindlich gemacht. Aber hier habe ich es dann zumindest einmal in den gelben Stift gestempelt. So finde ich, ist es ein süßes kleines Detail.

I didn't stamp the grid lines onto the white cardstock on the biggest part of the card but left it white. Onto the upper area I've stamped a greeting. The thanks is from the Big Scripty Words stamp set by LawnFawn, the small text under it from the Reveal Wheel Friends and Family Sentiments set. I've used turquoise ink for the thanks.
In the stapm set with the crayon there's included a little smiling face, that fits perfectly into the oval area on the crayons. I was thinking about stampig it onto all the crayons but then decided against it since I guess it would have made the card look to childish. But on that layer I've at least stamped it once onto the yellow crayon and I think that's a cute little touch here.


Freitag, 12. Juni 2020

Post für Dich!


Hallo Ihr Lieben!
Auf meiner Karte, die ich heute auf dem Stampcorner Blog zeige, gibt es mal eine Luftpost der anderen Art. Ein Brief, der an schillernden Luftballons befestigt angeschwebt kommt.

Hello everyone!
With this card, that I'm sharing over at the Stampcorner Blog today, I am bringing some different air mail to you. It's a letter that's comes flying to you hanging from a bunch of balloons.

Ich habe hier die Extraordinaire Rectangle Stencil von MFT benutzt und dann den inneren Bereich des weißen Cardstocks mit Distress Oxide Tumbled Glass und Broken China ganz dezent gewischt. 
Der Post für Dich Text ist schwarz auf einen Streifen weißen Cardstocks gestempelt, hellblau hinterlegt und unter das gewischte Rechteck geklebt.
Dann habe ich alles blau gemattet und auf einen weißen Kartenrohling geklebt.

I've used the Extraordinaire Rectangle stencil by MFT and inked the part within the rectangle a light blue using Distress Oxide Tumbled Glass and Broken China.
The saying means "mail for you". It's stamped with black ink onto a strip of white cardstock, matted blue and glued under the inked rectangle.
Then I've matted the background with blue cardstock and glued it onto a white note card.


Der Luftballon ist aus dem Stempelset Partytiere. Ich habe ihn fünf mal abgestempelt und mit Copics coloriert. Ich wollte, dass sie ein wenig wie Seifenblasen schillernd aussehen. Die Ballons sind mit V5, V1, V000, BG13, BG10, BG000 und ein klein wenig Y000 coloriert. Anschließend habe ich sie noch mit Glossy Accents überzogen.
Der Brief ist aus dem Stempelset Love Letters von LawnFawn. Er ist mit W5, W2, W1 und W00 coloriert, plus nochmal V5, V1 und V000 für das Herz. 
Die Wolke ist aus dem Stempelset Regenbogen - den Regenbogen habe ich einfach weggeschnitten. Hier habe ich C4, C1 und C00 zum Colorieren verwendet.
Hinten an jedem Ballon habe ich ein Stück silberne Schnur angeklebt, dann habe ich die Ballons mit 3D Tape hinter-/übereinander geklebt. Die Schnüre habe habe ich unten zusammenlaufen lassen und am unteren Ende dann den Brief angeklebt, ebenfalls mit 3D Tape. 
Die colorierte Wolke ist unter die Ballons geschoben. Zusätzlich habe ich noch die kleinste der Cute Cloud Outline Wolken von MFT aus weißem Cardstock gestanzt und Außenlinie und Innenteil separat voneinander auf die Karte geklebt.

I've stamped a balloon image five times and colored them with Copics. I wanted them to look a bit like soap bubbles. The balloons are colored with V5, V1, V000, BG13, BG10, BG000 and a hint of Y000. Then I've covered them with Glossy Accents.
The letter ist from the Love Letters stamp set by LawnFawn. It's colored with W5, W2, W1 and W000, plus V5, V1 and V000 again for the heart.
For the cloud I've used C4, C1 and C00.
I've attached a piece of silver string to the back of each balloon, thenglued the balloons on top of/next to each other using dimensionals. I've pulled the loose ends of the strings together and glued the letter onto those ends, using dimensionals again.
The colored cloud is stuck behind the balloons. I've also die cut the smallest of the Cute Cloud Outline clouds by MFT from white cardstock, separated the inside from the outside and added both pieces to the card.