Seiten

Donnerstag, 30. Juni 2022

Überraschung!

 
Hallo Ihr Lieben!
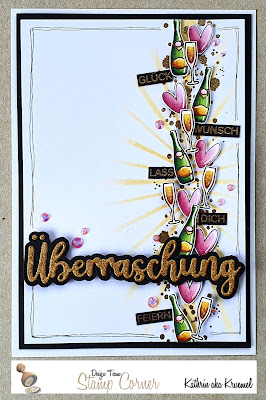
Ich finde, kleine Motive werden oftmals ein wenig unterschätzt. Deswegen zeige ich heute auf dem Stampcorner Blog diese Karte, auf der ich viele kleine Motive statt eines großen verwendet habe.
 
Hello everyone!
I think, those small images are sometimes underrated. So today I am sharing this card over at the Stampcorner Blog, where I used lots of small images instead a big one.
 
 Ich habe hier ein Stück weißen Cardstocks schwarz gemattet und auf einen weißen Kartenrohling geklebt. Auf der Karte ist viel weiß zu sehen, aber auch freier Platz ist ein wichtiges Designelement und auch wenn ich mir meist eher schwer tu, Stellen auf der Karte frei zu lassen, hier war es gar kein Problem.

I've matted a piece of white cardstock black and glued it onto a white card base. There's lots of white space on this card, but also white spaces are an important design element. And while most times I'm having a hard time to keep spaces empty, it really wasn't that hard with this card.


Auf der rechten Seite der Karte habe ich alle meine Motive als Streifen untereinander angeordnet. Auch wenn es viel aussieht, es sind eigentlich nur drei verschiedene Motive: die Sektflasche und das Sektglas aus dem Set Rente und dazu das Herz aus dem Set Fauli. Ich habe sie jeweils einige Male abgestempelt, mit Copics coloriert und auschgeschnitten. Dabei habe ich den Korken und die Schnörkel oberhalb der Sektflasche weggeschnitten.
Auf den weißen Carstock habe ich dann erst mit der Heavenly Glow Stencil von MFT und Distress Oxide Scattered Straw gelbe Strahlen nach links und rechts aufgewischt, darüber habe ich goldene Sprenkel gesetzt. Die sind mit den Sprenkeln, die neben dem Kleeblatt aus dem Glücksset gestempelt werden, mit goldenem Embossingpulver auf die Strahlen gestempelt.
Die einzelnen kleinen Motive sind mit dickem und dünnem 3D Tape auf den Cardstock geklebt. Darunter habe ich dann noch einige Texte aus dem Stempelset Kleine Worte, golden auf schmale Streifen schwarzen Cardstocks embosst, geschoben. Die Worte habe ich teilweise geteilt, damit sie nicht so lang sind und optisch besser zwischen die Motive passen.

On the right side of the card I've created a strip from all the little images. Even if it looks like a lot of work, I only used three different images actually: the champagne bottle, the champagne glass and heart. I stamped all of these several time, colored them with Copics and cut them out. While cutting the bottle out I've cut off the cork and the swirls coming out of it.
Onto the white cardstock I first inked some rays going to the left and right using the Heavenly Glow stencil by MFT and Distress Oxide Scattered Straw, then I golden heat embossed some speckles on top of them. 
I glued down the individual images using thin and thick foam tape.
Then I golden heat embossed some small texts meaning "congrats, let's celebrate you" onto thin strips of black cardstock and tucked those under the images. I cut them of the texts apart to make them narrower so they fit better between the images.


Hauptelement der Karte ist das gestanzte Überraschung, gemacht mit der Überraschung-Stanze aus dem Juni-Release. Ich habe es aus goldenem Glitzercardstock gestanzt und per Hand die schwarze Mattung dazu geschnitten. Dann habe ich beide Teile aufeinander und mit 3D Tape quer über die Karte geklebt. Das passte von der Breite her perfekt.
Ganz zum Schluss habe ich mit einem schwarzen Fineliner einen Rahmen um meinen Cardstock gemalt und noch einige pinkfarbene Glitzersteine verteilt.

Main element on my card is this die cut word suprise, made with the surprise die from Stampcorner's june release. I've die cut it from golden glitter cardstock and cut the matting by hand. I glued both pieces on top of each other and then onto my card, again using foam tape. The word with the matting was the perfect fit for the width of my card.
In the end I used a black fineliner to draw a frame all around my white cardstock and also added some pink rhinestones.

Mittwoch, 29. Juni 2022

Create a Smile Sketch Challenge

 
Hallo Ihr Lieben!
Es ist wieder soweit - die neue Create a Smile Challenge startet! Und nach dem Moodboard letztes Mal, gibt es für diese Challenge wieder einen Sketch für Euch:

Hello everyone!
It's time for the new Create a Smile Challenge to start! And after the moodboard we provided for you last time, we have a new sketch for this challenge:

Bei dem Sketch denkt man wohl als erstes an eine Szene mit Sonne. So ging es mir auch. Aber dann kam mir eine ganz andere Idee. Ich habe den Sketch auf den Kopf gestellt und so ist diese Karte entstanden:
 
Most will think of a szene with a sun at the first look at the sketch. I did, too. But then I had a different idea. I turned the sketch upside down and created this card:
 

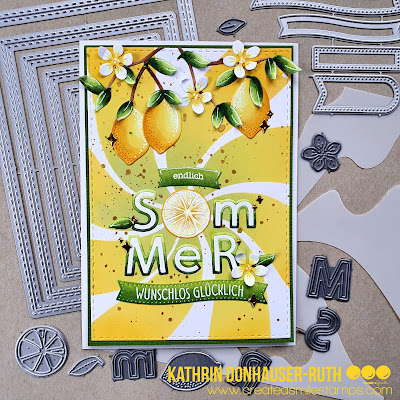
 Als erstes habe ich ein Stück weißen Cardstock genommen und mit der Wisp Stencil und Distress Oxide Twisted Citron, Squeezed Lemonade und Mustard Seed die geschwungenen Strahlen darauf gewischt. Ich hatte verschiedene der Formen des Stencils ausprobiert, dieser hier hat mir dann am besten gefallen, weil die Strahlen doch relativ nah beieinander gewischt werden können. Da mein Cardstockstück etwas größer war, als für die Karte gepasst hat, habe ich den weißen Cardstock dann mit einer der Double Stitched Rectangles Stanzen ausgestanzt.
Nach dem Wischen habe ich goldene Metallic Watercolor auf die Strahlen gespritzt, den Hintergrund grün gemattet und auf einen weißen Kartenrohling geklebt.

First I inked the curvy rays onto a piece of white cardstock, using the Wisp stencil and Distress Oxide Twisted Citron, Squeezed Lemonade and Mustard Seed. I had tried several of the different shapes of this stencil and liked this one better, since the rays can be put pretty close to each other. Since my cardstock was a bit too big for my card I used one of the Double Stitched Rectangle dies to cut it the size I needed it.
After I had finished the rays I spritzed some golden metallic watercolor on top of them, matted the cardstock green and glued it onto a white note card.


Dieser Teil der Karte mit dem Text war, was mich auf die Idee zu meiner Karte gebracht hat. Ich dachte mir, man könnte den Kreis auf dem Sketch auch als O eines Wortes verwenden. So kam ich auf das Wort Sommer, und Sommer und Zitronen passen ja gut zueinander. Ihr kennt das sicher - wenn man mal auf dem richtigen Weg ist, ergeben sich die Ideen wie von selbst.
Ich habe hier die Zitronenscheibe aus dem Lemon Numbers Stanzenset aus weißem Cardstock gestanzt und mit Copics coloriert.
Die Buchstaben sind mit den Cherry Uppercase und Cherry  Lowercase aus weißem Cardstock gestanzt. Den äußeren Rand habe ich mit Copics grün coloriert, unten dunkel und nach oben hin heller werdend.
Ich habe die Buchstaben rund um die Zitronenscheibe angeordnet und als Deko eine Blüte sowie zwei Blätter aufgeklebt. Die Blüte ist eigentlich eine Kirschblüte und aus dem Cherry Lowercase Stanzenset, aber ich finde, sie passt auch wunderbar zu den Zitronen. Das Blatt unter der Blüte ist aus dem Lemon Alphas Stanzenset, das kleine Blatt am S ist aus dem Cherry Uppercase Stanzenset. 
Über und unter dem Wort Sommer habe ich noch gestempelte Texte aufgebracht. Das kleine endlich ist aus dem Stempelset Endlich Frühling, der Text Wunschlos Glücklich ist aus dem Set Wunschkonzert. Ich habe die Texte jeweils mit weißem Embossingpulver auf kleine Banner aus weißem Cardstock, gemacht mit dem Useful Banners Stanzenset, aufembosst und dabei die Stempel so auf dem Acrylblock gebogen, dass sich die Texte an die Rundungen der Banner anpassen. Dann habe ich die Banner mit Distress Ink Twisted Citron, Mowed Lawn und Rustic Wilderness eingefärbt.
Zum Schluss habe ich noch ein paar "Glanzsterne" aufgeklebt. Dafür habe ich eine der Stanzen aus dem Bookmark Stanzenset und goldenen Spiegelcardstock verwendet. 

This area of the card is what got me started on my idea. I thought it would be a great idea, to use the circle drawn in the sketch as the letter o of a word. Then the german word for summer came to my mind, and summer and lemons go wonderfully together. I'm pretty sure you know those days - once you are on the right track the ideas come easily.
Here I used the lemon from the Lemon Numbers die set as the O, cut it from white cardstock and colored it with Copics.
The letters are made with the Cherry Uppercase and Cherry Lowercase die sets from white cardstock. Again I used my Copics to color the outer frames, dark at the bottom and light at the top.
I glued the letters down around the lemon and added a blossom and two leaves as decoration. The blossom is originally a cherry blossomo from the Cherry Lowercase die set, but I think, it also looks great with the lemons. The leave under the blossom is from the Lemon Alphas die set, the small leaf attached to the S is from the Cherry Uppercase die set.
I added two stamped texts above and under the word summer. The small one means "finally", the larger one means "perfectly happy". I white heat embossed both texts onto little banners, die cut from white cardstock with two of the Useful Banners dies, bending the stamps on my acrylic block so they match the form of the banners. Then I inked up the banners with Distress Ink Twisted Citron, Mowed Lawn and Rustic Wilderness.
In the end I added a few "light reflections". I used one of the dies from the Bookmark die set and golden mirror cardstock for those.


Oben auf der Karte habe ich dann weitere Zitronen, Blüten und Blätter aufgeklebt und einige Äste dazwischen gesetzt. Nun scheint es fast so, als säße man unter einem Zitronenbaum. 
Die ganzen Zitronen sind aus dem Stanzenset Lemon Alphas, die Zweige sind wieder aus dem Cherry Lowercase Stanzenset. Und sogar die Kirschstängel aus dem Cherry Uppercase Stanzenset kamen hier zum Einsatz. 
Alle Teile sind wieder aus weißem Cardstock gestannzt und mit Copics coloriert, die Highlights sind mit einem weißen Gelstift gemacht. Ich habe alles direkt auf den Strahlenhintergrund geklebt, die überstehenden Äste weggeschnitten - die Blüten und Blätter habe ich stehenlassen - und dann mit dem Finger die Spitzen der Blüten und Blätter ein wenig nach oben gebogen. Wenn ich schon kein 3D Tape verwende, sorge ich zumindest so für ein wenig Dimension.
Und an zwei der Zitronen habe ich weitere "Glanzsterne" angebracht.
 
To the top edge of the card I glued more lemons, blossoms and leaves and tucked a few twigs inbetween those. Now it kind of looks like you're sitting under a lemon tree.
The whole lemons are from the Lemon Alphas die set, the twigs again from the Cherry Lowercase set. And I even used the stems of the cherries from the Cherry Uppercase die set here.
Again I've die cut all pieces from white cardstock and colored them with Copics, the highlights are made with a white gel pen. I glued all the pieces onto the rays background, cut off the twigs hanging over the edge of the cardstock - I kept the overhang of the leaves and blossoms though - and then used my fingers to slightly bend up the tips of the leaves and blossoms. Since I didn't use foam tape here, I used this method to add a tiny bit of dimension.
And as a finishing touch I glued down more "reflections" to two of the lemons.
 

Montag, 27. Juni 2022

Noch ein Sneak auf das Juli-Release

 
Hallo Ihr Lieben!
Heute habe ich eine weitere Vorschau auf das Juli-Release von Stampcorner für Euch. Im Sommer mache ich ja gerne maritime Karten mit Meer, Wellen, Palmen und Strand. Aber da ich davon zur Zeit so einige gemacht habe, war mir mal nach etwas anderem. Deswegen ist meine Karte heute eher abstrakt-maritim. Ich finde, alleine die Farbkombi ist schon maritim, in Kombi mit dem Text und dem Motiv wirkt sie dann genau so, wie ich sie haben wollte.

Hello everyone!
Today I have another sneak of the july release by Stampcorner for you. I love to make beachy cards with the ocean, waves, palm trees and sand. But I've made quite a few of these lately and felt like I needed a change. So this card is some kind of abstract maritime. I think, just the color combo gives it a maritime feeling, in combined with the text and the image it turned out exactly how I had planned it.

Ich habe hier ein Stück weißen Cardstock türkisfarben gemattet und dann auf einen weißen Kartenrohling geklebt. 
Für den Hintergrund habe ich verschiedene Pinselstriche aus dem Stempelset Abstract Art von MFT verwendet und sie abwechselnd hell- und dunkeltürkis aufgestempelt. Da nur die Streifen ein wenig fad waren, habe ich außerdem noch einen der neuen Stencils verwendet. Ich habe mit einem Schwämmchen Versamark-Tinte durch einen Teil des Stencils auf den Hintergrund gewischt und dann Distress Glaze Salvaged Patina darüber gestreut und geschmolzen. Ich liebe den transparent-türkisfarbenen Look. Zuerst hatte ich überlegt, das Muster mit dem Glaze in Crackling Campfire zu machen, aber das war mir einfach zu intensiv. Stattdessen habe ich einige Spritzer mit einer roten Metallic-Watercolor aufgespritzt. 

I've matted a piece of white cardstock turquoise and then glued it onto a white note card.
For the background I used the different brush strokes from the Abstract Art stamp set by MFT and stamped them with light and dark turuqoise ink. Since only the strokes seemed a bit plain I used one of the new stencils from the july release. I used a little sponge daubber to put Versamark ink through the openings in the stencil, placing them just in the upper center of the card. Then I sprinkled Distress Glaze Salvaged Patina onto the ink and melted it with my heat tool. I love the translucent turquoise ink. I had thought about using Distress Glaze Crackling Campfire for the stenciled pattern but that was just too distracting. Instead I flicked some red metallic watercolor onto my background.


Die süße Robbe schaukelt mit einem kühlen Drinnk gemütlich in den Wellen. 
Sie ist mit Copics coloriert, für die Highlights habe ich einen weißen Gelstift verwendet. Außerdem habe ich die Gläser der Sonnenbrille mit Glossy Accents überzogen.
Der Text ist aus dem Stempelset Matrosen Freunde 1. Ich habe das Wort Meer durch eines aus gestanzten Buchstaben ersetzt und sie mit dem Henry's ABC Stanzenset von LawnFawn aus rotem Cardstock gestanzt und sie, ebenso wie das Motiv, mit 3D Tape auf den Hintergrund geklebt. Den Rest des Textes habe ich dann mit roter Tinte unter das Wort Meer gestempelt und dabei die Anordnung des Textes in einzeilig abgeändert. 
Als Deko habe ich noch einige rote Pailetten und kleine Herzen auf der Karte verteilt und damit das Muster des Stencils nochmal aufgegriffen. Außerdem habe ich mit einem türkisfarbenen Fineliner einen Rahmen um die Karte gemalt.

The cut seal is floating on the waves and enjoying a cool drink.
I've colored her in with Copics and used a white gel pen for the highlights. I also covered the glasses with some Glossy Accents. 
The text means "the ocean is a tub full of happiness". I've replaced the word ocean in the text with one made from die cut letters. I've die cut those from red cardstock using the Henry's ABC die by LawnFawn and glued them, just like the image, with foam tape onto the image. Then I stamped the rest of the text underneath.
To decorate my card I've glued down a few red sequins and small hearts, picking up the stenciled pattern again. And as the finishing touch I've drawn a frame around my card using a turquoise fineliner.

Sonntag, 26. Juni 2022

LawnFawnatics Challenge #127

 
Hallo Ihr Lieben!
Es gibt wieder eine neue LawnFawnatics Challenge - diesmal mit dem Thema Summertime Fun. 
Mein Vater ist vor einigen Jahren gestorben - aber einige meiner wertvollsten Erinnerungen an ihn haben mit Feuer zu tun. Er liebte Lagerfeuer, egal wo. Jedes Jahr haben wir den Urlaub auf einem Campingplatz in Italien verbracht. Es gab da diesen wilden Streifen zwischen den Stellplätzen und dem Strand. Dort haben wir jedes mal ein Lagerfeuer gemacht, und es gab immer einige Familien, die sich zu uns gesellt haben. Da saßen wir, haben Kartoffeln direkt im Feuer geröstet, die Sterne angeschaut und Lieder gesungen. Ich war auf dem Platz noch oft mit meinen eigenen Kindern, aber er hat seine Wildhaftigkeit verloren und offene Feuer sind auch nicht mehr erlaubt. Also konnte ich diese Erinnerung nicht mit meiner Kindern neu erleben. Da die Mäuse von LawnFawn aber schon die ein oder andere Kindheitserinnerung von mir nacherlebt haben, dürfen sie auch das Lagerfeuer nicht missen! Ich habe es hier direkt an den Strand verlegt und Palmen hatten wir auch keine, aber ein wenig künstlerische Freiheit darf ja sein.

Hello everyone!
There's a new LawnFawnatics Challenge - this time with the theme of Summertime Fun.
My father died a few years ago - but some of my fondest memories of him are related with campfires. He loved them, no matter where. Each year we went onto a campsite in Italy for our vacations. There was this wild area between the tends and the beach. Each year we've made a campfire there, and there were always several families joining us. We sat there, roasted potates directly in the fire, watched the stars and sang. I've been to said  campsite often with my own kids, but it has lost it wilderness and open fires aren't allowed anymore. So I wasn't able to give my kids the same experience. Well, the mice by LawnFawn already had to re-live several of my childhood memories, so they can not miss the campfire! I moved it to the beach and we also didn't have palm trees in Italy, but well, that's just the freedom of art, right?

Ich habe hier nur mit 3 Lagen gearbeitet und die mit dünnem 3D Tape aufeinander geklebt, so dass meine Szene relativ flach ist. 
Außenrum habe ich einen der Stitched Rectangle Frames, gestanzt aus schwarzem Cardstock, als Rahmen um die Szene geklebt.

I only did 3 different layers here and glued those on top of each other with thin foam tape, so this scene ended up pretty flat.
I glued one of the Stitched Rectangle Frames, die cut from black cardstock, down as the top layer to frame my scene in.


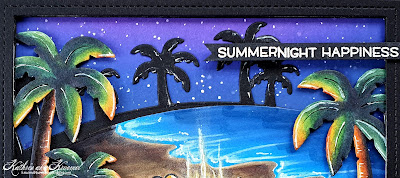
Im Hintergrund habe ich einen Nachthimmel mit Sternen gestaltet. Dafür habe ich Distress Oxide Wilted Violet, Blueprint Sketch und Chipped Sapphire auf einem Stück weißen Cardstocks verblendet und dann etwas weiße Acrylfarbe darauf verspritzt.
Davor kam eine Lage schwarzen Cardstocks, aus dem ich die Palm Tree Border von LawnFawn ausgestanzt habe. Die habe ich dann ein weiteres Mal aus weißem Cardstock gestanzt, die Palmen weggeschnitten und sie etwas schräg aufgeklebt. Darauf habe ich dann den Rest der Hintergrundszene mit Copics und Distress Oxide gestaltet.
Oben am rechten Rand der Karte war dann noch Platz für einen Text. Dafür habe ich Stempel aus den Sets Reveal Wheel Friends and Family Sentiments und dem Set Tiny Christmas kombiniert. Die Worte sind mit weißem Embossingpulver auf schwarzen Cardstock embosst. Die Schriftgröße des night ist ein klein wenig kleiner, aber ich finde, das fällt gar nicht wirklich auf.

In the background I created a night sky with stars. I inked up a  piece of white cardstock with Distress Oxide Wilted Violet, Blueprint Sketch and Chipped Sapphire. Then I spritzed some white acrylic paint onto it.
On top of the night sky I've glued a layer of black cardstock, from the top edge I have cut the Palm Tree Border by LawnFawn. I then cut that again from white cardstock, cut off the palm trees and glued it onto the black layer so some of the black is showing on the left. On that white cardstock I created the rest of my scene with Copics and Distress Oxide.
In the top right corner I've glued down the text for my card. I combined stamps from the set Reveal Wheel Friends and Family Sentiments and the Tiny Christmas stamp set.  I've white heat embossed them onto black cardstock. The night isn't as tall as the other two words - just a bit - but I really don't think someone would really notice.


Mit Distress Oxide Salty Ocean, Prize Ribbon und Chipped Sapphire habe ich das Meer auf den weißen Cardstock gewischt. Für die Wasserlinie habe ich mir einfach ein PostIt per Hand wellenförmig zugeschnitten. Da die Wasserfläche so ein wenig fad war, habe ich mit einem blau-grünen Copic an der rechten Kante noch etwas Struktur aufs Wasser gemalt.
Die weißen Linien auf dem Wasser habe ich mit einem weißen Gelstift gemacht, den ich teilweise mit dem Finger verwischt habe, so dass das Weiß nicht gar so krass wirkt.
Den Strand samt Mäusen und Lagerfeuer habe ich dann mit Copics gemalt. Dazu gleich mehr.
Oben auf habe ich dann den Tropical Backdrop geklebt. Den habe ich aus schwarzem Cardstock gestanzt, die Palmen und Gräser noch einmal aus weißem Cardstock und mit Copics coloriert. Diese Lage ist dann mit 3D Tape aufgeklebt.
Für die Sandhügel vor den Palmen habe ich die Beach Accents Stanzen verwendet, aus weißem Cardstock gestanzt und ebenfalls mit Copics coloriert. Vor die Mäuse habe ich mit schwarzer Tinte die Grasreihe aus dem Stempelset Chirpy Chirp Chirp aufgestempelt und dann die Sandhügel aufgeklebt. Darauf habe ich dann, an zwei Stellen durchgänging auf den Hintergrund, das Gras aus dem Set Dad and Me aufgestempelt.

I used Distress Oxide Salty Ocean, Prize Ribbon and Chipped Sapphire to create the ocean on the white cardstock. For the shore line I simply cut a PostIt Note by hand into a wavy shape. Since the water looked a bit too blue and plain I used a blue-green Copic to add some structure to the right side of the water. 
The white lines on the water are made with a white gel pen. I used my finger to smear the wet gel over the cardstock so the white wasn't too harsh a line.
The beach with the mice and campfire are made with Copics - more about that a little later.
I then glued the Tropical Backdrop on top. I've die cut it from black cardstock and also cut the individual palm trees from white cardstock. Then I colored them in with Copics and glued the whole frame down with foam tape.
For the sandy hills in front of the palm trees I used the Beach Accent dies, cut two pieces of white cardsdtock with them and then colored them with Copics again. I used black ink to stamp the grass row from the Chirpy Chirp Chirp stamp set in front of the mice and glued the hills down. 
Then I stamped some taller grass from the Dad and Me stamp set onto the hills, some of them overlapping with the beach layer underneath.


Und hier sind endlich die vier Mäuse mit ihrem Lagerfeuer. 
Die Mäuse sind aus den Sets Super Star, Bubbles of Joy, You Autumn Know und Crazy Antics, das Lagerfeuer aus dem Set S'More the Merrier. Ich habe die Motive mittels Masking übereinander gestempelt und dann ebenfalls mit Copics coloriert. Für das Feuer habe ich mich von einer Karte von Sandy Allnock inspirieren lassen. Sie zeigt dort super, wie sie das Feuer coloriert. 

And here are the four mice at the campfire.
The mice are from the sets Super Star, Bubbles of Joy, You Autumn Know and Crazy Antics, the campfire from the S'More the Merrier set. I did some masking to stamp the scene, then used my Copics again to color it in. For the fire I got inspired by a card by Sandy Allnock, where she shows  how she colors a campfire pretty easily. 

Samstag, 25. Juni 2022

Stempeleinmaleins - Ausgabe vom 25. Juni 2022


 Hallo Ihr Lieben!
Heute gibt es, wie jeden letzten Samstag im Monat, einen neuen Sketch beim Stempeleinmaleins. Und das ist meine Karte. Die ist schon im April entstanden, ich hatte die Sketche durcheinander gebracht. Wie gut, dass Blumen immer gehen, und die verbastle ich zur Zeit doch so gerne.

Hello everyone!
Today, just like every last saturday of a month, there's a new sketch at Stempeleinmaleins. And this is my card. Well, I made it back in april - I had mixed up the sketches. Luckily flowers are always in season - and I've been using those a lot lately.

Für meine Karte habe ich den Hintergrund foliert. Dafür habe ich die Diamonetta Hotfoil Plate von Spellbinders zweimal mit silberner Folie auf ein Stück weißen Cardstocks foliert. Den habe ich dann mit Distress Ink Salvaged Patina gewischt. Die Farbe ist im unteren Bereich etwas dunkler, im oberen heller aufgetragen. 
Über den Cardstock habe ich dann noch winzige Spritzer weißer Acrylfarbe verteilt.
Den folierten Cardstock habe ich dann dunkeltürkis gemattet und auf einen weißen Kartenrohling geklebt.

For my card I did some foiling on the background. I used the Diamonette Hot Foil Plate by Spellbinders to silver foil the pattern twice onto a piece of white cardstock. Then I inked it up with Distress Ink Salvaged Patina. I made it a bit darker at the bottom and lighter at the top of my cardstock.
Then I covered the cardstock with tiny speckles made from white acrylic paint.
I matted the foiled cardstock with some dark turquoise cardstock and then glued both layers onto a white note card.


Um die drei im Sketch dargestellten Rauten aus silberfarbenem Spiegelcardstock zu stanzen, habe ich eine der Stanzen aus dem Diamond Patterns Stanzenset von HoneybeeStamps verwendet.
Quer darüber  habe ich ein banner mit einem ausgestanzten "for you" gesetzt. Das Banner ist aus helltürkisfarbenem Cardstock gestanzt und dunkeltürkis hinterlegt. Außerdem habe ich hier zwei kleine Herzen mit aufgeklebt.
Die tollen Blumen sind aus dem Stempelset Cosmea von Create a Smile. Ich habe sie mit Copics und Polychromos in der No-Line Technik coloriert und mit einem weißen Gelstift einige Punkte als Highlights hinzugefügt. Cosmeen sind eine meiner Lieblingsblumenart und ich finde, sie dürfen auch mal türkis sein. Die Stängel habe ich im unteren Bereich frei Hand verlängert, so dass die Stiele bis komplett ans untere Ende der Karte reichen.

To cut the three diamonds included in the sketch from silver mirror cardstock I used one of the dies from the Diamond Pattern die set by HoneybeeStamps.
Across those diamonds I've placed a banner with a cut out "for you". The banner ist cut from light turquoise cardstock and matted with some dark turquoise. I also added two small hearts here.
The beautiful flowers are from the Cosmea stamp set by Create a Smile. I colored them in the no-line technique with Copics and Polychromos and added some dots with a white gel pen as highlights. Cosmeas are one of my favorite flowers and I think, they also look great in turquoise. I made the stems taller just freee hand so they would reach all the way down to the bottom of my card.


Um den Text zu ergänzen, habe ich einen Teil eines Stempels aus dem Set Occasional Labels von MamaElephant mit Salvaged Patina auf weißen Cardstock gestempelt und ausgeschnitten.
Das Wort Love ist mit der Love Ornament Stanze von HeroArts gemacht - den Kreis rundherum habe ich einfach weggeschnitten. Aber Form und Größe des Wortes passten hier einfach perfekt. Ich habe das Wort viermal aus weißem und einmal aus dunkeltürkisfarbenem Cardstock gestanzt und alle aufeinander geklebt.

To finish the text on my card I stamped part of one of the stamps from the Occasional Label stamp set by MamaElephant with Salvaged Patina ink onto some white cardstock and cut it out.
The word love is made with the Love Ornament die by HeroArts - I simply cut aways the circle around it. Size and style of this word just fit perfectly into the designated space. I've cut the word four times from white and once from dark turquoise cardstock and stacked them.


Und hier noch das fast schon obligatorische Bild aus einem anderen Winkel, um Euch den Schein der Folierung und des Spiegelcardstocks besser zeigen zu können.
Also Deko habe ich dann noch einige türkisfarbene, irisierende Steinchen auf meiner Karte verteilt.
Und hier könnt Ihr auch sehen, dass ich verschieden dicke 3D Tapes benutzt habe, um alle Elemente aufeinander und auf die Karte zu kleben.

And here's the picture taken at an angle, that I make nearly every time to show the shine of the foiling and the mirror cardstock better.
As embellishments I added a few turquoise iridescent rhinestones to my card.
And here you can also see that I used foam tape in different thicknesses to glue the elements of my card on top of each other and onto the card.

Freitag, 24. Juni 2022

Sneak auf das Juli-Release von Stampcorner

 
Hallo Ihr Lieben!
Das Juli-Release von Stampcorner steht in den Startlöchern. Und mit dieser Karte gebe ich Euch schon mal ein kleines Sneak. Ansonsten verrate ich nur: es wird sommerlich!

Hello everyone!
The july release by Stampcorner is only a few days away. And with this card I am giving you a little sneak onto one of the sets. All I can is: it's getting summer-ish!

Naja, bei Sommer denke ich natürlich zuerst an Sonnenschein und warmes Wetter. Und so habe ich einen sonnigen Starhlen-Hintergrund für meine Karte gestaltet.
Dafür habe ich einen Strahlenstencil von MFT - bei den Namen deren Sonnen-Stencils habe ich den Überblick verloren, denn ich habe so einige davon über die Zeit gesammelt - auf ein Stück weißen Cardstock gelegt und erst mit Distress Oxide Squeezed Lemonade die Strahlen aufgewischt. Dann habe ich den Stencil gedreht, so dass ich die nun weißen Strahlen mit Distress Oxide Mustard Seed einfärben konnte. Anschließend habe ich ihn ein weiteres Mal ein klein wenig gedreht, so dass ich beide bereits gewischte Strahlen jeweils etwa zur Mittig abgedeckt hatte, und habe dann noch Wild Honey darüber gewischt. Zum Schluss hatte ich noch feine weiße Linien, wohl dadurch, dass ich mit dem Schwämmchen nicht bis komplett an den Rand wischen konnte. Also habe ich nochmal Squeezed Lemonade verwendet und diese weißen Stellen ganz leicht eingefärbt. So entsteht kann man mit einem Stencil einen tollen Effekt erzielen.
Anschließend habe ich etwas goldene Metallic Watercolor sowie weiße Acrylfarbe auf den Hintergrund gespritzt.

Well, when I think of summer of course sunshine and warm temperatures come to my mind first. So I made a sunny rays background for my card.
I used one of the sunrays stencils by MFT - I really lost track of the individual names there because I collected quite a few of them over the years - and Distress Oxide Squeezed Lemonade to ink the rays onto a piece of white cardstock. Then I turned the stencil a bit to be able to fill in the white spaces between the rays and inked those with Distress Oxide Mustard Seed. I turned the stencil again, putting the opening about in the middle of the two already inked rays, and inked the cardstock again with Wild Honey. I ended up with a fine white strip between the rays, most likely because I didn't reach all the way to the edge with my blending foam. So I used the Squeezed Lemonade again to lightly fill in these white strips. This is a great way to create a wonderful effect with just one stencil.
Then I spritzed some golden metallic watercolor and some white acrylic paint onto my background.


Ist diese Robbe nicht zu goldig? Robbe und Text sind zwei individuelle Stempel aus einem der neuen Sets. Ich habe sie hier leicht überlappend aufeinander gestempelt und dann mit Copics coloriert. Die Details sind mit einem weißen Fineliner dazugemalt. Die Gläser der Sonnenbrille, die Wassertropfen und auch das Wort Sommer sind zudem mit Glossy Accents überzogen.
Ich habe das Motiv ausgeschnitten und mit 3D Tape auf einen Kreis, gestanzt aus dunkelblauem Cardstock, geklebt. Den habe ich dann mit einem etwas größeren Kreis aus goldenem Glittercardstock gemattet und alles wieder mit 3D Tape dort auf den Hintergrund geklebt, wo sich die Sonne befinden würde. 
Als Deko habe ich dann noch einige dunkelblaue Pailetten und Sternchen schräg über die Karte geklebt.

Isn't this seal one of the cutest ever? Seal and text are two individual stamps from one of the new sets. I stamped them down, making the letters of the word hello go slightly into the seal, and then colored them with Copics. For the details I used a white gel pen. I also covered the glasses, the droplets of water and the word summer with Glossy Accents.
I've cut the image out and glued it onto a circle, cut from dark blue cardstock, using foam tape. I then matted that circle with a slightly larger one cut from golden glitter cardstock and used foam tape again to glue everything onto the background, right in the spot where the sun would be. 
As decorations I added a few dark blue sequins and stars.

Donnerstag, 23. Juni 2022

Und noch mal zum Ruhestand

 
Hallo Ihr Lieben!
Ja, heute habe ich schon wieder eine Karte zum Ruhestand auf dem Stampcorner Blog zu zeigen! Von denen benötige ich momentan die ein oder andere. Außerdem war da ja noch dieser Textstempel aus dem Stempelset Rente, den ich eigentlich schon auf der bayrischen Karte mit Bierkrug verwenden wollte, auf die er aber einfach nicht gepasst hat. Aber weil ich den so genial finde, habe ich mir etwas anderes einfallen lassen. 

Hello everyone!
Yes, I have another retirement card, that I'm sharing over at the Stampcorner Blog today. I need quite a few of these at the moment. And there was also this text stamp, that I had planned to use on the bavarian style card with the beer mug and that it just didn't fit onto But I just love this one so much that I came up with a different idea to use it for.

Ich habe überlegt, welches Motiv zum Text passen würde - und kam auf den genialen Dino aus dem Stempelset WOW. Der war perfekt - auch wenn ich ihn hier ein wenig ergänzt habe. Und schon war die Idee zu dieser Karte geboren.
Für den Hintergrund habe ich mit der Tropical Leaves Background Stencil von LawnFawn und Distress Oxide Peeled Paint und Forest Moss die tropischen Blätter auf ein Stück kraftfarbenen Cardstock gewischt. Anschließend habe ich weiße Stempelfarbe, gemischt mit ein wenig Wasser, darüber gespritzt. Die weiße Stempelfarbe ist nicht so krass und ich wollte eher dezente Farbspritzer. 
Um den schmalen Rahmen zu stanzen, habe ich zwei der Deckle Frames Stanzen verwendet. Dabei habe ich sie bewusst gedreht, so dass die Ränder innen und außen nicht identisch gestanzt werden. Ich wollte für diese Karte einen etwas "gröberen" Look. Ich habe den Rahmen aus schwarzem Cardstock gestanzt und auf den inzwischen getrockneten Hintergrund geklebt.
Dann habe ich den Hintergrund schwarz gemattet und auf einen weißen Kartenrohling geklebt.
Als Boden habe ich die Slimline Tropical Leaves Border von LawnFawn und eine Grasstanze jeweils aus schwarzem Cardstock gestanzt. Mit einem weißen Gelstift habe ich einige Highlights auf die Blätterbordüre gemalt und sie auf den Hintergrund geklebt. Davor kam dann die Grasreihe. Die habe ich im oberen Bereich mit Distress Oxide Peeled Paint ein wenig gewischt. Außerdem habe ich hier einen "wir werden dich vermissen" Text aus dem Stempelset Eule mit weißem Embossingpulver aufembosst.

I thought about which image would go with this text, that means "retirment - a legend leaves the field" - and came across the great dinosaur from the WOW stamp set. I completed him a bit gor my design, but the idea for this card was born.
For the background I inked some tropical leaves with the Tropical Leaves Background stencils by LawnFawn and Distress Oxide Peeled Paint and Forest Moss onto a piece of craft colored cardstock. Then I spritzed some white ink, mixed with water, onto it. The white ink isn't that bright and I was after some more subtle speckles here.
To create the thin frame, I used two of the Deckle Frames dies. I turned them on purpose so the edges on the inside and outside aren't identical here because I wanted a more rustic look for this card. I've cut the frame from black cardstock and glued it onto the dried background.
Then I matted the background black and glued it onto a white note card.
As a ground I've die cut the Slimline Tropical Leaves Border die by LawnFawn and a grass border die both from black cardstock. I used a white gel pen for a few highlights on the leaves border and glued it onto the background. On top of it I've glued down the grass border. I have inked up its top edge with Distress Oxide Peeled Paint. I also white heat embossed a "we're going to miss you" text onto the strip of grass.


Und hier ist der geniale Text in Nahaufnahme. Ich wollte, dass es so aussieht, als hätte ihn jemand in eine Steintafel gemeißelt. Deswegen habe ich ihn mit Versafine Clair Morning Mist auf hellgrauen Cardstock gestempelt, per Hand ein unebenes Rechteck ausgeschnitten und darauf dann mit Copics einige Punkte als Struktur aufgetupft. Außerdem habe ich mit einem schwarzen Fineliner einige Risse in die Tafel gemalt.
Der Dino aus dem Set WOW sollte die Tafel halten. Äh ja, da ist aber nur der Kopf im Set.... Deswegen habe ich ein wenig getrickst. Den Rahmen um den Kopf habe ich weggeschnitten. Stattdessen habe ich ein schmales Dreieck als Hals hinter den Dino gesetzt. Der Schwanz ist der Schwanz sowie Rücken des Dino mit Kaffee - der passte perfekt! Und für die Hände - und Füße, die man hinter dem Gras aber nicht mehr sehen kann - habe ich die Hände/Flügelspitzen eines der Vögel aus dem Old Buzzard Stempelset von WhimsyStamps verwendet. Ich habe alle Teile mit Copics coloriert und an die "Finger" frei Hand ein paar Krallen gemalt - schon hatte der Dino Hände! Ich habe alle Teile hinter die Tafel und dann alles auf meine Karte geklebt. 
Als Deko durften dann noch ein paar grüne Pailetten auf die Karte hüpfen. 

And here's the great text in all its amazingness. I wanted it to look like someone chiseled it into a flat stone. So I stamped it onto some light grey ink with Versafine Clair Morning Mist, cut it out in a wonky rectangle and added some dots with Copics to give the stone some texture. I also added some cracks to it with a white fineliner.
The dinosaur from the WOW stamp set was asigned to hold the stone. Ah, but, there's only the head included in this set.... So I had to think a bit outside the box. I've cut off the frame around the dino image and put a tall triangle behind the head as the neck instead. For the tail I used the tail and back of the Dino mit Kaffee image - it was just the perfect fit! And for hands - and feet, but those aren't visible anymore behind the grass - I used the hands/tips of wings from one of the buzzard from the Old Buzzard stamp set by WhimisyStamps. I colored all pieces with Copics and drew some claws to the "fingers" - and the dino had some hands! I glued all dino pieces behind the stone and then onto the background.
To decorate the card I glued a few green sequins onto the card.

Montag, 20. Juni 2022

Juni-Challenge bei Stampcorner

 
Hallo Ihr Lieben!
Heute startet die Juni-Challenge bei Stampcorner. Seid Ihr auch absolut im Sommer-Modus und genießt die Sonne und das warme Wetter? Da ja der offizielle Sommeranfang vor der Tür steht, haben wir für diese Challenge das Thema Sommer gewählt.

Hello everyone!
Stampcorner's june challenge is starting today. Are you as much in a summer mood as I, enjoying the sun and the warm weather? Since it will be officially summer in just two days we picked the theme of summer for this challenge.

Okay, ich gebe zu, ganz so tropisch ist es bei uns natürlich nicht. Und auch das Meer habe ich nicht vor der Haustür - leider. Aber der kleine Gnom auf meiner Mini Slimline Card kann all das genießen. Und er tut es so sehr, dass er sogar fröhlich mit den Hüften schwingt - ich habe nämlich ein kleines interaktives Element auf der Karte versteckt:

Okay, I have to admit, it isn't that tropcial where I live. And I also don't have the ocean anywhere close by - sadly. But the little gnome on my mini slimline card is enjoying all that. And he's enjoying it so much that he even moves his hips - I've included a little interactive element on this card.


Ich habe hier mit der Heavenly Glow Stencil von MFT und Distress Oxide Dried Marigold und Scattered Straw die Sonnenstrahlen auf ein Stück hellblauen Cardstocks gewischt. Dann habe ich vom Rand her ein wenig Broken China aufgetragen, um die Ränder etwas abzudunkeln.
Für das Meer habe ich einfach einen Streifen türkisfarbenen Cardstocks zugeschnitten, mit einem weißen Gelstift ein paar Reflektionen aufgemalt und diesen Streifen auf den Sonnenhintergrund geklebt.
Für den Sand habe ich kraftfarbenen Cardstock zugeschnitten und mit den Sandy Beach Accents von LawnFawn die Sandhügel hineingestanzt. Dafür habe ich einfach verschiedene der kleinen Stanzen nahtlos in den Cardstock gestanzt. Dann habe ich braune und hellgoldene Metallic-Watercolor auf den Sand gespritzt, um ihm etwas Struktur zu verleihen. 
Der Text Chill Mal aus dem Stempelset Caramba ist direkt mit schwarzer Tinte auf den Himmel gestempelt.

I used the Heavenly Glow stencil by MFT and Distress Oxide Dried Marigold and Scattered Straw to ink the sun rays onto a piece of light blue cardstock. Then I darkened that blue cardstock a bit on the edges with Broken China.
For the ocean I've simply cut a strip from turquoise cardstock, added some reflections with a white gel pen and glued the strip onto the sky background.
For the sand I've cut a strip from some craft colored cardstock and die cut the sand hills into it using the Sandy Beach Accents dies by LawnFawn. I simply placed them directly next to each other to end up with one continuios cut. Then I flicked some brown and light yellow metallic watercolor onto the sand to add some texture.
The text means "take a break" and is stamped with black ink directly onto the sky.


Die Buchstaben für das Wort aloha sind mit dem Spell Anything Alphabet Stanzenset von MFT aus einem Papierbogen von Magnolia gestanzt. Der passt nicht nur farblich perfekt, sondern auch vom Motiv. Die schwarze Mattung habe ich dann per Hand geschnitten. Ich habe die Buchstaben in die Sandhügel gesteckt und zwischen L und O etwas Platz für den Gnom gelassen.
Der Gnom ist aus dem Stempelset Sommergnome und mit Copics coloriert. Ich habe ihn zweimal abgestempelt und einmal nur den Kopf mit Bart und Armen, einmal den Körper verwendet. Den habe ich beim Colorieren und Ausschneiden etwas nach oben verlängert, so dass das Meer hinter dem Gnom nicht sichtbar ist, wenn er sich nach links oder rechts neigt. Der Körper ist dann direkt auf die Karte geklebt, darüber habe ich ein kleines Loch in den Hintergrund gemacht, hinter dem Gnom eine kleine Plastikscheibe angebracht und diese durch das Loch gesteckt. Von der Rückseite her habe ich einen schmalen Streifen Cardstocks gegen die Plastikscheibe geklebt. Damit der Kopf des Gnoms keine 360° Grad Umdrehung macht, habe ich jeweils links und rechts ein kleines Stück Tape auf die Rückseite des Hintergrunds geklebt, jeweils an der maximalen Neigungsposition des Gnoms. 
Um die Szene zu komplettieren, habe ich noch einige Motive aus dem Stempelset Cool Summer verwendet: Seesterne, Muscheln, eine Plame und natürlich der leckere Cocktail, den ich dem Gnom in die Hand gegeben habe. Auch diese kleinen Motive sind mit Copics coloriert.
Ganz zum Schluss habe ich noch drei kleine weiße Wölkchen auf den Himmel geklebt, die Szene schwarz gemattet und auf eine weiße Mini Slimline Card geklebt.

The letters for the word aloha are die cut with the Spell Anything Alphabet die set by MFT from a sheet of patterned paper by Magnolia. That was not just perfect in color but also had the perfect print. I've cut the black matting by hand and tucked the letters behind the sandy hills, leaving a bit of space between the L and the O for my gnome.
The gnome is from the Sommergnome stamp set and colored with Copics. I've stamped him twice and used the head with beard and arms from one of the images, the body from the other. I made the body a bit taller at the top so the sea behind the gnome wouldn't show up when the gnome is moving to the left and right. The body is glued directly onto the background, for the head I've punched a small hole into the background, glued a little plastic disc to the back of the head and put that through the hole. To the other side of the disc I've glued a small strip of cardstock. To make sure the gnome's had isn't performing any weird 360° degree turns I've put a little piece of tape to the back of background to stop the gnome in it left and right most position.
To complete the scene I've added a few smaller images from the Cool Summer stamp set: starfish, sea shells, a palm tree and of the course the yummy drink, that I've put into the gnome's hand. Also those small images are colored with Copics.
In the end I've added three puffy white clouds to the sky, matted the whole scene black and glued it onto a white slimline card base.

Sonntag, 19. Juni 2022

Noch eine Schaufensterbox


Hallo Ihr Lieben!
Gestern haben wir Euch beim Stempeleinmaleins ja die Schaufensterbox gezeigt. Heute habe ich eine weitere solche Box zu zeigen. Die hier habe ich von den Maßen her etwas abgeändert, so dass da Schaufenster größer ist. Ich hatte da eine Szene im Kopf, und die hätte in das andere Fenster einfach nicht hineingepasst.
 
Hello everyone!
Yesterday we from Stempeleinmaleins shared the tutorial for the display window box. Today I have another of these boxes to show. I changed the size of this one a bit to be able to make the window larger. I had a scene in mind that wouldn't have fit the smaller one in the original box size.


Diesmal habe ich die Box aus weißem Cardstock gewerkelt und mit hellblauem Designpapier mit kleinen Wölkchen darauf beklebt.
Das Schaufenster bzw. die Box dahinter habe ich diesmal aus hellblauem Cardstock gemacht.

This time I made my box from white cardstock and covered it with light blue patterned paper with dotted clouds printed on.
The display window is this time cut from a light blue cardstock.


Das Thema dieser Box ist natürlich Geburtstag, ist ja unschwer zu erkennen. Die Vorderseite habe ich mit einem weiß auf schwarzen Cardstock embossten Text beklebt. Den Bindestrich zwischen den beiden Satzteilen hatte ich vergessen, später aber mit einem weißen Gelstift dazugemalt. Unter dem Text habe ich eine kleine Girlande aufgehängt.
Ergänzt wird der Text durch ein gestanztes Par-Tea, ein kleines Wortspiel passend zum Motiv in der Szene. Dafür habe ich einen Bogen weißes Designpapier mit grün-türkisen Punkten aus dem Watercolor Wishes Rainbow Paperpad von LawnFawn und schwarzen Cardstock verwendet und die Buchstaben mit dem Henry's ABC Stanzenset von LawnFawn ausgestanzt. 

The theme of this box is birthday, as is pretty easily noticable. I glued  cardstock strip with a white heat embossed text to the front of the card. I had forgotten to add the backslash between the two sentiment parts, but added that later with a white gel pen. And under the text I've hung up a party banner.
I finished the text with a die cut Par-Tea, the perfect pun to go with the tea party scene inside the display window. I've die cut it from a white sheet with green and turquoise dots from the Watercolor Wishes Rainbow Paper Pad by LawnFawn and also from black cardstock using the Henry's ABC die set.


Und dann ging es an die Dekoration des Schaufensters. Ich habe hier fast ausschließlich Stempel und Stanzen von LawnFawn benutzt. 
Das Schaufenster selbst habe ich diesmal aus hellblauem Cardstock gewerkelt, so hatte ich gleich den passenden Himmel-Hintergrund. Ganz hinten habe ich dann noch ein paar kleine weiße Wölkchen aufgeklebt.
Davor kam ein Hügel aus grünem Cardstock, gemacht mit einer Stanze aus dem Leafy Tree Backdrop Portrait Stanzenset. Ich habe den Hügel - wie später auch das Gras und das Laub des Baumes - mit Distress Oxide Mowed Lawn und Forest Moss ein wenig gewischt und dann gelb-goldene Metallic-Watercolor darüber gespritzt. Vor dem Hügel befindet sich noch eine weitere Lage Gras, die man hier aber nicht mehr sehen kann. Ich habe später noch zwei weitere Bilder, aufgenommen aus einem anderen Winkel, auf denen Ihr die verschiedenen Elemente ein wenig besser erkennen könnt.
Als nächste Lage kam der Baum, der ist mit dem Tree House Stanzenset aus dem neusten Release gemacht. Ich habe ihn - bis auf das Laub - aus weißem Cardstock gestanzt und die Teile dann mit Copics coloriert. Dabei habe ich auch hinter die Fenster eine Holzmaserung gemalt, die aber heller als die Rinde gehalten. Von einem der Äste hängt ein kleines Vogelhaus. Außerdem ist ein weiteres Partybanner vom Baum zum Rand des Fensters gespannt. Das selbe Banner aus dem Stempelset Virtual Friends Add-On befindet sich auch schon auf der Außenseite der Box. Neben dem Baum steht eine Blume - hier ebenfalls nicht sichtbar - und ein kleiner Pilz.
Und davor findet die Par-Tea statt. Hierfür habe ich die Stempelsets Tea-rrific Day, Tea-rrific Day Add-On und zwei Mäuse aus dem Set Simply Celebrate Critters verwendet. Auf dem Baumstumpf stehen natürlich Tassen und Kekse bereit, die Maus links schenkt gerade Tee aus der Eichel-Teekanne aus. Auch hier sind alle Motive mit Copics coloriert. 
Vorne als Abschluss in der Box habe ich dann eine weitere Lage Gras aufgeklebt.
Und weil es ein wirklich schöner und warmer Sommertag ist, haben sich die Mäuse unter einen großen Baum gesetzt, der mit seinen herabhängenden Ästen Schatten spendet. Dafür habe ich einige Wiedenäste oben von der Box herabhängen lassen.

And then it was time to decorate the display window. I used mainly stamps and dies by LawnFawn on this card.
Thsi time I used light blue cardstock to create my display window, that way I already had the perfect sky color for the background. I just added a few small white clouds to the sky in the background.
The back layer of my scene is a hill, die cut from green cardstock using a die from the Leafy Tree Backdrop Portrait die set. I used Distress Oxide Mowed Lawn and Forest Moss to shade my hill - and later also the leaves of the tree and the grass - and then spritzed some yellow-golden metallic watercolor onto it. There's also another layer of grass in front of the tree, but you can't see it on this picture. I am sharing two more pics a bit later in the post, taken at different angles, where you can get a look at all the different elements on the card.
Next I added the large tree, made with the Tree House die set from the latest release. Except for the leaves I've die cut it from white cardstock and then used my Copics to color the pieces in. I added some wood pattern behind the windows, but kept that lighter in color than the bark. There's a little bird house hanging from one of the branches and a party banner is put up from the tree to the side of the box. I used the same banner iamge from the Virtual Friends Add-On stamp set also on the outside of the box. There's also a flower - again not visible here - and a mushroom growing next to the tree.
In front of the tree house they are holding the par-tea. I used stamps from the Tea-rrific, Tea-rrific Add-On and two mice from the Simply Celebrate Critters stamp sets. There are cups and cookies on top of the tree trunk and the mouse on the left is about to give out some tea from this beautiful acorn tea pot. Again all images are colored with Copics.
As a final layer at the front of the box I added another row of grass.
And since it's a sunny and warm summer day, the mice put up their table under the shady vines of a large tree. So I added a few branches hanging down from the top of the box.


Und hier sind die versprochenen weiteren Bilder. Es ist gar nicht so einfach, in die Schaufensterbox hinein zu fotografieren, da die vorderen Lagen automatisch Schatten werfen....

And here are the promised additional pictures. It really isn't easy to take a picture of the inside of the display window, since the front layers always create a shadow...

Samstag, 18. Juni 2022

Stempeleinmaleins - Ausgabe vom 18. Juni 2022

 
Hallo Ihr Lieben!
Heute haben wir beim Stempeleinmaleins mal wieder eine Box - und zwar diese Schaufensterbox. Die hat ein eingearbeitetes Fenster, das man prima dekorieren kann, das aber zum Innenteil hin komplett abgeschlossen ist.

Hello everyone!
Over at Stempeleinmaleins we are sharing  a box tutorial again this week: a display window box. It has a window that leaves lots of room for decorations, but the display area is completly closed in so you can't look into the main box - and nothing can fall out of it.


Hier auf dem Bild kann man schon prima die Tiefe des "Schaufensters" sehen. Aber dazu gleich mehr. 
Ich habe meine Box aus schwarzem Cardstock gewerkelt und die Außenseiten mit dunkelblauem Designpapier mit gelb-braunen Punkten beklebt. Außerdem habe ich mit einem weißen Gelstift jeweils einen Rahmen auf die Designpapiere gemalt, um ein wenig mehr Kontrast auf die Box zu bringen.

Here on this pic you already get a pretty look at the depth of the display window. But more about that a little later.
I've made my box from black cardstock and glued dark blue patterned paper with yellow-ish brown dots onto all the sides. I also used a white gel pen to hand draw a frame onto the patterned paper to add some kind of contrast there.


Auch die Vorderseite meiner Box ist mit dem selben Designpapier beklebt. In der Mitte dieser Boxseite befindet sich das ausgestanzte Fenster mit der 3D Szene dahinter.
Auf den Rahmen um die Szene habe ich meinenText aufgeklebt. Dafür habe ich mit dem Henry's ABC Stanzenset von LawnFawn die Buchstaben für die Wort Dream und Stars aus gelbem und weißem Cardstock ausgestanzt. Die gelben Buchstaben habe ich als Schatten für die weißen Buchstaben verwendet und auf die mit einem goldenen Gelstift Highlights gemalt. 
Die gestempelten Texte sind ebenfalls von LawnFawn und schwarz auf weißen Cardstock gestempelt. Dann habe ich alles auf den Rahmen geklebt.

Also the front of my box is covered with the same patterned paper. The window with the 3D szene is cut from the center of this box front.
Onto the frame around the scene I've glued my text. I've used the Henry's ABC die set by LawnFawn to cut the letters for the words dream and stars from both white and yellow cardstock. I used the yellow ones as a matting for the white ones and drew some highlights with a golden gel pen onto the white letters.
The stamped texts are also byy LawnFawn. I've stamped them black onto white cardstock, then glued everything onto the frame.


Für die Szene habe ich das Stempelset Thank my lucky Stars von MFT verwendet. Ich habe die Sterne und das Hauptmotiv mit Copics coloriert und ausgeschnitten. 
In das Schaufenster habe ich hinten ein Stück weißen Cardstock geklebt, das ich mich Distress Oxide Mermaid Lagoon, Prize Ribbon und Chipped Sapphire gewischt und dann mit Wasser und goldener Metallic Watercolor bespritzt habe. Davor habe ich drei Wolkenlagen, gestanzt aus weißem Cardstock, in verschiedenen Tiefen eingeklebt.
Das Hauptmotiv ist auf die zweite Wolkenlage geklebt, hinter die Wolken sowie auf den Himmel dahinter habe ich dann die Sterne geklebt.

For the szene I used the Thank my lucky Stars stamp set by MFT. I colored the stars and the main image with Copics and cut them out.
Onto the back of the display box I've glued a piece of white cardstock, that I've inked up with Distress Oxide Mermaid Lagoon, Prize Ribbon and Chipped Sapphire, then spritzed some water and some golden metallic watercolor onto it. In front of the sky I've glued three rows of clouds in to the box, putting about 1/4" inch apart from each other. 
The main image is glued onto the middle layer of clouds, behind the clouds and onto the sky I've glued the stars.


Und hier habe ich noch ein Foto der geöffneten Box. Hinter das Schaufenster passt ganz leicht eine der quadratisch-praktischen Schokotafeln. Außerdem ist auch links und rechts neben der Schaufensterbox noch Platz für schmale Kleinigkeiten. 

And here I have a picture of the opened box. Behind the display box there's room to fit one of those "sporty" chocolates. There's also room on the left and right of the display box for some narrower gifts.