Hallo Ihr Lieben!
Nur noch ein paar Tage, dann wird das November-Release von Stampcorner erhältlich sein. Und heute gebe ich Euch ein weiteres Sneak darauf.
Hello everyone!
Only a few more days until the november release by Stampcorner will be available. And today I'm giving to another sneak of one of the new products.
Im Release wird es wieder einige neue Stencils geben. Ich weiß nicht, was das bei mir mit Holzmustern ist - sobald ich eines sehe, setzt bei mir ein Haben-Muss ein, egal ob Stempel, Stanze oder Stencil. Na, und der neue Holzmuster-Stencil ist so schön, da konnte ich nicht nein sagen.
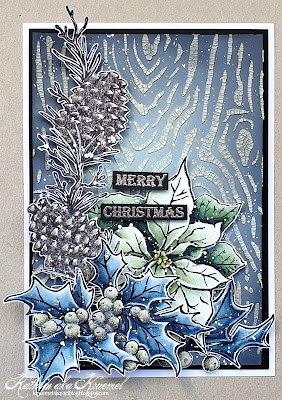
Hier habe ich für den Hintergrund ein Stück weißen Cardstocks mit Distress Oxide Speckled Egg, Weathered Wood und Black Soot gewischt, anschließend habe ich den Stencil aufgelegt und die Opaque Crackling Paste von Ranger durch den Stencil auf den Hintergrund aufgetragen. Der Stencil ist 15 x 15 cm groß, ich musste mich also für einen Teil entscheiden. Da er von den Motiven teils verdeckt wird, habe ich sichergestellt, dass nicht nur gerade Striche sichtbar bleiben.
Nach dem Trocknen habe ich auch auf die jetzt gerissene Paste die Oxide Farben leicht aufgetupft und zudem ganz leicht Gathered Twigs nur auf die Paste mit aufgewischt.
In the release there are a few new stencils included. I have no idea what it is with me and wooden patterns - but as soon as I see one, it's all about getting it, no matter if it's a stamps, a die or a stencil. Well, the new wooden pattern stencil is so beautiful, I just had to have it.
To create my background I inked up a piece of white cardstock with Distress Oxide Speckled Egg, Weathered Wood and Black Soot, then I put the stencil on top and applied some Opaque Crackling Paste by Ranger through the stencil. The stencil is 6" x 6", so I had to pick an area for my card. Since most of the bottom will be covered by my images, I made sure to not only have straight lines in the area that will be visible later.
After the paste had dried I dabbed some more of the Distress Oxides onto the now crackled paste and also put down a bit of Gathered Twigs onto the paste only.
Hier könnt Ihr das Muster besser erkennen. Ich finde es super, dass die Linien auf dem Stencil relativ dick sind - so verbiegen sich die Stege beim Drüberwischen nicht, gleichzeitig ist das Muster gut erkennbar.
Here you get a closer look at the pattern. I love that the lines are pretty thick - this way there are no thin lines on the stencil that might move when you ink over them, and at the same time the pattern can easily recognized as what it is.
Um meine Karte zu dekorieren habe ich zu Motiven von WhimsyStamps gegriffen. Der Zweig mit den Tannenzapfen ist aus dem Set Slimline Pines, der Weihnachtsstern und die Ilexzweige aus dem Set Vintage Poinsettia.
Ich liebe weiße Weihnachtssterne mit ihren leicht grünlichen Blüten, deswegen habe ich auch mein Weihnachtssternmotiv so coloriert. Die Ilexzweige sind eigentlich eher türkis-grau, wirken auf dem Bild aber irgendwie blau, dazu habe ich auch hier die Beeren in zartem Grün coloriert. Ich habe alle Motive mit Copics coloriert, ausgeschnitten und mit 3D Tape aufeinander und auf die Karte geklebt. Dann habe ich weißes Copic Opaque White über den kompletten Kartenaufleger gespritzt.
Der Text ist ebenfalls aus dem Set Vintage Poinsettia. Ich habe ihn silbern auf schwarzen Cardstock embosst, ausgeschnitten und aufgeklebt.
To decorate my card I used images by WhimsyStamps. The branch with the pinecones is from the Slimline Pines stamp set, the poinsettia and the holly leaves and berries are from the set Vintage Poinsettia.
I love white poinsettias and their slightly green flowers, so I colored my image like that. The holly leaves are colored in a more grey-ish turquoise, but look kind of blue in the picture. I used the same light green color that I used for the poinsettia to color the berries. All images are colored with Copics, then I cut them out and used foam tape to glue them on top of each other and onto the card.
Then I spritzed some Copic Opaque White over the panel and the images.
The set is from the Vintage Poinsettia set again. I've silver heat embossed it onto black cardstock, cut it out and glued it down.
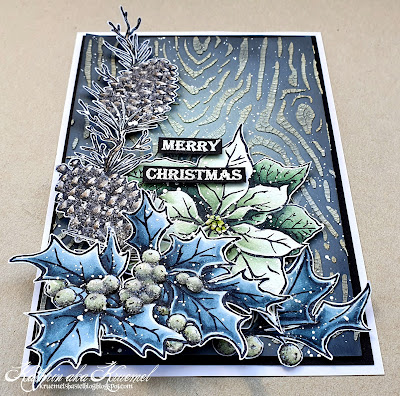
Die Beeren und einige Stellen der Tannenzapfen habe ich mit Glossy Accents überzogen und Rock Candy Glitter von Ranger aufgestreut - das verleiht den Motiven hier so einen tollen Eis-Effekt.
Dann habe ich den Cardstock schwarz gemattet und auf einen weißen Kartenrohling geklebt.
Und hier kann man neben dem Glitter auch wunderbar die Tiefe, die die Motive durch das Aufeinanderkleben mit 3D Tape erhalten, sehen.
I covered the berries and a few areas of the pinecones with Glossy Accents and put some Rock Candy Glitter by Ranger into the wet gloss - this adds such a nice icy look.
Then I matted my panel with black cardstock and adhered it onto a white note card.
And on this pictures besides the glitter you can also the the beautiful depth the card gets by using foam tape to stack the images.


.jpg)
