Hallo Ihr Lieben!
Heute startet eine neue Moodboard Challenge bei Create a Smile - und da der November 5 Mittwoche hat, ist es sogar die zweite diesen Monat. Und es wird festlich!
Hello everyone!
Today is the start of a new moodboard challenge by Create a Smile. Since there are 5 wednesdays this november, it's the second one of the month. And it's getting festive!
Ich mag mich wiederholen, aber ich mag die Farbkombi rot-grün nicht. Deswegen bin ich wirklich froh, dass hier vor allem rot und weiß das Moodboard bestimmen. Und die Farbkombi liebe ich, vor allem in Kombination mit Silber. So sieht auch unser Christbaum jedes Jahr aus.
I may repeat myself, but I don't like the color combo of red and green. So I am really happy that red and white are the main colors of this moodboard. That's a combo I love for christmas, escpecially combined with silver. That's also how our christmas tree is decorated each year.
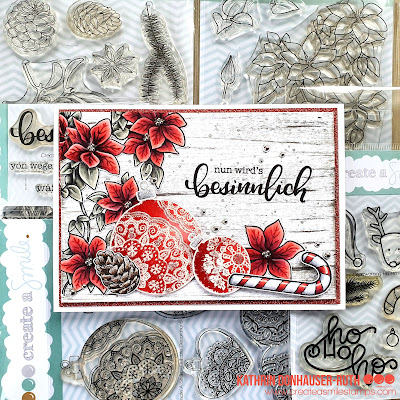
Für den Hintergrund habe ich die Direct To Paper Technik angewandt, bei der ein Stempelkissen ganz vorsichtig direkt über das Papier gezogen wird. Ich habe ein graues Stempelkissen verwendet und so eine Art Holzmuster aufs Papier gewischt.
For the background I did the direct to paper technique, where you lightly drag an ink pad over your paper. I used a grey ink pad and created some kind of wood pattern background.
Das Holzmuster war dann der Hintergrund für mein Weihnachts-Stilleben.
Für die Weihnachtsstern-Blüten habe ich ein wenig getrickst und das Clematis Stempelset verwendet. Ich habe die Blüten mit Copics rot coloriert und anschließend mit Polychromos das Muster auf die Blüten gemalt. Schon sehen sie aus wie Weihnachtssterne. Für die Blütenmitten habe ich silbernen Glitterkleber aufgetragen und dann kleine silberne Perlen hineingedrückt. Und weil ich grün und rot ja nicht mag, habe ich für die Blätter ein sehr dezentes Grün-Grau verwendet.
Die Zuckerstange aus dem Set Heartwarming Ho-Ho-Holidays und der Tannenzapfen aus dem Set Festive Foliage sind ebenfalls mit Copics coloriert. Auf den Tannenzapfen wollte ich eigentlich die Snow-Paste von Ranger auftragen. Die hat aber offenbar irgendein Bestandteil, das die Copics wieder anlöst und das Braun wurde orange-rot. Zum Glück habe ich es sofort bemerkt und die Paste gleich wieder abgenommen. Stattdessen habe ich ebenfalls silbernen Glitterkleber aufgetragen.
Die tollen Christbaumkugeln sind aus dem Set Delicate Decorations. Ich habe sie weiß embosst und dann mit Distress Ink Candied Apple und Aged Mahogany gewischt. Den Aufhänger habe ich dabei abgedeckt und später mit Copics coloriert. Na, und da Christbaumkugeln schön glänzen müssen, habe ich meine fertig ausgeschnittenen Kugeln dann mit klarem Ultra Thick Enamel Embossingpulver überzogen. Ich hatte allerdings nicht daran gedacht, dass bei zu langem Erhitzen auch das weiße Pulver darunter wieder anschmilzt, so dass mein Muster auf den Kugeln an einigen Stellen ein wenig verlaufen ist. Aber ich finde, das gibt den Kugeln einen tollen Vintage-Look. Anschließend habe ich auch hier an einigen Stellen und den Aufhängern silbernen Glitterkleber aufgetragen.
Den Text aus dem Set Besinnlich habe ich dann mit schwarzer Tinte direkt auf den Hintergrund gestempelt.
The wood pattern was the backdrop for my christmas decorations.
For the poinsettia flowers I did some cheating and used the Clematis stamp set. I colored the flowers red with my Copics, then used Polychromos to add the details to the leaves. And the clematis changed into poinsettias. For the flower centers I put down some silver glitter glue and put tiny silver beads into it. And since I don't like the color combo of red and green, I went with a very subtle grey-ish green to color the leaves.
The candy cane from the set Heartwarming Ho-Ho-Holidays and the pinecone from the Festive Foliage set are also colored with Copics. I wanted to put some snow paste by Ranger onto the pinecone, but it seems like contains something that reacts with the Copics and the brown turned into an orange-red. Luckily I realized it immediately so I scraped off the little paste I had already put down and added some of the silver glitter glue to the pinecone instead.
The beautiful christmas baubles are from the Delicate Decorations stamp set. I 've white heat embossed them and then used Distress Ink Candied Apple and Aged Mahogany to color them. When I did that, I covered the hanger and colored that with my Copics later. Well, and since a real bauble has to be shiny I brought out my clear UTEE and covered them with it. I didn't think of the fact, that also the white embossing powder would melt again when I heated the UTEE for too long. So my white lines are a bit runny in a few areas. But I don't mind it, I think it adds a nice vintage touch to the baubles. Then I added some of the silver glitter glue also to a few areas of the baubles and the hangers.
The text is stamped directly onto the background using black ink.
Als Deko habe ich noch einige silberne Perlen auf der Karte verteilt. Dann habe ich den dekorierten Cardstock mit rot-silbenem Glittercardstock gemattet und alles auf einen weißen Kartenrohling geklebt.
I glued down a few more silver pearls to my card. Then I matted the decorated cardstock with some silver-red glitter cardstock and glued it onto a white note card.


