Hallo Ihr Lieben!
Im Dezember wird es wieder neue Stempel und ein Stanzenset von Stampcorner geben. Eine Vorschau auf eines der Sets gebe ich Euch heute mit dieser Neujahrs-Karte.
Hello everyone!
There will be new stamps and dies by Stampcorner again in december. I am giving you a sneak at one of the new stamp sets with this New Year's card.
Das Set ist unverkennbar wieder aus der Feder von Oma Plott. Und Nilpferd Ernst hat offenbar seine große Liebe gefunden: Ernestine!
Für meine Karte habe ich mit Stanzen von SU die Zahl 2023 aus silber-rotem Glittercardstock gestanzt und per Hand eine Schattenlage aus hellgrauem Cardstock gestanzt. Dann habe ich die Zahlen auf ein Stück schwarzen Cardstock gelegt und in der Mitte Platz für Ernestine gelassen. So konnte ich sehen, wo ich die explodierenden Raketen abstempeln wollte. Der Raketenstempel und auch alle weiteren Motive auf der Karte kommen alle im selben Set wie Ernestine. Damit die Raketen schön glitzern, habe ich sie mit silberfarbenem Glitter-Embossingpulver auf den schwarzen Cardstock embosst.
This set is again designed by Oma Plott. And hippo Ernst seems to have found the love of his life: Ernestine!
For my card I used dies by SU to die cut the numbers 2023 from silver-red glitter cardstock and cut a shadow layer from light grey cardstock by hand. Then I laid the numbers onto a piece of black cardstock and left some room between them for Ernestine. This way I was able to tell, where I wanted to stamp the fireworks. The fireworks and all the other images on this card all come in the set with Ernestine. To make the fireworks glitter nicely I used silver glitter embossing powder to heat emboss them onto the black cardstock.
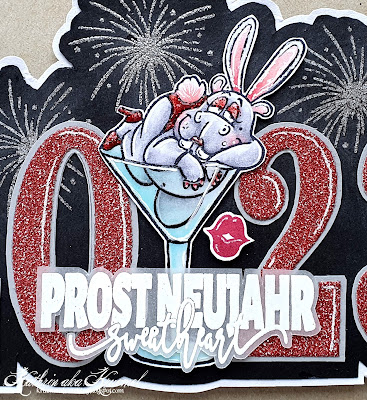
Und hier könnt Ihr Ernestine genauer sehen. Sie räkelt sich ziemlich lasziv im Hasenkostüm in einem Martini-Glas.
Ich habe alle Motive - auch die Sektflasche links und die Sektgläser rechts - mit Copics coloriert. Ernestines Schuhe und das Höschen habe ich rot beglittert, das Glas, die Sekflasche und die kleinen Sektgläser sind zudem mit Glossy Accents überzogen. Nachdem das getrocknet war, habe ich alle Motive per Hand ausgeschnitten und mit 3D Tape auf die Zahlen, die ich inzwischen auf den Cardstock aufgeklebt habe, geklebt.
Auch der Text ist aus dem selben Stempelset - es gibt noch mehr davon, aber den hier fand ich von der Größe her super passend. Ich habe ihn mit weißem Embossingpulver auf Vellum embosst, ausgeschnitten und ebenfalls mit 3D Tape über den Stiel des Glases geklebt. Und weil er so gut passte, habe ich auch noch den Kussmund mit roter Farbe abgestempelt und in eine Lücke über dem Text geklebt.
Here you get a closer look at Ernestine. She's lolling quite lascivious in a martini glass.
I colored all images - also the bottle of champagne on the left and the champagne glasses on the right - with Copics. I covered Ernestine's shoes and her panty with red glitter, the bottle, the small glasses and also the martini glass are also covered with Glossy Accents. After that had dried, I cut out all images by hand and attached them onto the numbers, that I had adhered to the black cardstock inbetween, using foam tape.
Also the text is from the same stamp set - there are more like this, but I liked the size of this one the best. I white heat embossed it onto vellum, cut it out and glued it across the glass' handle with foam tape. And since it really fits great on this card, I also stamped the smooch with red ink and glued it onto a spot, that was irritating me because there was that much black visible, above the text.
Da nun alle Elemente auf der Karte aufgeklebt waren, habe ich mit der Schere die doch recht ungewöhnliche Form zugeschnitten, alles auf weißen Cardstock geklebt und ein weiteres Mal per Hand drumrum geschnitten. Und damit man in die Karte auch etwas schreiben kann, habe ich von hinten eine weiße, oben gefaltete Karte geklebt, die etwa die Größe einer Mini-Slimline-Karte hat. Von vorne sieht man sie gar nicht, und es war die einfachste Lösung.
Since all elements on my card were now attached to the cardstock, I used my scissors and cut the quite unusual shape of my card. Then I glued it onto white cardstock and cut around it once again. Well, of course I wanted to be able to write something onto this card. So I cut a top folding note card the size of a mini slimline card and adhered it to the back of my shaped card. You don't see it from the front, and it was the easiest way to do it.


