Seiten

Freitag, 31. Mai 2024

You are Fabulous, Darling!

 
Hallo Ihr Lieben!
Das "Large Die of the Month Club Kit" von Spellbinders enthält im Mai ein Stanzenset mit Flamingos. Das habe ich nicht, aber da ich beim Basteln gerne YT Videos schaue, kam mir in letzter Zeit der ein oder andere Flamingo unter, und offenbar hat der Flamingo-Virus auf mich abgefärbt. Also habe ich das gute alte Flamazing Stempelset von MFT herausgeholt - das einzige mit realistischen Flamingos, das ich habe - und diese Karte damit gemacht.

Hello everyone!
Spellbinder's "Large die of the month Club Kit" in may has a die with flamingos. I don't have this set but since I always watch YT videos while crafting I came across quite a few flamingo cards the last weeks. And it seems, like the flamingo virus got me. So I brought out the good old Flamazing stamp set by MFT - the only one I have that includes a realistic flamingo image - and made this card with it.

Der Hintergrund besteht aus einem gelben Stück Cardstock, den ich mit Distress Oxide Spiced Marmalade, Abandoned Coral, Lumberjack Plaid und Aged Mahogany im Sonnenuntergangs-Look gewischt habe. Ganz unten sieht man noch die Originalfarbe des gelben Cardstocks. 
Vor allem im oberen Bereich habe ich weiße Acrylfarbe aufgespritzt. 

The background is made from a piece of white cardstock that I inked in a sunset look using Distress Oxide Spiced Marmalade, Abandoned Coral, Lumberjack Plaid and Aged Mahogany. At the very bottom you can still see the original color of the yellow cardstock.
I splattered some white acrylic paint onto the cardstock - more on the top and less at the bottom.


Die Flamingos habe ich mit hellrosa, die Beine mit schwarzer Tinte abgestempelt. Da ich einen Anhaltspunkt zum Ausschneiden brauchte, habe ich die Schnäbel per Second Generation Stamping mit Distress Ink Lost Shadow in ganz hellem Grau abgestempelt. Die Augen und Details am Schnabel habe ich dann per Hand dazugemalt. Außerdem habe ich die Flamingos am Schwanz, den Flügeln und am Hals leicht mit Copics coloriert. Dann habe ich alles per Hand ausgeschnitten. 

I used light ink to stamp the flamingos and black ink for their legs. Since I needed some guide for cutting the image out I did some second generation stamping with Distress Ink Lost Shadow to stamp the beaks in a very light grey. Later I added the details on the beaks and the eyes with a black fineliner. I also added a bit of shading with Copics to the flamingos's tails, wings and necks. Then I cut them out by hand.


Am oberen Rand der Karte habe ich jede Menge tropische Blätter sowie einige korallefarbene Blüten aufgeklebt. Die Blätter sind mit Stanzen von MFT und Noor Design aus schwarzem Cardstock gestanzt, die Blüten sind Dies von Magnolia. 
Die Ränder der schwarzen Blätter habe ich an einigen Stellen mit weißer Stempeltinte aufgehellt, damit sie sich später ein wenig voneinander abheben. 
Die Blüten habe ich erst mit Copics schattiert, dann die Details mit einem weißen Gelstift nachgemalt und dann in die Blütenmitten kleine Punkte mit einem goldenen Gelstift gesetzt.

Along the top edge of the cardstock I placed some tropical leaves and coral colored flowers. The leaves are cut from black cardstock using dies by MFT and Noor Design, for the flowers I used dies by Magnolia.
I used white pigment ink to lighten up the edges of the leaves in a few areas so they don't turn into one black mass later.
The flowers I first shaded lightly with Copics, then added details with a white gel pen and added tiny dots with a gold gel pen to the flower centers.


Unter den Flamingos befindet sich der Text meiner Karte. 
Zuerst habe ich das Scripty Aloha von LawnFawn zweimal aus korallefarbenem und einmal aus schwarzem Cardstock gestanzt. Eines der korallefarbenen Stanzteile habe ich mit Copics im Farbverlauf schattiert, dann die zweite Lage dahinter und alles leicht nach oben versetzt auf die schwarze Lage geklebt. 
Das Aloha dient hier als eine Art Boden für meine Flamingos. Da aber die Fläche hinter den beiden Vögeln zu leer war, habe ich hier die Wasserlinien aus dem Flamazing Set mit gold-holografischem Glitter-Embossingpulver aufembosst. 
Ganz unten auf der Karte befindet sich dann ein kleiner Untertext, ebenfalls aus dem Set Flamazing. Ich habe ihn mit weißem Embossingpulver auf ein etwas nach oben gebogenes Banner embosst. 
Rechts und links des Banners habe ich weitere Pflanzen und Blüten aufgeklebt. Hier kam zusätzlich noch eine Blattstanze von LawnFawn zum Einsatz. Jeweils eines der Blätter habe ich auf den Kopf gedreht, damit sie wie gespiegelt aussehen. 

Under the flamingos I placed my text.
First I die cut the Scripty Aloha by LawnFawn twice from coral and once from black cardstock. I used my Copics to color one of the coral words in a gradiant, then glued the second coral layer behind it and adhered both to the black word, moving that a bit down.
The aloha is some kind of ground for my flamingos to stand on. But the area between them looked a bit plain. So I used the water line images from the Flamazing set and heat embossed them with some gold holographic glitter powder onto the background.
At the very bottom I added a little subtext, again from the Flamazing set. I white heat embossed it onto a black banner that is slightly bent upwards on both ends. 
To the left and right of the banner I added more flowers and leaves. Here I added a leave die by LawnFawn to the mix. I turned one each of the leaves face down to make them look mirrored.


Hinter einige der Blätter sowie den rechten Flamingo habe ich dünnes, hinter den linken Flamingo dickes 3D Tape gesetzt. Die anderen Elemente sind direkt auf den Hintergrund geklebt. Die Blüten habe ich zwischen die Blätter geschoben und die sichtbaren Blütenblätter ein wenig nach oben gebogen. Dann habe ich den Cardstock schwarz gemattet und auf einen weißen Kartenrohling geklebt.

I put thin foam tape behind some of the leaves and the flamingo on the right, behind the left one I put thick foam tape. All the other elements are glued directly onto the background. I put the flowers between the leaves and bent the visible petals upwards. Then I matted the card panel black and adhered it to a white note card.

Donnerstag, 30. Mai 2024

Auf einen schöne Zeit

 
Hallo Ihr Lieben!
Mit dieser Karte und dem süßen Elefanten, die ich heute auf dem Stampcorner Blog zeige, machen wir nochmal einen Ausflug ans Meer. Da war ich gerade eine Woche und bin noch absolut in maritimer Stimmung. 

Hello everyone!
With this card, that I am sharing on the Stampcorner Blog today, and the cute elephant we are taking another trip to the beach. I just was on a one week vacation at the sea and am still in beach mood.

Basis hier ist einfach ein Stück weißen Cardstocks. Den habe ich im unteren Bereich mit Distress Oxide Antique Linen und Scorched Timber gewischt, darüber folg ein Streifen Tumbled Glass, der nach oben in Salvaged Patina und Peacock Feathers übergeht. 
Auf den "Sand" habe ich ein wenig Scorched Timber - verdünnt mit Wasser - und weiße Acrylfarbe aufgespritzt. 
Auf den hellblauen Bereich habe ich dann mit Salty Ocean den neuen Wellenstencil aufgewischt. Man sieht davon zwar auf der fertigen Karte nicht mehr so viel, aber es wird doch klar, dass der Elefant am Strand und nicht im Sandkasten steht.... Die Wellen habe ich ein wenig mit Stickles beglittert.

I simply inked a piece of white cardstock for my background. I used Antique Linen and Scorched Timber at the bottom, above it I did a strip with Tumbled Glass that I faded into Salvaged Patina and Peacock Feather on the top half of the cardstock. 
I splattered a bit of the Scorched Timber, mixed with water, and also some white acrylic paint onto the sand area.
Onto the light blue strip I stenciled the waves using Salty Ocean. You don't see much of them on the finished card but it still makes clear, that this elephant is at the beach and not his sandbox... I added a bit of Stickles to the waves.


Und hier könnt Ihr Fanti aus dem gleichnamigen Set genauer sehen. Ich habe ihn in ganz hellem Grau coloriert. Er steht vor seiner Strandhütten aus dem Strandhäuser Stempelset. Das musste für mich einfach hell sein. Nach dem Colorieren mit Copics habe ich Highlights mit einem weißen Gelstift und mit einem braunen Fineliner eine Art Holzmaserung aufgemalt. Ich wollte, dass es ein wenig verwittert aussieht, wie Holz am Strand das eben tut. Die Motive habe ich hier übrigens nicht wie üblich schwarz, sondern mit Memento Espresso Truffle gestempelt, das ist nicht ganz so hart.
Da der Strand doch ein wenig leer aussah, habe ich noch einen Zaun aus braunem Cardstock gestanzt. Der hatte ein weißes Inneres, das ich an einigen Stellen mit einem Sanding Block freigelegt habe. Einen Teil des Zauns habe ich hinter das Häuschen gesetzt, den anderen Teil unten links an den Rand des Cardstocks. 
Als Deko habe ich einen Anker vor dem Haus und einen Schwimmring am Zaun befestigt. Beide Motive sind aus dem Stempelset Paulchen. Außerdem habe ich noch drei Muscheln aus weißem Cardstock gestanzt und cremefarben coloriert. 

And here you can see Fanti from the stamp set with the same name. I colored him a very light grey. He's standing in front of his little beach house and that just had to be light, too. After coloring it with Copics I added highlights with a white gel pen and then used a brown fineliner to add a wood pattern to it. I wanted it to look a bit weathered, just like wood does in the salty air. By the way, I didn't stamp the images here with black ink as I usually do but used Memento Espresso Truffle, which is just a tad bit softer.
Since the beach looked a bit empty I die cut a fence from brown cardstock. It has a white core that I brought out in a few areas using a sanding block. I put a piece of the fence behind the house and the other half in the bottom left corner of my cardstock.
I decorated the card with an anchor in front of the house and a swimm ring on the fence. Both of these images are from the Paulchen stamp set. I also die cut three sea shells from white cardstock and colored them a light cream.


Den Text der Karte habe ich in die obere Hälfte des Cardstocks geklebt. Er ist aus dem selben Stempelset und mit weißem Embossingpulver auf dunkelbraunen Cardstock embosst. 
Rund um den Text habe ich dann drei weiße Wolken und ein paar Möwen verteilt. Die Möwen sind aus dem Stempelset Matrosenfreunde 2.

The text I put in the top half of my card - it means "to a good time". I white heat embossed it onto dark brown cardstock.
Around the text I added three white clouds and a few flying sea birds.


Den Zaun vorne, den Text und auch den Elefanten habe ich jeweils mit dünnem 3D Tape aufgeklebt.
Meine Szene  habe ich dann mit einem Stück braunen Cardstocks hinterlegt, den ich mit der größten der ebenfalls im Mai-Release neuen Zickzack Stitch Stanzen gestanzt habe. Auch hier habe ich die farbige Lage des Cardstocks an einigen Stellen abgeschliffen.
Zum Schluss habe ich alles auf einen weißen Kartenrohling geklebt.

The larger fence, the text and the elephant I adhered with thin foam tape.
I glued my scene to a piece of brown cardstock, that I have die cut with the largest of the also new in the may release Zickzack Stitch dies and used a sanding block again in a few areas to remove the colored layer.
Then I adhered everything to a white card base.

Mittwoch, 29. Mai 2024

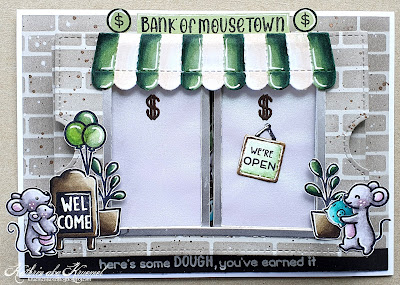
Bank of Mousetown

 
Hallo Ihr Lieben!
Das letzte Release von LawnFawn war wieder der absolute Hammer - und ich konnte mich mal wieder nicht beherrschen. Nun wollen all die tollen neuen Stempel und Stanzen eingeweiht werden. Hier kam das TaDa Diorama Shop Add-On und das How You Bean Money Add-On zum Einsatz - wie immer kombiniert mit vielen anderen Sets, denn genau das liebe ich an LawnFawn...

Hello everyone!
The latest release by LawnFawn was/is once again simply amazing - and again I wasn't able to resist most of it. Now all those great new dies and stamps want to get used. Here I used the TaDa Diorama Shop Add-On and the How You Bean Money Add-On - as always combined with lots of other sets, because that's what I love about LawnFawn...

In Mausstadt herrscht große Aufregung - endlich hat dort eine Bank eröffnet und die kleinen Mäuse müssen ihr Erspartes nicht mehr unter der Matratze, in Sparschweinen oder Sparstrümpfen verstecken. 
Ich habe den Hintergrund sowie alle Teile des TaDa Dioramas aus hellgrauem Cardstock geschnitten/gestanzt und dann mit einem Mauer-Stencil und Distress Ink Pumice Stone eine Mauer aufgewischt. Darauf habe ich dann etwas verdünnte weiße Stempelfarbe und grau-braune Metallic Watercolor aufgespritzt. 
Das Baby auf dem Arm wollte unbedingt die Ballons, die zur Eröffnung am Schild neben der Tür angebracht wurden, anschauen. Und auf der anderen Seite will eine Maus gerade ihr Sparschwein leeren lassen. Die Ballons sind aus dem Set Coaster Critters, das Sparschwein aus dem Plan on It Set. 

All the mice in Mousetown are so excited - finally a bank has opened up there and the mice don't have to hide their savings under the mattresses, in piggy banks or saving stockings anymore.
I die cut/cut the background and all the pieces for the TaDa Diorama from light grey cardstock and then used a brick stencil and Distress Ink Pumice Stone to add a brick pattern to the pieces. Then I splattered some thinned white ink and greyish brown metallic watercolor onto them.
The baby on his mom's arms really wanted to take a closer look at the balloons, that got attached to the sign next to the door for the grand opening. And on the other side another mouse is bringing in his piggy bank. The balloons are from the Coaster Critters set, the piggy bank from Plan On It. 


Der - eigentlich - Fensterrahmen aus dem Shop Add-On Set bildet hier den Rahmen der Schiebetüren. Ich habe ihn aus matt silbernem Metallic Cardstock gestanzt. Außerem habe ich per Partial Diecutting noch zwei halb so große Türen gestanzt, die ich dann auf die Laschen geklebt habe. Auch dort habe ich das große Fenster ausgestanzt. 
Die Türen habe ich mit einer Lage normalem Vellum und darauf einer Lage des Pearlescent Vellums von LawnFawn hinterlegt. So sind sie schön undurchsichtig. Auf die Türen habe ich das $-Zeichen aus dem Plan On It braun aufembosst.
Das Schild an der Tür und die Markise kommen ebenfalls im neuen Shop Add-On. Ich habe beides aus weißem Cardstock gestanzt und - wie alle Elemente der Karte - mit Copics coloriert. Auf das Schild habe ich noch mit Stempeln aus den Sets Open me (open) und Simply Celebrate More Critters (we're) ein "we're open" aufgestempelt.
Natürlich prangt über der Tür das "Bank of Mousetown" Logo. Die beiden Münzen sind aus dem How You Bean Money Add-On Set, das Bank of Mousetown habe ich aus verschiedenen Stempelteilen aus dem Henry's Build a Sentiment Spring Set zusammengestempelt. Alles ist mit schwarzer Tinte auf grünen Cardstock gestempelt.
Neben der Tür steht das schon erwähnte Schild mit den Luftballons. Es ist aus dem Set Treat Cart, darauf habe ich weiß ein "welcome" aus dem Elephant Parade Set embosst.
Die beiden Pflanzen links und rechts der Tür sind aus dem Set Virtual Friends Add-On. 

The - original - window frame from the Shop Add-On set is building the frame of the sliding doors here. I die cut it from matte silver metallic cardstock. I also did some partial diecutting to recieve two frames half the size that I glued onto the flaps. From those I had also die cut the large window. 
I backed the doors with regular vellum with a layer of LawnFawn's pearlescent vellum on top. This way they are nice and milky. Onto the doors I heat embossed the $ from the Plan On It set with brown embossing powder.
The sign on the door and the awning are also from the new Shop Add-On set. I die cut both parts from white cardstock and used my Copics to color them. I used Copics on all the elements on this card. Onto the sign I stamped a "we're open" using stamps from the sets Simply Celebrate More Critters (we're) and Open Me (open).
Of course there has to be the Bank of Mousetown logo above the door. The two coins are from the How You Bean Money Add-On set, the Bank of Mousetown I created combining parts of different stamps from the Henry's Build a Sentiment Spring set. I stamped those pieces with black ink onto green cardstock. 
Next to the door there's said sign with the balloons. It's from the Treat Cart set, I white heat embossed a welcome onto it, using a stamp from the Elephante Parade set.
The two plants beside the doors are from the Virtual Friends Add-On set.


Hier sieht man den Schein des Pearlescent Vellums nochmal. Die Markise habe ich 3D Tape aufgeklebt. Und ganz unten auf der Karte habe als Straße einen Streifen schwarzen Cardstocks aufgeklebt, auf den ich dann meinen Text gestempelt habe. Die Karte soll ein Geldgeschenk enthalten, so passte dieser Text aus dem How You Bean Money Add-On Set super. Ich habe ihn mit weißem Embossingpulver embosst. 

Here you get a better look at the shimmer of the pearlescent vellum. I used foam tape to adhere the awning. And at the very bottom of my card I added a strip cut from black cardstock as some kind of street. That's also where I added my sentiment to. I want to use this card to give away some money, so this text from the How You Bean Money Add-On set fits perfectly. I used white embossing powder for it.


Zieht man seitlich an den Laschen, öffnen sich die Schiebetüren und geben den Blick ins Innere der Bank frei. 

When you pull the tabs, the sliding doors open and give you a look inside the bank.

Vorne am Tresen steht der Manager - ganz schick und vertrauenswürdig mit Brille und Krawatte. Die anderen Mäuse machen das, was man in Mausstadt eben so macht: Spaß haben! Zwei der Mäuse konnten einfach nicht widerstehen und nehmen, ganz Dagobert-Duck-Like, ein Bad im Geld.... 
Den Tresen habe ich aus braunem Cardstock gestanzt und mit dem Woodgrain Backdrop das Holzmuster aufgestempelt. Die Tischplatte besteht aus einem Streifen dunkelbraunen Cardstocks, den ich mit der Querlatte der Picket Fence Border gestanzt habe. 
Die Krawatte des Managers ist aus dem Dad Jokes Set, die Brille aus dem Thanks a Bushel Set. Darin waren bereits die Augen und ich habe die Augen der Maus damit nicht 100 % genau getroffen, aber der leicht schiefe Blick macht die Maus nur noch süßer, finde ich. 
Auf dem Tisch steht noch ein Monitor aus dem Plan On It School Set, eine Tasse aus dem Plan On It Set und ein Stiftebecher aus dem Set Virtual Friends Add-On Set. 
Am Tresen stehen bereits zwei Mäuse, die Geld einzahlen wollen - die kleine Maus hat Ihr Geld in einer Socke aus dem Little Bundle Set angespart. 
Und hinten an der Wand hängt noch eine Uhr aus dem Set Plan On It Appointments.

At the counter in the front you can see the manager of the bank - all bussiness and trust worthy with his glasses and tie. The other mice are doing what you do in Mousetown: having fun. Two of them just couldn't resis and - just like Scrooge McDuck - are taking a bath in all that money in the vault...
I die cut the counter from brown cardstock and stamped the wood pattern with the Woodgrain Backdrop onto it. The counter top is made from a strip of dark brown cardstock that I die cut with the horizontal part of the Picket Fence Border.
The manager's tie is from the Dad Jokes Set, the glasses from the Thanks a Bushel set. Those already had eyes/dots in them and I didn't manage to stamp those exactly onto the mouse's eyes, but I think, that kind of crooked look makes this mouse even cuter.
On the desk there's a monitor from the Plan On It School set, a cup from the Plan On It set and a pencil filled cup from the Virtual Friends Add-On set.
Two mice are already inside the bank, wanting to put in their money. The little mouse has put all her savings into a sock from the Little Bundle set.
And on the wall on the left there's a clock from the Plan On It Appointments set.


Das zweite Innenteil des Dioramas habe ich aus Acetate gestanzt. Ich war mir nicht sicher, ob die Karte ohne es vielleicht etwas wackelig wird - und so hatte ich eine weitere Ebene für ein Motiv, die ansonsten aber nicht groß sichtbar ist. 
Hier trägt eine Maus weitere Münzen in den Tresorraum. 

The second inner piece of the diorama I've die cut from acetate. I wasn't sure if the card would end up wonky without it - and this way I had another layer to put an image onto, without the layer being visible much.
Here a mouse is carrying more coins into the vault.


Der Tresor ganz hinten im Diorama ist mit Geldscheinen und Münzen gefüllt. Die sind mit dem Hauptmotiv des How You Bean Money Add-On Sets gemacht - ich habe es mehrfach neben- bzw. übereinander maskiert. Von diesem Motiv stammen auch die Münzen, die die Maus in der Ebene davor trägt. 
Und zwischen den Geldscheinen stecken zwei Mäuse - eine davon wirft ein paar Münzen in die Luft. 
Die Mäuse auf meiner Karte sind übrigens aus folgenden Sets: Veggie Happy, Bubbles of Joy, Really High Five, Simply Celebrate Critters, Whoosh Kites, Dandy Day und Just Plane Awesome.
Ganz zum Schluss habe ich dann alles noch auf einen weißen Kartenrohling geklebt.

The vault in the very back is filled with coins and notes. Those are made with the main image from the How You Bean Money Add-On set - I did some masking to stamp it several times next to and on top of each other. I also used a part of the image for the coins, the mouse in the middle layer is carrying.
And between all that money two mice are having fun - one of them is throwing some coins in the air. The mice on this card are from these sets: Veggie Happy, Bubbles of Joy, Really High Five, Simply Celebrate Critters, Whoosh Kites, Dandy Day and Just Plane Awesome.
As the very last stemp I mounted my card panel to a white note card.


Dienstag, 28. Mai 2024

Stampcorner Juni-Release Sneak #2

 
Hallo Ihr Lieben!
Heute zeige ich Euch ein weiteres Sneak auf das Juni-Release von Stampcorner - in ein paar Tagen ist es ja schon soweit! 
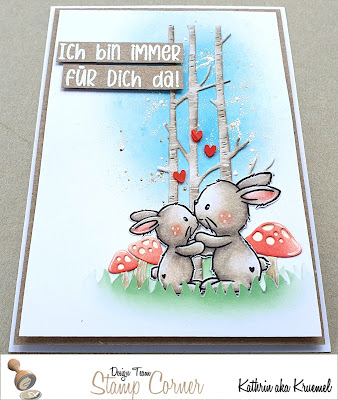
Diesmal habe ich mich für eine etwas simplere Karte in zarten Farben entschieden - ich finde, der Look passt super zu dem süßen Motiv.

Hello everyone!
Today I am sharing another sneak of the june release by Stampcorner - it's only a few days away now!
This time I made a kind of simple card in soft colors - I think, the look goes wonderfully with the cute image.

Basis war wieder ein Stück weißen Cardstocks. Auf den habe ich im unteren Bereich mit einem Gras-Stencil und Distress Oxide Cracked Pistacchio zwei Reihen Gras aufgewischt, sie aber nicht ganz zu den Rändern des Cardstocks gezogen. 
Mit ein wenig Abstand darüber habe ich dann Salvaged Patina aufgetragen. Es sieht fast ein wenig dunkel aus, daher glaube ich, dass da noch ein wenig andere Tinte, wahrscheinlich Mermaid Lagoon, im Pinsel war. Aber das macht nichts. 
Und weil ich vor kurzem meine Embossingpulver umgeräumt habe, sind mir die auch die Shabby und Chunky Pulver wieder in die Hände gefallen, die ich schon seit Jahren nicht benutzt habe. Ich habe ein wenig von dem Vintage Pink, das neben weißen auch goldene Anteile hat, hauptsächlich auf den blauen Teil aufgestreut und geschmolzen. 

Once I again I started with a piece of white cardstock. I used a grass stencil and Distress Oxide Cracked Pistacchio to ink two rows of grass onto the bottom of the cardstock but didn't ink it all the way to the edges.
With a bit of white between the colors I added Salvaged Patina above the grass. It looks a bit dark and I think, there was some darker color, most likely Mermaid Lagoon, left on the brush. But it doesn't bother me.
And when I re-organized my embossing powders a little ago I found those Shabby and Chunky powders again, that I haven't used for years. I sprinkled some of the Vintage Pink one, that has  some white and gold parts in it as well, mainly onto the blue inked area and melted it.


Mit einem Cutter habe ich entlang der Gräser der vorderen Lage geschnitten und so einen Schlitz geschaffen, hinter den ich Stanzteile und mein Motiv schieben konnte.
Die beiden süßen Hasen - die sicher auch super für Muttertag und ähnliches sind - habe ich mit Copics coloriert und per Hand ausgesschnitten.
Die Pilze sind mit der Mushroom Border von LawnFawn gemacht. Ich habe sie aus cremefarbenem Carstock gestanzt, die Hüte mit Abandoned Coral, die Stiele mit Scorched Timber ganz sanft gewischt. Und aus weißem Cardstock, den ich dann ebenfalls mit Scorched Timber bewusst streifig gewischt habe, habe ich noch drei Baumstämme ausgestanzt. Alle diese Elemente habe ich dann hinter das Gras geschoben.
Als Deko habe ich dann noch drei kleine rote Herzen über den Hasen aufgeklebt.

Using a cutter I cut along the grass of the front layer of grass to create a slit to tuck my image and die cuts behind.
These two cute bunnies - that would work perfectly on a mother's day card - I colored with Copics and cut them out with my scissors.
The mushrooms are made using the Mushroom Border die by LawnFawn. I die cut it from cream colored cardstock, then lightly inked the hats with Abandoned Coral, the stems with Scorched Timber. And from white cardstock I die cut some trees, inked them kind of streaky with Scorched Timber and put all elements behind the slit in the grass.
As decoration I glued three little red hearts above the bunnies' heads.


Der Text ist ebenfalls aus dem neuen Stempelset. Um den eher zarten Look der Karte beizubehalten, habe ich ihn mit weißem Embossingpulver auf craft farbenen Cardstock embosst.

The text means "I am always there for you". I white heat embossed it onto kraft colored cardstock to keep the soft look of the card.


Alle Elemente der Karte sind direkt auf den Hintergrund geklebt, nur die beiden Textstreifen habe ich mit dünnem 3D Tape hinterlegt.
Dann habe ich den Cardstock craft farben gemattet und alles auf einen weißen Kartenrohling geklebt.

I glued all the elements on this card directly onto the background, except for the two text strips, that I backed with some thin foam tape.
Then I matted the card panel with some kraft colored cardstock and adhered it to a white note card.

Montag, 27. Mai 2024

LawnFawnatics Challenge #173

 
Hallo Ihr Lieben!
Samstag Nacht sind wir aus dem Urlaub zurückgekommen - und so sehr ich ihn genossen habe, so sehr habe ich mich gefreut, wieder zu Hause zu sein. Denn dort wartete meine Bestellung aus dem letzten LawnFawn Release auf mich. Gleich gestern ist so diese Karte für die Dies Only Challenge auf dem LawnFawnatics Blog entstanden.

Hello everyone!
We returned from vacation saturday night - and as much as I enjoyed it, as happy I've been to be back home. Because there my order from the latest LawnFawn release was waiting for me. And I sat down yesterday to make this card for the current Dies Only challenge over at the LawnFawnatics blog. 

Von dem Moment an, an dem ich die Kaugummitautomat-Stanze Create a Gummball Machine im Intro-Video gesehen habe, wollte ich damit einen funktionierenden Kaugummi-Automaten machen. Die Münze steckt darin, man dreht am Griff, die Münze verschwindet und in der Ausgabe erscheint ein Kaugummi. Es war sogar weniger kompliziert, als befürchtet - und ich hatte im Urlaub ja genug Zeit, mir Gedanken zu machen. Und so sieht das dann aus:

Right from the moment I've seen the Create a Gummball Machine die in the intro video I wanted to make a working gummball machine. There's a coin in it, you turn the handle, the coin disappears and instead a gummball is showing up at the bottom. It actually wasn't as complicated as I expected - and I had lots of time to think about it during my vacation. And this is what it looks like:


Und weil das Wortspiel so super passt, habe ich natürlich eine Geburtstagskarte gemacht. Damit Euch nicht schwindlig wird, hier nochmal ein Stillstand-Bild:

And since the play on words worked so well I made a birthday card. To avoid you all getting dizzy, here's a regular picture of the card again:


Für den Hintergrund kam der ebenfalls neue Draped Ribbons Stencil zum Einsatz. Damit sich die weißen Kaugummigkugeln im Inneren des Automaten besser absetzen, habe ich sehr hellgrauen Cardstock für den Hintergrund gewählt und dann mit Distress Oxide Kitsch Flamingo, Picked Raspberry und Lumberjack Plaid das Muster durch den Stencil aufgewischt. Anschließend habe ich noch weiße Acrylfarbe aufgespritzt. 

For the background I used the also new Draped Ribbons Stencil. To have a bit of a contrast between the cardstock in the background and the white gummballs inside the machine I used some very light grey cardstock for my background. Then I used Disress Oxide Kitsch Flamingo, Picked Raspberry and Lumberjack Plaid to ink the pattern through the stencil onto the cardstock. Then I also added some splatters with white acrylic paint.


Den Kaugummiautomaten habe ich aus gemustertem Hologrammcardstock gestanzt und dabei zwei verschiedene Rottöne mit verschiedenen Mustern gewählt. Die silbernen Teile sind aus mattsilbernem Metallic-Cardstock, das "Loch" aus schwarzem Cardstock gestanzt. Ich habe außerdem das Oberteil des Automaten einmal aus Folie und einmal aus Vellum gestanzt. 
Die Kaugummikugeln sind aus Cardstock aus verschiedenen Pink-Tönen, von hell bis dunkel, gestanzt. Ich habe sie aufeinander und dann auf das Vellum geklebt. Das tönt den Hintergrund nur am Glasteil des Automaten etwas herunter. 
Die Münzen sind aus goldenem Hologramm-Cardstock gestanzt - eine befindet sich im Automaten, zwei weitere, zusammen mit weiteren Kaugummikugeln, neben dem Automaten. 
Außerdem habe ich hinter dem Automaten zwei Partybanner aufgehängt. Die sind mit dem Fishtail Banners Stanzenset einmal aus weißem Cardstock, einmal aus dem matt-silbernen Metallic-Cardstock gestanzt. 

I die cut the gummball machine pieces from patterned holographic cardstock using two different shades of red with different patterns. The silver parts I die cut from matte silver metallic cardstock, the "hole" I die cut from black cardstock. I also die cut the top once from acetate and once from vellum. 
The gummballs I die cut from different shades of pink cadrstock, from light to dark. I glued them together and then onto the vellum. This is used to tone down the background behind the top of the machine just a bit. 
The coins I die cut from gold holographic cardstock - one is stuck into the machine, two others are laying next to the machine, together with more gummballs. 
I also hung up two party banners behind it. I used the Fishtail Banners die set and cut one from white cardstock, one from the matte silver cardstock. 


Um den Automaten funktionieren zu lassen habe ich einfach ein recht kleines Loch in die obere Lage des Fußes und den silbernen Aufleger gestanzt sowie eines in Größe der Münze nur in den roten Fuß des Automaten. Durch das kleine Loch habe ich dann zwei winzige Stücke 3D Tape aufeinandergeklebt hindurch  gesteckt. Hinten habe ich einen Folienkreis am 3D Tape befestigt, auf den ich die Münze und die Kaugummikugel geklebt habe. Dabei habe ich sichergestellt, dass die Münze komplett verschwunden ist wenn die Kaugummikugel in der Ausgabe liegt. Von oben habe ich dann den Drehgriff auf das 3D Tape geklebt. Den Fuß habe ich dann ebenfalls mit 3D Tape so auf den kompletten Automaten geklebt, dass der Kreis frei drehbar ist. Macht meine Erklärung so Sinn?
Für die Challenge sind nur Stanzteile erlaubt - Texte sind eine Ausnahme. Und glaubt mir, ich hätte hier wirklich gerne ein paar Mäuse mit eingebaut! So aber habe ich nur zwei Texte aus dem Hay There Hayrides Stempelset weiß auf schwarzen Cardstock embosst und für den Rest des Textes das Wort Ball samt Ausrufezeichen ausgestanzt. Ich habe das Oliver's ABCs Stanzenset verwendet und die Buchstaben jeweils einmal aus weißem und einmal aus dunkel rosafarbenem Cardstock gestanzt. Die beiden Teile habe ich leicht versetzt aufeinander und dann mit 3D Tape auf die Karte geklebt.

To make the machine work I simply die cut a pretty small hole into the top layer of the machine base and the silver plate and also a hole the size of the coin just into the base of the machine. I put two really small pieces of stacked foam tape through the small hole. At the bottom I attached a circle cut from acetate to the foam tape and glued the coin and the gummball onto it. I made sure, that the coin isn't visible anymore when the gummball is fully visible. To the top of the stacked foam tape pieces I glued the handle, then adhered the machine base with foam tape onto the whole gummball machine, making sure the circle can turn and doesn't get stuck on the foam tape. Does my explanation make any sense like this?
Well, for the challenge you can only use die cuts - texts are the exception. And believe me, I'd loved to add a few mice here! Instead I just white heat embossed two texts from the Hay There Hayrides stamp set onto black cardstock and used dies for the word ball. I die cut those once from white and once from dark pink cardstock with the Oliver's ABCs die set. I stacked the letters a bit off and then adhered them with foam tape to the background.


Hier könnt Ihr den Glanz der verschiedenen Teile des Kaugummigautomaten besser sehen - der zeigt sich ja immer erst ein wenig gegen das Licht fotografiert. 
Als Deko habe ich noch einige silberne Sterne aufgeklebt, dann den Cardstock schwarz gemattet und dann alles auf einen weißen Kartenrohling geklebt.

Here you can see the shine of the different pieces of the gummball machine a lot better - it's alway only visible when the picture is taken at a bit of an angle.
I added a few silver star confetti as decoration, then matted the cardstock black and adhered it to a white note card.

Samstag, 25. Mai 2024

Serial Chiller

 
Hallo Ihr Lieben!
Vor kurzem bin ich über einen Stempel gestolpert, der "Serial Chiller" heißt und ein Faultier zeigt. Nun, der Stempel selbst war nicht meins, aber den Namen fand ich klasse und er hat mich zu dieser Karte inspiriert. 

Hello everyone!
A little ago I came across a stamp showing a sloth - and the name of the stamp was "Serial Chiller". Well, I didn't like the stamp itself but I loved the name and inspired me to make this card.

Da ich das Motiv im Fokus haben wollte, habe ich den Hintergrund eher dezent gehalten. Ein blankes Stück rosa Cardstock war mir dann aber auch zu fad. Also habe ich erst den Fern Background von WhimsyStamps mit rosafarbener Tinte auf hellrosa farbenen Cardstock gestempelt und dann die Ränder etwas dunkler rosa gewischt. Außerdem habe ich ein wenig hellgrüne Metallic Watercolor auf den Hintergrund gespritzt.
Und dann sehe ich oft, wie Cardstockstreifen als Dekoelement auf Karten verwendet werden. Also habe ich das hier auch mal ausprobiert. Ich habe Streifen aus Cardstock in verschiedenen Rosa- und Grüntönen geschnitten und sie dann von oben nach unten ausgerichtet auf die Karte geklebt - oben rechts und unten links des Motivs. 

Since I wanted my image to be the focus I went with a more sublte background here. But just a piece of light pink cardstock seemed too boring. So I first stamped the Fern Background by WhimsyStamps with light pink ink onto some light pink cardstock, then inked the edges with a darker shade of pink. I also splattered some light green metallic watercolor onto the cardstock.
I also see quite a few crafters using paper strips as decoration elements on their cards, so I decided to try that myself here. I cut strips from cardstock in different pink and green shades and glued them vertically onto my background - at the top on the right side and on the bottom on the left side of my image.


Natürlich musste auch ein Faultier auf meine Karte, damit der Text Sinn macht. Ich habe mich für diesen Kerl aus dem Picture Perfect Set von MFT entschieden und ihn mit Copics coloriert. Dann habe ich aus weißem Cardstock einen Polaroidrahmen gestanzt - das Fenster habe ich mit dem Cutter etwas größer geschnitten, damit möglichst viel vom Motiv sichtbar ist - und ihn mit 3D Tape auf das Motiv geklebt. 
Dekoriert habe ich den Rahmen dann mit diversen Blättern/Ranken und einigen Blüten. Sie alle sind mit Stanzen aus dem Tropical Leaves Backdrop von LawnFawn gemacht - die Blätter aus grünem, die Blüten aus hellrosa Cardstock. Dann habe ich alles mit Copics schattiert und, auch auf dem Motiv, Details mit einem weißen Gelstift aufgemalt. 

Of course I needed a sloth on my card for the text to make sense. I went with this guy from the Picture Perfect set by MFT and colored him with Copics. Then I die cut a polaroid frame frome white cardstock - I used my cutter to make the inner window a bit larger to show as much of the image as possible - and glued it with foam tape onto the image.
I decorated the frame with different leaves/vines and a few flowers. They all are cut using dies from the Tropical Leaves Backdrop by LawnFawn - the leaves from green, the flowers from light pink cardstock. I then shaded them with Copics and added some details with a white gel pen. I did that to the image as well. 


Haupttext ist natürlich das "Serial Chiller". Ich habe die Worte mit dem Henry Jr's ABCs Stempelset von LawnFawn zusammengesetzt und weiß auf schwarzen Cardstock embosst. Außerdem habe ich noch ein "take it easy" aus dem Hang in There Set von LawnFawn ebenfalls weiß auf schwarz embosst und neben den Pflanzen auf den Rahmen geklebt.

Main text, of course, is the "Serial Chiller". I created the words with the Henry Jr's ABCs stamp set by LawnFawn and white heat embossed them onto black cardstock. I also used a small "take it easy" text from the Hang in There stamp set by LawnFawn, also white heat embossed it onto black and attached it onto the frame next to the greenery at the bottom.


Da der Polaroidrahmen mit dem Motiv durch das 3D Tape bereits erhöht war, habe ich auch hinter die großen Textteile dünnes 3D Tape gesetzt und sie dann über- und unterhalb des Motivs auf den Hintergrund geklebt. Als Deko habe ich einige schwarze Steinchen verteilt.
Dann habe ich alles schwarz gemattet und auf einen weißen Kartenrohling geklebt.

Since the polaroid frame with the image was already raised with foam tape, I also put some thin one behind the large texts and then adhered them above and under the image. As decoration I added a few black rhinestones.
Then I matted my card panel black and adhered it to a white note card.

Freitag, 24. Mai 2024

Stampcorner Juni-Release #1

 
Hallo Ihr Lieben!
Der Sommer kommt langsam so richtig bei uns an - Zeit, sich schon mal auf die heißen Tage einzustellen und evtl. einen Gang runterzufahren. So wie diese süße "Chillkröte", die ich Euch heute als Sneak auf das Juni-Release von Stampcorner zeige.

Hello everyone!
Summer is nearly here - time, to prepare for those really hot days and maybe taking it a bit slower than usual. Just like this little turtle, that I am sharing with you today as a sneak of Stampcorner's june release.

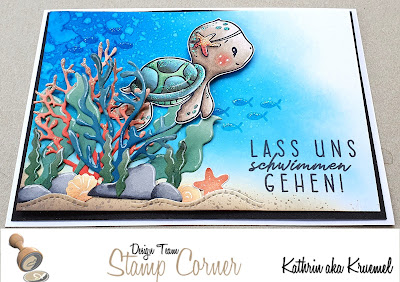
Ich habe hier eine Unterwasserwelt gestaltet, die ich aber zum rechten Rand der Karte hin habe auslaufen lassen. Gestartet habe ich mit einem Stück weißen Cardstock. Den habe ich im unteren Bereich erst mit Distress Oxide Antique Linen gewischt und ganz am Rand ein wenig Scorched Timber hinzugefügt. Davon habe ich dann ein wenig mit Wasser vermischt und fein aufgespritzt.
Das Wasser ist mit Distress Oxide Salvaged Patina, Mermaid Lagoon und Salty Ocean gewischt. Hier habe ich dann nur einige, zum Teil recht große Wassertropfen aufgebracht.
Auf den Hintergrund habe ich dann ebenfalls mit Distress Oxide in Salty Ocean und Mermaid Lagoon Fische aufgestempelt, die im Set mit der kleinen Schildkröte kommen.

I created an underwater scene here, letting it fade out towards the right edge of the card. I started with a piece o white cardstock. I inked the bottom with Distress Oxide Antique Linen first, then added a bit of Scorched Timber just along the edge. I mixed some of this dark brown ink with water and splattered it onto the inked area, making my splatters as fine as possible.
The water I created with Distress Oxide Salvaged Patina, Mermaid Lagoon and Salty Ocean. Here I just splattered some water, partly quite large drops of it, onto the ink.
I used Salty Ocean and Mermaid Lagoon again to stamp some fish, that come with the little turtle in the stamp set, onto the water.


Und hier ist die süße Schildkröte - sie sieht so wunderbar entspannt aus, wie sie das durchs Wasser gleitet. Ich habe sie mit Copics coloriert und ausgeschnitten. Dann habe ich sie auf den Hintergrund geklebt und sie dabei ein wenig hinter die äußerten Pflanzen geschoben.
Zu einer richtigen Unterwasserwelt gehören natürlich Wasserpflanzen. Ich habe hier eine Koralle sowie verschiedene Blattpflanzen aus farbigem Cardstock ausgestanzt. Dabei habe ich mich eines wilden Mixes verschiedener Marken bedient. Außerdem habe ich ein paar Steine sowie zwei Muscheln ausgestanzt. Alle Teile habe ich dann ebenfalls mit Distress Oxide etwas gewischt und dabei Abandoned Coral, Tea Dye, Rustic Wilderness, Uncharted Mariner und Evergreen Bough verwendet. Nur die Steine habe ich mit Copics schattiert. 
In den Sand habe ich dann mit zwei der Sandy Beach Accents Stanzen von LawnFawn zwei Hügel gestanzt und die Steine, Muscheln und Pflanzen dort hineingesteckt. Hier findet sich auch ein Seestern, der ebenfalls Teil des neuen Stempelsets von Stampcorner ist.

And here's the cute turtle - the way she's gliding through the water she looks wonderfully chilled. I colored her with Copics and cut her out. Then I attached her to the background, putting her just a tad bit under the plants.
Of course a real underwater scene needs some water plants. I die cut a coral and different kinds of plants from colored cardstock, using a wild mix of all kind of brands. I also die cut a few stones and two sea shells. Then I inked those pieces with Distress Oxide again, using Abandoned Coral, Tea Dye, Rustic Wilderness, Uncharted Mariner and Evergreen Bough. Only for the shading of the stones I used my Copics.
With two of the Sandy Beach Accents dies by LawnFawn I die cut two "hills" into the sand and tucked the stones, sea shells and plants into them. I also added a little star fish, that's also part of this new stamp set by Stampcorner.


Der Text auf meiner Karte kommt in dem selben Stempelset, wie die Schildkröte. Ich habe ihn mit grau-brauner Tinte auf den Hintergrund gestempelt, das ist nicht ganz so hart wie schwarz.

The text on my card means "let's go swimming" and I stamped it with grey-ish brown ink directly onto the background. This color isn't as hard as black.


Die Koralle, den Seestern und auch einige Stellen des Panzers der Schildkröte habe ich ein wenig mit Stickles beglittert. 
Zum Aufkleben der Schildkröte habe ich dünnes 3D Tape hinter dem Panzer und dickes 3D Tape hinter dem Kopf verwendet.
Dann habe ich meinen Kartenaufleger schwarz gemattet und auf einen weißen Kartenrohling geklebt.

I used Stickles to lightly glitter the coral, the star fish and also a few areas of the turtle's shell. 
 I used thin foam tape behind the turtle's shell and thick tape behind her head.
Then I matted the card panel black and adhered it to a white note card.

Donnerstag, 23. Mai 2024

Auszeit

 
Hallo Ihr Lieben!
Auf dem Stampcorner Blog zeige ich heute diese Karte mit dem süßen Bären aus dem Stempelset Frühling aus dem Mai-Release.

Hello everyone!
Over on the Stampcorner Blog I am sharing this card with the cute bear from the Frühling stamp set from the may release.

Bewaffnet mit dem Besen war mir klar, dass dieser kleine Bär irgendwo im Garten gearbeitet hat. Da ich aber in letzter Zeit doch so einige Karten mit dem klassischen "grünes Gras, blauer Himmel" gemacht habe, wollte ich hier mal etwas anderes.
Basis war hier ein Stück cremefarbenen Cardstocks, aus dem ich die größte der neuen Zickzack Stitch Stanzen ausgestanzt habe. Ursprünglich wollte ich craft farbenen Cardstock benutzen, das war mir aber für das sommerliche Motiv zu düster. Auf die Mitte des Cardstocks habe ich dann etwas Distress Oxide Kitsch Flamingo gewischt und einige Wassertropfen darauf gespritzt.

With the broom I knew this little bear must just come back from some garden work. Since I made quite some "green grass, blue sky" cards lately I felt like doing something different here.
I used a piece of cream colored cardstock and die cut the largest of the Zickzack Stitch dies from it. Then I inked the center with some Distress Oxide Kitsch Flamingo and splattered some water onto it.


Den süßen Bären habe ich mit Copics coloriert und per Hand ausgeschnitten. Als Boden habe ich ein Oval, gestanzt aus hellgrünem Cardstock, verwendet. Die Highlights sind mit einem weißen Gelstift gemacht.
Hinter dem Bären befindet sich das Motiv Blumenwiese. Da ich den Bären als Fokus, den Rest eher als Hintergrund wollte, habe ich das Blumenmotiv mit NoLine Coloring Ink von InkOn3 abgestempelt und mit Copics coloriert. Die Details habe ich dann mit Polychromos dazugemalt. Dann habe ich auch diese Motiv mit der Schere ausgeschnitten.
Und weil das immer noch ein wenig leer wirkte, habe ich die Motive aus dem Set Eukalypgus mit Kitsch Flamingo bzw. Picked Raspberry auf den cremefarbenen, pink gewischten Hintergrund gestempelt. Das Picked Raspberry war dann doch ein wenig zu intensiv. Also habe ich einfach einen Pinsel leicht mit Wasser angefeuchtet und die Stempelfarbe etwas nach innen ins Motiv hinein gezogen.
Mit dem Picked Raspberry habe ich dann noch ein paar feine Spritzer auf dem Cardstock verteilt.
Und rund um die Motive herum fliegen ein paar Schmetterlinge aus dem Butterfly Kisses Stempelset von LawnFawn.

I colored the cute bear with Copics and fussy cut him out. As the ground I die cut an oval from light green cardstock, the highlights I added with a white gel pen.
Behind the bear I used the flowers from the Blumenwiese stamp set. Since I wante the bear to be the focus of the card I used NoLine Coloring Ink by InkOn3 to stamp it, then colored it with Copics. I added a few details with my Polychromos to the image, then cut it out with my scissors again.
And since the background still looked a bit plain I used elements from the Eukalyptus stamp set and stamped it with Distress Oxide Kitsch Flaming and Picked Raspberry onto the pink inked background. Well, the Picked Raspberry looked a bit too bright so I used a damp brush to drag the ink of the stamped image inwards into the petals. 
Then I used the Picked Raspberry again to add a few small splatters of ink to the background. 
And to the sky I added a few butterflies from the Butterfly Kisses stamp set by LawnFawn.


Für den Text auf meiner Karte habe ich erst das Auszeit viermal aus dunkel-pinkem Cardstock gestanzt und aufeinander geklebt. Das  habe ich dann direkt unter dem Motiv aufgeklebt. 
Der kleinere Text darunter ist aus dem Stempelset Auszeit und mit schwarzer Tinte auf den cremefarbenen Cardstock gestempelt.

For my text I die cut the word Auszeit four times from dark pink cardstock and stacked them, then adhered them right under the image.
The smaller text underneath I stamped with black ink directly onto the cream colored cardstock.


Beim Zusammenkleben meiner Karte habe ich hinter den Bären sowie einige der Schmetterlinge dünnes 3D Tape gesetzt.
Als Deko habe ich einige klare Pailetten aufgeklebt und dann den cremefarbenen Cardstock auf einem weißen Kartenrohling befestigt. 

When putting my card together I used thin foam tape behind the bear and a few of the butterflies.
I added a few clear sequins as decoration, then adhered the cream cardstock to a white note card.
 

Mittwoch, 22. Mai 2024

Achtung, es wird bunt!


 Hallo Ihr Lieben!
Inspiration findet man ja fast überall - bei dieser Karte war es ein T-Shirt mit Regenbogen-Aufdruck im Watercolor Look. Das wäre doch perfekt für eine Karte, dachte ich. Die Umsetzung gestaltete sich dann schwieriger als gedacht. Entstanden ist dann diese wirklich kunterbunte Gute-Laune-Karte.

Hello everyone!
I find inspiration nearly everywhere. This one came from a shirt with a rainbow print in a watercolor look. That's perfect for a card, that's what I thought. Actually creating it then was harder than I thought. But finally I ended up with this really bright, colorful and happy card.

Nun, eigentlich wollte ich den Regenbogen in sanften Tönen auf meinen Cardstock wischen. Aber einen Layering Regenbogenstencil habe ich nicht. Also habe ich erst versucht, mir selbst einen zu machen, das hat dann aber nicht so richtig geklappt. Also habe ich mich entschieden, den Regenbogen kurzerhand frei Hand auf Watercolor Cardstock zu malen. Allerdings wurde er so um einiges kräftiger, als ich eigentlich geplant habe. 
 
I actually had planned to ink the rainbow onto my cardstock in very soft colors. But I don't have a layering rainbow stencil. So first I tried to create one myself, but that didn't work out either. So I decided, to simply draw it free hand onto a piece of watercolor cardstock. But it turned out way brighter than I had planned.
 

Ich habe Distress Ink Barn Door, Spiced Marmalade, Mustard Seed, Mowed Lawn, Salty Ocean und Wilted Violet verwendet und jeden Bogen zweimal mit mit Wasser verdünnter Farbe aufgemalt. Der etwas streifige Look gefällt mir sogar ganz gut.
Mit dem Spring Showers Stanzenset von LawnFawn habe ich dann ebenfalls aus Watercolor Cardstock vier Wolken gestanzt und mit den selben Farben eingefärbt. Die waren mir dann aber definitiv zu knallig. Also habe ich einfach Wasser darauf verteilt und mit einem Zewa aufgesaugt. Dadurch sind zumindest die Wolken schön zart. Am Regenbogen habe ich mich diesen Schritt nicht getraut...
Auf den Regenbogen habe ich dann erst ein wenig silberne Metallic Watercolor aufgespritzt, außerdem habe ich mit der Kleine Kleckse Stencil von Create a Smile und Distress Ink Spun Sugar und Salvaged Patina noch sanfte Farbkleckse hinter den Regenbogen gewischt. 
Ich hatte noch jede Menge übriggebliebene kleine Sterne in Regenbogenfarben in einer Box auf dem Schreibtisch. Ich habe mir einige ausgesucht und auf dem Regenbogen verteilt.
Als Motive habe ich dann die kleinen Schweinchen mit den Flügeln aus dem Little Pig Agenda Set von MamaElephant verwendet. Pinsel und Farbeimer sind aus dem Set Little Chickie Agenda - eigentlich hat den Eimer ein Küken verkehrt herum auf dem Kopf, den Pinsel habe ich einem der Hühnchen weggenommen. Die Motive sind mit Copics coloriert.
Und entlang des oberen Rands des Regenbogens habe ich dann noch einen Großteil meines Texts abgestempelt. Dafür habe ich verschiedene Stempel aus den Sets Eggstra Amazing Easter und Little Snow Globe Bear von LawnFawn kombiniert und sie an die Rundung des Regenbogens angepasst mit schwarzer Tinte direkt auf den Watercolor Cardstock gestempelt.

I used Distress Inks Barn Door, Spiced Marmalade, Mustard Seed, Mowed Lawn, Salty Ocean and Wilted Violet and drew each arch twice with the ink, mixed with some water. I like the kind of splotchy look. 
Using the Spring Showers die set by LawnFawn I die cut four clouds from watercolor cardstock and inked those with the same Distress Inks. But those really seemed to bright for the card. So I simply covered them with water and picked up the water - and with it some of the ink - with a paper towel. Now at least those are soft. I didn't dare to repeat that with my rainbow, though.
I first splattered some silver metallic watercolor onto the rainbow, then inked some splotches behind it using Distress Ink Salvaged Patina and Spun Sugar and the Kleine Kleckse stencil by Create a Smile.
From  a card I made a little ago I had a lot of tiny stars in all colors of the rainbow left over. I picked some and scattered that onto the rainbow.
As the images I picked those little piggies with wings from the Little Pig Agenda stamp set by MamaElephant. The brush and the paint tin are from the Little Chickie Agenda - the paint tin originally is on top of one of the chick's head, the brush I took from another chick. I colored the images with Copics.
And along the top edge of the rainbow I stamped most of my text. I combined different stamps from the stamp sets Eggstra Amazing Easter and Little Snow Globe Bear by LawnFawn and stamped them - matching the line of the rainbow - directly onto the watercolor cardstock using black ink.


Das Wort happy, das meinen Text ergänzt, ist mit der Happy Birthday Stanze von MFT gemacht - einmal aus schwarzem Cardstock, einmal aus Watercolor Cardstock. Eigentlich ist das H an happy groß geschrieben, das gefiel mir hier aber nicht. Also habe ich einfach das aus dem Wort birthday herausgeschnitten und das große H damit ersetzt. 
Den Text aus Watercolor Cardstock habe ich wieder mit Distress Ink im Regenbogen-Look eingefärbt, dann habe ich das schwarz gestanzte Wort etwas versetzt dahinter geklebt.
Und weil mir hier etwas fehlte, habe ich noch ein rosafarbenes, ein lilafarbenes und ein blaues kleines Herz mit aufgeklebt.

The word happy, that finishes my text, is made with the Happy Birthday die by MFT - I cut it once from black cardstock and once from watercolor cardstock. Originally the H of the happy is a capital letter, but I didn't like that here. So I simply cut out the h of the word birthday and used that as the first letter instead.
I used the same Distres Inks to color the word cut from watercolor cardstock again in a rainbow look, then cut the black one behind it as a shadow.
And since I was missing something here I added a pink, a purple and blue heart confetti.


Und dann hätte ich die Karte beinahe noch versaut... Mir hat nämlich der einfach nur weiße Cardstock im Hintergrund nicht gefallen. Also habe ich mit Distress Oxide Hickory Smoke die Ränder und Ecken abgedunkelt - und das sah furchtbar aus. Wie gut, dass die Farben wasserlöslich sind, so konnte ich sie mit einem feuchten Tuch zum größten Teil wieder entfernen und es ist nur noch ein ganz leichter Schatten zu sehen.
Die beiden Wolken mit den Schweinchen habe ich jeweils mit 3D Tape hinterlegt, alle anderen Teile sind direkt auf die Karte geklebt.
Die Flügel der Schweinchen und die Highlight-Ränder des Wortes Happy habe ich noch mit Stickles beglittert. Dann habe ich den Cardstock auf einen schwarzen Kartenrohling geklebt.

And then I nearly ruined the whole card... I didn't like that there was just the white cardstock in the background. So I used Distress Oxide Hickory Smoke to darkenthe edges and corners - and it looked awful. Luckily those colors are water solutable and I was able to wipe off most of it with a damp towel. Now there's only a soft grey shadow left.
I backed the two clouds with the piglets with foam tape, all the other elements are glued directly onto the cardstock.
I added some Stickles to the pigs' wings and the highlighted edges of the word happy. Then I adhered the card panel to a black note card.