Seiten

Donnerstag, 30. Juli 2020

Mal danke sagen


Hallo Ihr Lieben!
Heute zeige ich wieder eine Karte auf dem Stampcorner Blog. Und endlich kamen die süßen Elefanten und Hasen - naja, zumindest eines der Motive - aus dem Freunde #3 Stempelset zum Einsatz!

Hello everyone!
Today I am sharing another card over at the Stampcorner Blog. And finally I've used the cute elephants and bunnies - well, at least one of the images - from one of their new stamp sets. 

Das Design der Karte ist ganz einfach gehalten und besteht aus einer großen Szene mit Text darunter, das alles auf eine weiße Kartenbasis geklebt.

The design of this card is pretty simple. It's made with one big scene and a text underneath, all of that glued onto a white note card.


 Hier habe ich die Szene mal noch ein wenig größer für Euch.
Ich habe den Himmel mit Distress Oxide Blueprint Sketch, Chipped Sapphire und Black Soot gewischt. Mit Aquarellfarbe mit starken Glitzerpigmenten in Gold und Silber habe ich Punkte als Sterne aufgespritzt.
Die Lage mit Text und Motiven ist davorgeklebt.

Here I've taken a closer look of the scene.
For the sky I've inked up a piece of white cardstock with Distress Oxide Blueprint Sketch, Chipped Sapphire and Black Soot. Then I've added fine dots of high pigment water colors in gold and silver by simply tapping the brush onto my finger.
The layer with the text and image is glued on top.


So, und hier sind die süßen Tierchen dann ganz nah.
Ich habe sie mit Copics coloriert und das Gras nach unten heller auslaufen lassen. Da mich die weiße Linie vom  Ausschneiden des Motivs gestört hätte, habe ich hier einfach vor dem Ausschneiden einen Streifen mit blauen Copics, das ungefähr zum Blueprint Sketch passte, drumherumgemalt.
Den Schimmer rund um den Stern habe ich vor dem Aufkleben auf die passende Stelle mit Shimmer Chalk gemacht. .Das habe ich auch für den Schein auf den Tierchen benutzt.

Well, and here's a real close up of the cute animals.
I've colored them with Copics and made the green of the grass lighter towards the bottom. Since the white line around the image from cutting it out would really have bothered me here I've simply used a blue Copics marker that was pretty close to the Blueprint Sketch and drew a line around the image.
The glow around the star is made with shimmery golden chalk. That's also what I've used to add the glow to the animals.


Den Text habe ich - bevor ich das Grün im unteren Bereich aufgemalt habe - unter das Motiv gestempelt. Er ist aus zwei Stempeln zusammengesetzt, die beide zusammen mit noch vielen mehr aus dem Stempelset Danke sind. Ich habe das Danke golden coloriert und mit verschiedenen Spica Pens und einem weißen Gelmarker kleine Punkte aufgetragen, so dass es ein wenig so aussieht, als würde die Schrift glitzern. 

I've stamped the saying - before coloring that are with the greens - under the image. It means "thanks for always being there for me". I've colored the thanks with Copics in a golden tone and added tiny dots with different Spica Pens and a white gel marker. Now it looks like the word is glittering.


Mittwoch, 29. Juli 2020

Für einen lieben Menschen


Hallo Ihr Lieben!
Heute habe ich eine sommerliche Karte für einen besonders lieben Menschen zu zeigen.

Hello everyone!
Today I have  a card for you that was made for a very special and kind person.

Ich habe hier ein Stück weißen Cardstock für meine Karte passend zurecht geschnitten und daraus eines der Stitched Rechtecke ausgestanzt, um einen Rahmen zu erhalten. Unten am Rahmen habe ich etwas mehr Platz gelassen, so dass ich dort einen der Texte aus dem Stempelset Kleine Worte aufstempeln konnte. Dafür  habe ich den dreizeiligen Stempel in einer Zeile abgestempelt.
 Aus blauem Cardstock habe ich ein weiteres der Rechtecke ausgestanzt und, nachdem ich die Szene darauf geklebt hatte, den Rahmen mit 3D Tape darauf geklebt.

I've cut a piece of white cardstock the size I needed it for my card and then die cut a stitched rectangle from it to create a frame. I've left a bit more room at the bottom of the frame to have space for a stamped saying. That means "for a very special person".
I've die cut another stitched rectangle from blue cardstock and, after glueing the scene onto it, I've glued the frame on top with dimensionals.


Und hier ist die süße Maus, die mit dem dicken Herz in der Hand wohl alles sagt, was gesagt werden soll. Ich habe sie mit Copics coloriert.
Im Hintergrund blühen viele rosafarbene Blumen. Die Maus sitzt in gestanztem Gras vor einem Gartenzaun. Und oben am Himmel sind noch zwei zarte Wolken zu sehen.

And here's the cute mouse. The big pink heart in its hands says everything the card wants to say. Coloring was done with Copics.
In the background a bunch of pink flowers is blooming. The mouse is sitting in the grass in front of a die cut fence. And in the sky there are floating two puffy white clouds.


Dienstag, 28. Juli 2020

Tierische Geburtstagskarte


Hallo Ihr Lieben!
Auf dem Stamping-Fairies Blog zeige ich heute eine tierische Geburtstagskarte - und die zeigt, dass Tiere absolut verstehen zu feiern!

Hello everyone!
Over at the Stamping-Fairies Blog I am sharing a birthday card with animals today - and those animals really know how to throw a party!

Diese Karte ist 1 cm hoch bzw. dick - warum, zeige ich Euch später. Außerdem habe ich wieder eine Slimline Card gemacht. Auch wenn man es zuerst nicht sieht, der Platz war nötig. 
Die Karte selbst habe ich aus weißem Cardstock gearbeitet und mit schwarzem Cardstock beklebt. Aus der Front habe ich jeweils an derselben Stelle ein Rechteck ausgeschnitten, als Rahmen kam ein Polaroid darüber. Dahinter befindet sich das Motiv. 

This card is 1 cm thick - I'll show you later why. And again I've made a slimline card here. Even if you can't see it immediately, I needed all that space.
The card itself is made from white cardstock and covered with black cardstock. From both layers on the front I've cut out a recantgle and put a polaroid around it as a frame. The image is behind this frame.


Unter dem Polaroid habe ich dann den Text aufgeklebt. Dafür habe ich die Worte have, yourselfie und birthday aus dunkelpinkem, gelbem und grünem Cardstock ausgestanzt. Um den Platz zu füllen und gleichzeitig die Worte von der Breite her unterzubringen, habe ich verschiedene Stanzensets für die einzelnen Worte benutzt. Das have ist mit dem Impact Alphabet von MFT, das yourselfie mit dem Caption Alphabet und das Birthday mit der Happy Birthday to You Stanze gemacht. Zwischen die unteren beiden Worte habe ich noch ein Banner aufgeklebt, auf das ich den Rest des geplanten Textes gestempelt habe. Dafür habe ich einen Teil eines der Textstempel aus dem Stempelset Picture Perfect Party Animals, aus dem auch alle Motive auf der Karte sind, verwendet. 
Als Deko kamen hier ein paar hellblaue Enamel Accents auf die Karte.
Außerdem habe ich im oberen Bereich der Karte noch eine Partygirlande aus dem Pawty Time Stempelset gespannt.

Under the polaroid frame I've glued a text to the quite large area. I've die cut the words have, yourselfie and birthday from dark pink, yellow and green cardstock. To fill all the space and also make every word fit the width of the card and so I've used different dies for the words. The have was made with the Impact Alphabet by MFT, the yourselfie with the Caption Alphabet and the birthday with the Happy Birthday to You die. Between the two lower words I've added a white frame onto that I've stamped the rest of the text. I've used one of the text stamps from the Picture Perfect Party Animals stamp set, from which all of the images on the card are as well.
For decorations I've added a few light blue Enamel Accents to the card.
Across the top of the card I've also hung a party garland from the Pawty Time stamp set.


Und hier ist das erste Party-Tier! Die Giraffe hat auf jeden Fall ihren Spaß. 
Ich habe hier mit Copics in fröhlich-bunten Farbe coloriert, den Hintergrund habe ich in dunkelm Grau, nach innen heller werdend, eingefärbt. Dadurch hat man die Luftballons und vor allem die Schnüre nicht mehr so toll gesehen, deswegen habe ich hier die Stempellinien mit einem weißen Gelmarker nachgemalt.

And here's the first party animal! The giraffe really seems to have fun.
I've colored the image in happy colors, the background in dark greys, getting lighter towards the center. Due to the grey it was hard to see the stamp lines of the balloons and the strings so I've used a white gel marker to re-do the stamp lines here.

Nun habe ich gerade ja vom "ersten Party-Tier" gesprochen. Ja, da sind noch mehr!

Well, I just wrote about the "first party animal". And yes, there are more!


Das ist auch der Grund, warum die Karte so hoch/dick werden musste. Dazwischen befinden sich zwei Papierstrohhalme, die ich auf je ein Stück eines Holzstäbchens gesteckt und mit Eyelets fixiert habe. Darüber habe ich dann einen Streifen Folie, zum Ring geklebt, angebracht. An der Rückseite befindet sich der breite schwarze Cardstockstreifen, auf den ich noch mit weißem Embossingpulver "pull here" mit zwei Pfeilen aus dem Interactive Labels Stempelset aufembosst habe. Auf die Vorderseite des Folienstreifens habe ich die Motive geklebt. So können die nun wechseln.

And that's the reason why the card needed to be that thick. In between the front and back there are two paper straws that I've put a piece of a wooden stick through and fixed them with eyelets. Over those I've put a long strip of clear foil and closed it to a ring. To the back of this ring I've glued the wide strip of black cardstock onto which I've also white heat embossed a "pull here" with two arrows from the Interactive Labels stamp set. The images are glued to the front of this foil ring and now the images in the polaroid frame can change.

Hier seht Ihr das zweite Motiv auf der kompletten Karte.

Here you see the second image on the complete card.


Ganz ehrlich, ich habe den Verdacht, dass die beiden Papageien schon ordentlich von der Bowle gekostet haben... ;) Aber ich finde die beiden klasse.

Honestly, I really have a feeling like those two birds already had some of the punch... ;) But I totally love them!


Und auch Elefant befindet sich unter den Gästen, die ein Selfie geschossen haben.

And also an elephant ist amongst the guests that took a party selfie.


Und der Elefant hat es sich nicht nehmen lassen, seine Jonglierkünste auf dem Selfie festzuhalten.

And the elephant really couldn't resist to show off a bit and take a selfie of himself juggling some gifts on his trunk.


Samstag, 25. Juli 2020

Stempeleinmaleins - Ausgabe vom 25. Juli 2020


Hallo Ihr Lieben!
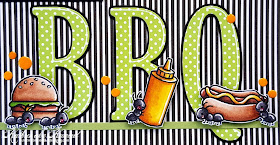
Heute verabschiedet sich das Stempeleinmaleins in die einmonatige Sommerpause. Aber vorher haben wir noch einen neuen Sketch für Euch. Und nach dem ist meine Karte entstanden.

Hello everyone!
Today Stempeleinmaleins is starting its one month summer break. But we have left a sketch for you. And this is the card I made after it.

Hier habe ich schwarz-weiß gestreiftes Designpapier für den Hintergrund verwendet, das ich grün gemattet und auf eine weiße Kartenbasis geklebt habe.
Den Text "let's have a" habe ich mit einzelnen Buchstaben und grüner Tinte auf einen Streifen weißen Cardstock gestempelt, schwarz gemattet und quer auf die Karte aufgeklebt.

Here I've used some black and white striped designer's paper for the background, matted it green and put it onto a white note card.
The text "let's have a" is stamped onto a strip of white cardstock using individual letter stamps and green ink, then matted black and glued across the top of the card.


Im Sketch sind drei Rechtecke eingezeichnet. Für sie habe ich die großen Buchstaben gesetzt. Ich habe sie mit dem großen Alphabet von SU aus grünem Designpapier mit weißen Punkten gestanzt, die schwarze Mattung ist per Hand geschnitten. Dann habe ich sie auf die Karte geklebt.
Und dann kam das Let's BBQ Stempelset von LawnFawn zum Einsatz, das ich mir kürzlich gegönnt habe. Aus ihm sind der Burger, die Senfflasche und der Hotdog. Die kleinen Ameisen, die alles so fleißig tragen, sind aus dem neuen Crazy Antics Stempelset. Alles ist maskiert, die Augen und Fühler der Ameisen habe ich noch mit einem schwarzen Glaze Pen von Sakura nachgemalt. Dadurch sind die Fühler leider etwas dicker geworden, aber so sieht man sie zumindest gut. 
Als Deko habe ich noch ein paar gelbe Enamel Accents auf der Karte verteilt.

There are three rectangles drawn in the sketch. I've used the big letters in their place. I've die cut those from green designer's paper with white dots using an alphabet die set by SU, the black matting is cut by hand. ThenI I've glued them onto the card.
And then I've inked up the Let's BBQ stamp set by LawnFawn, that I just got recently, for the first time. I've used the burger, the mustard bottle and the hot dog from this set. The ants, that are carrying all that food, are from the new Crazy Antics stamp set. I did some masking and used a black Glaze pen by Sakura to re-draw the eyes and the antennas. Well, the antennas got a bit thick but at least you can see them clearly now.
For decorations I've added a few yellow Enamel Accents to the card.


Mittwoch, 22. Juli 2020

Herzlichen Glückwunsch


 Hallo Ihr Lieben!
Heute habe ich wieder eine Karte mit Stempeln und Stanzen von JM Creation für Euch gemacht. Auf den ersten Blick wirkt die echt fad, aber natürlich steckt mehr dahinter. Ich habe mal wieder eine Color Changer Card gemacht. Das Motiv, das auf der "faden" Version zu sehen ist, ist mit StazOn auf Folie gestempelt, dahinter befindet sich weißer Cardstock. Zieht man den am pinkfarbenen Tab nach oben, verändert sich das Bild:

Hello everyone!
Today I have to share a card made using stamps and dies by JM Creation again. At first sight it looks really boring, but of course there's more behind it. After a long time I've made a magic color changer card again. The image on the "plain" part of the card is stamped with StazOn onto a piece of transparency and there's a layer of white cardstock behind it. When you pull the pink tab the picture changes:


Und schon wird aus der faden Karte eine fröhliche Geburtstagskarte!

And the boring card turns into a happy birthday card!

Kennt Ihr das, Ihr habt ein Design im Kopf und während des Werkelns vergesst Ihr einen Teil davon? Und wenn es Euch wieder einfällt, ist es zu spät? So ging es mir hier. Erst beim ersten "Aktivieren" der Karte fiel mir wieder ein, dass ich das süße Schweinchen ja eigentlich ohne Hut und Klee auf die Folie stempeln wollte, so dass diese Accessoires erst im bunten Teil zu sehen sind. Naja, da war es zu spät. Es ärgert mich immer noch ein wenig, denn so hätte der Effekt noch besser gewirkt, finde ich. 

Did it ever happen to you that you have a card design in mind and while making the card you forget about a part of it? And when you remember it, it is too late? That's what happened to me here. Only when I "acctivated" the card for the first time I remembered that I wanted the plain pig, without hat and clover, on the transparency so those accessoires would only show when the colorful side is visible. Well, it was too late. I still think that would have made the effect even better.


Hier seht Ihr die bunte Karte nochmal besser.
Ich habe den Rahmen mit zwei der Stitched Rechtecke gemacht, die Zwischenlagen aus weißem Cardstock ist mit einer größe zwischen den beiden anderen gestanzt. An den weißen Teil habe ich einen halbierten Wellenkreis aus dem DinLang Kreise und Wellen Stanzenset als Ziehtab angeklebt. Darauf habe ich ein kleines Bitte ziehen aus dem Stempelset Pfeile und Texte gestempelt.
Unten auf den Rahmen habe ich den Text angebracht - sonst war nirgends ein passender Platz. Dafür habe ich die Worte Herzlichen und wunsch - das Glück habe ich wegmaskiert - mit grüner Tinte direkt auf den Rahmen gestempelt und dazwischein ein pinkfarbenes Glück, gemacht mit dem
ABC 1 Stanzenset, geklebt.

Here you get a better look at the colorful side.
I've created the frame using two stitched recangle dies and die cut the white layer behind the transparency from a rectangle that's between those other two in size. To the edge of the white slider piece I've glued a half a scalloped circle, cut from pink cardstock, and stamped a "pull here" onto
it.
To the lower edge of the frame I've added a saying. I've stamped part of it with green ink and part of it is made with some die cut letter, cut from pink cardstock.


Das süße Schweinchen ist das Motiv Schweinchen Sebastian. Es kommt mit verschiedenen Accessoires, ich habe Zylinder und Kleeblatt benutzt. Coloriert habe ich ihn mit Copics. Da zu einer Party natürlich Luftballons nicht fehlen dürfen, habe ich die Luftballons aus weißem Cardstock gestanzt, aufeinander geklebt und dann mit Copic rosafarben coloriert. Ich habe sie oben rechts in die Ecke geklebt und mit weißem Gelmarker Schnüre bis zur Hand des Schweinchens gemalt.
Unten an der Kante kam noch eine der neuen Graslinien zum Einsatz, schließlich können Schweine nicht fliegen...

The cute piggie is called Sebastian. It comes with different accessoires stamps, I went with cylinder and clover here. He was colored with Copics. Since balloon are a must have at any party I've die cut two balloons from white cardstock, glued them on top of each other and then colored them pink. I've glued them to the top right corner of the background and then drew some strings with a white gel marker, making Sebastian hold them.
To the upper edge of the background I've also glued a grass border - I don't think Sebastian is able to fly...


Der Teil hinter dem weißen Cardstock ist auch noch als Shaker gearbeitet. Ich habe ihn mit kleinen grünen Pailetten, winzigen grünen Kugeln und pinkfarbenen Sechsecken gefüllt, so dass auch noch Konfetti regnen. Dann kann die Party ja beginnen!

The part behind the white cardstock is also turned into a shaker card. I've filled it with small green sequins, tiny green beads and pink hexagons so now there are also confetti showers. So let's get this party started!


Dienstag, 21. Juli 2020

You brightened my Day


Hallo Ihr Lieben!
Manchmal können überraschende Kurzbesuche so viel wert sein und einen ganzen Tag zum Strahlen bringen. So ein Besuch hat mich zu dieser Karte, die ich heute auf dem Stamping-Fairies Blog zeige,  inspiriert. Der, und der Sommer, der endlich da ist. Man kann ihn sehen, fühlen, riechen. 

Hello everyone!
Sometimes a short surprise visit can mean so much and brighten up a whole day. One of those visits inspired me to make this card, that I'm sharing over at the Stamping-Fairies Blog today. Well, and of course summer, which is finally here. You can see it, feel it, smell it. 

Ich hatte ja vor kurzem schon mal eine Karte mit Rahmen gezeigt, bei der ich nur innerhalb des Rahmen, nicht aber darauf das Motiv coloriert habe. Das hat mir so gut gefallen, dass ich es hier, etwas abgewandelt, noch einmal gemacht habe. 
Passend zu den Farben, die ich verwendet habe, habe ich das dekorierte Stück weißen Cardstock mit mattgoldenem Metallic-Cardstock gemattet und auf eine weiße Kartenbasis geklebt.

A little time ago I've already made a card with a frame where I only colored the parts of the image inside the frame, but not the ones on it. I liked that so much that I've done it again, with just a bit of variation.
Matching the colors I used for my card I've matted the decorated piece of white cardstock with a piece of matt golden metallic cardstock and then glued both layers onto a white note card.


Als Motiv habe ich hier die Flowers in Bloom von MFT benutzt und mit Memento Desert Sand auf den weißen Cardstock gestempelt. Eigentlich wollte ich nochmal das neuere Peony Perfection Motiv verwenden, das hat mir aber von der Aufteilung her dann nicht gefallen. Ich habe die Blumen maskiert, die Rectangle Extraordinaire Stencil auf die Karte gelegt und den Innenbereich mit Distress Ink Tumbled Glass gewischt. Vorher habe ich auch den Schmetterling gestempelt und ebenfalls maskiert, zu ihm aber gleich mehr. Dann habe ich die Blumen innerhalb des Rahmens mit Copics coloriert. Durch die helle Stempelfarbe konnte ich No-Line Coloring machen, das helle Braun passt aber gleichzeitig super zum Gold, das ich mit verwendet habe.
Der Text aus dem Stempelset Rainbow Greetings ist mit goldenem Embossingpulver quer über die Karte embosst. Dann habe ich noch ein paar klare Nuvo Drops mit Goldglitter auf der Karte verteilt.

For the image I went with the Flowers in Bloom stamp by MFT and stamped it with Memento Desert Sand ink onto white cardstock. Originally I had planned to use the newer Peony Perfection image again but I didn't like how it looked inside my frame and combined with the butterfly. I've masked the flowers, put the Rectangle Extraordinaire stencil onto my cardstock and filled just the inner space with Distress Ink Tumbled Glass. Of course I've also stamped and masked the butterfly before inking the background but we'll talk about that in just a second. Then I've colored the flowers adding ink only inside the frame again. Due to the light ink I've stamped the image with I was able to do some no-line coloring, and still the light brown ink goes great with the gold I've used also. 
The saying from the Rainbow Greetings stamp set is golden heat embossed across the card. Then I've also added a few clear Nuvo Drops with golden glitter.


Und hier ist der Schmetterling. Wie gesagt, den habe ich natürlich ebenfalls vor dem Einfärben des Hintergrunds gestempelt und maskiert. Er ist einer der tollen Schmetterlinge aus dem Set Brilliant Butterflies. Man kann es auf dem Bild nicht erkennen, da vom oberen Flügelpaar hier nur eine kleine Ecke oben zu sehen ist, aber ich habe die unteren Flügel des Schmetterlings in zwei verschiedenen Pinktönen gestempelt. Das geht prima, denn sie sind jeweils einzelne Flügelpaar-Stempel. Für die unteren Flügel habe ich das hellere Tickled Pink von MFT benutzt, die dunkleren oberen Flügel sind mit Pink Lemonade abgestempelt. 
Auch der Körper und die filigran verzierten Flügel sind jeweils Einzelstempel. Ich habe erst die Flügel mit dem tollen Muster mit Gold Pearl Embossingpulver von Ranger auf Vellum embosst, dann den Körper mit dem Fine Detail Gold, das ich auch für den Text verwendet habe, darüber embosst. Eigentlich sind die Stempel so ausgelegt, dass "bestimmt" ist, welche Motive zusammen einen Schmetterling ergeben. Aber man kann das prima mixen, was ich hier auch getan habe. So konnte ich den Schmetterling in der Größer perfekt auf meine Karte bzw. die Position abstimmen. Die Motive auf dem Vellum habe ich dann ausgeschnitten, nur hinter dem Körper etwas Kleber aufgetragen und auf den rosa gestempelten Flügeln aufgeklebt. Die Flügel aus Vellum habe ich dann noch ein wenig nach oben gebogen. 

And here's the butterfly. As mentioned, of course I've stamped this and covered it with masking tape prior to inking up the background. This is one of the amazing butterflies from the Brilliant Butterflies stamp set by MFT. You can't really see it on the picture since you only get a glimpse of the upper pair of wings, but I've used two different tones of pink to stamp the solid butterfly. That can be done easily since they are all individual stamps. For the lower pair I've used Tickled Pink by MFT, the upper pair is stamped with Pink Lemonade. 
Also the body and those delicately decorated pair of wings are individual stamps. First I've heat embossed those wings with the beautiful pattern onto a piece of vellum, using Gold Pearl embossing powder by Ranger, then I heat embossed the body with Fine Detail Gold embossing powder, the one I've also used for the saying. 
The stamps in this set are marked to show which stamps to use to end up with one matching butterfly but of course you can mix and match, and that's what I did here. That gave me the chance to make it fit perfectly onto my card in size and position. I've cut out the image(s) stamped on vellum and added a drop of glue only behind the body, then glueing it down onto the solid wings stamped in pink. Then I've slightly bent up the wings stamped on vellum.


Samstag, 18. Juli 2020

Stempeleinmaleins - Ausgabe vom 18. Juli 2020


Hallo Ihr Lieben!
Beim Stempeleinmaleins zeigen wir Euch heute ein Leporello in der Box - und Platz für Schokolade ist in der Box auch noch!

Hello everyone!
Over at the Stempeleinmaleins Blog today we are sharing a tutorial for a leporello in a box - and there's even room for some chocolate in the box.


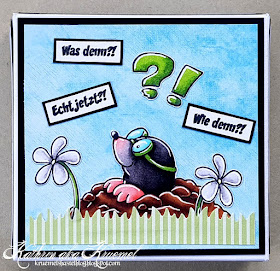
Ich habe daraus gleich die Geburtstagskarte für meinen Schwiegervater gemacht. Irgendwie bekommt dieses Jahr fast niemand eine "normale" Karte von mir/uns. 
Die Seiten und den Deckel der Box habe ich mit einem etwas kleinerem Stück schwarzen Cardstock beklebt, darauf kam ein wieder kleineres Stück blaues Designpapier mit dezentem Muster. Das passte hier so schön als Himmel.
Als Deko habe ich den süßen Maulwurf von Clearly Besotted verwendet - mein Schwiegervater hat mit denen so seine Erfahrungen. Auch die Blumen sind aus dem Maulwurfset. 
Unten habe ich einen Streifen Gras aus gestreiftem Designpapier aufgeklebt. Schließlich kann der Maulwurfshügel ja nicht aus dem Nichts kommen.
Das Ausrufe- und Fragezeichen sowie die Texte auf dem Deckel sind aus einem der tollen Eddie-Sets vom Stempellädle. Die Erdmännchen hätten auch prima gepasst, waren aber zu groß. 

I've turned this into my father in law's birthday card. Looks like nearly nobody from my family is getting a regular card this year.
I've glued slightly smaller pieces of black cardstock onto the sides and top, then put a smaller piece of blue designer's paper on top of that. The pattern looks like a blue sky to me.
For decorations I've picked this cute mole by Clearly Besotted - my FIL has his own experiences with those. Also the flowers are from this stamp set.
To the bottom I've glued a strip of die cut grass - the molehill just couldn't appear out of nowhere.
The question- and exclamation mark and the small texts are from a stamp set by Stempellädle. The small texts mean What?, How? and Really?.


So sieht es aus, wenn man die Box aufklappt. Die Box ist wie eine Pizzaschachtel gearbeitet. Ich habe in die vordere Seite noch eine kleine Kerbe gestanzt, damit sie leichter zu öffnen ist.
Innen im Deckel habe ich ein schwarz gemattetes Rechteck aus dem grün gestreiften Designpapier geklebt, darauf kam ein weißer Kreis sowie ein Text von JM-Creation. Der Luftballon ist aus dem Mice Time To Celebrate Stempelset von MFT. Das Geschenk darunter habe ich einfach weggeschnitten und durch ein handgemaltes Schnurende ersetzt. 
Zwei grüne Enamel Accents sind auch mit aufgeklebt.

This is what the opened box looks like. The box is made like a small pizza box. I've also punched a half circle from the front side to make opening it easier. 
To the inside of the lid I've glued a black matted rectangle, cut from the green striped designer's paper that I've also used for the grass. Then I've added a white circle and a "let's celebrate you" saying. The balloon is from the Mice Time to Celebrate stamp set by MFT. I've cut off the present at the bottom and replaced it with a hand drawn string end.
There are also two green Enamel Accents.


Ja, auf dem Bild hier ist nicht gerade viel erkennbar. Aber ich wollte Euch zeigen, wie das Leporello an der Seite der Box angeklebt ist, also musste alles aufs Bild. Links, am Anfang des Leporellos, seht Ihr noch ein Stückchen des schwarzen Bandes, das ich hier angeklebt habe, damit man das Leporello leichter aus der Box ziehen kann.

Yes, I know, this picture doesn't show any details. But I wanted to show you how the Leporello is glued to the inner side of the box. At the left edge of the picture you can see part of the black ribbon I've glued to this part of the Leporello to make taking it out of the box easier.


Hier könnt Ihr die Deko des Leporellos besser sehen.
Ich habe alle Teile mit dem blauen Designpapier, das ich wieder schwarz gemattet habe, beklebt. 
Auf dem ersten Teil sind ein Banner, ein paar Luftschlangen und die Worte "Zum Geburtstag alles", gedruckt am PC, aufgeklebt.
Die anderen Teile sind jeweils mit einem weißen Kreis, einem aus dem getreiften Designpapier und schwarz gemattetem Buchstaben und einem Motiv dekoriert. Außerdem habe ich auf allen Seiten wieder grüne Enamel Accents aufgeklebt. 
Die Mäuse sind von Impronte D'Autore. Eigentlich bilden sie eine Art Parade, ich habe sie voneinander getrennt und einzeln benutzt. 

Here you get a better look at the Leporello.
I've covered all parts with the blue designer's paper, again matted black. 
Onto the first part I've glued a banner, a few streamers and the words "for your birthday all".
All the other parts are decorated with a white circle, a letter cut from the striped designer's paper and again matted black, and an image. I've also added green Enamel Accents to all the parts.
The individual letters here finish the sentence from the first part with a "best".
The mice are by Impronte D'Autore. Originally they create some kind of parade, I've seperated them and used them individually.


Klappt man das komplette Leporello beiseite, kommt die Schokolade zum Vorschein. Ich habe hier alle Beschriftung mit Kopierpapier abgedeckt. Aber die beiden Lamas und der Text darauf sind so süß, die musste ich mit zeigen.
Zuerst hatte ich überlegt, ob ich die Rückseite des Leporellos überhaupt dekorieren soll - und dann entschieden, dass es so einfach komplett ist.

If you turn the complete Leporello to the side, you find the chocolat underneath. I've covered all the prints on the box with white copy paper. But those two lamas and the "love you" text are so cute, I just had to share them.
First I wasn't sure if the back of the Leporello needed decorations - and then decided that it wouldn't be complete without it.


Also habe ich die Seiten dort mit schwarz gematteten Stücken des grünen Designpapiers beklebt und darauf, wieder am PC geschriebene Papierstücke mit guten Wünschen aufgeklebt.

So I've covered the back sides with black matted pieces of the green designer's paper and added small strips of paper. On those I've printed some birthday wishes.


Donnerstag, 16. Juli 2020

Eine Portion Sommer


Hallo Ihr Lieben!
Schon vor einiger Zeit habe ich Euch eine Karte mit dem tollen Stempelset Hitzefrei gezeigt. Heute habe ich ein weiteres Motiv aus dem Set auf einer Karte, die ich heute auf dem Stampcorner Blog zeige, verarbeitet. 

Hello everyone!
Some time ago I've shared a card with one of the cute images from the Hitzefrei stamp set by Stampcorner. Today I have used another one on a card, that I'm sharing over at the Stampcorner Blog today.

Wie Ihr oben sehen könnt, ist es wieder eine interaktive Karte geworden, diesmal eine ganz banale Slider Card.

As you can see I've made another interactive card, this time it's a simple slider card.


Die Szene im Hintergrund ist komplett frei hand gemalt. Einen Wasserrutschen-Stempel - noch dazu aus der Perspektive und in der Größe, die ich brauchte - konnte ich bei bestem Willen nicht finden. Ich habe alles vorsischtig mit Bleistift skizziert und dann mit Copics coloriert. 
Oben links auf der Karte habe ich zwei Texte untergebracht. Das "eine Portion Sommer" ist aus dem Set Hitzfrei, der "Mach was Dir Spaß macht"-Text ist aus dem Stempelset Auszeit. Den kleineren Text habe ich statt zweizeilig einfach einzeilig abgestempelt. Sonst hätte der größere Text darunter nicht mehr wirklich auf die Karte gepasst.

The scene in the background is completly hand drawn. I really wasn't able to find a water slide stamps - even more not from the perspective and in the size I needed it. I've lightly drawn everything with a pencil and then colored it with Copics.
To the top left corner of the card I've added two sentiments. The smaller one means "a dose of summer", the larger one "do something fun". 


Und hier ist die kleine Katze. Schildkröte und Bären hatte ich ja bereits im Pool gezeigt. Der Katze war das sanfte Herumschaukeln auf den Wellen aber viel zu langweilig, deswegen hat sie sich die größte Wasserrutsche gesucht, die sie finden konnte. 
Ich weiß nicht, wie es Euch geht, aber irgendwie sind fast alle Wasserrutschen, die ich kenne, orange-gelb. Also auch die auf meiner Karte. Ich muss aber gestehen, dass das nicht so meins ist und es bestimmt auch Rutschen in anderen Farben gibt!
Im Hintergrund habe ich in paar Büsche gemalt. An allen Wasserrutschen, die ich kenne (wie gesagt, es sind nicht viele), sind Büsche gepflanzt. Vielleicht hat das etwas damit zu tun, dass dann niemand im Rutschenauslauf ins Wasser springen kann?
Für den Slidermechanismus musste ich ein wenig tricksen, damit die Katze auch in der Rutschbahn bleibt. Außerdem wollte ich das "Gegenrutschen" nach einer Kurve mit zeigen. Also habe ich die zwei verschiedene Sliderstanzen verwendet: die Downhill Slope Stanze von MFT und eine der Slider Channel Stanzen von LawnFawn. Mit partial diecutting konnte ich sie aneinander fügen und so rutscht die Katze genau so, wie ich das wollte.

And here's the little cat. I've already used the turtle and the bear and let them swim in a pool. Well, turns out that the lazily floating on the water thing is way too boring for this cat and so she went to find the biggest water slide around.
I don't know how about you but it seems like all the water slides I know are an orangey yellow. So I've picked this color for my water slide as well. I have to admit, I don't like water slides much so I am pretty sure there are plenty of different colors.
In the background I've colored some bushes. All the water slides I know, and as mentioned I don't know many, have bushes planted at their ends. I guess it's to avoid kids jumping into the water at the ends of the slides.
For the slider mechanism I had to do some thinking outside the box to make the cat follow the slide. I also wanted to include that "sliding to the oposite side after a curve" thing. So I#ve combined two different slider dies: the Downhill Slope by MFT and one of the Slider Channel dies by LawnFawn. By doing some partial die cutting I was able to turn them into one slope and make the cat slide exactly as I wanted her. 


Mittwoch, 15. Juli 2020

Eine - kleine - Getränkekiste


Hallo Ihr Lieben!
Diesmal brauchte ich ein kleines Geschenk für einen Mann. Da kommt die Getränkekiste-Stanze von JM Creation gerade recht.

Hello everyone!
I was in need of a small gift for a man. So this box die by JM Creation came in very handy.


Die Box ist darauf ausgelegt, vier kleine, viereckige Klopfer unterzubringen. Mir schwebte etwas anderes vor, daher ist meine Box unbefüllt.
Ich habe die Box selbst aus kraftpapierbraunem Cardstock gestanzt. 
Passend zum Motiv habe ich oben am Griff einen Flaschenöffner-Charm angebunden.

The box is made to fit four small square bottles. I had something else in mind so mine is still empty.
I've die cut the box from craft colored cardstock.
Matching the image I've tied a bottle opener charm to the handle.


Vor dem Zusammenkleben habe ich die Außenseite sowie die Trennteile in der Mitte - ich habe für mehr Stabilität zwei gegeneinander geklebt - mit dem Holzhintergrund und brauner Tinte rundum bestempelt.

Before glueing the box together I've used a wood panel image and brown ink and stamped on all the outsides as well as the handle parts (I've glued two together to make the handle really sturdy). 


Als Motiv habe ich den tollen Bierkrug verwendet. Ich wollte keine schwarzen Stempellinien, also habe ich ihn weiß auf weißen Cardstock embosst und anschließend mit Copics coloriert. Man muss hier zwar etwas mehr aufpassen, um die weißen Stempellinien nicht ebenfalls zu colorieren, aber das Ergebnis ist die "Mühe" wert. 
Den Schaum auf dem Bier habe ich noch ein weiteres Mal abgestempelt/embosst, ausggeschnitten und mit 3D Tape auf das komplette Bier geklebt. So wirkt er schön plastisch. Außerdem habe ich nur das Glas mit Glossy Accents überzogen.
Das Zum Wohl ist einer der  Texte, die im Set mit dem Bierkrug kommen. Er ist ebenfalls weiß auf dunkelbraunen Cardstock embosst und per Hand ausgeschnitten. 
Bierkrug und Text habe ich dann auf ein Label geklebt, das im Stanzenset Getränkekiste enthalten ist. Dafür habe ich blau-weißes Designpapier benutzt, schließlich bin ich aus Bayern!  Das Label mitsamt Motiven habe ich dann vorne auf die Getränkekiste geklebt.
Gefüllt wird sie mit zwei kleinen Fläschchen Bierlikör, den es hier in einer Brauerei gibt, sowie einem Tütchen Weißbier-Gummibärchen. Ich habe die vor kurzem entdeckt und keine Ahnung, ob die tatsächlich nach Bier schmecken. Aber ich werde es erfahren... ;)

As the image I've picked this great bear mug. I didn't want to have any black stamping lines with the glass image so I've white heat embossed it onto white cardstock and then colored it with my Copics. You have to be even more careful than usual so you don't color the white lines, too,  but I think it's worth it.
I've heat embossed the foam on the beer again, cut it out and used dimensionals to glue it on top of the complete image to add some dimension. I've also added a layer of Glossy Accents to the glass of the mug only.
The text means "cheers" and is white heat embossed onto brown cardstock, then cut out by hand. 
Mug and text were then glued onto a label, cut with a die that comes with the box die. I've picked blue and white designer's paper here - after all I am bavarian! Then I've glued the label onto the front of the box.


Dienstag, 14. Juli 2020

Have a wonderful day


Hallo Ihr Lieben!
Ich liebe es ja, Karten mit Szenen zu  machen und dafür viele verschiedene Stempelsets zu kombinieren. Ich denke, das habe ich die letzten Wochen oft genug "bewiesen". Also zeige ich heute auf dem Stamping-Fairies Blog mal eine Karte mit nur einem einzigen Stempel. Okay, zwei, wenn man den Text dazu zählt.

Hello everyon!
I love to create cards with scenes that combine lots of different stamp sets. I think I've "prooved" that during the last weeks and months. So today over at the Stamping-Fairies Blog I am sharing  a card using just one single stamp. Okay, two when you count the text.

Ich habe hier den Stempel Peony Perfection von MFT benutzt. Der stempelt wirklich nur eine Blume mit Stängel und Blatt. Ich habe ihn hier mehrfach über-/nebeneinander maskiert. 
Ich wollte eine Karte mit viel Kontrast. Zuerst hatte ich überlegt, mal wieder mit Polychromos auf schwarzem Cardstock zu colorieren. Aber die weißen Embossinglinien - die einzige Möglichkeit die Stempellinien auf schwarzem Cardstock sichtbar zu machen - hätten mir nicht gefallen. Und mit Polychromos brauche ich immer so viel länger mit der Coloration, einfach weil ich es zu selten mache. Bei diesem super detailierten Motiv, und das auch noch mehrfach, war mir das einfach zu viel. Also habe ich einfach mit schwarzer Tinte auf weißen Cardstock gestempelt und nach dem Colorieren des Motivs den weißen Cardstock schwarz, bzw. im oberen Bereich dunkelgrau, coloriert. Ich finde die Wirkung klasse!

I've used the Peony Perfection stamp by MFT. This really only stamps one flower with a stem and leave. I've stamped it several times next to and on top of each other and did some masking.
I was after a card with lost of contrast. So first I thought about coloring with my Polychromos on black cardstock. But the white embossed lines - the only way to make the stamp lines visible on the black cardstock - would have felt strange here. And it takes me forever to color an image with the Polychromos - just because I use them quite seldom. With this detailed image - and having stamped it even four times - it would have taken ages. So I've simply stamped the image onto white cardstock with black ink, colored it in and then colored the white spaces between the flowers with black - and grey in the top areas - Copics. I just love the look of it!


Hier habe ich die Blumen mal genauer für Euch fotografiert. Ich habe sie mit Copics coloriert und zwar so, wie ich Pfingstrosen, neben den fast weißen, liebe: von dunkelpink nach ganz hell pink. Die Linien in den Blütenblättern habe ich mit einem weißen Gelmarker hinzugemalt. 

Here I've taken a close up of the flowers. I've colored them with my Copics and exactly how I love them - besides the nearly white ones: from dark pink to a very light pink. The lines on the petals were added with a white gel marker.


Und hier seht Ihr den zweiten Stempel. Vom Thema her hätte auf diese Karte hätte so ziemlich alles gepasst. Also habe ich mich mehr nach der Schrift orientiert. Ich finde die Schreibschrift bei diesem hier wundervoll zu den Blumen. Er ist aus dem Stempelset Splendid Swans von MFT und mit weißem Embossingpulver auf einen Streifen Cardstock embosst. Den habe ich bewusst nicht gemattet, so passt er prima zum Design der Karte.
Zum Schluss habe ich den colorierten Cardstock rosafarben gemattet, auf eine weiße Kartenbasis geklebt und ein paar silberfarbene Pailetten über die Karte verteilt.

And here's the second stamps. Themewise nearly anything would have fit this card. So I picked a sentiment by the font. I love the script of this one with this wonderful flowers. It's from the Splendid Swans stamp set by MFT and white heat embossed onto a strip of black cardstock. I didn't mat this strip because I think without the matting it goes great with the design of this card.
In the end I've matted the whole colored panel with light pink cardstock, glued it onto a white note card and added a few silver sequins here and there.


Samstag, 11. Juli 2020

Stempeleinmaleins - Ausgabe vom 11. Juli 2020


Hallo Ihr Lieben!
Heute zeigen wir Euch beim Stempeleinmaleins eine Fling Card.  Ich fand die Kartenart für eine bloße Karte fast zu aufwändig und habe darum kurzerhand ein kleines Album daraus gemacht.

Hello everyone!
Over at Stempeleinmaleins we are sharing a Fling Card today. I thought this was pretty much work for "just a card" so I've simply turned it into a little album.

Ich habe hier wieder das tolle Papier von Mintay verwendet, das ich schon für die Geburtstags"karte" für meine Mom benutzt habe. Das finde ich einfach traumhaft. Ansonsten ist die Basis des Albums aus weißem Cardstock gewerkelt, alle Papiere sind mit türkisfarbenem Cardstock gemattet.

Again I've used the beautiful papers by Mintay that I've also used for my mom's birthday "card". I just love these! I've made the base of my album from white cardstock and matted all the papers with turquoise cardstock.


Auf der Vorderseite habe ich einen am PC gedruckten Text in Streifen geschnitten, türkisblau hinerlegt und auf ein weiteres Stück Designpapier geklebt. Der Text zeigt schon, dass es hier um besondere Momente geht. An zwei der Ecken habe ich jeweils eines der Corner Flowers von Mama Elephant mit 3D Tape aufgeklebt. Ich finde, diese Motive passen zum Designpapier. Drumherum kamen noch ein paar klare Glitezrsteine.

Onto the front I've glued a text printed with my home printer. It means "Every now and then the world stops for an instant. And when it starts turning again everything has changed.". It already tells that this is all about special moments. I've cut it into strips, matted it with dark turquoise cardstock and glued it onto a different piece of designer's paper. To the corner I've glued two of the Corner Flowers by Mama Elephant. I think, these go great with the designer's papers. I've also added a few clear rhinestones here.


Auf der linken Innenseite habe ich nur Designpapier aufgeklebt und unten quer einen Text von SU, abgestempelt auf einem Streifen, hinzugefügt. Der Text ist eigentlich aus einem Trauerset. Er beginnt mit "Für die" - das habe ich einfach nicht mit abgestempelt und auch sonst den Text so gestempelt, dass er einzeilig wird.
Auf der rechten Seite geht es dann mit dem ersten besonderen Moment los: der Geburt meiner großen Tochter.

Onto the left inside I've glued some designer's paper and added a saying by SU across the bottom. This saying means "moments that take your breath away". Well, this is from a sympathy set actually and it starts with "for those" - but I've simply removed those two words and changed the layout of the stamp to one single line.
On the right side there's the first special moment: the birth of my oldes daughter.


Auf der nächsten Doppelseite kommt dann die Geburst meiner Zwillinge. Das Album ist nicht chronologisch, aber ich wollte die beiden unbedingt auf zwei nebeneinander liegenden Seiten "unterbringen".

Next is the birth of my twins. The album isn't build up in chronological order but I really wanted those two be on two sides next to each other.


Dann geht es weiter mit dem ersten Tag der Beziehung mit meinem Mann und der Hochzeit ein paar Jahre später.

I continued with the first day of the relationship with my - now - husband and our wedding a few years later.


Und dann kommen die letzten beiden Bilder-Seiten. Ich habe das Foto auf der linken Seite bewusst unscharf ausgedruckt und, nachdem ich die Bilder für den Blog gemacht habe, durch ein gutes ersetzt. Das ist mein erstes Enkelkind. Da es leider viel zu früh geboren wurde und den Weg zu seinem Stern gegangen ist, habe ich passend einen Regenbogen, coloriert in den Farben der Designpapiere, sowie eine Wolke und einen Stern hinzugefügt.
Auf der rechten Seite habe ich bewusst Platz gelassen. Wenn alles gut geht, kann ich dort noch dieses Jahr ein weiteres Bild einkleben. ;)

And then there are the last two pages with pictures. I've printed the picture on the left that blurry on purpose - and replaced it with a good one after I've taken the pictures for my blog. This is my first grandchild. He was born way too early to survive. So I've added a rainbow, colored using only the colors of the designer's papers, a cloud and a star there.
I've kept the right page blank. If everything goes well this time I will be able to add another picture there in november. ;)


Zieht man am Halbkreis rechts der Karte, kommt auch dort noch ein Rechteck zum Vorschein. Auch das wollte dekoriert werden. Ich habe hier einen Text von Craft Emotions auf Designpapier gestempelt und wieder die beiden Corner Flowers als Deko verwendet. Mehr Deko konnte ich nicht anbringen, da dieses Rechteck zwischen die Cardstockstücke geschoben wird und somit jegliche Deko die Funktion des Mechanismus gestört hätte.

When you pull the half circle on the right another rectangle becomes visible. Of course that needed some decorations as well. I've stamped a text by Craft Emotions meaning "some people fit right into your heart" onto a piece of designer's paper and used the same two corner flowers again that I've also used on the front of the album. I wasn't able to add any more decorations here since this rectangle needs to slide between two pieces of cardstock and any embellishment would keep the mechanism from working.