Hallo Ihr Lieben!
Letztes Wochenende hatte Christine von Create a Smile in der Facebook-Gruppe zum Colorieren gegen das graue Wetter aufgerufen. Die Idee fand ich klasse, nun habe ich das colorierte Motiv auch endlich in eine Karte umgewandelt.
Hello everyone!
Last weekend Christine from Create a Smile started a "let's color against the grey weather challenge", just for fun. I liked that idea and now finally turned the image into a card.
Für den Hintergrund habe ich weißen Cardstock erst von unten links nach oben rechts dunkler werdend mit Distress Oxide Cracked Pistacchio, Lucky Clover und Rustic Wilderness gewischt und einige große Wassertropfen darauf verteilt. Dann habe ich den Fern Stencil und den Monstera Stencil verwendet und mit Pine Needles und Black Soot einige Blätter an die Kanten gewischt. Unten habe ich auch noch eine Grasbordüre mit Wald und Wiese Stencil aufgewischt, die sieht man aber wegen all dem Grün im Hintergrund nicht so toll.
Der Text ist aus dem Stempelset Sahnehäubchen und weiß auf schwarzen Cardstock embosst. Ich musste ihn so weit nach links kleben - warum, seht Ihr gleich noch.
For the background I inked up a piece of white cardstock with Distress Oxide Cracked Pistacchio, Lucky Clover and Rustic Wilderness, starting light at the bottom left corner and getting darker to the top right corner, and spritzed some large drops of water on top. Then I used the Fern stencil and the Monstera stencil to ink some leaves to the edges with Distress Oxide Pine Needles and Black Soot. I also added a grass border along the bottom edge, but there's so much green on this background that it's hardly visible.
The text is from the german version of the Cream Topping stamp set and white heat embossed onto black cardstock. Directly translated it means "let your soul hang loose" - which I'm sure doesn't make any sense in english and is a german way to say "lean back and chill out". But due to the "hang loose" in the german version it went great with the image. I had to attach the text that far to the left - I'll show you why a little later in the post.
Das süße Beuteltier habe ich in ein Marsupilami verwandelt. Um den Comic-Stil zu unterstreichen, habe ich die Schatten im Motiv mit einem W-Marker gemacht und das Gelb nur leicht von hell nach dunkel laufen lassen. Coloriert habe ich mit Copics. Dann habe ich das süße Tierchen auf den Ast aus dem Stempelset Hey Honey gesetzt. Damit auch genug Platz ist, habe ich ihn mit einem schwarzen Fineliner etwas verlängert.
Neben dem Ast an die obere und rechte Kante habe ich jeweils noch ein gestanztes Monsterablatt aufgeklebt.
Den Schwanz habe ich vom Körper getrennt, so dass es so aussieht, als würde er hinter dem Ast herunterhängen. Das war aber nicht der eigentliche Grund.
The cute marsupial is turned into a Marsupilami here - I'm sure you all know the comic seriers. To stick with the comic style I used a W-tone marker for the shadow and only shaded the yellow lightly. I used Copics to color the image. Then I put the little critter onto the branch from the Hey Honey stamp set. To make enough room for the animal I used a black fineliner to make the branch a bit longer.
Next to the branch I adhered a die cut monstera leave to the top and the right edge.
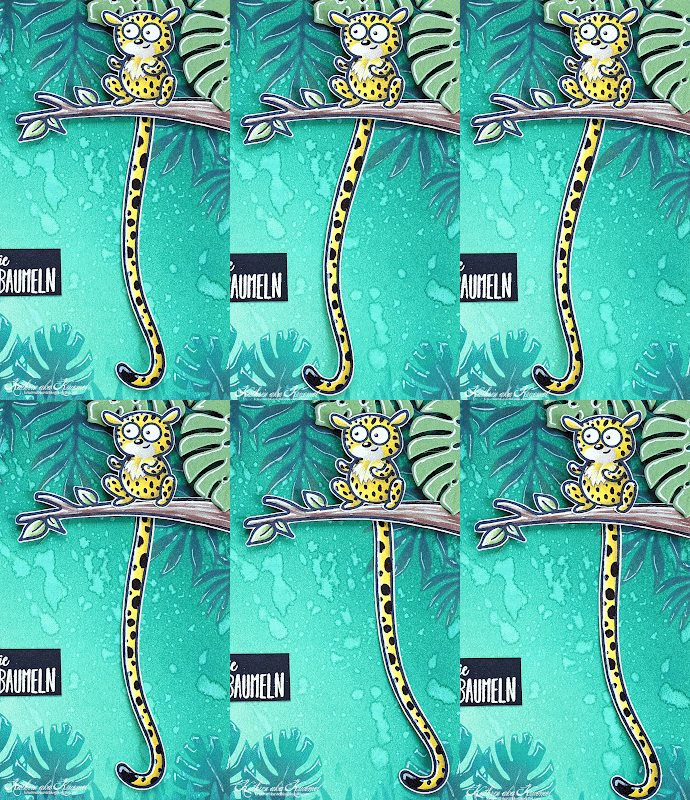
I cut off the animal's tail from the body so it looks like it's hanging down behind the branch. But that wasn't the only reason.
Ich konte einfach nicht widerstehen, den Schwanz des Marsupilami hin- und herbaumeln zu lassen! Dafür habe ich am oberen Ende des Schwanzes - hinter dem Körper versteckt - einen kleinen Kreis angeklebt, an dem der Schwanz befestigt ist. Dann habe ich von hinten ein rundes Foampad angeklebt, dieses durch einen kleinen Kreis, den ich aus dem Hintergrund gestanzt habe, gesteckt und von hinten wieder einen gestanzten Kreis gegengeklebt. Und damit der Schwanz auch schön schwingt, habe ich an den hinteren Kreis noch einen Streifen Cardstock angebracht, an dessen Ende ich eine Unterlegscheibe als Gewicht angeklebt habe.
Zum Schluss habe ich den Hintergrund mit dickem 3D Tape auf schwarzen Cardstock und dann alles auf einen weißen Kartenrohling geklebt.
I just couldn't resist to make the marsupil's tail move back and forth.
I attached a little circle to the top of the tail - it's hidden behind the body - then put a small round foam pad to the back of the circle. I stuck that through a small whole that I cut into the background and stuck another cardstock circle to the other side of the foam pad. To make sure the tail is moving nicely I attached a strip of cardstock to the back circle and glued a washer to the bottom end as a weight.
To finish the card, I attached the background with thick foam tape to some black cardstock and then adhered everything to a white note card.
Und weil der Schwanz natürlich nicht so ruppig schwingt, wie auf dem GIF oben, habe ich hier noch ein ganz kurzes Video.
And since the tail isn't moving like in the GIF above I have a very short video of it for you.

.jpg)

