Seiten

Samstag, 29. Juni 2024

Stampcorner Juli-Release Sneak #1

 
Hallo Ihr Lieben!
Heute zeige ich Euch ein Sneak auf das Juli-Release von Stampcorner, das im Juli ein wenig verspätet erst am 05. erhältlich sein wird.

Hello everyone!
Today I am sharing a card with a sneak of the july release by Stampcorner, that will be a little delayed an be available on the 5th of july.

Die süße Schildkröte, die so schön in ihr Buch vertieft ist, finde ich wunderbar. Lesen ist wie eine Urlaubsreise im Kopf und man kann so wunderbar in andere Welten abtauchen. 
Ich habe hier ein Stück hellgrauen Cardstocks genommen und mittig etwas Distress Ink Tumbled Glass sowie darunter ein wenig Twisted Citron aufgewischt. Dann habe ich hellblaue Metallic Watercolor aufgespritzt.
Und weil ich auch hier eine Verbindung zum Thema Lesen herstellen wollte, habe ich den Typewriter Text Background von MFT mit weißer Stempelfarbe über alles gestempelt.

The cute turtle, that's so deeply sunken into the story of her book, is just too cute. Reading is like  a vacation in your head and you can dive deep into different worlds so easily.
Here I started with a piece of light grey cardstock and inked the center with Distress Ink Tumbled Glass and a bit of Twisted Citron. Then I splattered some light aqua metallic watercolor onto it.
To build a connection to the reading theme of the card I used the Typewriter Text Background by MFT and stamped it over everything using white pigment ink.


Natürlich kann die kleine Schildkröte nicht einfach so im Nirgendwo sitzen. Also habe ich jeweils aus weißem Cardstock den Bücherstapel und die einzelnen Bücher von Gummiapan - als ob ich es geahnt hätte habe ich mir die erst kürzlich gekauft - sowie einige Steine abgestempelt und mit Copics coloriert. Die Steine sind eigentlich ein Felsen aus dem Happy Seagull Set von WaffleFlower und einer der Icebergs von MFT. 
Auch die kleine Schildkröte ist mit Copics coloriert, dann habe ich sie per Hand ausgeschnitten.
Und damit sie da in der Sommersonne keinen Hitzeschlag bekommt, habe ich ihr noch einen Sonnenschirm an die Seite gestellt. Der ist aus dem Stempelset Sommer? von Stampcorner. Und weil ich nur die Schildkröte mit schwarzen Outlines wollte, der Sonnenschirm aber optisch zu den Stanzteilen in der Szene passen sollte, habe ich ihn per No-Line Technik coloriert. 
Auf die Brille der Schildkröte habe ich außerdem Glossy Accents aufgetragen.

Of course the turtle can not sit somewhere in nowhere land. So I die cut the book stack, the individual books by Gummiapan - just as if I knew I just ordered them recently - and a few rocks from white cardstock, then colored them with Copics. The rocks are from the Happy Seagull set by WaffleFlower and one of the Icebergs by MFT. 
Also for the little turtle I used Copics to color her it, then fuzzy cut her out.
And to make sure she doesn't get a sunburn there in the summer sun I put an umbrella next to her. It's from the Summer? stamp set by Stampcorner. I only wanted the turtle to have black outlines and wanted the umbrella to match the other die cuts in the scene so I did the no-line technique to color it in.
I covered the turtle's glasses with Glossy Accents.


Auch ein Text durfte auf meiner Karte natürlich nicht fehlen. Dieser hier ist aus demselben Set, aus dem auch die Schildkröte ist. Es gab eine Verzögerung beim Hersteller, das ist auch der Grund, warum das Release diesen Monat etwas später kommt. Deswegen hatte ich für meine Sneaks nur die digitale Version zur Verfügung. Ich wollte aber meinen Text nicht als dicken weißen Streifen quer über die Karte haben. Also habe ich den ausgedruckten Text ganz nah entlang der Linien ausgeschnitten und ihn dann unter dem Motiv aufgeklebt.

My card also needed a text. This one means "adventures in your head" and comes in the same stamp set as the image comes from. There was a delay with the manufacturer, that's also why this month's release happens a bit later than usual. But that meant, I only had the digital versions of the stamps for my sneaks. I didn't want a big white banner with the text all across the card. So I used my scissors to cut it out close to the lines and then adhered the individual words under the image.


Die Motive habe ich dann mit 3D Tape auf den Hintergrund geklebt und alles auf einem weißen Kartenrohling befestigt.

I used foam tape to adhere the images to the background, then glued it onto a white card base.

Freitag, 28. Juni 2024

Ein Tag am Strand

 
Hallo Ihr Lieben!
Heute zeige ich Euch die Karte mit dem Deliver Summer Vibes Stempelset von MamaElephant, die eigentlich meine erste zu diesem Set war, bei der mir dann aber die Farbkombi der Coloration nicht gefallen hatte. Nach dem erneuten Colorieren - diesmal in fröhlichen Sommerfarben - ist diese Karte entstanden. Und so nehmen uns Hase und Katze heute mit an den Strand.

Hello everyone!
Today I am sharing with you the card with the Deliver Summer Vibes stamp set by MamaElephant, that was my first idea with the set but that I did have to postpone because I didn't like the color choices I had made for my first coloring of the images. After coloring them again - this time using happy summer-ish colors - I finished this card. And so bunny and cat are taking us to the beach with them.

Der Hintergrund der Karte ist teilweise mit der Beach Scene Builder Stanze von MFT gemacht. Ich habe ihn aus helltürkis farbenem und hellbraunem Cardstock gestanzt und so die Küstenlinie und den Strand gestaltet. 
Das Wasser habe ich ein wenig mit Distress Ink Salvaged Patina gewischt und weiße Wellenlinien aufgemalt. Dann habe ich mein weißes Chunky Embossingpulver am Rand aufgetragen und so für den Schaum an der Wellenkante gesorgt.
Den Strand habe ich ein wenig mit Distress Oxide Vintage Photo gewischt und dann etwas davon sowie weiße Acrylfarbe in feinen Spritzern aufgespritzt. Das gibt dem Sand Struktur.
Um den Himmel zu gestalten habe ich noch ein Stück weißen Cardstocks in Größe meines Kartenauflegers zugeschnitten und von oben mit Distress Oxide Mermaid Lagoon gewischt. Ich wusste ja bereits, wo mein Horizont beginnt und so konnte ich hier die Himmelsfarbe auslaufen und einen kleinen weißen Rand stehenlassen.
 
The background for my card is partially made with the Beach Scene Builder die by MFT. I die cut it from light aqua and kraft colored cardstock to create the coast line and beach.
I used Distress Ink Salvaged Patina to lightly shade the water and added some wavy lines with a white gel pen. Then I brought out my white chunky embossing powder and added it to the wavy edge to add some foam to the water.
The beach I lightly inked with Distress Oxide Vintage Photo and then added fine splatters with this brown ink and white acrylic paint. This adds some structure to the sand.
To create the sky I cut a piece in the size of my card panel from white cardstock and inked it from the top with Distress Oxide Mermaid Lagoon. I already knew where my horizon line would be and so I was able to let the color fade out a bit above it and also keep a thin white area.
 

 Hase und Katze lassen es sich so richtig gut gehen und genießen den schönen Tag am Meer. Ich habe hier zwei Motive aus dem Deliver Summer Vibes Set verwendet und mit Copics coloriert und per Hand ausgeschnitten. 
Mit den Sandy Beach Accents Stanzen von LawnFawn habe ich kleine Hügel in meinen Strand gestanzt und die beiden Motive dort hineingeschoben.

Bunny and cat are relaxing and enjoying their day off at the sea. I used two of the images from the Deliver Summer Vibes set here and colored them with Copics, then cut them out with my scissors. 
Using some of the dies from the Sandy Beach Accents dies by LawnFawn I cut some wavy lines into the beach and tucked the images behind them. 


Zu so einem richtigen Strand gehören  natürlich Palmen. Die große ist mit Stanzen aus dem Beach Scene Builder Set von MFT, die kleinere aus dem Hammock and Trees Set von LawnFawn gemacht. Ich habe sie aus weißem Cardstock gestanzt und mit Copics coloriert.

Of course there have to be some palm trees at such a beautiful beach. The larger one is made with dies from the Beach Scene Builder set by MFT, the smaller one with the Hammock and Trees set by LawnFawn. I die cut them from white cardstock and colored them with Copics.


Direkt auf den Himmel habe ich mit weißem Embossingpulver einen der Texte aus dem Deliver Summer Vibes aufembosst. Außerdem habe ich einige weiße Wolken, gemacht wieder mit dem Beach Scene Builder Set, verteilt.

Directly onto the sky I white heat embossed one of the texts from the Deliver Summer Vibes set. I also added a few white clouds, again made with the Beach Scene Builder set.


Ich habe Wasser, Strand, Motive und Palmen aufeinander geklebt und dann alles zusammen mit dünnem 3D Tape hinterlegt auf dem Himmel befestigt. Zum Schluss habe ich ihn auf einen weißen Kartenrohling geklebt. 

I glued water, beach, images and palm trees together and attached it with thin foam tape onto the sky. Then I adhered my card panel to a white note card.

Donnerstag, 27. Juni 2024

Wünsch Dir Was

 
Hallo Ihr Lieben!
Ich weiß, es gibt Ausnahmen, aber die meisten Männer stehen wohl nicht so sehr auf Blümchen und niedlich, wenn es um ihre Geburtstagskarten geht. Also zeige ich heute auf dem Stampcorner Blog diese Männer-Geburtstagskarte, die ganz ohne diese Elemente auskommt. Und ja, natürlich würde diese Karte bestimmt auch Frauen gefallen. Aber wenn man schon aus dem Vollen schöpfen kann, dann nehme ich da doch gerne Blumen und Co... ;)
 
Hello everyone!
I know, there are exceptions here, but most men will not pick flowers and cuteness when it comes to their birthday cards. So today on the Stampcorner Blog I am sharing this male birthday card, that doesn't use any of these elements. And yes, of course a lot of women would love this card, too. But if I have the chance, I still prefer going full on with all those flowers and co.... ;)
 
Ich habe hier ein Stück mittelblauen Cardstocks, der farblich ein wenig ins Türkis geht, von außen mit Distress Oxide Uncharted Mariner und Black Soot gewischt - das bildet den Hintergrund für meine Karte. Außerdem habe ich feine Wasserstropfen darauf gespritzt.
Aus blauem Metallic-Cardstock habe ich den Let's Celebrate Backdrop von LawnFawn ausgestanzt und mit dickem 3D Tape auf den Hintergrund geklebt. Außerdem habe ich noch einen Rahmen aus schwarzem Cardstock gestanzt und aufgeklebt.
 
I inked a piece of middle blue cardstock, that has some tint of turquoise, from the outside in with Distress Oxide Uncharted Mariner and Black Soot to create the background for my card. I also splattered some fine dropletts of water onto it.  
From blue mirror cardstock I die cut the Let's Celebrate Backdrop by LawnFawn and adhered it with thick foam tape onto the background. I also put a frame, die cut from black cardstock, on top.


Vor dem Aufkleben des Rahmens habe ich die Wunderkerze auf den Cardstock gewischt. Sie ist mit dem Stencil 48 von Stampcorner gemacht und ich habe in mehreren Schritten gearbeitet. 
Zuerst habe ich die goldenen Strahlen und Sterne aufgetragen. Dafür habe ich Versamark durch den Stencil gewischt - praktischerweise ist der ausgeschnittene Teil der Wunderkerze beim Stencil dabei, so dass man den ganz einfach abdecken kann - und habe die Sterne und Strahlen mit goldenem Glitzer-Embossingpulver embosst. Damit alles schön plastisch wirkt, habe ich dann eine zweite Lage aufembosst. 
Den oberen Teil der Wunderkerze, also den, den man anzündet, habe ich durch den Stencil mit dem Versamarkstift nachgezeichnet und dann mit silbernem Embossingpulver embosst. Auch hier habe ich zwei Lagen aufgetragen. Rund um die Strahlen und Sterne habe ich dann mit einem goldenen Gelstift noch ein paar Punkte aufgemalt und außen am Rand zum Rahmen ein paar mit einem weißen Gelstift hinzugefügt. Ich hatte doch glatt das Splattern vergessen!
Zum Schluss fehlte noch der Stiel - den habe ich mit einem Glitzer-Gelstift aufgemalt, so unterscheidet er sich optisch vom oberen Teil der Wunderkerze. Am Stiel habe ich dann noch eine kleine türkisfarbene Schleife aufgeklebt.
In der Mitte der Strahlen habe ich dann noch ein wenig Distress Oxide Salvaged Patina auf den Cardstock gewischt, so dass er hier ein wenig aufgehellt ist. 

Before I adhered the frame to the background I created the sprakler. It's made using Stampcorner's stencil #48 and I created it in different steps.
First I created the golden stars and rays. I put Versamark through the stencil - the small piece for the sparkler is included in the stencil set so it's very easy to just ink up the stars and rays - and then put gold glitter embossing powder on top. After melting it I repeated the steps to create a nice thick embossed layer.
The upper part of the sparkler - the one you light up - I created by tracing it throug the stencil with a Versamark pen, then silver embossed it. Again I put down two layers of embossing powder. I used a gold gel pen to add a few dots around the rays and stars and a white one to add a few to the cardstock close to the frame. I really forgot my white splatters here!
Now my sparkler only needed the "handle". I used a glitter gelpen to draw it, again tracing it through the stencil. I also glued a small bow tied from turquoise twine to the top of the handle.
Into the center of the rays I added a bit of Distress Oxide Salvaged Patina to make the background just a bit lighter there.


Für den Text habe ich die neue Zum Geburtstag Stanze benutzt. Ich habe ihn einmal aus goldenem Spiegelcardstock und einmal aus schwarzem Cardstock gestanzt und beide Teile etwas versetzt aufeinander geklebt. Dann habe ich ihn unten quer über die Karte geklebt.
Der Rest des Textes ist mit Stempeln aus dem Set Kleine Worte gemacht. Ich habe ihn einfach mit schwarzer Tinte auf hellblauen Cardstock gestempelt.

For the text I used the new "happy birthday" die. I die cut it once from gold mirror cardstock and once from black cardstock and stacked the pieces a bit offset. Then I adhered them across the bottom of the card.
The rest of the text means "make a wish" and is stamped black onto light aqua cardstock.


Von oben fotografiert sieht die Karte etwas düster aus, aber wenn man leicht von der Seite draufsieht, dann kann man den tollen Schimmer und Glanz sehen.
Zum Schluss habe ich alles auf einen weißen Kartenrohling geklebt.

Photographed from above the card looks a bit dark, but when you look at it from a bit of the side you can see all the great shimmer and shine.
I finished the card by adhering the card panel to a white note card.

Dienstag, 25. Juni 2024

Deliver Summer Vibes

 
Hallo Ihr Lieben!
Das Deliver Summer Vibes Set von MamaElephant ist bei mir eingezogen. Ich hatte gleich zwei Kartenideen dazu im Kopf und wie so oft stemple und coloriere ich dann gleich alle Motive dafür, bevor es ans Zusammenbauen der Karte(n) geht. Hier war es so, dass mir die Farbkombi, die ich für meine eigentlich erste Idee gewählt habe, dann nach dem Colorieren so überhaupt nicht gefallen hat, dass ich erstmal die andere Idee umgesetzt und die anderen Motive später neu coloriert habe. Und diese "zweite Wahl" zeige ich Euch heute.

Hello everyone!
I got myself the Deliver Summer Vibes set by MamaElephant. I had two card ideas for it and as usual in such a case I stamp and color the images for both cards in one sitting before putting the cards together. Well, in this case I so didn't like the color combo I had used to color the images for the original card idea I that I went with my other idea first and later colored the other images again. And so I am sharing this "second choice" card with you today.

Da ich meine Motive - dazu dann gleich mehr - bereits coloriert hatte, stellte sich die Frage nach dem Hintergrund. Ich habe dann den Urban City Stempel von MamaElephant mit grauer Tinte auf weißen Cardstock gestempelt - ich wollte die Häuse zwar erkennbar, aber nicht so im Fokus haben. Mit einem Mini Blending Brush und Distress Ink Speckled Egg habe ich dann jedes der Häuser von unten her leicht blau eingefärbt. So ist die Stadt im Hintergrund nicht nur eine große Fläche sondern bekommt ein wenig Tiefe. Außerdem habe ich die Bäume und Grünflächen ganz rudimentär mit Copics coloriert. 
Ich habe die Stadt ausgeschnitten und auf ein Stück hell-türkisfarbenen Cardstock geklebt. Den habe ich von unten her etwas mit Distress Ink Salvaged Patina abgedunkelt. 
Und ganz unten quer über den Cardstock habe ich eine Straße geklebt. Die habe ich mit einer Stanze aus dem Open Road Set von MFT aus schwarzem Cardstock gestanzt - ich musste sie per Partial Diecutting etwas verlängern - und den Mittelstreifen weiß hinterlegt.

Since I had already colored my images - more about these soon - I needed a background for them. I used the Urban City stamp by MamaElephant and stamped it with grey ink onto white cardstock. I wanted the houses to be noticable, but not in the focus. With a mini blending brush and Distress Ink Speckled Egg I lightly shaded each of the houses - it adds just a bit of depth to the city. I also used a green Copic marker to simply color in the trees and parks.
I cut the city out and adhered it onto a piece of light aqua cardstock, its edges I've shaded a bit with Distress Ink Salvaged Patina.
And at the very bottom I attached a street across the card. I die cut it from black cardstock using one of the dies from the Open Road set by MFT - I had to do some partial diecutting to make it a bit longer - and put some white cardstock behind the median strip.


Wie von MamaElephant beim Designen des Stempelsets gedacht, habe ich die Elemente hier genutzt, um die Ladefläche des Trucks aus dem Deliver by Truck Set zu füllen. Hier kamen gleich drei verschiedene "Füllungen" zum Einsatz - der Hamster mit Koffern im Ganzen, die anderen Elemente sind aus weiteren Motiven aus dem Set herausgeschnitten. Als Fahrer habe ich die Katze aus dem Deliver by Truck Set ins Auto gesetzt. 
Coloriert habe ich die Motive mit Copics.
Und so sind Hamster und Katze nun voll beladen und gut ausgerüstet auf dem Weg in den Urlaub am Strand. Und dann konnte ich einfach nicht anders, denn wer kennt sie nicht, die Frage "sind wir bald da?". Ich hatte ein Set von StudioG da, das den Text enthielt. Und im Set war auch noch ein "wie lange noch" enthalten. Ich habe beide Texte weiß auf aus schwarzem Cardstock gestanzte Sprechblasen embosst. Die sind aus dem Let's Chat Stanzenset von MamaElephant - ich habe die selbe Sprechblase zweimal gestanzt und eine auf den Kopf gedreht. 

Like intended by MamaElephant I combined the elements from the Deliver Summer Vibes set with the Deliver by Truck set and filled the truck bed with lots of summer accessoires. I used three different "truck loads" here - the whole image of the hamster with the suitcases, the other elements I cut off of two other images from the set. And as the driver I stamped the cat from the Deliver by Truck set into the cabin.
For the coloring I used Copics.
And now hamster and cat are on their way to their vacation at the beach, bringing everything they need there. And I just couldn't resist - who doesn't know the question of "are we there yet?". I had a set by StudioG with this text in it. And it also contains a "how much longer?" text. I white heat embossed both onto speech bubbles, cut from black cardstock. For those I used dies from the Let's Chat die set by MamaElephant - I die cut the same one twice and turned one upside down.


Der Haupttext auf meiner Karte ist wieder aus dem Deliver Summer Vibes Set - und ich finde, er ist hier fast ein wenig doppeldeutig. Natürlich liefert die Karte an sich jede Menge Summer Vibes, man kann den Text aber mit einem zwinkernden Auge auf die Texte in der Sprechblase beziehen.
Auch diesen Text habe ich weiß auf schwarzem Cardstock embosst.

The main text on my card is again from the Deliver Summer Vibes set - and I think, it is also a bit ambiguous. Of course the card itself deliver summer vibes with all the summer vacation elements, but with an winking eye you can also relate it to the texts in the speech bubbles.
Again I white heat embossed the text onto black cardstock.


Die Stadt habe ich direkt auf den hellblauen Cardstock geklebt. Die Straße und Sprechblasen sind mit dünnem, den Haupttext und die Motive mit dickem 3D Tape aufgeklebt. 
Über dem Text und hinter dem Auto - quasi als Abgas - habe ich noch ein paar hellrosa farbene Herzen aufgeklebt und dann alles auf einem weißen Kartenrohling befestigt.

I glued the city directly onto the light aqua cardstock. The street and speech bubbles I backed with thin, the main text and images with thick foam tape.
Above the text and behind the car - kind of as the exhaust fumes - I added a few light pink heart confetti. Then I attached my card panel to a white note card.

Montag, 24. Juni 2024

Hope your day glows with Happiness

 
Hallo Ihr Lieben!
Heute habe ich eine weitere Karte mit LawnFawn Produkten für Euch. Und es gibt noch so einiges aus dem letzten Release, das ich nicht verwendet habe.... Heute habe ich das Stanzenset Build a Drink Mason Jar Add-On eingeweiht. Und die Glühwürmchen. Die sind zwar nicht neu und ich war schon länger darum herum geschlichen, als ich dann das neue Stanzenset gesehen habe, musste ich es haben, denn das lädt ja geradezu zur Verwendung mit Glühwürmchen ein...

Hello everyone!
Today I have another card with LawnFawn products for you. And there's still quite a bit from the latest release I haven't used yet... Today I went with the Build a Drink Mason Jar Add-On die set. And the fireflies were also a recent buy. They aren't new and I had eyed with those since quite some time. So when I saw the mason jar die set I just had to buy the stamps because they are just the perfect match...

Hier habe ich einen Nachthimmel als Hintergrund gestaltet.
Ich wollte unbedingt den Mond aus dem Set Full Moon benutzten, denn der hat tolle eingeprägte Krater. Aber er war viel zu groß für meine Szene. Also habe ich ihn aus cremefarbenem Cardstock gestanzt und dann mit einer Kreisstanze einen Teil davon herausgestanzt, um ihn zu verkleinern. Die Ränder habe ich dann mit Distress Oxide Antique Linen leicht abgedunkelt und etwas Pumice Stone auf die Krater aufgetragen. 
Den Mond habe ich dann auf ein Stück weißen Cardstocks gelegt und den Bereich drumherum ebenfalls mit Antique Linen gewischt. Dann habe ich den Rest des Himmels mit Stormy Sky, Faded Jeans und Chipped Sapphire gestaltet und weiße Acrylfarbe aufgespritzt. 

As the background I created a night sky here.
I really wanted to use the moon from the Full Moon die set because it has great embossed crater details. But it was way too large for my scene. So I die cut it from cream colored cardstock and then used a circle die to cut out a part of it and make it smaller. I inked the edges with Distress Oxide Antique Linen and added just a bit of Pumice Stone onto the craters.
I put the moon onto a piece of white cardstock and inked around it with Antique Linen. Then I created the rest of my sky with Stormy Sky, Faded Jeans and Chipped Sapphire and splattered some white acrylic paint onto it.


Das Einmachglas habe ich aus hellblauem Cardstock gestanzt und mit einer Lage Vellum hinterlegt. Und den tollen Sternen-Swirl habe ich aus goldenem Glitter-Cardstock gestanzt. Ich habe ihn so am Glas befestigt, dass der Teil, der sich im Glas befindet, hinter dem Vellum liegt und der Rest oben aus dem Glas herausschaut. Außerdem habe ich noch den Griff aus matt-silbernem Metallic-Cardstock gestanzt und am Glas befestigt. Auch der Deckel, der neben dem Glas im Gras liegt, aus dem silbernen Cardstock gestanzt.

The mason jar I've die cut from light blue cardstock and put a layer of vellum behind it. The great star swirl I die cut from gold glitter cardstock and then attached it to the mason jar with the part, that's inside the jar, behind the vellum and the rest coming out of it at the top. I also die cut the handle/hanger from matte silver metallic cardstock and glued it onto the jar. From the same silver cardstock I die cut the lid, that's laying in the grass next to the jar.


Die Glühwürmchen aus dem Set Little Fireflies habe ich schwarz abgestempelt und mit Copics coloriert. Die Flügel sind mit Stickles beglittert, die gelben Teile ihrer Körper sind mit Glossy Accents überzogen. Und als Licht habe ich unten an jedes Glühwürmchen einen Kreis, gestanzt aus dem goldenen Glitter-Cardstock, angeklebt. 
Die Glühwürmchen habe ich dann mit 3D Tape auf den Hintergrund geklebt und den Bereich um ihre "Leuchtpunkte" jeweils mit gelber Kreide eingefärbt. Die habe ich auch hinter dem Swirl, an dessen Spitze natürlich auch ein Glühwürmchen fliegt, aufgetragen.

I stamped the fireflies from the Little Fireflies set with black ink and colored them with Copics. I used Stickles to add some glitter to their wings, the yellow parts of their bodies I covered with Glossy Accents. And as "light" I added a small circle, die cut from the gold glitter cardstock, at the bottom of each firefly.
I used foam tape to adhere the fireflies to the background and added some yellow chalk around their "lights". I put the same chalk also behind the swirl. And of course there's a firefly at the tip of that swirl.


Im unteren Bereich der Karte habe ich zwei Lagen Gras, gestanzt aus grünem Cardstock, aufgeklebt und das Einmachglas dazwischen geschoben. 
Und hier unten war auch Platz für meinen Text. Der ist ebenfalls aus dem Set Little Fireflies. Ich habe das Wort "glows" mit goldenem Glitter-Embossingpulver, den Rest des Textes mit weißem Embossingpulver auf schwarzen Cardstock embosst.

In the bottom area of my card I added two layers of grass, cut from green cardstock, and put the mason jar between them.
And here I also added my sentiment. It's also from the Little Fireflies set. I heat embossed the word "glows" with gold glitter embossing powder, the rest with regular white embossing powder onto black cardstock.


Oben am Himmel habe ich den Mond aufgeklebt, die obere Lage Gras und das Eimachglas sind, genauso wie die Glühwürmchen mit dünnem 3D Tape hinterlegt. Und als Rahmen habe ich dann mit dickem 3D Tape noch den Bayou Backdrop, gestanzt aus schwarzem Cardstock, aufgeklebt. 
Zum Schluss habe ich alles auf einem weißen Kartenrohling angebracht.

I glued the moon onto the sky, the top layer of the grass and the mason jar I adhered with thin foam tape (that I had also used behind the fireflies). And as a frame around it I added the Bayou Backdrop, cut from black cardstock and glued down with thick foam tape.
Then I just glued my card panel to a white note card.

Sonntag, 23. Juni 2024

Nochmal Möwe und Pommes

 
Hallo Ihr Lieben!
Heute habe ich gleich noch eine Möwen-Pommes-Karte für Euch. In letzter Zeit hatten wir so einige lustige Erlebnisse mit Möwen, dass es mir die kleinen Tiere besonders angetan haben...

Hello everyone!
Today I have another seagull-fries-card for you. We had some funny encounters with seagulls lately and so they have a special place in my heart...

Waffle Flower mit dem Mai-Release auch große Möwenkopf-Stanzen herausgebracht. Nun war es so, dass der Shop. bei dem ich bestellt hatte, diese Stanzen gar nicht im Angebot hatte. Und überall sonst waren sie ausverkauft. Also habe ich mir gedacht "so kompliziert sind die ja gar nicht" und kurzerhand meine eigenen Möwe konstruiert. 
Aber erstmal zum Hintergrund: den habe ich mit der Stitched Cloud Backdrop Stanze von LawnFawn aus hellblauem Cardstock gemacht und die Ränder mit Distress Oxide Mermaid Lagoon gewischt. Da ich hier nur die Landscape-orientierte Version der Stanze habe, habe ich einfach per Partial DieCutting das Wolkenmuster nach unten verlängert.

In their may release Waffle Flower also came out with a die set with large seagull heads. Well, the shop I ordered my dies and stamps from this release from didn't have that die set - and everywhere else it was already sold out. So I thought, that this isn't a much complicated shape and simply created my own seagull.
But first about the background: I used the Stitched Cloud Backdrop by LawnFawn to die cut it from light blue cardstock, then shaded it with Distress Oxide Mermaid Lagoon. I only have the landscape oriented version of this die, so I did some partial die cutting to fill the portrait oriented piece of cardstock with clouds.


Die Grundform für meine Möwe habe ich einfach per Hand auf ein Stück weißen Cardstock gezeichnet und mit der Schere ausgeschnitten. Für die Augen habe ich dann die Augen aus dem Stitched Teapot Set verwendet, der Schnabel ist eigentlich der Backer für den Ausgießer der Gießkanne aus dem Watercing Can Set, beides von LawnFawn. Das passte einfach alles perfekt zusammen und ergaben eine perfekte kleine Möwe.
Die Pommes habe ich dann mit dem Happy Seagulls Set von Waffle Flower gemacht - damit sie länger wirken, habe ich jeweils zwei Pommes aneinander gesetzt und die Naht später unter dem Schnabel versteckt. 
Und der Partyhut ist einfach mit einer großen Bannerstanze aus rot-weiß gestreiftem Cardstock gestanzt. 
Ich habe alle Teile mit Copics schattiert und oben an die Mütze einen roten Pompom geklebt.
Und weil Salz einfach zu Pommes gehört, habe ich an einigen Stellen klar trocknenden Kleber auf die Pommest aufgetragen und dann Distress Clear Rock Candy Glitter aufgestreut - das sieht nun aus wie Salzkörner. 
Die Texte sind aus dem Stempelset Inquisitive Seagulls. Ich habe sie schwarz auf weißen Cardstock gestempelt und mit einer Sprechblasenstanze von MamaElephant ausgestanzt. Die habe ich dann schwarz hinterlegt.

The base shape of my seagull I simply drew onto a piece of white cardstock and cut it out with my scissors. Then I added the eyes using a die from the Stitched Teapot set, the beak is the backer of the watering can from the Watering Can die set, both by LawnFawn. Those pieces fit together perfectly and created a cut little seagull. 
The fries I die cut with dies from the Happy Seagulls die set by Waffle Flower - to make them longer I put together two fries and have hidden the seems under the beak later.
The party hat is made from a simple triangle shape that I die cut from red and white striped patterned paper. 
I shaded all pieces with Copics and attached a red pom pom to the top of my party hat.
And since fries and salt just belong together I added some clear drying liquid glue to a few spots on each of the fries and sprinkled Distress Clear Rock Candy onto it - it looks just like grains of salt.
The texts are from the Inquisitive Seagulls set. I stamped them black onto white cardstock, cut them out with speech bubble dies by MamaElephant and matted them with some cut from black cardstock.


Könnt Ihr das Salz auf den Pommes hier erkennen?
Den Haupttext, ebenfalls aus dem Inquisitive Seagulls Set, habe ich einfach mit schwarzer Tinte auf einen Streifen weißen Cardstocks gestempelt und den quer unten über die Karte und Möwe geklebt.

Can you see the salt grains here?
The main text, also from the Inquisitive Seagulls set, I simply stamped with black ink onto a strip of white cardstock and glued that at the bottom of my card across the cardstock and seagull.


Auf dem Hintergrund habe ich dann noch einige aus weißem Carstock gestanzte Wolken aufgeklebt. Die Möwe ist mit dünnem, die Sprechblasen und der Textstreifen mit dickem 3D Tape hinterlegt.
Dann habe ich den Cardstock schwarz gemattet und auf einen weißen Kartenrohling geklebt.

I added a few clouds, die cut from white cardstock, to my background. Behind the seagull I put some thin, behind the speech bubbles and the text strip some thick foam tape.
Then I matted the card panel black and adhered it to a white note card.

Freitag, 21. Juni 2024

LawnFawnatics Challenge #175

 
Hallo Ihr Lieben!
Das Thema der neuen 
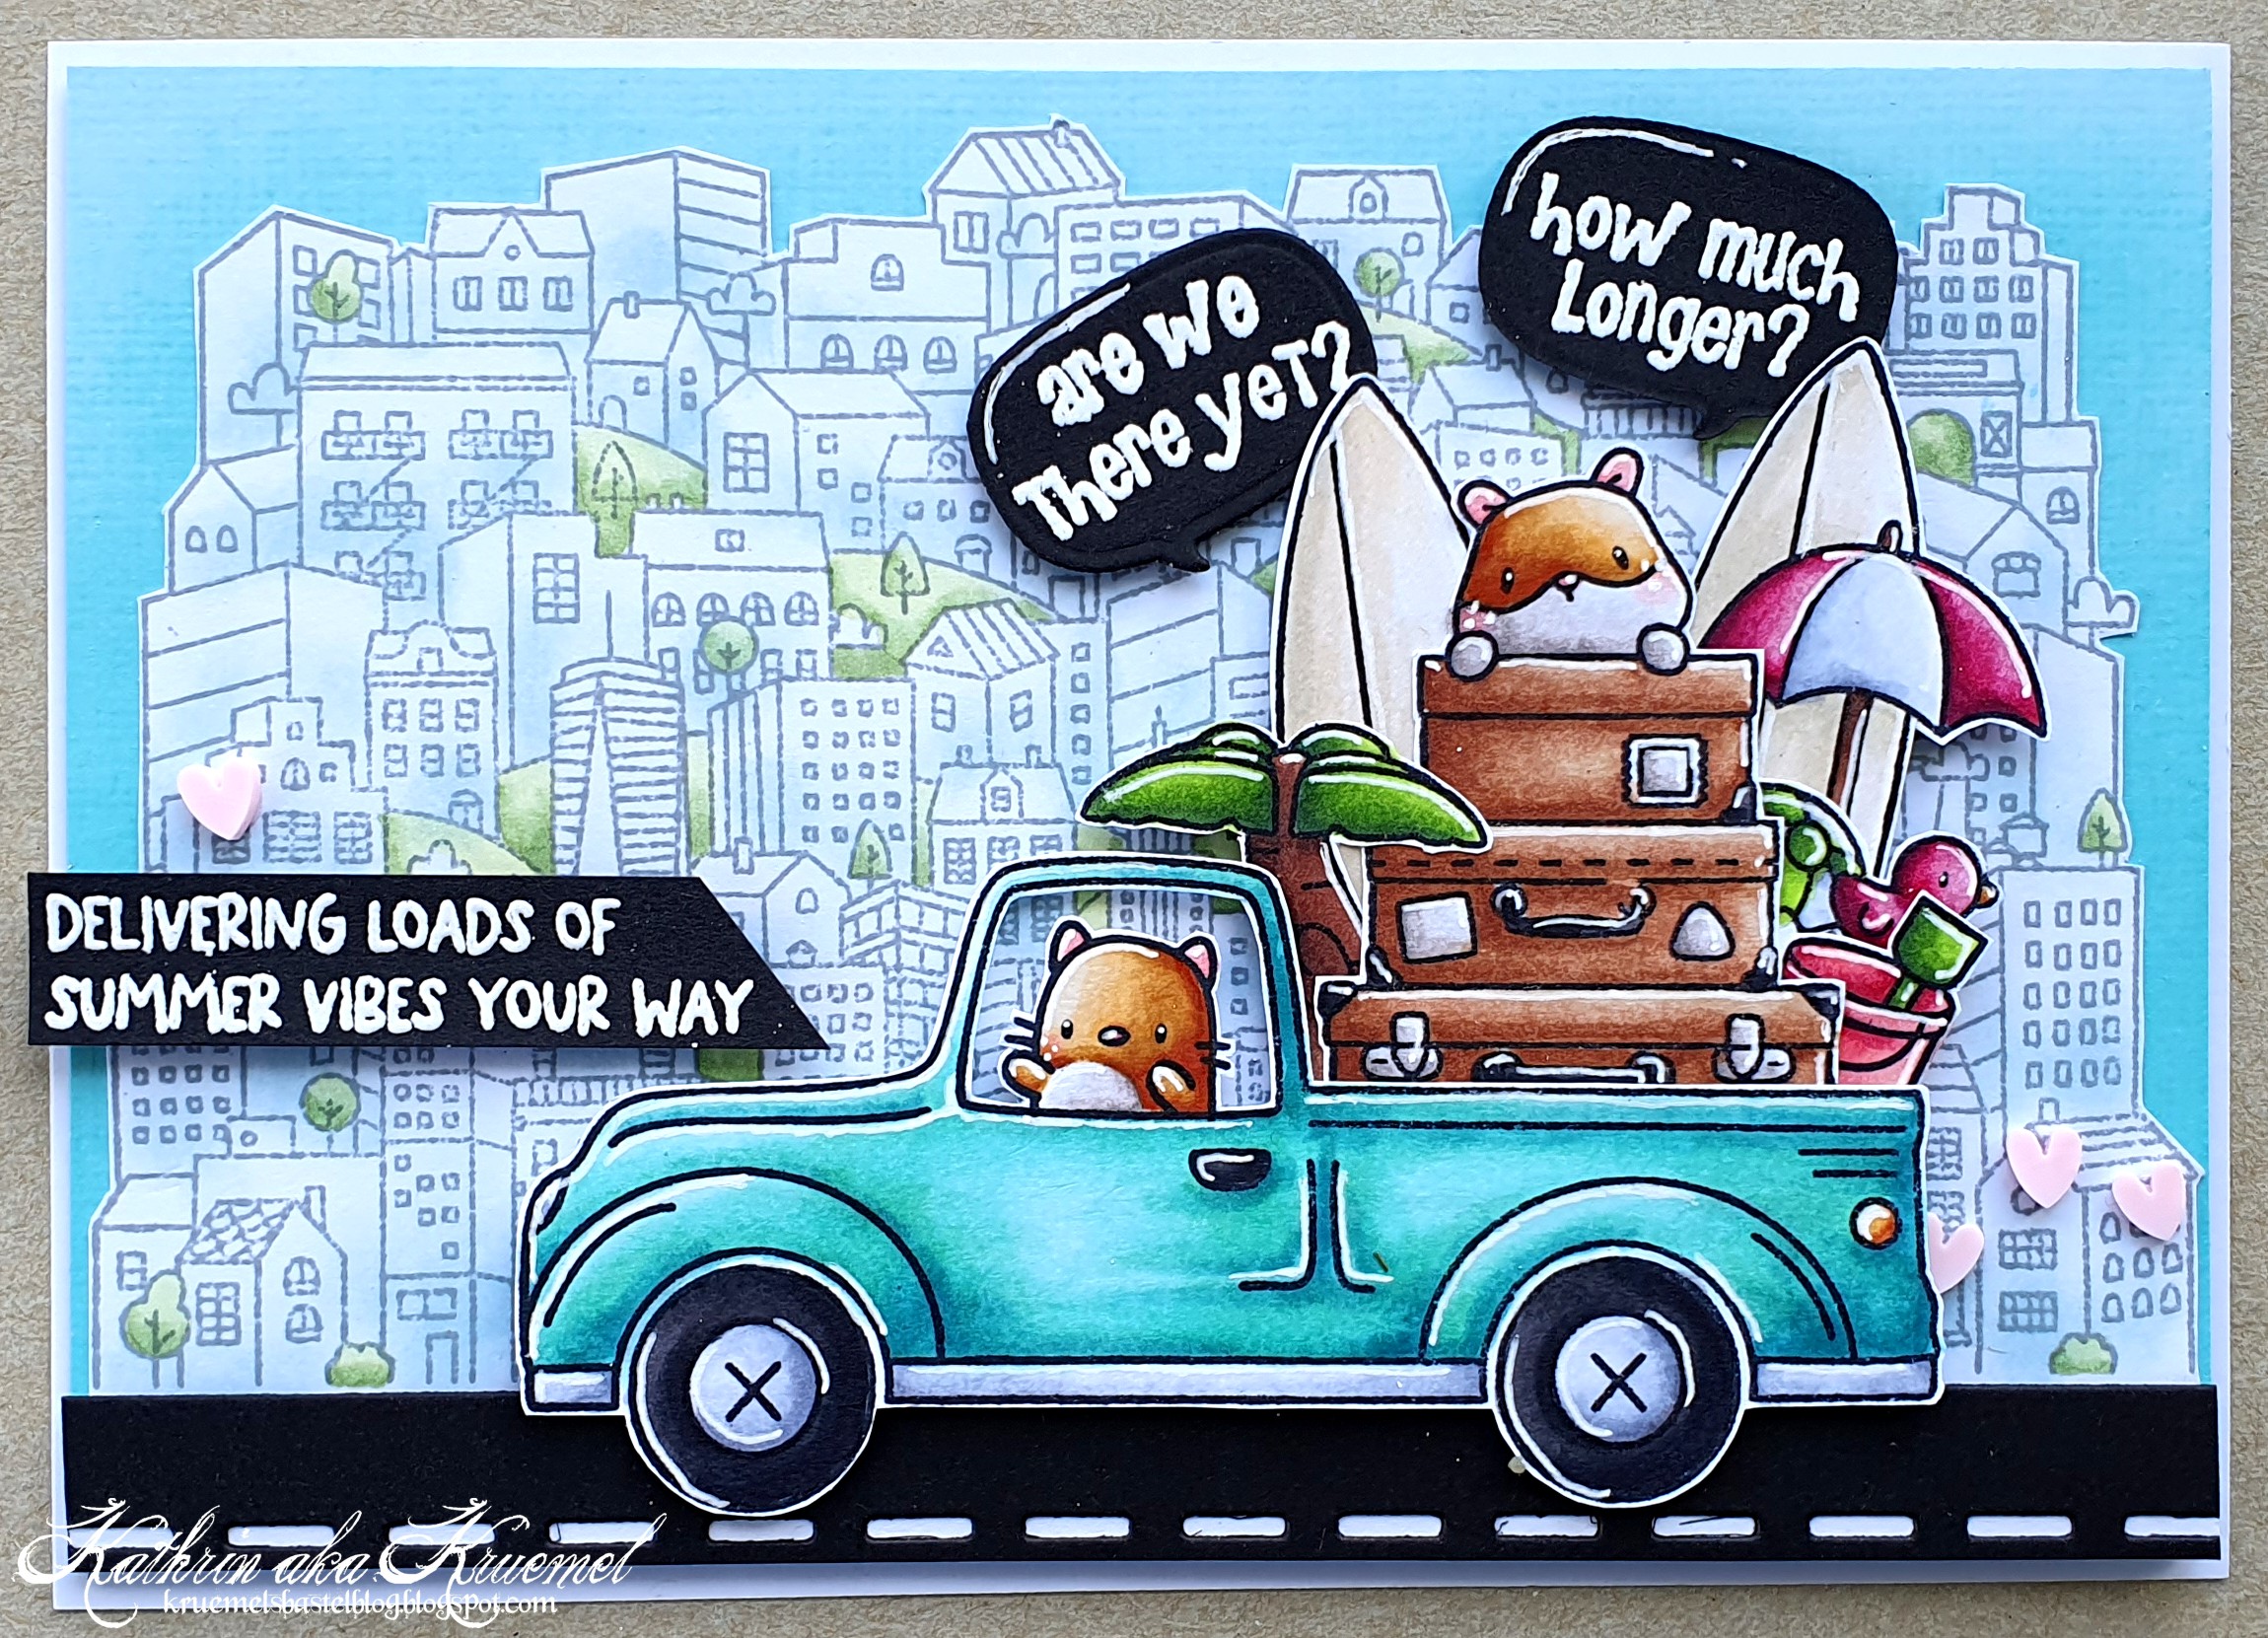
LawnFawnatics Challenge ist "Summertime Fun: Critters on Vacation". Und das ist meine Karte dafür.

Hello everyone!
The theme of the new LawnFawnatics challenge is "summertime fun: critters on vacation". And this is my card for it.

Ich liebe ja die Mäuse von LawnFawn über alles, also war recht schnell klar, dass die auf meiner Karte in den Urlaub fahren dürfen. Urlaub muss für mich irgendwas mit Meer sein, und zwar dort, wo es warm ist. "Meine" Mäuse sind da ganz meiner Meinung und sind ans Meer gefahren.
Natürlich ist wieder eine Karte mit viel Dimension und vielen Lagen entstanden. Ich finde, die machen Karten immer so toll lebendig. Der Hintergrund besteht aus einem Stück weißen Cardstocks, auf den ich erst mit einer Kreis-Maske eine kleine Sonne mit Distress Ink Squeezed Lemonade aufgewischt habe, dann habe ich die Sonne abgedeckt und den Himmel mit Squeezed Lemonade und Salty Ocean gewischt. Dabei habe ich darauf geachtet, die Farben möglichst wenig zu überlappen, damit der Himmel nicht grün wird.
Mit den Stitched Simple Wavy Borders habe ich die nächsten drei Lagen gestaltet - zwei habe ich aus weißem Cardstock, eine weitere aus hellbraunem Cardstock gestanzt. Die beiden weißen Lagen bilden das Meer, deswegen habe ich sie ebenfalls mit Salty Ocean gewischt. 
Das hellbraune Stanzteil ist die erste Lage meines Strandes. Den habe ich ein wenig mit Distress Oxide Frayed Burlap gewischt, dann ein wenig davon aufgespritzt. Auf die gleiche Weise habe ich auch die vorderste Lage Sand gestaltet, die ein Teil des Tropical Backdrop ist. Auf diese vier Teile habe ich dann noch weiße Acrylfarbe aufgespritzt.
Und natürlich durften Palmen an meinem Strand nicht fehlen. Die hier sind mit dem Tropical Backdrop aus schwarzem Cardstock gemacht. Da ich unbedingt die zwei Palmen auf der rechten Seite der Karte haben wollte, habe ich sie auf den Kopf gedreht. Außerdem habe ich den Rahmen drumherum weggeschnitten, so dass ich die beiden Palmen hier etwas weiter nach rechts schieben konnte, sonst hätten die Mäuse im Wasser nicht mehr auf die Karte gepasst. Durch das Auf-den-Kopf-Drehen passten natürlich die Palmenoberteile nicht mehr genau. Ich habe sie einfach jeweils einmal aus hellerem und einmal aus dunklerem türkisgrauem Cardstock gestanzt und die Spitzen mit Distress Oxide Evergreen Bough eingefärbt, dann habe ich die Teile versetzt auf die schwarzen Palmen geklebt.

I love the mice by LawnFawn and so I knew that I wanted to send them to a vacation on my card. Vacation to me always has to do something with the ocean, somewhere warm and sunny. "My" mice totally agree with me and rented a cottage at the beach.
Of course I made a card with lots of dimension and layers again. I think, these make the card so lively. The background is made from a piece of white cardstock. I first used a negative circle mask and inked the sun with Distress Ink Squeezed Lemonade, then covered the sun with masking tape and inked the sky with Squeezed Lemonade and Salty Ocean. I tried, not to let the two colors touch too much to not end up with a green sky.
The next three layers I made with the Stitched Simple Wavy Borders - I die cut two from white and one from light brown cardstock. The two white pieces will make my ocean so I inked those with Salty Ocean again.
The light brown piece will be one layer of the beach. I inked it with a bit of Distress Oxide Frayed Burlap and then splattered some of the same color on. Exactly the same I created the front layer of sand, that is made using part of the Tropical Backdrop die. Then I splattered white acrylic paint onto all four of these layers.
And of course my beach needed some palm trees. I made those from black cardstock using the Tropical Backdrop again. Since I really wanted the two palm trees to be on the right side of my card I turned them upside down. I also cut off the frame to be able to move those two palm trees a bit more to the right to be able to fit those two mice in the water onto the card. Since I turned the palm trees upside down, the individual top pieces didn't fit exactly anymore. I simply die cut them once from light and once from darker greyish aqua cardstock and inked the tips of the leaves with Distress Oxide Evergreen Bough, then glued the tops down turning each piece a bit.


Hier ist das Strandhaus, das die Mäuse gemietet haben. Es ist mit der Build a House Stanze und dem Build a House Beach Add-On Set gemacht. Dabei habe ich helltürkis für das Haus selbst und weiß, rot und ein wenig dunkelblau für die Deko gewählt. Das Haus habe ich ein wenig mit Distress Ink Broken China schattiert, die anderen Teile mit Hickory Smoke. Dann habe ich mit einem grauen Fineliner Querstriche auf das Haus gemalt und allen Teilen mit einem weißen Gelstift eine verwitterte Optik gegeben. 
Die Markise habe ich übrigens jeweils einmal aus weißem und einmal aus dunkelblauem Cardstock gestanzt, das dunkelblaue Teil in Streifen geschnitten und dann auf das weiße Teil aufgeklebt. Und hier war dann auch der einzige Platz, auf dem ich einen Text auf der Karte unterbringen konnte. Er ist aus dem On the Beach Set und schwarz auf grau-türkis farbenen Cardstock gestempelt. Und ich finde es ganz passend, dass es so aussieht, als wäre "happy summer" der Name der Unterkunft.
Damit das Haus in meine Szene passt, habe ich es unten ein wenig gekürzt und die Markise etwas höher als eigentlich vorgesehen aufgeklebt. 
Neben dem Haus steckt noch ein Surfbrett aus dem Beachy Christmas im Sand. Und bei der Palm hinter dem Haus habe ich auf die zweite Lage Palmblätter verzichtet. 

Here's the beach cottage the mice rented. It's made with the Build a House die set and the Build a House Beach Add-On set. I've chosen light aqua for the house and white, red and dark blue for the accents. I usesd Distress Ink Broken China to lightly shade the house, the other pieces I shaded with Hickory Smoke. Then I used a grey fineliner to add horizontal lines to the house and gave all the piece a weathered look with a white gel pen.
The awning I die cut once from white and once from dark blue cardstock, cut the blue one into strips and adhered it onto the white one. And that was also the only place for me to fit a text onto this card. It's from the On the Beach set and stamped with black ink onto grey-ish aqua cardstock. I think it fits the place perfectly because now it looks like "happy summer" is the name of the cottage.
To make the house fit my scene I cut it a bit shorter and also placed the awning a bit higher than it is meant to be.
Next to the house there's a surfboard from the Beachy Christmas set waiting for someone to ride the waves. And on the palm tree behind the house I skipped the second layer of leaves.


Hinter dem Haus kann man einen Blick auf das Wasser erhaschen und dort spielen zwei Mäuse mit einem Ball. Ich konnte es einfach nicht lassen, den beiden den Bikini bzw. die Badehose aus dem Plan On It Vacation Set anzuziehen - deswegen springen sie auch so weit aus dem Wasser: sie wollen unbedingt ihre neue Badebekleidung zeigen.... Der Wasserball ist ebenfalls aus diesem Set, die Maus links aus dem Set Sew Very Mice, die Maus rechts aus dem Whoosh Kites Set.
Und aus diesem Set ist natürlich auch die Maus, die gerade einen Drachen im Strandwind steigen lässt. Statt einer gestempelten Schnur  habe ich ein Stück graubraunes Twine zwischen Maus und Drachen gespannt. 

Behind the house we get a bit of water to see - there are two mice playing ball. I just couldn't resist to give those mice the bikini top and swim trousers from the Plan On It Vacation set. That's also why they are jumping up so high in the water: they want to show off their new swimwear... The ball is also from this image, the mice on the left from the Sew Very Mice Set, the one on the right from the Whoosh Kites set. 
And from this set also comes the mouse on the very right, that's flying his kite in the summer wind. Instead of a stamped string I used a piece of grey-ish brown twine between the two images. 


Das Schöne an einem Strandurlaub ist ja, dass er für jeden eine spaßige Beschäftigung bereithält. Und so spielen ganz vorne auf der Karte zwei kleine Mäuse im Sand und haben schon eine stattliche Burg gebaut. Die beiden Mäuse hier sind aus dem Set Crazy Antics, die Sandburg, Eimer und Schaufel sind aus dem Set Beachy Christmas. Deswegen hat die Sandburg auch eine Lichterkette, aber ich finde, es könnten auch als Dekoration aufgelegte Muscheln sein. 
Zum Schluss habe ich noch einige Muscheln aus den Sets On the Beach und Beachy Christmas im Sand verteilt. Alle Motive auf der Karte sind übrigens mit Copics coloriert. 

The good thing about a vacation at the beach is, that there's something fun to do for everyone. And so the two little mice are playing in the sand in the front of the scene. They have already built quite the sand castle! Those two mice are from the Crazy Antics set, the sand castle, the bucket and the shovels come in the Beachy Christmas set. That's also why there are christmas lights wrapped around the sand castle, but I think it could also be some seashells, put into the sand for decoration.
In the end I added a few seashells from the sets On the Beach and Beachy Christmas. All images on the card are colored with Copics.


Zum Zusammensetzen der Szene habe ich 3D Tape verwendet und vier verschiedene Ebenen gestaltet. Als Abschluss habe ich einen Rahmen, gemacht mit einem der Stitched Rectangle Frames aus grau-türkis farbenem Cardstock, aufgeklebt.
Auf die Wellen, die Sonne,einige Stellen im Sand und die Muscheln habe ich noch Stickels aufgetragen, dann habe ich meine Szene auf einen weißen Karterohling geklebt.

To put the scene together I used foam tape and created four layers. As a finishing touch I added a frame, made from grey-ish aqua cardstock with one of the Stitched Rectangle Frame dies.
I put a bit of Stickles onto the waves, the sun, a few places of the sand and the seashells, then attached my card front to a white card base.

Donnerstag, 20. Juni 2024

Eine Baby-Shaker-Card

 
Hallo Ihr Lieben!
Als ich die süße Maus aus dem Stempelset Sommer Sonne aus dem Juni-Release von Stampcorner gesehen habe, wusste ich sofort, dass ich sie für eine Babykarte verwenden wollte. Mit dem kleinen Teddy ist sie ja auch perfekt dafür. Und so ziert sie nun diese Shaker Card, die ich heute auf dem Stampcorner Blog zeige.

Hello everyone!
When I saw the cute mouse from the stamp set from Stampcorner's june release I knew that I wanted to make a baby card with it. With that little teddy the mouse is just perfect for that. And so became the star on this shaker card, that I'm sharing on the Stampcorner Blog today. 

Ihr seht es schon, es ist definitiv eine Karte für ein kleines Mädchen... Den weißen Cardstock, den ich für den Hintergrund verwendet habe, habe ich mit Distress Oxide Tattered Rose, Saltwater Taffy und Worn Lipstick gewischt und für den oxidierten Look mit Wasser bespritzt. 
Den Rahmen meines Shakers habe ich aus weißem Cardstock gestanzt. Zuerst habe ich eine der Zickzack Stitch Stanzen ausgestanzt, dann mittig aus dem Stanzteil eine der Rectangle Stitch Stanzen. Den Ausschnitt habe ich dann von hinten mit Folie abgedeckt und den Rahmen mit dickem 3D Tape auf dem Hintergrund befestigt. 
 
As you can see, this is clearly a card for a little girl. The white cardstock that I used for my background I've inked with Distress Oxide Tattered Rose, Saltwater Taffy and Worn Lipstick. Then I splattered wome water onto it for the oxidized effect. 
The frame for my shaker I created from white cardstock. I first die cut one of the Zickzack Stitch dies, then cut one of the Rectangle Stitch dies from the center. I put some acetate behind the window and adhered it with thick foam tape to the background.
 

Bevor ich den Shaker zugeklebt habe, habe ich ihn natürlich gefüllt - es befinden sich darin winzige silberne und rosarote Kügelchen und kleine Herzen und Sterne, gestanzt aus Cardstock in verschiedenen Rot- und Rosatönen. Die Teile waren - immer noch - Überbleibsel meiner Regenbogenkarten und waren praktischerweise bereits fertig auf meinem Tisch.

 Of course I filled my shaker before I put it together - I used tiny silver and rose red beads and small hearts and stars, cut from different tones of pink and red cardstock. Those pieces were - still - left overs from my rainbow cards and were handily laying all cut out already on my table.


Die süße Maus habe ich mit Copics coloriert, die Highlights sind mit einem weißen Gelstift gemacht. Dann habe ich sie mit der Schere ausgeschnitten und oben auf den Shaker geklebt.

The cute mouse I colored with Copics and added highlights with a white gel pen. Then I fuzzy cut her out and glued her onto the shaker window.


Auch meinen Text habe ich direkt auf das Shaker-Fenster geklebt. 
Die Buchstaben für das Wort Baby habe ich je zweimal aus weißem Cardstock gestanzt. Je einen der Buchstaben habe ich leicht mit Worn Lipstick gewischt und dann etwas versetzt auf den weißen Buchstaben geklebt. 
Die anderen Texte sind aus dem Set Kleine Worte und mit weißem Embossingpulver auf craft farbenen Cardstock embosst. 

Also the text I adhered onto the shaker window.
I die cut each of the letters for the word Baby twice from white cardstock and inked one of each lightly with Worn Lipstick. Then I glued those onto the white letters, offsetting them a bit. 
The other texts mean "hello" and "heartfelt welcome". I white heat embossed them onto kraft colored cardstock.


Die ausgestanzten Buchstaben und die Maus habe ich mit dickem, die kleinen Textstreifen mit dünnem 3D Tape aufgeklebt. 
Als Deko habe ich dann noch ein paar silberfarbene Pailetten und drei Herzen auf der Karte verteilt und außerdem ein wenig Glitzer auf die gestanzten Buchstaben aufgetragen.
Dann habe ich alles auf einen weißen Kartenrohling geklebt.

I adhered the mouse and the die cut letters with thick, the text strips with thin foam tape.
As decoration I added a few silver sequins and three white hearts to the card and also put a bit of glitter onto the die cut letters. Then I adhered the shaker to a white note card.

Mittwoch, 19. Juni 2024

You Sparkle

 
Hallo Ihr Lieben!
Mir passiert es immer wieder mal, dass ich in meinem Bastelzimmer sitze und so gar keine Idee habe, was ich machen könnte. Dann fange ich halb inspiriert irgendwas an und meist endet alles im Papierkorb. So einen Tag hatte ich vor kurzem - allerdings hatte der ein Happy End, denn zum Schluss hatte ich sogar eine Karte fertig. Und die zeige ich Euch heute.
 
Hello everyone!
Every now and then it happens, that I am sitting in my craft room and have no idea what to make. Then I usually start something half inspired and more often than not everything ends up in the trash. I had one of those days a little ago - but this one had a happy end, because I had a finished card at the end of the day. And that I am sharing with you today.
 
Der Hintergrund hier ist mit dem Tropical Leaves Stencilset von LawnFawn gemacht. Allerdings habe ich die Blätter nicht wie gewohnt gewischt, sondern habe den Stencil mit Distress Ink eingefärbt, mit Wasser besprüht und dann auf Watercolor Cardstock gedrückt. Ich habe Salvaged Patina, Peacock Feathers und Pine Needles verwendet. Das gleiche wollte ich dann mit dem zweiten Stencil im Set wiederholen, aber dabei habe ich die erste Lage quasi überdeckt. Also habe ich gleich nach der zweiten Farbe wieder aufgehört und stattdessen den ersten Stencil nochmal verwendet und die Schritte wiederholt. Jede Farblage musste trocknen, so dass alles etwas länger dauerte. Aber dadurch liegen die Farben aufeinander statt ineinander zu verlaufen und so waren die Blätter zumindest eines der Stencils doch noch sichtbar. Und ich finde den leicht fleckigen Look toll.
Dann habe ich etwas von dem Distress Mica Spray Frosted Juniper aufgespritzt. 
 
The background is made with the Tropical Leaves stencil set by LawnFawn. But I didn't ink the leaves like I usually do. Instead I put some Distress Ink onto the stencil, misted it with water and pressed it onto a piece of watercolor cardstock. I used Salvaged Patina, Peacock Feathers and Pine Needles here. Then I wanted to repeat the same steps with the second stencil in the set but by doing that I covered the layer I had made with the first stencil. So I stopped after the second color and instead brought in the first stencil again, repeating all the steps. I let each layer of color dry before adding the next one. That took quite a bit longer, but now the colors are layered instead of mixed and due to that at least the leaves of one of the stencils are visible. And I really love the splotchy look.
Then I splattered some Distress Mica Spray Frosted Juniper on top.
 

Für die Blumen habe ich die Fantasy Flowers Stanze von Alex Syberia verwendet und die Teile ebenfalls aus Watercolor Cardstock gestanzt. Die habe dann per Ink Smooshing eingefärbt - die Blumen mit Distress Ink Tattered Rose und Dried Marigold, die Blätter und Stengel mit Salvaged Patina und Peacock Feathers und die Blumenmitten mit Spiced Marmalade. Die anderen Teile in der Blume habe ich aus schwarzem Cardstock gestanzt. 
Zum Zusammenkleben der Blumen habe ich dann 3D Tape verwendet, so bekommen sie eine tolle Tiefe und durch das Ink Smooshing hatte sich der Cardstock eh ein wenig gewellt/verbogen. 
Hinter den Blumen habe ich dann einige Blätter aufgeklebt - ein großes Monsterablatt von Action, ein kleineres von NoorDesign, einen Farn von CraftEmotions und ein gefächertes Blatt von MFT.  Ich habe alle aus schwarzem Cardstock gestanzt, von der Mitte her mit etwas Distress Oxide Salvaged Patina gewischt und dann ebenfalls etwas von dem Frosted Juniper aufgespritzt. 
Anschließend habe ich alle Teile, teilweise mit 3D Tape aufeinander geklebt.

For the flowers I used the Fantasy Flowers dies by Alex Syberia and die cut the pieces from watercolor cardstock. Then I inked them by doing some Ink Smooshing - for the flowers I used Distress Ink Tattered Rose and Dried Marigold, the leaves and stems with Salvaged Patina and Peacock Feathers and the flower centers with Spiced Marmalade. The other inner parts of the flowers I die cut from black cardstock.
To put the flowers together I used foam tape. This way they get some nice dimension and the cardstock had bent/curled up a bit anyway due to the ink smooshing. 
Behind the flowers I put some leaves - a large monstera leaf by Action, a smaller one by NoorDesign, a fern by CraftEmotions and a fanned out leaf by MFT. I die cut all of them from black cardstock, inked them from the centers with a bit of Distress Oxide Salvaged Patina and then splattered more of the Frosted Juniper on top.
Then I glued all the pieces together, partly using foam tape.


Nun fehlte noch ein Text. Ich bin meine Textstanzen durchgegange und fand das Wort Sparkle aus einem Stanzenset von HelloBluebird. Das habe ich dann dreimal aus schwarzem Cardstock gestanzt und die Teile gestackt.
Um den Text zu ergänzen habe ich ein kleines you weiß auf schwarzen Cardstock embosst. Es ist aus einem Stempelset von Altenew, das ich auf dem Tisch liegen hatte, weil ich von dort evtl. einen Text benutzen wollte, der dann aber doch nicht passte. 

Now my card needed a sentiment. I went through my text dies and came across a sparkle die from a die set by HelloBluebird. I die cut it three times from black cardstock and stacked the pieces.
To finish the text I white heat embossed a little you onto black cardstock. It's from a stamp set by Altenew, that I had laying on my table because I thought about using a text stamp from it but then it didn't fit.


Ich habe dünnes 3D Tape verwendet, um die Blätter und Blumen auf den Hintergrund zu kleben. Auch hinter dem you befindet sich etwas davon. 
Die Blumen und das Wort Sparkle habe ich etwas mit Stickles beglittert. Und dann hatte ich diese orange-lichen irisierenden Glitzersteine, die perfekt zu den Blumen passten. Also habe ich davon auch noch einige auf der Karte verteilt. 
Zum Schluss habe ich alles schwarz gemattet und auf einen weißen Kartenrohling geklebt.

I used thin foam tape to adhere the leaves and flowers to the background and also put a tiny piece of it behind the word you.
I used Stickles to add some glitter to the flowers and the word sparkle. And then I had those orange-ish iridescent rhinestones that went perfectly with the color of the flowers. So I added some of these to the card as well.
I matted the card panel black and adhered it to a white note card.