Freitag, 29. Juli 2022

Oh happy day!

 
Hallo Ihr Lieben!
In der Share Handmade Kindness FB Gruppe von Jennifer McGuire gibt es jeden ersten Donnerstag im Monat den Technique Throwback Thursday. Dabei wird zu einem älteren Video von Jennifer verlinkt und man kann eine Karte danach machen. Diesmal geht es darum, kleine Die Cuts kreativ zu verwenden. Äh, ja. Das war zumindest mein Plan. Aber dann kam mir ein anderes Video von Jennifer dazwischen, außerdem ein neu bei mir eingezogenes Stempelset - und dann war da mit den Die Cuts kreativ einsetzen irgendwie nicht mehr ganz so einfach, wie ich es geplant hatte. Aber die Karte, die zum Schluss rauskam, gefällt mir doch super.

Hello everyone!
Every first thursday of the month it's Technique Throwback Thursday in Jennifer McGuire's Share Handmade Kindness FB group. They link to an older video by Jennifer and you are invited to use the technique from said video on a card. This month it's about using die cuts creatively. Well, at least that was the plan. But then I saw a recent video by Jennifer, add a newly bought stamp set - and then using die cuts creatively wasn't as easy as I had planned it. But I really love how the card, that I ended up with, turned out.

Das zweite Video, das mir dazwischen kam, hat zu diesem Hintergrund geführt. Dafür habe ich einfach mit verschiedenen Blautönen leicht überlappende Streifen auf ein Stück weißen Cardstock gestempelt. Der Streifen ist Teil des Color Block Gradiating Stripes Stempel von PinkFresh. Der hat von oben nach unten immer breiter werdende Streifen als Motiv - das geniale ist, dass man jeden Streifen einzeln aus dem Muster nehmen kann. Ich habe hier den breitesten Streifen verwendet.
Den gestreiften Hintergrund habe ich dann schwarz gemattet und auf einen weißen Kartenrohling geklebt.

The second video, that made me change my plans, led me to this background. I used different tones of blue ink to stamp some slightly overlapping strips onto a piece of white cardstock. The stamp I used is part of the Color Block Gradiating Stripes die by PinkFresh. I has strips from a very thin one at the top to a broad one at the bottom - but the great thing is that you can take ouch each strip individually of the background stamp. I used the broadest strip here.
I matted the striped background black and glued it onto a white note card.


Dann brauchte ich einen einfarbigen Hintergrund für meinen Text und die gestanzten Blumen. Deswegen habe ich das Rechteck aus dem Painted Shapes Stempelset von ConcordAnd9th mit tiefschwarzer Tinte auf den Hintergrund gestempelt. Man kann es hier nicht mehr so toll erkennen, aber die Formen in diesem Stempelset sehenaus wie mit einem Pinsel und Wasserfarbe gemalt.
Der gestanzte Text ist eine Mischung aus der Happy Stanze von WhimsyStamps und einer "oh happy day" Stanze, die mal ein einem Set von Action enthalten war. Ich habe alle Worte einige Male aus weißem Cardstock gestanzt und aufeinander geklebt. Für die oberste Lage des Happy habe ich das nochmal aus golden-holographischem Cardstock gestanzt. 
Hinter dem happy fehlte mir noch etwas, deswegen habe ich hier mit golden-glitzerndem Embossingpulver noch dieses Strahlenmotiv von SU aufembosst und anschließend die Worte aufgeklebt.
Für die Blumen und Blätter habe ich jede Menge verschiedene Stanzen von verschiedenen Firmen kombiniert. Die Blattranke ist aus dem Strawberry Frame Stanzenset von LawnFawn, die Blüten von Magnolia und die kleinen Blätter weiß ich nicht mal, von wem sie sind. Die Blätter sind aus grünem Cardstock gestanzt und mit Distress Ink Mowed Lawn ein wenig schattiert. Die Blüten habe ich aus weißem Cardstock gestanzt und in der Mitte hellblau eingefärbt. In jede Blumenmitte habe ich dann noch einen Kreis, gemacht aus gelbem Cardstock mit den Beerenstanzen des Joy Wreath Stanzensets von MFT, gesetzt. Dann habe ich alles, teilweise mit 3D Tape, rund um den Text auf die Karte geklebt.

Then I needed a solid colored background for my text and the die cut flowers. So I stamped the rectangle from the Painted Shapes stamp set by ConcordAnd9th with deep black ink onto the background. You can't really tell anymore on my card, but the shapes in this stamp set look like they are painted with watercolors.
The die cut text is made of a mix of the Happy die by WhimsyStamps and a "oh happy day" die that was included in a die set I bought at a local Action some time ago. I've die cut each word a few times from white cardstock and stacked them. As the top layer of the word happy I've die cut it again from some golden holographic cardstock.
I felt like something was missing behind the word happy, so I've heat embossed this rays image by SU onto the card using some golden-sparkling embossing powder. Then I glued down the words.
For the flowers and leaves I used a mix of different brands. The vine image is from the Strawberry Frame die set by LawnFawn, the blossoms are by Magnolia and I can't even tell which brand those smaller leaves are. I've die cut the leaves from green cardstock and shaded them with Distress Ink Mowed Lawn. The blossoms are die cut from white cardstock and I lightly brushed some light blue ink onto the flower centers. As flower centers I also glued down some circles, die cut from yellow cardstock using the berries die from the Joy Wreath die set by MFT. Then I attached all the die cuts around the text, using foam tape for some of the flowers.


Als Deko habe ich dann noch einige Perlen auf die Karte geklebt. Die changieren wunderbar von blau zu gelb-gold und passten einfach perfekt in mein Farbschema. Da ich alle Pailetten, Perlen etc. in nicht beschriftete Becher umgefüllt habe, kann ich leider auch hier keinen Hersteller nennen. Schade, denn von denen würde ich mir glatt nochmal welche bestellen! 
Die verschiedenen Farben der Perlen kann man leider nicht auf einem Foto einfangen, dafür seht Ihr hier den Glanz des Wortes happy sowie des Embossingpulvers echt gut.

As embellishments I added a few pearls to my card. Those are super shiny and change from blue to a golden yellow so they were perfect for the colors I had picked for my card. Well, I have all my sequins, pearls etc. sorted into little individual containers, that I never labeled. So sadly I can't tell you which brand those are. I really would love to know myself, because I'd really like to re-order some of these!
It's impossible to catch the different colors of those pearls on a picture, but at least you can see the shine of the word happy and the embossing powder here pretty good.

Donnerstag, 28. Juli 2022

Eine sommerliche Mini Slimline Shaker Card

 
Hallo Ihr Lieben!
Für diese Karte, die ich heute auf dem Stampcorner Blog zeige, habe ich nochmal das Stempelset Hallo Sommer verwendet. Da gab es doch glatt eine Robbe, die bisher noch nicht zum Einsatz kam!

Hello everyone!
For this card, that I'm sharing over at the Stampcorner Blog today, I used the new Hallo Sommer stamp set once again. There really was a little seal, that I hadn't used so far!

Ich habe hier eine Mini Slimline Card gemacht. Und weil ich schon so lange keine Shaker Card mehr gemacht habe, auch gleich noch ein Shaker Element mit eingebaut.
Für die Fenster im Shaker habe ich die Mini Slimline Pickens 1 Stanze von WhimsyStamps  an der selben Stelle aus mehreren gleichgroßen Stücken weißen Cardstocks gestanzt und die dann alle aufeinander geklebt. Hinter die Fenster habe ich Designpapier mit Wellendruck, das ich noch irgendwo in meinem Vorrat gefunden habe, geklebt und dann den Shaker erst türkisfarben gemattet, dann auf eine weiße Mini Slimline Karte geklebt.
Obenauf habe ich dann noch eine Lage roten-weiß gestreiften Designpapiers aus dem Paper Pack 02 von Stampcorner geklebt. Auch hier habe ich die Fenster-Stanze von WhimsyStamps an derselben Stelle aus dem Papier gestanzt.

I made a Mini Slimline card here. And since I hadn't made a shaker card for a long time I also included a shaker in this card.
To die cut the windows for the shaker I used the Mini Slimline Pickens 1 die by WhimsyStamps and cut it into the exact same spot into several pieces of white cardstock, then stacked them. Behind the windows I've glued some patterned paper with a waves print, that I found in my old stash. Then I matted the shaker with some turquoise cardstock and glued it onto a white mini slimline card base.
On top of the shaker I've glued another layer, cut from a red and white striped patterned paper from the Paper Pack 02 by Stampcorner. Again I had die cut the die by WhimsyStamps in the exact same spot in my paper as I had in the white cardstock.


Hier ist die kleine Robbe, die ich bisher nicht benutzt hatte. Die Sonnenbrille ist wieder mit Glossy Accents überzogen, die Robbe ist, so wie alle Motive auf der Karte, mit Copics coloriert. 
Ich habe sie ausgeschnitten und oben auf das oberste Shakerfenster geklebt. Das Melonenstück ist ebenfalls aus dem Set Hallo Sommer, der leckere Cocktail stammt aus dem Cool Summer Stempelset. 

Here's the little seal I hadn't used so far. Again the glasses are covered with Glossy Accents, the seal is colored with Copics - as are all images on this card.
I cut the seal out and glued it on top of the top most shaker window. The slice of melon is also from the Hallo Sommer stamp set, the yummy looking cocktail is from the Cool Summer stampset.


Beim - bzw. muss ich eigentlich auf dem sagen - mittleren Fenster habe ich meinen Text untergebracht. Den habe ich mit weißem Embossingpulver auf die Folie, die ich zum Abdecken der Shakerfenster verwendet habe, aufembosst. Dann habe ich Gelstifte benutzt, um die Bereiche zwischen den embossten Linien blau und rot einzufärben. 
Hier habe ich als Deko zwei Seesterne, ebenfalls aus dem Set Cool Summer, verwendet.

In - or I should say on - the center shaker window I put down my text. 
I've white heat embossed it onto the acetate, that I used to cover my shaker windows, then used some gel pens to fill in the areas between the embossed lines with red and blue.
As decoration I added two starfish, again from the Cool Summer stamp set.


Und auf dem unteren Fenster chillt eine weitere Robbe. Dahinter habe ich eine Palme aus dem Set Cool Summer gepflanzt und von ihr aus ein Partybanner an den Rand der Karte gespannt. Das Banner ist aus dem Set Hallo Sommer. 

And on the lowermost window another seal is taking a nap. I planted a palm tree behind him and hung up a party banner from the palm tree to the edge of the card.


Hier habe ich die Karte mal geschüttelt, damit Ihr sehen könnt, wie ich die Fenster gefüllt habe. Ich habe hier kleine türkisfarben-transparente Sechsecke, klar-irisierende Sternchen und kleine halbtransparente rot-orangene Kügelchen zum Füllen verwendet. Wenn alles an den unteren Rand der Fenster geschüttelt ist, wirkt es durch die Kügelchen ein wenig wie Sand, was ich einen tollen Hintergrund für die Motive finde.
Als Deko habe ich noch einige klare Pailetten auf der Karte verteilt.

Here I shaked the card so you can see the filling of the shaker windows. I used small transparent-turquoise hexagons, clear iridescent stars and a few small, semi transparent orange-red pearls. Wenn the filling is on the bottom of each window, those tiny pearls look like Sand, what makes a great beach behind the images.
To decorat the car I added a few clear sequins to my card.

Mittwoch, 27. Juli 2022

Create a Smile Sketch Challenge Juli 2022

 
Hallo Ihr Lieben!
Heute startet die Juli-Sketch Challenge von Create a Smile. Und diesmal ist der Sketch ein wenig anders, er ist nämlich rund: 

Hello everyone!
Today starts the july sketch challenge over at the Create a Smile blog. And this time the sketch is a bit different: it's a circular one:


Nun, ich habe meinen Kreis trotzdem auf eine normale Kartenbasis montiert. Bei meiner Idee wären so viele Elemente über den Rand der Karte übergestanden, dass sie wohl beim Versand total verknickt worden wären...

Well, I still mounted my circle onto a regular card base. With the idea I had in mind many elements would have overhang the edge of the circle and I was afraid those would get bended in the mail....


Ich hatte mich Knall auf Fall in das Stempelset Blatt und Blüte aus dem Juli-Release von Create a Smile verliebt und von vornherein die Idee, mit den kleinren Blüten einen Kranz in Regenbogenfarben zu machen. Und nun passte das auch noch perfekt zum Sketch.
Ich habe hier für den Hintergrund den Freude und Jubel Stempel mit hellgrauer Tinte auf ein Stück weißen Cardstocks gestempelt. Den habe ich dann mit Hologramm-Cardstock in silber-irisierend gemattet und auf einen weißen Kartenrohling geklebt.

I fell in love immediately with the Blatt und Blüte stamp set from the july release by Create a Smile and just knew that I wanted to create a wreath in rainbow colors with the smaller blossoms. What a coincidence, that this idea worked perfectly with the sketch.
For the background I stamped the Freude und Jubel text with light grey ink onto a piece of white cardstock. Then I matted it with some silver holographic cardstock and glued both layers onto a white note card.


Für die Deko habe ich die beiden zusammenhängenden Blumen insgesamt 6 mal weiß auf weißen Cardstock embosst und dann die Blumen in Regenbogenfarben eingefärbt. Ich hatte noch eine weitere Blüte in einem dunkleren Türkis, aber die hat nicht mehr mit um den Kreis gepasst und ich habe sie einfach weggeschnitten.
Zum Einfärbender Blüten habe ich einen kleinen Blending Brush und Distress Ink in den Farben Seedless Preserves, Spun Sugar, Picked Raspberry, Barn Door, Spiced Marmalade, Squeezed Lemonade, Twisted Citron, Peacock Feathers, Tumbled Glass, Blueprint Sketch und Wilted Violet verwendet. Dann habe ich mit Polychromos noch ein paar zusätzliche Schatten eingearbeitet und außerdem die Blütenmitte jeweils mit einem schwarzen Glaze-Pen eingefärbt. Ich habe alle Blüten per Hand ausgeschnitten und kreisförmig auf einem größeren Kreis, gestanzt aus schwarzem Cardstock mit einer der Stitched Circle Frames Stanzen, angeordnet.
Mit einer etwas kleineren der Stitched Circle Frames Stanzen habe ich den Ring aus Hologramm-Cardstock sowie den zweiten Kreis aus schwarzem Cardstock gestanzt. Auf diesen habe ich dann mit weißem Embossingpulver ebenfalls den Freude und Jubel Text aufembosst. 
Der Text auf der Karte ist zweigeteilt. Der Stempel "ich schicke Dir gute Laune" ist aus dem Set Heute wird Gut. Ich habe den Textteil "ich schicke Dir" mit schwarzer Tinte auf weißen Cardstock gestempelt und ihn dabei beim Aufkleben in das Misti so gebogen, dass er sich an die Rundung des Hologramm-Rings anpasst. Den Rest des Textes habe ich auf Banner, gemacht mit einer der Useful Banners Stanzen, gestempelt. 
Im Sketch ist mittig im Kreis ein Stern eingezeichnet. Eigentlich bin ich da oft eher weniger motivtreu, aber der Stern mit dem Hurra aus dem Stempelset Ausflippen passte hier einfach super. Auch ihn habe ich mit schwarzer Tinte auf weißen Cardstock gestempelt und anschließend ausgeschnitten. 
Den Stern und den kleinen Text habe ich dann wieder mit dem Hologramm-Cardstock gemattet. 

For the flowers I white heat embossed the two blossoms six times onto white cardstock and then colored them in rainbow colors. I had another blossom in a darker turquoise, but it didn't fit around the circle so I've simply cut that off. 
To color the blossoms in I used a small blending brush and Distress Ink in the colors Seedless Preserves, Spun Sugar, Picked Raspberry, Barn Door, Spiced Marmalade, Squeezed Lemonade, Twisted Citron, Peacock Feathers, Tumbled Glass, Blueprint Sketch and Wilted Violet. Then I added some additional shading with Polychromos and filled in the flower centers with a black Glaze pen. I've cut out all the flowers by hand and put them in a circle shape onto a larger piece of black cardstock, die cut using one of the Stitched Circle Frames dies.
With the next smaller die from the Stitched Circle Frames set I've die cut the ring from holographic cardstock and also the smaller black circle. Onto that smaller circle I've white heat embossed the Freude und Jubel text again.
The text on the card means "I'm sending you happiness". I divided the text into two - stamping the one in the smaller font with black ink onto a piece of white cardstock, bending the stamp while putting it in my Misti to make it match the holographic circle/ring. The rest of the text is stamped onto a banner, die cut from white cardstock with one of the Useful Banners dies.
In the sketch there's a star drawn in the center of the circle. Well, most times I'm not that close to the sketch when it comes to decorative elements. But here the black star with the white hooray in the center from the Ausflippen stamp set was just too good of a match. I stamped it black onto white cardstock, then fuzzy cut it.
Again I used the silver holographic cardstock to mat the star and the smaller text.


Die einzelnen Lagen habe ich dann mit verschieden dickem 3D Tape aufeinander geklebt und zum Schluss ein paar silber-holografische Pailettenals Deko auf die Karte geklebt.
Und hier sieht man auch, dass es sich wirklich um silbernen Hologramm-Cardstock handelt - auf allen anderen Bildern wirkt der eher regenbogenfarben. 

I put the different layers together using foam tape in different thicknesses, then added a few holographic silver sequins.
And here is the proof, that I really used silver holographic cardstock - it looks like some rainbow colored cardstock on all the other pictures.

Montag, 25. Juli 2022

Life is an adventure

 
Hallo Ihr Lieben!
Als PrettyPinkPosh ihr Juni-Release rausgebracht hat, war ich als Oma eines 19 Monate alten Jungen im 7. Himmel: Baustelle, Autos, Dinos - alles als Stencil und Stempel. Na, da konnte ich nicht nein sagen! Und so zeige ich Euch heute diese Karte mit einem der Sets.
 
Hello everyone!
When PrettyPinkPosh release their june release me as the grandma of a 19 months old boy was over the moon: construction trucks, cars and dinosaurs - everything available as stamps and stencils. Well, of course I couldn't resist. And so I'm sharing this card with one of the sets today.

Ich weiß, in dem Alter wird mein Enkel das noch nicht zu schätzen wissen - wobei Bilder von Baggern und Co der absolute Renner sind, also mal sehen, was er zu der Karte sagen wird. Trotzdem wollte ich die Sets natürlich schon einweihen. Und mit diesem Text, finde ich, geht sie auch prima für einen Mann, der das Kind in sich nicht verloren hat (tut das ein Mann jemals?).
Für den Hintergrund habe ich den Layered Cars Stencil mit Distress Ink Pumice Stone, Hickory Smoke und Black Soot auf weißen Cardstock gewischt. Der Hintergrund sollte eher dezent sein, deswegen habe ich zu diesen Farben gegriffen. Unter der Stelle, an der sich die farbige Ampel befindet, ist eigentlich auch noch eine Ampel im Stencil. Die habe ich aber wegmaskiert. Die Stempelmotive sowie die gestencilten Motive sind zwar optisch, aber nicht von der Größe her identisch. Und so hätte man die gestencilte Ampel direkt unter dem aufgeklebten Motiv gesehen. Beim Bus war das kein wirkliches Problem.
Über den Cardstock habe ich dann mit gelblich-grauer Tinte den Best Friends Background von MFT gestempelt und anschließend goldene Metallic-Watercolor darüber gespritzt. Irgendwie wollte ich das Gelb im Bus im Hintergrund nochmal aufgreifen. 
Den Cardstock habe ich dann schwarz gemattet und auf einen weißen Kartenrohling geklebt.

I know, he might not be able to really enjoy these images for quite some time - but I might be wrong, because images of excavators etc are a huge hit with him lately, so he might love looking at the card. However, of course I wanted to use the sets. And I think, with this text it will also work for a men, because we all know that they never really grow up.
For the background I've inked a piece of white cardstock with the Layered Cars stencil and Distress Ink Pumice Stone, Hickory Smoke and Black Soot. I wanted it to be quite soft to make the image really pop. Originally there's also a traffic light directly in the spot where I've glued down the stamped one. Well, the images on the stencils and stamps are the same, but not the same size, so the stamped one wouldn't have covered up the stenciled one and I masked it off. It wasn't a problem with the bus image though.
I used some yellow-ish grey ink to stamp the Best Friends Background by MFT onto the stenciled pattern, then spritzed some golden metallic watercolor over it. I really wanted to bring up the yellow of the bus again in the background.
I matted the cardstock black and glued it onto a white note card.


Die Motive sind alle aus dem Across the Miles Stempelset, bis auf das kleine Herz, das ist aus dem Construction Trucks Stempelset. Zuerst hatte ich den Hintergrund hochkant gearbeitet, aber dann passte irgendwie nicht alles zufriedenstellend auf die Karte. Also habe ich einen neuen im Querformat gemacht, und nun war genug Platz in der Breite.
Hinter dem Bus habe ich zwei kleine ausgestanzte Wölkchen aufgeklebt, die Worte Beep und Vroom habe ich auf ausgestanzte Sprechblasen gestempelt und die dann zusätzlich schwarz gemattet. 
Alle Motive sind mit Copics coloriert, das Herz, die Fenster sowie die Lichter der Ampel sind außerdem mit Glossy Accents überzogen. 
Ich habe alles mit zwei unterschiedlichen Dicken von 3D Tape auf den Hintergrund geklebt und per Hand noch die Stange des Stopschilds dazugemalt - das hat eigentlich keine, sah aber irgendwie komisch aus.

The images are all from the Across the Miles stamp set - except for the little heart, which is from the Construction Trucks set. First I had made my background in a portrait orientation, but then it wasn't wide enough for the images I wanted to use. So I made a new one in a landscape orientation and now it was perfect.
Behind the bus I added two tiny die cut clouds, the words beep and vroom are stamped onto die cut speech bubbles that I also matted black. 
All images are colored with Copics, the heart, the windows and the lights on the traffic light image are also covered with Glossy Accents.
I glued everything down using two different thicknesses of foam tape, then added the pole of the stopp sign by hand. The stamp actually hasn't one but that looked a bit weird behind the traffic light.


Für den Text habe ich verschiedene Stempel von LawnFawn kombiniert: Das adventure aus dem Set Little Dragon, die anderen Stempel aus dem Set Coaster Critters. Sie sind mit weißem Embossingpulver auf schwarzen Cardstock embosst und ebenfalls mit 3D Tape unter dem Bus auf die Karte geklebt.

For the text I've combined different stamps by LawnFawn: adventure from the Little Dragon stamp set, the others from the Coaster Critters Set. I've white heat embossed them onto strips of black cardstock and glued those under the bus, again using foam tape.

Sonntag, 24. Juli 2022

LawnFawnatics Challenge #129

 
Hallo Ihr Lieben!
Fun with Food ist das Thema der LawnFawnatics Challenge #129. Oh, da gibt es von LawnFawn ja schier unendlich viele Möglichkeiten... Da aber das Hive Five Kit noch unbenutzt auf meinem Tisch lag - ich war ein paar Tage krank und konnte es noch nicht einweihen - war mir klar, dass ich das mit verwenden wollte. Und so ist die Idee zu dieser Karte entstanden.

Hello everyone!
Fun with Food is the theme of the LawnFawnatics Challenge #129. Well, LawnFawn has tons of wonderful food related images, so the possibilities are nearly endless... But I had the Hive Five kit laying on my desk unused - I was sick for a few days so I wasn't able to use it right away - and so I knew I wanted to include that. That's how the idea for this card was born.

Als Hintergrund habe ich zuerst den Quilted Backdrop aus weißem Cardstock gestanzt und ihn dann kleiner geschnitten. Der ist schön dezent und erinnert mich an eine alte bestickte Tischdecke. 
Dahinter habe ich einen schwarz-gelb gestreiften Hintergrund gesetzt - der greift das Bienenmuster nochmal auf und passt super zum Honig. Ich habe einfach 1cm hohe Streifen aus beiden Cardstockfarben ausgeschnitten und aneinander auf einen weißen Kartenrohling geklebt, dabei habe ich einen weißen Rand sichtbar gelasssen. Allerdings hat mir nicht gefallen, wie der Hintergrund durch das Lochmuster im weißen Aufleger zu sehen war. Das sah irgendwie unruhig aus. Deswegen habe ich hinter den weißen Cardstock erst noch ein Stück hell-türkis farbenen Cardstock und dann alles mit 3D Tape auf den gestreiften Hintergrund geklebt.

For the background I first die cut the Quilted Backdrop from a piece of white cardstock and then cut it smaller. I love the pattern, it reminds me of an old tablecoth.
Behind the white piece I've created a black and yellow striped background - it repeats the pattern of the bees and goes perfectly with the honey. I simply cut 1 cm wide strips from both colors of cardstock and then glued them onto a white cardbase, leaving a white edge all around. I just didn't like how the striped patttern looked through the holes in the white cardstock, it just looked too busy. So I've glued a piece of light turquoise cardstock behind the white piece with the pattern, then used foam tape to attache it to the striped background.


Als Deko habe ich zuerst mit dem Henry's ABC Stanzenset die Buchstaben für das Wort Toast aus türkisfarbenem und schwarzem Cardstock gestanzt. Das O habe ich hier ausgelassen, denn das wollte ich durch die Scheibe Toast ersetzen. Die Buchstaben habe ich aufeinander und dann auf den weißen Hintergrund geklebt.
Der Toast ist, genauso wie das Messer und die Butter, aus dem Stempelset Let's Toast. Ich habe alle Motive mit Copics coloriert. In dem Stempelset ist auch ein Stempel, den man als Marmelade oder Butter auf den Toast stempeln kann. Das habe ich hier mit hellem Gelb gemacht. Denn ganz ehrlich - ich esse selten Honig- oder Marmeladentoast, aber wenn, dann gehört da Butter drunter! Unbedingt! ;) Einen Rest Butter habe ich auch an das Messer coloriert. Für den Honig auf dem Toast und auch den vom Honiglöffel abgelaufenen Honig habe ich Stanzen aus dem Set Art Supplies benutzt. Die habe ich aus weißem Cardstock gestanzt, ebenfalls mit Copics coloriert und dann dick mit Glossy Accents überzogen. Nun sieht er wirklich realistisch aus!
Das Honigglas, der Honiglöffel und die beiden Party-Bienen sind aus dem Hive Five Stempelset. Hinter die Bienen habe ich mit helltürkisfarbener Tinte noch zwei "Fluglinien" aufgestempelt. Außerdem habe ich auch die Flügel mit Glossy Accents überzogen.
Der Text hier ist mit Stempeln aus dem Let's Toast Set gemacht. Ich habe dafür zwei verschiedene Stempel kombiniert, sie weiß auf schwarzen Cardstock embosst und ausgeschnitten.
Als Deko habe ich dann noch ein paar kleine Blümchen mit aufgeklebt. Dafür habe ich Stanzen aus dem Honeycomb Shaker Gift Tag Set, das ebenfalls im Kit enthalten war, verwendet. Statt der runden Blumenmitte habe ich kleine Hexagons verwendet - etwas, das ich im Create with Us Video zum Hive Five Kit gesehen haben. Die Idee finde ich wirklich süß. Auch diese Teile sind aus weißem Cardstock gestanzt und mit Copics coloriert. 
 
To decorate my card I've die cut the letters for the word toast from turquoise and black cardstock, using the Henry's ABC die set. I left out the o because I wanted to replace this with a slice of toast. I stacked the letters and glued them onto the white background.
The toast, as well as the knife and the butter, are from the Let's Toast stamp set. I've colored all images with Copics. In this stamp set there's also a stamp included that can be used to stamp jam or butter onto the toast. So I stamped that with light yellow ink onto the toast. Honestly, I rarely eat toast with jam or honey, but when I do, there has to be butter under the honey or jam! HAS TO! ;) I also colored a bit of butter onto the knife. For the honey on the toast and also the puddle of honey that I placed under the honey dipper I used dies from the Art Supplies die set. I've cut those from white cardstock, colored them with Copics and then added a thick layer of Glossy Accents on top. Now it looks so real!
The honey jar, the honey dipper and the party bees are from the Hive Five stamp set. Behind the bees I stamped a trail each with light turquoise ink, directly onto the white background. And I also covered the bees' wings with Glossy Accents.
The text here is made with stamps from the Let's Toast stamp set. I combined two different stamps for it, white heat embossed those onto black cardstock and cut them out.
As decoration I also added some little flowers. I used dies from the Honeycomb Shaker Gift Tag die set here, that's also included in the kit. Instead of the round flower centers I used tiny hexagons - something they did in the Hive Five Create with Us video. I just loved this idea. Again I've die cut the pieces from white cardstock and colored them with Copics.


Unter dem Text mit den Motiven habe ich noch einen weiteren Text quer über die Karte geklebt. Ich konnte einfach nichtd anders, als das Wort Honig noch irgendwie einzubauen. Dafür habe ich einen weiteren Stempel aus dem Hive Five Stempelset verwendet. Der Text ist wieder weiß auf schwarzen Cardstock embosst. Links über dem Text befindet sich ein drittes Blümchen.
Als Deko habe ich dann noch ein paar gelbe Enamel Accents auf der Karte verteilt.

Under the text with the images I added a second text across my card. I just couldn't resist to include the word honey somehow. I used another stamp from the Hive Five stamp set for it and again white heat embossed it onto black cardstock. To the upper left I added a third flower.
As embellishments I glued some white Enamel Accents to my card.


Und hier kann man gut erkennen, dass ich die Motive teilweise mit verschieden dickem 3D Tape auf den Hintergrund geklet habe. Ich kann einfach nicht ohne, denn dadurch wirkt jede Szene einfach gleich viel lebendiger.

And here you can see that I used foam tape in different thicknesses to glue some of my elements onto the card. I just can't do without, it adds a lot of life to every scene.

Samstag, 23. Juli 2022

Stempeleinmaleins - Ausgabe vom 23. Juli 2022

 
Hallo Ihr Lieben!
Heute zeigen wir Euch beim Stempeleinmaleins die Stacked Die Cut Technik. Nun, ich "stacke" meine Stanzteile ja gerne, um mehr Höhe auf meine Karte zu bringen. Aber man kann das auch als eigenes dekoratives Element nutzen.

Hello everyone!
Over at Stempeleinmaleins we are sharing the Stacked Die Cuts Technique with you today. Well, I love to stack my die cut to add some dimension to my cards. But you can also use it as a decorative element.

Ich habe wieder mal eine Geburtstagskarte gemacht - die braucht man irgendwie immer.
Wie Ihr hier schon sehen könnt, habe ich für die Technik Cardstock in fünf verschiedenen Blautönen verwenedet. Aufgeklebt ist alles auf weißen Cardstock, den man im mittleren Bereich der Karte sowie natürlich am Rand sieht.
Um den dunkelblauen Cardstock habe ich mit einem weißen Gelstift einen Rahmen gemalt. 

I've made a birthday card again- you can never have too many of those.
As you can see I've used five different shades of blue for this technique. Then I glued everything onto a piece of white cardstock, which is visible in the center and of course the edge of the card.
To draw the white frame onto the dark blue cardstock I've used a white gel pen.


Für die  äußere Ausstanzung sowie das Wort habe ich eine Stanze aus dem Pinwheel Party Stempelset von TheGreetery benutzt. Ich hatte die Worte und den Schatten noch nicht geteilt und konnte so alles auf einmal ausstanzen - fünf mal stanzen gespart! ;) Nur das aufeinander kleben der Worte war hier nicht ganz so einfach, vor allem der kleine Apostroph hat mich Nerven gekostet. 
Auch die Worte sind mehrfarbig, was man aber nur sieht, wenn man die Karte leicht von der Seite betrachtet. Aber der Effekt ist klasse, nur leider schlecht fotografierbar.
Beim Aufeinanderkleben der einzelnen Lagen habe ich hellste Lage auf den weißen Cardstock geklebt und dann nach oben hin immer dunkler werdend gearbeitet. 
Auf die dunkelste Lage habe ich vor dem Aufkleben mit Distress Oxide Tumbled Glass und dem Card Sized Confetti Stencilset von MFT einige Punkte aufgewischt und dabei darauf geachtet, dass sie nicht bis ganz an die oberen und unteren Ränder gehen.
Nachdem alle Lagen "gestackt" waren, habe ich dann den ausgestanzten Text an sich eingeklebt.
Die kleinen Texte sind aus dem Stempelset Bitty Birthday Wishes von MFT. Ich habe sie mit Versafine Clair Blue Belle auf weißen Cardstock gestempelt und dann mit dünnem 3D Tape auf die Karte geklebt. Der untere Text verdeckt ein klein wenig des Ombrè-Effekts rund um die Ausstanzung, aber das stört mich nicht, er ist an anderen Stellen ja noch super erkennbar.
Als Deko habe ich dann noch einige silberfarbene Sternpailetten aufgeklebt.

For the cut outs and the die cut word I used a die from the Pinwheel Party stamp set by TheGreetery. I hadn't cut the dies apart yet so I was able to die cut both pieces in one run through the BigShot - and saved myself  die cutting them again. ;) But stacking the words took long enough, it really wasn't that easy with these words, and especially the tiny apostrophe really tested my patience. 
Also the words are stacked from the 5 different shades of blue, but you can only see that when you look at the card a bit from the side. It's a wonderful effect, just not an easy one to photograph.
When stacking the different layers I glued the lightest directly onto the white cardstock and then worked through the colors, getting darker with each layer.
Before glueing down the darkes layer I added some dots to it, using the Card Sized Confetti stencil set by MFT and Distress Oxide Tumbled Glass, making sure to not go up completly to the top and bottom edge of the cardstock.
After all the layers were stacked I glued the stacked text into the center of the cut out.
The small texts are from the Bitty Birthday Wishes stamp set by MFT. I stamped those with Versafine Clair Blue Belle onto strips of white cardstock and then glued those onto the card with some thin foam tape. The bottom strip covers a small area of the ombre effect around the cut out, but it doesn't bother me since it is still pretty good visible in different spots around the text.
To decorate my card I added a few silver star shaped sequins.

Freitag, 22. Juli 2022

Juli-Challenge bei Stampcorner

 
Hallo Ihr Lieben!
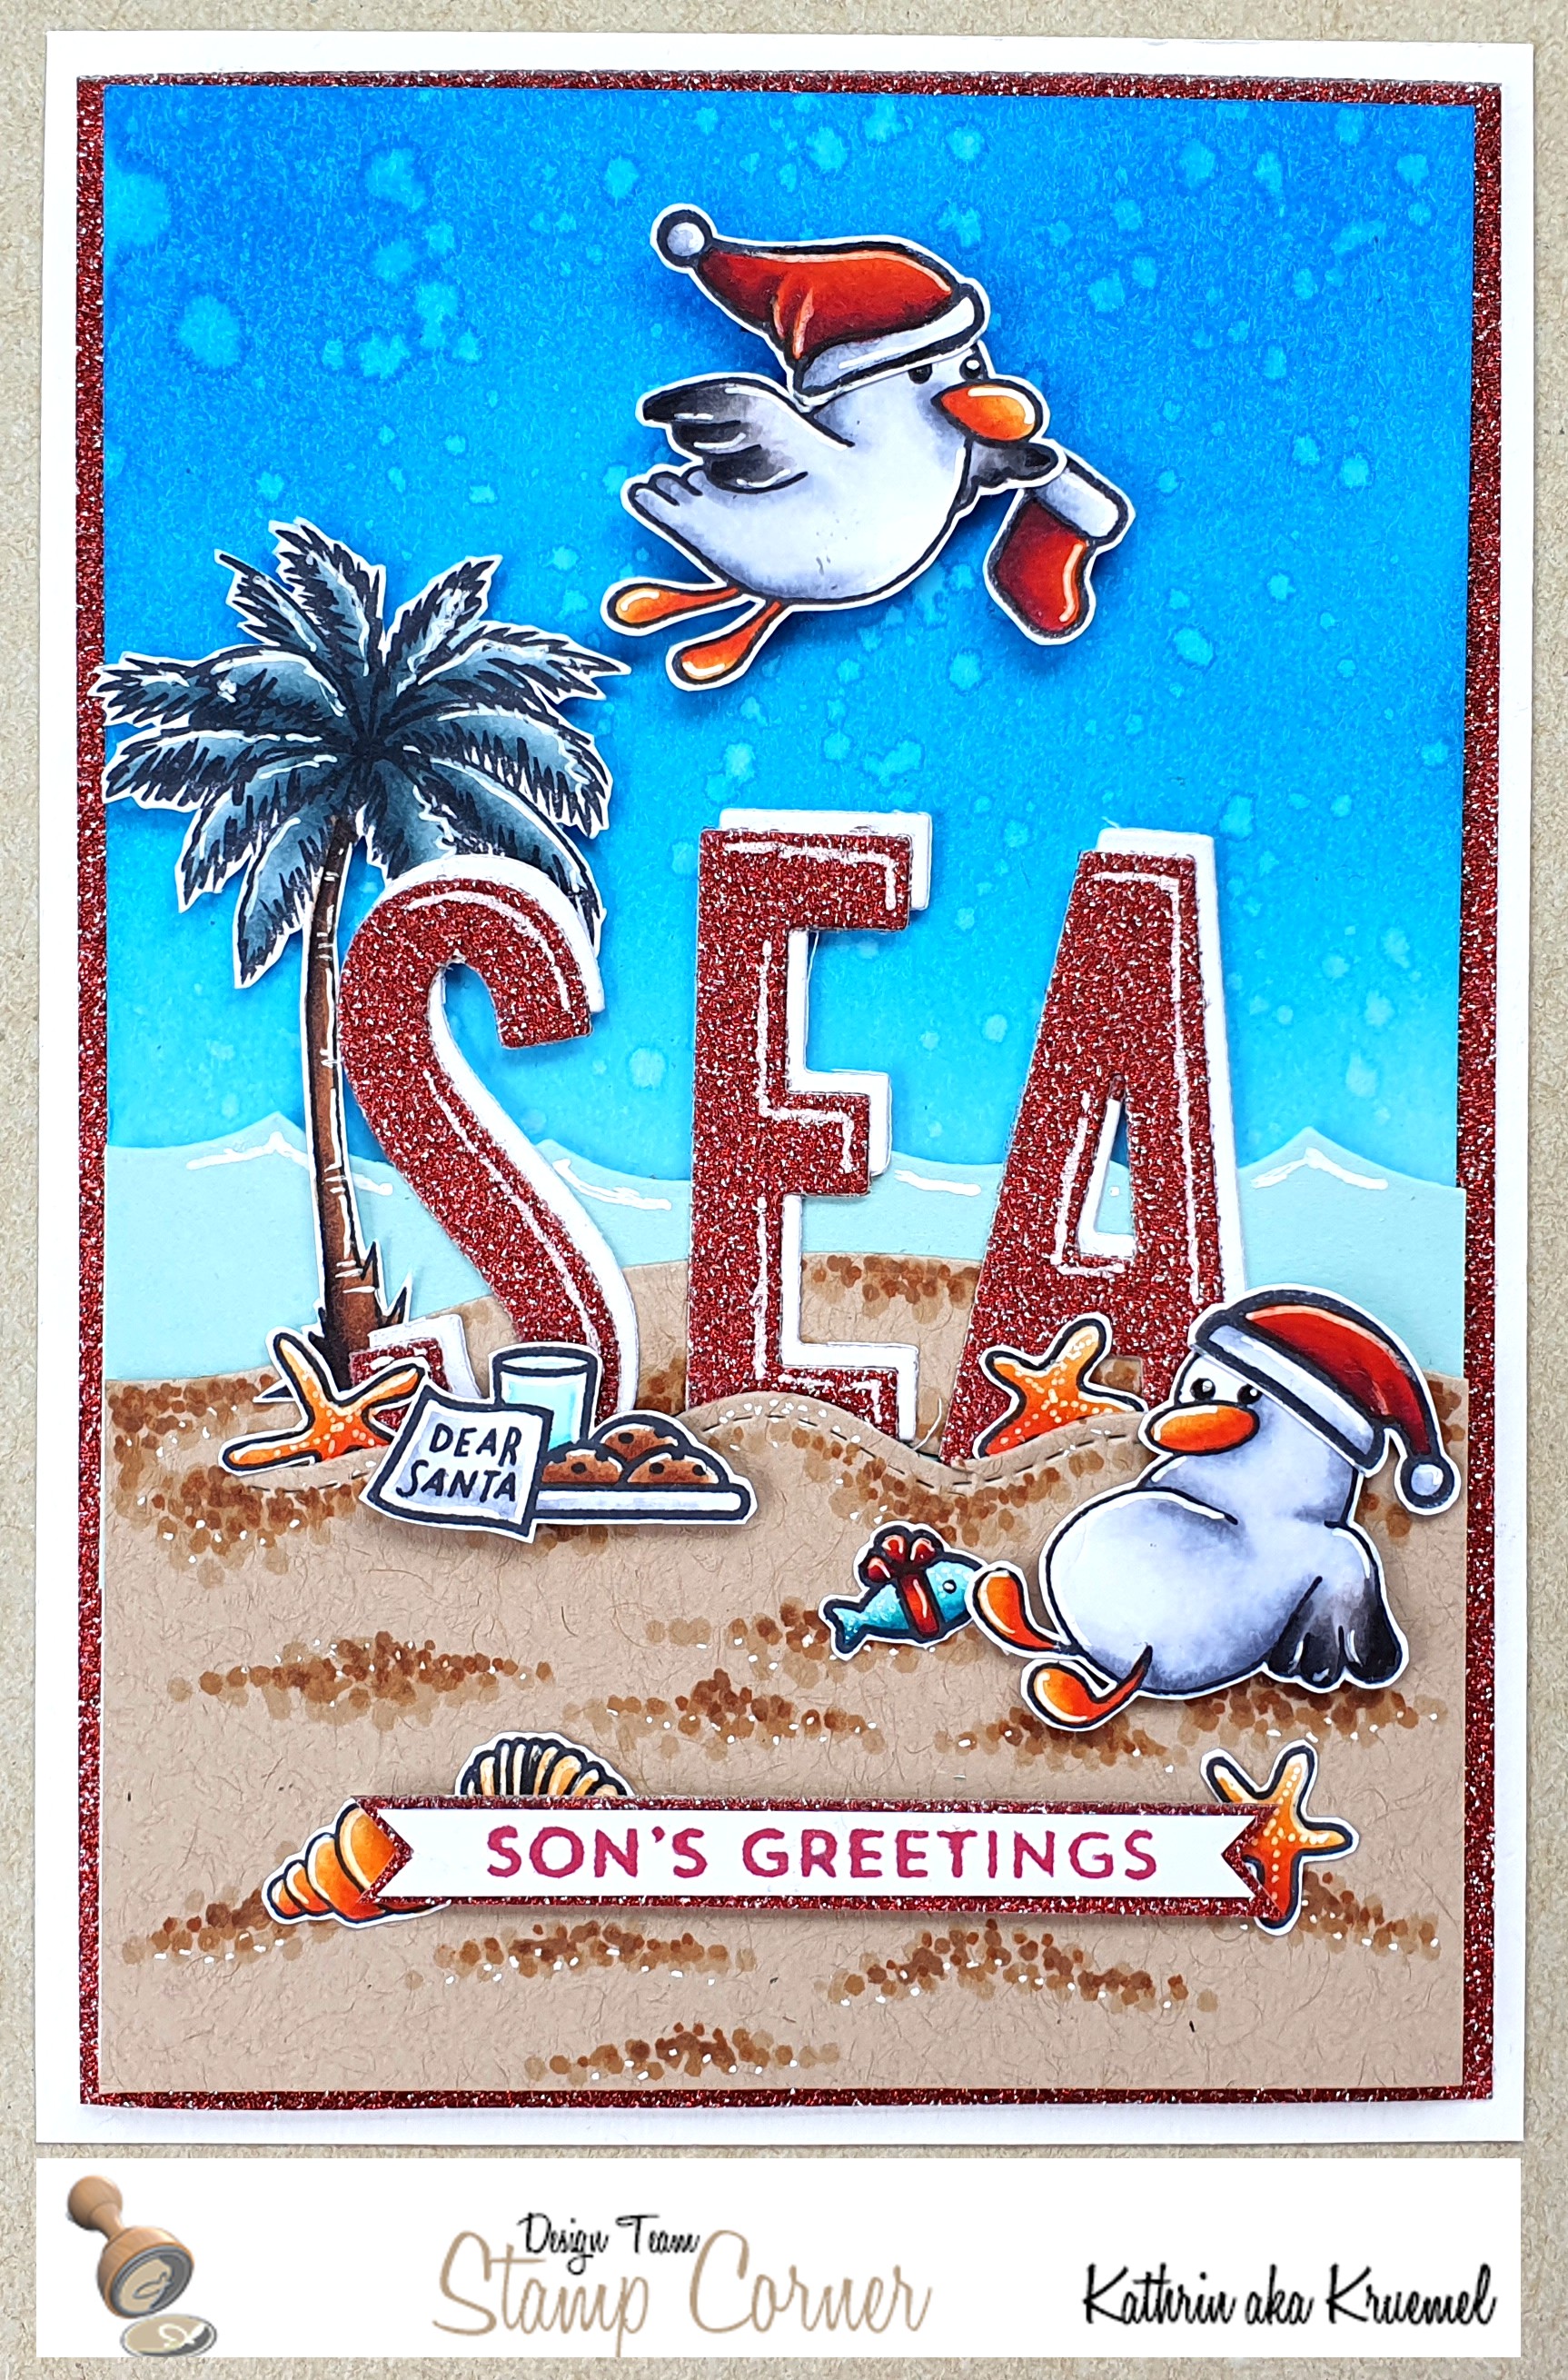
Vor zwei Tagen ist die Juli-Challenge von Stampcorner gestartet. Und weil es doch recht populär ist inzwischen, haben wir das Thema "Christmas in July" gewählt. Dass dabei nicht unbedingt Schnee im Spiel sein muss, zeige ich Euch mit meiner Karte zur Challenge. Ich tue mich mit Karten außerhalb deren Saison immer ein wenig schwer. Aber dann kamen die genialen Möwen aus dem Juli-Release bei mir an und ich hatte sofort eine Idee im Kopf. Und außerdem wird auf der Südhalbkugel Weihnachten ja sowieso im Sommer gefeiert!

Hello everyone!
Two days ago the july challenge by Stampcorner has started. Since it is quite popular by now whe decided to go with "christmas in july" as our theme. With my card I'm prooving hat you don't necessarily have to include snow on your cards. I always have some kind of a hard time making cards out of their season. But then those great sea gulls from the july release flew into my mailbox and I immediately had an idea in mind. And also - on the souther hemisphere people are celebrating in the middle of summer!

Irgendwie kam mir der Weihnachtsgruß "Season's Greetings" in den Sinn - und zack war die Idee zu dieser Karte geboren. Ich wollte das SEA groß in die Mitte der Karte setzen und den Rest des Textes in klein darunter. 
Meine komplette Szene  habe ich mit rotem Glittercardstock gemattet und auf einen weißen Kartenrohling geklebt. Allein der Glitter bringt schon einen weihnachtlichen Touch, finde ich.

The christmas greeting "Season's Greetings" came to my mind - and there was the idea for this card. I wanted to put the SEA in large letters onto the center of my card and then finish it with a small text at the bottom of the card.
After I had finished my scene I've matted it with red glitter cardstock and glued it onto a white note card. I think, just the red glitter cardstock adds a festive touch to the card.


Für den Himmel habe ich ein Stück weißen Cardstock mit Distress Oxide Tumbled Glass, Mermaid Lagoon und Salty Ocean eingefärbt und ein paar Wassertropfen darüber gespritzt.
Vor den Himmel kam eine Lage Meer - mit einer Wellenstanze aus dem Ocean Waves Stanzenset von MFT aus türkisfarbenem Cardstock gestanzt. 
Die einzelnen Lagen meiner Karte sind wieder mit 3D Tape aufeinander geklebt. 
Oben am Himmel fliegt die erste Möwe. Ich habe ihr eine Weihnachtsmütze, die eigentlich der Bär aus dem Set Oh What Fun von LawnFawn trägt, aufgesetzt. Außerdem trägt sie eine Weihnachtssocke aus dem Stempelset Christmas Dreams, ebenfalls von LawnFawn. 
Coloriert sind alle Motive mit Copics, für die Highlights habe ich einen weißen Gelstift benutzt.

For the sky I've inked up a piece of white cardstock with Distress Oxide Tumbled Glass, Mermaid Lagoon and Salty Ocean and put a few drops of water on top.
In front of the sky I've glued a wavy ocean line, made from turquoise cardstock with one of the Ocean Waves dies by MFT.
Once again the individual layers on this card are put on top of each other with foam tape.
In the sky one of two seagulls is flying. I've put a Santa hat on her head, originally the bear from the Oh What Fun set by LawnFawn is wearing it, and it's also carrying a christmas stocking from the Christmas Dreams set by LawnFawn.
I've colored all images with Copics and added the white details with a gel pen.


Vor den Wellen ist dann der Strand, auf dem bereits die Vorbereitungen für das Weihnachtsfest in vollem Gang sind.
Den Sand habe ich aus kraftfarbenem Cardstock geschnitten und mit Copics und einem weißen Gelstift einige Punkte daraufgemalt. So sieht der Cardstock gleich aus wie Sand. Außerdem  habe ich mit den Beach Accents Stanzen von LawnFawn einen "hügeligen" Schlitz in den Sand gestanzt, hinter den ich die gestanzten Buchstaben sowie einige kleinere Motive gesteckt habe.
Hinten am Strand befindet sich eine Palme aus dem Cool Summer Stempelset von Stampcorner.
Um die Buchstaben für das Wort SEA zu stanzen habe ich das Impact Alphabet Stanzenset von MFT verwendet. Ich habe die Buchstaben aus rotem Glittercardstock und normalem weißen Cardstock gestanzt und leicht versetzt aufeinander geklebt. Rot und weiß wirkt doch immer weihnachtlich, selbst am Strand. Dann habe ich die Buchstaben hinter den eingestanzten Schlitz gesteckt und dazu ein paar Seesterne aus dem Stempelset Cool Summer von Stampcorner mit hineingesteckt. Davor stehen noch sowie Milch, Cookies und eine Notiz für den Weihnachtsmann, wieder aus dem Christmas Dreams Stempelset von LawnFawn,für den Weihnachtsmann bereit.
Im Sand liegt eine weitere Möwe. Auch die trägt wieder eine Weihnachtsmannmütze, diesmal von einem der Pinguine aus dem Stempelset Here we Go A-Waddling von LawnFawn. Außerdem hat er offenbar schon das erste Weihnachtsgeschenk gefunden. Der Fisch mit Schleife ist wieder aus dem Set Christmas Dreams.
Vorne quer auf der Karte befindet sich dann ein kleines Banner mit dem Rest des Textes. Der ist aus dem Stempelset Bitty Holiday Wishes von MFT und mit roter Tinte auf weißen Cardstock gestempelt. Dann habe ich auch ihn mit dem roten Glittercardstock gemattet und mit dünnem 3D Tape auf den Strand geklebt. Als Deko habe ich hier dann noch einige Muscheln und einen weiteren Seestern, wieder aus dem Set Cool Summer von Stampcorner, ein wenig unter das Banner geschoben. 

On top of the waves I've glued the beach, where they are already in the middle of all the christmas preparations.
I've cut the beach from some craft colored cardstock and added some small dots with brown Copicsc and a white gel pen. This makes the brown cardstock look a lot more like sand. I also used the Beach Accents dies by LawnFawn to die cut a "hill-y" slit into the sand, planing to put the die cut letters and some smaller images into it.
In the back of the beach I've planted a palm tree from the Cool Summer stamp set by Stampcorner. 
To die cut the letters for the word SEA I've used the Impact Alphabet die set by MT. I've cut  the letters from red glitter cardstock and white cardstock and put them on top of each other just a bit off. Red and white always looks christmas-sy, even at the beach. Then I've put the letters into the slit and added a few star fish from the Cool Summer stamp set by Stampcorner next to the letters. The sea gulls also put up a glass of milk, cookies and a note to Santa, again using a stamp from the Christmas Dreams stamp set by LawnFawn, in front of the word. 
There's a second sea gull lying in the sand. Also he is wearing a Santa's hat, this time taken from one of penguins from the Here we go A-Waddling stamp set LawnFawn. It also seems like he already found a christmas gift. The fish with bow is again from the Christmas Dreams stamp set.
Across the bottom of my card I've glued a banner with the rest of the text. I've stamped it with red ink onto white cardstock, using a stamp from the Bitty Holiday Wishes by MFT. I matted the banner again with the red glitter cardstock and glued it onto the beach with some thin foam tape. To decorate this part of the card I've added another star fish and some sea shells, again from the Cool Summer stamp set by Stampcorner, tucking them partly under the banner.

Donnerstag, 21. Juli 2022

Moin!

 
Hallo Ihr Lieben!
Ich bin wohl zu sehr süddeutsch, um mit dem Wort Moin etwas anderes als "guten Morgen" zu verbinden. Deswegen habe ich die kleine Robbe auch auf eine Karte mit Sonnenaufgangsszene gepackt und die zeige ich heute auf dem Stampcorner Blog.

Hello everyone! 
Moin is a north german greeting that sounds like "morning" but is used there all day long. Well, I am too much a southern german to think of anything else than "good morning" when hearing that greeting. And so I put the little seal onto a card with a sunrise scene - and this card I'm sharing over at the Stampcorner Blog today. 

Ich habe hier zur Abwechslung mal zwar mit mehreren Lagen, aber ohne 3D Tape gearbeitet. Die Karte ist für meine Verhältnisse also ziemlich flach. 
Die komplette Szene ist schwarz gemattet und auf einen weißen Kartenrohling geklebt.

For a change I used different layers but no foam tape on this card. So compared to what I usually do this card is a pretty flat one.
The complete scene is matted black and glued onto a white note card.


Für den Sonnenaufgangshimmel habe ich einen Kreis aus Masking Tape auf ein Stück weißen Carstock geklebt und dann den Himmel drumherum mit Distress Oxide Barn Door, Mustard Seed und Tumbled Glass gewischt. Zwischen dem gelben und dem blauen Bereich habe ich einen feinen Streifen weiß stehenlassen. Anschließend habe ich das Masking Tape abgezogen und die Sonne mit Squeezed Lemonade gewischt. Dabei habe ich ein klein wenig in die angrenzenden Bereiche mit hineingewischt. Ein paar Wassertropfen und einige wenige Spritzer goldener Metallic-Watercolor und schon war der Hintergrund fertig. 
Mit der Palmtrees Stanze von Crealies habe ich dann die drei Palmen und die Insel gestanzt. 
Die Palmen sind aus schwarzem Cardstock gestanzt. Ich habe dann eine einfache weiße Tafelkreide genommen und damit einige Striche auf jeweils die Hälfte der Plamenblätter aufgetragen. Dann habe ich sie mit dem Finger verwischt. So bekommen die Palmen ein wenig Struktur.
Die Insel ist aus kraftfarbenem Cardstock gestanzt. Mit Copics, einem weißen Gelstift und einem goldenen Stift habe ich einige Sandkörner aufgetupft, anschließend habe ich die Palmen und die Insel auf den Sonnenaufgang geklebt.
Vor die Insel kam dann noch eine Lage Meereswasser. Das habe ich aus grau-türkisfarbenem Cardstock mit einer Wellenstanze ausgestanzt und aufgeklebt.

For the sunrise sky I glued a circle cut from masking tape onto a piece of white cardstock and then inked up the sky around it with Distress Oxide Barn Door, Mustard See and Tumbled Glass. I left a thin strip between the yellow and blue white. Then I pulled off the mask and inked up the sky with Squeezed Lemonade, putting a bit of this light yellow ink also on the sky directly around the sun. I added a few small drops of water and just a few drops of golden metallic watercolor to the cardstock and the background was done.
With the Palmtrees die by Crealies I've die cut the three palm trees and the island. 
The palm trees are cut from black cardstock. I then used a piece of school board chalk to lighten a few areas of the palm trees. I simply drew a few lines and smeared those with my fingers.
The island is cut from craft colored cardstock. I used Copics, a white and a golden gel pen to add some sand structure to it, then glued the island and the palm trees onto the sunrise.
In front of the island I added a strip of sea water. I've die cut that from some grey-ish turquoise cardstock and used a wave border die to cut the top edge. Then I glued the water down.


Und hier ist die süße Robbe, natürlich wieder aus dem Set Hallo Sommer. Sie ist extra früh morgens aufgestanden, um einen Gruß in den Sand zu scharren. Dafür hat sie sich sogar schick gemacht und sich den Hut des Hasens aus dem Stempelset Matrosen Freunde 2 ausgeliehen. Das Schreiben des Grußes war so anstrengend, dass die Robbe anschließend am Strand eingeschlafen ist.
Robbe und Hut sind wieder mit Copics coloriert, dann ausgeschnitten und später auf die Karte geklebt.
Für das Moin habe ich den Stempel aus dem Set Matrosen Freunde 1 verwendet. Ich habe es mit Fade Out Ink auf ein weiteres Stück kraftfarbenen Cardstock gestempelt. Dabei habe ich jeden Buchstaben einzeln gestempelt und den Cardstock jeweils ein Stück seitlich geschoben, so dass die Buchstaben weiter auseinander stehen. Sonst wäre die Coloration als in den Sand geritzes Wort nicht möglicht gewesen. Die Linien zwischen den Buchstaben habe ich einfach beim Colorieren verlängert. Als I-Punkt habe ich statt der Möwen ein Herz aus dem Set Glückskäfer verwendet.
Ich habe das Wort mit braunen Copics nachgemalt und dann mit etwas Abstand wieder kleine braune Punkte mit Copics sowie einige goldene und weiße mit Gelstiften gemacht. Auf die selbe Art habe ich auch noch einige Hügel in den Sand sowie den Schatten unter der Robbe gemacht.

And here's the cute seal, again from the Hallo Sommer stamp set. The seal got up very early in the morning to scrape a greeting into the sand. She even dressed up and borrowed the hat from the bunny from the Matrosen Freunde 2 stamp set. Writing the greeting into the sand was such hard work, that the seal fell asleep on the beach after she was done.
Seal and hat are again colored with Copics, then cut out and later glued onto the card.
For the greeting I stamped the word with Fade Out Ink, moving the cardstock a bit to the side between stamping each letter individually to get a bit more of distance between the letters. Otherwise coloring the word the way I had planned wouldn't have been possible. Instead of the birds, that originally create the title on the I, I used a heart image.
I re-drew the word with brown Copics, then made tiny dots from Copics and a white and golden gel pen with a bit of a distance to the word. I used the same technique to create a few hills into the sand and the shadow under the seal.

Dienstag, 19. Juli 2022

When in doubt....

 
Hallo Ihr Lieben!
Heute habe ich eine weitere Karte mit Mäuse-Szene zu zeigen. Und natürlich kamen wieder die Mäuse von LawnFawn zum Einsatz. Ich liebe die einfach. 

Hello everyone!
Today I have another card with a mice scene to share. And of course I've used the mice by LawnFawn again. I just love them!

Man sieht es wohl auf den ersten Blick, Glitter ist das Hauptthema hier. Ich war mir echt unsicher, welchen Hintergrund ich nehmen sollte. Aber dann habe ich mich für einen Bogen aus dem All the Dots Paper Pad von LawnFawn entschieden. Mit den Punkten in verschiedenen Größen und verschiedenen Gelbtönen, hat er mich irgendwie an Glitter erinnert. 
Das Papier habe ich schwarz gemattet und auf einen weißen Kartenrohling geklebt.
Und da mir das Papier als Hintergrund direkt hinter meinen Motiven doch ein wenig zu unruhig war, habe ich einfach ein Stück Vellum zugeschnitten und mit 3D Tape auf den Hintergrund geklebt. Das 3D Tape ist hinter den Motiven versteckt. Aber so wird der Hintergrund abgeschwächt, ist aber trotzdem noch sichtbar.

I guess you can tell at the first look that glitter is the allover theme of this card. I really wasn't sure about what to use as the background. But then I came across a sheet from the All the Dots paper pad by LawnFawn. The dots in different sizes and different shades of yellow reminded me of glitter.
I've matted the patterned paper black and then glued it onto a white note card.
And since the pattern was a bit too busy behind my scene, I've cut a piece of vellum about 1/2 Inch smaller on each side and used foam tape to glue it onto the patterned paper. The foam tape is hidden behind the images. This tones the background down without covering it completly.


Und hier ist meine Mäuse-Szene.
Die kleinen Kerlchen haben Buchstaben türkis gestrichen, waren aber mit dem Ergebnis nicht so ganz zufrieden. Passend zum Spruch auf der Karte haben sie dann kurzerhand den Glitzer ausgepackt - denn Glitzer macht alles besser. Nun, die Maus oben auf den Buchstaben hat es eventuell ein wenig übertrieben: die arme Maus unten ist ebenfalls komplett beglittert, ich denke, deswegen schaut sie ein wenig verwundert nach oben. Und auch an den Buchstaben haben sich schon dicke Glitzerhäufchen gebildet. Nur die kleine Maus, die gerade erst dazugekommen ist, findet das ganze wirklich klasse. Und so, wie man im Winter Schneeflocken fängt, will sie den Glitzer, den die obere Maus immer noch fleißig ausstreut, auffangen. 
Ich habe diesmal fast ausschließlich Stempel verwendet - nur die Glitter- und Farbflecke sind mit Stanzen aus dem Set Art Supplies aus weißem Cardstock gestanzt. Die Buchstaben sind mit dem Set Quinn's Capital ABC gestempelt und nach dem Colorieren einzeln ausgeschnitten. 
Die Glitter streuende Maus ist aus dem Set Merry Mice, die beiden Mäuse unten aus dem Bubbles of Joy Stempelset. Der Glitzertreuer ist aus dem Set Just Add Glitter und die beiden Farbeimer aus den Sets Chirpy Chirp Chirp (groß) und Easter Before 'n Afters (klein).
Coloriert habe ich alle Motive mit Copics. Dabei habe ich jeweils die beglitterten Flächen in Orange und Rot coloriert (auch die aus weißem  Cardstock gestanzten Stanzteile) und später ganz leicht rote und irisierende Stickles aufgetupft. Die irisierenden Stickles habe ich zudem ein klein wenig auf die türkisfarbenen Flächen aufgetragen. Um den Glitzer zu colorieren, habe ich die Flächen erst komplett mit Farbe gefüllt und dann rote und orangefarbene Fineliner sowie einen weißen Gelstift benutzt und ganz viele kleine Punkte aufgetragen. So ist auch der aus dem Streuer fallende Glitter direkt auf dem Vellum entstanden.
Die Texte - und auch die kleinen Sparkles, die man allerdings kaum sieht - sind wieder aus dem Set Just Add Glitter. Alles ist weiß aufembosst - die Sparkles direkt auf das Vellum, die Texte auf schwarzen Cardstock. 
Anschließend habe ich 3D Tape in zwei verschiedenen Höhen verwendet, um die Elemente auf das Vellum zu kleben. Vellum wellt sich beim Auftragen von Füssigkleber ja gerne, und mit dem 3D Tape konnte ich gleich noch verschiedene Ebenen schaffen. 

And here's my mice scene.
The little guys have been painting letters in a turquoise color, but they weren't completly happy with the result. So matching the text on the card they brought out the glitter, because glitter make everything better. Seems like the mouse on top of the letters has gone a bit overboard with the glitter: even the mouse at the bottom of the letters is full of it. Guess that's why she's looking up a bit wary. And also at the bottom of the letters piles of glitter have already built up. Only the little mouse, that is just coming to join the other two, ist totally excited. And like you would catch snowflakes in winter she wants to catch the falling bits of glitter, that the mouse on top is still pouring out of the jar.
This time I nearly used stamps only - just the glitter and color splashes are made with dies from the Art Supplies die set, cut from white cardstock. The letters are stamped with the Quinn's Capital ABCs stamp set and I've cut them out after coloring them.
The mouse with the glitter container is from the Merry Mice set, the other two at the bottom are from the Bubbles of Joy set. The container of glitter is from the Just Add Glitter set and the paint cans are from the sets Chirpy Chirp Chirp (large) and Easter Before 'n Afters (small).
I've colored all image with Copics. During coloring I used red and orange for the areas I wanted to look glittery (also the white die cuts) and added a hint of red and iridescent Stickles later. I put a bit of the iridescent Stickles onto the turquoise letters as well. To color the glitter I first colored the areas completly, then used a red and orange fineliner and a white gel pen to add lots of tiny dots. That's also how I made the glitter falling out of the container, put directly onto the vellum.
The texts - and also the little sparkle images that are hardly visible - are from the Just Add Glitter set again. All of them are white heat embossed - the sparkles directly onto the vellum, the texts onto black cardstock.
Then I used foam tape in two different thicknesses to glue all the elements onto the vellum. Vellum tends to warp when using liquid glue - the foam tape avoids that and also adds different layers to the card.


Zum Schluss habe ich noch einige klare Dots mit goldenem Glitter als Deko auf dem Designpapier verteilt. 
Und hier kann man dann auch ganz gut sehen, wie schön die Karte glitzert.

As a finishing touch I've glued down a few clear dots with golden glitter onto the patterned paper.
And here you can also see all the pretty glitter on this card.

Montag, 18. Juli 2022

Eine Karte zur Taufe

 
Hallo Ihr Lieben!
Ich wurde gebeten, eine Karte zur Taufe der kleinen Marlie zu machen. Gewünscht war ein Wiegenmotiv und der Name auf der Karte. Gesagt, getan!

Hello everyone!
I was asked to make a card fo the baptism of little Marlie. They asked to include a cradle image and the name on the card. Well, here it is!

Jetzt war es tatsächlich so, dass ich nicht ein einziges Wiegenmotiv hatte - weder Stempel, noch Stanze. Babybett ja, aber keine Wiege. Nach langem Suchen im WWW habe ich dann doch noch eine Stanze von Tattered Lace gefunden und sie mir gekauft. Kann man ja doch immer wieder mal brauchen. Und groß genug für meine Idee war sie außerdem. 
Ich habe hier Designpapier mit weißem Holzmuster für den Fußboden auf ein Stück rosafarbenen Cardstocks geklebt, als Tapete kam rosa-weiß getreiftes Designpapier zum Einsatz.
Und weil ich auch keinen Text zur Taufe hatte, habe ich hier einzelne Buchstaben mit dem Wort Zum kombiniert, um den Text mit weißem Embossingpulver auf ein Banner aus dunkelbraunem Cardstock zu embossen. Darunter habe ich dann den Rest des Textes mit brauner Tinte direkt auf die Karte gestempelt.

Well, I found out I really didn't have a cradle image - no stamp, no die. A crib - yes, but no cradle. So after searching the WWW for quite some time I came across this die by Tattered Lace and decided to buy it. I'm sure I will have other occasions to use it. And it also was perfect in size for the idea I had in mind.
I used a patterned paper with a white wood pattern for the floor here and glued it onto a piece of pink cardstock, as the tapestry I used some white and pink striped paper.
Then I found out I also didn't have any baptism stamps. So I combined individual letters with a word stamp to white heat emboss the text "for your baptism" onto a banner cut from brown cardstock. Then I stamped the rest of the text with brown ink directly onto the card.


Und hier seht Ihr, welche Idee mir bei der Nennung eines Wiegenmotivs sofort in den Sinn kam. Eine Wiege muss schaukeln! Ich hoffe, Euch wird beim Anblick des GIF nicht schlecht, es ist irgendwie ein wenig unruhig ausgefallen.... ;)

And here you get to see, which idea came immediately to my mind after I was asked to add a cradle image. A cradle has to rock! I really hope you don't get sick by looking at the GIF, it turned out a bit shaky this time... ;)


Ich habe die Wiege einige Male aus weißem Cardstock gestanzt und dann in Lagen mit Copics coloriert. Die einzelnen Lagen habe ich dann ausgeschnitten - der Korb im Hintergrund, die Beine und der Betthimmel als nächste Lage, und als letzte Lage dann der Stoff außenrum - und jede Lage zusätzlich zweimal mit Cardstock hinterlegt. Das sorgt nicht nur für eine tolle Tiefe, sondern gibt der Wiege auch genug Stabilität zum Schaukeln. Außerdem wird sie dadurch ordentlich schwer, was sie auch ohne zusätliche Gewichte im Hintergrund schön Schaukeln lässt.
Unter der Deko an einer der Kufen befindet sich der Drehpunkt für meinen Spinner Mechanismus. Damit die Wiege keinen kompletten Überschlag macht, habe ich zwei Stopper in den gewünschten  Endpostionen eingebaut.

I've die cut the cradle several times from white cardstock and then colored the different layers with my Copics. I cut the layers apart - the basket in the background, the legs and hood as the next layer and the fabric around the basket as the top layer - and also put two more white cardstock layers behind each colored layer. That does not only add some great depth, but also makes the cradle pretty sturdy to rock savely. The extra layers also add nice weight, so I didn't have to add any extra weights to the back to make it rock nicely. 
Under the decoration piece at the legs I've hidden the spinner mechanism. To keep the cradle from make a 360 turn I added two stoppers to the mechanism to make the cradle stop in the position I wanted it to.


Und für den Namen habe ich das Spell Anything Alphabet von MFT verwendet. Die Buchstaben sind einmal aus dunkelbraunem Cardstock, einmal aus hellrosafarbenem Designpapier mit kleinen weißen Sternchen gestanzt und dann mit aufgedoppeltem 3D Tape auf die Karte geklebt. So behindern sie die Wiege nicht beim Schaukeln.

And for the name I used the Spell Anything die set by MFT. I've die cut the letters from dark brown cardstock and from a very light pink patterned paper with tiny white stars and then glued them onto the card using two layers of foam tape. This makes sure they don't get in the way of the rocking cradle.