Samstag, 31. Dezember 2022

Stempeleinmaleins - Ausgabe vom 31. Dezember 2022

 
Hallo Ihr Lieben!
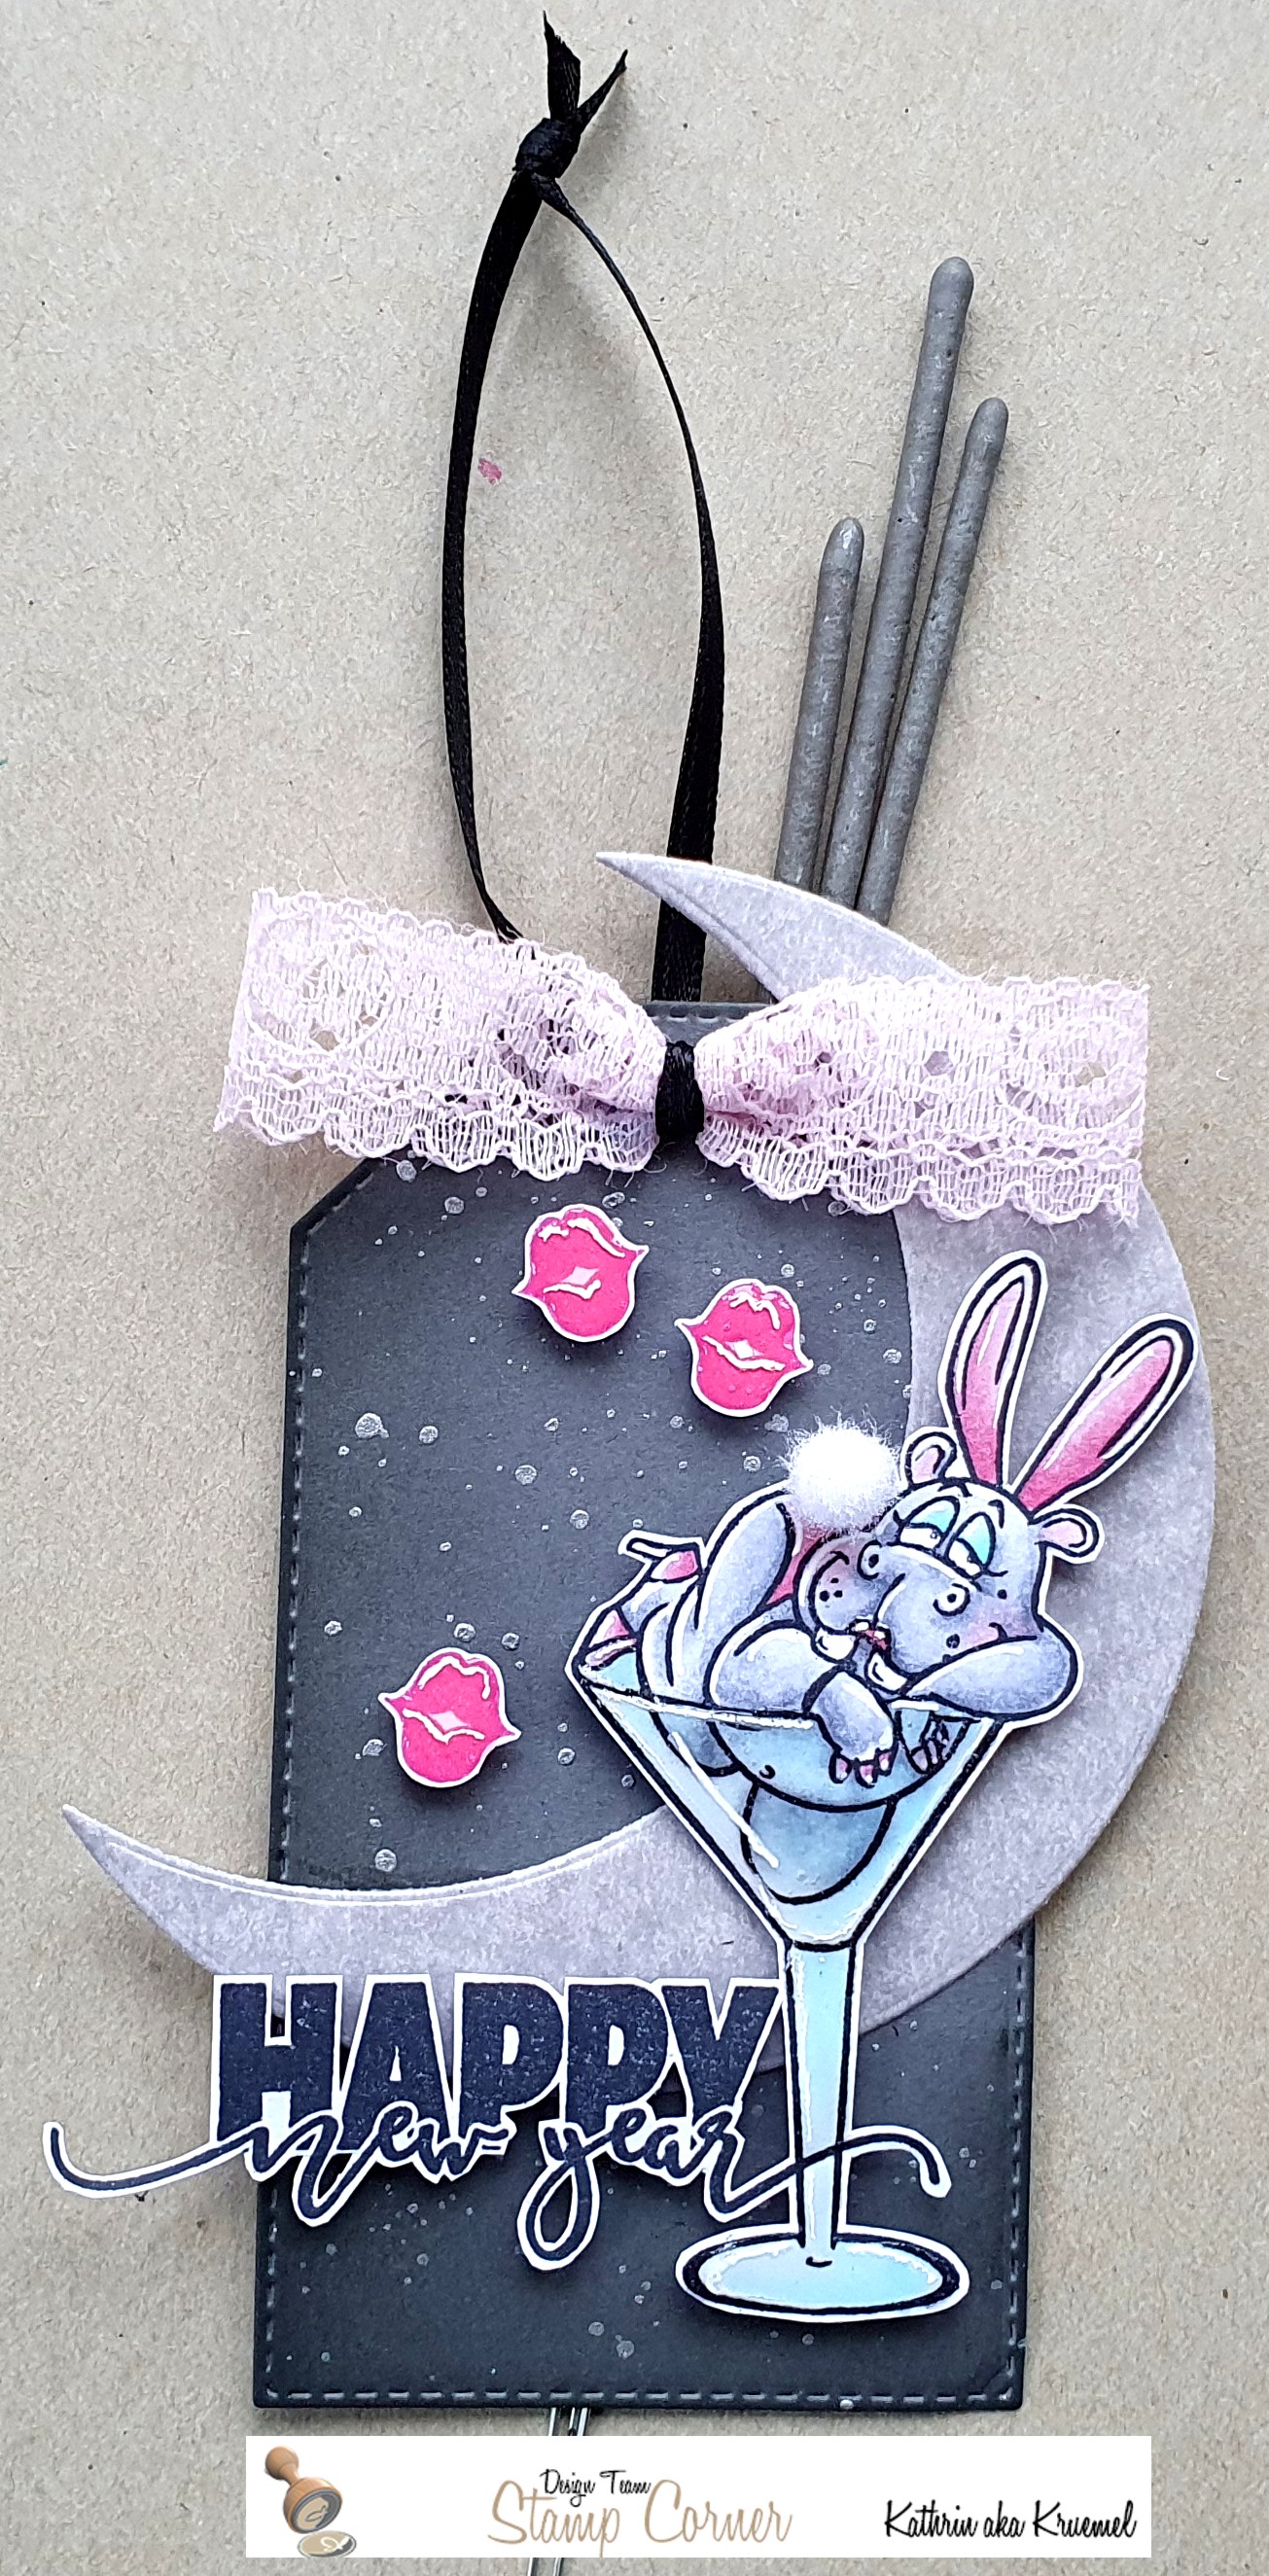
Heute gibt es mit einem neuen Sketch die letzte Ausgabe des Stempeleinmaleins des Jahres 2022. Irgendwie ist es bei mir inzwischen zu Tradition geworden, nach diesem letzten Sketch eine Neujahrskarte zu machen. Na, und wenn dieser SEME Post dann auch direkt am 31. Dezember online geht, dann passt das ja doppelt!
 
Hello everyone!
Today the last issue of Stempeleinmaleins of the year 2022 is going online with a new sketch. It became kind of a tradition for me, to make a new year's card after this last sketch of the year. And when this SEME post goes online exactly on the 31rd of december, then this is even more appropriate.


 Hier habe ich im Hintergrund mit einer Feuerwerks Hotfoil Plate und silber-glitzernd-holografischer Folie ein Feuerwerk auf weißen Cardstock foliert. Dann habe ich den Himmel mit Distress Ink Mermaid Lagoon, Uncharted Mariner und Black Soot gewischt. Ich habe bewusst zu den Inks gegriffen. Die lassen sich zwar nicht so leicht verblenden, ich war mir aber nicht sicher, ob die nicht die Folierung irgendwie matt erscheinen lassen. Das muss ich die Tage mal testen. 

For the background I hot foiled the fireworks onto a piece of white cardstock, using silver glittery holographic foil. Then I inked up the sky with Distress Ink Mermaid Lagoon, Uncharted Mariner and Black Soot. I used the Inks on purpose, even if they don't blend that easily, but I was afraid, that the Oxides would kind of dull the foiling. I really have to try that one of these days.

 
Unten auf den Cardstock habe ich dann zwei Lagen gestanzter Skylines aufgeklebt. Dafür habe ich die Slimline City Skapes Stanze von WhimsyStamps benutzt. Das praktische hier ist, dass nicht nur eine Stanze mit den Häusern samt Fensterausschnitten im Set enthalten ist, sondern - neben anderen passenden Stanzen wie eine Straße und Fahrzeuge - auch noch ein kompletter Streifen, der genau hinter die Häuser passt. So kann man die Fenster ganz einfach hinterlegen, was ich hier mit grau-blauem Cardstock gemacht habe. Die Skylines habe ich aus schwarzem Cardstock gestanzt. Und damit sich die beiden Häuserreihen etwas voneinenader abheben, habe ich die obere Kante mit einem weißen Stempelkissen betupft. Das sieht gleich noch ein wenig wie Schnee aus. Beide Lagen sind mit dünnem 3D Tape aufeinander geklebt.
Der Text ist mit einer der Stanzen aus dem Set Bold Merry Words von MamaElephant gemacht - ich habe mir das Set extra wegen diesem Text gekauft. Er ist viermal aus schwarzem Cardstock gestanzt, für die oberste Lage habe ich ihn aus silberfarbenem Holografic Cardstock gestanzt, der passt super zur Folierung. Die Schatten-Lage aus Vellum habe ich per Hand geschnitten. 
Den gestanzten Text habe ich dann mittig auf die Karte geklebt, im oberen Bereich mit dickem 3D Tape. Darunter habe ich noch einen kleineren Text aufgeklebt. Der ist aus dem Bitty Holiday Wishes Stempelset von MFT, silbern auf schwarzen Cardstock embosst und mit einem schmalen Streifen des holografischen Cardstocks hinterlegt.

Across the bottom edge of my background I added two layers of die cut city skylines. I used the Slimline City Skapes dies by WhimsyStamps for them. The great thing is, that there is not only a die that cuts the skyline with the cut out windows, but - besides other stuff like a stree and vehicles - also a solid one, that fits exactly behind the houses with windows. That makes it super easy to put a different color of cardstock behind the windows. I used some blue-ish grey here, the skylines are cut from black cardstock. To create some contrast between the two skylines, I pressed a white ink pad onto the top of the houses. That even looks a bit like snow on the roofs. I put the two skylines on top of each other with some thin foam tape.
The text is made using one of the dies from the Bold Merry Words die set by MamaElephant - I bought this set only because if this text. I've die cut it four times from black cardstock and for the top layer once from silver holographic cardstock, that goes great with the foiling. The shadow layer from vellum I've cut by hand.
I adhered the die cut text to the center of my card, using thick foam tape under the top. Underneath I placed a little subgreeting. It's from the Bitty Holiday Wishes stamp set by MFT, silver heat embossed onto black cardstock and matted with a thin strip of the holographic cardstock.

 
Zum Schluss habe ich den Cardstock schwarz gemattet und auf einen weißen Kartenrohling geklebt. Das Feuerwerk glitzert fast wie ein echtes - und der Text glitzert damit um die Wette.

To finish the card, I matted my card panel with black cardstock and attached it to a white note card. The fireworks are nearly glittering like a real one - and the text does, too.

Donnerstag, 29. Dezember 2022

Ein Tag für ein Silvester-Mitbringsel

 
Hallo Ihr Lieben!
Heute zeige ich auf dem Stampcorner Blog diesen Tag, den ich, an eine Sektflasche gebunden, als Mitbringsel zur Mädels-Silvesterparty gemacht habe. Und dafür durfte die tolle Ernestine nochmal zum Einsatz kommen! 

Hello everyone!
Today I am sharing this tag over at the Stampcorner Blog. I plan to tie it to a bottle of champagne and bring it to our girls new years party. And Ernestine was just perfect for it.

Der Tag ist bewusst einfach gehalten - und passt super zur weiß-silbernen Sektflasche, die ich bereits hier stehen habe. Und für die Extra-Portion Sparkle habe ich hinten am Tag noch drei Sternwerfer befestigt.

I kept the tag quite simple - and it matches perfectly the white and silver champagne bottle I already bought. And for some extra sparkle, I attached three sparklers to the back of the tag.


Als Grundlage habe ich einen der neuen Stitched Tags aus grauem Cardstock gestanzt und die Ränder, vor allem unten, mit Distress Oxide Black Soot gewischt. Dann habe ich silberfarbene Metallic Watercolor darüber gespritzt. 
Oben am Tag habe ich ein Stück rosafarbene Spitze als Schleife angebunden und zudem etwas schwarzes Satinband als Aufhänger angebracht.

For the base I die cut one of the new Stitched Tags from grey cardstock and inked the edges with Distress Oxide Black Soot, especially on the bottom of the tag. Then I flicked some silver metallic watercolor on top.
To the top of the tag I tied a bow from pink lace and also added some black satin ribbon as a hanger.


Ernestine hat diesmal ein rosafarbenes Hasenkostüm mit passenden High Heels an. Auf das Puschelschwänzchen habe ich einen kleinen Pompom geklebt. Coloriert habe ich mit Copics, das Glas - und auch die Kussmünder, die ich mit pinkfarbener Tinte gestempelt habe, sind mit Glossy Accents überzogen.
Den Text aus dem selben Stempelset habe ich vor dem Ausschneiden des Motivs den Glasstiel überlappend aufgestempelt und dann alles zusammen ausgeschnitten.
Hinter Ernestine habe ich einen großen Mond, gestanzt mit der Over the Moon Stanze von MFT aus hellgrauem Cardstock. 
Den Mond habe ich direkt auf den Tag geklebt, die Kussmünder und Ernestine sind mit 3D Tape befestigt. 

This time Ernestine is wearing a pink bunny costume with matching high heels. Onto the tail I attached a small fluffy pompom. I colored the image with Copics, the glass - and also the smooches that I stamped with pink ink, are covered with a layer of Glossy Accents.
Before I cut out the image I stamped the text from the same stamp set next to the image, making the swirl of year overlap the stem of the glass.
Behind Ernestine I adhered a big moon, cut from light grey cardstock with the Over the Moon die by MFT.
I attached the moon directly onto the tag, then used foam tape to adhere the smooches and Ernestine.

Mittwoch, 28. Dezember 2022

Create a Smile December Moodboard Challenge

 
Hallo Ihr Lieben!
Heute startet die letzte Create a Smile Challenge im Jahr 2022 - und gleichzeitig ist es die letzte Challenge für mich als DT-Mitglied. Das Team wird ja immer für 6 Monate gewählt, und ich hatte schon das große Glück, dass Christine unsere Zeit wegen des damaligen Shop-Umzugs, bei dem sie so viel um die Ohren hatte, um weitere 6 Monate verlängert hat. Und so möchte ich mich ganz herzlich bei Christine und Nina für die grandiose Zeit und tollen Sketche und Moodboards bedanken. Ich werde Euch vermissen!

Hello everyone!
Today is the start of the last Create a Smile Challenge of the year 2022 - and also my last challenge as a DT member. The team always gets picked for a 6 months term, and I was already so lucky to get another 6 months, since Christine was so busy with setting up the new shop that she gave us another 6 months term. So, I want to thank Christine and Nina from the bottom of my heart - for the amazing time and the wonderful sketches and moodboards. I am going to miss you!

Auch dieses Moodboard ist einfach wieder wunderbar. Als ich den Goldtopf darauf gesehen habe, hatte ich sofort die Idee zu dieser Neujahrs-Karte im Kopf:

Again this moodboard is just wonderful and so inspiring. When I saw the pot of gold on one of the pictures I immediately had the idea for this New Year's card in my head:


Zuerst habe ich für den Hintergrund ein Stück weißen Cardstocks, beginnend an der unteren rechten Ecke, mit Distress Oxide Squeezed Lemonade, Twisted Citron, Mowed Lawn, Rustic Wilderness und Black Soot gewischt und einige Wassertropfen darauf verteilt. 

First I created the background by inking up a piece of white cardstock with Distress Oxide Squeezed Lemonade, Twisted Citron, Mowed Lawn, Rustic Wilderness and Black Soot, starting at the bottom right corner of the cardstock. Then I flicked a bit of water onto the cardstock.


Für meinen Goldtopf habe ich den Hexenkessel der Hexe aus dem Set Hex Hex "ausgeleert" und mit Goldmünzen gefüllt. Den Kessel habe ich mit Copics coloriert und ausgeschnitten. Die Goldmünzen sind aus dem Set Alle Mann an Bord. Ich habe sie einige Male mit goldenem Embossingpulver auf Watercolor Cardstock embosst und anschließend mit einem Mix aus Wasser, Distress Ink Mustard Seed Re-Inker und ein wenig goldenem Mica Spray coloriert. Anschließend habe ich sie ausgeschnitten und rund um den Kessel angeordnet. In den Kessel habe ich einen Schlitz geschnitten und dort eines der Münzhäufchen eingesteckt. 
Zwischen die Goldmünzen habe ich drei vierblättrige Kleeblätter gesetzt. Die habe ich mit den kleinen Herzen der Hearts Stanze, aus grünem Cardstock gestanzt, zusammengesetzt. 
Und weil Gold natürlich strahlt und glänzt, habe ich hinter den Kessel und das Gold Strahlen auf den Hintergrund geklebt. Dafür habe ich die Focal Stanze aus goldenem Glitter Cardstock gestanzt und die einzelnen Strahlen, passend an die Szene, aufgeklebt. Außerdem  habe ich mit den kleinen Sternchen aus dem Stanzenset Bookmark und matt-goldenem Metallic Cardstock noch kleine Glanzpunkte gestanzt und sie auf den Motiven verteilt. 

For my pot of gold I took the cauldron from the Hocus Pocus stamp set and filled it with gold coins. I colored the cauldron with Copics and cut it out. The coins are from the set Alle Mann an Bord. I gold heat embossed them several times onto a piece of watercolor cardstock, then colored them with a mix of water, Distress Ink Mustard Seed Re-Inker and a bit of gold Mica Spray. I cut them out and arranged them around the cauldron. I also cut a slit into the cauldron to cover the potion, that's boiling in it, with the coins.
Between the coins I placed three fourleafed clovers. I made those using the small hearts from the Hearts die set, cut from green cardstock.
And since gold is very shiny, I added some rays behind the cauldron and coins. I've die cut the rays from gold glitter cardstock with the Focal die, then glued down the individual rays, changing their positions to match my scene. And I also added a few tiny stars from the Bookmark die set, cut from matte gold metallic cardstock, to create some reflections on the images.


Den Text habe ich auf den oberen, dunklen Teil meines Cardstocks platziert und dafür Stempel aus den Sets Potzblitz und Wunschkonzert mit gestanzten Zahlen kombiniert. Die gestempelten Texte habe ich mit weißem Embossingpulver direkt auf den Hintergrund embosst. Darunter habe ich dann die Zahlen aufgeklebt. Sie sind mit den Lemon Numbers Stanzen gemacht - die Zahlen an sich habe ich aus dem matt goldenenen Metallic Cardstock, die Schatten aus dem goldenen Glitter Cardstock gestanzt und aufeinander geklebt. 

I placed my text in the upper, darker are of my background and combined stamps from the sets Potzblitz and Wunschkonzert with die cut numbers. The text means "I'm going crazy! Has really another year passed?! All the best for 2023". I white heat embossed the stamped parts of the text directly onto the background, then glued the numbers under it. For the numbers I used the Lemon Numbers die set, cutting the numbers from matte gold metallic cardstock, their shadows from gold glitter cardstock.


Den dekorierten Cardstock habe ich dann schwarz gemattet und auf einen weißen Kartenrohling geklebt. Aber irgendwie fehlte etwas. Also habe ich mit einer der Stitched Rectangle Frames Stanzen den dünnen Rahmen aus goldenem Glitter Cardstock gestanzt, den unteren Teil so weggeschnitten, dass der Rahmen jeweils bis kurz vor die Motive reicht, und ihn aufgeklebt. So war das ganze dann stimmig für mich.
Und auf diesem Bild kann man noch gut erkennen, dass ich - mal wieder - 3D Tape benutzt habe, um die Münzen, den Kessel und die Kleeblätter aufeinander zu kleben.

I matted my card panel with black cardstock and glued it onto a white note card. But there was something missing. So I used one of the Stitched Rectangle Frames to die cut a thin frame from the gold glitter cardstock, cut off the bottom so the frame ends close to the images and then glued it down. That really finished that card off.
And on this picture you can also see that I used foam tape - once again - to put the coins, cauldron and clovers on top of each other.

Samstag, 24. Dezember 2022

Stempeleinmaleins - Ausgabe vom 24. Dezember 2022

 
Hallo Ihr Lieben!
Es ist Weihnachten! Vielleicht habt Ihr ja heute beim letzten Festtags-Einkauf noch den ein oder anderen Gutschein gekauft. Oder die Nachbarn laden spontan zu einem Nachmittags-Weihnachts-Glühwein ein (bei uns kann das durchaus passieren!). Und der Postbote klingelt auch noch... Für solche spontanen Fälle habe ich immer ein paar kleine Gutscheinkarten zu Hause. Und beim Stempeleinmaleins zeigen wir Euch heute, wie Ihr die in wirklich nur 5 Minuten schön verpacken könnt. 
 
Hello everyone!
It's christmas eve! Maybe you brought a few gift cards while running the last errands before the holidays. Or the neighbours invite you spontaneously for a cup of mulled wine (something that can easily happen in our neighbourhood, not only on christmas eve). And the postie rings the door for some last-minute deliveries as well.... For those occasions I always have a few gift cards at hand. And over at Stempeleinmaleins we are sharing a way, how to nicely wrap those in only five minutes. 

Okay, ich gebe zu, mit der Deko dauert es doch ein klein wenig länger. Aber mit nur einer schönen Schleife zugebunden und versehen mit einem Tag, ist der Halter genauso schön. 
Ich habe für meinen rotes Designpapier mit weißen Flecken verwendet und eine Banderole aus weißem Ripsband gemacht.
Dekoriert habe ich die Banderole mit einer silber folierten Raute, gemacht mit einer der Nested Diamonds Hotfoil Plate von PinkFresh. Den weißen Cardstock habe ich anschließend mit Distress Ink Bundled Sage gewischt.
Auf die Raute habe ich einen silber folierten Tannenzweig und rot folierte Beeren, jeweils von Spellbinders, aufgeklebt. Den Tannenzweig hatte ich mit der passenden Stanze ausgestanzt, aber für meinen Geschmack war der weiße Rand außenrum viel zu breit. Also habe ich zur Schere gegriffen und alles mit der Hand nochmal näher an der Folierung ausgeschnitten.
Unten quer über die Raute, nur darauf angeklebt, so dass die Banderole abgezogen werden kann, habe ich ein Banner mit einer Linie, auf die der Name des Beschenkten geschrieben werden kann, aufgeklebt. Das habe ich aus einem Bogen eines Designpapierblocks von Action ausgeschnitten. Es passte farblich so toll. Und zum Schluss habe ich darüber noch eine kleine Schleife aus Twine angeklebt. Außerdem habe ich noch ein paar kleine weiße Perlen um den Zweig herum verteilt aufgeklebt.
 
Okay, I have to admit, decorated like this it takes a few more minutes to finish this gift card holder. But it's as nice with just a  ribbon tied around it, and maybe a little tag added.
I used red patterned paper with white speckles for my holder and instead of some ribbon, I created a sleeve from white ribbon.
Onto the ribbon I glued a silver foiled diamond, made with one of the Nested Diamonds hotfoil plate by PinkFresh. Then I inked up the white cardstock with Distress Ink Bundled Sage.
Onto the diamond I adhered a silver foiled fir branch and some red foiled berries, both by Spellbinders. I had cut out the branch with the matching die, but for my taste there was way too much white around the branch. So I used my scissors and hand cut it out closer to the foiled lines.
Across the diamond, and only attached to that so the sleeve can be pulled off, I attached a strip of cardstock, where the name of the recipient can be written on.  I cut that from a sheet of patterned paper, because it was just perfect in color. To finish my decorations I glued a little bow, made from twine, to the branch and added a few tiny white pearls around the branch.


Im Inneren befindet sich natürlich die Geschenkkarte. Außerdem blitzt hier ein Stück eines anderen Designpapieres hervor, das verdeckt nicht nur eine Papierkante, sondern sieht auch schön aus. In das zweite Fach kann man problemlos noch ein Stück Cardstock in Geschenkkarten-Größe mit ein paar persönlichen Grüßen stecken.
Hier habe ich nur noch einen kleinen Gruß, aus dem selben Bogen Designpapier wie der auf der Banderole geschnitten, aufgeklebt.

Of course, inside there's the gift card. And you can also see a bit of another patterned paper. That not only covers a paper edge, it also looks nice. Into the second "envelope" you can easily slide a piece of cardstock, cut into gift card size, with some personal greetings.
In only added a christmas greetinng, cut from the same sheet of patterned paper as the strip on the sleeve.

Habt alle ein wundervolles, fröhliches und glückliches Weihnachtsfest 2022!
Wishing all of you a happy, peaceful and joyous christmas 2022!

Freitag, 23. Dezember 2022

T'Was the night before Christmas

 
Hallo Ihr Lieben!
Nur noch einmal schlafen, dann ist Heiligabend! Das ist nicht nur mir ganz siedend heiß eingefallen, nein, auch das Mädchen und die Katze auf meiner Karte sind sich desssen bewusst. Also haben sie sich aufs Dach geschlichen und just in dem Moment fliegt doch der Weihnachtsmann vorbei....

Hello everyone!
Only one more sleep until Christmas Eve! It's not only me who has that on mind today, also the girl and cat on my card know that. So they climbed on the roof and just in that moment Santa is flying by in his sleigh....
 
Auf dem Stampcorner Blog habe ich diese Karte gestern bereits gezeigt, da wollte ich auf meinem eigenen Blog aber lieber den gestrigen Adventskalenderstempel zeigen. Deswegen gibt es diese Karte hier erst heute - aber da passt sie vom Datum her dann auch perfekt!
Mir war mal danach, wieder einen Stempel von MFT zu verwenden. Und auch wenn das Set Shout it from the Rooftop gar nicht winterlich/weihnachtlich ist, es macht sich super auf einer Weihnachtskarte, finde ich.
 
I already shared this card on the Stampcorner Blog yesterday, but I decided to show you my card with yesterday's advent calendar stamp here instead and am sharing this card one day late. But date wise it fits perfectly!
I felt like using a stamp by MFT again - after quite a long time. And even if the Shout it from the Rooftop set isn't wintery/christmassy, I think it makes a wonderful christmas scene.
 
 
Ich habe zuerst das Hausdach, das Mädchen und die Katze auf ein Stück weißen Cardstock gestempelt und anschließend mit Masking Tape überdeckt. Im oberen Bereich habe ich einen Kreis, den ich mit einer Stanze ebenfalls aus Masking Tape gestanzt habe, auf den Cardstock geklebt und dann den Himmel mit Distress Oxide Stormy Sky, Faded Jeans, Chipped Sapphire und ein klein wenig Black Soot gewischt. Als Sterne habe ich dann goldene Metallic Watercolor aufgespritzt.
Nach dem Trocknen habe ich die Masken abgezogen und das Innere des Mondes mit ein wenig Pumice Stone nur am äußeren Rand etwas schattiert.
Und dann habe ich Santa vor/über den Mond gesetzt. Ich habe dafür einen Stempel von SunnyStudios verwendet. Es gibt aber auch einen von Stampcorner, den ich allerdings nicht habe, der mir noch besser gefallen hätte, denn hier fliegt Santa in die andere Richtung. Ich habe ihn mit schwarzem Embossingpulver aufembosst. Und weil ich sicher bin, dass die Rentiere und der Schlitten beim Flug über dem Himmel eine leicht glitzernde Spur hinterlassen, habe ich mit Stickles diese Spur noch hinzugefügt. 

First I stamped the roof, the girl and the cat onto a piece of white cardstock, then covered them with masking tape. Onto the upper area of the cardstock I attached a circle, also cut from masking tape, and then inked up the sky with Distress Oxide Stormy Sky, Faded Jeans, Chipped Sapphire and a little bit of Black Soot. For the stars I flicked some gold metallic watercolor onto the sky.
After the watercolor had dried, I pealed off the masking tapes and used a bit of Pumice Stone to in just the outer edge of the moon.
And then I stamped Santa onto the moon/sky. I used a stamp by SunnyStudio here, but there's also one by Stampcorner that I don't have, but would have liked even better because Santa is flying the other direction on that image. I black heat embossed him onto the sky. And since I am sure the reindeer and sleigh leave a slight shimmer trail in the sky I used Stickles to  add that trail.


Die Motive habe ich mit Copics coloriert - wobei das hier ganz einfach war - den größten Teil habe ich einfach schwarz gefüllt. Die Details des Mädchens und der Katze sieht man auf dem Bild viel intensiver als in echt. 
Die Fenster habe ich mit gelb hell erleuchtet, das Dach habe ich erst vollflächig mit R46 eingefärbt, dann mit einigen Lagen T6 abgedunkelt. Die Schatten der Figuren sind mit T8 gemacht. Für die Highlights habe ich einen weißen Gelstift benutzt.
Eigentlich hätte ich ja liebend gerne dicke Schneeflocken vom Himmel fallen lassen. Wenn man aber den Mond so voll vom sternenklaren Himmel leuchten sieht, können da ja keine Wolken sein, aus denen es schneit. Um trotzdem etwas Schnee auf die Karte zu bringen, habe ich nur die Spitzen eines trocknen, ziemlich festen Pinsels vorsichtig in das Copic Opaque White getaucht und damit Schnee auf den unteren Teilen der Dächer aufgetupft.
Nun fehlte meiner Karte nur noch ein Text. Der ist aus dem Stempelset Tiny Christmas von LawnFawn. Ich habe ihn mit goldenem Embossingpulver auf einen schmalen Streifen schwarzen Cardstocks embosst und den Streifen dann mit 3D Tape unten quer über das Haus geklebt.

I colored the images with Copics - but that was super easy here, I simply filled most of the images black. The stamped details of the girl and cat are way less visible in real life than on the picture. 
I used yellow to put a warm light into the rooms behind the windows, the roof I first covered with R46, than added a few layers of T6 to tone it down. For the shadows of the images I used T8 and the highlights are made with a white gel pen.
I really wanted to let some thick snowflakes fall from the sky. But well, when you see the full moon shine in a starry sky there can hardly be any clouds that the snowflakes could come out of. To add at least a hint of snow to my card, I carefully dipped just the tip of a quite hard brush into the Copics Opaque White and dabbed it onto the lower areas of the roofs to create a thin layer of snow there.
Now my card was only missing a text. This one is from the Tiny Christmas stamp set by LawnFawn. I gold heat embossed it onto a strip of black cardstock and glued that across the house at the bottom edge of my card using foam tape.
 

 Zum Schluss habe ich dann die Szene noch schwarz gemattet und auf einen weißen Kartenrohling geklebt.

To finish this card I matted the scene black and adhered it to a white note card.

Donnerstag, 22. Dezember 2022

Stampcorner December Daily #22

 
Hallo Ihr Lieben!
Hinter dem heutigen, und leider auch letzten, Adventskalendertürchen von Stampcorner versteckt sich nochmal ein Stempelset von Oma Plott - mit wunderbar schwarzem Humor. So kurz vor Weihnachten ist bei mir Galgenhumor immer ganz groß geschrieben, so dass das Set wie gerufen kam!

Hello everyone!
Behind today's, and sadly last, advent calendar shutter by Stampcorner there's another stamp set designed by Oma Plott - and with her great black humor. That close to christmas I need a bit of gallows humor in my life so this set was very welcome!

Auf meiner Karte sieht man aber das Motiv erstmal nicht.
Ich habe hier mit der Dot Burst Hotfoil Plate von MemoryBox und goldener Folie das Strahlenmuster auf ein Stück weißen Cardstock foliert, dann habe ich den Cardstock mit Distress Oxide Salvaged Patina eingefärbt und an den oberen Rändern noch ein wenig Broken China hinzugefügt. Wie Ihr später sehen werdet, habe ich dabei den Ausgangspunkt der Strahlen heller gelassen.

On my card you can't see the image at first.
I used the Dot Burst Hotfoil Plate by MemoryBox and gold foil to bring the ray pattern onto a  piece of white cardstock, then inked it with Distress Oxide Salvaged Patina. As you can see later I left the center of the rays lighter, then also put down some Broken China to the top edge for a even darker color there.


Mittig auf den Cardstock habe ich dann einen Rahmen, gestanzt mit einer der Stitched Rectangle Frames Stanzen von LawnFawn aus helltürkisfarbenem Cardstock, aufgeklebt. Hinter dem Rahmen befindet sich eine doppelte Lage Vellum, damit auch nicht zu viel hindurch zu erkennen ist.
Auf dem Rahmen seht Ihr den ersten Stempel aus dem Set - hier sieht es sogar aus wie zwei. Er lautet "Spoileralarm - ihr werdet alle sterben". Ich habe das Spoileralarm drei mal weiß auf einen Streifen roten Cardstocks embosst und mit einem weißen Gelstift jeweils drei weiße Punkte zwischen die Worte gesetzt. So sieht es ein wenig aus wie so ein "Newsflash-Banner". Den Rest des Textes habe ich mit rotem Glitter-Embossingpulver auf weißen Cardstock embosst. Den Cardstock habe ich dann erst mit goldenem Spiegelcardstock, anschließend mit normalem schwarzem Cardstock gemattet. Beide Teile habe ich dann mit 3D Tape auf den Rahmen geklebt. Bei dem roten Banner habe ich das Tape nur auf den Cardstock des Rahmens aufgeklebt - um das Tape hinter dem kleineren Text zu verstecken, habe ich von der Rückseite ebenfalls ein Stück schwarzen Cardstocks dagegen geklebt.
Eigentlich sah so mein Plan für diesen Teil der Karte aus, aber irgendwie war mir das noch ein wenig zu fad. Da kamen die Texte aus den Stempelsets Echt Jetzt? und Nur Kein Stress genau recht. Ich wollte sie nicht zu auffällig, aber dennoch lesbar auf das Vellum bringen - nur stempeln war da raus. Aber dann fiel mir das Embossing Glaze ein, das ja etwas durchsichtig ist. Also habe ich die Texte auf dem Vellum verteilt und mit Hickory Smoke embosst.

Into the center of my cardstock I attached a frame, die cut from light aqua cardstock with one of the Stitched Rectangle Frames dies by LawnFawn. Behind the frame I put two layers of Vellum, one was too transparent for me because I didn't want too much of what's behind it show.
On the frame I used the first stamp from this new set - here it even looks like two. It stamps "spoiler alert - you're all going to die". I white heat embossed the spoiler alert three times onto a strip of red cardstock and used a white gel pen to draw three dots between the words. Now it looks like one of those newsflash bannners. The rest of the text is embossed onto white cardstock, using some red glitter embossing powder. Then I matted this white cardstock first with some gold mirror cardstock and behind that a layer of regular black cardstock. I used foam tape to attache both pieces to the frame. For the red banner I put the tape only onto the die cut frame - to hide the tape behind the smaller text I glued a piece of black cardstock to the back of the vellum, right in the same spot.
And that was my original plan for this part of the card. But somehow it looked kind of plain. So I added some additional texts meaning "really?", "no!" and "you're serious?". I wanted them to be readable but not too dark - so stamping on the vellum was off the table. But then I remembered the Embossing Glaze, which is a kind of transparent embossing powder. So I used Hickory Smoke to emboss the texts onto the vellum.


Hier sieht man den Glanz der folierten Strahlen und auch der mit dem Glaze embossten Worte besser. Und man kann bereits erkennen, dass sich hinter dem Rahmen noch etwas versteckt...

Here you get a better look at the shine of the foiled rays and also the words embossed with the Glaze. And you can already tell that there's something behind the frame with the vellum.


Der Rahmen lässt sich nach oben klappen - und darunter ist endlich das Motiv zu sehen. Es ist eine weitere Variante des süßen Todes! (Pst, verratet ihm nicht, dass ich ihn so genannt habe!) Und so macht dann auch der Text auf dem Rahmen Sinn.

The frame can be folded open - and underneath there's finally the image. It's another version of the cute Grim Reaper! (Pst, don't tell him I called him cute!) And with the image all of a sudden the text on the frame makes sense.


Ich habe das Motiv mit Copics coloriert und ausgeschnitten. 
Auch die Texte hier kommen in dem Stempelset. Ich habe sie auf eine doppelte Sprechblase gestempelt. Die habe ich zuvor mit einer Stanze aus dem Comic Speech Bubbles Stanzenset von WhimsyStamps aus weißem und schwarzem Cardstock gestanzt und ein wenig versetzt aufeinander geklebt. Beim Aufstempeln der Text habe ich dann das So Viel des oberen Textes hochkant vor das Wort Drama gesetzt. Eigentlich wird es als erste Zeile gestempelt, aber so hätte der Text nicht in die Sprechblase gepasst. Gestempelt habe ich die Texte mit roter und schwarzer Tinte. 
Und weil der Tod so viel Spaß hat, wirft er sich nicht nur ein Popcorn in den Mund, nein, er wirft auch einige um sich. Im Rahmen hinter dem Motiv befindet sich nämlich noch ein relativ flacher Shaker, den ich mit einigen Popcorns gefüllt habe. Leider haben sich die beim Foto fast alle hinter dem Tod und den Sprechblasen versteckt - und ich habe es zu spät bemerkt. 
Tod und Sprechblaen sind natürlich auf die Folie oben auf dem Shaker aufgeklebt.

I colored the image with Copics and cut it out.
Also the texts here are from today's stamp set - they mean "that much drama screams for Popcorn" and "Oooooh, this is going to be so much fun". I stamped them onto a double speech bubble that I had cut from white and black cardstock using a die from the Comic Speech Bubbles die set by WhimsyStamps, then stacked them a bit off. I had to change the word arrangement of the first text a bit - or it wouldn't have fit into the bubble. And I used red and black ink to stamp the texts.
And because the Grim Reaper has so much fun, he's not just popping some popcorn into his mouth but also throwing some around. Inside the frame I included a relatively flat shaker, that I filled with some more popcorns. Sadly most of them are hiding behind the image and the speech bubbles - and I realized it way too late to take new pictures.
The Grim Reaper and the speech bubbles are of course attached to the acetate that covers the shaker.

Montag, 19. Dezember 2022

Stampcorner December Daily #19

 
Hallo Ihr Lieben!
Aus dem heutigen Adventskalendertürchen von Stampcorner hüpft dieser süße Frosch. Und bei mir ist er gleich auf eine Karte weitergehüpft.
 
Hello everyone!
Out of today's advent calendar shutter by Stampcorner jumped this cute frog. And in my case it jumped on right onto a card.

Ich hatte diesen Embossingfolder mit den Froschpfotenabdrücken von Nellie Snellen zu Hause - der war hier perfekt! Ich habe aus dem oberen Bereich eines Stücks grünen Cardstocks erst mit einer der Deckle Frames Stanzen von Stampcorner ein Fenster ausgestanzt, dann habe ich den Cardstock mit dem Embossingfolder geprägt. An den Außenrändern habe ich dann noch Distress Ink Mowed Lawn und Rustic Wilderness aufgewischt und grüne Metallic Watercolor über den ganzen Cardstock gespritzt. 
Oben quer über das Fenster habe ich ein "Sei kein Frosch", gemacht mit einem der Texte, die mit dem Motiv kommen, aufgeklebt.

I had this embossing folder with a frog footprint pattern by Nellie Snellen - it was just perfect to go with this image! From the upper area of a piece of green cardstock I first cut a window using one of the Deckle Edge dies by Stampcorner, then dry embossed the cardstock. I used Distress Ink Mowed Lawn and Rustic Wilderness to darken the edges a bit, then flicked some green metallic watercolor over the cardstock.
Across the top of the cut out window I put a banner with a stamped on "don't be a frog" - a german way to say "be a sport".


Den Frosch habe ich mit Copics in zum Cardstock passenden Grüntönen coloriert. Die Augen sind außerdem mit Glossy Accents überzogen. Dann habe ich ihn in das Fenster geklebt - den Kopf obenauf, den Körper hinter das Fenster, so dass es so aussieht, als lehne er sich etwas aus dem Fenster.
Für den Text hier habe ich die Buchstaben für das Wort HÜPF mit dem Henry's ABC Stanzenset von LawnFawn aus schwarzem Cardstock gestanzt. Für etwas Dimension habe ich jeweils drei schwarze Buchstaben aufeinander und die dann auf die Karte geklebt. Zwischen die Buchstaben habe ich mit einem weißen Gelstift noch "Sprunglinien" aufgemalt. Darunter befindet sich noch ein kleines Banner mit einem aufgestempelten "mal wieder bei mir vorbei". 

I used Copics to color the frog in greens that match the cardstock I used for the background. The eyes are covered with Glossy Accents. Then I glued him into the window - the hat on top of the cardstock, the body behind the window so it looks like he's leaning out of the window a bit.
For the text I used the Henry's ABC die set by LawnFawn to die cut the letters for the word "jump" from black cardstock. For some dimension I stacked three of each letter, then glued them onto the cardstock. Between the letters I drew some jump lines using a white gel pen. And under the die cut letters I added a little banner with a stamped on text to finish the sentence. It means something like "come over for a visit soon again", just that we say "jump over" here, which is perfect with the frog image.


Zum Schluss habe ich dann den grünen Cardstock mit dickem 3D Tape auf ein etwas größeres Stück schwarzen Cardstock geklebt - so ist auch das Fenster hinter dem Frosch dunkel ausgefüllt - und alles auf einen weißen Kartenrohling geklebt.

To finish this card I used some thick foam tape to attach the green cardstock to a slightly larger piece of black cardstock - this way also the window behind the frog is filled in - and adhered everything to a white note card.

Sonntag, 18. Dezember 2022

Stempeleinmaleins - Ausgabe vom 17. Dezember 2022

 
Hallo Ihr Lieben!
Der Esstisch an Weihnachten ist bei uns immer in silber, weiß und grün gehalten. Genauso, wie  auch der Christbaum immer silber, weiß und rot ist. Manche mögen das langweilig finden, ich nenne es Tradition. Und deswegen sind auch die die kleinen weihnachtlichen Aufsteller, die wir Euch gestern beim Stempeleinmaleins zeigen und die bei mir dieses Jahr die Teller an der Weihnachtstafel zieren werden, in grün, weiß und silber/grau ausgefallen. Es muss ja alles zusammenpassen, da bin ich penibel!

Hello everyone!
Our table on christmas is always decorated in silver, white and green. And our christmas tree is always decorated in silver, white and red. You might think that's boring, I call it a tradition. And so my little christmas-sy displays, that we were sharing over at Stempeleinmaleins yesterday and that I will put on the plates on for our christmas dinner this year, are made in silver, white and green. Well, they have to match, and I am very strict there!


Ich habe meinen Aufsteller aus hellgrauem Cardstock gemacht und die einzelnen Teile erst mit weißem Cardstock, dann mit grünem Designpapier mit weißen Flecken beklebt.
Ob ich wirklich die fürs Foto verwendeten Zapfen hineinstellen werde, ist noch nicht ganz sicher. Immerhin passen sie ins Farbkonzept. Hier habe ich sie aber hauptsächlich verwendet, weil es ein No-Name Produkt ist, und ich so auf der sicheren Seite bin. Oben an den Zapfen habe ich eine große Schleife aus Tüll gebunden, an der ich mit silber-weißem Twine ein kleines silbernes Glöckchen befestigt habe. 
Die beiden Ilexblätter, gemacht mit der Deck the Halls Stanze von Sizzix aus helltürkisfarbenem und grauem Cardstock, hatte ich noch von einem anderen Projekt auf dem Schreibtisch liegen. Und ich finde, sie passen super. Ich habe sie am linken Flügel des Rückteils angeklebt. 

I made my display from light grey cardstock and then covered the different pieces with white cardstock and green patterned paper with white speckles.
I am not entirely sure if I will use those chocolats on christmas eve, but at least they match my color scheme. Honestly, I used those because they are not branded and so I am save, because there are a few big companies that hired an attorney and now ask for money from crafters, that showed their products on their sites. Weird, I know, it's free advertisement... I've tied a bow from tulle to the top of the chocolat pinecone and tied a little silver bell with white and silver twine to it.
The two holly leaves, cut with the Deck the Halls dies by Sizzix from light aqua and grey cardstock, were left overs from a recent project. And I thought, those are a nice detail here. I attached them to the left wing of the back of the display.


Vorne über die Spitze meines Bodenteils habe ich ein kleines Banner mit einem Weihnachtsgruß aufgeklebt. Der Text ist mit einem alten Stempel von Whiff of Joy und grüner Tinte auf weißen Cardstock gestempelt. Den Cardstock habe ich dann mit silberfarbenem Glitzercardstock hinterlegt und mit aufgedoppeltem 3D Tape aufgeklebt. So dient das Banner nämlich auch noch dem Zapfen, der durch die runde Spitze gerne nach vorne rutscht, als Stopper.

Across the front edge of the display base I added a little banner with a merry christmas stamped onto it. I used a very old stamp by Whiff of Joy here and some green ink, stamped the text onto white cardstock and matted it with silver glitter cardstock. Then I used two layers of foam tape, to attach the banner to the base. This way it also holds the pinecone, that tends to slide down due to its round tip, in place.

Samstag, 17. Dezember 2022

Stampcorner December Daily #17

 
Hallo Ihr Lieben!
Im heutigen Türchen der Adventskalender Aktion von Stampcorner versteckt sich ein weiterer Ernst, das süße Nilpferd aus der Feder von Oma Plott. Und der arme Kerl hat sich erkältet. Für Männer kann das ja einem Todesurteil gleichen....

Hello everyone!
Behind today's shutter of Stampcorner's advent calendar release there's another Ernst, the cute hippo drawn by Oma Plott. The poor guy catched a bad cold! And this can be like a death penalty to men...

Ich habe daher eine Taschentuchverpackung gewerkelt - wie in der Werbung, in der die Ehefrau dem fast sterbenden Gatten eine Medizin aufs Bett wirft. Das ist dann doch optisch etwas schöner, und auch sehr viel liebevoller!
Den Außenteil meiner Verpackung habe ich aus braunem Cardstock gewerkelt, die Schublade, in der sich die Taschentücher befinden, ist aus rotem Cardstock gemacht.

I made a tissue box - there's a commercial in Germany where a sick man lays in bed and tells his wife to please call his mum. Instead she's throwing a box of pills on the bed. There's a "please call my mum" text in this stamp set, that I used on my box. But I really think this box is a lot nicer than a box of pills - and a lot more loving.
I made the outside of my box from craft colored cardstock, the drawer, that holds the tissues, is made from red cardstock.


Ich habe einige Zeit überlegt, mit was ich meine Box bekleben soll. Dann habe ich mir kurzerhand einen Bogen voller Hatschi! ausgedruckt und das als Designpapier verwendet. Bevor ich die Teile aufgeklebt habe, habe ich die Ränder mit Distress Ink Ground Espresso gewischt und dann noch rote Metallic Watercolor aufgespritzt.

I really wasn't sure what I wanted to cover my box with. Then I simply printed a sheet full of rows of Achoo! and used that as my patterned paper. Before adhering it to the box I used Distress Ink Ground Espresso to ink up the edges and also flicked some red metallic watercolor onto the paper.


Auf dem Deckel der Box klebt der arme kranke Ernst! Den habe ich mit Copics coloriert - mit fiebrigen Backen und einer roten Schnupfennase. Die Wärmflasche und den Schal habe ich in braun gehalten, auf den Schal habe ich mit Polchromos noch rote und weiße Streifen aufgemalt.
Ich habe hier zwei der Texte aus dem Set kombiniert, allerdings die Anordnung ein wenig abgeändert. Das ich habe steht eigentlich über dem Wort Schnupfen, ich habe es davor gestempelt. Sonst hätten die Texte so nicht auf meine Box gepasst. Zum Abstempeln habe ich schwarze Tinte verwendet und einige Worte - bzw. das "es geht zu Ende!" - mit Rot hervorgehoben. Dann habe ich die Texte schwarz gemattet und auf die Box geklebt.
Ernst habe ich mit 3D Tape befestigt und hinter ihn ein Stück Cheesecloth gesetzt.

On top of the box there's poor sick Ernst. I colored him with Copics - with fevery red cheeks and red runny nose. The hot-water bottle and the scarf I colored in browns and added some red and white stripes to the scarf using polychromos.
The text means "I have a runny nose - it's going to be my end! Can you please call my mummy?". I stamped the texts in black and highlighted a few words in red. Then I matted the strips black and adhered them to the box. 
To attach Ernst I used foam tape and put a piece of cheesecloth behind him.


Öffnet man die Box - sie wird vorne an der Schmalseite mit zwei Magneten verschlossen gehalten - dann befindet sich im Inneren ein weiterer Text und die Öffnung, aus der man die Taschentücher entnehmen kann. Und auch hier ist alles mit dem selbstgedruckten Hatschi!-Papier überzogen.

When you open the box - it gets held close with the help of two magnets on the front flap - there's another text on the inside and of course the opening, through which the tissues can be taken out. And again everything is covered with the home printed Achoo! paper.


Auch den Text hier - ebenfalls im Stempelset enthalten - habe ich in schwarz und rot gestempelt, schwarz gemattet und aufgeklebt.
Zusätzlich habe ich als Deko noch ein rotes und ein braunes Fähnchen, versehen mit einem kleinen Herz, aufgeklebt.

The text on the inside of the lid - it says "even if the chances with man flu are pretty few: get well  soon" - is again stamped in red and black, matted with black cardstock and attached directly onto the patterned paper.
I also added two little banners, a red and a brown one, decorated with a small red heart to the inside of the lid.


Und wenn alle Taschentücher aufgebraucht sind, kann man einfach die Schublade, die das Innenteil bildet, aufschieben und sie neu befüllen. So eine Männergrippe kann sich ja ein wenig hinziehen....

And once all the tissues are used up the drawer, that holds the tissues, can be opened and get refilled. A man flu won't be cured within a day....

Freitag, 16. Dezember 2022

Stampcorner December Daily #16

 
Hallo Ihr Lieben!
Heute habe ich eine weitere Karte für Euch, das einen der im Dezember fast täglich neu erscheinenden Stempeln von Stamporner zeigt. Und das hier ist der Stempel von Tag 16.

Hello everyone!
Today I am sharing another card showing one of the new stamps, that are realeased by Stampcorner nearly daily during the month of december. And this is the stamp for day #16.

Das A7-Stempelset hat ein herbstliches Thema. Das habe ich zwar umgesetzt, meine Karte hat aber definitiv einen winterlichen Touch. Aber auch im Herbst gibt es frostige Tage, und die Stimmung habe ich auf meiner Karte eingefangen.
Hier habe ich für den Hintergrund ein Stück weißen Cardstocks mit dem Perfect Poinsettias Embossingfolder von Altenew geprägt. Dann habe ich silber-blaue Metallic Watercolor darüber gespritzt. 

This A7 stamp set has a fall-ish theme. I made a fall card here, but it definately has a wintery touch. But there are frosty days in fall also, and this is the feeling I wanted to add to my card.
For the background I dry embossed a piece of white cardstock with the Perfect Poinsettias embossing folder by Altenew, then spritzed some silver-blue metallic watercolor onto it.


Hier ist der süße Bär, der aus den gesammelten Blättern eine Girlande gebastelt hat. Ob er damit den Tannenbaum schmücken möchte? Ich habe den Bären nur ganz leicht mit Copics grau schattiert, der Schal hat einen helltürkisfarbenen Touch, nur die Blätter habe ich in kräftigem Türkisblau coloriert. Außerdem habe ich sie mit Rock Candy Distress Glitter überzogen. Das gleiche habe ich mit dem Blatt und den Eicheln, die aus dem selben Stempelset sind, gemacht. Dann habe ich die Motive ausgeschnitten.
Als Hintergrund für den Bären habe ich das gestitchte Tag aus dem Dezember-Release von Stampcorner in zwei verschiedenen Größen ausgestanzt, einmal aus grauem Cardstock, einmal aus dezent gestreiftem Designpapier aus dem Paper Pack 06. Für den Tag aus dem Designpapier habe ich außerdem nur den obersten Teil des Tags noch aus einem Stück Designpapier aus dem Paper Pack 02 ausgestanzt und diesen Teil dann mit 3D Tape auf den gestreiften Tag geklebt. Den grauen Tag habe ich schräg darunter geklebt.
Oben durch die Löcher im Tag habe ich etwas weißes Twine gezogen und zur Schleife gebunden. Außerdem habe ich das Blatt und eine der Eicheln oben am Tag angeklebt. Und unter den Tag habe ich drei aus hell-türkisfarbenem Cardstock gestanzte Schneeflocken geklebt.

Here's the cute bear, that made a garland from the fallen leaves he just collected. If he plans to decorate his christmas tree with them? I used my Copics to lightly shade the bear in greys, the scarf is colored in a light aqua. Only for the leaves on the garland I used a bright turquoise. I also covered those with Rock Candy Distress Glitter and did the same with the larger leaf and the acorns, that are both from the same stamp set. Then I cut the images out.
As a background for the bear I die cut stitched tags in two different sizes, using the tag die set from the Stampcorner december release. I cut a larger one from grey cardstock and a slightly smaller one from some white and aqua striped patterned paper. With this smaller die I also cut only the top of the tag from some grey paper with white dots and adhered this part with foam tape. The larger tag I put under the this striped one, putting it down in an angle.
Through the holes in the tags I put some white twine and tied it to a bow.
I also attached the larger leaf and one of the acorns to the top of the tags. And under them I slid three snowflakes, cut from light aqua cardstock.


Für den Text auf meiner Karte habe ich wieder gestempelte und gestanzte Wörter kombiniert. 
Das Wort Lieblingsmensch ist mit der Lieblingsmensch-Stanze von Stampcorner dreimal aus weißem und einmal aus türkisblauem Cardstock gestanzt, dann habe ich alle Stanzteile aufeinander und quer über die Karte und die Tags geklebt.
Die restlichen Teile des Textes - ein Hallo aus dem Set Kleine Worte und einen Text aus dem heutigen Stempelset - habe ich weiß auf grauen Cardstock embosst und ausgeschnitten. Anschließend habe ich die Cardstockstreifen mit 3D Tape über und unter dem gestanzten Wort mit 3D Tape aufgeklebt. Rechts war dann noch Platz für eine weitere vereiste Eichel.

For the text on my card I combined stamped and die cut words again.
I die cut the word Lieblingsmensch - favorite person - three times from white and once from turquoise cardstock, then stacked the words and glued them across the card and tags.
The other parts of the text - a hello and another text from today's stamp set meaning "let's collect some leaves together" - are white heat embossed onto grey cardstock. I cut them out and adhered them onto the card above and under the die cut word using foam tape again. And on the right side there was room for another frosted acorn.


Zum Schluss habe ich den dekorierten Cardstock türkis gemattet und auf einen weißen Kartenrohling geklebt. 
Ich war ja versucht, ein paar zum frostigen Look der Karte passende Glitzersteine aufzukleben, habe mich dann aber dagegen entschieden. Manchmal muss man wissen, wann Schluss ist....

To finish the card I matted the decorated cardstock piece turquoise and adhered it to a white note card. And I really was tempted to add a few rhinestones that match the frosty look of the card. But then I decided, not to - sometimes you just know when a card is finished...