Montag, 31. Oktober 2022

Stempeleinmaleins - Geburtstagsausgabe 2022 Nummer 2


Hallo Ihr Lieben!
Neben dem Sketch heute morgen, haben wir zum Geburtstag des Stempeleinnmaleins auch eine Anleitung "außer der Reihe" für Euch. Und weil wir ja mit großen Schritten auf die Adventszeit zugehen, zeigen wir Euch den 4er-Secret-Box Adventskalender. 
 
Hello everyone!
Besides the sketch from this morning, we also made a tutorial for Stempeleinmaleins' birthday - in addition to our regular saturday tutorials. And since we're heading towards christmas time, we're sharing a tutorial for a 4 Tier Secret Box Advent Calendar. 


Das Grundgerüst für meine Box habe ich aus weißem Cardstock gewerkelt, die Seiten sind mit hellgrau-weißem Designpapier mit einigen wenigen Schneeflocken beklebt.
An den Deckel, den ich mit grünem Designpapier überzogen habe, habe ich zwei kleine Banner aus helltürkisfarbenem Cardstock gehängt. Auf die habe ich mit weißem Embossingpulver "zauberhafte" und "Weihnachtszeit" aufembosst. Festgebunden sind sie mit helltürkisfarbenem Organzaband.

The base of my calendar is made from white cardstock, onto the sides I glued some light grey and white patterned paper with a few snowflakes.
To the lid, that I covered with green patterned paper, I tied two banners, cut from light turquoise cardstock, onto which I white heat embossed the words "wonderful" and "christmastime". I used some light turquoise organdy ribbon to tie the banners to the lid.


Auf den Deckel habe ich ein Weihnachtshäuschen geklebt. Das ist mit verschiedenen Village-Sets von Sizzix/Tim Holtz gemacht. Eigentlich hatte ich eines der größeren Häuser gebaut, das war dann aber zu groß für meine Box. Also habe ich eines der kleineren in der Art des größeren nachgebaut, und dabei z. B. für die Dachziegel eine Stanze aus dem Set mit den größeren Häusern verwendet. Die Seitenteile der Häuser habe ich mit dem Mini Lumber Embossingfolder embosst und dann Distress Ink Hickory Smoke darauf aufgewischt. 
Das Haus befindet sich auf einem Stück silberfarbenem Glittercardstock, den ich mit einer der Den Sweet Den Stanzen von LawnFawn ausgestanzt habe. Und hinter dem Haus befindet sich ein Stück schwarzen Cardstocks als Himmel. Ich habe silberfarbene Metallic Watercolor darauf gespritzt. Dieses Stück brauchte ich als Hintergrund für mein Haus - das sah sonst irgendwie verloren aus - und außerdem, um meine Bäume darauf anzukleben.
Die Bäume sind aus türkisfarbenem Cardstock mit Stanzen von Marianne Design gemacht. Ich habe sie jeweils mit 2 weißen Bäumen hinterlegt, damit sie besser stehen.

Onto the lid I glued a christmas house. I used the different Village die sets by Sizzix/Tim Holtz here. I first had made a house using the set with the larger houses, but that turned out too big. So I re-built a similar ones using dies from the sets with the smaller 3D houses, using some dies like the one for the shingles from the set with the large house. I dry embossed the houses sides with the Mini Lumber embossing folder, then put a soft layer of Distress Ink Hickory Smoke on top.
The house is glued to a piece of silver glitter cardstock, that I had cut with one of the Den Sweet Den sets by LawnFawn. And behind the house I added a dome shaped piece of black cardstock, that I spritzed some silver metallic watercolor onto. I needed this as a backdrop for my house - it just looked lost without it - and also to attach my trees to.
The trees are cut from turquoise cardstock using dies by Marianne Design. I glued 2 trees cut from white cardstock behind each tree to make them more sturdy and stand better.


Das Haus habe ich dann mit Lichterketten und einem Kranz aus dem Build a House Christmas Add-On Stanzenset von LawnFawn dekoriert, die Girlande um die Haustür ist von Magnolia. 
Die Lämpchen der Lichterkette habe ich außerdem mit Glossy Accents überzogen.
Auf die Tannenbäume und die Hausdächer habe ich etwas von der Snowgrit Paste von Ranger aus dem letztjährigen Holiday Kit aufgetragen.
Und weil das Haus da nur auf dem silberfarbenen Cardstock etwas unwinterlich aussah, habe ich noch einige fluffige Pompoms sowie klare Pailetten drumherum verteilt.

I decorated the house with some christmas lights and a wreath from the Build a House Christmas Add-On die set by LawnFawn, the garland around the front door is by Magnolia.
I covered the little lights with Glossy Accents.
Onto the trees and the roof I added some of the Snowgrit Paste by Ranger from last year's holiday kit.
And since the house looked a bit un-wintery just glued onto the silver cardstock, I put some fluffy pompoms and clear sequins around it.


Und weil die Weihachtszeit ja doch etwas länger dauert und da alles schön mit Lichtern dekoriert ist, habe ich auch mein Haus beleuchtet. Man kann das Haus abheben, darunter befindet sich eine kleine, oben offene Box, in die ich ein Lämpchen gelegt habe. Die Fenster des Hauses sind mit gelbem Transparentpapier hinterlegt, so dass das Licht, das aus den Fenstern scheint, schön warm ist.

And since christmas time is longer than just a few days and everyone has set up lots of lights, I also made my house light up. You can lift the house, there's a box, open at the top, inside into that I put a little light. I glued yellow vellum behind the windows, so the light shining through them is nice and warm.


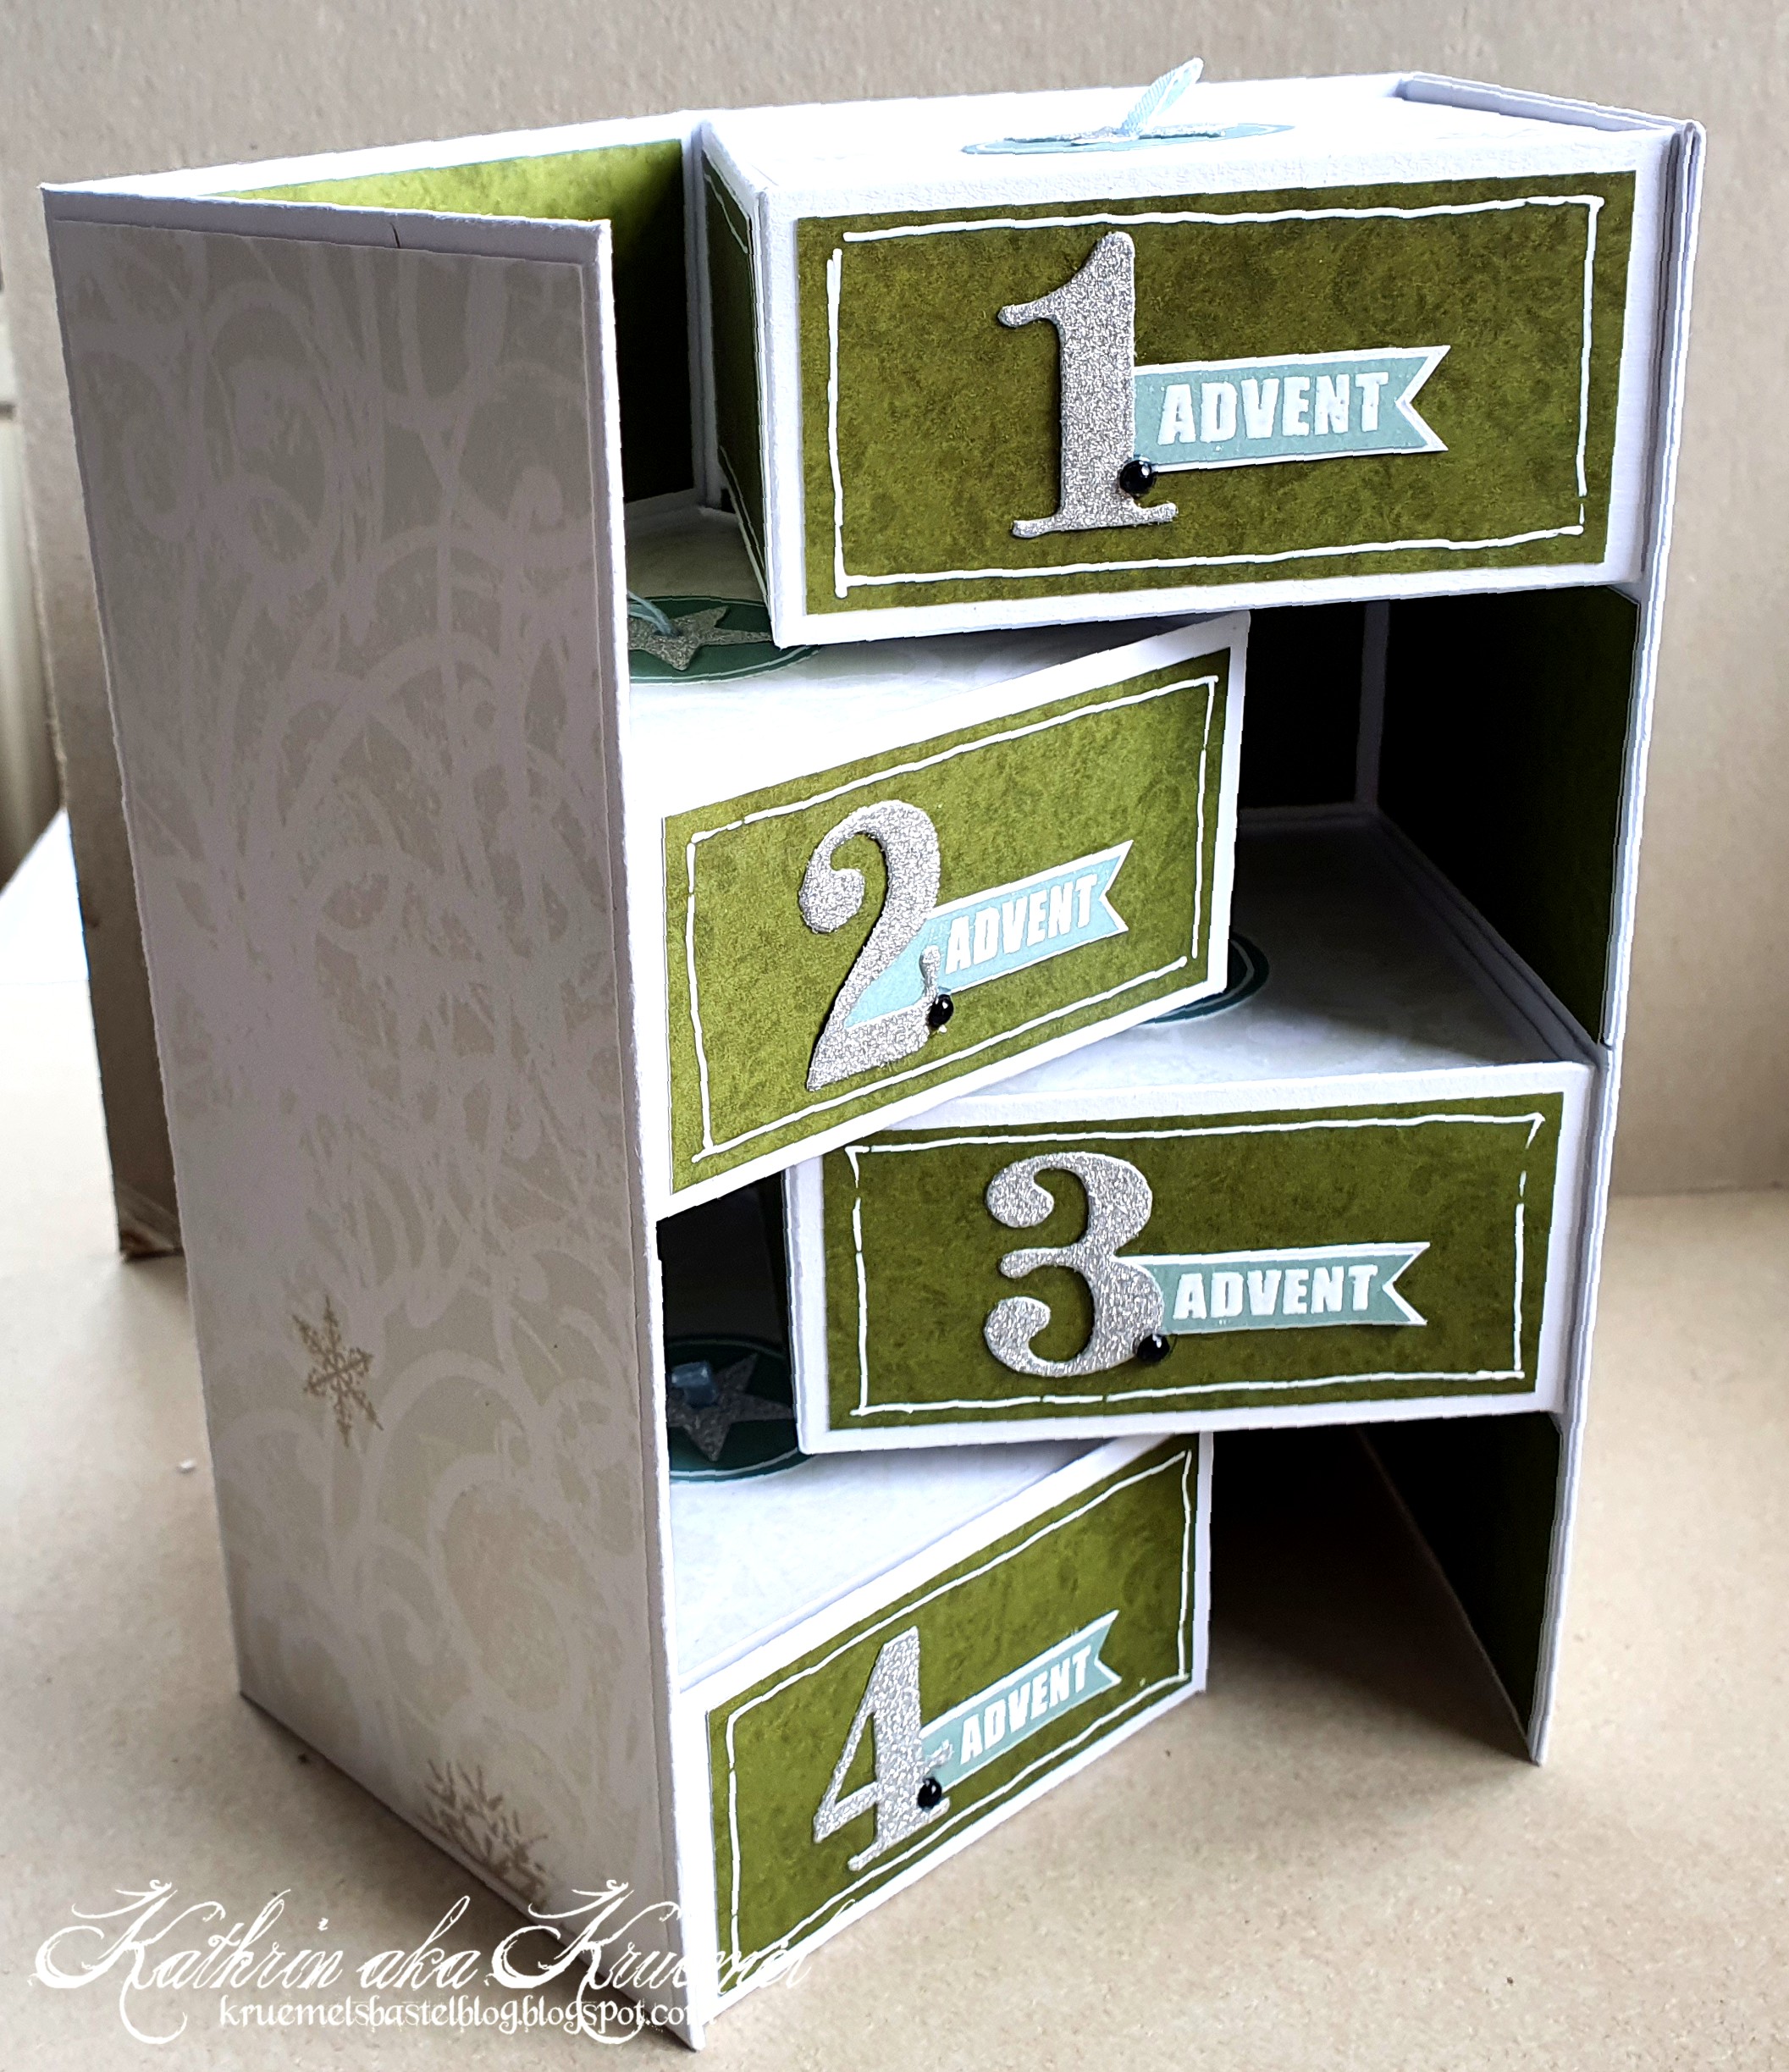
Nimmt man den Deckel ab, kann man die Box zu beiden Seiten aufdrehen - innen verstecken sich vier aufeinander gestapelte Boxen. Zwei davon drehen nach links, zwei nach rechts auf.

When you pull off the lid, you can open the box to both sides. There are four stacked boxes on the inside - two turn to the left and two to the right.


Innen habe ich meinen Adventskalender mit grünem Designpapier mit ganz zartem Muster beklebt. 
Auf den einzelnen Boxen befinden sich die Zahlen von 1 bis 4, aus silberfarbenem Glittercardstock gestanzt, jeweils mit einem kleinen Banner mit weiß aufembosstem Advent dahinter. So wird auch sicher immer die richtige Box geöffnet.

I covered the inside of my advent calendar with some green cardstock with a very subtle pattern.
On the individual boxes there are the numbers from 1 to 4, cut from silver glitter cardstock, and a little banner with a white heat embossed advent next to it. This way I made sure the right box gets opened each sunday.


Der Inhalt eines Adventskalenders soll natürlich bis zum entsprechenden Tag geheim bleiben. Deswegen werden die Boxen mit kleinen Deckeln geschlossen, die man komplett abnehmen kann, so dass man auch bei den unteren Boxen gut an den Inhalt kommt. Die Deckel habe ich wieder mit dem Designpapier, das ich auch für die Außenseite der Box verwendet habe, beklebt. Damit man sie leicht herausnehmen kann, habe ich kleine Schlaufen aus Organzaband befestigt und außerdem als Deko einen türkisfarbenen Kreis und einen silbernen Stern mit aufgeklebt.

Of course the content of a advent calendar has to stay secret until the designated day. So the box have little lids, that can be pulled off, so you can reach the content easily also at the bottom boxes.  I covered the lids with the same patterned paper that I had also used on the outside of my calendar. To make taking them off easy I added little loops from organdy ribbon. For decorations I added a turquoise circle and a silver star here.

Stempeleinmaleins - Geburtstagsausgabe 2022 Nummer 1

 
Hallo Ihr Lieben! 
Ist es denn zu glauben? Heute vor 13 Jahren ging der erste Post des Stempeleinmaleins online. Also ist heute Geburtstag, und den wollen wir natürlich feiern. Deswegen haben wir außer der Reihe zwei Posts für Euch. Los geht es mit einem neuen Sketch. Um 12.00 Uhr haben wir dann noch eine Anleitung für Euch. 
 
Hello everyone!
Can you believe it? 13 years ago today the very first post over at Stempeleinmaleins went live. That means, it's our birthday! And of course we have to celebrate it. So we have two posts today, even when it isn't a saturday. We start with a new sketch. And at 12.00 pm we have a tutorial prepared for you.
 
Aber heute ist auch Halloween, und weil das die letzte Chance war, noch eine Halloweenkarte zu machen, habe ich genau das getan. Ich verspreche Euch aber, dass ich für mein zweites Projekt heute ein anderes Thema umgesetzt habe...
Hier habe ich für den Hintergrund ein Stück weißen Cardstock mit Distress Oxide Faded Lilac, Wilted Violet, Villanous Potion und Black Soot gewischt - in der Mitte hell, nach außen hin dunkler werdend. Dannn habe ich einige Tropen Wasser sowie lilafarbenes Micaspray darüber gespritzt.

But it's also Halloween today, and that means, it's the last chance to make a Halloween card. So I did. But I promise that I've chosen a different theme for my second project today....
For the background I've inked up a piece of white cardstock with Distress Oxide Faded Lilac, Wilted Violet, Villanous Potion and Black Soot - light in the center and darker towards the edges. Then I sprinkled a few droplets of water and some purple Mica Spray on top.


Bei der Deko habe ich nochmal in die Vollen gegriffen...
Im oberen Teil der Karte befindet sich ein Hexenkessel, den ich als Shaker gestaltet habe. Ich habe dafür die Cauldron Shaker Stanze von PrettyPinkPosh verwendet und den Kessel einige Male aus schwarzem Cardstock gestanzt.
Hinter dem Hexenkessel befindet sich ein aus weißem Cardstock gestanztes Spinnennetz - eigentlich sind es ja mehrere zusammenhängende -, das ich mit einer Stanze von MemoryBox gemacht habe.

I really went a bit crazy when it comes to all the elements on this card.
In the upper area I've included a cauldron, that I turned into a shaker. I used the Cauldron Shaker die by PrettyPinkPosh for it and die cut it several times from black cardstock.
Behind the cauldron I've glued down a spider web, actually it's several connected ones, die cut from white cardstock with a die by MemoryBox.


Hier habe ich den Kessel mal ordentlich für Euch umgerührt, äh geschüttelt. Er ist mit kleinen Kügelchen in Grün und Lila gefüllt. Die sind halb transparent, so dass der Mix schön dezent ist.
Aus dem Kessel steigen grüne Blubberblasen auf. Einige bestehen aus grün irisierenden Perlen, für die drei großen Perlen habe ich kleine Kreise aus giftgrünem Cardstock gestanzt und klare Dew Drops darauf geklebt.
Quer über den Kessel habe ich ein aus lilafarbenem Glitzercardstock gestanztes Boo gesetzt. Auch das ist mit einer Stanze von PrettyPinkPosh gemacht.
Und dann sind hier schon die ersten Tiere/Dinge zu sehen, die in so einer Hexenküchen nicht fehlen dürfen: oben am Griff des Kessels befindet sich ein Wurm aus dem A Bug Deal Set von LawnFawn, der ein wenig erschrocken schauende Frosch ist aus dem Witch Way is the Candy Set von MFT - eines meiner absoluten Halloween-Lieblingssets -, und die beiden Augen sind aus dem Frightful Fillers Set von ClearlyBesotted.

Here I stirred the cauldron - well, shaked it. It's filled with tiny beads in green and purple. Those are semi transparent and so the mix is pretty subtle.
There are some bubbles coming out of the cauldron. Some of them are made from green iridescent pearls, for the three large ones I've cut small circles from green cardstock and glued clear Dew Drops on top.
Across the cauldron I've added a boo, die cut from purple glitter cardstock. Again I used a die by PrettyPinkPosh for it.
And then you can also see a few of those animals/items, that can't be missed in a witch's kitchen: a little worm from the A Bug Deal set by LawnFawn is sitting on the right handle of the cauldron, the frog with the kind of puzzled look is from the Witch Way is the Candy stamp set by MFT, one of my all time favorite Halloween stamp sets, and the eyeballs are from the Frightful Fillers stamp set by ClearlyBesotted.


Der Kessel steht auf einem Stapel Bücher, die mit Hexensprüchen und -rezepten gefüllt sind.
Ich habe dafür mit der Quick Stripes Stanze von MamaElephant verschieden dicke Streifen aus lilafarbenem und grünem Cardstock gestanzt und in der Länge gekürzt. Dann habe ich die Buchrücken mit Ovalen und Streifen, teilweise aus Glittercardstock, beklebt. Und auch der eigentliche Text meiner Karte versteckt sich hier. Auf drei der Bücher habe ich den Text "happy fright night" mit einem Stempel von Whiff of Joy in verschiedenen Farben aufembosst. 
Auf einen der Cardstockstreifen habe ich einen schmaleren weißen Streifen aufgeklebt, dessen Enden ich mit einer Kreisstanze nach innen gewölbt habe. Außerdem habe ich einige Linien mit grauer Tinte aufgestempelt. Nun sieht es so aus, als würde der Buchrücken dieses Buches nach hinten zeigen.
Als Deko habe ich zwei Wackelaugen sowie kleine Sterne auf die Bücher aufgeklebt.
Und dann durften natürlich weitere Motive nicht fehlen.
Die Katze ist wieder aus dem Set Witch Way is the Candy, die Flaschen mit bereits fertigen Zaubertränken ist mit dem Set Tränke von Create a Smile gemacht, auch der Zauberstab ist von dort, allerdings aus dem Set Tierisch Vielseitig, und die Spinne ist wieder aus dem Frightful Fillers Set von Clearly Besotted. Alle Motive sind mit Copics coloriert. Das kleine Spinnennetz links, das eine Spinne von der Wand zu den Büchern gesponnen hat, habe ich von der größeren Stanze oben rechts weggeschnitten. 

The cauldron is standing on top of a pile of books, that surely are filled with magic spells and recipes. I used the Quick Strips die by MamaElephant to die cut different wide strips from green and purple cardstock and cut them shorter. Then I decorated the books with ovals and strips, partly cut from glitter cardstock. Also the saying of my card is hidden here. I used an old stamp by Whiff of Joy to heat emboss a "happy fright night" with different colored embossing powders onto the spines of three of the books.
I also die cut a smaller strip from white cardstock, rounded the short sides inwards with a circle punch and stamped some lines onto it with grey ink, then glued it onto one of the thinner strips. Now it looks like the spine is showing in the other direction.
To decorate my books I glued down two googly eyes and some small stars.
And then of course my card needed more images.
The cat is again from the Witch Way is the Candy set, the bottles with the already finished potions are from the set Potions by Create a Smile, also the magic wand is by them, but from the Tierisch Vielseitig stamp set, and the spider is again from the Frightful Fillers set by Clearly Besotted. All images are colored with Copics. The little cobweb on the left, that a spider has build from the wall over to the books, is cut off of the connected webs in the top right corner.


Zum Aufkleben der verschiedenen Elemente kam wieder viel 3D Tape zum Einsatz. Dann habe ich alles schwarz gemattet und auf einen weißen Kartenrohling geklebt.

To put my scene together I've once again used lots of foam tape. Then I matted the scene black and glued it onto a white note card.

Sonntag, 30. Oktober 2022

Noch eine Karte nach dem neuen Stempeleinmaleins-Sketch

 
Hallo Ihr Lieben!
Seit gestern gibt es den neuen Sketch beim Stempeleinmaleins. Und gestern habe ich Euch bereits meine Karte danach gezeigt. Nun, die Karte von gestern war der zweite Versucht. Heute zeige ich Euch den ersten, mit dem ich aber irgendwie nicht ganz zufrieden bin. Aber zeigen möchte ich sie Euch dann doch.

Hello everyone!
Since yesterday there's a new sketch at Stempeleinmaleins. I already shared my card after it yesterday. Well, actually yesterday's card was my second attempt. Today I am sharing my original card, that I somehow am not completly happy with. But I want to show it to you anyway.

Der Sketch hat mich doch glatt dazu verführt, eine One-Layer-Karte zu machen. Okay, fast, der Text ist dann doch etwas erhöht aufgeklebt.
Ich habe hier grauen Cardstock als Basis genommen und die Deko mit Stencils aufgewischt. Dazu gleich mehr. Vom Rand her habe ich Distress Oxide Black Soot aufgetragen. Da ich hier bewusst auf die schwarze Mattung, die ich ja fast immer benutze, verzichtet habe, entsteht so zumindest ein wenig Kontrast zum weißen Kartenrohling.

The sketch actually inspired me to make a One Layer Card. Well, nearly, because I still did prop up the text a bit.
I used a piece of grey cardstock as the base and added the decorations with stencils. More about that a little later in the post. I used Distress Oxide Black Soot to darken the edges of the cardstock a bit. I didn't add the black matting I use on nearly all my cards here on purpose and with the black ink there's at least a bit more of a contrast to the white card base.


Für den dekorierten Streifen links habe ich zuerst Kürbisse mit Distress Oxide Wild Honey, Spiced Marmalade und Mowed Lawn auf den grauen Cardstock gewischt. Leider weiß ich nicht, von wem der Stencil ist, da ich hier die Verpackung nicht mehr habe. Die Gesichter, die ich dann mit Black Soot aufgewischt habe, sind mit einer Stencil von Taylored Expressions gemacht.
Danach habe ich mit weißer Tinte die Gespenster mit der Layered Ghosts Stencil von PrettyPinkPosh aufgewischt und zwar so, dass einige vor den Kürbissen zu fliegen scheinen. Das Stencilset besteht aus drei Stencils - den Geistern, einer Stencil mit den Gesichtern und einer mit Sternen. Die Sterne habe ich mit Twisted Citron aufgewischt, sie waren aber auf dem grauen Cardstock so schlecht sichtbar, dass ich sie mit einem grünen Glaze Pen nachgemalt habe. Die Gesichter der Geister habe ich mit Black Soot aufgewischt. Anschließend habe ich giftgrüne Metallic Watercolor über den Streifen gespritzt. Da ich dabei an einigen Stellen auch die Gesichter der Geister getroffen habe, habe ich diese dann mit einem schwarzen Glaze Pen nachgemalt. 

For the decorated strip on the left side I first stenciled down the pumpkins with Distress Oxide Wild Honey, Spiced Marmalade and Mowed Lawn. I have no idea what brand this stencil is because I didn't keep the original packaging. The faces, that I added with Black Soot, are made with a stencil by Taylored Expressions.
Then I used white ink to add the ghosts, using the Layered Ghosts stencil by PrettyPinkPosh. I made sure, that some of the ghosts went on top of the pumpkins. This stencil set contains three stencils - one with the ghosts, one with their faces and one with stars. I added a few stars with Twisted Citron, but those were hardly visible on the grey cardstock so I used a green Glaze pen to re-draw them. The faces of the ghosts are added with Black Soot. Then I spritzed some bright green metallic watercolor over the cardstock. I ended up with some speckles on the ghosts' faces and so I used a black Glaze pen to re-draw them.


Auf der rechten Seite der Karte, auf der im Sketch der Text eingezeichnet ist, habe ich einen weiteren Kürbis und Geist sowie drei weitere Sterne aufgestencilt. 
Darauf kam dann der Text. Das Boo habe ich mit der Boo Script Stanze von PrettyPinkPosh gestanzt - viermal aus schwarzem, einmal aus weißem Cardstock. Das weiße Stanzteil habe ich dann mit Distress Oxide Twisted Citron und Mowed Lawn eingeärbt, alle Stanzteile aufeinander und auf die Karte geklebt. 
Das To You darunter ist Teil eines Stempels aus dem Set Here's to You von MFT. Ich habe es weiß auf schwarzen Cardstock embosst und mit 3D Tape unter dem Boo aufgeklebt.

On the right side of the card, where the text is drawn in the sketch, I stenciled down another pumpkin, ghosts and three stars.
Then I glued the text down, partly covering the pumpkin. I've die cut the word boo with the Boo Script die by PrettyPinkPosh - four times from black and once from white cardstock. I colored the white one with Distress Oxide Twisted Citron and Mowed Lawn, glued the black pieces under it and then attached the word to the card.
The small to you under it is made with part of a stamp from the Here's to You stamp set by MFT. I've white heat embossed it onto black cardstock and glued it down with foam tape.


Und da mir fast etwas zu wenig orange auf der Karte war, habe ich noch einige kleine orangefarbene Pailetten zwischen den Motiven verteilt.

And since there was a bit too little orange on this card I added a few tiny orange sequins between the images.

Samstag, 29. Oktober 2022

Stempeleinmaleins - Ausgabe vom 29. Oktober 2022

 
Hallo Ihr Lieben!
Heute gibt es einen neuen Sketch beim Stempeleinmaleins - und das ist meine Karte danach. Es wird fruchtig!

Hello everyone!
Today we have a new sketch over at Stempeleinmaleins - and this is the card I made after it. It's gettiny fruity today!

Der Sketch ist eher Richtung Clean and Simple gehalten - mir kam dann aber doch die perfekte Idee. Und dafür habe ich den Sketch um 90° Grad gedreht, so dass meine Karte hochkant ausgerichtet ist.
Für den Hintergrund habe ich den unteren Teil des Cardstocks mit Distress Oxide Speckled Egg ganz leicht gewischt und die Farbe etwa zur Mitte des Cardstocks ins Weiß auslaufen lassen. Dann habe ich farblich passende Metallic Watercolor darüber gespritzt. Auch hier habe ich im oberen Bereich der Karte nur wenige Spritzer, unten dafür mehr aufgebracht.
Den weißen Cardstock habe ich dann schwarz gemattet.

The sketch is more a clean and simple one - but then I had the perfect idea. I turned the sketch 90° degrees to get a portrait oriented card.
For the background I've inked up the lower area of my card lightly with Distress Oxide Speckled Egg and let the color fade into to the white about half way up. Then I spritzed some metallic watercolor in a matching color onto the white cardstock, putting down only a few at the top of the card and more at the bottom.
Then I matted the background with black cardstock.


Im unteren Bereich der Karte habe ich zuerst mit Partial Die Cutting nur den unteren Teil der Äpfel direkt aus dem weißen Cardstock gestanzt. So konnte ich später die Apfelbordüre darüber legen können, ohne dass der Hintergrund unter den Äpfeln sichtbar ist und gleichzeitig die Äpfel über die Mattung hinausragen. 
Die Äpfel habe ich mit der Apple Border Stanze von LawnFawn aus weißem Cardstock gestanzt. Die Äpfel habe ich dann mit Distress Ink Fired Brick und Barn Door gewischt, für die Stiele habe ich Vintage Photo verwendet und für die Blätter eine Mischung aus Distress Oxide Peeled Paint und Distress Ink Forest Moss. Ich mische die beiden Tinten gerne mal, weil die Inks doch etwas farbintensiver sind.
Die Äpfel habe ich mit 3D Tape auf die Karte geklebt. Dahinter habe ich ein Schild mit der Aufschrift Fresh Apples aus dem Stempelset Apple-Solutely Awesome von LawnFawn aufgeklebt. Dann habe ich rote Pailettenherzen sowie eine rote Pailette als Deko aufgeklebt.
Die Apfelreihe habe ich links und rechts dann auf  Höhe der Mattung abgeschnitten, unten ragen sie darüber hinaus.

First I did some partial die cutting with the Apple Border die by LawnFawnn at the bottom edge of my cardstock. This way I could put the Apple Border on top later without the light blue background being visible between them, and at the same time let the apples hang over the matt of my cardstock.
The apples are die cut again with the Apple Border die from white cadstock. Then I inked up the apples with Distress Ink Fired Brick and Barn Door, for the stems I used Vintage Photo, and for the leaves a mix of  Distress Oxide Peeled Paint and Distress Ink Forest Moss. I like to mix both types of ink every now and then, the Inks are just more vibrant than the Oxides.
I attached the apples onto my card with foam tape. Behind them I placed a sign with a "fresh apples" stamped on - the stamps are from the Apple-Solutely Awesome set by LawnFawn. Then I put some red heartshaped confetti and a red sequin above the border.
I cut off the border of apples along the ege of the black matt, letting their bottoms overhang the matt.


Oben rechts auf der Karte habe ich, wie im Sketch eingezeichnet, meinen Text aufgebracht. Und Platz für ein kleines Motiv war auch noch. 
Der Text und auch das Motiv sind wieder aus dem Set Apple-Solutely Awesome. Ich habe die Texte mit weißem Embossingpulver auf schwarzen Cardstock embosst und ausgeschnitten. Dabei habe ich den Textteil Apple von Apple-Solutely durch einen weiteren gestanzten, etwas größeren Apfel ersetzt. Der ist mit dem Stanzenset Build a Barrel: Apple Set von LawnFawn aus weißem Cardstock gestanzt und wieder mit den selben Farben, die ich bereits für die Apfelbordüre verwendet habe, eingefärbt.
Die kleine Maus, die sich den roten Apfel schmecken lässt, ist mit Copics coloriert. 
Den Apfel habe ich direkt auf den Hintergrund geklebt, die restlichen Teile sind mit 3D Tape aufgeklebt. Dann habe ich auch hier ein paar Pailetten und Herzchen als Deko rund um die Motive/Texte verteilt.

Like drawn in the sketch, I added my text to the top right of the card. And there was also room for a little image.
The text and the image are from the Apple-Solutely Awesome stamp set again. I white heat embossed the texts onto white cardstock and cut them out. I replaced the "apple" from apple-solutely with another die cut, just a bit largger apple. It's from the Build a Barrel: Apple die set by LawnFawn. Again I've cut it from white cardstock and inked it up with the same colors I had already used for the apple border. 
The little mouse, that's enjoying the sweet taste of a red apple, is colored with Copics.
I glued the apple directly onto the background, then used foam tape to attach the other elements. And then I added some more red heart confetti and red sequins around the images/texts.

Freitag, 28. Oktober 2022

Stampcorner November-Release Sneak #2

 
Hallo Ihr Lieben!
Nur  noch ein paar Tage, dann wird das November-Release von Stampcorner erhältlich sein. Und heute gebe ich Euch ein weiteres Sneak darauf. 

Hello everyone!
Only a few more days until the november release by Stampcorner will be available. And today I'm giving to another sneak of one of the new products.

Im Release wird es wieder einige neue Stencils geben. Ich weiß nicht, was das bei mir mit Holzmustern ist - sobald ich eines sehe, setzt bei mir ein Haben-Muss ein, egal ob Stempel, Stanze oder Stencil. Na, und der neue Holzmuster-Stencil ist so schön, da konnte ich nicht nein sagen. 
Hier habe ich für den Hintergrund ein Stück weißen Cardstocks mit Distress Oxide Speckled Egg, Weathered Wood und Black Soot gewischt, anschließend habe ich den Stencil aufgelegt und die Opaque Crackling Paste von Ranger durch den Stencil auf den Hintergrund aufgetragen. Der Stencil ist 15 x 15 cm groß, ich musste mich also für einen Teil entscheiden. Da er von den Motiven teils verdeckt wird, habe ich sichergestellt, dass nicht nur gerade Striche sichtbar bleiben.
Nach dem Trocknen habe ich auch auf die jetzt gerissene Paste die Oxide Farben leicht aufgetupft und zudem ganz leicht Gathered Twigs nur auf die Paste mit aufgewischt.

In the release there are a few new stencils included. I have no idea what it is with me and wooden patterns - but as soon as I see one, it's all about getting it, no matter if it's a stamps, a die or a stencil. Well, the new wooden pattern stencil is so beautiful, I just had to have it.
To create my background I inked up a piece of white cardstock with Distress Oxide Speckled Egg, Weathered Wood and Black Soot, then I put the stencil on top and applied some Opaque Crackling Paste by Ranger through the stencil. The stencil is 6" x 6", so I had to pick an area for my card. Since most of the bottom will be covered by my images, I made sure to not only have straight lines in the area that will be visible later.
After the paste had dried I dabbed some more of the Distress Oxides onto the now crackled paste and also put down a bit of Gathered Twigs onto the paste only.


Hier könnt Ihr das Muster besser erkennen. Ich finde es super, dass die Linien auf dem Stencil relativ dick sind - so verbiegen sich die Stege beim Drüberwischen nicht, gleichzeitig ist das Muster gut erkennbar.

Here you get a closer look at the pattern. I love that the lines are pretty thick - this way there are no thin lines on the stencil that might move when you ink over them, and at the same time the pattern can easily recognized as what it is.


Um meine Karte zu dekorieren habe ich zu Motiven von WhimsyStamps gegriffen. Der Zweig mit den Tannenzapfen ist aus dem Set Slimline Pines, der Weihnachtsstern und die Ilexzweige aus dem Set Vintage Poinsettia. 
Ich liebe weiße Weihnachtssterne mit ihren leicht grünlichen Blüten, deswegen habe ich auch mein Weihnachtssternmotiv so coloriert. Die Ilexzweige sind eigentlich eher türkis-grau, wirken auf dem Bild aber irgendwie blau, dazu habe ich auch hier die Beeren in zartem Grün coloriert. Ich habe alle Motive mit Copics coloriert, ausgeschnitten und mit 3D Tape aufeinander und auf die Karte geklebt. Dann habe ich weißes Copic Opaque White über den kompletten Kartenaufleger gespritzt.
Der Text ist ebenfalls aus dem Set Vintage Poinsettia. Ich habe ihn silbern auf schwarzen Cardstock embosst, ausgeschnitten und aufgeklebt.

To decorate my card I used images by WhimsyStamps. The branch with the pinecones is from the Slimline Pines stamp set, the poinsettia and the holly leaves and berries are from the set Vintage Poinsettia.
I love white poinsettias and their slightly green flowers, so I colored my image like that. The holly leaves are colored in a more grey-ish turquoise, but look kind of blue in the picture. I used the same light green color that I used for the poinsettia to color the berries. All images are colored with Copics, then I cut them out and used foam tape to glue them on top of each other and onto the card.
Then I spritzed some Copic Opaque White over the panel and the images.
The set is from the Vintage Poinsettia set again. I've silver heat embossed it onto black cardstock, cut it out and glued it down.


Die Beeren und einige Stellen der Tannenzapfen habe ich mit Glossy Accents überzogen und Rock Candy Glitter von Ranger aufgestreut - das verleiht den Motiven hier so einen tollen Eis-Effekt.
Dann habe ich den Cardstock schwarz gemattet und auf einen weißen Kartenrohling geklebt.
Und hier kann man neben dem Glitter auch wunderbar die Tiefe, die die Motive durch das Aufeinanderkleben mit 3D Tape erhalten, sehen.

I covered the berries and a few areas of the pinecones with Glossy Accents and put some Rock Candy Glitter by Ranger into the wet gloss - this adds such a nice icy look.
Then I matted my panel with black cardstock and adhered it onto a white note card.
And on this pictures besides the glitter you can also the the beautiful depth the card gets by using foam tape to stack the images.

Donnerstag, 27. Oktober 2022

Eine Halloweenkarte braucht keinen Text!

 
Hallo Ihr Lieben!
Der Oktober nähert sich seinem Ende - und da musste ich einfach noch eine weitere Halloweenkarte machen, bevor ich meine makabere Bastelseite wieder bis nächstes Jahr wegpacken muss. Und diese Karte zeige ich heute auf dem Stampcorner Blog

Hello everyone!
October is coming to an end - so I just had to make another Halloween card, before I have to put my spooky craft side away until next year. And this card I'm sharing over at the Stampcorner Blog today. 

Zum Posttitel gleich mal so viel: ich wollte wirklich einen Text auf die Karte stempeln. Aber als dann alle Elemente untergebracht waren, war einfach kein Platz mehr übrig! Wenn ich das RIP auf dem Grabstein ein wenig höher gesetzt hätte, wäre darunter noch Platz gewesen, aber das habe ich nicht. Und sind wir doch mal ehrlich: es gibt Karten, die kommen auch gut ohne Text aus. Und eine Halloweenkarte gehört da für mich definitiv dazu. 
Für den Hintergrund habe ich die Nighttime Sky Stencil von LawnFawn benutzt. Zuerst habe ich den kompletten Kreis auf ein Stück weißen Cardstock gelegt und den Himmel mit Distress Oxide Iced Spruce, Broken China, Uncharted Mariner und Black Soot gewischt. Das Broken China sieht man so gut wie nicht mehr, da ich es mit den beiden anderen Blautönen quasi komplett überwischt habe.  Aber dadurch war das Verblenden der doch recht unterschiedlichen Töne Iced Spruce und Uncharted Mariner sehr viel einfacher. Anschließend habe ich ein wenig Wasser sowie weißes Copic Opaque White, vermischt mit Wasser, auf den Himmel aufgespritzt.
Anschließend habe ich die Stencil mit dem runden Ausschnitt aufgelegt und den Mond mit Pumice Stone gewischt. In meinem Pinsel war noch ein kleiner Rest Antique Linen, deswegen wirkt der Mond etwas gelblich, das gefiel mir aber super. Zum Schluss habe ich wieder mit Pumice Stone, diesmal intensiver, die Mondkrater aufgewischt. Natürlich könnt Ihr auch einen normalen runden Stencil benutzen, dann ist der Mond eben ohne Krater.

The title of this post means: a Halloween card doesn't need a text. Well, to explain that: I really had planned to add a text to my card. But once I had all the elements put down there simply wasn't room for it left. If I had put the RIP a bit higher on the gravestone, there would have been room under that. But I didn't. And to be honest - there are cards that don't necessarily need a text, and a Halloween card is one of those, in my opinion.
For the background I used the Nighttime Sky stencil by LawnFawn. First I put the solid circle onto a piece of white cardstock and inked the sky with Distress Oxide Iced Spruce, Broken China, Uncharted Mariner and Black Soot. The Broken China is kind of invisible since I completly blended the other two blues over it, but that mid blue color made blending the pretty different Iced Spruce and Uncharted Mariner a lot easier. Then I spritzed some water and some Copic Opaque White, mixed with a bit of water, onto the sky. 
Next I used the stencil with the cut out circle and inked the sky with Pumice Stone. I had a bit of yellow left in my blender brush so my moon got a slightly yellow touch, but I really liked that. In the end I used Pumice Stone again, this time putting it down heavier, to add the craters to the moon. Of course you could use a solid circle stencil instead of the Nighttime Sky one, a moon without the craters for sure would look as nice.


Ich musste einfach nochmal die Motive aus dem Stempelset Süßes oder Saures benutzen, die finde ich so klasse!
Die Fledermaus am Ast ist - wie alle anderen Motive auf der Karte - mit Copics coloriert, die Highlights sind mit einem weißen Gelpen gemacht. Dann habe ich sie ausgeschnitten und mit 3D Tape auf die Karte geklebt. 

I really wanted to use the images from the Süßes oder Saures stamp set again, I just love those!
The bat hanging from the branch - and all the other images on my card - is colored with Copics, adding highlights with a white gel pen. Then I cut it out and glued it onto the card with foam tape.


Und dann konnte ich einfach nicht an der Slimline Decrepit Grave Stanze von WhimsyStamps vorbei. Wie gesagt, eigentlich ist es eine Slimline Stanze und der Grabstein sehr viel höher. Aber man kann ihn ja einfach kürzer schneiden - und das habe ich hier getan. 
Ich habe den Grabstein einmal aus dunkelgrauem, einmal aus hellgrauem Cardstock und aus dem dunkleren Grau auch die Sockel gestanzt und aus dem helleren die etwas kleinere rechteckige Stanze ausgestanzt. Dann habe ich alle Teile mit Distress Oxide Black Soot ein wenig - und bewusst fleckig - schattiert und feine Sprenkel mit schwarzer Farbe und dem weißen Copic Opaque White aufgespritzt. 
Im Stanzenset sind zwei Prägestanzen enthalten. Ich dachte mir, ich versuche mal, die zu folieren. Es hat geklappt, ich brauchte nur eine extra Lage Cardstock in meiner Hotfoil Maschine. So habe ich das Muster oben auf dem hellenren Grabsteinteil sowie da RIP silber auffoliert. Den Grabstein habe  ich dann mit 3D Tape zusammengeklebt und oben noch den Totenkopf mit den gekreuzten Knochen aus demselben Stanzenset aufgeklebt. 
Ich habe den Grabstein zwischen zwei Lagen gestanztem Gras, gestanzt aus schwarzem Cardstock, gesetzt und alles auf die Karte geklebt. 
Kürbis und Hexenhut sind wieder aus dem Süßes oder Saures Stempelset. Die Katze, die den Hexenhut eigentlich trägt, habe ich hier einfach weggeschnitten. 
Nun, zu dem Hexenhut wollte ich so gerne einen Hexenbesen setzen. Da hatte ich aber keine in Größe und Stil passende Stanze - also war Um-die-Ecke-Denken angesagt. Ich habe jeweils aus weißem Cardstock einen Ast sowie zwei Blätter in unterschiedlicher Größe und von der Form her Birken-Blättern ähnelnd ausgestanzt und mit Copics coloriert. Das dünnere Ende des Astes habe ich dann zwischen die Blätter - das kleinere obenauf - geklebt und fertig war der Hexenbesen! Den habe ich dann an den Grabstein angelehnt aufgeklebt. Ich bin sicher, jeder von uns hat etwas passendes in seinem Bestand.

And then I couldn't resist the Slimline Decrepit Grave die by WhimsyStamps. Well, it's  a slimline sized die and the grave stone is way taller. But it can easily be cut down - and that's what I did here.
I've die cut the grave stone once from light and once from dark grey cardstock and also cut the base of the grave from the dark grey. Then I cut the smaller rectangle die from the center of the lighter grave stone, inked all pieces a bit - and on purpose a bit blotchy - with Distress Oxide Black Soot and covered all pieces with tiny speckles of black color and the white Copic Opaque White. 
There are also two dies included in the set, that can be used to deboss some details. Well, I thought those might work for hotfoiling as well. It worked, I just needed to add an extra cardstock shim to my hotfoil sandwich. So I hotfoiled the details on the head of the grave stone and the RIP using silver foil. I put the grave stone together with foam tape and then added the skull with the crossed bones, also from this die sest, to the top of the stone.
I put the grave stone between two layers of grass, cut from black cardstock, and glued it onto my background.
The pumpkin and witch's hat are again from the Süßes oder Saures stamp set. I cut off the cat, that is originally wearing the hat, for this card.
And then I really wanted to add a broom since it would look perfect with the hat. But I didn't have a die the right size and the look I was after - so I had to do some thinking outside the box. From white cardstock I've cut a branch and two leaves - similar to a birch leaf in shape and a larger and smaller  one - and colored  them with Copics. Then I glued the thinner end of the branch between the two leaves and my broom was done! I glued that down, leaning it against the grave stone. I'm sure you can find something similar in your stash to create your own broom.


An das Band am Hexenhut habe ich noch ein kupferfarbenes Sternchen aufgeklebt. Außerdem habe ich den Himmel noch mit einigen kleineren Fledermäusen aus dem Süßes oder Saures Set, gestempelt mit Versafine Clair Nocturne, gefüllt. 
Und hier könnt Ihr die silberne Folierung auf dem Grabstein noch besser sehen. Es hat mich wirklich gefreut, dass das so geklappt hat! Das nächste Mal werde ich noch versuchen, das Muster erst in den Cardstock zu prägen und dann zu folieren. Ich glaube, das wirkt dann noch besser, habe aber ein wenig Angst, dass ich Folienabdrücke auch auf den erhabenen Stellen rund um das Muster haben werde. Wir werden sehen, ob das klappt.

I glued a small copper colored star onto the witch's hat and stamped a few flying bats with Versafine Clair Nocturne ink into the sky.
And here you can also see the silver foiling on the grave stone. I am really happy that that worked out! And next time I'll try debossing the pattern into the cardstock first and then add some foiling on top. I think, that might look even better, but am a bit afraid of over foiling on the raised areas around the pattern. We'll see how that goes!

Dienstag, 25. Oktober 2022

Stampcorner November Sneak #1

 
Hallo Ihr Lieben!
Momentan geht es Schlag auf Schlag hier - eine Karte folgt auf die nächste. Und heute zeige ich Euch bereits ein Sneak auf eines der neuen Stempelsets, die es am 01. November bei Stampcorner geben wird. 

Hello everyone!
I have made so many cards lately, and of course I want to share all of them with you here on my blog. Today's card is a sneak at one of the stamp sets, that will be available in the Stampcorner shop november 1st.

Bei dem süßen Motiv mit dem Bär auf dem Regenbogen, war klar, dass ich eine farbenfrohe Karte werkeln würde. Und da Farben ja immer gute Laune verbreiten - und ich wegen der Grippewelle die ein oder andere Gute-Besserungs-Karte brauche - habe ich mich genau dafür entschieden. 
Ich habe hier mal zu Watercolor Markern gegriffen und damit auch den Hintergrund gestaltet. Für mich als Kontrollfreak ja immer eine Herausforderung, vor allem, wenn Ink Smooshing im Spiel ist. Und ich gebe zu, dass dies bereits mein dritter Versuch war. Bei den ersten beiden hatte ich mich Streifen in Regenbogenfarben quer über den Cardstock entschieden. Beim ersten gefiel mir die Ausrichtung nicht, beim zweiten der Hintergrund in Kombi mit dem Motiv. Also habe ich mir eine letzte Chance gegeben und die Farben nur entlang des Randes aufgetragen und dabei bewusst einen Teil frei gelassen. Und das Ergebnis fand ich dann klasse. Ich war versucht, goldene Glitter Watercolor darüber zu sprenkeln, hatte aber Angst, dass das zu dem Hintergrund einfach nicht passt und mich deshalb dagegen entschieden. So ist dieser Hintergrund gleich doppel ungewöhnlich für mich. 
Ich habe jeweils ein wenig Farbe auf ein Stück Folie aufgetragen, ein wenig Wasser darauf geträufelt und die Folie dann auf den Rand des Watercolor Cardstocks gedrückt. Beim ersten Aufdrücken entsteht ein relativ gleichmäßiges Ergebnis. Ich habe die erste Farblage jeweils getrocknet und dann die Folie erneut aufgedrückt, so entstehen die Flecken. Bei einigen Farben habe ich diesen Schritt noch ein weiteres Mal wiederholt. Wenn ich zufrieden war, habe ich mit der angrenzenden Farbe weitergemacht und dabei darauf geachtet, dass die Farben ein wenig überlappen. 

When I saw the cute image with the bear on the rainbow I knew, that I wanted to make a colorful card. And since colors always bring happiness - and since I need quite a few get well cards at the moment - I've decided to turn that image into one.
I went with watercolor markers here and used them to create my background also. That's always a challenge for me and my inner control freak, especially when there is ink smooshing involved. And I have to admit, this background was my third try. With the first two I had colorful strips across the cardstock in mind. Well, I used my cardstock in a landscape format for the first background and didn't like it. I did a new one in portrait orientation but then didn't like it in combination with the image. So I decided to give it one more try and only put the colors down along the edge of the cardstock, leaving a part of it free. And I really liked how that turned out. I really was tempted to sprinkle some golden metallic watercolor on top but was afraid that it wouldn't look good and so I decided against it. So this card is different from my usual ones in more than one way.
I used a piece of acetate and scribbled some of the color onto it, then added just a bit of water and pressed the color onto the edge of my watercolor cardstock. With the first layer of ink the color looks pretty even. I dried the first layer of color and then pressed the acetate down again, this way those speckles get created. I repeated that second step a third time on a few of the colors. Once I was happy with the color I moved on to the next, making sure to overlap the colors a bit.


Natürlich habe ich auch das Motiv mit Watercolors coloriert. Der Bär ist fast ein wenig dunkel geworden, finde ich. Aber er ist natürlich trotzdem zuckersüß! Vor dem Colorieren habe ich das Motiv mit schwarzem Embossingpulver auf Watercolor Cardstock embosst, so ist das Colorieren einfacher und die Farben laufen nicht so leicht ineinander.
Da der Regenbogen hier nur drei Bögen hat, habe ich jeweils zwei Farben pro Bogen verwendet. Der äußerte war Pink und Orange - das Orange hat das Pink aber eher ins Rote verschoben. Zur Reihenfolge des Regenbogens passt es natürlich trotzdem.
Ich habe das Motiv ausgeschnitten und mit dünnem 3D Tape auf den Hintergrund geklebt.
Die Texte sind aus den Stempelsets Gute Wünsche und Kleine Worte. Ich habe sie weiß auf schwarzen Cardstock embosst und ausgeschnitten. Das Banner mit dem Für Dich ist mit dickem 3D Tape aufgeklebt. Dabei habe ich den unteren Abschluss des Regenbogens verdeckt, damit der nicht so in der Luft schwebt. Darunter habe ich dann den kleineren Text, wieder mit dem dünneren 3D Tape, aufgeklebt.

Of course I used watercolors to color the image, also. Well, the bear turned out a bit dark, but of course he's still super cute! Before I colored the image, I black heat embossed it onto a piece of watercolor cardstock. This makes coloring easier since the colors don't run into each other that easily.
Since the rainbow only has three arches, I colored each of them in two colors. The outermost one is colored in pink and orange, but the orange turned the pink into more of a red tone. I don't bother since the colors of the rainbow are still correct.
I cut the image out and glued it onto the background with thin foam tape. 
The text means for you - get well soon. I've white heat embossed them onto black cardstock and then cut them into strips. I glued the larger one down with thicker foam tape, covering the ends of the rainbow so those have some kind of base ground. To attach the smaller text I used the thinner foam tape again.


Da so ein wenig Gold der Karte auf keinen Fall schaden konnte, habe ich zumindest einige goldene Sternpailetten in zwei Größen auf der Karte verteilt. Dann habe ich alles schwarz gemattet und auf einen weißen Kartenrohling geklebt.

I thought, a hint of gold wouldn't hurt the card, so I added a few star shaped  confetti in two different sizes. Then I matted my cardstock black and glued it onto a white note card.

Montag, 24. Oktober 2022

Eine Explosionbox zur Hochzeit

 
Hallo Ihr Lieben!
Ich durfte wieder eine Explosionbox für eine Hochzeit werkeln. Und weil mich das Innenleben echt Nerven gekostet hat, habe ich die Außenseite eher schlicht gehalten. Aber beides passt trotzdem zusammen.

Hello everyone!
I was asked to make another Explosionbox for a wedding. And since the inside of the box really was a challenge to make, I kept the outside a bit more simple. But still both parts fit together colorwise.


Ich habe die Box aus weißem Cardstock gemacht, die Seiten dann mit kleinerem roten Cardstock beklebt und darauf kam wieder ein Stück weißen Cardstocks, den ich mit einem Embossingfolder mit kleinen aufsteigenden Herzen beprägt habe. Der Deckel ist in den selben Farben gehalten.

I made the box from white cardstock, glued a matting from red cardstock onto the sides and then added another layer of white cardstock, that I had dry embossed with little raising hearts. The lid is made in the same colors.


Hier könnt Ihr die Herzen besser sehen. Da das so ein wenig fad aussah, habe ich als Deko noch einige kleine silberfarbene Perlen zwischen die Herzen gesetzt.

Here you get a better look at the hearts. Since that looked a bit plain I put a few small silver pearls between the hearts.


Auch den Aufleger auf dem Deckel der Box habe ich mit den Herzen geprägt und hier nur unten und link die silbernen Perlen aufgeklebt.
Quer über die Box kam ein aus silbernem Spiegelcardstock gestanztes - und mit einigen weißen Die Cuts hinterlegtes - Hochzeit, den Rest des Textes habe ich mit dem Dymo geschrieben und mit 3D Tape aufgeklebt.
Außerdem habe ich hier noch zwei rote Herzluftballons aufgeklebt. Die sind mit einer Stanze von MFT aus rotem Cardstock gestanzt, mit Glossy Accents überzogen und ebenfalls mit 3D Tape aufgeklebt. Von den unteren Enden habe ich feines silberfarbenes Garn hängen lassen, das unter dem Wort Hochzeit verläuft.

I also dry embossed the cardstock I put on top of the lid and then added more silver pearls, this time only to the bottom and left.
Across the box I glued the word wedding, cut from silver mirror cardstock and with a few white die cuts underneath. The rest of the text - a "for your" and the name of the couple - is made with my Dymo and glued down with foam tape.
To the top right of the lid I added two heart shaped balloons. I've die cut those from red cardstock with dies by MFT, covered them with Glossy Accents and then glued them down using foam tape again. From the bottom ends I let dangle two strings of thin silver thread, that are attached under the die cut word.


Und so sieht die geöffnet Box aus. Das Hochzeitspaar fährt gerne zusammen Motorrad. Und da fing das Drama an. Nach einigem Suchen habe ich SVG Cutting Files für 3D Motorräder gefunden und die so verkleinert, dass zwei davon in die Box passen. Die Box hat trotzdem eine etwas größere Grundfläche als meine üblichen Boxen.

And this is the opened box. I was told, that the couple likes to go on bike rides together. And that's where the drama started. After some searching I was able to find two SVG cutting files for 3D bikes and made those smaller, so they fit into my box. This box is still a bit larger than my usual ones.


Auf die beiden Seiten der Box, die nach dem Öffnen stehen bleiben, habe ich Cardstock aufgeklebt, den ich mit Distress Oxide Candied Apple, Aged Mahogany, Hickory Smoke und Black Soot gewischt habe. Dann habe ich silberne Metallic Watercolor und Liquid Stardust aufgespritzt.

I glued some white cardstdock,that I had inked up with Distress Oxide Candied Apple, Aged Mahogany, Hickory Smoke and Black Soot onto the two sides that keep standing when the box is opened. I also spritzed some silver metallic watercolor and some Liquid Stardust onto the cardstock.


Da die Motorräder nicht einfach so in den Liebes-Sternhimmel fahren sollten, habe ich dort einen Bogen aus silberfarbenem Spiegelcardstock aufgestellt, in den ich einige kleine Herzen, gestanzt aus rotem Cardstock, gehängt habe. Für den Bogen habe ich eine Borderstanze, die zu einem Metalltorstanzenset gehört, und eine Stanze, die ein oben rundes Fenster stanzt, kombiniert und oben noch ein weiteres Herz ausgestanzt.

Since I didn't want those bikes to stare into the starry lovers sky, I added an arch cut from silver mirror cardstock, that I hang a few little hearts, cut from red cardstock, into. To create the arch I combined a border die, that belongs to a iron gate die set, and a die, that cuts a window with a rounded top. Then I also cut another little heart from the top area.


Hinten an die Motorräder habe ich zwei Nummernschilder angebracht - auf einem steht just und auf dem anderen married. Dann habe ich kleine "Dosen" aus mit silbernem Tape beklebten Papierstrohhalmen an den Hecks der Motorräder angebunden. Und drumherum habe ich noch einige kleine rote Herzkonfetti verteilt.
Ihr habt es auf den Bildern bestimmt schon gesehen - die Motorräder sind super detailreich. Aber sie waren wirklich nicht schön zusammenzubauen. Jedes Motorrad ist etwa 9cm lang. An vielen Teilen, wie z. B. den Reifen, waren keine Klebelaschen eingeplant, so dass teilweise nur die Dicke des Cardstocks als Klebefläche blieb. Und ich hatte die Motorräder vorsichtshalber aus nicht zu dickem Cardstock geschnitten, da ich weiß, dass meine Cameo so kleine und detailreiche Teile nicht gerne aus extra dickem Cardstock schneidet. Und ganz ehrlich - so toll sie aussehen - ob ich mir das jemals wieder antue, steht in den Sternen!

I glued two plates to the back of the bikes - there's a just written on one and married on the other. Then I tied little "cans", made from paperstraws covered with silver tape, to the bikes' tails and glued down some tiny red heart shaped confetti around the bikes.
You may have seen it on the other pictures - these bikes are wonderfully details. But it was so hard to put them togther. Each bike is about 9 cm long. And there were many parts that didn't have those little flaps to glue them together, so all that was left was the tickness of the paper to put the glue onto. Just in case I had cut the bikes from thinner paper, since the parts were so tiny and I know that my Silhouette doesn't cut those too well from extra thick cardstock. To be honest - as great as they look - I don't think I will make those again anytime soon!


In die beiden aufklappenden Seitenteile habe ich kleine Taschen eingearbeitet. Auch sie sind mit geprägtem und rot gemattetem Cardstock beklebt. Außerdem habe ich hier schwarze Kreise mit einem kleineren Kreis aus silbernem Spiegelcardstock, aus denen ich ein Herz gestanzt habe, aufgeklebt. Darunter habe ich zwei Stücke rotes Band aufgeklebt.
In einer der Taschen befindet sich eine Karte für die persönlichen Grüße, in der anderen befindet sich ein Kuvert aus rotem Cardstock.

I included little pockets in the two side flaps of the box. Those are again covered with dry embossed and matted red cardstock. I also added a black circle with a smaller circle cut from silver mirror cardstock, that I cut a heart from the center, to the pockets and tucked two pieces of red ribbon under them. 
One pocket holds a little note card for some personal greetings, in the other one I've tucked an envelope, cut from red cardstock.