Montag, 28. Februar 2022

Chill mal!

 
Hallo Ihr Lieben!
Morgen ist es soweit - der März-Release von Stampcorner geht online. Und ich habe heute noch eine weitere Karte mit einem Sneak auf eines der neuen Motive. Diesmal geht es in die Tropen.
 
Hello everyone!
The new release by Stampcorner will go online tomorrow. And today I have another card with a sneak of one of the new images. This time we're traveling into the tropics.
 
Ich muss gestehen, ich beneide die kleine Maus hier absolut. Ich wäre auch reif für die Insel! Das Motiv ist aus dem selben Stempelset, aus dem auch der mexikanische Marienkäfer von letztem Freitag war. 
Für den Hintergrund habe ich verschiedene Backdrop Stanzen von LawnFawn kombiniert. 
Der Himmel mit Sonne ist mit der Sunburst Backdrop Stanze gemacht. Ich habe ihn aus weißem Cardstock gestanzt und ihn später so in der Höhe gekürzt, dass meine Karte ein Endformat von 10,5 x 14,8 cm hat. Das geht sich mit den Stanzen im amerikanische Format in der Breite perfekt aus, wenn man, so wie ich, die Aufleger immer noch mattet. Den weißen Cardstock habe ich dann mit Distress Oxide Squeezed Lemonade, Tumbled Glass und Mermaid Lagoon eingefärbt.
Die Palmen mit dem dazugehörigen Strand habe ich mit der Tropical Backdrop Stanze gemacht. Die Palmen sind nochmal als Extra-Stanzen in dem Set enthalten. Die habe ich aus braunem bzw. grünem Cardstock gestanzt und mit Copics schattiert. 
Den Sand samt Palmen habe ich auf den Himmel geklebt und dazwischen einen Streifen hell-türkis farbenen Cardstock als Meer gefasst. Mit einem weißen Gelpen habe ich dort ein paar Wellen aufgemalt.
 
I have to admit - I totally envy the mouse her vacation. I am ready for some as well! The image is from the same stamp set as the mexican ladybug that I shared with you last friday.
For the background I combined different backdrop dies by LawnFawn. 
The sky with the sun is made with the Sunburst Backdrop die, cut from white cardstock. I then cut it down so my finished card has the german standard size of 10,5 x 14,8 cm. You can use the dies in the american format pretty well, since they are perfect in width if you mat you decorated cardstock, as I usually do. I inked up the white cardstock with Distress Oxide Squeezed Lemonade, Tumbled Glass and Mermaid Lagoon. 
The palm trees with the sandy beach are cut with the Tropical Backdrop die set. The palm trees are included as individual dies in this set.. I've die cut those from brown and green cardstock and shaded them with my Copics.  
I glued the beach and palms onto the sky, putting a strip of light turquoise cardstock inbetween to add the sea. With a white gel pen I added a few ripples onto the water.


Und hier liegt die Maus in der Sonne, genießt einen kühlen Cocktail und lässt es sich gut gehen. Ich habe auch sie mit Copics coloriert und per Hand ausgeschnitten. 
Als zweite Sandlage habe ich noch einen weiteren Streifen Cardstock aus hell-kraftfarbenem Cardstock etwas wellig ausgestanzt und über die Lage mit den Palmen geklebt. Auf diesen Strandteil habe ich dann die Maus geklebt und einige Sandkörner mit Copics auf den Sand aufgetupft.
 
And here's the mouse, laying in the sun and enjoying a cool drink. Again I used my Copics to color the mouse in, then I cut it out by hand.
As a second beach layer I've die cut another strip of light craft colored cardstock with a wavy border die and glued this layer on top of the one with the palm trees. Onto this area of the beach I glued the mouse and added a few dots with my Copics for a more sandy look.
 

Auch der Text kommt in diesem neuen Stempelset. Ich habe ihn mit Versafine Clair Acorn direkt auf den Sand gestempelt. Chill mal - mehr Text braucht diese Karte nicht, oder?


"Relax" is what this text means. I stamped it with Versafine Clair Acorn directly onto the sand. And I really think this card doesn't need any more text, right?

Sonntag, 27. Februar 2022

Just a card, but...

 
Hallo Ihr Lieben!
Eigentlich halte ich Politisches etc. aus meinem Blog raus. Aber manchmal muss man Ausnahmen machen, und die derzeitige Situation in der Ukraine macht mich wahnsinnig traurig, wütend und sprachlos. Unter Bastlern aus der ganzen Welt kam die Idee aus, Instagram und Co mit gelb-blauen Karten zu fluten, um unsere Unterstützung auszudrücken. Ja, ich weiß, es ist nur eine Karte. Sie wird weder die Situation ändern noch den Krieg beenden. Aber es ist die Bastler-Weise um seine Position zu zeigen. Und sollte sie jemandem, der es sieht, nur ein klein wenig Hoffnung geben, das Wissen, dass die Welt nicht wegsieht und viele helfen, dann war das das Basteln der Karte wert. Wenn Ihr mitmachen wollte verwendet die Hashtags CardsforUkraine and UkraineCardDrive. 

Hello everyone!
Usually I keep politics etc away from my blog. But there have to be exceptions, and the situation i the Ukraine makes me sad, mad and speechless. Crafters all over the world are flooding Instagram and Co with blue and yellow cards to show our support. I know, it's just a card. It won't change the situation or end the war. But it's the crafters way to make a statement. And if it just gives one person who sees this a tiny bit of hope, let him know that the world isn't looking away and many are helping, than making this card was worth it. If you want to join use the hashtags CardsforUkraine and UkraineCardDrive. 

Ich habe mich für schwarzen Cardstock als Grundlage entschieden. Aus dem habe ich mit der Love Lines Stanze von MFT das Streifenherz ausgestanzt. Anschließend habe ich den Cardstock mit einem Schnörkelembossingfolder von Cuttlebug embosst und dabei den Embossing Diffusor mit dem runden Ausschnitt von Sizzix verwendet. Auf diese Weise blieben die Streifen des Herzes sowie der Bereich darum herum ungeprägt. 
Um die Prägung etwas mehr hervorzuheben, habe ich goldenes Gilding Wax auf die erhabenen Bereiche aufgetragen, anschließend habe ich Moon Silver Metallic Watercolor von Coliro über den Cardstock gespritzt. 

I went with a piece of black cardstock as the base of my card and die cut the striped heart from its center, using the Love Lines die by MFT. Then I dry embossed the cardstock with a flourish embossing folder by Cuttlebug, using the Embossing Diffusor with the circle cut out by Sizzix. This way the strips of the heart and the area around it don't get embossed and stay smooth.
To bring out the embossing a bit more, I added some golden Gilding Wax onto the raised areas, then I spritzed some Moon Silver metallic watercolor by Coliro over the cardstock. 


Hinter das ausgestanzte Herz habe ich zwei Stücke Watercolor Cardstock gelegt. Die habe ich zuvor mit Distress Spray Stain Broken China bzw. Squeezed Lemonade eingefärbt und durch Wassertropfen einige hellere Stellen herausgearbeitet. Nach dem Trocknenhabe ich goldene Metallic Watercolor aufgespritzt. Da die Farben super  intensiv waren, habe ich eine Lage Vellum über den eingefärbten Cardstock gelegt und ihn dann mit 3D Tape hinter das Herz geklebt. 
Für den Text auf meiner Karte habe ich eine Kombination aus Stempeln und Stanzen gewählt. Das Wort peace ist aus dem Handwritten Holidays Stanzenset von Sizzix. Ich habe es 5-mal aus schwarzem Cardstock gestanzt, diese Stanzteile aufeinander geklebt und obenauf noch einmal ein aus matt-goldenem Spiegelcardstock gestanztes Wort geklebt. 
Der Rest des Textes it mit einem uralten Stempel von SU und einem Text aus dem Sympathy Stempelset von Avery Elle gemacht. Ich habe sie mit schwarzer Tinte auf cremefarbenen Perlmuttcardstock gestempelt und dann alle Teile des Texte auf die Karte aufgeklebt.
Oben rechts am Herz habe ich noch eine Friedenstaube mit 3D Tape aufgeklebt. Sie ist mit einer Handstanze von Rayher ebenfalls aus dem cremefarbenen Perlmuttcardstock gestanzt. Das tolle ist, dass die Stanze das Papier auch gleich prägt. Die Flügel habe ich dann mit Copics blau und gelb eingefärbt. Außerdem habe ich der Taube einen Zweig, ebenfalls mit einer Handstanze gestanzt, in den Schnabel gegeben. 
Zum Schluss habe ich ein paar blaue Perlen auf der Karte verteilt, den schwarzen Cardstock mit 3D Tape auf ein weiteres Stück des cremefarbenen Perlmuttcardstocks und anschließend alles auf einen weißen Kartenrohling geklebt.

Behind the cut out heart I've put two pieces of watercolor cardstock, that I sprayed with Distress Spray Stain Broken China and Squeezed Lemonade. I added some texture to it by putting down a few droplets of water. After the cardstock pieces had dried I spritzed some golden metallic  watercolor onto them. Since the Spray  Stain colors were super  bright, I've put  a piece  of vellum over the sprayed  cardstock  pieces and  then glued  them behind the  heart  with dimensionals.
For  the text I went  with a combination of stamps and dies. The word peace is from the Handwritten Holidays die set by Sizzix. I stacked 5 die cut words, cut from black cardstock, and then added one more die cut word, this time cut from a matte golden metallic cardstock, as the top layer.
The rest of the text is made using an really old stamp by SU and a sentiment from the Sympathy stamp set by AveryElle. I stamped them with black ink onto some cream colored pearlescent cardstock and then glued all pieces of the text onto the card.
To the top right of the heart I added a dove with dimensionals. It's punched out from the cream colored pearl cardstock, using a handheld punch by Rayher. The great thing is that it also embosses some details into the punched out piece. I added some blue and yellow color to the wings and tail with my Copics and also gave the dove a little branch in its beak, that I again punched out with a handheld punch. 
In the end I added a few blue pearls to my card, glued the black cardstock with foam tape onto another piece of the pearlescent cardstock and then to a white note card. 

Samstag, 26. Februar 2022

Stempeleinmaleins - Ausgabe vom 26. Februar 2022

 
Hallo Ihr Lieben!
Beim Stempeleinmaleins gibt es heute einen neuen Sketch für Euch! Und ich habe danach diesen Blumengruß gewerkelt. Er soll daran erinnern, dass aus Unkraut manchmal die schönsten Wildblumen werden. Man muss ihnen nur die Chance geben, so lange zu wachsen.

Hello everyone!
Over at Stempeleinmaleins we have a new sketch for you today! And I used it to make this card. I made it remind someone, that some weeds turn into beautiful wildflowers. You just have to give them the chance and let them grow long enough.

Hier habe ich zwei wundervolle Stanzen verwendet, um den doppelten Hintergrund zu gestalten: die Quatrefoil A2 Stanzen von HoneybeeStamps. Die Base-Stanze ist für die Lage aus dunkler türkisfarbenem Carstock verwendet worden. Hier werden nur die Außenlinien gestanzt sowie die tollen Muster in Punktform in das Papier gestanzt. Mit der Top-Plate kann man dann einen passenden Aufleger stanzen, durch dessen Ausschnitte dann das gepunktete Muster sichtbar ist. Diese obere Lage habve ich dreimal aus heller türkisfarbenem Cardstock gestanzt, aufeinander und anschließend auf die untere Lage geklebt.
Und weil das Muster zwar wunderschön war, mir aber doch etwas fehlte, habe ich anschließend weiße Acrylfarbe darüber gespritzt, aber nur ganz dezent.
Den großen Halbkreis im Sketch habe ich mit Vellum dargestellt. Ich habe einen großen Kreis mit gestitchtem Rand aus dem Vellum gestanzt und links zwei Falzlinien gezogen. So konnte ich das Vellum hier um meinen Kartenaufleger legen und von der Rückseite mit Klebeband ankleben. Die Klebestellen sind so verdeckt. Damit der Kreis nicht aufklappen kann, habe ich ein paar weitere Stücke Klebeband später unter dem Motiv versteckt und den Kreis hier auf der Karte angeklebt.

Here I used two beautiful dies to create this layered background: the Quatrefoil A2 dies by HoneybeeStamps. The base die is used to create the layer that I've cut from darker turquoise cardstock. This one only die cuts the outer rectangle shape and also cuts the pattern, created from lots of little dots, into the paper. With the top plate you can die cut a matching top layer, through its cut outs you see the dotted pattern from the base layer. I've die cut this top layer three times from lighter turquoise cardstock, stacked those and then glued them onto the base layer.
And since the pattern is beautiful but I still felt like there's something missing, I then spritzed some white acrylic paint over the background, but going very light here.
I used some vellum to mimic the large circle in the sketch. I've die cut a large circle with a stitched edge from the vellum and added two scored lines on the left side. This way I was able to wrap the vellum around the edge of my card and used doublesided tape to glue it to the back. Now you don't see any glue. To keep the circle from flapping open, I later added a few more pieces of doublesided tape under where I've put the image to hide it as well, then glued the circle to the top of my card.


Die tolle Blüte ist aus dem Stempelset Essentials Nr. 463 von StudioLight - ein viel zu banaler Name für so wunderbare Blumen!
Ich habe die Blüte mit dem Yellyfish Ink von LawnFawn auf Watercolor Paper gestempelt und dann durch No-Line Technik coloriert. Dafür habe ich diesmal meine ZIG Marker benutzt. Da gibt es ja 30 neue Farben, die fast alle wunderbar gedeckt sind. Ich konnte sie endlich ergattern und habe hier die Blautöne zum Colorieren der Blütenblätter verwendet. Für das Innere der Blüte habe ich ältere Gelb- und Brauntöne benutzt. 
Wie immer kam ein weißer Gelpen für die Highlights zum Einsatz. Hier habe ich aber auch noch einen goldenen Gelpen benutzt, um im Inneren der Blüte ein paar weitere Punkte zu setzen. Nach dem Ausschneiden habe ich die Blüte samt Blättern mit 3D Tape auf den Hintergrund und das Vellum geklebt.
Die Blätter unter der Blüte sind mit schon älteren Blätter-Stanzen von Magnolia gemacht. Farblich passend zur Blütenmitte, habe ich die Bläter aus matt-goldenem Metallic-Cardstock gestanzt.
Der Text ist aus dem Spring Stempelset von HoneybeeStamps. Ich habe ihn mit goldenem Embossingpulver auf weißen Cardstock embosst, ausgeschnitten und mit 3D Tape aufgeklebt.
Und als Deko habe ich ein paar goldene Glitzersteine rund um die Blume verteilt.

This beautiful flower is from the Essentials No 463 stamp set by StudioLight - in my eyes this set would deserve a way nicer name!
I stamped the flower with the Jellyfish Ink by LawnFawn onto some watercolor paper and then did some no-line coloring to color it in. And here I used my ZIG Markers to do the coloring. There are 30 new colors, most of them wonderfully muted and smokey. I finally got my hands on them and used the new blues here. For the inner area of the flower I used some older browns and yellows. 
As usual I used a white gel pen to add a few highlights. But here I also added some dots with a golden gel pen to the center of the flower. After cutting the flower out I glued it and the leaves onto the background/vellum with foam tape.
The leaves under the flower are made with an older die by Magnolia. I've die cut those from some matte golden metallic cardstdock, making them match the color of the flower center.
The text is from the Spring stamp set by HoneybeeStamps. I golden heat embossed it onto strips of white cardstock and glued them down with foam tape. 
And for decorations I added a few golden rhinestones around the flower.


Die fertig gestaltete Karte habev ich dann nur noch auf einen weißen Kartenrohling geklebt.

Now I only had to glue everything onto a white note card to finish this card.

Freitag, 25. Februar 2022

Fiesta Mexicana

 
Hallo Ihr Lieben!
Gestern habe ich Euch eine Karte mit einer der süßen Eulen aus dem Mid-Month Release von Stampcorner gezeigt - und heute gibt es bereits eine Vorschau auf eines der Motive aus dem März-Release. Es geht nach Mexiko! Und da darf es dann auch mal so richtig farbenfroh werden.

Hello everyone!
Yesterday I shared a card with one of the cute owls from Stampcorner's mid month release - and today I already have a card giving you a sneak at one of the images from the march release. We're going to Mexico! And so it's getting realy colorful today.

Na, habe ich mit farbenfroh zu viel versprochen?
Für  den Hintergrund habe ich weißen Cardstock mit Distress Oxide Wild Honey, Crackling Campfire, Seedless Preserves und Black Soot gewischt und anschließend ein paar Wassertropfen darüber verteilt. Ich finde, so ist ein toller Sonnenuntergangshimmel entstanden, wie man ihn sich in der Wüste so vorstellt.
Darunter habe ich zwei Lagen kraftfarbenen Cardstock in unterschiedlichen Nuancen aufgetragen, die ich mit welligen Bordürenstanzen hügelig ausgestanzt habe. Dann habe ich mit Copics ein paar Punkte als Sandkörner aufgetupft.

Did I promise to much when I talked about colorful?
For the background I inked up a piece of white cardstock with Distress Oxide Wild Honey, Crackling Campfire, Seedless Preserves and Black Soot and then spritzed a few droplets of water onto it. I think, this is a sunset sky how you imagine it to look in the desert - at least if you've never seen one in real life.
At the bottom of the card I added two layers of craft colored cardstock, using two different tones of it. I used some border dies to die cut the top edge a bit wavy. Then I added a few small dots with my Copics to give these layers a sandy touch.


Hier ist der geniale Marienkäfer! Ganz ehrlich, beim ersten Blick dachte ich, es ist eine Kakerlake. Das liegt wohl daran, dass man bei Mexiko sofort das Lied "La Cucaracha" im Kopf hat. Aber beim Abstempeln ist mir natürlich der Unterschied sofort aufgefallen.
Den Sombrero habe ich in klassisch mexikanischen Farben coloriert, für den Körper habe ich mich für braun entschieden, damit man die Arme/Beine noch gut erkennen kann. Coloriert habe ich mit Copics und den kleinen Kerl anschließend ausgeschnitten.
Der Kaktus ist mit einer sehr alten Stanze von Magnolia gemacht - ich wusste, dass ich die irgendwann brauchen würde! Ich habe ihn aus hellgrünem Cardstock gestanzt und mit Copics schattiert. Die ausgestanzten Teile habe mit in hellem Grün-Gelb eingefärbtem weißem Cardstock hinterlegt. Für alle Highlights kam wieder ein weißer Gelstift zum Einsatz.
Der Text ist aus dem zweiten neuen März-Stempelset. Der ist eigentlich auf einen Gamer ausgelegt. Nun, ich habe nur Mädels und die zocken nicht. Also kam mir - Schande über mein Haupt - bei diesem Srpuch als erstes Alkohol in den Sinn! ;) Und ich finde, der Text passt perfekt. Und so viele Runden scheint der Marienkäfer noch gar nicht genossen zu haben, er steht noch ziemlich gerade. Den Text habe ich mit schwarzer Tinte direkt auf die hellere Sandschicht gestempelt.

Here's the great ladybug! And honestly, when I first looked at the stamp I thought it was a cockroach. Guess that's because when thinking of Mexico you immediately have the song "La Cucaracha" playing in your head. But of course, as soon as I've stamped it I knew the difference.
I colored his hat in classical mexican color, for the body I went with brown so the legs/arms would remain visible. I used Copics to do the coloring and then cut the little guy out.
The cactus is made using a very old die by Magnolia - I knew I had kept that for a reason! I've die cut it from light green cardstock and then used Copics to shade it. Behind the cut outs I put some white cardstock that I had covered with some light yellowish green color. For all the highlights I used a white gel pen again.
The text means "Just another round, then I'll quit. Maybe.". This is a text from another set from the march release. Well, it is made to go with a gamer image that's included in that set. I only have girls, and they don't play video games. So, it's a shame I have to admit, the first thing that came to my mind here was alcohol! ;) Well, I think the text fits this image perfectly. And it seems like the ladybug didn't enjoy too many rounds so far because he's still standing pretty straight. I stamped the text with black ink directly onto the lighter sand layer.


Wahrscheinlich bediene ich hiermit sämtliche Klischees, aber zu einer mexikanischen Party gehören bunte Girlanden! Also habe ich eine rote und eine türkisfarbene über den Abendhimmel gespannt. Die sind mit den  Fringed Scallop Border Stanzen von MFT gemacht - ebenfalls ältere Stanzen. 
Und dann musste ich einfach noch das Wort Caramba aus dem gleichen Stempelset, aus dem auch der Marienkäfer ist, mit verwenden! Ich habe es auf eine gezackte Sprechblase, die ich aus weißem Cardstock gestanzt habe, schwarz aufgestempelt. Und damit die Sprechblase nicht gar so sehr heraussticht, habe ich sie mit der selben Copic Combi, die ich auch für den Hut verwendet habe, etwas abgedunkelt.

Guess I'm serving all the cliches here, but for me there have to be some colorful garlands at every mexican party! So I put a red and a turquoise one across the evening sky. I used the Fringed Scallop Border dies by MFT here - also some quite old dies.
And then I just had to include the word caramba, that comes in the same stamp set as the ladybug image. I stamped it with black ink onto a jagged speech bubble, that I've die cut from white cardstock. Since the white was way too bright for my card, I used the same Copics that I had also used to color the hat to give it a soft yellowish brown look.

Donnerstag, 24. Februar 2022

Flat Shaker Birthday Card

 
Hallo Ihr Lieben!
Seit 15.2. gibt es ein neues Oma-Plott-Stempelset bei Stampcorner. Und ich zeige heute auf dem Stampcorner-Blog eine Karte mit einer der beiden süßen Eulen aus dem Set.
 
Hello everyone! 
Stampcorner released a new stamp set on february 15th, that was again designed by Oma Plott. And today I am sharing a card over at the Stampcorner Blog, using one of the two great owls from this set.

Schon lange wollte ich mal eine Flat Shaker Card machen - hier habe ich mich getraut. Ich denke, bei dickerem Füllmaterial sollte man auf die herkömmtliche Art zurückgreifen, aber ich habe viele kleine, dünne, sechseckige Konfetti in die Karte gefüllt, und damit klappt die Flat Shaker Methode wirklich super!

I wanted to make a Flat Shaker Card for quite some time - and here I finally dared to. I think, when using shaker material, that's just a tad bit thicker, using the good old traditional method for making a shaker is the better option. But I filled my shaker with really thin, hexagon shaped foil confetti, and with those the flat shaker method works wonderfully!


Hier habe ich die Konfetti fürs Foto mal sichtbar auf die Karte geschüttelt. Ich war ein wenig in Sorge, dass sich die Konfetti an den ausgestanzten Luftballons, die innerhalb des Shakers liegen, sperren würden. Aber die Sorge war unnötig.
Für die Karte habe ich weißen Cardstock mit goldener und türkisfarbene Metallic Watercolor bespritzt. Darauf habe ich dann den Rahmen mit den Luftballons geklebt. Der ist mit der Balloon Cover-Up Stanze von MFT gemacht - ich habe zwei weitere Ballons etwas höher hinter der Eule aufgeklebt, da sie sonst zu viele davon verdeckt hätte. 

Here I shaked the confetti onto the card. I was a bit afraid that they would get stuck on the die cut balloons, that are inside the shaker. But that's not the case.
For the card I splattered some golden and turquoise metallic watercolor onto a piece of white cardstock. Then I glued the frame with the balloons on top. I used the Balloon Cover-Up die by MFT and added two more balloons since the owl covered too many of the ones at the bottom. 


Auch den Text, ebenfalls aus dem neuen Oma-Plott Stempelset, ist direkt auf den weißen Cardstock gestempelt. Ich habe einfach schwarze Tinte dafür benutzt. 
Dann habe ich meinen Shaker über oder um den weißen Cardstock gebaut.

The text, also from this new stamp set, is stamped directly onto the white cardstock. I simply used some black ink to stamp it down.
Then I created the shaker over/around the white cardstock. 


Und hier ist die süße Eule! Ich habe mich sofort in sie verliebt.
Coloriert habe ich mit Copics und anschließend die feinen Federn mit Polychromos aufgemalt. Für die weißen Details/Highlights kam wieder ein weißer Gelpen zum Einsatz.
Auf die Folie des Shakers habe ich noch zwei Rahmen, gestanzt aus schwarzem Cardstock aufgeklebt. Dafür habe ich einfach den Balloon Cover-Up zwei weitere Male gestanzt und die Ballons herausgeschnitten. Dann habe ich die kleine Eule ausgeschnitten und mit 3D Tape ebenfalls auf die Folie geklebt.

And here's the cute owl! I fell in love with it immediately!
I colored it in with Copics and then used Polychromos to add the fine feather details. For the white details and highlights I used a white gel pen.
I glued two more black frames onto the foil of the shaker. I simply die cut the Balloon Cover-Up two more times and cut out the balloons. Then I cut out the little owl and glued it onto the foil with dimensionals.


Hier seht Ihr die Folie des Shakers - und, dass ich die Luftschlangen rund um den Text ebenfalls oben auf die Folie geklebt habe. So ist dieser Teil dekoriert, auch wenn alle Shaker Elemente sich gerade am unteren Rand der Karte angesammelt haben. Die Luftschlangen sind mit einer der Stanzen aus dem Balloon Shaker Window and Frame Stanzenset von MFT gemacht.

Here you get to see the foil of the shaker - and the fact, that I glued the streamers around the text on top of the foil as well. This way the top part of the card is decorated, even when all the shaker elements are at the bottom edge of the card. I used a die from the Balloon Shaker Window and Frame die set by MFT to cut the streamers.

Mittwoch, 23. Februar 2022

Create a Smile Moodboard Challenge

 
Hallo Ihr Lieben!
Heutet startet die neue Challenge bei Create a Smile - und für die nächsten zwei Wochen haben wir wieder ein Moodboard als Inspiration für Euch:

Hello everyone!
Today the new Create a Smile Challenge goes live - and for the next two weeks we have another moodboard for you to get inspired:


Auf den ersten Blick fand ich dieses Moodboard ein wenig weihnachtlich - habe ich wohl von den Tannenzweigen beeinflussen lassen. Aber auch eine Weihnachtskarte ist somit problemlos mit dem Moodboard kompatibel! Ich habe dann die Farben aufgegriffen, denn die Kombo gefiel mir total.

At a first look I though this moodboard is pretty christmas-sy - guess the fir branches gave me this idea. But it also means, that even a christmas card would be perfect with this moodboard! I decided to go with the colors, since I really like that combo.


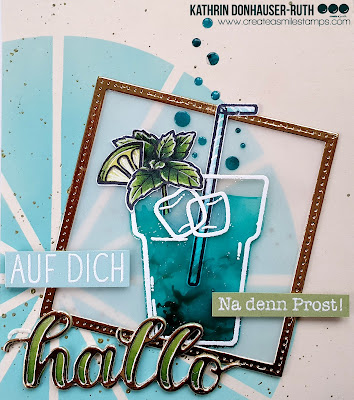
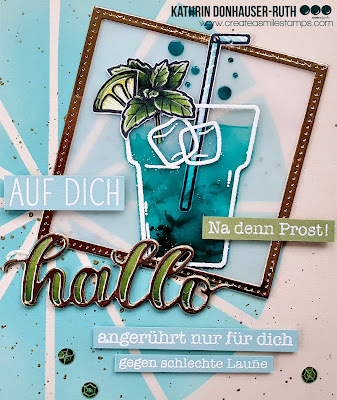
Und so ist dann diese Cocktail-Karte entstanden. Ich glaube, ich hatte in letzter Zeit zu viele Mädelsabende.... ;)
Ich habe hier mal cremefarbenen Cardstock für meinen Hintergrund verwendet und somit das Creme im Moodboard aufgegriffen. Es gibt den Blau-/Türkis-/Grüntönen einen wunderbar warmen Touch. Auf den cremefarbenen Cardstock habe ich mit der Slices Stencil und Distress Oxide Salvaged Patina die "Kuchenstücke" aufgewischt, und zwar so, dass nur einTeil der Stencil auf der Karte zu sehen ist. Ich finde, die Stencil passt perfekt zum Limettenstück, das ich am Cocktailglas befestigt habe.

And so this cocktail card happened. Guess I had a few girls' nights too many during the last weeks...
Here I went with some cream colored cardstock for my background to pick up the cream from the moodboard. I think, it adds a beautiful warm touch to the blues/turquoises/greens. I used the Slices stencil and Distress Oxide Salvaged Patina to ink the cake slices onto the cream cardstock, only putting part of the stencil onto the cardstock. I think, this stencil goes perfectly with the piece of lime I put onto the brim of my cocktail glass.


Das Cocktailglas-Motiv ist aus dem Set Auf Uns. Ich habe das Glas und die Eiswürfel mit weißem Embossingpulver auf Acetate embosst. Dann habe ich von der Rückseite her Alcohol Inks Stream, Aqua und Pool aufgetragen und mit dem Air Blower verteilt. So sieht es ein wenig aus, wie ein Cocktail, bei dem sich die verschiedenen Schichten vermischen. Fragt mich nicht nach dem Rezept - ich kenne es nicht. Aber es scheint Blue Curacao im Spiel zu sein. ;) Von den Eiswürfeln habe ich mit einem Tuch, auf das ich ein wenig Blending Solution getropft habe, die Farbe wieder abgewischt, was auf der Folie ja super geht. Dann habe ich etwas Cloudy Blue auf das Tuch gegeben und von hinten auf die Eiswürfel getupft, so dass sie ein bisschen eine andere Farbe haben als die Flüssigkeit im Glas.
Die übrigen Motive, also der Strohhalm, die Minze und die Limette, sind normal auf Papier gestempelt, mit Copics coloriert, ausgeschnitten und an das Glas geklebt.
Da meine Karte irgendetwas eckiges brauchte, habe ich einen der Stitched Square Frames aus goldenem Spiegelcardstock ausgestanzt und als Rahmen um das Motiv gelegt. Und damit der gestencilte Hintergrund nicht zu sehr durch das Glas hindurchscheint, habe ich hinter den Rahmen noch ein Quadrat aus Vellum gelegt, um den Hintergrund hier etwas abzuschwächen.
Vom "Cocktail mischen" hatte ich etwas Folie mit Farbe übrig. Aus diesem Stück habe ich dann mit einer der Stanzen aus dem Set Weather die kleinen Kreise ausgestanzt und als aufsteigende Blubberblasen über dem Cocktail auf den Cardstock geklebt.

The cocktail glass image is from the Here's to Us. Most of Create a Smile's stamp sets are available in english and german - mostly I own the german versions, but there's quite often a matching english text in the english versions. So I just write down the english names, if available, to make it easier for you. I heat embossed the glass and ice cubes with white embossing powder onto a piece of acetate. Then I added Alcohol Ink Stream, Aqua and Pool to the back of the acetate and blew them around with the Air Blower. It kind of looks like a cocktail, where the different layers just start to run into each other. Don't ask me for the recipe for this cocktail - I don't know it. But it seems like lots of Blue Curacao is involved. ;) 
I've put a drop of Blending Solution onto a clean cloth and dabbed off the color of the ice cubes - easy to do on acetate -, then put a few drops of Cloudy Blue onto the cloth and dabbed it onto the back of the ice cubes so they have a slightly different color than the liquid in the glass.
The other images, the paper straw, the mint and the lime, are stamped onto paper, colored with Copics, cut out and glued to the glass.
Since I felt like this card needed something with corners I've die cut one of the Stitched Square Frames from golden mirror cardstock and put it around the image as a frame. To make sure the stenciled background doesn't change the image too much, I also put a square cut from vellum behind the frame to tone the background down a bit in this area.
I had some acetate with ink left from "mixing my cocktail". From this I've die cut the little circles from the Weather die set and glued them above the glass, making them look like little bubbles rising from the cocktail.


Bei den Texten konnte ich mich einfach nicht entscheiden - sieht man hier vielleicht. Sicher war, dass ich die Doppeltes Hallo Stanze benutzen wollte. Die untere Lage habe ich aus grünem Cardstock gestanzt und ein wenig mit Copics schattiert. Die obere Lage ist aus goldenem Spiegelcardstock gestanzt. 
Drumherum habe ich dann einfach Texte auf Cardstockstreifen gesetzt, die manchmal aus Stempelsets mit komplett anderen Themen stammen, so zusammengesetzt für mich aber absolut Sinn ergeben.
Das Auf Dich ist Teil eines Stempels aus dem Set Ein ziemlicher Knaller, das Na denn Prost ist aus dem Set Auf Uns, Angerührt nur für Dich ist aus dem Set Maus au Chocolat und bezieht sich eigentlich auf eine heiße Schokolade and das gegen schlechte Laune ist aus dem Set Stempelsüchtig, bei dem es eigentlich um das Thema Stempeln geht... Alle Texte sind mit weißem Embossingpulver auf helltürkisfarbenen bzw. grünen Cardstock embosst und mit 3D Tape auf die Karte geklebt.

Well, maybe you can already tell it from looking at the picture - I just wasn't able to decide on a text. The only thing I was sure about was, that I wanted to use the Hello Twice die. The upper layer is cut from green cardstock and shaded with Copics, the top layer I've cut from golden mirror cardstock.
Then I added a few different texts on cardstock strips, some of them are from sets with completly different themes. But put together like this they make sense.
The top word reads "to you", the text on the green strip means here's to us.Thte texts on the lower two strips mean "mixed just for you" and "to drive away the bad mood". All texts are white heat embossed onto light turquoise/green cardstock and glued onto the card with dimensionals.


Hier kann man den goldenen Spiegelcardstock besser erkennen. Dazu hat mich der Bilderrahmen über dem Sofa auf dem Moodboard inspiriert.
Den cremefarbenen Cardstock habe ich etwas schmäler als gewöhnlich zugeschnitten und auf der rechten Seite der Karte einen etwa 1 cm breiten Streifen grün-weiß gestreiftes Designpapier aufgeklebt. Zum Schluss habe ich noch drei kleine grüne Pailetten auf den unteren Teil der Karte und das fertig gestaltete Cardstockstück auf einen weißen Kartenrohling geklebt.

Here you get a better look at the golden mirror cardstock. I got inspired to add this bit of gold by the picture frame hanging on the wall above the sofa on the moodboard.
I've cut the cream colored cardstock a bit narrower than usual and added a strip of green and white striped patterned paper of about 1 cm width to the right edge of my card.
In the end I glued three little green sequins to the bottom are of my card and glued the decorated cardstock onto a white note card.

Dienstag, 22. Februar 2022

You're all kinds of amazing


 Hallo Ihr Lieben!
Ich habe mir vorgenommen, dieses Jahr auch hin und wieder  mal aus meiner Komfortzone herauszutreten. Keine Angst, das wird keine neue Serie, aber immer wieder, wenn mir danach ist, möchte ich auch mal etwas für mich neues/anderes ausprobieren. Dass das nicht ganz ohne Fehlschläge abläuft, habe ich bei dieser Karte gemerkt.

Hello everyone!
I challenged  myself again this year and plan to leave my comfort zone every now and then. Don't worry, this isn't going to be a new series, but whenever I feel like it, I plan to try something new or different. Well, I already realized with this card, that this will include some failures.
 
 Der eigentliche Plan war, das Motiv auf durchsichtige Folie zu embossen und von hinten mit Alcohol Inks zu "colorieren". Aber mit dem Ergebnis war ich so gar nicht zufrieden. Also habe ich nach zwei fehlgeschlagenen Versuchen entschieden, zu Watercolors zu greifen. Und damit habe ich den gewünschten Look dann hinbekommen.
Auch das Motiv ist für mich eher ungewohnt. Es ist aus dem Lotus Clusters Stempelset von Aall and Create. Aber ich mag das Ergebnis wirklich, woran das Motiv eine Hauptschuld trägt.

The original plan was to heat emboss the image onto clear acetate and then "color" it from the back with Alcohol Inks. But I didn't like how it turned out. So after two tries I decided, to use watercolors instead - and with those I achieved the look I was after.
Also the image is kind of different to what I usually use. It's from the Lotus Clusters stamp set by Aall and Create. But I really like this card, and the image is one of the reasons.


Ich habe das Motiv mit schwarzem Versafine auf Watercolor Cardstock gestempelt und dann coloriert. Dazu aber gleich mehr.
Über das Motiv habe ich einen großen Ring, gestanzt aus weißem Cardstock, um und auch etwas über das Motiv geklebt. Für den Ring habe ich einfach zwei Kreisstanzen ineinander gelegt und so den Ring erhalten. Den links überstehenden Teil habe ich einfach entlang des Watercolor Cardstocks abgeschnitten. 
Auf das Motiv kam dann der Text. Dafür habe ich die Little Hello Stanze von MFT verwendet. Den Schatten habe ich einmal aus grünem und einmal aus schwarzem Cardstock gestanzt und beide leicht versetzt übereinander geklebt. Darauf kam dann das eigentliche ausgestanzte Wort. Auch das habe ich dreimal aus schwarzem Cardstock und einmal aus matt-goldenem Spiegelcardstock gestanzt und aufeinander geklebt, das goldene Wort als oberste Lage.
Darunter befindet sich ein kleines Banner aus schwarzem Cardstock, auf das ich den Rest des Textes aufembosst habe. Dafür habe ich mal Embossingpulver in einem anderen Goldton verwendet, da dieses besser zum goldenen Cardstock passte. Der Text ist aus dem Anything but Basic Friendship Stempelset von MFT.
Das Banner habe ich mit 3D Tape aufgeklebt, so dass es fast so hoch wie das ausgestanzte Hello liegt.

I stamped the image with black Versafine ink onto watercolor cardstock, then colored it in. But more about that a little later.
Around and also a little over the image I've put a big ring, die cut from white cardstock. I simply used two circle dies to cut the ring. There was some hang over on the left side, that I've simply cut off along the edge of the watercolor paper.
On top of the image I added the text. I used the Little Hello die by MFT here. The shadow layer is die cut once from green and once from black cardstock, then I glued them on top of each other, moving the top layer a bit to the top and right. Onto that I glued the actual word. Also this is die cut three times from black carstock and once from matte gold cardstock. I stacked them, using the golden die cut word as the top layer.
Under the die cut hello there's a little banner, cut from black cardstock, onto which I've golden heat embossed the rest of the text. I used a different tone of golden embossing powder here, because this one worked better with the matte gold cardstock. The text is from the Anything but Basic Friendship stamp set by MFT.
I used dimensionals to glue the banner down, so it has nearly the same height as the die cut hello.

Und hier habe ich einen Teil der Karte, auf dem man die Coloration recht gut im Detail sieht, für Euch fotografiert.
Ich habe hier die Distress Spray Stain Farben Peeled Paint, Spun Sugar und Scattered Straw zum Colorieren verwendet. Ich bin mir aber sicher, dasss die Re-Inkers ebenso gut funktionieren würden. Zuerst habe ich den Watercolor Cardstock in dem Bereich, den ich gerade colorieren wollte, angefeuchtet und dann ein wenig der Farbe, gemixt mit viel Wasser, in recht dicken Tropfen auf diesen Bereich aufgetragen. Dann habe ich ihn mit dem Air Blower von Tim Holtz verblasen, auch über die gestempelten Linien hinaus. So entstehen die tollen Farbspritzer an den Rändern der Motive. Dannn habe ich den Motivteil mit dem Heat Tool getrocknet und die nächste Lage Farbe, diesmal mit weniger Wasser gemischt, aufgetragen. Das habe ich jeweils ein paar Mal wiederholt, bis mir das Ergebnis gefallen hat. 
Für das Blatt habe ich pures Peeled Paint benutzt, für die Blüten habe ich jeweils Spun Sugar mit mehr oder weniger Scattered Straw vermischt. So sind auch nicht alle Blüten exakt gleich in der Farbe.
Ganz zum Schluss habe ich noch ein wenig stark verdünnte Farbe um die Motive herum verteilt.
Über das getrockente Motiv habe ich mit dem Splatter Brush von Tim Holtz noch etwas verdünnte weiße Acrylfarbe aufgespritzt.


And here I took a picture of an area of the card, where you can see the details of the coloring pretty good.
I used the Distress Spray Stain colors Peeled Paint, Spun Suar and Scattered Straw for my coloring. But I'm sure the Re-Inkers would work as good. 
First I wetted the area of the image that I wanted to color with a wet brush, then put some quite big drops of color, mixed with lots of water, onto that area. I used the Air Blower by Tim Holtz to move color, not sticking to the stamped lines. This way I created those streaks of color that seem to flow out of the image. I dried the cardstock with a heat gun and then added the next layer of color, this time using way less water. I repeated this step until I was happy with the result.
For the leave I used pure Peeled Paint, for the flowers I mixed Spun Sugar and Scattered Straw. I didn't take care of how much of which I used and so each of the flowers has a slightly different color tone. In the end I put a very light layer of color around the image.
I used the Splatter Brush by Tim Holtz to spritz some white acrylic paint over the finished image as the last step.


Um die Karte fertig zu stellen, habe ich dann noch ein paar mattgoldene Glitzersteine rund um den Text verteilt und den Cardstock mit dem Motiv mit demselben mattgoldenen Cardstock, aus dem ich auch das Wort hello gestanzt hatte, hinterlegt. Das alles habe ich dann auf einen weißen Kartenrohling geklebt.

To finish the card I added a few matte gold rhinestone around the text and then used the same matte gold cardstock, that I also used to die cut the word hello from, to mat my watercolor cardstock. Then I glued it onto a white note card.


Montag, 21. Februar 2022

Geburtstagskarte mit Partymäusen

 
Hallo Ihr Lieben!
Meine älteste Tochter hatte Geburtstag - und da durfte natürlich eine Geburtstagskarte nicht fehlen. Und so ist diese Karte  mit Mäusen in Partystimmung entstanden.
 
Hello everyone!
My oldest daughter celebrated her birthday - and of course I wanted to make her a birthday card. And so this card with mice in a party mood got made.
 
 Ganz ehrlich, ich war mir nicht sicher, ob diese Karte jemals fertig werden würde. Ich hatte sie auf einem Stempeltreffen mit Freundinnen angefangen und den ganzen Tag nur mit Colorieren vertütelt. Irgendwie wollte nichts so recht passen. Am nächsten Tag ist sie dann aber doch noch fertig geworden, und ich mag sie wirklich sehr!
Die Karte hat ein Format von 17 x 12 cm, also total ungewöhnlich. Sie musste nicht verschickt werden, also macht das nichts, und ich konnte sie einfach so anpassen, wie sie mir vom Arrangement der Elemente am besten gefallen hat.
Im Hintergrund befindet sich schwarzer Cardstock, auf den ich mit hellblauer Folie und dem Swiss Dots Background Hotfoil Stamp von Couture Creations in meiner GoPress Maschine viele kleine Konfetti auffoliert habe. 

Hontestly, I wasn't sure if this card ever gets finished. I startet it during a stamp meeting with some crafting friends and was busy all day with just coloring. Nothing seemed to work the way I had planned. Then the next day I got it finished and really love how it turned out!
This card is 17 x 12 cm in size - so nothing within the regular sizes. I didn't have to mail it so that wasn't a problem, and I simply made it the size how it went best with how I wanted to arrange the elements.
In the background there's some black cardstock, onto which I hot foiled a bunch of tiny confetti using some light blue foil and the Swiss Dots Background by Couture Creations in my GoPress machine.


Für die herabhängenden Luftschlangen habe ich die Curly Q Stanze von Taylored Expressions benutzt. Ich habe sie aus weißem Watercolor Cardstock gestanzt und coloriert. Hier hatte ich zuerst meine ZIG Marker benutzt, aber irgendwie war ich nicht zufrieden. Also habe ich anschließend noch Polychromos oben draufgesetzt. Das selbe habe ich übrigens auch mit dem Motiv gemacht - und wahrscheinlich hat das Colorieren deswegen so lange gedauert....
Den Luftschlangen-Rahmen habe ich noch mit drei Lagen schwarzen Cardstocks hinterlegt. Von allen Lagen habe ich den unteren Querrahmen abgeschnitten, um den Rahmen an meine Kartengröße anzupassen. Das fehlende Stück habe ich einfach mit Stücken, die ich mit der größten der Single Stitched Rectangle Frames von MFT extra aus schwarzem Cardstock gestanzt habe, aufgefüllt. Da ich für die oberste Lage einen kompletten Rahmen per Partial Die Cutting gestanzt habe, fällt die Stückelei darunter gar nicht auf. 
Ein Text durfte natürlich auch nicht fehlen. Hier habe ich das Wort Celebrate mit der Celebrate Bunting Hotfoil Stanze von Ultimate Crafts und golden-glitzernder Folie auf Vellum foliert. Das Banner, das eigentlich darunter foliert wird, habe ich einfach beim Ausschneiden des Wortes weggeschnitten. Um das Vellum aufzukleben, habe ich es durch meine Xyron gedreht und dann auf die Luftschlangen geklebt. Wenn das Vellum komplett mit Kleber überzogen ist, sieht man den nicht mehr.
Um den Text zu ergänzen, habe ich die Worte Hooray und It's your Day aus dem Itty Bitty Birthday Stempelset von MFT auf gelben Cardstock gestempelt, ausgeschnitten und ober- bzw. unterhalb des Vellums aufgeklebt.

For the streamers that hang down from the frame I used the Curly Q die by Taylored Expressions. I've die cut it from white watercolor cardsdtock and colored them in. First I used my ZIG Markers, but I didn't like the result so I brought in my Polychromos and put those on top of the watercoloring. I did the same with the image on this card - guess that's why the coloring took me so long....
I put three additional Curly Q die cuts, cut from black cardstock, under the one cut from watercolor cardstock. To make the frame match the size of my card I simply cut off the bottom frame line. I used pieces of additional frames, that I've cut with the largest of the Single Stitched Rectangle Frames by MFT from black cardstock, to get the size I wanted. For the top frame I did some partial die cutting, so the seams of the ones I put together are hidden. 
Of course my card needed a text. I used the Celebrate Bunting Hot Foil plate by Ultimate Crafts and some sparkling golden foil in my GoPress machine to hot foil the word onto some Vellum. I simply cut away the banner, that gets foiled under the word, when cutting the word out. To glue the vellum down, I ran it through my Xyron. Due to the even layer of glue the Xyron applies onto the whole piece of vellum you don't see the glue through.
To finish the text I stamped the word Hooray and the text It's your Day from the Itty Bitty Birthday stamp set by MFT onto some yellow cardstock, cut it out and glue it above/under the vellum.


Das Motiv ist der Conga Line Stempel von ColoradoCraftCompany - okay, ein Stück davon. Das Motiv ist wirklich groß und passt perfekt auf eine Karte im Querformat. Ich habe einfach nur einen Teil davon verwendet. 
Ehrlich gesagt, bin ich ir immer noch nicht sicher, ob das Mäuse oder Hamster sind - aber als ich anfing, darüber nachzudenken,  hatte ich schon mit der Coloration in Mäusefarben begonnen. Aber die Ohren passen eher zu Hamstern, und Schwänze haben die "Mäuse" auch nicht....
Ich liebe die Motive von Anita Jeram, das ist aber das erste Motiv, das ich mir zugelegt habe. Besonderes süß finde ich sie, mit Watercolors und No-Line Coloring coloriert. Also habe ich das Motiv mit dem Jellyfish Stempelkiss von LawnFawn abgestempelt und dann, wie schon erwähnt, mit den ZIG Markern coloriert. Ehrlich gesagt, mir fehlt mit den Stiften einfach noch die Übung. Wahrscheinlich war ich deswegen mit dem Ergebnis nicht zufrieden und habe Polychromos obenauf gelegt. Mit meinen Copics bin ich einfach viel geübter und das Colorieren geht ohne großes Nachdenken. 
Die Highlights und Punkte auf dem großen Partyhut sind mit einem weißen Gelpen gemacht. Anschließend habe ich das Motiv ausgeschnitten und auf den folierten Hintergrund geklebt. Drumherum kamen dann die aufeinander geklebten Rahmen - insgesamt 8 Lagen. 

This image is the Conga Line stamp by ColoradoCraftCompany - okay, a part of it. This image is really large and fits wonderfully across a landscape card. So I simply used just a part of it.
Hontestly, I am still not sure if these are mice or hamsters - but when I started thinking about it, I had already started coloring them as mice. But the ears definately look more like hamsters - and these "mice" also don't have tails...
I love the images by Anita Jeram, but this is the first image I got of her line of stamps. I especially love them colored with watercolors and no-line technique. So I stamped the image with the Jellyfish ink pad by LawnFawn and then - as mentioned  above - colored it in with my ZIG Markers. I am still lacking exersize with those. Most likely that's why I wasn't  happy with how they turned out, and I put some Polychromos on top. I'm just so much faster with my Copics, and don't have to think much about my coloring using those. 
For the highlights and the dots on the large party hat I used a white gel pen. Then I cut the image out and glued it onto the background, then put my stacked frames around it - there are 8 layers of those in total.


Zum Schluss habe ich die so entstandene Szene noch auf einen weißen Kartenrohling, den ich natürlich auch selbst passend zuschneiden musste, geklebt. 
Und ich wollte Euch den tollen Glanz der Folierung mal wieder nicht vorenthalten!

In the end I glued the finished scene onto a white card base, that I had to cut myself to get the right size. And again I dind't want you to miss the great shine of the foiling, so here's a picture showing it.

Sonntag, 20. Februar 2022

Februar-Challenge bei Stampcorner

 
Hallo Ihr Lieben!
Heute ist es endlich soweit - wir beenden die Winterpause und starten mit der ersten Stampcorner Challenge des Jahres 2022! Um es einfach angehen zu lassen, haben wir uns für das Thema "neu" entschieden. Was auch immer Euch dazu einfällt - Ihr könnt es umsetzen. Das kann eine Karte zum neuen Heim oder neuen Baby sein, Ihr könnt eine neue Technik ausprobieren oder aber Ihr verwendet, so wie ich hier, etwas, das gerade erst bei Euch eingezogen und somit neu ist, auf der Karte.
 
Hello everyone!
Today the day is finally here - we end our winter break and start the first Stampcorner Challenge of this new year 2022! To make it an easy one, we picked the theme of "new". Whatever comes to your mind here, you can do that. You can make a card for a new home or a new baby, try a new technique or use something new from your stash, like I did here. 

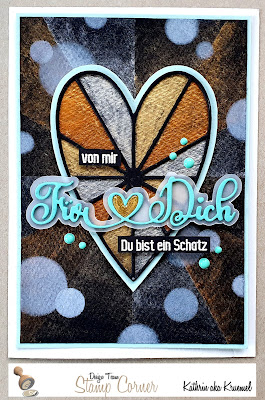
Eigentlich habe ich auch etwas neues ausprobiert. Ich habe das erste Mal schwarzen Watercolor Cardstock benutzt. Und das nicht nur für den Hintergrund, sondern auch für das Herz. Dafür habe ich ihn mit Metallic Watercolors eingefärbt. Ich habe die Linien der Herzstanze, die ich verwenden wollte, auf zwei Stücke Cardstock übertagen - eines in der Größe meines Kartenauflegers, eines groß genug, um das Herz damit hinterlegen zu können. Dann habe ich drei verschiedene Goldtöne - ja auch das silbrig wirkende ist ein Goldton mit dem Namen Champagne - verwenet, um die einzelnen "Kuchenstücke" abwechselnd zu colorieren. Dabei habe ich auf dem Hintergrund recht viel Wasser benutzt, damit er nicht so stark farbig wird, bei dem Stück, mit dem ich das Herz hinterlegen möchte, habe ich kaum Wasser in die Farbe gemischt. 
Nach dem Trocknen habe ich auf dem Hintergrund noch ein paar Bokeh-Punkte verteilt. Dafür habe ich eine Stencil mit unteschiedlich großen Kreisen sowie weiße Stempelfarbe benutzt. Eventuell hätte ich sie etwas dezenter gestalten können, aber durch die Stencil sieht das immer viel zarter aus, als es dann im Endeffekt ist. Aber mir gefällt es auch so.

Actually, I also tried something new here. For the very first time I used black watercolor cardstock - not only for the background, but also for the piece I put behind the heart. I colored it with metallic watercolors. First I transferred the lines of the rays in the heart onto two pieces of cardstock - one the size of my card (or just a bit smaller so I was able to mat it), and one large enough to put it behind the die cut heart. Then I used three different tones of golden metallic watercolor - yes, even the silver looking one is actually a gold tone, called champagne - to color the different sections of my cardstock. I added lots of water to the background piece and nearly no water to the other piece to end up with some very bright colors there.
After my background had dried I added some bokeh dots using a stencil with different sized circles and some white ink. Well, I guess I could have made those a bit softer, but looking through the stencil the color always looks softer than it really does. I like it that way as well.


Für die Deko habe ich mit der Heart Burst Stanze von MFT das Herz dreimal aus schwarzem Cardstock gestanzt und die Teile aufeinander geklebt. Dann habe ich sie mit dem intersiver gold colorierten Cardstockstück hinterlegt, die Überstände weggeschnitten und alles mit hell türkisfarbenem Cardstock gemattet. Ich liebe die Farbkombi aus gold und türkis! Anschließend habe ich das Herz mit 3D Tape so auf den Hintergrund geklebt, dass die Farbsektionen jeweils passend übereinander liegen.
Das neue Produkt, das bei mir zum Einsatz kam, ist die tolle Für Dich Stanze von Stampcorner. Ich habe ebenfalls drei mal aus etwas dunkler türkisfarbenem Cardstock gestanzt und die Teile aufeinander geklebt. In die Mitte des Herzes zwischen den Worten habe ich ein aus goldenem Spiegelcardstock gestanztes Herz gesetzt. Anschließend habe ich alles auf Vellum geklebt, dieses per Hand mit etwas Abstand ausgeschnitten und anschließend oben auf das Herz geklebt.
Für den Rest des Textes habe ich zwei Stempel aus den Sets Träume und Danke verwendet. Ich habe sie mit weißem Embossingpulver auf schwarzen Cardstock embosst, ausgeschnitten und über bzw. unter dem ausgestanzten Text aufgeklebt.
Als Deko kamen dann noch ein paar türkisfarbene Enamel Dots zum Einsatz.

For my card decoration I've die cut the Heart Burst die by MFT three times from black cardstock and stacked the pieces. Then I glued the more intense colored piece of black watercolor cardstock behind the die cut, cut off the overhang and matted the heart with some light turquoise cardstock. I love the color combo of gold and turquoise! Then I used foam tape to glue the heart onto the background, making sure the ray sections match in color and lay exactly on top of each other.
The new product I used here is this beautiful text die, meaning "for you". I've die cut it three times from a bit darker turquoise cardstock and stacked those pieces on top of each other as well. Into the heart that's between the words I put a heart die cut from golden mirror cardstock. Then I glued the text onto a piece of vellum, cut it out by hand to create a shadow layer and then glued the text onto the heart.
To finish my text I white heat embossed two more texts onto strips of black cardstock and glued them above and under the die cut text - a "from me" above, a "you are a gem" under it.
To decorate my card I used a few turquoise Enamel Dots.


Die Karte hat einen grandiosen Schimmer - je nachdem, wie man sie im Licht bewegt, strahlt sie mehr oder weniger. Von dem "mehr" - vor allem natürlich des Herzes - könnt Ihr hier mehr sehen.
Um die Karte fertig zu stellen, habe ich den schwarzen Watercolor Cardstock türkis gemattet und dann alles auf einen weißen Kartenrohling geklebt.

This card has an amazing shine - depending on how you hold it into the light you get more or less of it. On this pic you get a look at the "more", especially of the heart.
To finish my card I matted the background with some light turquoise cardsdtock and glued it onto a white note card.

Samstag, 19. Februar 2022

Stempeleinmaleins - Ausgabe vom 19. Februar 2022

 
Hallo Ihr Lieben!
Beim Stempeleinmaleins zeigen wir Euch heute ein Windlicht. Darin befindet sich in meinem Fall ein elektrisches Teelicht - ist einfach am sichersten. Und ja, es ist wieder frühlingshaft, hier aber wirklich angebracht. Das Windlicht kann man super als kleines Geschenk, oder aber als Deko für alle möglichen Feiern verwenden, da man es von Text und Motiv her wunderbar persönlich/passend gestalten kann. Und wer weiß, vielleicht kann man auf diese Weise Tischdeko und Gastgeschenk bei Feiern wie Taufe oder Hochzeit "in einem Aufwasch" erledigen, denn sie sind doch fix gemacht.

Hello everyone!
Over at Stemmpeleinmaleins we are sharing an idea for a tea light decoration today. I used an electric tea light - it's just safer. And yes, again this is a very spring-ish creation, but here that's what it asked for. You can easily make these as little gifts or table decorations for all kinds of celebrations because they can easily be personalized/matched the occasion. And who knows, maybe doing these for decorations and then hand them out as give aways at the end of a communion or wedding since they are pretty quick to make.

Mein Windlicht ist aus weißem Vellum gemacht, unten habe ich eine Banderole aus weißem Cardstock aufgeklebt, um das Gehäuse des Teelichts zu verstecken. Den Cardstock habe ich mit einer Bordürenstanze von Magnolia zu einem schönen Doily gestanzt. Darum habe ich dann noch etwas türkisfarbenes Band gewickelt und zur Schleife gebunden.
Der Text auf meinem Windlicht ist silbern aufembosst. Ich habe Stempel von Concord and 9th verwendet. Das Wort friend ist extra auf Vellum embosst und mit 3D Tape aufgeklebt. 

My tealight decoration is made from white vellum and I added a sleeve around the bottom to hide the tealight itself. I used a border die by Magnolia to die cut the top edge of the sleeve into a nice doily like shape. Then I wrapped a piece of turquoise ribbon around the sleeve and tied it to a bow.
The text on my tealight is silver heat embossed. I used stamps by Concord and 9th here. The word friend is embossed onto an extra piece of vellum, then glued down with dimensionals.


Da ich die Kombi silber, weiß und türkis gleichzeitig wunderbar frühlingshaft, aber auch edel finde, habe ich mich hier für diese Farbkombi entschieden.
Oberhalb der Bordüre beginnend, habe ich lauter kleine Blüten um das Teelicht herum geklebt. Die sind mit verschiedenen Blumenstanzen von Magnolia aus türkisfarbenem und weißem Cardstock gestanzt. Dann habe ich sie etwas geformt und mit kleinen Klebepunkten aufgeklebt.

Since I think the color combo of silver, white and turquoise is both wonderfully spring-ish and elegant I went with this combo here.
I've die cut quite a few little flowers from turquoise and white cardstock, using different flower dies by Magnolia. Then I shaped them a bit and used little glue dots to glue them around the tea light holder, starting just a bit above the sleeve.

 
Die Blumen sind so aufgeklebt, dass sie von links her wieder oben am Rand erscheinen. 
In die Mitte der Blüten habe ich kleine silberne Perlen geklebt. Und weil mir irgendetwas fehlte, habe ich auch links neben das h von hello noch zwei winzige Blüten aufgeklebt. 

I made sure, that the flowers that show up at the top left are visible when looking straight on at the tealight.
I glued little silver pearls into the center of each flower. And since I felt like something was missing, I also added two tiny flowers right to the left of the h from hello.


Und so sieht das Windlicht dann beleuchtet aus. Ich hatte nur warm-weiße Teelichter da, mag aber den gelblichen Touch nicht, den mein Windlicht dann hat. Das passt einfach nicht zu den gewählten Farben. Also werde ich mal noch kalt-weiße Teelichter kaufen!

And this is the tealight lit up. I only had warm white tealights at home, but definately don't like the yellow-ish touch these add. It just doesn't got with the cool colors I picked. So I guess I'll be ordering some cold white lights soon!