Donnerstag, 31. März 2022

Der Frühling ist da!

 
Hallo Ihr Lieben!
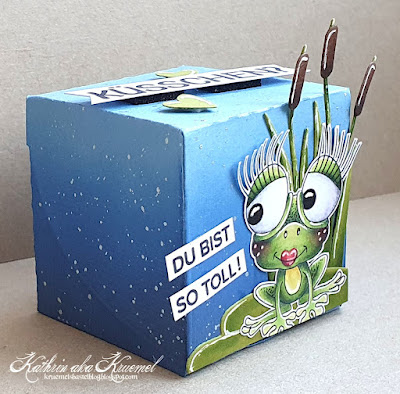
Jetzt können wir es wirklich sagen - der Frühling ist da! Aber das scheint noch nicht jedem klar zu sein, wie man auf dieser Karte, die ich heute auf dem Stampcorner Blog zeige, sehen kann.

Hello everyone!
Now we can really say "spring is here!". Just seems like not everyone got notice of that, as you can see on this card that I'm sharing over at the Stampcorner Blog today.

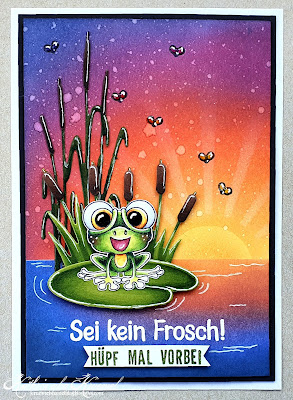
Ich habe hier ein Stück weißen Cardstock verwendet, nach dem Dekorieren blau gemattet und auf einen weißen Kartenrohling geklebt. Eigentlich war der zu dekorierende Cardstock etwas größer. Aber irgendwie hatte ich mich beim Wischen verschätzt und so war der blaue Hintergrund nicht mittig. Deswegen habe ich den Cardstock einfach noch etwas kleiner geschnitten.
Ich habe hier den unteren Teil des weißen Cardstocks maskiert, dann erst ein wenig Distress Ink Bundled Sage als Hintergrund für das Gras, darüber dann als Himmel Tumbled Glass und Salty Ocean aufgewischt. Und weil ich die kleinen Blütensamen, die im Frühling in der Luft schweben, so schön finde,  habe ich helle Metallic Watercolor in feinen Punkten auf den Himmel aufgespritzt. 
Nach dem Trocknen habe ich mit Copics das höhere Gras im Hintergrund aufgemalt.

Here I used  a piece of cardstock, that I've matted blue after I had decorated it and then glued it onto a white note card. I had cut the white cardstock a bit larger but after I had ink blended the background onto the card I realized that it wasn't centered. So I simply cut the piece a bit smaller.
Here I masked off the bottom area of the white cardstock, then inked the upper area with a bit Distress Oxide Bundled Sage as the base layer for the grass, above it I used Tumbled Glass and Salty Ocean for the sky. I love all those tiny white flower seed that float through the air during spring. So I used some light metallic watercolor and spritzed it in small dots over the sky.
After the paint had dried I used Copics to draw the tall grass onto the background.


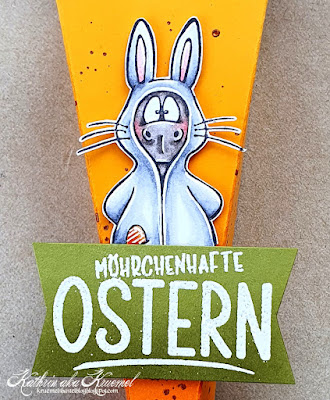
Hier ist der kleine Igel aus dem Stempelset Stay Crazy, wie man unschwer erkennen kann von Oma Plott gezeichnet. Der ist noch ganz verschlafen und hat noch gar nicht mitbekommen, dass der Frühling bereits begonnen hat. Wie gut, dass der kleine Schmetterling ihn aufweckt!
Ich habe den Igel und auch die Schmetterlinge mit Copics coloriert. Die Schmetterlinge sind aus dem Butterfly Kisses Flip-Flop Stempelset von LawnFawn. Vor der Nase des Igels ist eigentlich ein angebissener Apfel. Den hatte ich ebenfalls coloriert, aber dann beschlossen, dass der inzwischen bestimmt verrottet ist und ihn nicht mit auf die Karte geklebt. Für die Highlights habe ich wie immer einen weißen Gelstift benutzt.
Ich habe die Motive ausgeschnitten und auf den Hintergrund geklebt, dann habe ich vor den Igel noch eine weitere Lage etwas niedrigeres Gras gemalt und hierfür dunklere Grüntöne benutzt.
Der Text ist aus dem Stempelset Echt Jetzt. Ich habe ihn mit weißem Embossingpulver auf Vellum embosst und dann mit einer Sprechblasenstanze ausgestanzt. Die Sprechblase sowie die beiden Kreise, die sie in eine Gedankenblase verwandeln, habe ich dann auf den Hintergrund aufgeklebt.

Here's the little hedgehog from the Stay Crazy stamp set by Stampcorner. He's not really awake yet and hasn't realized, that spring has begun. He's really lucky that the butterfly is waking him up!
I colored the hedgehog and the butterflies with Copics. The butterflies are from the Butterfly Kisses Flip-Flop stamp set by LawnFawn. Originally there's a half way eaten apple next to the hedgehog's nose, that I had colored also. But then I decided, it most likely would have gone rotten by now and so I didn't add it to the card. For the highlights I used a white gel pen.
I cut the images out and glued them onto the card, then added another row of grass in front of the images, making it shorter and darker than the one in the background.
The text means "for real?!". I white heat embossed it onto vellum, than cut it out with a speech bubble die. Then I glued down the text and the two little dots, that turn the speech into a think bubble, onto the background.


Nun fehlte noch ein richtiger Text auf der Karte. 
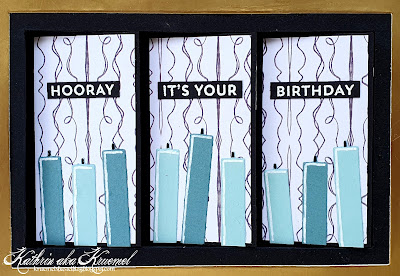
Ich habe mit den Henry's ABC Stanzen die Buchstaben für das Wort Frühling aus einem Bogen aus dem Flower Market Paper Pad, beides von LawnFawn, ausgestanzt. Außerdem habe ich sie noch aus pinkfarbenem Cardstock gestanzt, die ich als Schatten hinter die Buchstaben aus Designpapier geklebt habe.
Die Buchstaben habe ich mit dünnem 3D Tape unter die Wiese mit dem Igel geklebt. Dann habe ich verschiedene Stempelteile von Stempeln aus dem Set Danke verwendet, um den Rest des Textes vor und hinter das Wort Frühling direkt auf die Karte zu stempeln.
Ganz zum Schluss habe ich noch rote Metallic Watercolor in feinen Punkten auf und über das Gras aufgetragen, um viele Blumen im Gras zu verteilen.

Now my card needed a real text.
I used the Henry's ABC die set to cut the letters for the german word spring from a sheet from the Flower Market paper pad, both by LawnFawn. I also die cut them from pink cardstock, that I glued as a shadow layer behind the letters cut from patterned paper. 
I used thin foam tape to glue the letters under the grass layer with the hedgehog. Then I used different stamps to stamp the rest of the text directly onto the background to create a "spring is here" text.
In the end I used a fine brush to put lots of small red dots from red metallic watercolor onto and above the grass to add a lot of small flowers to the grass.

Dienstag, 29. März 2022

Küsschen?

 
Hallo Ihr Lieben!
Noch zwei Tage, dann gibt es das April-Release von Stampcorner. Ich gebe Euch heute noch eine weitere Vorschau auf einen der süßen Frösche. Und ein Text aus einem weiteren Stempelset hat sich auch mit aufs Projekt geschlichen...

Hello everyone!
Two more days, then the new Stampcorner release will be available. Today I have another sneak at one of the new frog images. And a text from another new set also sneaked on my project...

Ich habe hier eine Box mit der Box 1 Stanze von Stampcorner gewerkelt. Die habe ich aus hellblauem Cardstock gestanzt, ich finde, das erinnert an Wasser und so passt es perfekt zum Motiv.

I used the box 1 die by Stampcorner to create this little box. I've die cut it from light blue cardstock, since it looks like water it goes perfectly with the image.


Alle Seiten bis auf  Boden und Deckel habe ich mit Distress Oxide Prize Ribbon und Chipped Sapphire gewischt, jeweils unten dunkler und nach oben hell in die Farbe des Cardstocks auslaufend. Auch die tollen abgerundeten Seiten habe ich so gewischt, allerdings unten nicht ganz so dunkel, dass sie farblich zum Seitenteil darunter passen.
Anschließend habe ich silberfarbene Metallic Watercolor auf alle Seiten gespritzt.

Besides the lid and bottom of the box I've inked up all sides with Distress Oxide Prize Ribbon and Chipped Sapphire, starting dark at the bottom and let the color fade out into the color of the cardstock. I did the same with the rounded sides, just not making them as dark to make their color match the sides underneath. 
Then I spritzed some silver metallic watercolor onto all sides.


Und hier ist die geniale Froschdame. Ich war mir ja nicht sicher, ob ich die extrem langen Wimpern ausschneiden könnte, aber das war gar kein Problem. Und ich finde, die stehen ihr klasse. Passend zu dem etwas tussi-haften Look der Wimpern - und dem Text auf dem Deckel der Box - habe ich ihr beim Colorieren  noch einen roten Kussmund hinzugefügt. Dafür habe ich einfach ein etwas aberundetes Herz auf die Mitte des Mundes gemalt und das rot coloriert. 
Auch hier habe ich zum Colorieren wieder Copics sowie einen weißen Gelstift für die Highlights verwendet. 
Hinter der Froschdame wachsen wieder eine paar Rohrkolben, gemacht mit der Cattails Border Stanze von LawnFawn, und sie sitzt wieder auf einem Seerosenblatt. Da ich nur eine Seerosenblatt-Stanze besitze, kam wieder die von PapertreyInk zum Einsatz. 
Ich habe alle Teile aufeiander und anschließend auf die Vorderseite der Box geklebt. Dabei habe ich nicht gut aufgepasst, und als ich dann die überstehenden Teile des Seerosenblattes weggeschnitten habe, habe ich der armen Dame auch den vorderen Teil der Zehen mit weggeschnitten. Oops, sorry. Aber das tut ihrer Schönheit natürlich keinen Abbruck!
Liebt Ihr kleine Texte auch so wie ich? Die passen auf jede Karte oder Box. Und so ein Set mit vielen verschiedenen Texten wird es ebenfalls im April-Release geben? Einen davon habe ich hier neben dem Motiv mit auf die Box geklebt.

And here's the beautiful frog lady. I wasn't sure if I'd be able to cut her out with her extremly long lashes, but it actually worked great. And they suit her just wonderfully. Matching the kind of chickie look of her lashes - and to go with the text on top of the box - I added some puckered lips when I did the coloring. I simply drew a rounded heart over her mouth and colored it red. 
Again I used Copics to color the image and a white gel pen for the highlights. 
Behind the frog lady there are some cattails growing, again I used the Cattails Border die by LawnFawn for those, and the frog is sitting on a water lilly leaf. Since I only have that one water lilly leaf die I used the one by PapertreyInk again.
I glued all pieces on top of each other and then onto the front of the box. I didn't check the height good enough, so when I cut off the overhanging parts of the water lilly leaf, I also cut off the tip of the toes of the poor frog. Oops, sorry. But I think she still looks nice.
I love small text stamps - they fit onto every card or box. And so I am really happy that there will be a stamp with full of those in the april release. I used one text next to the frog here, it means "you are so great". 


Oben auf der Box habe ich dann noch einen Text aus dem Frosch-Stempelset verwendet. Der passt doch perfekt zum Motiv, und außerdem verrät er auch gleich, was sich in der Box befindet. ;) 
Eigentlich befindet sich hinter dem Wort kein Fragezeichen. Also habe ich das hinter einem der Texte aus dem Stempelset Echt Jetzt hinter das Wort gestempelt.
Der Text ist mit 3D  Tape auf die Box geklebt und außerdem habe ich zwei grüne Herzen mit aufgeklebt.

On top of the box I glued down a text from the frog stamp set. It means "want a kiss?" and goes great with the image. 
I glued the text down with foam tape and added a little heart above and under the text.

Samstag, 26. März 2022

Stempeleinmaleins - Ausgabe vom 26. März 2022

 
Hallo Ihr Lieben!
Beim Stempeleinmaleins gibt es wieder einen neuen Sketch für Euch - hier seht Ihr, wie ich ihn umgesetzt habe. Für meine Idee habe ich ihn hochkant gedreht.

Hello everyone!
We have a new sketch over at Stempeleinmaleins - and this what the card I made following this sketch looks like. For my idea I had to turn it to a portrait format.

Für den Hintergrund habe ich die All the Stars Cover-Up Stanze von MFT zweimal ausgestantz - einmal aus silberfarbenem, einmal aus hellgoldfarbenem schimmernden Cardstock. Dann habe ich beide diagonal geteilt und die silbernen Sterne in den goldenen Hintergrund, die goldenen in den silbernen Hintergrund eingesetzt. Auf diese Weise konnte ich die diagonale Teilung im Sketch einbauen und trotzdem einen fortlaufenden Hintergrund erhalten.
Dekoriert habe ich meinen Sternenhintergrund dann mit Dekorosetten und Girlanden. Die Rosetten habe ich mit einer der Pinwheel Party Stanzen von TheGreetery aus weißem Papier gestanzt. Dann habe ich mit Hilfe der passenden Stencil Embossing Ink auf die Rosetten aufgetragen und diesen Teil anschließend golden embosst. Danach habe ich die übrigen Streifen der Rosette mit Distress Ink Black Soot gewischt. 
Die Partygirlanden habe ich mit den Twisted Crepe Stanzen, ebenfalls von TheGreetery, aus dunkler goldfarbenem Schimmercardstock gestanzt.
Ich habe die Deko auf den Hintergrund geklebt und dann einen schwarzen Rahmen drumherum gesetzt. Dafür habe ich 4 dieser Rahmen gestanzt, aufeinander- und dann auf den Hintergrund geklebt.

For the background I've die cut the All the Stars Cover-Up die by MFT twice - once from silver and once from light golden pearl cardstock. Then I cut both apart diagonally and glued the silver stars into the golden background, and the golden stars into the silver background. This way I was able to include the diagonal seam drawn in the sketch but still keep one complete background.
I decorated this star background with pinwheels and garlands. I've die cut the pinwheels with one of the Pinwheel Party dies by TheGreetery from white paper. Then I used the matching stencil to cover it with embossing ink and then golden heat embossed this part of the pinwheel. After heat embossing it I inked up the left over strips in the pinwheel with Distress Ink Black Soot. 
To die cut the garlands I used the Twisted Crepe dies, also by TheGreetery, and die cut those from a darker golden pearl cardstock.
I glued all pieces onto the background and then added a black frame. I've die cut 4 of those, stacked them and glued them down.


Der Text ist definitiv das Hauptelement auf meiner Karte. Dafür habe ich einen der Texte aus dem Jumbo Sentiments Stempelset von TheTon auf Vellum embosst und anschließend mit einer der passenden Stanzen ausgestanzt. Ich habe nur extra-feines schwarzes Embossingpulver hier und damit nie Erfolg auf Vellum. Darum habe ich den Text mit Versafine Clair Nocturne auf das Vellum gestempelt und anschließend klar embosst. Dadurch ist es zwar nicht tiefschwarz, aber für meinen Geschmack immer noch schwarz genug. 
Den ausgestanzten Text habe ich dann mit 3D Tape auf den Hintergrund geklebt. 
Um aus einer Glückwunschkarte eine Geburtstagskarte zu machen, habe ich noch einen der Texte aus dem Stempelset Itty Bitty Celebrations by MFT mit goldenem Embossingpulver auf einen schmalen Streifen schwarzen Cardstocks embosst und diesen dann ebenfalls mit 3D Tape über den großen Text geklebt.

The text is definately the star of this card. I heat embossed one of the words from the Jumbo Sentiments stamp set by TheTon onto Vellum and then cut it out with the matching die. I only have extra fine black embossing powder at home and never get a good result on Vellum with this. So I used Versafine Clair Nocturne to stamp the text onto the Vellum and then covered it with clear embossing powder. It doesn't turn out plain black that way, but for my taste it's still dark enough.
I used dimensionals to glue the text onto the background.
To turn this card into a birthday card I golden heat embossed one of the sentiments from the Itty Bitty Celebrations stamp set by MFT onto a thin strip of black cardstock and glued this on top of the word congrats, again using dimensionals. 


Als Deko habe ich noch einige goldene Perlen auf der Karte verteilt - so strahlt und schimmert sie einfach wunderbar!

As embellishments I glued a few golden pearls onto the card - now it has a great shimmer and shine!

Freitag, 25. März 2022

Sei kein Frosch!

 
Hallo Ihr Lieben!
Heute gebe ich Euch einen kleinen Blick auf ein Motiv, dass es im April-Release von Stampcorner geben wird. Ich finde diesen Frosch einfach klasse - und er bringt jede Menge Frosch-Freunde mit!

Hello everyone!
Today I am sharing this card with you, that gives you a sneak at one of the images from Stampcorner's april release. I just love this little frog - and he brings a lot of friends with him in a stamp set!

Für meine Karte habe ich einen Sonnenuntergang am See gestaltet. Dafür habe ich den unteren Teil eines Stücks weißen Cardstocks maskiert und mit der Maske überlappend einen Kreis aus Masking Tape für die Sonne aufgeklebt. Anschließend habe ich den Himmel mit Distress Oxide Wild Honey, Spiced Marmalade, Crackling Campfire, Seedless Preserves und Chipped Sapphire gewischt, die Maske für die Sonne entfernt und nur diesen Teil nochmal mit Wild Honey gewischt. Dann habe ich einige Wassertropfen darauf verteilt. Nachdem die getrocknet waren, habe ich beschlossen, dass noch ein paar Sonnenstrahlen toll aussehen würden. Also habe ich eine Strahlenstencil von MFT über die Sonne gelegt und mit einem kleinen Blending Brush weiße Stempelfarbe aufgewischt, und zwar so, dass sie nach einigen Zentimetern in den Hintergrund übergeht.
Für das Wasser habe ich den oberen Teil des Cardstocks maskiert und dann Distress Oxide Spiced Marmalade, Crackling Campfire, Wilted Violet, Blueprint Sketch und Chipped Sapphire aufgewischt. Die Wasserlinien habe ich später mit einem weißen Gelpen dazugemalt.
Den gewischten Cardstock habe ich schwarz gemattet und auf einen weißen Kartenrohling geklebt.

For my card I created a sundown at a lake. I masked off the bottom part of a piece of white cardstock and added a circle cut from masking tape, taping it down so only the very top will be visible in the sky. Then I inked up the sky with Distress Oxide Wild Honey, Spiced Marmalade, Crackling Campfire, Seedless Preserves and Chipped Sapphire. I removed the circle mask and inked up just the sun with Wild Honey again. Then I spritzed some droplets of water onto the background. After the water had dried, I thought, some sunbeams would look nice. So I put a ray stencil by MFT over my sun and filled the rays with white ink using a small blending brush, making sure to let the color fade into the background after a few centimeters. 
For the water I masked off the top area of my cardstock and then used Distress Oxide Spiced Marmalade, Crackling Campfire, Wilted Violet, Blueprint Sketch and Chipped Sapphire. Later I added the ripples to the water with a white gel pen.
I matted the inked up cardstock black and glued it onto a white card base.


Hier könnt Ihr den tollen Frosch mit seinen großen Glupschaugen besser sehen. Ich habe ihn mit Copics coloriert und anschließend ausgeschnitten. Die Highlights sind mit einem weißen Gelpen gemacht. Außerdem habe ich einige dunkelgrüne Punkte auf den Oberschenkeln und über der Nase des Frosches mit einem Fineliner aufgetupft.
Da er ja nicht so auf dem Wasser sitzen kann, habe ich ihn auf ein Seerosenblatt von PapertreyInk gesetzt. Dahinter wachsen einige Rohrkolben - die kleineren sind mit der Cattails Border von LawnFawn, die höheren dahinter mit einer Stanze von CraftEmotions gestanzt. Ich habe alle Teile aus grünem bzw. braunem Cardstock gestanzt und anschließend mit Copics schattiert. 
Die höheren Rohrkolben sind direkt auf den Hintergrund geklebt, die niedrigeren sowie der Frosch auf dem Seerosenblatt jeweils mit 3D Tape.
Und weil die rechte Seite der Karte ein wenig fad aussah, habe ich dort noch einige Fliegen aus dem Toadally Awesome Stempelset von LawnFawn aufgestempelt. Auf die Flügel habe ich außerdem etwas Glossy Accents aufgetragen. 

Here you get a better look at the great frog with his amazingly big eyes. I colored him in with Copics and then cut him out. I used a white gel pen to add some highlights and also used a dark green fineliner to add some tiny dots to the legs and above the nose of the frog.
Since the frog isn't able to just sit on the water, I gave him a water lilly leave by PapertreyInk to sit on. Behind him I planted a few cattails  - the smaller ones are made with the Caittails Border die by LawnFawn, the taller ones I used a die by CraftEmotions for. I've die cut all pieces from green and brown cardstock, then shaded them with Copics.
The taller cattails are glued directly onto the background, the smaller ones and the frog on the leaf are attached with foam tape.
And since the right side of the card looked a bit empty I stamped a few flies onto it. The fly image is from the Toadally Awesome stamp set by LawnFawn, I covered the wings with Glossy Accents.


Unten auf dem Wasser habe ich dann noch den Text meiner Karte untergebracht.
Der Text "sei kein Frosch" stammt ebenfalls aus dem neuen Frösche-Stempelset. Ich habe ihn mit weißem Embossingpulver auf das Wasser embosst.
Für den Text darunter habe ich kleine Buchstabenstempel verwendet und damit sowie mit Versafine Clair Shady Lane den Text zusammengesetzt. Anschließend habe ich ihn mit dünnem 3D Tape unter den embossten Text geklebt.

I added my text to the water area of my card.
The top one, that comes in the new frog stamp set, means "don't be a frog" - a german way to say "don't be such a baby". I white heat embossed it directly onto the background.
For the text under that - this one means "hop on over" - I used small letter stamps to put the text together and stamp it with Versafine Clair Shady Lane onto white cardstock. Then I cut it out and glued it onto the card with thin foam tape.

Donnerstag, 24. März 2022

Möhrchenhafte Ostern

 
Hallo Ihr Lieben!
Habt Ihr schon den süßen Osterhasen - äh, das Osternilpferd aus der Feder von Oma Plott im Stampcorner Shop entdeckt? Ich war ja schockverliebt. Und so darf der Kleine heute, zusammen mit einem passenden und ebenfalls neuen Text, diese österliche Mini-Slimline Karte, die ich auf dem Stampcorner Blog zeige, zieren.

Hello everyone!
Have you discovered the cute easter bunny, oops, easter hippo drawn by Oma Plott already? I was completly in love the minute I saw him. And so this little cutie is star of this mini slimline card, that I'm sharing over at the Stampcorner Blog today.

Um die Mini-Slimline Karte zu machen, habe ich die drittgrößte der Deckle Edge Slimline Stanzen von Stampcorner verwendet. Dank Partial Diecutting konnte ich sie in der Länge genau so kürzen, wie ich sie brauchte. Ich habe sie einmal komplett aus hellblauem Cardstock gestanzt. Den habe ich etwas unterhalb der Mitte beginnend nach oben hin mit Distress Oxide Broken China und Salvaged Patina gewischt und zwar so, dass ganz oben noch die Originalfarbe des Cardstocks zu sehen ist. Dann habe ich weiße Sprenkel auf dem Himmel verteilt. Dafür nehme ich wahnsinnig gerne das Copic Opaque White, das verfärbt sich nicht durch angelöste Farbe darunter. 
Für den unteren Bereich habe ich mit der Deckle Edge Stanze auch noch einen Teil aus hellgrünem Cardstock gestanzt, den habe ich dann mit einer Grasstanze geteilt. Von unten her habe ich die Stanzteile mit Distress Oxide Mowed Lawn gewischt und dann grüne Farbspritzer darauf verteilt.

To create my mini slimline card I used the third largest of the Deckle Edge Slimline dies by Stampcorner. Thanks to partial die cutting I was able to make it the length I needed it to be. I've die cut it once from light blue cardstock that I inked up with Distress Oxide Broken China and Salvaged Patina, starting at a little under the middle of the card and working upwards, making sure the original color of the cardstock was visible at the top of the piece. Then I spritzed some white color over the sky background. I love to use the Copics Opaque White for this since it doesn't get stained from any color under it.
For the lower part of the card I used the Deckle Edge die again to cut a piece of light green cardstock, then cut that twice with a grass border die. From the bottom I inked those up with Distress Oxide Mowed Lawn and then spritzed some green color on top.


Das hintere Gras habe ich direkt auf den Himmel geklebt, das vordere mit dickem 3D Tape. Und dazwischen durfte das süße Nilpferd Platz nehmen.

The grass in the background was glued directly onto the sky background, the one on top is glued down with foam tape. And in between there was room for the little hippo.


Hier könnt Ihr ihn noch viel besser erkennen. Ich habe ihn mit Copics coloriert und für die Highlights einen weißen Gelpen verwendet. Dann habe ich ihn ausgeschnitten.
Da so eine einzige Möhre doch etwas wenig gewesen wäre, habe ich noch einige kleine Möhren und Ostereier zu Füßen des Nilpferds untergebracht. Die kleine Möhre ist aus einem Stempelset von LawnFawn, die Ostereier sind mit den Eiern aus dem Stempelset Sensenmann von Stampcorner gemacht. Alle diese Motive habe ich mit dünnem 3D Tape aufgeklebt, so dass sie eine Zwischenlage zwischen Himmel und hohem Gras bilden.
Und der kleine Hippo schaut so, als hätte er Angst, dass ihm die große Möhre, die er da hinter seinem Rücken versteckt, gleich jemand klaut. Also habe ich eine Sprechblase mit einem aufgestempelten "MEINS!!" über seinem Kopf angebracht. So kann er gleich mal klar stellen, dass das seine Möhre ist! Das Meins habe ich mit kleinen einzelnen Buchstaben zusammengestempelt, mit einer Sprechblasendie ausgestanzt, die schwarz gemattet und ebenfalls mit 3D Tape aufgeklebt.

Here you get a better lok at him. I colored him in with Copics and used a white gel pen for the highlights. Then I cut him out.
Since one single carrot would have been quite little I also put some small carrots and some easter eggs around him in the grass. The little carrot is from a stamp set by LawnFawn, the easter eggs are from another set by Stampcorner. I used some thinner foam tape to glue all the images onto the card, so they create an additional layer between the sky background and the large grass area.
And the little hippo looks like he's afraid that someone might steel that big carrot he's hiding behind his back. So I added a speeech bubble onto which I stamped a "mine!!" to let him express that this big one is his carrot. I used individual letters to stamp the word, cut it out with a speech bubble die, matted that black and glued it down, again using foam tape.


Und nun fehlte noch der Text. Ich liebe den "möhrchenhaften Ostern" Text von Stampcorner! Den habe ich mit Versafine Clair Nocturne direct auf die hohe Graslage gestempelt.
Darüber habe ich ein kleines Banner geklebt, auf dem ich wieder aus einzelnen Buchstaben ein "ich wünsche Dir" aufgestempelt habe. Das Banner habe ich hellblau gemattet und mit dem dünnen 3D Tape aufgeklebt.

And now I needed a text for my card. I love this play with words by Stampcorner. It means "carrot-y easter", but sounds very much like "fairytale-ish" in german. And if something "fairytale-ish" in german, than it means it's simply wonderful. I hope that makes sense... I used Versafine Clair Nocturne to stamp the text directly onto the larger grass layer.
Above it I added a little banner, onto which I've stamped "wishing you a", again using small individual letters. I matted the banner light blue and glued it down, using the thin foam tape again.

Mittwoch, 23. März 2022

Create a Smile Moodboard Challenge


Hallo Ihr Lieben!
Heute startet eine neue Moodboard Challenge bei Create a Smile. Und dieses Mal ist das Moodboard Frühling und Ostern pur - sowohl von den Farben her, also auch von den gezeigten Bildern. Aber natürlich gibt es jede Menge Raum, es auch anders zu interpretieren.
 
Hello everyone!
Today the new moodboard challenge by Create a Smile is starting. And this time the moodboard just screams spring and easter - not only in its colors, but also from the pictures used. But of course there's plenty of room for other interpretations as well.


Ich liebe die Farbkombi aus Kraft, Rosa und Weiß. Und so stand für mich ziemlich schnell fest, dass ich die auf meiner Karte übernehmen möchte. Naja, und mit den tollen Sachen aus dem Februar-Release, stand auch das restliche Design meiner Karte im Nu. Und das ist sie:

I love the color combo of craft, pink and white. And so I knew pretty quick that I wanted to use those colors on my card. And well, with the great items from the february release also the rest of my card design came together pretty easily. And this is it:


Ich habe hier ein Stück kraftfarbenen Cardstock als Basis benutzt und dekoriert. Anschließend habe ich das neue Postage Rectangle Stanzenset verwendet, um aus rosafarbenem Cardstock die größte der Briefmarken auszustanzen. Den kraftfarbenen Cardstock habe ich von der Größe her so zugeschnitten, dass der gestitchte Rand der Briefmarke noch sichtbar ist.
Da ich wusste, dass ich das tolle Set dEGGorations verwenden wollte, habe ich auch den Hintergrund mit Ostereiern versehen. Dafür habe ich die neue Easter Egg Stencil benutzt und erst komplett gefüllte rosafarbene Ostereier auf den kraftfarbenen Cardstock gewischt. Ich habe Distress Oxide Kitsch Flamingo und Picked Raspberry verwendet. Die Farben werden auf dem kraftfarbenen Cardstock abgetönt, so dass schön zart-rosafarbene Ostereier entstanden sind. Auf der Stencil sind auch viele verschiedene Muster, mit denen man die Eier dekorieren kann. Ich habe mich für drei davon entschieden - schräge Streifen, Zick-Zack-Streifen und Punkte - und diese mit weißer Stempelfarbe auf die rosafarbenen Eier gewischt. 
Mir fehlte hier am Hintergrund noch etwas. Also habe ich die Outline-Buchstaben aus dem Set Clear Letters verwendet und die Worte Frohe Ostern in den Deckel meines Misti geklebt. Die habe ich dann so oft in Reihen auf die Ostereier gestempelt, bis der komplette Hintergrund voll war. Hier habe ich Distress Oxide Hickory Smoke verwendet, da das schön dezent ist, der Text aber trotzdem lesbar bleibt und nicht komplett untergeht. 

Here I used a piece of craft colored cardstock as my base and decorated that. Then I used the new Postage Rectangle die set, to die cut the largest of the postage stamp shapes from light pink cardstock. I cut the craft colored cardstock down until the great stitched details on the postage stamp would still be visible around the craft cardstock.
I knew I wanted to use the great dEGGorations stamp set and so I decided to also add easter eggs onto my background. I used the also new Easter Egg Stencil to cover the craft cardstock with some plain pink easter eggs. I went with Distress Oxide Kitsch Flamingo and Picked Raspberry for the eggs. The craft colored cardstock tones the colors down so I ended up with some nice soft pink eggs. On this stencil there are also a lot of different patterns you can add to your eggs. I picked three of them - slanted stripes, a zig zag pattern and dots - and stenciled those on top of the eggs using white pigment ink.
I felt like there was something missing on this background so I brought out the outline letters from the Clear Letters set and worte the words happy easter in the lid of my misti. Then I stamped those in rows all over the easter eggs. I used Distress Oxide Hickory Smoke to stamp them. The grey is pretty subtle, but still the text is legible and doesn't blend in too much.


Beim Aufwischen der Ostereier habe ich in einer der Eier-Reihen mittig den süßen Hasen aus dem Set dEGGorations mit eingeplant. Den habe ich mit No-Line Tinte gestempelt und mit Copics coloriert. Genauso habe ich die Schleife aus dem selben Set gemacht und hinterher alles ausgeschnitten. 
Das Gesicht habe ich nach dem Colorieren mit Versafine Clair Nocturne aufgestempelt und auch an die passende Stelle meines Hintergrundes - so sind die Schnurrhaare fortlaufend und ich habe hier keinen weißen Rand vom Ausschneiden. 
Der Text heute wird ge(f)eiert ist aus dem Set Verrücktes Huhn. Ich habe ihn mit weißem Embossingpulver auf einen Streifen etwas dunkleren kraftfarbenen Cardstocks embosst. 
Erst habe ich den Hasen mit 3D Tape auf den Hintergrund geklebt, anschließend das Banner mit dem Text darunter. 
Und da der süße Hase irgendwie in der Luft hing, habe ich noch die Grasbüschel aus dem Set Scene Builders weiß auf hellbraunen Cardstock embosst, ausgeschnitten und rechts und links neben dem Hasen hinter das Banner geschoben. Im Moodboard ist ja auch grün enthalten, und ich war wirklich versucht, das Gras auf hellgrünen Cardstock zu embossen, mich dann aber dagegen entschieden und bin so bei meiner ursprünglichen Farbkombi geblieben.
Als Deko habe ich ein paar rosafarbene Enamel Dots auf der Karte verteilt und den dekorierten Cardstock ebenfalls mit 3D Tape auf die ausgestanzte Briefmarke geklebt.

When stenciling on the eggs I planned room in the center of one row  to add this cute bunny from the dEGGorations stamp set. I stamped it with no-line ink and colored it with Copics. I did the bow, which comes in the same set, the same way, then cut all the pieces out.
After I was done with the coloring I stamped the face onto the egg using Versafine Clair Nocturen, then I stamped it in the matching spot onto the background. This way the whiskers continue without me having a white border around them from cutting the image out.
The text means "today gets celebrated", but in german "celebrate" contains the german word for egg. So I can't translate this play of words, but it definately is egg/easter related. I white heat embossed onto a strip that I've cut from a slightly darker kraft tone.
I first glued the bunny onto the background with dimensionals, then added the banner under it.
And since the cute bunny was somehow floating in the air, I decided to white heat emboss the grass from the Scene Builders stamp set onto light brown cardstock, cut it out and stuck it under the banner with the text. There is some green in the moodboard, and I was really tempted to emboss the grass onto green cardstock, but then decided against it and to stuck with my usual color palette instead.
For decorations I glued a few pink Enamel Dots onto my card and then glued this decorated panel onto the die cut postage stamp, again using foam tape.

Montag, 21. März 2022

Ostermöhre mit Nilpferd

 
Hallo Ihr Lieben!
Ostern rückt näher. Und dieses Jahr findet mal wieder der die letzten beiden Jahre wegen Corona ausgefallene Osterbrunch mit der ganzen Familie statt. Da das bei uns mit Osternestern inzwischen ein wenig eskaliert - Oma und Opa verstecken für jeden ein Nest, Uroma versteckt für jeden ein Nest, sogar die Kinder verstecken seit einigen Jahren für jeden ein Nest, dazu noch die einzelnen Eier - verstecke ich nur noch Nester für die Kinder und das Enkelkind, und für alle gibt es ein Oster-Goodie auf dem Brunchtisch. Dieses Jahr werde ich wohl die Ostermöhren machen. Und da kommt das Oster-Nilpferd und vor allem dieser geniale Text, beide von Stampcorner, gerade recht!

Hello everyone!
Easter is coming closer. And since our brunch has been canceled the last two years due to Covid, we are going to finally have one with all the family again. Since the thing with the easter basket is kind of escalating in our family - grandma and grandpa are hiding something for each family member, great grandma is hiding a basket for each family member, even my kids each do it since a few years, then add all the colored eggs - I am only doing it for my girls and my grandchild and have a easter goodie placed on the plates at our brunch. I think, I'll make those carrot boxes this year. And the cute bunny hippo and especially this great text, both by Stampcorner, come in really handy.

Ich habe die Möhre, für die wir vor einigen Jahren die Anleitung beim Stempeleinmaleins hatten, aus orangefarbenem Cardstock geschnitten. Dann habe ich sie von unten her mit Distress Ink Wild Honey gewischt und orange-braune Metallic Watercolor darüber gespritzt.

I've cut the carrot, that we shared the tutorial for a few years ago over at Stempeleinmaleins, from orange cardstock, inked it up from the bottom with Distress Ink Wild Honey and then spritzed some orange-brown metallic watercolor onto it.


Für das Grün habe ich, anders als in der Anleitung, gestanzte Blätter verwendet. Dafür habe ich die Blätter der Carrot Stanze von TheGreetery aus hellgrünem Cardstock gestanzt. In dem Stanzenset sind drei Blätter enthalten, ich habe je 6 für die Vorder- und die Rückseite verwendet. 
Von unten her habe ich sie mit Distress Ink Peeled Paint und Forrest Moss eingefärbt und jeweils hinter die Laschen der Box geklebt. Damit man die Klebestellen nicht so sieht, habe ich noch etwas orangefarbenen Cardstock dahinter gesetzt.
Geschlossen habe ich die Box mit einem Stück Twine, das durch zwei Löcher in den Laschen gezogen wird. Als Deko habe ich eine kleine weiße Blüte mit gelber Perle aufgeklebt.

For the greenery I used die cut leaves, that's where I did a change from the tutorial where we used a hand cut flat panel. I used the leaves from the Carrot die by TheGreetery here to die cut them from light green cardstock. There are three different leaves in the die set, I used 6 each for the front and the back flap. 
I inked up the leaves from the bottom with Distress Ink Peeled Paint and Forrest Moss, then glued them behind the flaps. To hide the stems of the leaves on the inside I glued two pieces of orange cardstock over them.
To close the box I used a piece of twine, that's woven through two holes in the flaps, and glued down a little white flower with a yellow pearl as the center for decoration.


Und hier ist das süße Nilpferd im Hasenkostüm. Eigentlich hat er eine große Karotte hinter dem Rücken, die habe ich ihm hier weggenommen. Schließlich klebt er ja schon auf einer großen Karotte. Außerdem habe ich die Füße hinter dem Cardstockstück mit dem Text versteckt.
Da unser Ostertisch meist in gelb/orange, grün und weiß gehalten ist, habe ich mich auch für meine Möhre für diese Farben entschieden. Deswegen steckt mein Oster-Nilpferd auch in einem weißen Hasenkostüm. Coloriert habe ich ihn mit Copics.
Den Text habe ich mit weißem Embossingpulver auf grünen Cardstock embosst, den ich von unten her ebenfalls mit Distress Ink Peeled Paint gewischt habe. 
Nilpferd und Text sind mit 3D Tape auf die Möhre geklebt.

And here's the cute hippo in the bunny costume. He is hiding a big carrot behind his back, that I took away from him since he's already glued onto a giant carrot. I've also hidden his feet behind the cardstock with the stamped on text.
Our easter table is most times decorated in orange/yellow, green and white. So these are also the colors I picked for my carrot. That's why the easter hippo is wearing a white bunny costume. The coloring was done with Copics.
I white heat embossed the text onto green cardstock, then inked it up from the bottom with Distress Ink Peeled Paint again.
I've glued down the hippo and the text onto the carrot with foam tape.

Sonntag, 20. März 2022

März-Challenge bei Stampcorner


 Hallo Ihr Lieben!
Es ist wieder Zeit für eine neue Challenge bei Stampcorner. Diesmal haben wir uns für das Thema "Ostern" entschieden.

Hello everyone!
It's time for a new challenge at Stampcorner. This time we picked "Easter" as our theme.

Äh, ich bin beim letzten LawnFawn-Release dezent eskaliert. Und ja, natürlich habe ich auch die Osterstempel mitgeordert. Die durften hier dann, zusammen mit einigen anderen Produkten, gleich mal zum Einsatz kommen.

Well, I went totally crazy with the latest LawnFawn release. And yes, of course I've also ordered their new easter stamps. So I decided to ink those up right after I got them, and I also threw in a few other of the new itens.

Ich habe hier die ebenfalls neue Platform Pop-Up Stanze samt Add-On verwendet, um diese tolle Kartenart zu machen. Wie man sie verschickt, zeige ich Euch später im Post. 
Ich habe die Basis aus grünem Designpapier mit weißen Punkten gestanzt - das passt prima zum Gras und sieht wunderbar frühlingshaft aus. Die lilafarbene Schleife ist mit einer der Stanzen aus dem Set und einem Papier aus dem Watercolor Wishes Rainbow Paper Pad  gemacht. In Kombination mit dem Designpapier erinnert die ganze Karte an ein Osterei, finde ich.

I used the also new Platform Pop-Up die including the Add-On set to make this great type of card. I'll show a pic a little later in this post about how it can be mailed.
I've die cut the base from a light green patterned paper with white dots - I think this goes great with the grass and also adds a wonderful spring-ish touch. The purple bow is made with a die that comes in the set and a sheet from the Watercolor Wishes Rainbow paper pad. I think, the purple bow in combination with the patterned paper look give the card itself the look of a easter egg.


Für das große Wort Easter habe ich die Giant Happy Easter Stanze aus weißem Cardstock gestanzt und anschließend das Wort happy darüber weggeschnitten, sonst wäre der Text zu hoch geworden. Dann habe ich die einzelnen Buchstaben nochmal aus Designpapier ausgestanzt und auf das weiß gestanzte Wort geklebt. Das gestreifte Designpapier ist dabei aus dem Flower Market Paper Pad - ich habe die Stanze in verschiedenen Richtungen auf das Papier gelegt, damit die Streifen in unterschiedliche Richtungen gehen -, dazu habe ich weitere gepunktete Papiere kombiniert. Anschließend habe ich das Wort noch mit einem lilafarbenen Schatten hinterlegt, den ich wieder aus dem Papier gestanzt habe, das ich auch für die Schleife benutzt habe.
Das Gras ist aus der Platform Pop-Up Stanze, das habe ich auf alle drei Lagen im Inneren Karte geklebt. Auf die mittlere kam dann das gestanzte Wort. 
Die süßen Motive sind aus dem Tiny Spring Friends Stempelset, sowie die Ostereier aus dem Magic Spring Messages Set. Alle Motive sind mit Copics coloriert. Dann habe ich sie auf den drei Graslagen verteilt. 
An der hinteren Graslage habe ich die Sonne mit den Wolken befestigt. Sie sind mit Stanzen aus dem Platform Pop-Up Add-On Set aus weißem Cardstock gestanzt und mit Copics coloriert. Dann habe ich sie an kleinen Stücken Acetate befestigt und das hinter das Gras geklebt. So schweben Sonne und Wolken toll in der Luft.
Um den Text wieder zu vervollständigen, habe ich noch ein kleines happy aus  dem Tiny Spring Friends Stempelset abgestempelt und schräg auf das erste E von Easter geklebt.

For the big word easter I used the Giant Happy Easter die and die cut it from white cardstock, then cut off the word happy since the text would have been too tall with it. Then I die cut the letters again from patterned paper and glued them onto the white word. The stripey papers are from the Flower Market paper pad - I put down the die in different angles to make the stripes go in different directions - and I combined more dotted designs with those. I also put a purple shadow behind the word, die cutting it from the same purple paper that I also used for the bow.
The grass is made with a die from the Platform Pop-Up die set. I glued it onto each of the three inner layers, then glued the word onto the middle layer.
The cute images are from the Tiny Spring Friends stamp set, the easter eggs from the Magic Spring Messaeges set. All images are colored with Copics, then I glued them onto the different layers of the card.
To the third layer of grass I attached the sun with the clouds. I've die cut those from white cardstock using dies from the Platform Pop-Up Add-On die set, then colored them with Copics. I attached them to strips of acetate and glued that to the back of the grass layer. Now the sun and clouds are magically floating in the sky.
To complete the text again I've stamped a small happy from the Tiny Spring Friends stamp set and glued it onto the E from easter, putting it a bit at an angle.


Hier seht Ihr die Karte ein wenig schräg von oben fotografiert, so kann man die einzelnen Lagen besser sehen. Was ich besonders an dieser Karte liebe, ist, dass die Oberfläche geschlossen ist und man nicht, wie beispielsweise bei Box Cards, hindurchsehen kann.
Der Hintergrund ist mit der Platform Pop-Up Add-On Stanze gemacht - die Karte kann man genauso gut ohne machen. Eigentlich hatte ich das auch vor. Aber dann  habe ich mich umentschieden. Das blaue Designpapier, das ich für den Himmel verwendet habe, ist ein weiterer Bogen aus dem Watercolor Wishes Rainbow Paper Pad. Für die Szene habe ich einen Stempel aus dem Window Scenes: Spring verwendet. Der stempelt eigentlich eine Osterszene in einem Rahmen. Um den Stempel für meinen Hintergrund nutzen zu können, habe ich ihn erst ohne den Rahmen abgestempelt - den habe ich beim Abstempeln einfach maskiert - und dann die Graslagen rechts und links erneut angesetzt. Da das Motiv eigentlich zwei Graslagen hat, gab es für jedes Ende einen passenden Anschluss. 
Auch diese Szene habe ich mit Copics coloriert und anschließend alle Teile der Szene bis auf die untere Graslage mit den Eiern und den Baum weggeschnitten und auf den blauen Hintergrund geklebt.

Here you see a picture of the card taken a bit more from the top, this way you can see the different layers better. What I like best about this card, is the fact, that the top is completly closed so you don't see through the layers, like you do with Box Cards etc.
For the backround I used the Platform Pop-Up Add-On die - you can make this card withouth it and originally that was my plan. But then I changed my mind. I've cut the background from another sheet of the Watercolor Wishes Rainbow paper pad. For the scene I used a stamp from the Window Scenes: Spring stamp set. This stamps an easter scene in a frame. To make it wide enough for my background, I first stamped just the scene without the frame - I simply masked it off to stamp the image, then I added more grass to the left and right. Since the stamp has two layers of grass with easter eggs, there was a matching curve for both the left and right side. 
Again I used my Copics to color the scene, then I cut off all pieces besides the bottom grass layer with the eggs and the tree and glued those onto the blue background.


Um die Karte verschicken zu können, drückt man den Innenteil einfach nach unten und faltet die Karte flach. Sie hat so eine etwas lustige Form, passt aber in einen ganz normalen Briefumschlag.
Und auf diesem Foto könnte Ich auh meine verlängerte Hintergrundszene nochmal besser sehen. 

To be able to mail the card you simply push the middle part down and fold the card flat. It has some kind of funny shape when it's put flat, but you can simply mail it in a regular envelope.
On this picture you also get a better look at my enlarged background scene.

Samstag, 19. März 2022

Stempeleinmaleins - Ausgabe vom 19. März 2022

 
Hallo Ihr Lieben!
Beim Stempeleinmaleins zeigen wir Euch heute, wie Ihr diese Hasenbox machen könnt, die auch eine nette Dekoidee auf den Tellern des Ostertisches ist.

Hello everyone!
Over at Stempeleinmaleins we are sharing with you how to make this little bunny box. It is also a nice idea as a decoration on the table of your Easter brunch.

Die Box ist komplett aus einem Stück weißen Cardstocks gemacht. Sie geht echt fix, und auch die Dekoriation ist schnell aufgeklebt.

The box is made from one piece of white cardstock - and really quick to make. Also the decoration is added quickly.


Ich habe mich für einen weißen Hasen entschieden.
Um die Box zu verschließend, habe ich rosarotes Satinband verwendet und am Ohr über der Schleife noch eine Blume mit einem gestanzten Zweig aufgeklebt.
Die Wangen meines Häschens habe ich mit rosafarbener Kreide gewischt, die Highlights sind mit einem weißen Gelstift gemacht.

I decided to make a white bunny.
To keep the box closed I used a piece of pink ribbon and glued a little flower and punched out branch over the bow to the bunny's ear.
I used pink chalk to add some color to my bunny's cheeks, the hightlights are made with a white gel pen.

Donnerstag, 17. März 2022

I miss you

 
Hallo Ihr Lieben!
Vor einiger Zeit habe ich Euch ja schon eine Karte mit der Partyeule aus dem Stempelset Eule von Stampcorner gezeigt. Nun, im Set ist eine weitere, schrecklich traurige Eule enthalten. Und bevor sie vor lauter Kummer darüber, dass sie unbenutzt im Schrank liegt, noch trauriger wird, zeige ich heute ganz schnell eine Karte damit! Und die zeige ich heute auf dem Stampcorner Blog.
 
Hello eveyone!
A little ago I've shared a card with the party owl from the owl stamp set by Stampcorner. Well, there's another, very sad looking owl included in this stamp set. And to avoid her getting even more sad about the fact that she doesn't get used I quickly made a card with this cutie!  

Für den Hintergrund habe ich meine Distress Spray Stains verwendet, in diesem Fall Stormy Sky, Faded Jeans und Black Soot. Ob man Oxide Sprays oder Spray Stains verwendet, macht vom Ergebnis nur einen kleinen Unterschied. 
Ich habe aus Yupo einen Kreis gestanzt und den auf ein Stück Watercolor Cardstock gelegt. Das habe ich dann ganz leicht mit Wasser besprüht und anschließend die Distress Sprays darübergesprüht. Nach dem Trocknen mit dem Heat Tool habe ich den Yupo-Kreis entfernt und nur auf den Mond ein wenig Wasser gesprüht. Das Wasser reaktiviert das Spray um den Kreis und zieht die Farbe in den weißen Kreis hinein. So entsteht der tolle Effekt.
Für die Sterne habe ich etwas weiße Acrylfarbe sowie silberfarbene Metallic Watercolors auf den Hintergrund aufgespritz und dabei den Mond wieder abgedeckt.
Der Text aus dem Stempelset Eule ist mit weißem Embossingpulver direkt auf den Hintergrund embosst.
Anschließend habe ich den Hintergrund schwarz gemattet und auf einen weißen Kartenrohling geklebt.

For the background I brought out my Distress Spray Stains, in this case Stormy Sky, Faded Jeans and Black Soot. You can use Distress Oxide Sprays or Spray Stains makes no big difference in the result you get. 
I've punched a circle from Yupo and then put it on top of a piece of watercolor cardstock. I lightly misted the cardstock with water, then sprayed the colors on top. After I had dried the cardstock with a Heat Tool, I removed the Yupo circle and sprayed a bit of water only on top of the moon. The water re-reacts the color around the circle and kind of pulls it into the circle. This is how you get that cool effect on the moon.
For the stars I sprinkled some white acrylic paint and some silver metallic watercolor onto the background and covered the moon again with the Yupo circle while spritzing the color on.
The text means "I miss you" and is white heat embossed onto the background.
I matted the background with black cardstock and glued it onto a white note card.


Möchte man die süße Eule nicht ganz feste in den Arm nehmen und trösten? Ich habe sie erst mit Copics in E40-Tönen und hellen W-Tönen grund-coloriert, die feinen Linien habe ich dann mit Polychromos hinzugefügt. Die Highlights sind mit einem weißen Gelpen gemacht. Auf die Tränen in den Augen habe ich zudem etwas Glossy Accents aufgetragen.
Der Ast ist mit einer Stanze von MFT gemacht. Diese hier ist bereits etwas älter, es gibt aber eine ähnliche neue. Ich habe den Ast aus dem braunen Woodgrain Cardstock von LawnFawn, die Blätter aus einem dunklen Grün gestanzt und auch hier einige Highlights mit einem weißen Gelpen aufgemalt.
Im Hintergrund habe ich erst einige Wolken, gestanzt aus Vellum, aufgeklebt und dabei die Klebestellen hinter der Eule versteckt. Die Eule und der Ast sind dann mit 3D Tape aufgeklebt.
Ganz zum Schluss habe ich noch ein kleines Herz aus gelbem Cardstock gestanzt, es per Hand mit einer Zick-Zack-Linie geteilt und die beiden Teile als gebrochenes Herz ebenfalls mit 3D Tape über der Eule aufgeklebt.

Don't you just want to give this cute owl a big fat hug to make everything better? I first gave her a very basic layer of color using E40s and light W tones, then added the fine details with Polychromos. For the highlights I used a white gel pen. Onto the tears I put a layer of Glossy Accents.
The branch is made with a die by MFT. This is an older one, but they have a similar newer one available. I've die cut the branch from some dark brown woodgrain cardstock by LawnFawn, the leaves from a very dark green cardstock and again added some highlights with a white gel pen. 
Onto the background I glued some clouds that I've die cut from Vellum, hiding the glue behind the owl. Then I glued the owl and branch on top with dimensionals.
In the end I've die cut a little hearat from yellow cardstock and used my scissors to cut it apart in a zig zag, then glued both pieces as a broken heart over the owl, again using dimensionals.
 

Dienstag, 15. März 2022

Flip Flap Shutter birthday card

 
Hallo Ihr Lieben!
Mein Mann hatte vor kurzem Geburtstag. Uh, eine Männerkarte, wobei ich meinen Mann so gut kenne, dass Karten für ihn nicht gar so schwer fallen. In letzter Zeit bin ich öfter über die Flip Flap Shutter Card gestolpert und wollte die auch mal ausprobieren. So geschehen hier, und sie war eigentlich gar nicht kompliziert zu machen.

Hello everyone!
My husband celebrated his birthda a few days ago. Oh, a men's card, but I actually know him so well that cards for him aren't that hard to make. I came across the Flip Flap Shutter Card several times during the last two weeks and really wanted to give it a try. Mission accomplished, and this card wasn't as hard to make as it seemed.

Die Karte ist etwas größer als eine übliche C2 Karte. Die Kartenbasis ist aus weißem Cardstock geschnitten, den Aufleger mit dem Flip Flap Shutter habe ich mit kraftfarbenem Cardstock hinterlegt.

This card is slightly larger than a regular C2 card. I've cut the card base from white cardstock and matted the piece with the Flip Flap Shutter with craft colored cardstock.


Der Mechanismus selbst ist aus schwarzem Cardstock gemacht, damit es nicht zu trist wirkt. habe ich noch einen Rahmen aus mattgoldenem Metallic-Cardstock aufgeklebt.
Die drei einzelnen Panele des Mechanismus habe ich mit schwarz-weißem Designpapier beklebt, darauf kamen Kerzen aus hell- und dunkeltürkisfarbenem Cardstock. Die Kerzen sind mit der Birthday Candles Stanze von MFT gemacht. 
Den Text habe ich auf alle drei Fenster verteilt und dafür Stempel aus dem Set Bitty Birthday Wishes von MFT mit weißem Embossingpulver auf schwarzen Cardstock embosst. 
So wäre das natürlich eine ziemlich traurige Geburtstagskarte...

I've made the mechanism from black cardstock. Since this looked kind of sad I added a  frame, cut from matte gold metallic cardstock.
I glued some pieces of black and white patterned paper onto the three panels of the card, on top I glued candles die cut from light and dark turquoise cardstock. For the candles I used the Birthday Candles die set by MFT.
I seperated the text into three pieces and used stamps from the Bitty Birthday Wishes stamp set by MFT. I white heat embossed it onto strips cut from black cardstock.
Of course, this would be a pretty sad looking birthday card....


Aber da kommt der Flip Flap Shutter Mechnismus ins Spiel! Zieht man am Dreieck links an der Karte, klappt die komplette obere Lage zur Seite, die Panele drehen sich - und dann ist aber richtig Geburtstag angesagt! 

But that's where the Flip Flap Shutter mechanism comes into play. When you pull the triangle on the left side of the card, the whole top of the card moves to the left, the panels turn - and the card is turned into a proper birthday card!


Auch hier habe ich die Panele mit dem schwarz-weißen Designpapier beklebt, diesmal waren aber kleine Punkte als Konfetti auffoliert. 
Oben habe ich Partyrosetten aufgehängt. Die habe ich mit der Pinwheel Party Stencil von TheGreetery und Distress Oxide Salvaged Patina, Gathered Twigs, Speckled Egg und Brushed Corduroy gewischt und anschließend mit der passenden Stanze ausgestanzt. 
Die Kerzen befinden sich hier an derselben Stelle, wie auf der vorderen Seite der Panele. Aber diesmal sind sie angezündet. Dafür habe ich die Flammen aus goldenem Glittercardstock gestanzt und im unteren Bereich mit Copics etwas orange eingefärbt. 
Quer über den Kerzen habe ich zwei Partygirlanden, gestanzt mit der Twisted Crepe Stanze von TheGreetery aus mattgoldenem Metallic-Cardstock, aufgehängt. Außerdem habe ich noch einige weitere goldene Konfetti über der Szene foliert. 
Der Text ist wieder aus dem Bitty Birthday Wishes Stempelset von MFT und ebenfalls weiß auf schwarzen Cardstock embosst. Diesmal habe ich die einzelnen Teile unten auf die Kerzen geklebt, da oben bereits jede Menge los ist.

Also here I covered the panels with the black and white patterned paper, this time I used some sheets with small golden dots being foiled onto them.
I've hung up some party decorations to the top of the panels. I used the Pinwheel Party stencil by TheGreetery and inked the pinwheels onto some white paper using Distress Oxide Salvaged Patina, Gathered Twigs, Speckled Egg and Brushed Corduroy. Then I've cut them out with the matching border die. 
I glued the candles into the exact same spots as they are glued onto the front of the panels. But this time they are lit up. I've die cut the flames from golden glitter cardstock and added a bit of orange to the bottom with my Copics.
Above the candles I've hung up some party garlands, die cut from matte golden metallic cardstock with the Twisted Crepe dies by TheGreetery. I also added a few more foiled dots on top of the scene.
The text is again from the Bitty Birthday Wishes stamp set by MFT and white heat embossed onto black cardstock. This time I've glued it on top of the candles, since there was already a lot happening at the top of the panels.