Mittwoch, 31. Mai 2023

Create a Smile Sketch Challenge

 
Hallo Ihr Lieben!
Heute startet eine neue Challenge von Create a Smile. Und das ist der Sketch, der für die nächsten beiden Wochen das Thema der Challenge ist:

Hello everyone!
Today starts another Create a Smile Challenge. And this is the sketch, that's our theme for the next two weeks: 


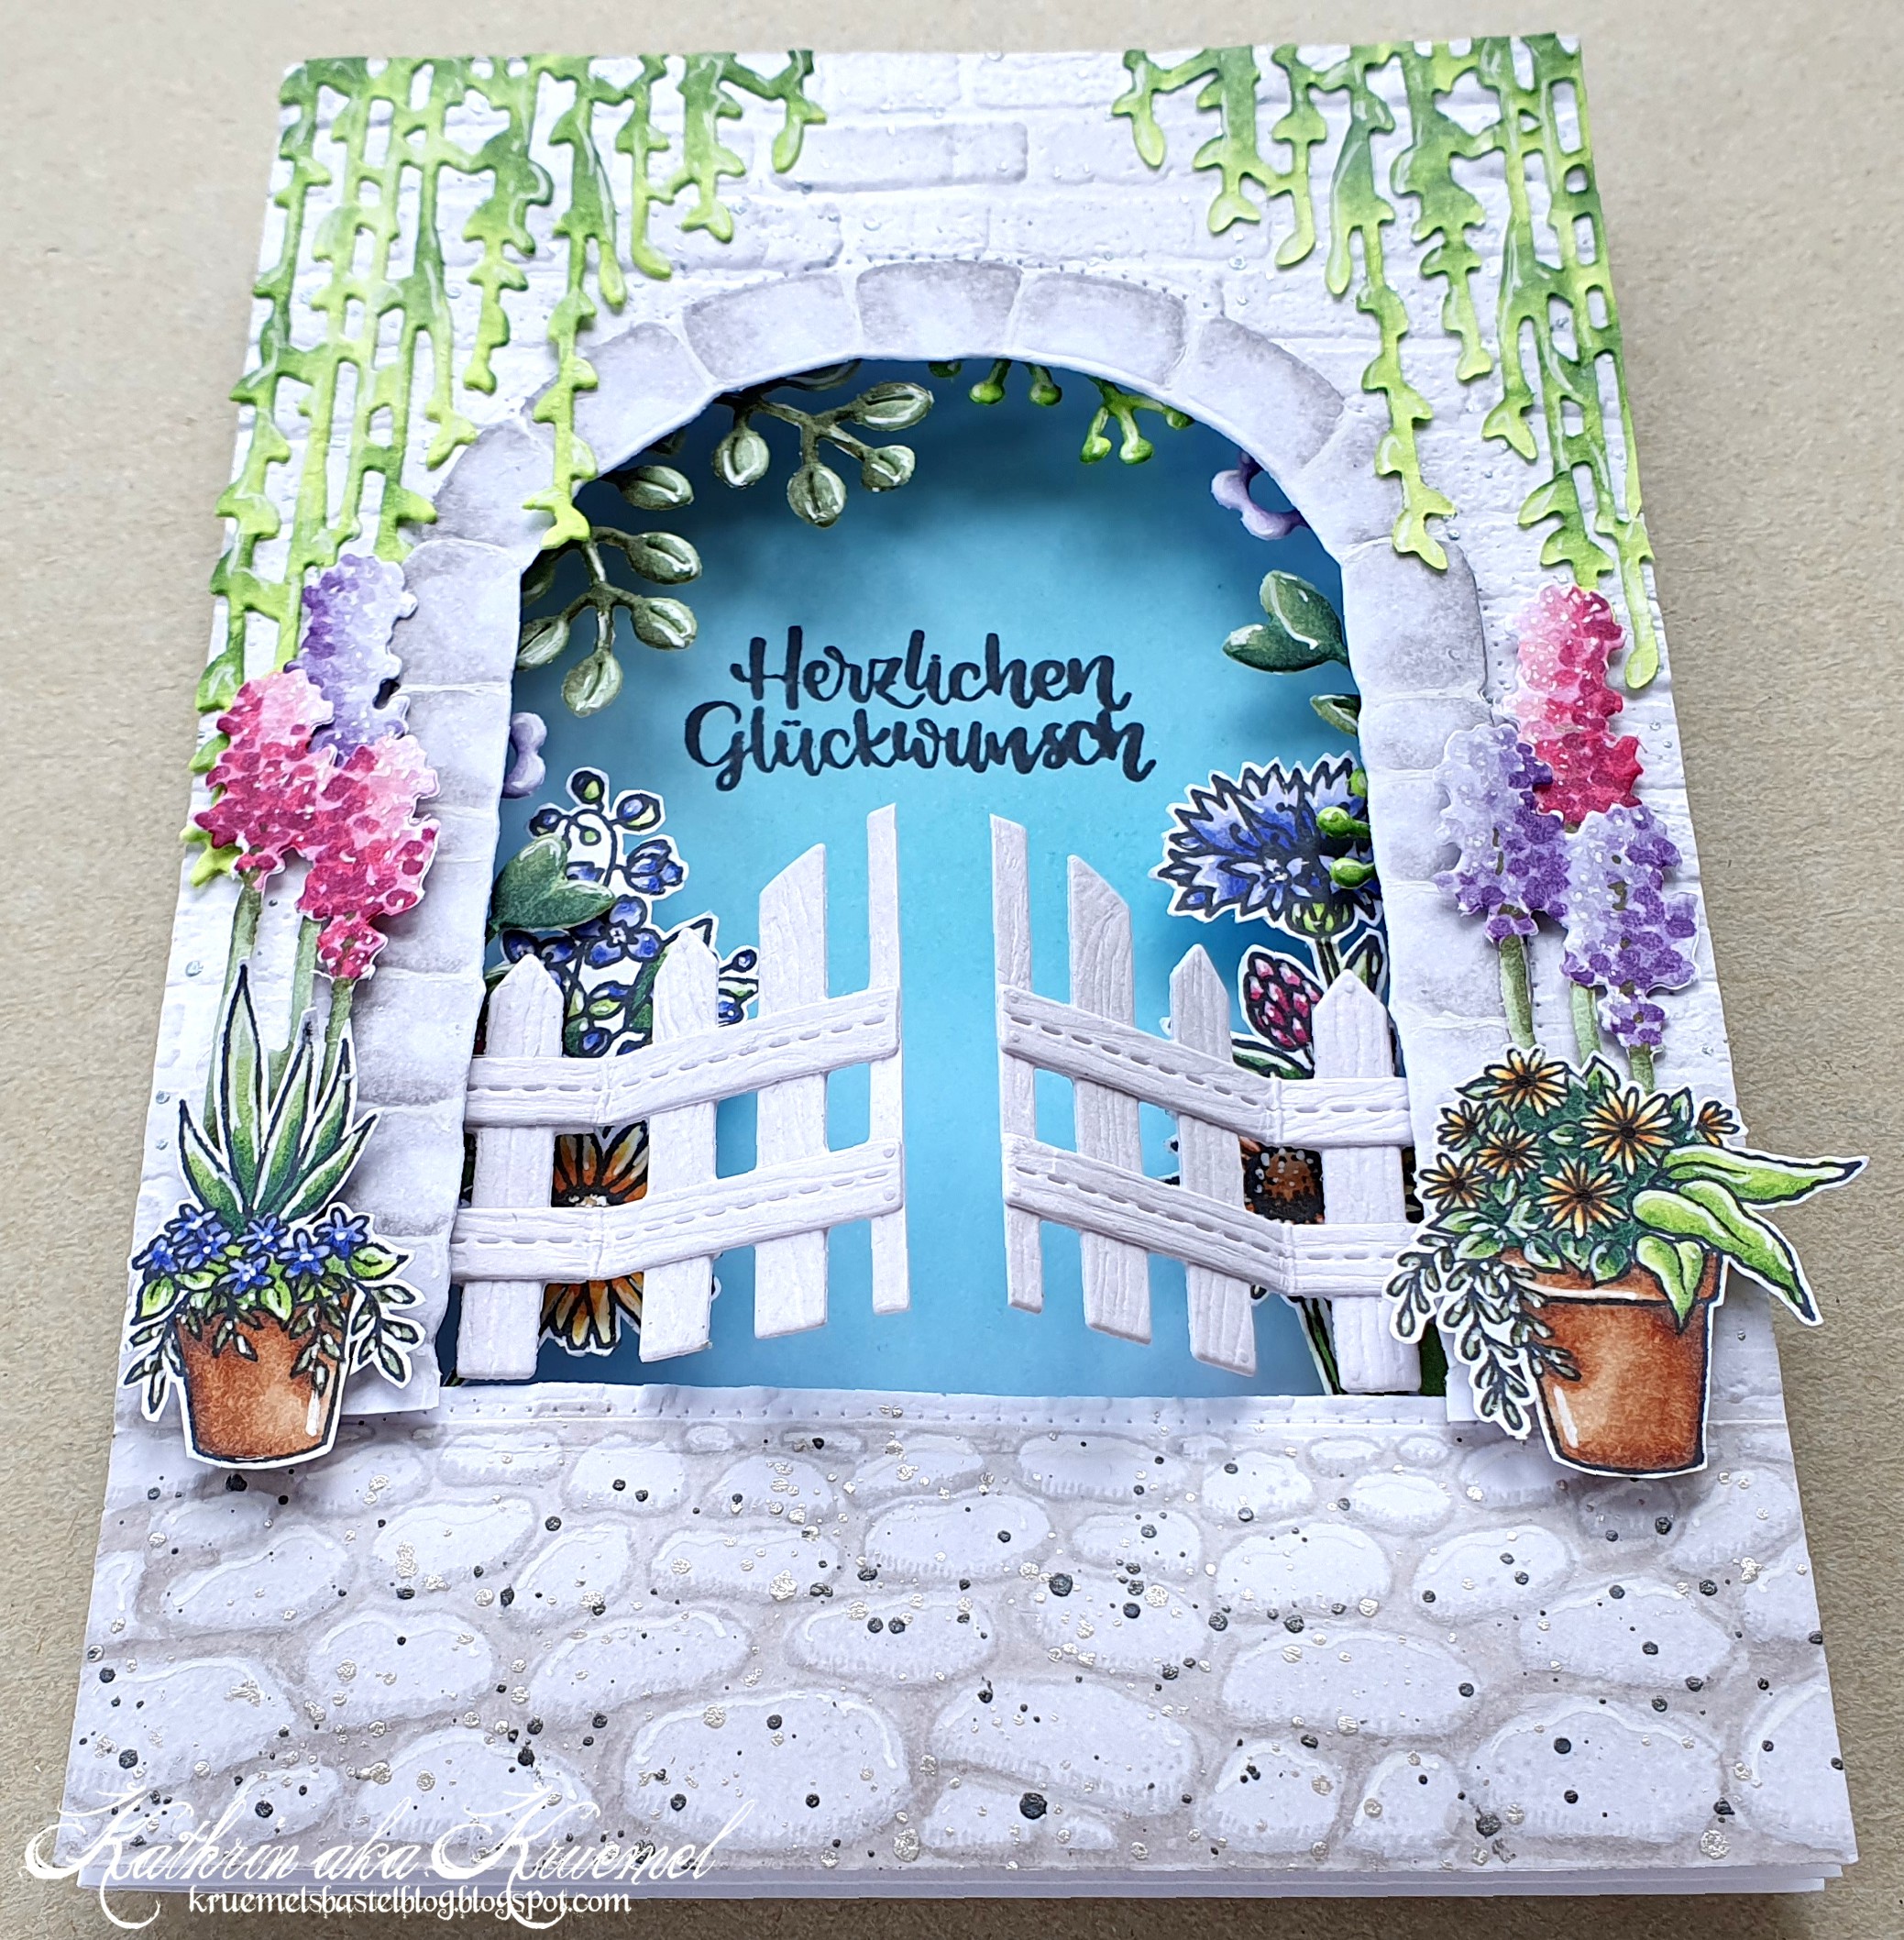
Ihr seht, auf dem Sketch ist viel freier Platz  - und der hat mich ein wenig aus dem Konzept gebracht, noch dazu, wo ich mit weißem Cardstock gearbeitet habe. Am Ende bin ich mit der Karte aber doch sehr zufrieden. Und das ist sie:

As you can see, there's lots of empty space on this sketch - and that's what gave me some problems, the more since I worked with white cardstock. But in the end I am really happy with how the card turned out. And this is it:


Auf den weißen Cardstock habe ich zuerst mit dem Organic Shapes Stencil und Distress Ink Rustic Wilderness die unebene Fläche grün eingefärbt, dann habe ich etwa die oberen zwei Drittel des Cardstocks mit grüner Metallic Watercolor bespritzt.

First I inked this wonky shape onto my white cardstock using the Organic Shapes stencil and Distress Ink Rustic Shapes. Then I spritzed some green metallic watercolor over the top two thirds of the cardstock. 


Nun ist grün und orange ja eigentlich nicht meine bevorzugte Farbkombi. Aber als ich ein Kind war, hatten wir das Wählscheibentelefon, das wohl alle Kinder der 70er kennen, in der orangen Variante. Ich mochte die Farbe nie, aber trotzdem war für mich klar, dass ich deshalb das toll nostalgische Telefon orange colorieren musst. Und so war klar, dass grün - neben beige die andere Farbe, in der das Telefon damals erhältlich war - den Hintergrund bilden musste. Unter das Telefon habe ich noch einen der ovalen Schatten aus dem Stanzenset Shadows and Flowers, gestanzt aus scharzem Cardstock, angebracht.
Das Telefon habe ich mit Copics coloriert, die Wählscheibe habe ich mit einem klaren Glaze-Pen von Sakura, das Herz in der Mitte mit Glossy Accents überzogen. Auch die Sprechblase - beides übrigens aus dem Set Am Telefon - ist mit Copics ein wenig schattiert, dann habe ich beides ausgeschnitten. 
Im Hintergrund habe ich Zahlenreihen, angelehnt an Telefonnummern - aufgestempelt. Dafür habe ich die Zahlen aus dem Set Klein und Fein mit mit Distress Ink Lost Shadow reihenweise aufgestempelt. Den grünen Fleck habe ich dabei mit dem Gegenstück des Lochstencils abgedeckt, so dass die Zahlenreihen hinter dem grünen Fleck zu verlaufen zu scheinen.

Well, green and orange is not my favorite color combo. But when I was a kid, we had the rotary phone, that most kids of the 70ies know, in the orange version. I never liked that color, but still it was clear to me, that I just had to color that nostalgic phone in exact that bright orange color. And since - besides beige - green was the other color that phone was available, I knew that I wanted to make the background green. Under the phone I placed one of the oval shadows from the Shadows and Flowers die set, cut from black cardstock.
I colored the phone with Copics, the rotary part I glazed with a clear Glaze Pen by Sakura, the heart in the center is covered with Glossy Accents. I shaded also the speech bubble - by the way both from the On the Phone stamp set - with Copics, then cut both images out.
Onto the background I stamped rows of numbers, thinking of phone numbers. For those I used the Klein und Fein stamp set and stamped the numbers with Distress Ink Lost Shadow. I covered the green inked area with the matching small pieces, that come in the stencil set and so it looks like the numbers are behind the green area.

 
Der kleiner Text, den ich mit weißem Embossingpulver auf schwarzen Cardstock embosst habe, ist aus dem Set Keine Sorge. Der Text darunter ist aus dem Set Für jede Gelegenheit und mit orangefarbener Tinte direkt auf den weißen Cardstock gestempelt. Dabei habe ich den unteren Bereich etwas dunkler als den oberen gestempelt und dem Text somit einen leichten Ombre-Look verliehen.
 
The text means "I haven't forgetten you. How are you?". The smaller one from the stamp set Don't Worry is white heat embossed onto a strip of black cardstock. The large one I stamped with orange ink directly onto the white cardstock, stamping the bottom of the text a bit darker and this way giving him an ombre look. 


Zum Schluss habe ich die Sprechblase, das Telefon und den kleinen Text mit 3D Tape auf den Hintergrund geklebt und einige orangefarbene Enamel Dots rund um das Telefon verteilt. Dann habe ich den Cardstock schwarz gemattet und alles auf einen weißen Kartenrohling geklebt.

To finish the card, I adhered the speech bubble, the phone and the small text to the background using foam tape and put a few orange Enamel Dots around the phone. Then I matted the cardstock black and attached it to a white note card.

Dienstag, 30. Mai 2023

Stampcorner Juni-Release Sneak #2

 
Hallo Ihr Lieben!
Na, wollt Ihr noch ein Sneak auf das Juni-Release von Stampcorner sehen? Diesen Monat war die Zeit ein wenig knapp, aber einen zweiten Sneak habe ich noch für Euch. 
 
Hello everyone!
So, are you interested in another sneak of the june release by Stampcorner? I was very short on time this month, but at least a second sneak I can share with you.
 
Gleich vorweg - auch bei dieser Kartenart hat mich ein Video auf YT ganz extrem inspiriert. Es heißt Multi-Layer Scenes on Cards und ist von  CraftyAnna. Darin wird der Aufbau der Karte erklärt. 
Für den Hintergrund habe ich weißen Cardstock mit Distress Oxide Mermaid Lagoon, Salvaged Patina, Cracked Pistacchio, Evergreen Bough und Rustic Wilderness gewischt. Anschließend habe ich in meinem Stempelkissenbestand nach Farben gesucht, die etwas dunkler als die Oxides waren und damit habe ich dann den neuen Hintergrund aus dem Juni-Release aufgestempelt. Dabei habe ich die Bereiche jeweils farblich passend eingefärbt und lauter Stempelkissen verschiedener Firmen verwendet.
Anschließend habe ich zwei der neuen Stitched Rectangle Stanzen verwendet und aus dem Hintergrund gestanzt. Für die Zwischenlage habe ich noch eine Größe, die zwischen den beiden anderen liegt, mittig aus einem Stück weißen Cardstocks gestanzt. 
Hinter alle Fenster habe ich Acetate geklebt und sie dann im Dschungellook dekoriert. Auf der hintersten Lage befinden sich zwei Wolken und ein kleineres Blatt. Auf diese Lage habe ich mit 3D Tape die weiße Lage Cardstock geklebt und diese dann mit einem weiteren Blatt, einer Liane, einer Dschungel-Pflanzen Bordüre und zwei Hibiskusblüten dekoriert. Alle Stanzteile habe ich übrigens aus weißem Cardstock gestanzt und mit Copics coloriert. Es kamen dabei Stanzen der verschiedensten Firmen zum Einsatz, darunter Spellbinders, LawnFawn und MFT. Auf die weiße Lage kam dann, wieder mit 3D Tape, der oberste Rahmen.

To mention it at the beginning - also this card was highliy inspired by a YT video. It's called Multi-Layer Scenes on Cards and is by CraftyAnna. She shares how to create this type of card in it.
For the background I inked a piece of white cardstock with Distress Oxide Mermaid Lagoon, Salvaged Patina, Cracked Pistacchio, Evergreen Bough and Rustic Wildernes. Next I looked for ink pads, that were a bit darker than the colors I used for the background, and stamped this new background stamp onto it. I tried to use the matching inks in the specific areas while I was inking the stamp and also used ink pads by all kind of brands.
Then I used two of the new Stitched Rectangle dies and die cut those from the background. For the middle layer I used a third die from the set - in size between the two others I used - and die cut it from a piece of white cardstock. 
I put acetate behind all cut out windows and then decorated them in a jungle look. On the back layer I adhered two clouds and a smaller leaf. On top of this layer I adhered the white cardstock piece using foam tape. Then I decorated that with another leaf, a vine, a jungle leaf border and two flowers. All die cuts are die cut from white cardstock and colored with Copics. I used dies from different brands here, Spellbinders, LawnFawn and MFT are some of them. On top of the white layer I attached the top frame, using foam tape again.
 

 Hauptelement der Karte ist dieser süße Elefant aus einem neuen Stempelset, der gerade Besuch von einem Schmetterling bekommt. Auch er ist mit Copics coloriert und per Hand ausgeschnitten. 
Zuerst habe ich auch diese Lage mit Dschungelpflanzen dekoriert - hier befinden sich Farne und eine weitere Blüte. Als letztes Element habe ich dann den Elefanten in die Szene gesetzt.
Ich habe überlegt, einen kleinen Text oben auf die Szene zu kleben, dann aber beschlossen, dass diese Karte gar keinen Text braucht. Ich finde sie so sehr schön und ein Text hätte einen Teil der Szene überdeckt. 

Main element on the card is this cute elephant from one of the new stamp set - he's just getting a visit from his friend the butterfly. I used Copics for the image also, then fuzzy cut it out.
First I decorated also the top layer with plants - there are farns and another flower. As the last element I put the elephant into the scene.
I had thought about putting a small text on the top left of the card, but then decided, that this card doesn't need one. I like it just the way it is and a text would have covered part of the scene.


Zum Schluss habe ich den restlichen Cardstock, aus dem ich die Rechtecke gestanzt habe, zugeschnitten und auf einen weißen Kartenrohling geklebt. Dann habe ich meine Szene in den Ausschnitt eingeklebt.
Und hier könnt Ihr auch den tollen 3D Effekt der kompletten Szene nochmal richtig sehen.

To finish the card, I attached the left over piece of inked cardstock, that I had die cut the rectangles from, to a white note card and put the scene back into the cut out.
And here you can also see the great 3D effect of this scene pretty good.

Montag, 29. Mai 2023

Ein verwunschener Garten zum Geburtstag

 
Hallo Ihr Lieben!
Wir waren auf den 60. Geburtstag einer Nachbarin eingeladen. Auf die Frage, womit man Ihr etwas Gutes tun könne, war die Antwort "winterharte Pflanzen sind immer willkommen". Da lag es natürlich nahe, das Thema Garten auch auf der Geburtstagskarte umzusetzen.Und so ist diese Karte entstanden.

Hello everyone!
We were invited to the 60th birthday of a neighbour. When we asked her, what we could give her as a gift, the answer was, some plants for her garden. So of course using the garden theme for her card came to my mind immediately. And so I made this card.

Die Front besteht aus vielen Lagen. Zuerst habe ich aus weißem Cardstock die äußere Form des Secret Garden Window von LawnFawn gestanzt. Dann habe ich den oberen Bereich des Cardstocks mit einem Embossingfolder von SU mit einem Mauermuster geprägt und die Steine leicht mit Distress Ink Lost Shadow gewischt.
Unter dem Ausschnitt habe ich den Steinpfad aus dem On Solid Ground von MFT ebenfalls mit grauer Tinte aufgestempelt und mit Lost Shadow leicht gewischt. Zusätzlich habe ich die Bereich zwischen den Steinen mit Copics hellgrau eingefärbt.
Über den kompletten Cardstock habe ich dann silberfarbene und nur über den Steinpfad zusätzlich schwarze Metallic Watercolor gespritzt.

The front of the card is made from lots of layers. First I die cut the outer shape from the Secret Garden Window die set by LawnFawn from a piece of white cardstock. I dry embossed a brick pattern into the upper area of the cardstock using an embossing folder by SU and lightly colored the bricks with Distress Ink Lost Shadow.
Under the cut out window I stamped the stone path from the On Solid Ground stamp set by MFT using grey ink and also inked them lightly with Lost Shadow. I also colored the areas between the stones with a grey Copic.
Over the complete cardstock I spritzed some silver, only over the stone path also some black Metallic Watercolor.


Hinter das ausgestanzte Fenster habe ich dann das kleiner Fenster mit den Pflanzen aus dem Secret Garden Window gesetzt und zuvor die Pflanzen mit Copics coloriert. Alle Pflanzen unterhalb etwa der Hälfte des Bogens habe ich weggeschnitten. Stattdessen habe ich dort Blumen aus dem Wild Meadow Set von MamaElephant angeklebt, die ich ebenfalls mit Copics coloriert habe.
Zwischen die beiden Lagen des Fensters habe ich einen Zaun mit Gartentor gesetzt. Der ist aus Woodgrain Cardstock von Ranger mit der Picket Fence Stanze von LawnFawn gemacht und ebenfalls mit Lost Shadow etwas schattiert. 
Der Steinbogen rund um das Fenster ist mit der Arch Stanze von MarianneDesign gemacht. Da ich die Säulenförmigen Teile auf meiner Karte nicht haben wollte, habe ich sie weggeschnitten und den Rest der Steine wieder angeklebt. Außerdem habe ich nur den mittleren Stein oben im Bogen durch Partial Diecutting ein klein wenig verbreitert, damit der Bogen auch gut über den bogenförmigen Ausschnitt des Fensters passt. Auch den Bogen habe ich mit Copics coloriert.
Die Deko neben dem Tor ist mit einer Mischung aus Stanzen und gestempelten Motiven gemacht, die ebenfalls alle mit Copics coloriert sind. Die Blumentöpfe sind aus dem Set Travel Plans von MFT, die Pflanzen dahinter habe ich mit einer Stanze von NoorDesign gemacht. Außerdem habe ich von der oberen Kante der Karte noch Ranken hängen lassen. 
Das Blau hinter dem Gartentor ist übrigens das Innere der Karte, aus deren Vorderseite ich ebenfalls den größeren Bogen des Secret Garden Window sets gestanzt habe. Im Inneren habe ich einen Teil mit Distress Oxide Salvaged Patina leicht gewischt und dort dann den Text aus dem Set Für jede Gelegenheit von Create a Smile so aufgestempelt, dass es bei geschlossener Karte durch das Tor sichtbar ist.

Behind the cut out window I put the smaller window with the flowers from the Secret Garden Window set, that I had colored the plants of with my Copics. All plants under about the half of the arch I cut off. Instead I placed some flowers from the Wild Meadow stamp set by MamaElephant, that I had colored with Cpoics as well, there.
Between the two layers of the window I put a fence with a garden door. I die cut that from some woodgrain cardstock by Ranger with the Picket Fence die by LawnFawn and shaded the pieces with Lost Shadow.
The arch doorway around the cut out window is made with the Arch die by MariannaDesing. Since I didn't like the column parts on the arch, I cut those pieces off and re-attached the rest of the stones. I also did some partial diecutting to only make the top most stone of the arch a bit wider, so the whole arch fits over the cut out window. Again I used Copics to color the arch.
The decoration next to the garden door is made with a mix of dies and stamped images, all colored with Copics. The flower pots are from the Travel Plans stamp set by MFT, the flowers behind them are made with a die by NoorDesign. I also added some vines, that hang from the top edgeof my card.
The blue behind the window is actually the inside of my card. I had die cut the bigger arch of the Secret Garden Window from the front of my card as well. On the inside of the card I inked a small section with Distress Oxide Salvaged Patina and then stamped a "heartfelt congratulations" from the Für jede Gelegenheit stamp set by Create a Smile onto that inked area, making sure it is visible through the window when the card is closed.


Alle Lagen für meine Szene habe ich mit dünnem 3D Tape aufeinander geklebt. Da sie aus 7 Lagen plus der Kartenbasis besteht, ist die Karte recht hoch geworden. Aber ich musste sie ja nicht mit der Post verschicken - und ich liebe die Tiefe, die die Karte hat.

All layers for my scene I attached to the card base with thin foam tape. Since there are 7 layers plus the actual card base, the card turned out pretty thick. But I didn't have to send it in the mail and I really love the depth the whole scene has.

Sonntag, 28. Mai 2023

BBQ gone wrong....

 
  Hallo Ihr Lieben!
Manchmal, wenn ich so gar nicht weiß, was ich basteln soll, schaue ich YouTube Videos. Und oft habe ich dann plötzlich eine Idee. So ging es mir auch hier. Ich hatte ein Video von Carries Rhoades angeschaut, in dem sie eine Grillstanze als Neuheit von HoneyBeeStamps vorgestellt hat. Das war erst mal nicht die Inspiration zu dieser Karte. Aber als sie dann oben und unten eine kleine Bordüre aus Würstchen aufgeklebt hat, hatte ich sofort einen Hund im Kopf, der die Wurstkette hinter sich herzieht. Und schon war die Idee zu dieser Karte geboren.

Hello everyone!
Every now and then, when I really don't have an idea for a card, I watch craft videos on YouTube. And most times I get an inspiration. That's what happened here. I watched a video by Carrie Rhoades, where she made a card showing a new grill die by HoneyBeeStamps. But that's not, what inspierd this card. At the end, she added little borders made from sausages to the top and bottom to the card - and I immediately had a dog in mind, that just stole that sausages chain and is running away with them. And that's how I got the idea for this card.

Für den Hintergrund habe ich ein Stück weißen Cardstock mit Distress Oxide Mermaid Lagoon und Tumbled Glass gewischt und einige Wassertropfen darauf verteilt. 
Rechts und links habe ich dann jeweils einen Baum gepflanzt. Der ist mit der Tree House Stanze von LawnFawn gemacht. Ich habe den Hausbaum einfach einmal komplett aus weißem Cardstock gestanzt, mit Copics coloriert und dann jeweils links und rechts der Tür zerschnitten. Auf jede Seite meines Cardstocks habe ich dann einen Baumteil geklebt. 
Das Laub an den Bäumen habe ich aus grünem Cardstock gestanzt, mit Mowed Lawn gewischt und dann grüne und weiße Metallic Watercolor aufgespritzt. Genauso habe ich später auch die Grasbordüre hinter den Terrassenplatten gestaltet. Auch beim Laub reichte mir je ein Stanzteil, das ich dann mittig geteilt habe.

For the background I inked a piece of white cardstock with Distress Oxide Mermaid Lagoon and Tumbled Glass and flicked some water onto it.
On the left and right side I planted a tree. I made that with the Tree House die by LawnFawn. I simply cut one tree house from white cardstock, colored it with Copics and then cut it to the left and right of the door. Then I attached one piece to each side of my cardstock.
The leaves on the trees are die cut from green cardstock, shaded with Mowed Lawn and then covered with little dots of white and green metallic watercolor. That's also how I did the grass border at the end of my terrace later. Also for the leaves I only needed one die cut, cutting it apart in the center.


Der Grill ist mit einer Stanze von DixieCraft gemacht, die ich schon ewig habe. Ich habe ihn jeweils einmal aus schwarzem und einmal aus silberfarbenem Spiegelcardstock gestanzt und einige Teile aus dem silbernen Cardstock ausgeschnitten und auf den schwarzen Grill geklebt. Genauso habe ich auch die Grillzange - mit einer Stanze von SU - gemacht. 
Die Würstchen oben auf dem Grill sind eine Stanze von Magnolia. Ich habe sie aus weißem Cardstock gestanzt und mit Copics coloriert - für die Würstchen auf dem Grill natürlich mit schönen Grillstreifen, zumindest an der Unterseite. 
Die Terrasse habe ich mit einem der Stempel aus dem Set On Solid Ground von MFT gemacht. Ich habe sie schwarz auf weißen Cardstock gestempelt, mit Distress Ink Pumice Stone gewischt und dann schwarze und weiße Metallic Watercolor aufgespritzt. Sie bildet den Boden für meine Szene.
Die Hunde sind alle von LawnFawn - drei aus dem Set Furry and Bright und der ganz rechts aus dem Set Joy to All. Auch sie sind mit Copics coloriert. Und der Hund ganz links ist der Würstchendieb. Ich habe ihm eine Wurst ins Maul gegeben und quer über die Karte weitere aufgeklebt, so dass sie wie eine Wurstkette aussehen.

The grill is made with a die by DixieCraft, that I have had forever. I die cut it once from the each black glossy and silver mirror cardsdtock and then cut off a few pieces of the silver grill, attaching them to the black one. That's also how I made the barbecue tongs, this time using a die by SU.
The sausages on the grill are made with a die by Magnolia. I cut them from white cardstock and colored them with Copics - of course adding some nice brown grill marks to their bottoms.
For the terrace I used a stamp from the On Solid Ground stamp by MFT. I stamped it black onto white cardstock, inked it with Distress Ink Pumice Stone and then flicked some white and black metallic watercolor on top. This is the ground for my scene.
All dog images here are by LawnFawn - three from the set Furry and Bright, the one very right from the Joy to All set. Again I used Copics to color them. And the dog on the left is the sausage thief. I put one sausage in his mouth and then added more sausages all across the card so they look like a sausage chain.


Beim Text war ich erst etwas ratlos - aber dann kam mir dieser Songtitel in den Sinn. Er ist recht lang, deswegen habe ich das Lemon Alpha Stanzenset von Create a Smile verwendet. Die Buchstaben für den Text passten gerade eben so über die Karte (okay, durch die unterschiedlichen Höhen konnte ich ein wenig tricksen). Alle Buchstaben sind einmal aus schwarzem und einmal aus weißem Cardstock gestanzt und minimal versetzt (sonst wären sie ja noch breiter geworden) aufeinander und dann auf die Karte geklebt.
Der kleine Text darunter ist dann mit Stempeln aus dem Set Crazy Antics von LawnFawn zusammengebaut und weiß auf schwarzen Cardstock embosst.

I had no idea for the text at first - but then thought of the Who let the Dogs Out song title. It's very long so I used the Lemon Alpha die set by Create a Smile. The letters for the text fit just exactly across the card (okay, I had to play a bit with different levels and that way was able to make it fit). I die cut all letters once from black and once from white cardstock and then stacked them, putting the white ones just a tiny bit off (or they would have been even wider). Then I glued them onto the background.
The smaller text underneath is put togehter using different stamps from the Crazy Antics stamp set by LawnFawn and white heat embossed onto black cardstock.


Zum Aufkleben der verschiedenen Elemente im Vordergrund habe ich dann dickes und dünnes 3D Tape verwendet - und die Grillzange musste, wie bei uns üblich wenn wir den keinen Grill nutzen, am Griff eingehängt werden. Das gehört einfach so! ;)
Zum Schluss habe ich alles noch auf einen weißen Kartenrohling geklebt.

To adhere the different elements in the foreground I used thick and thin foam tape - and the barbecque tongs just have to be hung up into the handle of the grill, that's a rule in our house when we use the small grill! ;)
To finish the card, I just attached everything to a white card base.

Samstag, 27. Mai 2023

Stempeleinmaleins - Ausgabe vom 27. Mai 2023

 
Hallo Ihr Lieben!
Das ist meine Karte nach dem neuen Sketch, den wir heute beim Stempeleinmaleins für Euch haben.
 
Hello everyone!
This is the card I made after the new sketch we are sharing today over at Stempeleinmaleins.
 
 Wenn Ihr Euch den Sketch anschaut, werdet Ihr sehen, dass er eigentlich grafischer mit drei auf der Spitze stehenden Quadraten ist. Mir war so gar nicht nach geradlinig, deswegen habe ich sie durch die Wolken ersetzt. Äh, und den schmalen vertikalen Streifen habe ich tatsächlich erst gesehen, nachdem meine Karte fertig war... 
Für den Hintergrund habe ich ein Stück weißen Cardstocks mit Distress Oxide Squeezed Lemonade, Salvaged Patina, Mermaid Lagoon, Uncharted Mariner und Black Soot gewischt. Da ich durch den Sketch ja ungefährt wusste, wo sich mein Motiv befinden würde, habe ich diesen Bereich als leuchtende Fläche hinter dem Stern gelb gewischt und dann den Nachthimmel drumherum immer dunkler werdend. Nach dem Wischen habe ich Wassertropfen sowie hell-goldene Metallic Watercolor auf den Cardstock gespritzt.

When you take a look at the sketch you'll notice, that it is more graphic with three squares standing on one corner. I didn't feel like making a linear card and so I replaced them with clouds. And well, the thin vertical strip I actually only saw after I had finished my card...
For the background I inked up a piece of white cardstock with Distress Oxide Squeezed Lemonade, Salvaged Patina, Mermaid Lagoon, Uncharted Mariner and Black Soot. Due to the sketch I knew pretty well where my image will be and so I inked this area yellow as a halo for my star, then the nightsky around it getting darker towards the edges. After I had inked up the cardstock, I spritzed some water and some light yellow metallic watercolor onto it.


Das süße Motiv ist der Mini Dream Big Stempel von ColoradoCraft. Ich habe ihn mit Copics coloriert und per Hand ausgeschnitten. Den Stern habe ich zudem mit klarem Wink of Stella beglittert. 
Die Wolken sind mit der Puffy Clouds Stanze von MFT aus Vellum gestanzt. Mit dünnem 3D Tape habe ich die Maus auf dem Stern an den Wolken befestigt und dann an diesen Stellen hinter die Wolken ebenfalls 3D Tape gesetzt und sie festgeklebt.
Der große Stern, den sich die Maus so fasziniert ansieht, ist von aus dem Stanzenset Traditional Stars von MemoryBox und aus goldenem Spiegelcardstock gestanzt. Dann habe ich ihn ebenfalls mit 3D Tape auf den Hintergrund geklebt.

The cute image is the mini stamp Dream Big by ColoradoCraft. I colored it with Copics, fuzzy cut it and put some clear Wink of Stella on top of the star.
The clouds are die cut from vellum using the Puffy Clouds die set by MFT. I attached the mouse with thin foam tape to the stars, then put more foam tape behind the image and the cloud areas that are covered by it and then adhered them to the card.
The large star the mouse is looking at so fascinated is from the Traditional Stars die set by MemoryBox and cut from gold mirror cardstock. Then I attached it with foam tape as well.


In dem kleinen Stempelset ist auch ein Dream Big Text enthalten, das Big war mir hier aber zu klein. Also habe ich nur das Dream mit goldenem Embossingpulver auf schwarzen Cardstock embosst. Dann habe ich die Buchstaben für das Wort Big wieder aus goldenem Spiegelcardstock und zusätzlich einen kleinen Stern mit einer Stanze von Magnolia gestanz. Dann habe ich alle Textteile mit dickem 3D Tape aufgeklebt.
 
In the mini stamp set there is also a Dream Big text included, but the word big was too small for this card. So I only gold heat embossed the word dream onto black cardstock. Then I die cut the letters for the word Big and a additionl little star using a die by Magnolia from gold mirror cardstock and adhered the text with thick foam tape to the card.
 

 Da ich von Anfang an eine schwarze Mattung für diese Karte nicht nötig fand, habe ich den Cardstock ein wenig größer geschnitten und ihn nach dem Dekorieren nur noch auf einen weißen Kartenrohling geklebt.
Und hier könnt Ihr den Schein der aufgespritzen Metallic Watercolor, des Spiegelcardstocks sowie den Glitter auf dem Stern besser sehen.

Since I decided before cutting the cardstock that a black mat wouldn't be necessary with this dark backtround I had cut the cardstock a bit larger and then only attached it to a white note card.
And here you can see the shine of the gold metallic watercolor and then mirror cardstock and also the glitter on the star a lot better.

Freitag, 26. Mai 2023

LawnFawnatics Challenge #149

 
Hallo Ihr Lieben! 
Das Thema der LawnFawnatics Challenge #149 ist "dies only". Es soll also eine Karte nur unter Verwendung von Stanzen gemacht werden. Ein kleiner gestempelter Text ist erlaubt, aber auch auf den habe ich verzichtet. Und das ist meine Umsetzung des Themas.

Hello everyone!
The theme of the LawnFawnatics Challenge #149 is "dies only". We should make a card using dies only. A small stamped sentiment is allowed, but I skipped that as well. And this is my take on the theme.

Als erstes habe ich ein Stück hellgelben Cardstock zurechtgeschnitten und von außen her mit Distress Oxide Mustard Seed und Wild Honey gewischt. Die Mitte des Cardstocks habe ich nicht eingfärbt, so dass hier die Originalfarbe des Cardstocks sichtbar ist. Dann habe ich goldene Metallic Watercolor und weiße Acrylfarbe aufgespritzt. 
Ein weiteres Stück Cardstock, diesmal weiß, habe ich mit Distress Oxide Mustard Seed, Wild Honey, Spiced Marmalade und etwas Rusty Hinge gewischt und dann ebenfalls goldene Metallic Watercolor sowie einige kleine Wassetropfen darauf gespritzt. Nach dem Trocknen habe ich aus diesem Cardstockstück dann den Honeycomb Backdrop ausgestanzt und mit 3D Tape auf den anderen Hintergrund aufgeklebt. 
Am Rand habe ich dann zwei Stellen noch einige der kleinen ausgestanzten Hexagons aufgeklebt.

First I cut a piece from light yellow cardstock and inked it - from the edges towards the center - with Distress Oxide Mustard Seed and Wild Honey. The center I left without any ink so the original color of the cardstock is visible there. Then I flicked some gold metallic watercolor and white acrylic paint on top.
Another piece of cardstock, this time white, I completly inked with Distress Oxide Mustard Seed, Wild Honey, Spiced Marmalade and a hint of Rusty Hinge and then again flicked some gold metallic watercolor and a few small droplets of water onto it. After it had dried, I cut the Honeycomb Backdrop from it and attached it with foam tape onto the other background.
Onto the edges I attached some of the small inner hexagons in two areas of the card.


Als Deko für obere rechte sowie untere linke Ecke habe ich jeweils eine Sonnenblume verwendet. Dafür habe ich die Blume mit der Magic Iris Sunflower Add-On aus weißem Cardstock gestanzt und mit Copics coloriert. Zum Aufkleben auf den Hintergrund habe ich hier dünnes 3D Tape benutzt.

As decoration for the top right and bottom left corner I used sunflowers. I die cut the Magic Iris Sunflower Add-On twice from white cardstock and colored the flowers with Copics. Then I adhered it onto the background with thin foam tape.


Für den Text habe ich die ebenfalls neue Giant Hello Sunshine Stanze benutzt. Ich habe sie mehrmals aus weißem Cardstock gestanzt und die Teile aufeinander geklebt. Dann habe ich nur das Wort Sunshine einmal aus goldenem Spiegelcardstock gestanzt, die inneren dünnen Buchstaben herausgenommen und dieses Teil dann oben auf die gestapelten Texte geklebt. 
Dann habe ich den Text nur oben auf die Sonneblumen aufgeklebt. Als Deko habe ich dann noch drei rote Herzen, gestanzt mit der Hearts and Stars Skinny Tag Stanze, neben dem Text angebracht.

For the text I used the also new Giant Hello Sunshine die. I die cut it several times from white cardstock and stacked the pieces. Then I die cut only the word sunshine from gold mirror cardstock, removed the thin inner letters and glued this piece on top of the stacked words.
Then I adhered the text onto on top of the sunflowers and added three little hearts, die cut with the Hearts and Stars Skinny Tag die from red cardstock, next to the text.


Durch die Farben, Motive und natürlich den Glanz des Spiegelcardstocks ruft diese Karte doch direkt "Sommer", oder?

With the colors, the images and the shine of the mirror cardstock this card just screams "summer" to me.

Donnerstag, 25. Mai 2023

Geburtstagskarte mit Party-Eule

 
Hallo Ihr Lieben!
Geburtstagskarten kann man nie genug auf Vorrat haben, finde ich. Und so zeige ich heute auf dem Stampcorner Blog diese Karte.

Hello everyone!
You can never have too many birthday cards in your stash. And so I made this card, that I'm sharing over on the Stampcorner Blog today. 

Ich gehe gerne mal durch meine älteren Stempel, um zu sehen, was ich denn mal wieder verwenden könnte. Und diesmal hat mich die kleine Party-Eule aus dem Stempelset Eule angsprungen. 
Für den Hintergrund habe ich einen großen Stern aus einem Stück weißen Cardstocks gestanzt und den Cardstock dann mit Distress Oxide Salvaged Patina, Uncharted Mariner und ein wenig Black Soot gewischt. Dann habe ich feine Tropfen Wasser und ein wenig goldene Metallic Watercolor aufgespritzt. 

Every now and then I go through my older stamps and look for images I haven't used for quite some time. This time this little party owl from the Eule stamp set catched my eye.
For the background I die cut a large star from a piece of white cardsdtock and then inked the cardstock with Distress Oxide Salvaged Patina, Uncharted Mariner and a bit of Black Soot. Then I flicked some fine drops of water and a bit of gold metallic watercolor onto it.


Hinter den sternförmigen Ausschnitt habe ich ein Stück gelben Cardstocks gelegt, den ich mit Distress Oxide Spiced Marmalade an den Rändern etwas abgedunkelt habe. Der Stern war dann der "Rahmen" für das Motiv.
Ich liebe die riesengroßen Augen dieser Eule...  Ich habe sie mit Copics coloriert und die Highlights mit einem weißen Gelstift gemacht. Dann habe ich sie ausgeschnitten und mit 3D Tape auf den Stern geklebt. 
Als Deko habe ich ein paar kleinere Sterne aus gelbem Cardstock gestanzt und in einer schrägen Linie auf die Karte geklebt.
Die kleinen Texte sind wieder aus den Stempelsets Kleine Worte und Kleine Worte 2. Diese beiden Stempelsets gehören zu meinen absoluten Favoriten, man kann damit für jede Karte den passenden Text zusammensetzen. Die Texte sind schwarz auf weißen Cardstock gestempelt und ebenfalls mit 3D Tape aufgeklebt. 

Behind the star shaped cut out I put a piece of yellow cardstock, that I inked with Distress Oxide Spiced Marmalade on the outside. The star is the "frame" for my image.
I love thos big eyes of the owl so much... I colored her with Copics and added some highlights with a white gel pen. Then I cut her out and attached her with foam tape on top of the star.
As decoration I cut some smaller stars from the same yellow cardstock and adhered them in a line across the card.
The smaller text on this card mean "hip hip hooray, party" and "for your birthday". I stamped them with black ink onto strips of white cardstock, then attached those to the background using foam tape again.


Für den Haupttext habe ich die Viel Glück Stanze von Stampcorner verwendet. Ich habe die Worte je dreimal aus weißem und einmal aus gelbem Cardstock gestanzt. Die gelben Stanzteile habe ich von unten her wieder mit Spiced Marmalade eingefärbt, dann habe ich alle Worte aufeinander und auf die Karte geklebt.

The main text means "good luck" - here we say "good luck for your birthday" when we want to wish a happy birthday. I die cut each word three times from white and once from yellow cardstock, then inked the yellow ones from the bottom upwards with Spiced Marmalade again. I stacked all the words and then adhered them to the background.


Hier sieht man die goldenen Spritzer auf der Karte viel besser. Ich finde, sie bringen den Hintergrund und die gelben Elemente auf der Karte zusammen.
Zum Schluss habe ich den dekorierten Cardstock schwarz gemattet und alles auf einen weißen Kartenrohling geklebt.

Here you get a better look at the golden splatters on the background. I think, they bring the background and the yellow elements on the card together.
To finish the card, I matted my decorated cardstock black and attached everything to a white note card.

Mittwoch, 24. Mai 2023

Create a Smile May Moodboard Challenge Reminder

 
Hallo Ihr Lieben!
Heute zeige ich Euch eine weitere Karte, die nach dem Moodboard der aktuellen Create a Smile Challenge entstanden ist. 

Hello everyone!
Today I am sharing another card, that I made inspired by the moodboard of the current Create a Smile challenge.

Nun, die Karte sah in meinem Kopf anders aus - und auf den Bildern sieht sie nochmal anders aus als in Wirklichkeit. 
Für den Hintergrund habe ich den Regenbogen-Stencil aus dem April-Release verwendet und zwei Regenbögen - nicht dem Muster des Stencils folgend - auf weißen Cardstock gewischt. Dabei habe ich jeweils Teile der Regenbögen abgedeckt und so die einzelnen Bögen mit Distress Ink Picked Raspberry, Wild Honey, Mowed Lawn, Blueprint Sketch und Wilted Violet aufgewischt. Dann habe ich den Stencil noch einmal aufgelegt und durch den Stencil Versamark über die farbigen Regenbögen gewischt. Dann habe ich alles mit einer Schicht klaren Embossingpulvers überzogen. So waren die Farben der Regenbögen versiegelt und ich habe den Cardstock drumherum mit Distress Oxide Blueprint Sketch, Chipped Sapphire und Black Soot eingefärbt und einige wenige kleine Wassertropfen aufgespritzt.

Well, this card looked different in my head - and looks different on the pics again.
For the background I used the rainbow stencil from the april release to ink two rainbows - not really following the pattern of the stencil when placing them - onto white cardstock. I covered most of the arches to be able to ink the arches individually with Distress Ink Picked Raspberry, Wild Honey, Mowed Lawn, Blueprint Sketch and Wilted Violet. Then I put the stencil on again and put a layer of Versamark on top of the colored rainbows. Then I covered them with a layer of clear embossing powder. Now the colors of the rainbows were sealed and I was able to ink the cardstock around them with Distress Oxide Blueprint Sketch, Chipped Sapphire and Black Soot and flicked just a few very small droplets of water onto the cardstock.


Auf diesem Bild kann man es ganz leicht erkennen - statt der Spritzer mit Metallic Watercolor habe ich hier Sterne mit Stencil Paste aufgetragen. Ich habe den Sparkle Stencil und klar-glitzernde Paste von LawnFawn benutzt und einige Sterne an bewusst gewählten Stellen aufgebracht.
Vor jeden der beiden Regenbögen habe ich zwei Wolken, gestanzt aus weißem Cardstock mit Stanzen aus dem Set Weather, geklebt. Und in die Mitte war Platz für den Mond. Der ist aus dem Set Traumtänzer und mit Copics coloriert. 
Den Text habe ich dann ober- und unterhalb der Regenbögen aufgeklebt. Er ist ebenfalls aus dem Set Traumtänzer. Die kleinen Teile sind mit weißem Embossingpulver auf schwarzen Cardstock embosst. Für das Wort Traum habe ich silbern-glitzerndes Embossingpulver verwendet und das Wort anschließend nah der Stempellinien ausgeschnitten.

On this picture you can see it a bit - instead of the drops of metallic watercolor I decided to stencil some stars with stencil paste onto the background. I used the Sparkle stencil and clear glittery stencil paste by LawnFawn to stencil a few stars into selected areas.
I glued two clouds, die cut from white cardstock using dies from the set Weather. And in the center war room for the moon. It's from the set Dream Big and colored with Copics.
The text - 'a dream is just the beginning' - I arranged above and under the rainbows. It's also from the set Dream Big. I white heat embossed the smaller text parts onto white cardstock. For the large word I used silver glitter embossing powder and then cut the word out with my scissors, close to the stamped lines.


Und dann habe ich mich noch entschieden, auch ein niedliches Motiv auf die Karte zu kleben.
Das Eichhörnchen ist aus dem Stempelset Pulliwetter - und fliegt eigentlich an einem Drachen davon. Den habe ich durch den Luftballon aus dem Set Verrücktes Huhn ersetzt. Auch diese Motive habe ich mit Copics coloriert und für den Luftballon wieder Regenbogenfarben - nur ohne pink - verwendet.

And then I decided, to add a cute image to the card.
The squirrel is from the set Pulliwetter - and originally flies away with a kite. I replaced that with a balloon from the set Verrücktes Huhn. Again I used Copics to color the images and used rainbow colors - minus the pink - to color the balloon. 


Hier kann man die klar-glitzernden Sterne am Himmel noch ein wenig besser sehen.
Die Motive und Texte habe ich dann mit dickem und dünnem 3D Tape auf dem Hintergrund befestigt, den Cardstock schwarz gemattet und alles auf einen weißen Kartenrohling geklebt.

Here you can see the clear glittery stars on the sky a bit better.
I adhered the images and texts to the background with thick and thin foam tape, matted the cardstock black and attached everything onto a white note card.

Dienstag, 23. Mai 2023

Stampcorner Juni-Release Sneak #1

 
Hallo Ihr Lieben!
Kinders, wo rennt die Zeit hin? Der Mai ist schon fast vorbei, und das bedeutet, es ist wieder Zeit für Sneaks auf das Juni-Release von Stampcorner. Eines der Motive aus einem neuen Stempelset zeige ich Euch auf dieser Karte.

Hello everyone!
Where is time going? May is nearly over and that means, it's already time for some sneaks of the june release by Stampcorner. One of the new images I am sharing with you on this card.

Ich war noch am Überlegen, was ich dennn damit machen sollte, als ein neues Video von Jennifer McGuire rauskam. Die Peek Hole Card - eine Karte mit Ausschnitten durch alle Lagen der Karte, die dann mit foliertem Acetate hinterlegt werden. Wollte ich unbedingt ausprobieren! Und so ist die Idee zu dieser Karte entstanden.
Aus allen Lagen der Karte - zwei Lagen der Grundkarte sowie jeweils einen Aufleger für die Kartenfront sowie innen auf der Karte - habe ich einen Kreis ausgestantz. Dann habe ich einen der Aufleger von unten her mit Distress Oxide Lumberjack Plaid, Abandoned Coral, Saltwater Taffy und Tattered Rose gewischt und etwas Wasser für den oxidierten Effekt aufgespritzt.

I wasn't sure yet what I wanted to do with this image when Jennifer McGuire released a new video. The Peek Hole Card - a card with cut out on all layers of a card, where some foiled acetate gets put behind. I really wanted to try that! And that's how the idea for this card came to life.
From all layers of my card - the two layers of the card base and two cardstock pieces, that go on top - I die cut a circle. Then I inked up one of the smaller pieces to go on top from the bottom with Distress Oxide Lumberjack Plaid, Abandoned Coral, Saltwater Taffy and Tattered Rose and flicked some water onto the cardstock for the great oxide effect.


Der keine Elefant mit seinem Marienkäferfreund ist einfach zu süß! Ich habe ihn mit Copics coloriert und per Hand ausgeschnitten. 
Ich habe ihn so auf den Cardstock aufgeklebt, dass er ein wenig in das Fenster mit dem Acetate hineinragt. Auf das Acetate habe ich zuvor mit silberner Folie und der Dot Burst Plate von MemoryBox diesen strahlenfrömigen Kreis aus Punkten auffoliert.
Da mir die Karte insgesamt zu leer war, habe ich noch einige hohe Blumen hinter den Elefanten gesetzt. Ich habe die Pusteblume mit der Make a Wish Stanze von Sizzix einmal sowie die Kornblume mit der Cornflower Stanze von Gummiapan zweimal aus weißem Cardstock gestanzt und dann mit Copics coloriert. 

The little elefant with his ladybug friend is so cute! I colored the image with Copics and fuzzy cut it out.
Then I attached it to the background, making it overlap the cut out circle a bit. Onto the acetate I foiled these dotty rays using the Dot Burst hotfoil plate by MemoryBox and silver foil. 
Since the card seemed a bit plain, I put a few large flowers behind the image. I die cut the dandelion with the Make a Wish die by Sizzix once, the cornflower with the Cornflower die by Gummiapan twice from white cardstock and colored them with Copics.


Da die beiden so gute Freunde zu sein scheinen, erschien mir ein großes Friends perfekt als Haupttext auf der Karte. Das habe ich mit einer Stanze von MFT aus silbernem Spiegelcardstock gestanzt. Pst - im neuen Release es wird von Stampcorner auch ein deutsches "Freunde" als Stanze geben. Das habe ich aber nicht, also habe ich auf einen englischen Text gesetzt.
Als kleinen Text darunter habe ich einen Stempel aus dem Gardens Before 'n Afters von LawnFawn schwarz auf weißen Cardstock gestempelt und mit dünnem 3D Tape quer über die Karte geklebt. 
Als Deko habe ich noch drei kleine rote Herzen hinzugefügt. 

Since those two seem to be such great friends, a big die cut friends seemed the right thing for my main text here. I die cut it from silver mirror cardstock using a die by MFT.
For the subtext I used a stamp from the Gardens Before 'n Afters by LawnFawn. I stamped it black onto white cardstock and attached it with thin foam tape across the card.
As decoration I also added three small hearts.


Hier kann man die Folierung auf beiden Kreisen gut sehen - und wenn man die geschlossene Karte direkt von oben/vorne anschaut, sind die beiden Muster absolut deckungsgleich. 

Here you can see the foiling on both circles pretty well - and when you look at the closed card directly from the front/top, both patterns lay exactly on top of each other and appear to be one.


Auch hier kann man ganz gut sehen, dass das Muster auf beiden Kreisen gleich ist. Und wenn auch das Innere der Karte so einen tollen Kreis aufweist, verdient es auch ein wenig Deko.

Again you can see pretty well here, that the pattern on both circles is identical. And since the inside of the card shows such a great element, it also deserves a bit of decoration.


Den Aufleger im Inneren habe ich nicht eingefärbt, deswegen habe ich meine Texte hier weiß auf roten Cardstock embosst. Das thank you ist wieder aus dem Set Gardens Before 'n Afters von LawnFawn, das Wort Sweetie stammt aus dem neuen Stempelset. Und daneben durfgte dann noch ein kleiner Marienkäfer, ebenfalls aus dem neuen Set, Platz nehmen.

I didn't ink the cardstock I put on the inside of my card, so I white heat embossed the texts onto red cardstock. The thank you is again from the Gardens Before 'n Afters set by LawnFawn, the word sweetie comes in the new set. And next to the text I placed a little  ladybug, also from the new set by Stampcorner. 


Und für dieses letzte Bild habe ich die Karte mal noch gegen mein Fenster gehalten, so sieht man den See Through Effekt am besten.
 
And for this last picture I held the card against my window - this way you see the See Through effect the best.
 

Montag, 22. Mai 2023

Glück

 
Hallo Ihr Lieben!
Na, seid Ihr bereit für eine weitere Karte mit einem Motiv von ColoradoCraft? Heute habe ich einen weiteren Hamster mit Kleeblatt verwendet.

Hello everyone!
Are you ready for another card with an image by ColoradoCraft? This time I used another hamster with clover.

Eigentlich wollte ich eine eher einfache Karte machen, aber ich war mit dem Hintergrund nicht zufrieden. Deswegen habe ich ihn kleiner geschnitten und später auf einen Flat Shaker gesetzt. Dafür habe ich dunkelgrünen Cardstock als Basis verwendet und ihn mit hellgrünen ausgestanzten Kleeblättern und goldenen Pailetten gefüllt. 

I had planned to make a more simple card, but then I didn't like my background. So I cut it down and put it onto a flat shaker. For that, I cut a base from dark green cardstock and fillet the shaker with little clovers punched from light green cardstock and gold sequins.


Für die Szene habe ich die Kleeblattwiese des zweiten Motives aus dem Set Four Leaf Clover mit grauer Tinte auf weißen Cardstock gestempelt und dabei den Hamster, der eigentlich im Klee sitzt, maskiert. Die Wiese habe ich dann mit grüner Tinte und darüber blauen Himmel gewischt. Anschließend habe ich pinkfarbene Metallic Watercolor aufgespritzt. Die einzelnen Kleeblätter in der Wiese habe ich dann mit Polychromos noch etwas nachcoloriert, damit sie besser erkennbar sind.
Den süßen Hamster habe ich ebenfalls mit Copics coloriert und an die Stelle des anderen Hamsters in den Klee geklebt. Die Flügel der Libelle habe ich mit Stickles überzogen.
Außerdem habe ich die einzelnen Kleeblätter aus dem Set mehrere Male abgestempelt, mit Copics coloriert und ausgeschnitten. Die habe ich dann in drei Ebenen aufgeklebt - hinten direkt auf den Hintergrund, in der Mitte mit dünnem und unten/vorne mit dickem 3D Tape. 
Rund um die Szene habe ich einen dünnen goldenen Rahmen gesetzt. Dafür habe ich eine der Stitched Rectangle Frames von Create a Smile dreimal aus weißem Cardstock und einmal aus goldenem Spiegelcardstock gestanzt, alle aufeinander geklebt und dann auf dem  Hintergrund befestigt. 
Neben den kleinen Hamster habe ich dann noch zwei kleine pinkfarbene Herzen gesetzt.

For the scene I stamped the clover meadow from the second image of the Four Leaf Clover set with grey ink onto white cardstock. I masked off the hamster, that's originally sitting in the meadow, to place a different image there later. Then I inked the meadow with green and above it a sky with blue ink and spritzed some pink metallic watercolor over the cardstock. I used my Polychromos to accent the individual clovers in the meadow a bit, to make them better noticable. 
The cute hamster I colored with Copics and glued it into the place where the other hamster is sitting in the meadow. The dragonfly's wings are covered with Stickles. 
I also stamped the individual clovers from the set several times, colored them with Copics and cut them out. I attached those on three different levels - in the background directly to the cardstock, in the middle with thin and in the foreground with thick foam tape.
Around the scene I placed a gold frame. I cut one of the Stitched Rectangle Frames by Create a Smile three times from white cardstock and once from gold mirror cardstock. Then I stacked them and adhered them to the background.
Next to the little hamster I placed two small pink hearts.


Als Text habe ich nur ein großes Glück aufgebracht. Ich habe dafür die Glück Insert Stanze von Kulricke aus schwarzem Cardstock gestanzt und ausgeschnitten. Damit der schwarze Streifen nicht zu breit wird, habe ich die Ü-Punkte mit weggeschnitten und durch zwei weitere kleine Kleeblätter ersetzt. Dann habe ich goldenen Spiegelcardstock hinter den Cardstock gesetzt und ihn leicht schräg quer über den Rahmen geklebt.

As the image I just went with a large luck. I die cut the word from black cardstock and cut it out. Since the strip would have been too large with the dots on the U I cut those off as well and replaced them with another two small clovers. Then I put some gold mirror cardstock behind the black cardstock strip and attached it a bit slanted onto the frame and across the card.


Den Cardstock mit den Motiven habe ich dann oben auf meinen Shaker und dann alles auf einen weißen Kartenrohling geklebt. Von den Kleeblättern im Shaker kann man immer nur Teile sehen, aber ich finde, das macht nichts, da man sie nach wie vor erkennen kann.

I adhered the cardstock with the images on top of my shaker and then attached everything to a white note card. You can only see parts of the clovers in the shaker, since they are too large to be seen fully, but I don't mind and think, they are still recognizable as clovers.