Montag, 31. Januar 2022

Thanks for your kindness

 
Hallo Ihr Lieben!
Ich habe so viele Stanzen und Stempel, die ich unbedingt haben wollte, die aber noch nie zum Einsatz kamen. Und die sollten nun endlich mal verwendet werden. Dazu gehört auch diese tolle Hintergrundstanze von Sizzix. Und hier ist also meine erste Karte damit.

Hello everyone!
I have so many stamps and dies, that I really wanted to have but never used yet. And I really want to put those to a use. This beautiful background die by Sizzix is one of them. And this is the first card I made with it.
 
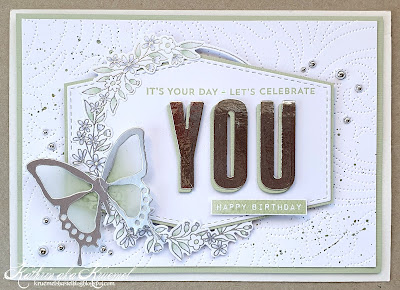
Die Karte mag recht simple aussehen, aber sie hat wirklich lange in der Fertigung gedauert. Der Grund dafür ist, dass ich die Bouquet Stanze von Sizzix einmal aus dem hell-koralle farbenen Cardstock ausgestanzt habe, dann ein weiteres Mal aus Cardstock in dem dunkleren Farbton. Alle Blütenbläter habe ich dann an ihren Platz in dem aus hellerem Cardstock gestanzten Hintergrund wieder an ihren Platz geklebt. Press'n'Seal hat das ganze ein wenig erleichtert, aber es hat trotzdem ewig gedauert.
Die Mitten der Blumen habe ich mit etwas weißer Stempelfarbe aufgehellt und dann - Ihr erratet es vielleicht - habe ich auch hier die kleinen ausgestanzten Teile durch welche aus noch dunklerem Cardstock gestanzt und eingeklebt. Ich finde, das plastische Ergebnis war die Arbeit auf jeden Fall wert!
Über den kompletten Hintergrund habe ich dann ein paar Spritzer weißer Acryfarbe verteilt.
Anschließend habe ich die größte der Deckle Edge Frame Stanzen von Stampcorner benutzt und den Hintergrund damit ausgestanzt, damit er auf eine Karte in Din-Format passte.
Das tolle an diesen Deckle Edge Frame Stanzen ist, dass im Set abwechselnd Rechtecke mit Büttenrand und Stanzen mit geradem Rand und Stitched Lines enthalten sind. Dadurch kann man wunderbar tolle Rahmen stanzen - oder eben komplette Cardstocklagen. 
Ich habe die beiden größten Stanzen mit Washitape zusammengeklebt und so vier identische Rahmen aus dem dunkelsten Koralleton, den ich für die Blumenmitten verwendet habe, ausgestanzt. Die habe ich dann aufeinander und auf meinen ausgestanzten Hintergrund geklebt. Ich finde, der Rahmen macht die Karte erst komplett.
 
This card may look pretty simple, but it took me a long time to make it. The reason is, that I decided to die cut the  Bouquet die by Sizzix once from light coral colored cardstock, then cut it again from a darker shade of coral cardstock. I glued all the petals cut from the darker shade of cardstock into the cut outs in the lighter die cut. Press'n'Seal helped a bit, but it still took ages to glue all the little pieces down. 
I used some white stamping ink to lighten up the centers of the flowers and then - you might already guess it - replaced the tiny drops, that create the flower centers, with ones cut from even darker shade of coral cardstock. I really think, the look makes all that work worth!
Next I spritzed some white acrylic paint over my pieced together background.
Then I used the largest of the Deckle Edge Frame dies by Stampcorner to cut the background down to a german Din size.
The great thing about this Deckle Edge Frame die set is, that there are rectangles with a deckle edge and then, alway inbetween the sizes of the deckled ones, some with a straight line and some stitching details. This way you can either cut wonderful frames - or complete layers of cardstock.
I used the two largest dies and taped them together to die cut four identical frames from the cardstock, that I used to cut the flower centers. And I think, this frame really finishes this card off.


Dieser tolle und wirklich große Text ist aus dem Jumbo Sentiments Stempelset von TheTon - eine Firma, die ich erst entdeckt habe. In diesem Set sind noch drei weitere so große Worte sowie einige kleinere, um einen kompletten Text auf eine Karte zu stempeln. Ich habe das Wort thanks mit goldenem Embossingpulver auf Vellum embosst und dann mit der passenden Outline-Stanze ausgestanzt. Hinter dem Embossingpulver kann man prima 3D Tape verstecken - also habe ich das Vellum damit auf den Hintergrund geklebt.
Der restliche Text ist foliert. Dafür habe ich eine der Plates aus dem Thank You Combo Set von Spellbinders mit goldener Folie wieder auf den dunkel-koralle farbenen Cardstock foliert und anschließend ausgeschnitten. Dann habe ich ihn mit 3D Tape quer über das Wort thanks geklebt.

This great and really big text is from the Jumbo Sentiments stamp set by TheTon - a brand I just discovered. There are three more words of that size in the stamp set and a few smaller ones to complete the text on a card. I golden heat embossed the word thanks onto vellum and then used the matching outline die to cut it out. Behind the embossing you can wonderfully hide some foam tape, so that's what I used to glue the vellum onto the background.
The rest of the text is foiled. I used one of the plates from the Thank You Combo set by Spellbinders and golden foil, to foil it onto the dark coral cardstock, then cut it out. Again I used foam tape to tape the cardstock strip across the word thanks.


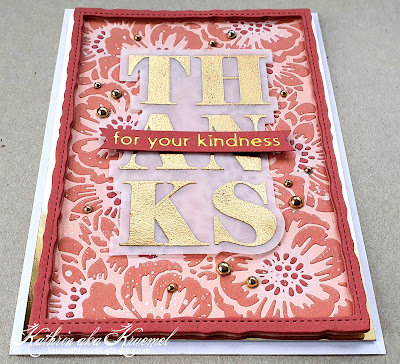
Als Dekoration habe ich noch ein paar goldene Halbperlen auf der Karte verteilt, zu viel wollte ich aber nicht, da sonst die Blumen zu sehr in den Hintergrund gerückt wären. 
Ich habe alles mit goldenem Spiegelcardstock gemattet und auf einen weißen Kartenrohling geklebt.

As decoration I added a few golden pearls to my card, but not too many since I didn't want the flowers to get lost in the background.
I matted my card panel with some golden mirror cardstock and then glued it onto a white note card.

Samstag, 29. Januar 2022

Stempeleinmaleins - Ausgabe vom 29. Januar 2022

 
Hallo Ihr Lieben!
Wie auch die Jahre zuvor, haben wir beim Stempeleinmaleins auch in diesem Jahr an jedem letzten Samstag im Monat einen Sketch für Euch. Und das ist die Karte, die mir danach vom Tisch gehüpft ist.

Hello everyone!
Just like the previous years, we from Stempeleinmaleins have a new sketch for you every last satuday of the month. This is the sketch I made after our new one.

Meine Karte ist schon wieder recht frühlingshaft ausgefallen - ich wäre einfach bereit! Der Sketch ist diesmal ziemlich genau in den Vorgaben, aber da kam mein innerer Rebell raus und ich habe nach einer Möglichkeit gesucht, ihn anders darzustellen.
Für den Hintergrund habe ich ein Stück weißen Cardstock mit der Dotted Swirls Debossing Cover Stanze von Altenew "gestanzt". Die Stanze prägt aber nur ein gepunktetes Schnörkel-Muster in den Cardstock, was wunderbar subtil ist. Dann habe ich grüne Metallic-Watercolor darübergespritzt, von der Ecke unten links zu der oben rechts. 
Den weißen Cardstock habe ich hellgrün gemattet und auf einen weißen Kartenrohling geklebt.

Again my card turned out pretty spring-ish - I'm just ready for it! The sketch this time is quite detailed in the items to use on it - but my inner rebell came out and I was looking for a way to use it in a different way.
For the background I've "cut" a piece of white cardstock with the otted Swirls Debossing Cover die by Altenew. The die just debosses some dotted swirls into the cardstock, which is a wonderful subtle touch. Then I spritzed some green metallic watercolor onto the cardstock, from the bottom right to the top left corner.
I matted the cardstock with some light green cardstock and glued it onto a white note card.


Für die Deko habe ich zuerst mit einer der Label-Stanzen aus dem Blueprint 33 Stanzenset das Sechseck aus weißem Cardstock gestanzt, auch das habe ich hellgrün gemattet. 
Der tolle Blumenkranz ist der Spring Wreath von MFT. Den habe ich silbern embosst und dann mit der passenden Stanze ausgestanzt. Dann habe ich die Blumen nur ganz zart mit Copics coloriert - die Blüten weiß, die Blätter in einem ganz hellen grün. Anschließend habe ich das Label in den Kranz hineingeschoben.
Unten am Kranz habe ich einen Schmetterling aufgeklebt. Er ist mit einer ganz alten Stanze von Whiff of Joy gemacht. Die detailierte Lage habe ich aus matt-silbernem Spiegelcardstock, die gefüllte Lage aus Vellum gestanzt. Von hinten habe ich dann auf das Vellum jeweils nach am Schmetterlingskörper ein wenig grüne Stempelfarbe aufgetragen. So ist der Schmetterling nicht rein silber-weiß. Dann habe ich ihn auf den Kranz/das Label geklebt - und mir gefällt es, dass durch die Schmetterlingsflügel der Blumenkranz ein wenig sichtbar ist. Das gibt ihm so einen zarten Look.
Für den Text auf dem Label habe ich oben mit hellgrüner Tinte zwei der Texte aus dem Itty Bitty Birthdays Stempelset von MFT aufgestempelt.
Das You ist mit den Wedding Alphabet Stanzen von XCut gestanzt. Unten befinden sich vier aufeinander geklebt Lagen gestanzt aus hellgrünem Cardstock, darüber, ein wenig versetzt, noch eine Lage gestanzt aus silbernem Spiegelcardstock. 
Und das kleine happy birthday unter dem Wort you ist mit einem der Stempel aus dem Occasional Labels Stempelset von MamaElephant gemacht und ich habe ihn ebenfalls mit der hellgrünen Tinte abgestempelt. Nach dem Ausschneiden habe ich ihn mit dünnem 3D Tape auf das Label geklebt.
 
For the decorations on my card I first die cut the hexagon from white cardstock with one of the label dies from the Blueprint 33 die set by MFT, then matted it with some light green cardstock.
The great flower wreath is the Spring Wreath by MFT. I silver heat embossed it and then cut it out with the matching die. I colored it very softly with my Copics, the flowers in white and the leaves in a very light green. Then I put the label into the wreath.
To the bottom of the wreath I glued a butterfly. I used a very old die by Whiff of Joy for it. The detailed layer is cut from some mat silver mirror cardstock, the solid layer from vellum. I used some green ink to color the back of the vellum, just in the center. Now the butterfly isn't just plain white and silver. Then I glued it onto the wreath/label - and I really like that you can see the wreath through the butterfly wings. This gives it a very soft look.
For the text on the label I stamped two texts from the Itty Bitty Birthday stamp set by MFT onto the top of the label, again using light green ink.
The you is made using the Wedding Alphabet die set by XCut. I stacked four layers of letters, cut from green cardstock, then put one layer cut from silver mirror cardstock on top, putting it just a bit off.
And the little happy birthday under the word you is made using a stamp from the Occasional Labels stamp set by MamaElephant. After cutting it out I glued it onto the label with dimensionals.


Hier seht Ihr den Glanz auf der Karte etwas besser.
Das Label samt Deko ist mit 3D Tape auf den Hintergrund geklebt. Als Deko habe ich dann noch ein paar glänzend-silberne Perlen auf der Karte verteilt.

Here you get a better look at the shine on my card. 
The label is glued onto the background with foam tape. For decorations I added a few shiny silver pearl to my card.

Freitag, 28. Januar 2022

Eine Tasche als Gute-Besserungs-Geschenk

 
Hallo Ihr Lieben!
Mit meinem heutigen Post gebe ich Euch eine Vorschau auf eine der Neuheiten, die es mit dem Februar-Release von Stampcorner geben wird: eine Taschen-Stanze! Sie ist nicht zu klein, so dass doch einiges hineingeht, aber auch nicht so groß, dass sie zu wuchtig wird und wirkt. 
Ich habe sie hier verwendet, um ein kleines Gute-Besserungs-Geschenk zu werkeln.

Hello everyone!
With this post I'm giving you a sneak at one of the new items from Stampcorner's february release: a bag die! It's not too small, so there's plenty of room in it, but also not too large to look gigantic. 
I used it here, to create a little get well gift.


Die Tasche habe ich aus rotem Cardstock gestanzt - rot und weiß sind für mich immer noch die klassischen Gute-Besserungs- bzw. Krankheitsfarben. 
Für die Deko kamen einige der neuen Artikel von WhimsyStamps zum Einsatz. Die passten einfach wie die Faust aufs Auge - oder in dem Fall Hammer auf Daumen. ;)

I've die cut the bag from red cardstock - red and white are still the classical get well colors to me.
To decorate the bag I've used a few items from the latest WhimsyStamps release - they were just perfect here and fit like "hammer on the thumb". ;)


Die Hand mit dem verbundenen Daumenist aus dem Stempelset ManFlu und mit Copics coloriert. Aus dem selben Set ist auch der kleine #getwellsoon Text. Den habe ich mit weißem Embossingpulver auf schwarzen Cardstock embosst, dann habe ich den Streifen mit 3D Tape auf die Tasche geklebt.
Und das große Ouchie! ist aus dem Set Big BooBoo. Ich habe es erst auf die - noch nicht zusammengeklebte - Tasche gestempelt, dann das colorierte Motiv an seinen Platz gelegt und den überlappenden Teil des Textes auch dort aufgestempelt. So ergeben sich keine Linien an den Höhenunterschieden, wo der Stempel nicht bis an die Kante stempelt.
Nur ganz leicht auf den Bildern zu erkennen ist, dass ich hinter die Hand noch zwei der Kleckse aus dem Stempelset Kleckse mit Distress Ink Festive Berries aufgestempelt habe. In echt sind die besser erkennbar. Aber ohne fehlte der Tasche irgendwas.
Für die Pflaster und den Kussmund habe ich Stanzen aus dem Set Slimline Big BooBoo Stanzenset benutzt. Die Teile sind aus braunem bzw. rotem Cardstock gestanzt und anschließend mit Copics und einem weißen Gelmarker noch ein wenig schattiert. 
Um die Tasche zu verschließen, habe ich einen dünnen Streifen Cheesecloth/Verbandsmull zugeschnitten und durch die Schlitze in der Tasche gefädelt. So passt auch die Schleife zum Thema.  
Ganz zum Schluss habe ich noch ein paar silberne Pailetten als Deko aufgeklebt. So ganz ohne Bling kann ich halt nicht...

The image of the insured hand is from the ManFlu stamp set and colored with Copics. The #getwellsoon text is from the same set. I white heat embossed it onto a strip of black cardstock and glued that onto the bag with dimensionals.
It's hard to see on the pictures - it is way better visible in real life - that I stamped a few splotches onto the bag, right under the hand, with Distress Ink Festive Berries. I felt like the bag was too plain without those.
The big Ouchie! is from the Big BooBoo stamp set. I stamped it onto the - not yet glued together - bag, then put the colored image in place and stamped the text again. This way I don't end up with any broken stamp lines where the stamp can't stamp properly due to the different heights of the papers. 
For the band aid and the kissing mouth I used dies from the Slimline Big BooBoo die set. The pieces are cut from brown and red cardstock, then I used Copics and a white gel pen to add some shading to them. 
To keep the bag closed I've cut a strip from cheesecloth and tied it through the slits in the bag. Now even the bow goes with the theme of the bag.
In the end I added a few silver sequins as decoration - I just can't do without at least a bit of bling...

Donnerstag, 27. Januar 2022

So eine Schweinerei!

 
Hallo Ihr Lieben!
Hi hi, ich konnte mir den Posttitel einfach nicht verkneifen. Aber ich habe natürlich nur im übertragenen Sinne eine Schweinerei gemacht. Vielmehr habe ich endlich das süße Schwein aus einem der Januar-Neuheiten Sets verwendet! Und die Karte damit zeige ich heute auf dem Stampcorner Blog.
 
Hello everyone!
Today I'm sharing a card with this "sow" cute stamp from one of the january release stamp sets by Stampcorner. It was about time to use it, right?! And so I'm sharing this card over at the Stampcorner Blog today. 
 
 Für  den Hintergrund habe ich ein Stück weißen Cardstocks im oberen Bereich mit Distress Oxide Tumbled Glass gewischt, auf den unteren Bereich habe ich ein Stück kraftfarbenen Cardstocks aufgeklebt. Dessen Ränder habe ich noch mit Distress Oxide Ground Espresso ein wenig abgedunkelt. 
Da mir die Szene so irgendwie ein wenig zu fad aussah, habe ich noch den Animal Fence von MFT - bei dem ich mir nicht mal sicher bin, ob der nicht schon längst in Rente gegangen ist - aufgeklebt, den ich aus grauem Cardstock gestanzt habe. 

For the background I've inked up the upper area of a piece of white cardstock with Distress Oxide Tumbled Glass. Onto the lower part I've glued a piece of craft colored cardstock. Before glueing it down I used Distress Oxide Ground Espresso to darken the edges a bit.
Since the scene was missing something I decided to add this Animal Fence by MFT - I'm not even sure if it has retired or not -, that I've cut from grey cardstock. 


Hier seht Ihr das süße Schwein! Ich habe es mit Copics coloriert und anschließend ausgeschnitten. Da ich unbedingt den "lass Dich knutschen" Text aus dem selben Stempelset Oops verwenden wollte, kam mir die Idee, das Gesicht des kleinen Schweins mit Kussmündern zu bedecken. Da hatte wohl jemand beim Küssen ganz dick roten Lippenstift aufgetragen! Nun, einen Kussmundstempeln in dieser Größe habe ich nicht. Aber ich habe einfach eine der Kaffeebohnen aus dem Stempelset Kaffee 3 benutzt und mit roter Tinte überall auf das Gesicht gestempelt. Ich finde, die geht perfekt als Kussmund/Lippenstiftknutsche durch, oder?!
Da das Schweinchen ja doch voller Matschflecken ist, habe ich es in eine Matschpfütze gesetzt. Die habe ich mit der kleinsten der Stitched Dens Stanzen von LawnFawn aus dunkelbraunem Cardstock gestanzt. Dann habe ich mit Copics und einem weißen Gelmarker ein paar Schatten und Highlights auf die Pfütze aufgetragen und sie dann dick mit Glossy Accents überzogen. Dann habe ich das süße Schwein in die Pfütze gesetzt.
Rund um den Kopf des Schweinchens habe ich noch ein paar kleine roter Herzen verteilt.
Der Text unter der Pfütze ist mit weißem Embossingulver auf roten Cardstock embosst. Das rote Fähnchen habe ich dann noch mit rosafarbenem Cardstock hinterlegt. 

Here you get a closer look at the cute piglet! I colored it with Copics and then cut it out. Since I wanted to use the "I could kiss you" text - which is what the text under the pig means - I got the idea of covering the pig's face with kisses. Seems like someone wore a thick layer of red lipstick here! Well, I don't have many kissing mouths stamps - and none fit in size. So I simply used a coffee bean stamp from the Coffee 3 set by Stampcorner and stamped it all over the pig's face with red ink. I really think, those look perfect. 
Since the pig is full of muddy spots I've put it in a puddle. I used the smallest of the Stitched Dens die set by LawnFawn and die cut it from dark brown cardstock. Then I used Copics and a white gel pen to add a few details and highlights onto the puddle and then covered it with a thick layer of Glossy Accents before placing the piggie into it.
Around the piggie's head I've added a few red hearts.
The text under the puddle is white heat embossed onto a strip of red cardstock. Then I matted it with a strip of pink cardstock.


Für den Text oben auf meiner Karte habe ich zu einer Kombination aus Stempeln und gestanzten Buchstaben gegriffen. 
Das "ich hab Dich lieb" ist ebenfalls aus dem Oops Stempelset, ich habe es zweizeilig mit Versafine Clair Fallen Leaves abgestempelt und das Piep Piep, das eigentlich davor steht, weg maskiert. Dazwischen habe ich dann das Wort saumäßig aus gestanzten Buchstaben gesetzt. Das passte einfach perfekt zum Motiv! Zum Ausstanzen der Buchstaben habe ich das Mini Alphabet and Numbers Stanzenset von CCDesign verwendet. Für das scharfe S musste ich etwas tricksen - ich habe einfach die 1 unten an das B geklebt. Um das A in ein Ä zu verwandeln, habe ich die inneren Kreise der 8 benutzt. Ich habe die Buchstaben einmal aus rotem und einmal aus rosafarbenem Cardstock gestanzt, sie leicht versetzt aufeinander und dann auf die Karte geklebt. Die Highlights sind wieder mit einem weißen Gelmarker gemacht.

For the text on the upper half of the card I used a combination of stamps and die cut letters.
The stamped text means "I love you". I devided the text into two sections and stamped it with Versafine Clair Fallen Leaves onto the sky. In between the two parts I added a "sow much", it just went perfectly with the image. To die cut the letters I used the Mini Alphabet and Numbers die set by CCDesigns. We have a ß and a ä here in Germany so I had to think outside the box a bit to create those letters. For the ß I simply glued the 1 under the B. To turn the a into an ä I used the inner circles of the 8 over the letter. I've die cut each letter once from red and once from pink cardstock, stacked them a tad bit off and then glued them onto the card. For the highlights I used a white gel pen again.

Mittwoch, 26. Januar 2022

Create a Smile Moodboard-Challenge

 
Hallo Ihr Lieben!
Heute startet die neue Challenge bei Create a Smile - diesmal mit einem Moodboard als Inspiration. Und das sieht so aus:
 
Hello everyone!
Today the new challenge over at Create a Smile goes live - this time we have a moodboard to inspire you. And this is what it looks like:


 Das Moodboard erinnert natürlich sehr an das Thema Liebe und den Valentinstag. Aber wenn man genauer hinsieht, dann kann man danach problemlos auch eine andere Karte machen. Meine ist trotzdem "herzig" ausgefallen.
 
 The moadboard reminds a lot of love and Valentine's Day. But if you take a closer look, you can easily make a card with another theme. Well, mine still turned out quite heart-y. 


Ich habe mit einer der Kreisstanzen einen Kreis aus grauem Cardstock ausgestanzt. Der bildet den Hintergrund für meine Motive. Darauf kamen die Strahlen, die ich mit der Focal Stanze aus silberfarbenem Glittercardstock gestanzt habe. Dann habe ich die einzelnen Strahlen aufgeklebt. Der Plan war eigentlich, sie hinter das Kuvert zu kleben und den Kreis mittig auf der Karte anzubringen, wodurch das Kuvert mit den Strahlen etwas nach rechts verschoben worden wäre. Aber das sah aus, als könnte ich nicht gerade kleben. Deswegen ist der komplette Kreis mit den Strahlen auf der Karte etwas nach rechts gerutscht.
Das tolle Kuvert und das Siegel sind aus dem Stanzenset DinLang Postage. Ich habe das Kuvert aus weißem Cardstock gestanzt und mit Copics hellgrau schattiert. Das Siegel habe ich mehrfach aus rotem Cardstock gestanzt, den äußeren Ring und das Herz aufeinander gestackt und dann alles mit Glossy Accents überzogen, damit es auch schön glänzt. 
Das Kuvert habe ich so auf den Kreis geklebt, dass die offene Lasche ein wenig nach oben steht. Dann habe ich einige Herzen, wieder aus rotem Cardstock mit einer weiteren Stanze aus dem DinLang Postage Stanzenset gestanzt und mit Glossy Accents überzogen, aus dem Kuvert fliegen lassen. Dazwischen war Platz für einige kleine weiße Perlen.
Das Siegel habe ich unten rechts leicht überlappend neben das Kuvert geklebt. Auf der linken Seite war dann Platz für die tolle Schreibmaschine aus dem Set Schreib mal wieder. Der Text auf dem Papier ist aufgestempelt, es sind noch zwei weitere Texte in diesem Set enthalten. Coloriert habe ich sie, ebenfalls in schwarz und rot, mit Copics. Die Tasten sowie der Drehgriff und das Teil links, sind wieder mit Glossy Accents überzogen. 
Ein Stück oberhalb der Schreibmaschine habe ich dann noch einen weiteren Text aufgeklebt. Der ist aus dem Stempelset Bearmail, das ich in der englischen Variante habe. Happy Mail gefiel mir einfach super zu dieser Karte.
 
Here I used one of the circle dies to die cut a circle from a piece of grey cardsdtock. It makes the background for my images. I glued the rays from the Focal die onto it, which I've die cut from silver glitter cardstock. Then I glued the individual rays down onto the circle. Originally I had planned to glue the rays behind the envelope and glue the grey circle centered onto my card. That would have moved the envelope and rays off center - but that looked like I wasn't able to glue them down right. So instead I moved the whole circle a bit to the right on my card.
The great envelope and seal are both from the DinLang Postage die set. I've die cut the envelope from white cardstock and shaded it in a light grey with my Copics. The seal is die cut several times from red cardstock, then I stacked the outer ring and the heart several times onto one whole seal and covered everything with some Glossy Accents to make the seal nice and shiny. 
I glued the envelope onto the circle, letting the flap stand up a bit at the top. Then I let some hearts, again die cut from red cardstock using another die from the DinLang Postage die set and also covered with Glossy Accents, fly out of the envelope. In between the hearts there was room for a few small white pearls.
I glued the seal to the bottom right of the envelope, on the left side there was room for the great typewriter image. The text on the paper sheet can be changed, there are others included in the set. Again I used my Copics to color the typewriter in black and red. The keys, the knob and the piece on the left side are again covered with Glossy Accents.
A bit above the typewriter I added another text. This one's from the Bearmail stamp set - happy mail just seemed perfect for this card.


Der Hintergrund meiner Karte ist weiß - aber nicht nur. Ich habe ihn mit der Letters Stencil dekoriert. Allerdings habe ich hier keine Farbe durch die Stencil aufgetragen, sondern sie geprägt. Mit den passenden Platten/Matten geht das super in einer Diecutting Maschine. 
Auf diesen embossten Hintergrund habe ich die Motive und Stanzteile aufgeklebt, dann habe ich ihn rot gemattet und auf einen weißen Kartenrohling geklebt.

The background for this card is white - but not plain. I decorated it with the Letters stencil. But I didn't apply any color through the stencil, instead I dry embossed it. With the right plates/mats this works wonderfully in a die cutting machine.
I glued all my images and die cuts onto the embossed background, then matted it red and glued it onto a white note card.

Dienstag, 25. Januar 2022

Thank you for being a friend!

 
Hallo Ihr Lieben!
Es gibt diese Freundschaften, die schon seit dem Sandkasten halten. Für so einen Freund zeige ich heute auf dem Stamping-Fairies Blog dieseFreundschafts-/Dankeskarte. 
Und diese Karte ist die letzte, die für das Stamping-Fairies DT entstanden ist. Nach knapp 6 Jahren habe ich den Entschluss gefasst, das Team zu verlassen. Veränderungen gehören zum Leben dazu, aber wenn die Veränderungen, die andere vornehmen, auf einen persönlich nicht passen, dann muss man selbst ebenfalls Veränderungen vornehmen. Und so kam es zu meinem Entschluss. Aber keine Angst, Ihr bekommt hier deswegen nicht weniger Karten zu sehen!

Hello everyone!
There are those friends that we've known since we were little. This card, that I'm sharing over at the Stamping-Fairies Blog today, is made for such a friend.
And this card is also the last one I made as a member of the Stamping-Fairies DT. After nearly 6 years, that I was part of this team, I decided to leave it. Changes are part of life, but when those changes other make just don't work for you and who you are, you have to make some changes yourself. That's how I made this decision. But don't worry, that doesn't mean you will see less cards here!

Für den Hintergrund habe ich eines der Papiere aus dem Poppin' Polka Dots Paperpad von MFT verwendet. Die Ränder habe ich mit Distress Ink Peeled Paint und Forest Moss gewischt. Lustigerweise wurden dabei die weißen Punkte auf dem Papier dunkler als der Rest, aber ich finde dieses Muster total spannend, denn so wird nicht nur das Papier an sich, sondern eben auch die Punkte von außen nach innen heller.
Das Designpapier habe ich später schwarz gemattet und auf einen weißen Kartenrohling geklebt.

For the background I've used a sheet from the Poppin' Polka Dots paper pad by MFT. I inked up the edges with Distress Ink Peeled Paint and Forest Moss. When I inked them up, the white dots turned out darker than the colored area of the paper, but I really like this effect since not only the paper gets lighter from the edges towards the center, but also the dots themselves. 
Later I matted this paper with some black cardstock and glued it onto a white note card.


Der Text auf der Karte ist mit der Thank you for being a Friend Stanze von MFT gemacht. Ich habe ihn aus dem vorher gewischten Designpapier ausgestanzt. Da ich die beiden kleinen Motive zwischen dem Text aufbringen wollte, habe ich Partial Die-Cutting gemacht und so zuerst nur den oberen Teil des Textes gestanzt, dann die Stanze nach unten geschoben und noch den unteren Teil des Textes ausgestanzt. 

The text on this card is made with the Thank you for being a Friend die by MFT. I've die cut it from the inked up patterned paper. Since I wanted to place those two small images between the lines of the text, I did some partial die cutting. First I've only cut out the upper two lines, then moved the die further down on my paper and die cut the rest of the text.


Ich habe den Text auch einmal aus schwarzem Cardstock gestanzt und die schwarzen Buchstaben in die ausgestanzten Buchstaben geklebt. Das Wort friend habe ich sogar 4mal aus schwarzem Cardstock gestanzt, die Worte aufeinander geklebt und zuoberst noch ein friend, gestanzt aus blauem Cardstock, geklebt. Auf den i-Punkt habe ich ein kleines Herz geklebt.
Die beiden süßen Babies sind aus dem Babysaurs Stempelset von MFT. Ich fand die beiden einfach zuckersüß zusammen - und perfekt für eine Freundschaftskarte für jemanden, den man seit seinen Windeltagen kennt. Ich habe die Motive mit Copics coloriert, ausgeschnitten und oben auf die dritte Textlinie geklebt. 
Unter das Wort friend habe ich noch einen weiteren Text geklebt. Der ist aus dem Stempelset Itty Bitty Baby Stempelset und mit weißem Embossingpulver auf schwarzen Carstock geklebt. Damit er die gleiche Höhe wie das aufeinander geklebte friend erhält, habe ich es mit 3D Tape aufgeklebt.
Zum Schluss habe ich als Deko noch ein paar hellblaue Pailetten auf der Karte verteilt.

I've die cut the text from black carstock also and then glued the black letters into their negative spaces. The word friend was die cut four times, then I stacked those layers on top of each other. As the top layer I used a die cut word that I've cut from blue cardstock. On top of the title of the i I glued a little heart.
Those two cute babies are from the Baysaurs stamp set. I think they are perfect on a card for someone that you've known since you both were in diapers. I colored the images with Copics, cut them out and then glued them on top of the third text line.
Under the word friend I added another text. This one's from the Itty Bitty Baby stamp set and white heat embossed onto a strip of black cardstock. I used dimensionals to glue it down with the same height as the stacked word friends.
In the end I added a few light blue sequins all over the card.

Samstag, 22. Januar 2022

Stempeleinmaleins - Ausgabe vom 22. Januar 2022

 
Hallo Ihr Lieben!
Heute zeigen wir Euch beim Stempeleinmaleins eine weitere Box. Vielleicht ist das ja schon eine Idee für ein kleines Valentinstagsgeschenk? Ich habe meine Box vorsichtshalber mal eher neutral gehalten, trotz Herzen kann sie auch für andere Gelegenheiten verschenkt werden.

Hello everyone!
Today we are sharing another box tutorial over at the Stempeleinmaleins blog. Maybe that's a little something you want to make for Valentine's Day? I kept mine a little more neutral - just in case. Despite the hearts mine can still be used for a lot of occasions.


Ich habe das Unterteil meiner Box aus hellblauem, den Deckel aus weißem Cardstock gewerkelt. Durch die Ausschnitten im Deckel sieht man den blauen Cardstock hindurch, da sind die beiden unterschiedlichen Farben besonders schön zu sehen.
Die untere Kante meines Deckels habe ich mit einer Bordürenstanze ein wenig aufgehübscht. 
Durch die - hier runden - Ausstanzungen im Deckel sieht man nicht nur das Unterteil der Box, sondern auch die Deko, die ich hier aufgeklebt habe. Ich hatte von einer anderen Karte noch diese Reststücke der Siegel-Stanze aus dem DinLang Postage Stanzenset von Create a Smile auf meinem Tisch. Die habe ich in den Kreis geklebt. Dazu kam ein kleines For You Label aus dem Occasional Labels Stempelset von MamaElephant sowie ein kleiner schwarz-irisierender Glitzerstein.

I made the inner part of my box from light blue, the lid from white cardstock. Through the cut outs in the lid you can see the blue cardstock, I think using two different colors of cardstock brings out this effect even better.
I used a border punch to decorate the bottom edge of my lid.
Through the - in my case round - cut outs in the lid you do not only see the blue cardstock but also the decoration I glued onto the box. I had those left over pieces from the seal die by Create a Smile left on my table and glued those onto the box. Then I added a little For You labe from the Occasional Labels stamp set by MamaElephant and a black iridescent rhinestone.


Durch ein kleines Loch im Deckel habe ich eine Schlaufe aus hellblauem Twine gezogen. Damit sie nicht nach unten durchrutschen kann, habe ich oben eine Schleife aus dunkelroter Spitze darum herum gebunden. Außerdem habe ich hier ein kleines Tag, bestempelt mit einem weiteren Text aus dem Occasional Labels Stempelset, angebunden.

Through a little hole that I punched into the lid I've put a loop from blue twine. To avoid it sliding back into the lid I've tied a bow from red lace around the loop. And I added a little tag, onto which I've stamped another text from the Occcasional Labels stamp set.


Und so sieht die Box geöffnet aus. Darin ist auch genug Platz für ein paar süße Leckereien... ;)

And this is the opened box. There's enough room in it for some sweet treats.... ;)

Donnerstag, 20. Januar 2022

Kuschelzeit

 
Hallo Ihr Lieben!
Im Winter, wenn es früh dunkel wird, macht man es sich gerne in eine warme Decke eingemummt gemütlich. Da sind wir Menschen nicht anders als die Tiere - naja, zumindest als die kleine Maus auf meiner Karte, die ich heute auf dem Stampcorner Blog zeige. 

Hello everyone!
During the winter months it's getting dark early, so getting cozy, wrapped in a soft and warm blanket, is one of the best things to do. Those animals are no different than us humans - well, that counts as least for the little mouse on this card, that I'm sharing over at the Stampcorner Blog today.

Hier habe ich den unteren Teil der Karte mit einem Post It abgedeckt und den Himmel mit Distress Oxide Faded Jeans, Chipped Sapphire und Black Soot gewischt. Oben an den Rand der Karte habe ich einen Cardstock-Kreis gelegt, so dass dort ein Mond entstanden ist. Den habe ich mit Distress Oxide Pumice Stone ein wenig abgedunkelt, dann habe ich einige große Wassertropfen darauf verteilt, damit der Mond auch ein paar Krater bekommt. Dann habe ich silberfarbene Schimmer-Watercolor über den Himmel gespritzt. 
Dann habe ich die Maus auf meinen Cardstock gestempelt und dabei das No-Line Kissen von InkOn3 verwendet. Den Schnee am Boden habe ich mit Distress Oxide Stormy Sky gewischt und es dabei die Maus mit Masking Tape abgedeckt. Es sollte so aussehen, als läge sie in einer mit Schnee gefüllten Kuhle.
Unten auf den Schnee habe ich dann noch mit Versafine Clair Morning Mist das Wort "Kuschelzeit" aus dem Eisbär Stempelset  aufgestempelt.

Here I covered the lower part of some white cardstock with a Post It and then inked the sky with Distress Oxide Faded Jeans, Chipped Sapphire and Black Soot. I've put a circle cut from cardstock over the top edge of my cardstock to create a moon there. I darkened that a bit with Distress Oxide Pumice Stone and then put a few big drops of water onto the ink to create some craters. Next I spritzed some silver metallic watercolor over the night sky.
Then I stamped the mouse onto my cardstock using the No-Line ink pad by InkOn3. I used Distress Oxide Stormy Sky to create the snow and covered the mouse with masking tape while inking the snow. I wanted it to look like the mouse is lying in a snow covered hole. 
I used Versafine Clair Morning Mist to stamp the word "cozy time" onto the snow.


Die süße Maus in der Kiste ist Joyce von PurpleOnion. Ich habe sie mit ZIG Markern coloriert und anschließend ein paar feinere Details mit Polychromos hinzgefügt. Die Highlights sind mit einem weißen Gelpen von Sakura gemacht.
Den Tannenbaum, unter dem es sich die Maus gemütlich gemacht hat, habe ich mit dem Tannenzweig-Motiv aus dem Slimline Pines Stempelset vom WhimsyStamps und Versafine Clair Rain Forest auf den Himmel über der Maus gestempelt. Die Tannennadeln sind bei diesem Stempel nicht gefüllt, so dass man den Himmel hindurch sehen konnte. Deswegen habe ich einen dunkelgrünen Polychromo verwendet und die Nadeln grob gefüllt. Dabei muss man auf keinen Fall jede Nadel einzeln colorieren, einfach grob in Nadelrichtung über das Motiv gehen reicht vollkommen. 
Ich wollte meine Tanne noch mit Schnee bedecken. Das Versafine Clair trocknet so langsam, dass mir der weiße Gelpen immer grünlich verfärbt wird. Deswegen habe ich das Motiv erst etwas mit dem Embossingföhn getrocknet und dann Embossing Glaze von Ranger auf die Zweige aufgetupft, das wie eine Art Versiegelung wirkt. Darauf konnte ich dann mit einem weißen Gelpen den Schnee aufmalen - und er blieb wunderbar weiß.

The cute mouse in the box is Joyce by Purple Onion. I colored it in with ZIG markers and then used Polychromos to add a few fine details. The highlights are made with a white gel pen.
The pine tree, under which the mouse is napping, is stamped using the pine branch image from the Slimline Pines by WhimsyStamps and Versafine Clair Rain Forest. The needles of this image aren't filled so you could see the sky through them. So I took a dark Polychromo and colored them in. There's no need to actually color each individual needle - just doing strokes in the direction towards the tips of the needles will do.
I wanted to cover my pine tree with snow. The Versafine Clair ink dries so slowly that my gel pen always picks up the color underneath. So I first dried the image with my heat gun, then covered the branches with some Embossing Glaze by Ranger. This works as a barrier and I was able to add some perfectly white snow onto the branches with my white gel pen.

Dienstag, 18. Januar 2022

Ein wunderschöner Wintertag

 
Hallo Ihr Lieben!
Heute zeige ich auf dem Stamping-Fairies Blog diese Winterkarte. Und weil Winter für mich mit frostigen und blassen Farben einhergeht, habe ich genau dazu gegriffen, um diese Karte zu machen.

Hello everyone!
Over at the Stamping-Fairies Blog I am sharing this winter card today. And since winter means frosty and soft colors I picked exactly those to make this card.

Ich habe hier mal Watercolors verwendet, so dass meine Szene auf einem Stück Watercolor Paper arrangiert ist. Das habe ich dann schwarz gemattet und auf einen weißen Kartenrohling geklebt. Ich finde, bei dieser Karte ist weniger Schnick-Schnack einfach mehr.

Here I used watercolors so I created my scene on a piece of watercolor paper. I matte that black later and glued it onto a white note card. With this card I think less is more and so I kept it pretty simple, designwise.


Wie gesagt habe ich hier Watercolors verwendet - genauer gesagt habe ich mit Distress Ink Kissen coloriert. Die habe ich auf die Non-Stick Mat meiner Glass Media Mat abgedrückt und von dort dann die Farbe mit einem feuchten Pinsel aufgenommen. 
Für den Hintergrund habe ich Stormy Sky (Himmel) und Tumbled Glass (Schnee am Boden) benutzt. 
Die Szene im Hintergrund habe ich mit den Tiny Houses von MFT aus Watercolor Paper gestanzt. Vor dem Zusammenkleben habe ich sie mit Pumice Stone (Häuser), Gathered Twigs (Dächer), Forest Moss (Tannen) und wieder Tumbled Glass ganz rudimentär coloriert. Auf die Hausdächer und die Tannen habe ich nach dem Trocknen weiße Acrylfarbe auf die Stanzteile aufgetragen. Die Fenster und Türen habe ich mit schwarzem Cardstock hinterlegt.
Die süßen Motive sind aus dem Have a wonderful wintery Day Stempelset von PicketFence. Um sie in No-Line Coloring zu colorieren, habe ich sie mit Distress Ink Antique Linen ebenfalls auf Watercolor Paper gestempelt und dabei den Hasen vor den Schneemann maskiert. 
Zum Colorieren habe ich wieder Forest Moss, Gathered Twigs und Tumbled Glass und zusätzlich Rusty Hinge (Möhre), Hickory Smoke (Hase) und Spun Sugar (Backen und Ohren) verwendet.
Anschließend habe ich alle Motive aufeinander- und auf den oberen Teil der Karte geklebt.
Der Text ist ebenfalls aus dem Stempelset von PicketFence. Eigentlich ist der einzeilig, der wäre bei mir aber über die komplette Breite der Karte gegangen. Also habe ich ihn zweizeilig mit schwarzer Farbe unter die Winterszene gestempelt.
Zum Schluss habe ich mit einem ganz feinen Pinsel noch einige Schneeflocken aus weißer Acrylfarbe über der Szene verteilt.

As mentioned above I used watercolors for this card - to be precise I colored with Distress Ink pads. I put some of the ink on the non-stick mat of my Glass Media Mat and then picked it up with a wet fine brush.
For the background I used Stormy Sky (sky) and Tumbled Glass (snow on the ground). 
The scene in the background is die cut from watercolor paper with the Tiny Houses die set by MFT. Before glueing it together I did some basic coloring of the die cut pieces with Pumice Stone (houses), Gathered Twigs (roofs), Forest Moss (trees) and again Tumbled Glass. After the pieces had dried I put some white acrylic paint onto the roofs and trees. Behind the windows and doors I glued some small pieces of black cardstock.
The cute images are from the Have a wonterful wintery Day stamp set by PicketFence. To be able to do some no-line coloring I stamped them onto watercolor paper with Antique Linen and did some masking to put the snowman behind the bunny.
To color the images I used Forest Moss, Gathered Twigs and Tumbled Glass again and added Rusty Hinge (carott), Hickory Smoke (bunny) and Spun Sugar (cheeks and inner ears).
Then I glued all pieces together and onto the upper area of my card.
The text is also from the same stamp set by PicketFence. Originally it's written in one line, but that would have been all across my card. So I divided it into two lines and stamped it with black ink under my winter scene.
In the end I used a fine brush and white acrylic paint to lay down some snowflakes over my scene.

Sonntag, 16. Januar 2022

Eine Box von Herzen

 
Hallo Ihr Lieben!
Von Stampcorner gibt es ganz frisch drei neue Stanzensets - und zwei davon habe ich gleich verwendet, um diese Box zu werkeln. 

Hello everyone!
There are three brand new die sets by Stampcorner - and I used two of them to create this little box.

Und dabei habe ich mal wieder die Kamera mitlaufen lassen. Sorry, das Licht war nicht das allerbeste - Winter halt, da hilft auch kein noch so gutes Ringlicht. Aber ich denke, es ist trotzdem genug zu erkennen: 

And I did a video how I made this box. Sorry, the light isn't the best - I blame winter for it, no matter how good a ring light you have. But I think there's still enough too see here. Sorry, language is in german, but the pictures should say enough:


Und hier habe ich noch einige Detailbilder inkl. Beschreibung für Euch: 

And here I have a few details pictures including descriptions for you:


Ich habe  meine Box aus rotem Cardstock gestanzt. Die Aufleger sind per Hand zugeschnitten - einmal aus schwarzem Cardstock, darauf dann Aufleger aus Designpapier. Dafür habe ich einen Bogen aus dem Paper Pack 02 von Stampcorner genommen - das hellgraue Papier mit den weißen Herzen passte prima zum Text und zu dem Motiv, das ich verwenden wollte.

I've die cut my box from red cardstock. Then I cut a some cardstock by hand to glue onto the sides. I used some light grey patterned paper with white hearts from the Paper Pack 02 by Stampcorner, then cut some matting from black cardstock for those. The patterned paper goes perfectly with the die cut text and the image I used.


Ist der gestanzte Text nicht wunderschön? Ich liebe die filigrane Schrift und das Herz zwischen den beiden Worten. 
Ich habe den Text dreimal aus rotem Cardstock gestanzt und die Teile aufeinander geklebt. Da der Text seitlich über meine Box übersteht, hat er so mehr Stabilität. 
Das kleine Stinktier ist aus dem Scent with Love Stempelset von LawnFawn. Ich habe es mit Copics coloriert und ihm auch eine Schleife am linken Ohr verpasst.
Den Text habe ich dann auf das Motiv geklebt und wollte es so aussehen lassen, als hielte das Stinktier eine Art Textgirlande. Dann habe ich das Stinktier mit 3D Tape auf die Box geklebt.
Darunter habe ich noch eine kleine Schleife aus rotem Satinband aufgeklebt. Die ist reine Deko, verschlossen wird die Box mit einer kleinen Lasche.

Isn't this die cut text beautiful? It means "from the heart". I love the filigre font and the heart between the two words.
I've die cut the text three times from red cardstock and stacked them. Since the text is wider than the box, it will hang over on both sides and stacking it makes it more sturdy.
The cute little skunk is from the Scent with Love stamp set by LawnFawn. I colored it in with Copics and also added a little bow to the left ear. 
I glued the text on top of the image and wanted it to look like the skunk is holding some kind of text banner. Then I used foam tape to glue the skunk onto the box.
Under it I added a litle bow, made from red satin ribbon. It's just there for decorative purposes and doesn't hold the box closed - there's a little notch in the lid for that.


Und um den Post abzuschließen, habe ich noch ein Bild der geöffneten Box. Ich finde besonders die abgerundeten Seiten am Deckel ein tolles Details!

To end this post I have a picture of the opened box. I especially love the rounded sides of the lid!

Samstag, 15. Januar 2022

Stempeleinmaleins - Ausgabe vom 15. Januar 2021

 
Hallo Ihr Lieben!
Heute zeigen wir Euch beim Stempeleinmaleins eine Schachtel in Herzform. Wie Ihr hier schön sehen könnt, ist die Schachtel hier dreieckig. So ist die Box echt schnell gemacht, weil man nicht an die Rundungen des Herzes den Rand anpassen muss.

Hello everyone!
Over at Stempeleinmaleins we are sharing this heart shaped box today. As you can see on the pic above, the box has a triangle shape. This makes this box pretty easy and quick to make, since you don't have to make the sides of the box match the round parts of the heart.


Ich habe den Deckel meiner Box aus grauem, das Unterteil aus rotem Cardstock gewerkelt.
Auf den Deckel habe ich etwas Cheesecloth aufgeklebt, darauf kam ein Briefkuvert, gestanzt aus weißem Cardstock. Verschlossen habe ich es mit dieser Siegelstanze, die in einem Stanzenset von Action enthalten war. Um das Siegel dreidimensional zu gestalten, habe ich aus der Mitte rund um das Herz, das eh ausgestanzt wird, einen Kreis gestanzt und so die äußere Form als Ring erhalten. Davon habe ich dann einige aufeinander geklebt, ebenso von den Herzen, und auf die komplette Stanze geklebt.
Die Blätter, die ich auch aus grauem Cardstock gestanzt und an den Rändern mit ein wenig Gesso bestrichen habe, sind von Magnolia. Ich habe sie unter das Kuvert geschoben und ein paar dunkelrote Rosen darauf geklebt. 
Unter das Kuvert habe ich etwas rotes Organzaband geschoben.
Die Sprüche, die ich rechts neben und ein wenig auf das Kuvert geklebt habe, sind aus dem Occasional Labels Stempelset von MamaElephant. 
Als Deko habe ich noch ein paar klare Glitzersteine auf der Box verteilt.

I made the lid of my box from grey, the bottom part from red cardstock.
Onto the lid I've glued some cheesecloth and glued an envelope onto it, that I've die cut from white cardstock. I closed the envelope with this seal that I've cut from red cardstock. I used a small circle punch to punch out a circle from the center so I ended up with this wonky ring. I did this several times and then stacked those rings and the hearts, last glueing them onto a whole seal. 
The leave, that I've cut from grey cardstock and put some Gesso onto the edges, are by Magnolia. I put those under the corners of the envelope and put a few red roses on top.
Under the envelope I placed a folded piece of red organdy ribbon.
The texts, that I glued to the right and bit on top of the envelope, are from the Occasional Labels stamp set by MamaElephant.
For decoration I added a few clear rhinestones.


Um die dreieckige Box habe ich ebenfalls etwas Organzaband gewickelt und an einer Seite zu einer großen Schleife gebunden.

I wrapped some more of the red organdy ribbon around the triangle shaped box and then tied it to a big bow on one of the sides.


Hinten im Kuvert befindet sich ein Schlitz, durch den ich ein Stück weißen Cardstock geschoben habe. Darauf habe ich ein Happy B-Day aus dem Special Delivery Stempelset von LawnFawn aufgestempelt. Damit man auch weiß, dass sich hier noch etwas versteckt, habe ich einen kleinen Tab mit einem Kreis mit ausgestanztem Stern von hinten gegen den weißen Cardstock geklebt. Daran kann man den Brief mit dem Gruß aus dem Kuvert ziehen.

There's a slit cut into the back of the envelope. I put a piece of white cardstock, onto that I've stamped a happy B-Day text from the Special Delivery stamp set by LawnFawn, through that slit into the envelope. To make the recipient know that there's something hidden in the envelope, I've glued a little die cut tab with a circle with a cut out star to the back of the letter. This helps to pull out the letter with the greeting out of the envelope.

Freitag, 14. Januar 2022

Noch mehr Weihnachtstags

 
Hallo Ihr Lieben!
Am Dienstag habe ich Euch ja bereits meine Weihnachtstags von letztem Jahr gezeigt. Nun, ich gebe zu, dass ich in diesem Post nur die halbe Wahrheit gesagt habe. Bei Tags arbeite ich gerne in Batches, mache also den gleichen Schritt immer mehrfach bevor ich zum nächsten übergehe. Schließlich brauche ich davon ja dann doch eine ganze Menge. Trotzdem mache ich nicht immer alle Tags auf einmal, denn dann wird es das absolute Chaos auf meinem Tisch, ich arbeite also immer nur an etwa 6 Tags auf einmal. Bei den hellblauen Tags habe ich dann nach der Fertigstellung des ersten Schwungs festgestellt, dass es für die Anzahl, die ich brauchte, einfach zu aufwändig war. Und so habe ich umgeschwenkt und stattdessen noch drei weitere Tagvarianten gestaltet - darunter auch eine abgewandelte Möhren-Variante. Und diese Tags zeige ich Euch heute.

Hello everyone!
Tuesday I've shown you the tags I made for last christmas. Well, I have to admit that I only told you half the truth in that post. I like to work in batches when making cards, doing the same step several times before moving on to the next. I really need a lot of tags! But if I'd make all of those tags at once the mess on my table would be uncontrollable. So most times I finish about 6 and then start all over. After finishing the first 6 of those light blue tags I realized that they were so time comsuming that I wouldn't be able to finish them in time. And so I changed the design and made 3 more types of tags, including a changed version of the carott one. And these tags I'm sharing with you today.


Ich starte mit der abgewandelten Möhren-Version. Die Basis für alle diese Tags habe ich diesmal aus einem Cardstockstreifen gemacht, den ich am oberen Rand mit einer Stanze in ein Tag verwandelt habe.
Die Möhre habe ich diesmal von meiner Cameo schneiden lassen - die Form gefällt mir einfach besser. Das selbe gilt für die Nikolausmütze. Für das Grün habe ich wieder die Farnstanze von Spellbinders benutzt. Die Möhre ist mit Distress Ink Rusty Hinge gewischt, das Grün mit Peeled Paint.
Das Möhri habe ich mit dem Alphabet and Numbers Stanzenset von MFT aus orange-braunem Spiegelcardstock gestanzt und aufgeklebt. 
Auf den Bommel der Nikolausmütze habe ich einen weißen PomPom geklebt, oben am Tag habe ich eine orange-braune Schleife angebracht. Außerdem habe ich den Tag mit einem goldenen Glitzer-Gelpen von Sakura umrandet.

I start with the changed version of the carrot tag. I've made all of these tags from a strip of cardstock and used a punch to turn the top edge into a tag. 
This time I used my Cameo to cut the carrot - I like this shape better. I also used my Cameo for the Santa's hat, for the greens I used the same fern die by Spellbinders. I've inked the edges of the carrot with Distress Ink Rusty Hinge, the greens are inked with Peeled Paint.
To die cut the letters for the word möhri I used the Alphabet and Numbers die set by MFT and die cut them from some orange-brown mirror cardstock.
I glued a white pompom on the tip of the hat and added a brown-orange bow to the top of the tag. I also used a  golden glitter gel pen by Sakura to add a frame around my tags.


Im Hintergrund habe ich mit der Celestial Stars Hotfoil Plate von Spellbinders Sterne auf den Tag foliert und dafür braun-orange Folie verwendet.
Mit derselben Folie habe ich auch das Christmas auf schwarzen Cardstock foliert. Dafür habe ich die Merry Christmas Hotfoil Plate von Gemini benutzt. In diesem Set ist auch eine Stanze enthalten, die das Wort dann gleich ausstanzt. Das Merry links daneben habe ich nicht mit foliert - ich habe einfach die Folie nur unter das Christmas gelegt - und nach dem Ausstanzen den überstehenden Cardstock per Hand weggeschnitten. Dann habe ich den Text mit 3D Tape auf den Tag geklebt.

In the background I foiled some stars onto the tags, using the Celestial Stars Hotfoil Plate by Spellbinders and some orange-brown foil.
I used the same foil to foil the word christmas onto some black cardstock. I used the Merry Christmas hotfoil plate by Gemini here. There's also die in this set, that cuts out the foiled words. I didn't foil the word merry - I simply only placed foil under the word christmas - and after cutting the word out I cut off the cardstock to the left of the word christmas by hand. Then I glued it down with dimensionals.


Die zweite Tagvariante war mit Rentier und aus weißem Cardstock. 
Das süße Rentier habe ich mit der Build a Reindeer Stanze von XCut gestanzt. Auf die zweite Lage des Geweihs und auch die darin aufgehängten Christbaumkugeln habe ich verzichtet.
Für die Nase habe ich eine Kugel aus Watte benutzt. Da hatte ich aber nur weiße im Haus. Also habe ich sie mit roter Alcohol Ink eingefärbt - geht prima, ist aber eine große Sauerei. Nachdem die Kugeln getrocknet waren, habe ich sie auf das Rentier geklebt.
Unter dem Kopf des Rentiers, wofür im Stanzenset ein Schal enthalten ist, habe ich eine kleine Schleife mit Glöckchen aufgeklebt.
Der Text hier besteht aus einem Teil eines Stempels aus dem Set Jingle all the Way von CraftEmotions, das ich mit dem Lobster Stempelkissen von LawnFawn gestempelt habe. Ergänzt habe ich den Text durch ein kleines all the way, das ich mit einem Stempel von StudioG und mit schwarzer Tinte gestempelt habe.
Zum Schluss habe ich den Tag noch mit einem roten Fineliner umrandet.

Tag #2 was made from white cardstock and had a reindeer on it.
I used the Build a Reindeer die set by XCut to die cut the cute reindeer. I didn't use the second layer of the antlers and the baubles, that can be hung into the antlers.
For the nose I used  a cotton ball. I only had white ones at home so I colored them with red alcohol ink. Worked great, but really was a huge mess! After the balls had dried I glued them onto the reindeer.
Under the reindeer, where there should be die cut scarf that's also included in the die set, I added a little bow with a tiny bell tied to it.
For the text I used part of a stamp from the Jingle all the Way stamp set by CraftEmotions, that I stamped with the Lobster ink pad by LawnFawn. Then I finished the text with a little all the way by StudioG, stamped with black ink.
In the end I used a red fineliner to draw a frame around my tag.
 

 Und die dritte Variante ist wieder in schwarz und foliert.
Diesmal habe ich den schwarzen Cardstock mit der Diagonal Stripes Hotfoil Plate von PinkFresh und silberner Hologramm-Folie foliert.
Der süße Weihnachtsmann ist mit der Santa Peeking Stanze von Cottage Cutz gemacht, auch hier habe ich wieder einen weißen PomPom als Bommel verwendet.
Aus rotem Cardstock habe ich ein HO³ ausgestanzt und als Text aufgeklebt. Die Buchstaben sind mit dem Impact Alphabet Stanzenset von MFT gemacht, für die kleine 3 habe ich das  Confetti Numbers Set benutzt.

And here's my tag version #3 - this one's made from black cardstock again and also foiled.
This time I foiled some stripes with the Diagonal Stripes Hotfoil plate by PinkFresh onto the black cardstock, using some silver holographic foil.
The cute Santa is made with the Santa Peeking die cut by Cottage Cutz, again I used a white pompom at the tip of the hat.
From red cardstock I've die cut a HO³ and glued it down as the text. I've die cut the letters with the Impact Alphabet die set by MFT, for the small 3 I used the Confetti Numbers die set.


Auf diesem Bild könnt Ihr das Holografische der Foilie viel besser sehen.
Zum Schluss habe ich eine große Schleife aus rotem Organza gebunden und oben am Tag aufgeklebt.

On this picture you get a way better look at the holografic foil.
In the end I glued a big bow, tied from red organdy ribbon, to the top edge of my tag.

So, und damit bin ich jetzt aber erstmal wirklich durch mit dem Thema Weihnachten!

And now I'm really done with christmas for a few months!