Posts mit dem Label thank you werden angezeigt. Alle Posts anzeigen

Donnerstag, 27. Februar 2025

Von Herzen schönen Dank

 
Hallo Ihr Lieben!
Am heutigen Donnerstag zeige ich Euch eine Dankeskarte, dich ich mit Produkten von Stampcorner gemacht habe.

Hello everyone!
On this thursday I am sharing with you a thank you card I made using products by Stampcorner.

Ich habe schon länger keine Karte in der Eclipse Technik mehr gemacht, also wurde es mal wieder Zeit...
Auf ein Stück weißen Cardstocks habe ich mit schwarzer Tinte Herzen aufgestempelt. Das Herz, das ich hier verwendet habe, ist aus dem Set Fauli.
Aus dem bestempelten Hintergrund habe ich dann mit dem Alphabet-Stanzenset das Wort Dank herausgestanzt. Auf den Rest des Hintergrunds habe ich dann blau-graue Metallic Watercolor gespritzt.

I haven't made an eclipse card since quite some time, so it was about time...
With black ink I stamped a little heart all over a piece of white cardstock.
I used the alphabet die set to cut the letters for the word "Dank" - thanks - from this cardstock, then splattered some grey-ish blue metallic watercolor onto the rest of the background.


Zuerst habe ich nur die  Herzen auf den ausgestanzten Buchstaben rot coloriert, aber es waren dann irgendwie doch zu wenig davon auf den Buchstaben sichtbar. Also habe ich auch die Buchstaben selbst coloriert und mich für ein Blaugrau entschieden.
Ich habe noch je 3 jedes Buchstaben aus schwarzem Cardstock gestanzt, alle Buchstaben aufeinander geklebt - die bunten natürlich als oberste Lage - und sie dann in den Ausschnitt im Hintergrund eingesetzt. 
Mit einem weißen Gelstift habe ich Highlights aufgemalt und außerdem einen roten Gelstift benutzt, um eine Art roten Schatten an jeden Buchstaben zu malen.
Der kleine Text über dem gestanzten Wort ist mit Stempeln aus den Sets Kleine Worte und Kleine Worte 2 gemacht und weiß auf schwarzen Cardstock embosst.

First I had colored only the hearts on the die cut letters red, but there weren't enough of them on the letters so I decided, to color the letters a grey-ish blue.
I die cut three more of each letter from black cardstock, stacked them - of course the colored one on top - and then pieced them back into their spot in the background.
I used a white gel pen to add some highlights to the letters, then used a red gel pen to draw some kind of red shadow next to each letter.
The small text above the die cut word is white heat embossed onto black cardstock and together the text means "many thanks from the heart".


Natürlich durfte auch ein Motiv auf der Karte nicht fehlen. Ich habe mich für den kleinen Bären mit der Blume aus dem Set Sommer Sonne entschieden. Er ist mit Copics coloriert, dann habe ich ihn per Hand ausgeschnitten. Auf die Brust habe ich ihm ein kleines rotes Herz geklebt.
Unten hinter die Füße habe ich einen dünnen Schatten, gemacht aus schwarzem Cardstock mit den Oval Shadows von MFT, angeklebt.

Of course my card needed an image. I went with this little bear with the flower. He's colored in with Copics, then I cut him out with my scissors. Onto his chest I glued a little red heart.
Behind the bear's feet I put a shadow, die cut from black cardstock using one of the Oval Shadows by MFT.


Ich habe alle Herzen auf der Karte mit Glossy Accents überzogen.
Der Cardstock-Streifen mit dem aufembossten Text ist mit dünnem 3D Tape hinterlegt, so hat es die selbe Höhe wie die gestanzten und hinterlegten Buchstaben. Hinter dem Bären befindet sich dickes 3D Tape. 
Mit einem roten Gelstift habe ich dann einen Rahmen auf den weißen Cardstock gemalt und ihn auf ein Stück schwarzen Cardstocks geklebt, den ich mit der größten der A2 Zick Zack Stitch Stanzen gemacht habe, aufgeklebt.
Zum Schluss habe ich alles auf einem weißen Kartenrohling befestigt.

I covered all the hearts on this card with Glossy Accents.
I backed the cardstock strip with the heat embossed text with thin foam tape, so it has the same height as the stacked letters. Behind the bear I put some thick foam tape.
I used the red gel pen again to draw a frame onto the white cardstock. Then I glued that onto a piece of black cardstock, that I had die cut with the largest of the A2 Zick Zack Stitch dies.
As the last step I glued the card panel to a white note card.

Freitag, 22. November 2024

Eine Karte zum Abschied

 
Hallo Ihr Lieben!
Wenn die Putzfrau in Rente geht, dann ist das doch der perfekte Zeitpunkt, um das süße Mädel mit dem Staubsauger mal wieder zum Einsatz kommen zu lassen. 

Hello everyone!
When your cleaning lady at work goes into retirement then that's the perfect moment to use this little girl with the vacuum cleaner again.
 
Für den Hintergrund habe ich ein Stück cremefarbenen Cardstocks erst mit Distress Oxide Scattered Straw, Wild Honey und Gathered Twigs gewischt. Dann habe ich mit dem All Star Burst Embossingfolder von SimonSaysStamp die Strahlen und Sterne hineingeprägt. Auf die Sterne und höchsten Stellen der Strahlen habe ich dann goldenes Gilding Wax aufgetragen. Da ich verschiedene Goldtöne habe, habe ich drei verschiedene benutzt - jeweils in der Helligkeit zur Farbe im Hintergrund passend. Anschließend habe ich noch weiße Acrylfarbe aufgespritzt.
Als Rahmen habe ich den Ribbon Frame von TheGreetery auf die Karte geklebt. Den habe ich horizontal geteilt, damit er auf die deutsche A2 Karte passt. Die "Lücken" habe ich dann hinter dem Text und Motiv versteckt.
Gestanzt habe ich den Rahmen aus gelbem Cardstock und mit Copics Schatten hinzugefügt.

For the background I inked a piece of cream colored cardstock with Distress Oxide Scattered Straw, Wild Honey and Gathered Twigs. Then I used the All Star Burst embossing folder by SimonSaysStamp to emboss the rays and stars into the cardstock. Onto the stars and the hightest point of the rays I dabbed some gold Gilding Wax. Since I have different tones of gold Gilding Wax I used three different ones here, making them match the intensitiy of the color in the background. Then I also added splatters of white acrylic paint.
I used the Ribbon Frame die by TheGreetery to put a frame onto my card. I cut it apart crosswise to make it fit the german standard A2 card size. The "gaps" I've hidden behind the text and image.
I die cut the frame from yellow cardstock and added shadows with my Copics.


Das Motiv ist Belle Vacuuming von Belles 'n' Whistles - und ich bin froh, es nicht aussortiert zu haben. Ich habe es mit Copics coloriert und per Hand ausgeschnitten.

The image is Belle Vacuuming by Belles 'n' Whistles - and I am really happy that I kept it. I colored her with Copics and fuzzy cut her out.


Für den Text habe ich mit dem Wedding Alphabet Stanzenset von XCut die Buchstaben für das Wort Danke einmal aus hellblauem und einmal aus schwarzem Cardstock gestanzt. Die hellblauen Buchstaben habe ich mit Copics schattiert, dann habe ich die schwarzen Buchstaben etwas versetzt als Schattenlage dahinter geklebt.
Der Rest des Textes ist mit Stempeln aus den Reverse-Sets von Kulricke gemacht und einfach schwarz auf hellblauen Cardstock gestempelt.

For the text I used the Wedding Alphabet die set by XCut to cut the letters for the word "danke" - thanks - from light blue and black cardstock. I shaded the blue ones lightly with Copics, then glued the black ones a bit offset behind them as a shadow layer.
The rest of the text means "for everything and all the best for your future" and is simply stamped black onto light blue cardstock.


Den Rahmen habe ich mit dünnem, das Motiv und den Text mit dickem 3D Tape auf den Hintergrund geklebt. Als Deko habe ich einige goldene Perlen auf der Karte verteilt und dann alles auf einem weißen Kartenrohling befestigt.

I adhered the frame with thin, the image and text with thick foam tape. Then I added a few gold pearls as decoration and put my card panel onto a white note card.

Mittwoch, 6. November 2024

Danke Telefonjoker

 
Hallo Ihr Lieben!
Heute habe ich mal keine Karte, sondern einen - recht großen - Anhänger zu zeigen.

Hello everyone!
Today I don't have a card but a - quite large - tag to share with you.

Nun, für die Geschichte dahinter muss ich Euch kurz mit aufs Stempelmekka nehmen - und Ihr bekommt hier die Kurzfassung der Geschichte, denn die hat dann noch ganz andere Kreise gezogen. Bereits letztes Jahr bin ich um das XXL Alphabet Gestreift von Steckenpferdchen herumgeschlichen. Jeder Buchstabe ist 9,5 cm groß und auch breit, und auch wenn es seinen Preis absolut wert ist, es ist bei dieser Größe natürlich nicht billig und kostet doch ein ganzer Batzen Geld auf einmal. Außerdem gab es keine Zahlen dazu... Dieses Jahr gab es sie dann - sogar zu einem wirklich unschlagbaren Bundle-Preis - und ich kam wieder ins Grübeln. Wie gut, dass wir beide Tage auf dem Mekka waren, so konnte ich eine Nacht darüber schlafen. Und an diesem Abend wollte ich dann als Entscheidungshilfe meinen Mann anrufen. Meine Freundin war schneller und rief ihren an - eigentlich nur zum Spaß. Der kam dann aber aus dem Nichts mit so vielen Ideen dazu rüber, dass wir uns das Alphabet am Ende beide gekauft haben... 
Letztes Jahr hatte ihm meine Freudin eine Tüte Gummibärchen aus Hagen mitgebracht, die er super lecker fand. Dieses Jahr gab es die leider nicht. Nun, ich wusste, wo ich sie hier bei mir bekomme... Mit dem tollen Alphabet habe ich dann diesen Dankes-Tag für unseren "Telefonjoker" gebastelt und ihn an einem Glas, gefüllt mit den Gummibärchen, befestigt.
So, nun aber mal zur Sache hier! Ich habe einen großen Tag aus Vellum gestanzt und einen schmäleren, etwas längeren aus grauem Designpapier mit kleinen weißen Punkten dahinter gelegt. Und weil man durch das Vellum ja den Kleber sieht, habe ich beide oben mit zwei weißen Eyelets verbunden.

Well, for the story behind this tag I have to take you with me to Stempelmekka, the one and only stamp fair here in Germany - and I am giving you the short story, because this one really led to a bunch of fun and many people involved. 
Already during our visit last year I fell in love with the XXL Alphabet Gestreift die set by Steckenpferdchen. Each letter is about 9,5 cm/nearly 4 Inches large and wide and of course it's worth its money. But with this size it's still a quite large amount for one die set. And they also didn't have numbers to go with it.... This time they had them - even for a really generous bundle price - and once again I was unsure if to buy it or not. Luckily we were both days at that fair and so I had one night to think about it. That night I wanted to call my husband, maybe he could help me make a decision. But my friend was quicker and called her husband - originally just for fun. But he came up with so many amazing ideas we didn't have thought of, that, in the end, we both got that die set...
Last year my friend brought him some gummy bears from Hagen, that he really loved and that we weren't able to get this year. Well, I knew where to buy them where I live... I used the amazing alphabet to create this thank you tag and attached it to a jar that I filled with the gummy bears.
Well, now let's finally talk about the tag! I die cut a large one from vellum and put a thinner but longer one cut from grey paper with tiny white dots behind it. Since you can see any glue through the vellum I used two white eyelets to connect both at the top.


Den Buchstaben D habe ich dann mit besagtem Alphabet-Set gestanzt - eine vollflächige Lage aus weißem und eine gestreifte Lage aus schwarzem Cardstock. Beide habe ich dann etwas versetzt aufeinander geklebt. 
Mit silbernem Band und meinem Dymo habe ich dann ein "anke" geschrieben, um das Wort Danke zu schreiben. Außerdem habe ich noch das Wort "Telefonjoker" geschrieben und beide Teile mit schwarzem Cardstock hinterlegt. Die habe ich dann auf dem D angebracht, das ich mit 3D Tape etwas schräg auf die Tags geklebt habe. Als Deko habe ich ein paar Sterne aus silbernem Schimmer-Cardstock gestanzt und außerdem einige silberne Perlen mit aufgeklebt.

I used said alphabet set to die cut the letter D - a solid one from white and a striped one from black cardstock. I glued those on top of each other a bit offset. 
Using my Dymo and silver tape I created a "anke" strip to complete the word Danke - thanks. I also wrote the word Telefonjoker, which is the german word for the call-a-friend option in TV quiz shows. I matted both words with black cardstock and adhered them onto the D, that I have glued a bit slanted onto the tags using foam tape. I cut a few stars from silver shimmer cardstock and also added a few silver pearls to complete my decorations.


Oben durch die beiden Eyelets habe ich etwas schwarzes Organzaband gezogen und zur Schleife gebunden. 

Through the eyelets at the top of the tag I thread some black organdy ribbon and tied it to a bow.
 

 Das Banner habe ich dann mit doppelseitigem Tape an einem großen Glas befestigt. Das Glas musste so groß sein, damit das doch auch recht große Banner überhaupt draufpasst. Das habe ich dann mit den Gummibärchen gefüllt. Da das Glas so groß ist, haben ganze vier Tüten hineingepasst. Aber so hat er zumindest länger was davon... ;)

I attached the banner with doublesided tape to a large jar. The jar had to be that big for the also quite big banner to fit onto it. Then I filled it with the gummy bears. Four bags fit into it, but at least that means he'll be having some candy for quite some time... ;)

Dienstag, 22. Oktober 2024

A note to say thanks

 
Hallo Ihr Lieben!
Bei der Oktober-Challenge der Share Handmade Kindness Gruppe geht es diesmal um verschiedene Arten, Embossingfolder bzw. Hintergründe damit einen Tick interessanter zu machen. Ja, ich habe jede Menge Embossingfolder und ich gebe zu, ich denke viel zu selten daran, sie zu benutzen. Bei meiner Karte für die Challenge kam aber dann zumindest der Birch Trees Folder von NellieSnellen zum Einsatz.

Hello everyone!
In the video, that's the theme of the Share Handmade Kindness october challenge, Jennifer is sharing different ways to make dry embossed backgrounds even more interesting. Yes, I have a bunch of embossing folders and I have to admit, I never think of using them. For my card for the challenge I at least used the Birch Trees folder by NellieSnellen.

Nun, eigentlich wollte ich einen ganz anderen Hintergrund gestalten - einen, bei dem die debosste Seite mit einem Stempelkissen eingefärbt und dann sogar noch ein Textstempel darüber gestempelt wird. Hatte ich auch gemacht. Aber das Seedless Preserves, das ich benutzt hatte, war viel zu dunkel zu den Blumen und dann ist mir beim Aufstempeln des Textes auch noch der Stempel verrutscht. Wie gut, dass das Seedless Preserves nicht durchgeblutet hatte. Also habe ich einfach den embossten Cardstock auf den Kopf gedreht und das Positiv benutzt. 
Ich habe den bereits embossten Cardstock zurück in den Embossingfolder gelegt und die Seite des Folders, der die Oberseite prägt, mit Distress Oxide Tattered Rose und Tea Dye eingefärbt. Dann habe ich alles erneut durch die Big Shot gedreht. So wird der Bereich zwischen den Bäumen eingefärbt. Ich hatte hier ganz hellen rosa-beigen Cardstock für den Hintergrund benutzt und der passte nun viel besser zu meiner Deko. Damit der Hintergrund noch ein klein wenig interessanter wird, habe ich noch weiße Acrylfarbe aufgespritzt.

Well, originally I had planned a totally different background - one where the debossed side gets inked up with an ink pad and then Jennifer even stamped a text onto it. I had tried it. But the Seedless Preserves I had used was way too dark to go with my flowers and then I even moved the paper when I stamped the text. Luckily the Seedless Preserved hadn't bled through the paper so I simply turned the cardstock around and used the embossed side.
I put the already embossed cardstock back into the embossing folder and inked the side that creates the embossed side with Distress Oxide Tattered Rose and Tea Dye. Then I ran the cardstock through my Big Shot again. This way the area between the trees gets inked up. I had used some very light pinkish beige cardstock for the background and that now looked so much better with my decorations. To make the background a bit more interesting I splattered some white acrylic paint onto it.


Ich wollte unbedingt eine Dankeskarte im Herbstlook machen. Also habe ich das Lovely Layers Mini Fall Flowers Set von HoneyBeeStamps benutzt und damit die verschiedenen Blumen, Blätter und Kornähren ausgestanzt. Den Blumen habe ich Stengel der Cornflower von Gummiapan verpasst, außerdem habe ich mit dem Branching Out Set von MemoryBox noch ein paar Äste gestanzt. Ich habe für alles farbigen Cardstock benutzt und diesen dann mit Distress Ink schattiert. Es kam Tea Dye, Fired Brick, Aged Mahogany, Forest Moss, Brushed Corduroy und Black Soot zum Einsatz.
Mein Blumenarrangement habe ich dann mit Vellum hinterlegt, das ich mit einer der Elegant Rectangle Stax Stanzen von MFT gestanzt habe. Darauf habe ich mit einem goldenen Gelstift einen Rahmen aufgemalt.
 
I really wanted to make a thank you card in a fall look. So I used the Lovely Layers Mini Fall Flowers set by HoneyBeeStamps to cut different flowers, leaves and corn ears. I added stems from the Cornflower die by Gummiapan to the flowers and also die cut some twigs using the Branching Out set by MemoryBox. I cut he pieces from colored cardstock and then shaded them with a bit of Distress Ink. I used Tea Dye, Fired Brick, Aged Mahogany, Forest Moss, Brushed Corduroy and Black Soot.
Behind my flower arrangement I put some vellum, that I have cut using one of he Elegant Rectangle Frames by MFT. I drew a frame with a gold gel pen onto it.
 
 
Auch der Text auf der Karte ist von MFT. Ich habe das thanks aus dem Thanks and Hello Set einmal aus weißem Cardstock und einmal aus matt-goldenem Metallic-Cardstock gestanzt.
Die gestempelten Texte sind aus dem Set Itty Bitty Thanks. Damit sie zum Rest der Karte passen, habe ich sie mit goldener Tinte auf weißen Cardstock gestempelt.

Also the text on the card is by MFT. I die cut the thanks from the Thanks and Hello die set once from white cardstock and once from matte gold metallic cardstock.
The stamped texts from the Itty Bitty Thanks set. To make them go with the rest of the card I stamped them with gold ink onto white cardstock.


Die Blumen und das thanks habe ich mit dünnem 3D Tape auf das Vellum geklebt und dann auch das mit dem dünnen Tape hinterlegt. Der Textstreifen unten ist dann mit dickem Tape hinterlegt, damit er die selbe Höhe hat wie der Rest der Deko.
Zum Schluss habe ich noch einige wenige goldene Perlen aufgeklebt und dann alles auf einem weißen Kartenrohling befestigt.

The flowers and the thanks I adhered with thin foam tape to the vellum and then backed that up with the thin tape, too. The text strip at the bottom of the card I backed with thick tape to get it to the same height as the other elements.
I added just a few gold pearls and then glued my card panel onto a white note card.

Freitag, 20. September 2024

Grüner wirds nicht


 Hallo Ihr Lieben!
Heute habe ich eine wirklich grüne Karte für Euch... 
Wir haben einen großen, alten Apfelbaum im Garten. Leider sind die Äpfel nicht für lange Lagerung geeignet, Apfelsaft trinkt bei uns keiner und außerdem ist unser Keller dafür zu warm und zu hell. Also bin ich um jeden Apfel, den mir jemand abnimmt, froh, denn das bedeutet, ich muss weniger davon wegwerfen. Und für eine Freundin, die mir gleich eine Kiste abgenommen hab, habe ich diese Karte als Beigabe gemacht. 

Hello everyone!
Today I have a very green card for you.... 
We have an old and ginormous apple tree in our garden. Sadly the apples aren't ones that can be stored for long, we don't drink apple juice and to top that our basement is also too light and warm to store any fruits or vegetables. So I am really glad for every apple I can give to someone because it means I don't have to throw away that many. For a friend that took a hole crate I made this card to go with the apples.

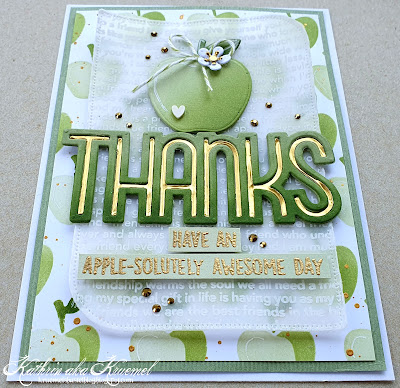
Letztes Jahr hatte ich mir ja den Layering Stencil mit den Äpfel aus Stanzen selbst gemacht, und jetzt, pünktlich zum Herbst, ist es an der Zeit, ihn wieder herauszuholen - auch wenn die Karte nicht wirklich herbstlich ist.
Ich habe die Teile der verschiedenen Stencils mit 4 verschiedenen Grüntönen auf weißen Cardstock gewischt und anschließend goldene Metallic Watercolor aufgespritzt.

Last year I made myelf a layering stencil with apples using dies and now, right in time for fall, it was time to bring it out again - even if this card didn't turn out very fall-ish.
I inked the elements of the different stencil parts onto white cardstock, using four different shades of green ink and then added splatters with gold metallic watercolor.


Um den Hintergrund hinter dem Text und Motiv etwas abzuschwächen, habe ich entschieden, etwas Vellum aufzulegen. Ich habe eine der Rounded Corners Stanzen von Create a Smile aus Vellum gestanzt und dann mit weißer Stempelfarbe den Best Friends Background von MFT aufgestempelt. Man sieht es hier bereits - durch das Trocknen mit dem Heat Tool (die weiße Farbe wäre sonst auf dem Vellum nie getrocknet) hat sich das Vellum etwas gewölbt und da es im oberen Bereich nicht auf dem Hintergrund fixiert ist, steht es dort nach oben. Das dürfte sich im Kuvert aber bessern, und falls nicht, macht das auch nichts, finde ich.

To tone down the background a bit behind the image and text I decided to add some vellum. I die cut one of the Rounded Corners by Create a Smile from it and then stamped the Best Friends Background by MFT onto it. You can already tell on this picture - since I dried the vellum with my heat tool (the white ink would never have dried on the vellum on its own) the paper warped a bit. And since it isn't attached at the bottom, the corners bend up some here. I guess, it will get better in the envelope and if not I don't think it looks too bad as is.


Der Apfel ist aus dem Back To School Set von MFT. Ich habe ihn passend zu den Äpfeln im Hintergrund aus grünem Cardstock gestanzt - der Apfel selbst besteht aus drei Lagen - und mit grüner Tinte schattiert. 
An den Stiel habe ich eine Schleife aus grün-weißem Twine geklebt und den Apfel außerdem mit einer weißen Blüte aus dem Stanzenset Stitched Strawberry Frame von LawnFawn dekoriert. Die Blütenmitte habe ich aus matt-goldenem Metallic-Cardstock gestanzt. Außerdem habe ich unten auf den Apfel ein kleines weißes Herz geklebt.

The apple is made using a die from the Back To School set by MFT. I die cut it from green cardstock to make the apple match the ones in the background. Just the apple itself I die cut three times and inked all pieces with green ink. 
I glued a bow made from green and white twine to the stem and also decorated the apple with a white blossom from the Stitched Strawberry Frame set by LawnFawn. The flower center I die cut from matte gold metallic cardstock. I also glued a small white heart to the bottom of the apple.


Der Text ist mal wieder ein Mix aus gestanztem Wort und gestempeltem Text.
Das große Wort Thanks habe ich mit der Giant Outlined Thanks Stanze von LawnFawn gemacht und hier wieder drei Teile aufeinander geklebt. Die oberste Lage habe ich von unten her grün schattiert. Und eigentlich hatte ich die Schattenlage, die dann durch das Innere der Buchstaben sichtbar ist, aus hellgrünem Cardstock gestanzt. Später hat mir das dann aber nicht mehr gefallen. Also habe ich das Wort nochmal aus dem matt-goldenen Cardstock gestanzt und nur die schmalen Buchstaben eingeklebt. Ich musste sie mit der Kante meiner Schere eindrücken, was man ihnen auch ein wenig ansieht.
Der Text darunter ist aus dem Set Apple-Solutely Awesome von LawnFawn und ich fand, der passte einfach perfekt. Nicht nur wegen des Textes an sich, mit einer ganzen Kiste Äpfel kann der Tag nur "apple-solutely awesome" werden. ;) Ich habe ihn gold auf hellgrünen Cardstock embosst.

The text is once again a mix of die cut word and stamped text.
The large thanks I die cut three times with the Giant Outlined Thanks die by LawnFawn. The top layer I shaded from the bottom up with green ink. And I originally had cut the shadow layer, that fills the inside of the letters, from light green cardstock. But I didn't like that once the card was put together. So I die cut the word again from the matte gold cardstock and glued the thin letters into the outlines. I had to use the edge of my scissors to press them in, and you can tell that from their look.
The text underneat is from the Apple-Solutely Awesome set by LawnFawn and I think, it is just perfect. Not only because of the apple theme but also because with a whole crate of apples your day can only be "apple-solutely awesome". I gold heat embossed it onto light green cardstock.


Ich habe alle Elemente auf das Vellum geklebt und den embossten Text dabei mit 3D Tape hinterlegt. Dann habe ich hinter das Vellum ebenfalls 3D Tape geklebt - natürlich an den Stellen, an denen sich die Deko auf der Vorderseite befindet - und alles so auf den Hintergrund geklebt.
Den dekorierten Cardstock habe ich dann grün gemattet und alles auf einen weißen Kartenrohling geklebt.

I glued all the elements to the vellum and put foam tape behind the embossed text. Then I put more foam tape to the back of the vellum - of course in the areas that are covered by the elements on the front - and adhered it to the background.
I matted the card panel dark green and then attached it to a white card base.

Dienstag, 10. September 2024

I'm so grapeful for you

 
Hallo Ihr Lieben!
Im Garten sind die Weintrauben reif - und das hat mich dann doch glatt zu dieser Karte inspiriert. Und dann ist mir auch noch das perfekte Wortspiel eingefallen. 

Hello everyone!
The grapes in our garden are ripe - and they inspired me to make this card - the more since I came up with the perfect pun for the images.

Lila ist ja so gar nicht meins - auch lila Trauben mag ich nicht wirklich gerne. Eigentlich hatte ich also vor, die Trauben grün zu colorieren. Aber grüne Trauben in grünem Wagen mit grünen Blättern und das alles vor grünem Hintergrund - das war dann doch ein wenig viel. Also habe ich doch zu lila gegriffen und finde das Ergebnis klasse.
Im Hintergrund habe ich ein Stück grünen Cardstocks mit grüner Tinte und dem Fall Leaves Background Stencil von LawnFawn Blätter aufgewischt.  Dabei habe ich bewusst nur die großen Blätter gewischt, die mich von der Optik her an Weinblätter erinnert haben, und einige kleine in der selben Form dazwischen gesetzt. Und dann habe ich den Stencil einfach so oft verschoben, bis der Cardstock damit gefüllt war. 
Ich habe den Cardstock von außen her ebenfalls ein wenig mit dunkelgrüner Tinte gewischt und anschließend weiße Acrylfarbe und grüne Metallic Watercolor aufgespritzt.
Insgesamt habe ich hier Cardstock in drei verschiedenen Grüntönen verwendet. Aus dem hellsten habe ich den Fall Leaves Backdrop gestanzt und fast alle Blätter weggeschnitten. Nur an der oberen Kante sowie im oberen Bereich der Seiten habe ich die - eigentlich wohl - Ahornblätter stehenlassen und leicht mit Distress Ink Bundled Sage gewischt. 

Purple is so not my favorite color - and I also don't like purple grapes much. Originally I had planned to color my grapes green. But green grapes in a green cart, with green leaves and all of that on a green background - that sounded a bit too much. So I decided to go with purple and really love how this card came out.
In the background I used green ink and the Fall Leaves Stencil by LawnFawn to ink leaves onto a piece of green cardstock. I selectively only inked those  leaves, that reminded me of wine leaves, and put a few small ones in between. Then I moved the stencil a few times until I had those leaves all over the cardstock.
I inked the cardstock from the outside in with the same green ink I used to stencil the leaves, then splattered some white acrylic paint and green metallic watercolor onto it.
I used three different shades of green cardstock here. From the lightest I die cut the Fall Leaves Backdrop and cut off nearly all the leaves. Only along the top edge and the top of the sides I kept the ones that, I guess, are acorn leaves. Those I lightly inked with Distress Ink Bundled Sage.


An die Kanten habe ich dann Trauben gehängt, die alle mit dem selben Stempeln aus dem Set Year Fourteen gemacht sind. Ich habe sie mit Copics coloriert, ausgeschnitten und am Rahmen zwischen den - übriggebliebenen - Blättern angebracht. 
Dann habe ich aus dem mittleren Ton meiner grünen Cardstockstücke weitere Blätter ausgestanzt und dafür Stanzen aus den Sets Fall Leaves Backdrop und Magic Iris Fall Leaves Add-On verwendet. Auch die habe ich leicht gewischt und dann zwischen den Trauben auf dem Rahmen verteilt.
Und dann habe ich aus braunem Cardstock noch kleine "Ranken" gestanzt und aufgeklebt. Die sind aus den Sets Pumpkin House und Stitched Pumpkin Frame.

I hung grapes, that are all made using the same image from the Year Fourteen set, from the edges of the cardstock frame. I colored them with Copics, cut them out and attached them between the - left over - leaves.
From the middle shade of my green cardstocks I die cut more leaves using dies from the sets Fall Leaves Backdrop and Magic Iris Fall Leaves Add-On. I again inked them lightly and glued them between the grapes onto the frame.
And then I decided to add some "vines", that I cut from brown cardstock with dies from the sets Pumpkin House and Stitched Pumpkin Frame.


Unten innerhalb des Rahmens habe ich dann meinen Text untergebracht. Dafür habe ich mit dem Henry's ABCs Stanzenset die Buchstaben für das Wort Grapeful ausgestanzt: einmal aus lilafarbenem und dreimal aus schwarzem Cardstock. Die lilafarbenen Buchstaben habe ich von unten her ein wenig gewischt und dann alle Buchstaben aufeinander geklebt, die lilafarbenen etwas versetzt. 
Für den Rest des Textes  habe ich Stempel aus dem Set Henry's Build a Sentiment Spring Set benutzt und sie mit lilafarbener Tinte auf weißen Cardstock gestempelt. 
Und oben auf den Buchstaben ist eine kleine Maus dabei, ihre Traubenernte nach Hause zu fahren. Die Maus ist aus dem Set Whoos Kites - das Garnknäuel in ihrer Hand habe ich maskiert -, der Wagen aus dem Set Let's Go Nuts und darin befindet sich wieder die Traube aus dem Set Year Fourteen.

Inside the frame, at its bottom, I adhered my text. I die cut the letters for the word grapeful using the Henry's ABCs die set. I cut the letters once from purple and three times from black cardstock. I shaded the bottom of the purple letters, then stacked them all, setting the purple ones a bit off.
For the rest of the text I used stamps from the Henry's Build a Sentiment Spring set and stamped them with purple ink onto white cardstock. 
On top of the die cut letters one of the cute mice is working hard to carry home the grapes she just harvested. The mouse is from the set Whoosh Kites - I masked off the garn roll she's holding -, the cart is from the set Let's Go Nuts and the grapes are again the ones from the set Year Fourteen.


Zum Zusammensetzen kam natürlich wieder 3D Tape zum Einsatz, allerdings hier doch eher spärlich. Und wenn ich schon mal lila auf einer Karte benutze, war das der perfekte Moment, um auch mal die lilafarbenen Herzen, die in einem Mix kamen, zu benutzen. Also habe ich drei davon neben der Maus aufgebracht.
Dann habe ich alles auf einem weißen Kartenrohling befestigt.

Of course I used foam tape to put the card together, but I really didn't use that much of it. 
Well, and since I was using purple on a card it was the perfect time to also use some of the purple hearts that came in a mix. So I glued three of them next to the mouse.
Then I attached the card panel to a white note card.

Freitag, 6. September 2024

You're a star

 
Hallo Ihr Lieben!
Ich bin ja eigentlich nicht der "ich-hebe-jeden-Schipsel-auf"-Typ. Aber wenn es ein kompletter Hintergrund oder Stanzteil ist, dann kann es schon sein, dass ich es gleich auf der nächsten Karte verarbeiten will. Sie in irgendeiner Box zu sammeln klappt bei mir nicht. Entweder nutze ich sie sofort oder sie wandern in den Müll. Hier hatte ich das aus goldenem Metallic Cardstock gestanzte thanks übrig - und das hat dann tatsächlich zu dieser und zwei weiteren Reste-Karten geführt... 

Hello everyon!
I am not the "I-keep-every-leftover-scrap" type of crafter. But when it's a complete background or a die cut, then it can happen that I am going to use it on the next card. I know exactly that I don't need to keep a leftover box - either I use them right away or they will never get used. Here I had the word thanks die cut from gold metallic cardstock left over - and that actually led to this and two more cards using leftovers....

Auf dieser Karte wollte ich eigentlich den All the Stars Background von MFT verwenden und die Sterne in Reih und Glied aufkleben. Damit das einfacher ist, habe ich die Stanze erst benutzt, um die Schneidlinien in ein Stück weißen Cardstock zu drücken. Den habe ich dann mit Distress Ink Stormy Sky, Faded Jeans, Chipped Sapphire und Black Soot eingefärbt. Mit einem Pinsel habe ich weiße Acrylfarbe aufgespritzt.
Dann habe ich mit Glimmerpaste und einem Stencil Strahlen aufgewischt - der Ausgangspunkt liegt im unteren Drittel der Karte, wo später mein Text sein soll. 
Nachdem die Paste trocken war, habe ich meine Pläne über den Haufen geworfen, denn der Hintergrund gefiel mir so gut, dass ich fand, die Sterne würden zu viel davon verdecken.

On this card I wanted to use the All the Stars Background by MFT and glue the stars down in rows. To make that task easier I first used the die to emboss the cutting lines into a piece of white cardstock. Then I inked it with Distress Ink Stormy Sky, Faded Jeans, Chipped Sapphire and Black Soot. Using a brush I splattered on some white acrylic paint.
Then I used a rays stencil and glimmer paste to add rays to the background - the center is in the lower third of the card, where I wanted my text to be later.
After the paste had dried I changed my plans because I really liked the background and thought, the stars would cover too much of it.
 

 Also habe ich erstmal meinen Text aufgeklebt. Der ist mit der Giant Outlined Thanks Stanze von LawnFawn gemacht und besteht aus dem schon erwähten Übrigbleibsel, gestanzt aus matt-goldenem Metallic Cardstock. Außerdem befinden sich dahinter 4 weiße Lagen und die Schattenlagen, die ich zwischen die goldene und die weißen Lagen geklebt habe, habe ich aus Vellum gestanzt. 
Und dann habe ich ganz spontan die süße Maus aus dem Set Dream Big von ColoradoCraft als Motiv benutzt. Und dazu passte dann der kleine "you're a star" aus dem Super Star Set von LawnFawn perfekt. Ich habe ihn mit goldenem Embossingpulver auf schwarzen Cardstock embosst.

So I started with the text. I made that using the Giant Outlined Thanks die by LawnFawn. It's put together from the already mentioned left over die cut from matte gold metallic cardstock and four more white layers, that I backed the gold die cut with. The shadow layer, that I adhered between the gold and the white layers, I cut from vellum.
And then I brought out this cute mouse from the Dream Big set by ColoradoCraft. The little "you're a star" text from the Super Star set by LawnFawn just went perfect with it. I gold heat embossed it onto black cardstock.


Die kleine Maus auf dem Stern habe ich mit Copics coloriert, ausgeschnitten und auf den gestanzten Text gesetzt.
Und dann habe ich doch noch zumindest einige der Sterne an ihrem Platz aufgeklebt. Dafür habe ich erst ein weiteres Stück weißen Cardstocks mit Distress Spritz Peacock Feathers und Uncharted Mariner eingesprüht und nach dem Trocknen daraus die Sterne ausgestanzt. Die Ränder habe ich dann leicht mit dunkeltürkisfarbenem Gilding Wax betont und sie dann auf den Hintergrund geklebt. An die Stelle, auf die die Maus schaut, habe ich einen Stern, den ich aus dem matt-goldenen Metallic Cardstock gestanzt habe, aufgeklebt.
Nunja, Ihr ahnt es vielleicht. Natürlich hatte ich nun jede Menge türkisfarbener Sterne und auch noch das Negativ übrig... Das Negativ habe ich dann für eine meiner Sneak-Karten auf das September-Release von Stampcorner verwendet und Euch bereits gezeigt. Die Karte mit den Sternen folgt dann demnächst...

I colored the little mouse on the star with Copics, cut her out and placed her on top of the die cut text.
And then I added at least a few stars back in their place. So I spritzed another piece of white cardstock with Distress Spritz Peacock Feathers and Uncharted Mariner and die cut the All the Stars Background from it once the cardstock had dried. I dabbed some dark turquoise Gilding Wax onto the stars and adhered them to the background. In the spot the mouse it looking it I added a star that I cut from the matte gold metallic cardstock.
Well, you might already fear it. Of course I had a bunch of turquoise stars and also the negative left over... The negative I used on one of the sneaks for the september release by Stampcorner and already shared that card with you. The card with the stars I will show you in the near future...


Natürlich kam zum Aufkleben der Elemente wieder dünnes 3D Tape zum Einsatz. Und weil der Himmel zwischen den großen Sternen dann doch noch etwas leer wirkte, habe ich einige klar-irisierende Sterne auf der Karte verteilt. Die stechen nicht sofort ins Auge, füllen die Karte aber trotzdem.
Zum Schluss habe ich dann alles - ohne Mattung - auf einen weißen Kartenrohling geklebt. Den breiteren weißen Rand finde ich hier echt klasse - und er ist ein wenig durch die Größe der Hintergrundstanze bedingt, die ja im US-Format gestaltet ist.

Of course I used thin foam tape to adhere the elements. And since the sky looked a bit plain between those large stars I scattered some clear-iridescent star confetti. They don't take a lot of attention but still fill the card.
At the end I glued the card panel - without adding a mat - to a white note card. I love the quite wide white border - and part of the reason why I ended up with it it the american card sized background die.

Samstag, 31. August 2024

Danke sagen

 
Hallo Ihr Lieben!
Eine Freundin wohnt in einem von drei Häusern, die in einer kleinen Sackgasse stehen. Und genau die war nun für Monate gesperrt und damit auch der Weg zu Haus und Garage versperrt. Aber die Nachbarn waren so lieb und haben sie über ihre privaten Grundstücke fahren lassen, so dass das doch möglich war. Dafür möchte sie sich nun erkenntlich zeigen und hat mich gefragt, ob ich ihr zwei Karten machen könnte. Und das hier ist sie - sind sie. Da beide gleich ausgefallen sind, zeige ich nur eine.

Hello everyone!
A friend of mine lives in one of three houses at the end of a dead end road. And this road was closed for several months due to construction works. That also meant that she wasn't able to drive to her house. Well, it would have meant that if the neighbours wouldn't have given her permission to drive through their private properties. She wants to thank them now and asked me, if I can make her two cards. And here it is - they are. I made two identical ones so I am only sharing one.

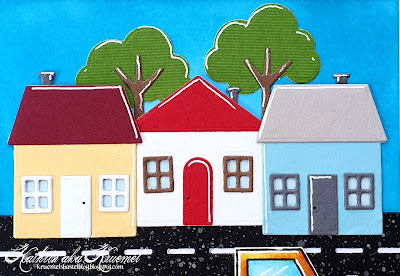
Ich habe auf ein Stück weißen Cardstock den Himmel mit Distress Oxide Mermaid Lagoon, das Gras mit Mowed Lawn gewischt. Dann habe ich zwei Straßen aufgeklebt. Die sind mit der On the Road Stanze von LawnFawn sowie einer der Open Road Stanzen von MFT gestanzt. Ich habe sie mit schwarzer und grauer Metallic Watercolor bespritzt und dann die Mittelstreifen weiß hinterlegt.

I inked a sky with Distress Oxide Mermaid Lagoon and some grass with Mowed Lawn onto a piece of white cardstock. Then I glued two roads on top. I die cut those from black cardstock using the On the Road die by LawnFawn and one of the Open Road dies by MFT. I added splatters of black and grey metallic watercolor, then put white cardstock behind the center lines.


Oben, entlang der quer aufgestellten Straße, habe ich die drei Häuser platziert. Die sind, genauso wie die Bäume dahinter, mit dem Home Sweet Home Stanzenset von MFT aus farbigem Cardstock gestanzt.

At the top. along the street I glued across the background, I placed the three houses. These and also the trees behind them are die cut with the Home Sweet Home die set by MFT from colored cardstock.


Und unten auf der Karte befindet sich die gesperrte Straße samt Baustelle.
Die Baustelle ist mit Stempeln aus den Sets Helper Vehicles, Construction Trucks und Construction Additions von PrettyPinkPosh gemacht. Ich habe alle Teile mit Copics coloriert und per Hand ausgeschnitten.
Und unter der Baustelle war dann noch genug Platz auf der Straße, um meinen Text unterzubringen. Das Danke besteht aus mehreren Lagen, alle aus weißem Cardstock gestanzt. Und weil die Freundin einen tierischen Nachnamen hat, musste ich einfach diesen kleinen freundlichen Bären aus dem Treat Cart Set von LawnFawn mit auf die Karte bringen.
Der kleine Text darunter ist am PC geschrieben - "für Eure Hilfe" fand ich irgendwie unpassend, aber einen anderen passenden Text konnte ich unter meinen Stempeln auch nicht ausmachen. Also habe ich mir so beholfen.

At the bottom of the card there's the closed road with the construction site.
The construction images are from the sets Helper Vehicles, Construction Trucks and Construction Additoins by PrettyPinkPosh. I colored all pieces with Copics and cut them out with my scissors.
Under the construction site there was enough room on the road to add my text. The danke - thank you - is made from several layers, all cut from white cardstock. And since my friend's last name is just like the name of a wild animal I just had to add that cute, friendly little bear from the Treat Cart set by LawnFawn.
The small text underneath means "for showing a way through the chaos" and I printed that with my home printer. It was the only text that made sense but I really wasn't able to find a stamp like that in my stash. 


Die Baustellenelemente sind jeweils mit dünnem 3D Tape hinterlegt, hinter den Bären und den gedruckten Text habe ich dickes 3D Tape gelegt. Zum Schluss habe ich den Cardstock auf einen weißen Kartenrohling geklebt.

I put thin foam tape behind the construction site elementes, the bear and the printed text I backed with thick foam tape. Then I adhered the card panel to a white note card.

Montag, 17. Juni 2024

Muchas Gracias

 
Hallo Ihr Lieben!
Heute zeige ich Euch eine Karte, zu der ich die Idee bereits während der Intro-Woche von LawnFawn hatte. Aber leider hat jeder Tag nur 24 Stunden und die Woche nur 7 Tage. Und so hat es ein wenig gedauert, bis ich sie umsetzen konnte. Jetzt aber war es soweit. 

Hello everyone!
Today I am sharing a card with you, that I had the idea for already during LawnFawn's intro week. Sadly each day only has 24 hours and the week only 7 days. So it took me some time until I was able to turn it into reality. But now it happened.

Ja, ich mag hier ein wenig mit Klischees gespielt haben, aber ich konnte nicht anders, als einem der Kakteen aus dem letzten Release einen Sombrero und einen Schnurrbart zu verpassen und alles mexikanisch angehaucht zu gestalten. 
Hier kam wieder der Desert Canyon Backdrop zum Einsatz - diesmal wirklich in einer Wüstenlandschaft. Ich habe ihn aus gelbem Cardstock gestanzt und dann die Felsen mit Distress Oxide Spiced Marmalade, Crackling Campfire und Barn Dor gewischt. 
Die Sandhügel habe ich aus cremefarbenem Cardstock gestanzt und mit Antique Linen und Scorched Timber gewischt. Auf den Sand und die Hügel habe ich dann ein wenig des Scorched Timber aufgespritzt.
Der Himmel besteht aus einem Stück weißen Cardstocks, den ich mit Tea Dye, Saltwater Taffy und Abandoned Coral eingefärbt habe. Auf alle Teile habe ich dann noch weiße Acrylfarbe aufgespritzt. 
Die Sonne besteht aus einem Kreis aus cremefarbenem Cardstock, den ich am äußeren Rand ein wenig mit Antique Linen gewischt habe.

Yes, I did go totally cliche here but I just couldn't resist and had to give one of the cacti from the latest release a sombrero and a mustache and make some mexican inspired card.
Again I used the Desert Canyon Backdrop - this time really on a desert scenne. I die cut it from yellow cardstock and then inked the rocks with Distress Oxide Spiced Marmalade, Crackling Campfire and Barn Door.
The sand I die cut from cream colored cardstock and inked it with Antique Linen and Scorched Timber. Onto both pieces I splattered some of the Scorched Timber.
The sky is made from a piece of white cardstock that I inked with Tea Dye, Saltwater Taffy and Abandoned Coral. Onto all the pieces I also splattered some white acrylic paint.
The sun is made from a circle, cut from cream cardstock. The edge I inked with a bit of Antique Linen.


Der Text meiner Karte ist, zusammen mit Senor Kaktus, gleichzeitig der Eyecatcher, auch wegen der Farben. Ich habe die Giant Outlined Gracias Stanze aus rotem und gelbem Cardstock gestanzt und dann von unten her ein wenig schattiert. Für den roten Cardstock habe ich Distress Ink Aged Mahogany und Black Soot benutzt, für die gelben Innenteile habe ich Distress Oxide Mustard Seed benutzt. 
Das I habe ich mit dem großen Kaktus aus dem Set Critters in the Desert überklebt. Wie schon erwähnt, habe ich den mit Sombrero und Schnurrbart versehen. Als ich die Idee zu der Karte hatte, war ich mir sicher, dass es einen Sombrero von LawnFawn gibt. Als ich die Karte dann machen wollte, fand ich keinen. Ich habe auch im Shop gesucht und nichts gefunden. Also bin ich fremdgegangen und habe den Sombrero aus dem Set Hut Ab von Create a Smile benutzt. Der Schnurrbart ist aus dem Set Dad and Me. Wie alle Motive auf der Karte habe ich Copics zum Colorieren verwendet.
Hinter dem Text befindet sich die Cactus Border. Die habe ich aus weißem Cardstock gestanzt und ebenfalls mit Copics coloriert.

The text, together with Senor Cactus, is also the eyecatcher of this card, also because of the bright colors. I die cut the Giant Outlined Gracias die from red and yellow cardstock and then inked the bottom of the letters. I used Distress Ink Aged Mahogany and Black Soot for the red pieces, the yellow inner pieces I inked with Distress Oxide Mustard Seed. 
I put the large cactus from the Critters in the Desert set onto the I. As already mentioned did I dress him up with a Sombrero and a mustache. When I had the idea for this card I was sure that there's a sombrero hat by LawnFawn. When I sat down to make the card I wasn't able to find one. I even searched the shop but nothing showed up. So I used the one from the Hut Ab set by Create a Smile here. The mustache is from the Dad and Me set. For all the images on the card I used Copics to color them.
Behind the text I placed the Cactus Border. I die cut it from white cardstock and used Copics also to color it in.


Unten vor dem Text tummeln sich dann zwischen Agaven und Steinen einige Wüstentiere. Sie alle sind aus dem Critters in the Desert Set. Den Roadrunner musste ich erstmal googeln und habe tatsächlich Bilder gefunden, bei denen man erkennen konnte, dass sie einen blauen Schwanz und Flügel haben. Der Hals ist dafür grau fleckig. Diesen Look habe ich versucht, nachzumachen.
Neben dem Wort Gracias habe ich noch zwei Kakteen aus dem Desert Canyon Backdrop aufgeklebt. Dabei habe ich jeweils den inneren "Arm" abgeschnitten.

In front of the text, between agaves and rocks, there are a few desert critters. They all come from the Critters in the Desert set. I had to google the roadrunner and found several pictures that showed their blue tail feathers and wings. The neck is dotted grey. I tried to re-create that look.
Next to the word gracias I added two more cacti from the Desert Canyon Backdrop set. I cut off the inner "arm" on each of them.


Meinen Text wollte ich noch mit einem "muchas" ergänzen. Es gibt wohl ein Set mit spanischen Texten, das habe ich aber nicht. Also habe ich ein "much" aus dem Set Veggie Happy weiß auf braunen Cardstock embosst und dann das "as" aus dem Satz "you're sweet as honey" aus dem Set Hive Five dahinter embosst. Den Text habe ich mit 3D Tape auf den Himmel geklebt und dann mit schwarzer Tinte noch ein paar Vögel aus dem Set Life is Good auf den Himmel gestempelt.

I wanted to add a "muchas" to my text. There is a stamp set with spanisch texts but I don't have that. So I white heat embossed the "much" from a stamp from the Veggie Happy set onto brown cardstock and then put the "as" from the "you're sweet as honey" text from Hive Five behind it. I used foam tape to adhere the text to the sky and then stamped a few birds from the Life is Good set with black ink onto the sky.


Aus braunem Cardstock habe ich dann noch einen der Stitched Rectangle Frames ausgestanzt und als oberste Lage aufgeklebt. Das gibt immer so einen schönen optischen Abschluss.
Beim Zusammenkleben meiner Elemente habe ich wieder dickes und dünnes 3D Tape benutzt und dann alles auf einen weißen Kartenrohling geklebt.

I die cut one of the Stitched Rectangle Frames from brown cardstock and used it as my top layer. I love the finished look these frames add to a scene.
I used thin and thick foam tape to put my scene together and then adhered it to a white note card.

Donnerstag, 2. Mai 2024

Danke für Deine Hilfe

 
Hallo Ihr Lieben!
Auf dieser Karte, die ich heute auf dem Stampcorner-Blog zeige, habe ich ein weiteres A7-Set aus dem April-Release benutzt. Und beim Anblick dieses süßen Hasen musste ich sofort an ein kleines Nerd-Hasenmädchen denken. Und so ist die Karte dann auch irgendwie schulbezogen.

Hello everyone!
On this card, that I'm sharing over on the Stampcorner Blog today, I used another A7 set from the april release. And when I saw this little bunny I just had a little nerdy bunny girl in my head. An so this card ended up some kind of school related.

Natürlich wäre die Karte perfekt als Dankeskarte für einen Lehrer/eine Lehrerin. Aber auch für den Nachhilfelehrer wäre sie absolut passend.
Die Idee zum Hintergrund ist inspiriert von einem Mail Art Video von Kristina Werner. Dort hat sie auf einen Umschlag große, verschiedenfarbige Buntstifte aufgemalt und dahinein dann die Adresse geschrieben. Ich habe hier mehr und dünnere Bleistifte auf meinen Hintergrund gemalt. Und auch wenn es nicht so aussieht, die Stifte sind super einfach gemacht. Sie bestehen einfach aus Balken, die ich in mehr oder weniger geraden Linien mit Copics dreifarbig gelb eingefärbt habe. An die Enden habe ich dann entweder einen rosafarbenen Radiergummi oder eben eine Bleistiftspitze gemalt. Und es macht gar nichts, wenn sie nicht exakt gerade sind. Ich habe nur im Vorfeld 1 cm breite Streifen, je 0,5 cm voneinander entfernt, auf den Cardstock gemalt, damit die Abstände gleich sind.
Unter die Stifte habe ich mit einem C2-Marker jeweils einen dünnen Schatten gemalt. Und auf die Stifte, bei denen man das Ende sieht, habe ich mit Versafine Toffee das Danke aus dem Stempelset Kleine Worte aufgestempelt. 
Dann habe ich - mal wieder - weiße Acrylfarbe auf den Hintergrund gespritzt.

Of course this card would be perfect as a thank you card for a teacher. But also for a tutor it would fit great.
The idea for the background is inspired by one of Kristina Werner's Mail Art videos. She drew several large pens in different colors onto an envelope and wrote the adress onto them. I created more and thinner pencils here. And even if it doesn't look like that, those pencils are super easy to make. They are simply made from colored strips that I colored with three different shades of yellow with my Copics - in more or less exact lines. Then I added either an eraser or a tip to the strips. And it really doesn't matter, that the pencils aren't perfectly straight. I only drew some 1 cm thick strips, 0,5 cm apart from each other, with a pencil onto my white cardstock first to make sure the pencils are evenly spaced on my background.
I used a C2 marker to draw a shadow under each pencil. Then I stamped "thank you" with Versafine Toffee onto those pencils of which the ends are visible. 
Then - once again - I splattered some white acrylic paint onto the cardstock.


Auch das süße Hasenmädchen ist mit Copics coloriert. Die Highlights und das Muster auf dem Kleid sind mit einem weißen Gelstift gemacht. Die Brillengläser habe ich außerdem mit Glossy Accents überzogen.

Also the little bunny girl is colored with Copics. I used a white gel pen for the highlights and the pattern on her dress. The glasses I covered with some Glossy Accents.


Für meinen Text habe ich einmal die Texte Danke und Für deine Hilfe aus dem Kleine Worte Set mit weißem Embossingpulver auf dunkelgrauen Cardstock embosst.
Außerdem habe ich die Von Herzen Stanze verwendet. Den Text habe ich dreimal aus schwarzem Cardstock gestanzt und aufeinander geklebt. Hinter das Herz habe ich ein Stück Cardstock geklet, den ich mit den selben Farben, die ich auch für die Radiergummis an den Stiften benutzt habe, eingefärbt habe. Dann habe ich das Herz von oben ebenfalls mit Glossy Accents überzogen. Auf die Buchstaben habe mit einem Aqua Shimmer Pen von Nuvo Glitter aufgetragen.
Den Text habe ich auf ein Stück heller grauen Cardstock geklebt und mit etwas Abstand zum Wort ausgeschnitten, um eine Schattenlage zu erhalten. Dieser Text dient dann gleichzeitig als Boden für meinen Hasen.

For the text I white heat embossed the words "thank you" and "for your help" onto strips of dark grey cardstock.
I also die cut the text "from the heart" three times from black cardstock and stacked them. I put some cardstock,  that I have colored  with the same colors I had used for the erasers on the pens, behind the heart, then filled it with Glossy Accents. Onto  the letters I put some shimmer with a Nuvo Aqua Shimmer pen. 
I glued the die cut text onto some lighter grey cardstock and cut it out with some distance to recieve a shadow layer. This text also creates a ground for my bunny to stand on.


Da das Hasenmädchen doch recht stark mit dem Hintergrund verschmolzen ist, habe ich mit einer der A6 Deckle Edge Stanzen ein Rechteck aus Vellum gestanzt und unter das Motiv gelegt. Das sowie die Texte habe ich dann mit 3D Tape auf das Vellum geklebt und konnte so den Kleber, mit dem ich das Vellum auf dem Hintergrund befestigt habe, gut verstecken. 
Als Deko habe ich dannn noch einige kleine rosa Herzen auf der Karte verteilt. Dann habe ich den Cardstock schwarz gemattet und auf einen weißen Kartenrohling geklebt.

Since the bunny kind of blended into the background I used one of the A6 Deckle Edge dies to cut a rectangle from vellum and put that under the image. I adhered the image and the texts with foam tape to the vellum and then hid the glue, that I used to glue the vellum onto the background, behind it.
I added a few pink hearts as decoration, then matted the card panel black and adhered it to a white note card.