Dienstag, 31. Januar 2023

Be Creative!

 
Hallo Ihr Lieben!
Clean and Simple soll es für die Challenge in einer FB-Gruppe sein. Eigentlich ja eher nicht meins. Gestern allerdings war meine Bastelzeit sehr begrenzt, denn mein Enkel hatte sich für nachmittags angekündigt. Und in nur 1 1/2 Stunden schaffe ich sonst keine Karte. CAS aber sollte klappen - dachte ich. Und tatsächlich, das letzte Glitzersteinchen war aufgeklebt und es klingelte an der Tür. Timing!

Hello everyone!
Clean and simple is the challenge theme in a german FB group. Usually not my first choice when it comes to cardmaking. But yesterday my crafting time was very limited because I was babysitting my little grandson. And I usually don't get a card done in 1.5 hours. Well, I though CAS should work. And I was right. I just had glued down the last rhinestone when the door bell rang. Perfect timing!

Hier habe ich einfach nur ein Stück weißen Cardsstock schwarz gemattet und später alles auf einen weißen Kartenrohling geklebt.

Hier I simply used a piece of white cardstock as my background, matted that black and attached it to a white note card later.


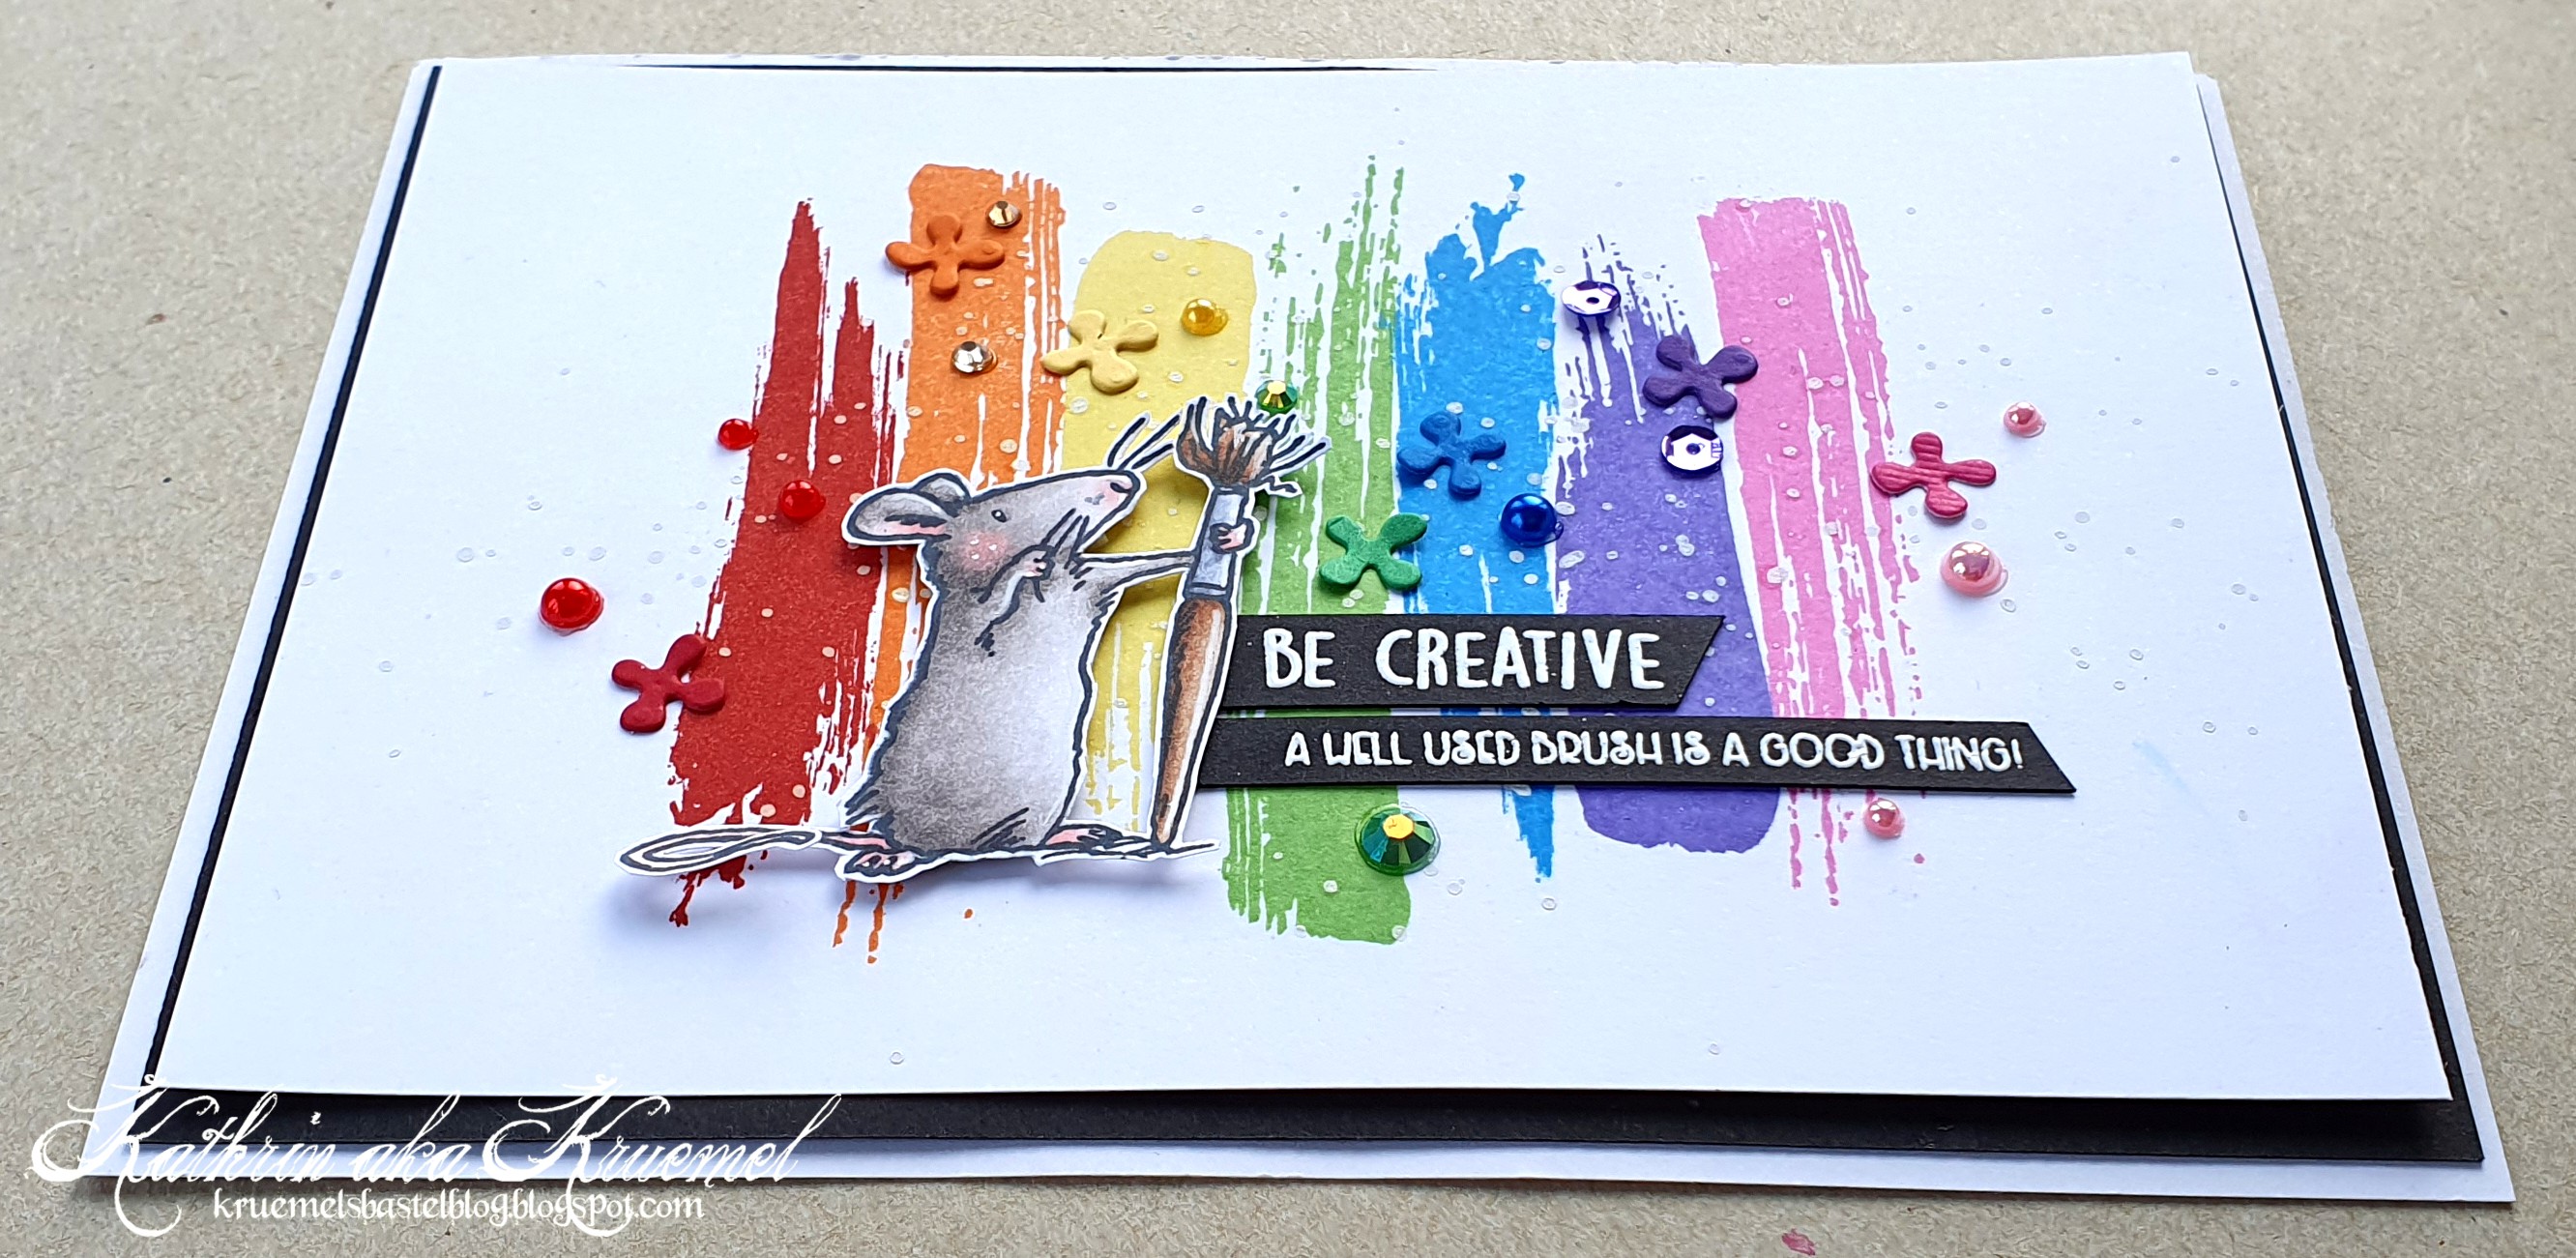
Mit Stempeln aus dem Set Abstract Art von MFT habe ich dann die Pinselstriche in Regenbogenfarben mittig auf den Cardstock gestempelt. Dann habe ich etwas weiße Acrylfarbe darüber gespritzt.
Die süße Maus ist aus dem Set Be Creative von ColoradoCraft. Ich habe sie mit Copics coloriert, ausgeschnitten und mit dünnem 3D Tape aufgeklebt.
Der Text "be creative" ist aus dem Stempelset Just Add Glitter von LawnFawn, der kleinere Text darunter kommt im Set mit der Maus. Beide habe ich weiß auf schwarzen Cardstock embosst, ausgeschnitten und neben der Maus direkt auf den Hintergrund geklebt.
Da mir das dann doch noch ein wenig zu clean war, habe ich aus Cardstock, passend zu jeder Farbe aus dem Pinselstrich-Regenbogen, mit einer Stanze von Magnolia noch ein kleines Blümchen ausgestanzt und auf den jeweils farblich passenden Pinselstrich geklebt. Eigentlich wollte ich die Blütenmitten noch mit einem weißen Gelstift dekorieren, aber dazu hat mir dann die Zeit gefehlt. Es geht auch ohne, oder? Dazu kamen dann noch farblich passende Perlen, Glitzersteine und - im Fall von lila, denn da hatte ich nichts anderes - Pailetten. 

I used stamps from the Abstract Art stamp set by MFT to stamp brushstrokes in rainbow order onto the center of my white cardstock piece. Then I flicked some white acrylic paint on top.
The cute mouse is from the Be Creative stamp set by ColoradoCraft. I colored her in with Copics, cut her out and attached her onto the brushstrokes with some thin foam tape.
The text "be creative" is from the Just Add Glitter set by LawnFawn, the smaller subtext under it come in the same stamp set as the mouse. I white heat embossed both onto black cardstock, cut them out and then adhered them next to the mouse directly to the background.
Since the card still looked a bit too clean to me, I die cut little flowers from cardstock, matching each brushstroke color, using a die by Magnolia and then attached one to each brushstroke. I had planned to draw some details with a white gel pen to the flower centers, but I was running out of time for that. It still looks good, even without the details, right? Then I added some pearls, rhinestones and - at least for the purple because I don't have any pearls or rhinestones in that color - some sequins in matching colors.
 

Um den dekorierten Cardstock auf die schwarze Mattung zu kleben, habe ich wieder 3D Tape benutzt, das sorgt für ein wenig mehr Höhe. Und hier sieht man auch die Glitzersteine etc. besser.

To attach the decorated cardstock to the black mat I used foam tape again to add some height to my card. And here you also get a better look at the rhinestones etc.

Montag, 30. Januar 2023

Stampcorner Februar-Release Sneak #3

 
Hallo Ihr Lieben!
Im Februar-Release von Stampcorner wird es auch wieder ein Stempelset aus der Feder von StuffDeluxe geben. Und eines der beiden Motive aus dem Set zeige ich Euch heute. 
 
Hello everyone!
There will also be a new stamp set drawn by StuffDeluxe included in the february release by Stampcorner. And I am showing you one of the two images in the set today.
 
Der kleine Hase mit seinem Teddy erinnert mich irgendwie total an meinen Enkel! 
Ich habe hier einen Bogen aus dem Paper Pack 01 von Stampcorner als Hintergrund verwendet. Die Sterne sind zwar eigentlich eher maritim, aber ich fand, zu diesem Motiv passen sie toll.
 
The little bunny with his teddy completly reminds me of my little grandson!
I used a sheet from the Paper Pack 01 by Stampcorner her as my background. It's more a maritim paper pack, but the stars just go wonderfully with the image.
 
 
Als Hintergrund für den Hasen habe ich einen Stern aus craft farbenem Cardstock gestanzt und auf das Hintergrundpapier geklebt. 
Aus weißem Cardstock habe ich dann den Friends Forever Circle Frame Text von MFT gestanzt und quasi als Rahmen für das Motiv verwendet. 
Den süßen Bären habe ich mit Copics coloriert, ausgeschnitten und mit 3D Tape auf den Stern geklebt. Als Deko habe ich noch einen Kreis mit ausgestanztem Stern aus hellblauem Cardstock gestanzt und die Ausstanzung dunkelblau hinterlegt. Außerem habe ich einen weiteren hellbauen sowie drei kleinere weiße Sterne als Deko auf der Karte verteilt.
Der Text auf meiner Karte ist ebenfalls aus dem neuen Stempelset Kuschelzeit. Ich habe ihn mit weißem Embossingpulver auf schwarzen Cardstock embosst und mit der Kante unter den Hasen geschoben mit dünnem 3D Tape aufgeklebt.
 
As the background for the bunny I die cut a star from kraft colored cardstock and attached it directly to the background paper. 
From white cardstock I die cut the Friends Forever Circle Frame die by MFT and used it as some kind of frame for my image.
The cute bunny I colored with Copics, cut him out and attached it onto the star with foam tape.
To decorate my card I die cut a circle with a star cut out from light blue cardstock and put some dark blue cardstock behind the cut out. I also added another light blue star and three smaller white ones.
The text means "I love you" and is also from this new stamp set. I white heat embossed it onto a black cardstock strip and tucked the edge under the bunny, using thin foam tape to adhere it to the card.
 
 
An der oberen rechten Kante der Karte habe ich dann noch je einen unten schräg geschnittenen Streifen hellblauen und craft farbenen Cardstocks geklebt und mit einem weiteren kleinen weißen Stern dekoriert. 
Zum Schluss habe ich alles craftfarben gemattet und auf einen weißen Kartenrohling geklebt.
 
Onto the top right of my card I attached two strips of cardstock - both cut at an angle, one from kraft and one from light blue cardstock and decorated it with another small white star.
To finish the card I matted the patterned paper kraft  and attached it to a white note card.

Samstag, 28. Januar 2023

Stempeleinmaleins - Ausgabe vom 28. Januar 2023

 
Hallo Ihr Lieben!
Vielleicht habt Ihr es schon mitbekommen, aber beim Stempeleinmaleins gibt es seit Anfang des Jahres eine Änderung. In den, ich glaube, 13 Jahren, die es das Stempeleinmaleinns jetzt gibt, haben sich auch unsere Leben und Bedürfnisse geändert. Und wir schaffen es einfach nicht mehr, jeden Samstag einen Post zu machen. Sicherlich - und hoffentlich - habt Ihr da Verständnis. Und so wird es ab sofort pro Monat - weiterhin - einen Rückblick auf eine unserer vielen Anleitungen geben, dann eine neue Anleitung und an jedem letzten Samstag im Monat einen Sketch. Den gibt es also heute - und ich waren Euch gleich, nach diesem Sketch habe ich gleich drei Karten gewerkelt. Grund dafür waren die Hintergründe, die ich gestaltet hatte, um ein wenig mit den Nuvo Shimmer Powders zu spielen und Farbkombinationen auszuprobieren. Das hier ist die erste dieser Karten, und ich zeige sie zuerst, da sie dem Sektch quasi genau nachempfunden ist.

Hello everyone!
Maybe you've already heard about it, but we have some changes in our Stempeleinmaleins schedule. I think it's 13 years that we're doing the blog - and during that time all our own lifes and needs have changed. We're sure - and hope! - you all understand. So from now on, we will provide a re-visit of one of the many tutorials we've done in all those years (we already did that since at least one year), then we will have a new tutorial and also a new sketch every saturday of the month. And today we have the first sketch of 2023 - I want to warn you beforehand, I made three cards using this sketch. The reason were the backgrounds I had finished from playing around with my Nuvo Shimmer Powders and trying different color combinations. This is the first of those cards, and I'm sharing this first because it is really true to the sketch.

Für den Hintergrund habe ich hier den Balloon Strings Background von MFT mit weißem Embossingpulver auf Watercolor Cardstock embosst. Dann habe ich die Nuvo Shimmer Powders Solar Flare, Catherine Wheel und Cherry Bomb beutzt und den Cardstock eingefärbt. Wie gesagt, ich lerne noch, und sicher könnte man den Hintergrund etwas zarter gestalten. Aber ich finde knallig hier ganz gut. 
Nach dem Trocknen habe ich den Cardstock zugeschnitten, schwarz gemattet und auf einen weißen Kartenrohling geklebt. 

For the background I white heat embossed the Balloon Strings Background by MFT onto a piece of watercolor cardstock. Then I used the Nuvo Shimmer Powders Solar Flare, Catherine Whell and Cherry Bomb to color the cardstock. As I already mentioned, I am still learning how to handle those colors, and I'm sure I could have made it less bright. But I like bright in this case.
After the cardstock had dried, I cut it down, matted it black and adhered it to a white note card.


Da der Hintergrund ja schon recht auffällig ist und ich nicht zu viel davon verdecken wollte, habe ich mich bei der Deko ein wenig zurückgehalten.
Zuerst habe ich einen Kreis aus Vellum gestanzt und mit 3D Tape auf den Hintergrund geklebt. Dann habe ich mit der Heart Rays Stanze von MFT die einzelnen Teile des Herzens aus gelbem, hellorangefarbenem, hell- und dunkelrotem sowie pinkem Cardstock gestanzt und so die Farben des Hintergrunds nochmal aufgegriffen. Mit der Schere habe ich dann passend noch einen weißen Herzrahmen ausgeschnitten und oben auf das Herz geklebt. Hier fehlte einfach irgendwas helles. 
Die Texte sind beide aus dem Itty Bitty Love Stempelset von MFT und weiß auf schwarzen Cardstock embosst. Außerdem habe ich die Love Speech Bubbles, ebenfalls von MFT, aus rotem und weißem Cardstock gestanzt und jeweils das rote Herz in die weißen Sprechblasen gesetzt. 
Anschließend habe ich alle Teile mit 3D Tape aufgeklebt und zum Schluss einige klare Glitzersteine als Deko in einem Streifen quer über die Karte gesetzt.

Since the background is already quite eye catching and I also didn't want to cover too much of it, I went a bit lighter with my decorations.
First I die cut a circle from Vellum and attached it to the background with foam tape. Then I used the Heart Rays die by MFT to die cut the rays from yellow, light orange, light and dark red and pink cardstock, picking up the colors from the background again. With my scissors I cut a matching heart frame and attached it to the heart. I just felt like something light was missing there. 
Boths texts are from the Itty Bitty Love stamp set by MFT and white heat embossed onto black cardstock. I also die cut the Love Speech Bubble, also by MFT, from white and red cardstock, then put each of the red hearts into the coordinating white speech bubble. 
I attached all pieces to the card using foam tape and adhered some clear rhinestones across the card to finish it off.

Freitag, 27. Januar 2023

Stampcorner Februar-Release Sneak #2

 
Hallo Ihr Lieben!
Heute gibt es eine weitere Vorschau auf das Februar-Release von Stampcorner. Neben zwei Stencils und zwei Stempelsets wird es auch eine neue Box-Stanze geben. Und die zeige ich Euch heute.

Hello everyone!
Today I have another sneak on Stampcorner's february release for you. Besides two stencils and two stamp sets there's also a new box die. And this I'm showing you today. 

Ihr seht schon, die Box hat eine toll verzierte/dekorierte Fensterausstanzung. Passend zum anstehenden Februar, habe ich meine Box zum Valentinstag dekoriert. Aber ich kann mir die wahnsinnig toll als Gastgeschenke für Kommunion, Taufe und Hochzeit vorstellen!

As you can see, this box has a wonderfully decorated window cut out. Matching the near february, I decorated my box with a Valentine's theme. But I can imagine this being a wonderful give away on baptisms, holy communions and weddings!


Bei der Box kommt man - natürlich ohne Deko - mit einer einzigen Klebung aus. Der Boden kann einfach zusammengesteckt werden.
Ich habe meine Box aus hellrosa farbenem Cardstock gestanzt. Als kleines Extra und damit man den Inhalt nicht gleich sieht, habe ich einen "doppelten Boden" eingebaut. Dafür habe ich einfach einen Streifen roten Glitzercardstocks in der Höhe und Breite der Box zugeschnitten - links und rechts habe ich je 0,5 cm Klebelasche in der Breite hinzugefügt - und den dann von innen in die Box geklebt. So bekommt das Muster auch noch eine tolle Tiefe.

Without counting the decorations you only need to glue the box together on one flap. The bottom can just be folded and tucked in.
I die cut my box from light pink cardstock. As a little extra I and to hide the content I created a double front. I simply cut a piece of red glitter cardstock the length and height of the box - adding 0,5 cm on the left and right as a flap to glue it down - and then glued it inside the box. This way, the pattern cut in the front also gets some wonderful depth. 


Aus weißem Cardstock habe ich die Front ein weiteres Mal ausgestanzt und rundum etwa je 2 mm abgeschnitten. Diesen Cardstock habe ich dann leicht versetzt auf die rosafarbene Front der Box geklebt.
Als Deko habe ich zwei Herzen aus rotem Glitzercardstock gestanzt und schwarz gemattet. Um das größere Herz habe ich dann etwas feinen Silberfaden gelegt.
Die Texte sind aus den Stempelsets Kleine Worte und Kleine Worte 2 und jeweils weiß auf schwarzen Cardstock embosst. Dann habe ich sie mit 3D Tape auf der Box befestigt.
Dekoriert habe ich sie dann noch mit ein paar kleinen klaren Glitzersteinen.

I die cut the front of the box again from white cardstock, cut away about 2 mm from each edge and attached the cardstock to the front of the box, moving it a bit upwards. 
To decorate my box, I die cut two hearts from red glitter cardstock and matted them black. Around the larger heart I wrapped some thin silver twine.
The texts mean "all my love for you on Valentine's day". I white heat embossed them onto pieces of black cardstock and adhered them with foam tape.
Then I decorated the box with a few small clear rhinestones.


Auch die Seitenteile meiner Box habe ich mit etwas kleineren Stücken weißen Cardstocks beklebt.
Zum Öffnen, ist in die Box oben eine Lasche eingearbeitet. 

I cut pieces of white cardstock a bit smaller than the sides of the box and attached those.
The top of the box is a flap, so the box can easily be opened.

Donnerstag, 26. Januar 2023

Sending lots of love

 
Hallo Ihr Lieben!
Da sich der Januar dem Ende neigt, dachte ich, ich mache schon mal eine Valentinskarte. Und die zeige ich heute auf dem Stampcorner Blog

Hello everyone!
Since january is coming to an end I decided that it's time to make a valentine's card. And the one I came up with I am sharing over at the Stampcorner Blog today. 

Und weil er so schön drollig dreinschaut, habe ich als Motiv den süßen Otter aus dem Stempelset  Meerverliebt 2 verwendet. Der ist auch perfekt, um ihn ein paar herzförmige Ballons halten zu lassen.

And since he looks so cute I went with the cute otter from the stamp set Meerverliebt 2 as the image. He's also perfect to let him hold some heart shaped balloons.


Ich mag mal wieder ein wenig hinterher sein und sicher kennt Ihr alle die Nuvo Shimmer Powders schon. Ich bin einige Monate drumherum geschlichen, vor allem weil ich schon meine Brushos viel zu wenig nutze, und habe sie mir jetzt zum Geburtstag gewünscht. Der leichte Schimmer ist einfach phantastisch! Und zwei der Farben kamen hier gleich zum Einsatz.
Für den Hintergrund habe ich zuerst den Neverending Love Background von MFT mit klarem Embossingpulver auf ein Stück Watercolor Cardstock embosst. Dann habe ich das Cherry Bomb Shimmer Powder darüber verteilt und ordentlich mit Wasser besprüht. Vielleicht habe ich ein wenig viel des Pulvers benutzt, denn die Farben sind sehr kräft, aber das gefällt mir hier super.
Um später die Buchstaben für den Text, die kleinen Herzen und die Herzluftballons daraus ausstanzen zu können, habe ich außerdem etwas von dem Catherine Wheeler Shimmer Powder auf ein weiteres Stück Watercolor Cardstock aufgestreut und ebenfalls mit Wasser besprüht.
Um den oberen Bereich meiner Karte zu füllen, war die Heart Garland Backdrop Portrait Stanze von LawnFawn perfekt. Die habe ich aus weißem Cardstock gestanzt und mit dünnem 3D Tape auf den getrockneten Hintergrund geklebt. Aus dem rot eingefärbten Cardstock habe ich dann auch die kleinen Herzen für die Girlande ausgestanzt und aufgeklebt.

I may be a bit behind once again and am sure you all know the Nuvo Shimmer Powders already. I was debating with myself for months, especially since I don't use my Brusho powders at all, but then decided to put them on my birthday wish list. I just love the soft shimmer they create. And I used two of the colors on this card.
For the background I first heat embossed the Neverending Love Background by MFT with clear embossing powder onto a piece of watercolor cardstock. Then I put some of the Cherry Bomb Shimmer Powder onto the cardstock and heavily sprayed it with water. I may have used a bit too much of the powder because the color is really bright, but I like that here.
To die cut the small hearts, the letters for the text and the heart shaped ballons later I put some of the Catherine Wheeler Shimmer Powder onto another piece of watercolor cardstock and sprayed that with water as well. 
To fill in the upper area of my card the Heart Garland Backdrop Portrait by LawnFawn was just perfect. I die cut it from white cardstock and attached it with thin foam tape to the dried background. From the red colored cardstock I die cut the small hearts for the garland and glued them down.


Und hier ist der kleine Otter - den kann ich mir auf so ziemlich jeder Karte vorstellen. Ich habe ihn mit Copics coloriert und ihm dabei farblich zu meiner Karte passend ein rotes Halstuch gegeben. Dann habe ich die Highlights mit einem weißen Gelstift hinzugefügt und den Otter ausgeschnitten. 
Für den Text habe ich erst die kleinen Worte aus dem Special Delivery Stempelset von LawnFawn mit weißem Embossingpulver auf schwarzen Cardstock embosst. Dann habe ich mit der Heartfelt Love Stanze von MFT die Buchstaben für das Wort Love gestanzt - dabei habe ich später statt des Herzes für das O den Otten aufgeklebt. Ich habe die Buchstaben viermal aus weißem, einmal aus schwarzem Cardstock und einmal aus dem rot eingefärbten Watercolor Cardstock ausgestanzt. Drei weiße Lagen habe ich direkt hinter die roten Buchstaben geklebt, die vierte weiße ein wenig nach oben rechts, die schwarze etwas nach unten links verschoben angeklebt. Dann habe ich alles auf den Hintergrund geklebt und dabei 3D Tape zum Aufkleben des Otters und der schwarzen Cardstockstücke benutzt. 
Die Herzluftballons sind ebenfalls aus dem Heart Garland Backdrop Portrait Stanzenset. Ich habe die Schnüre aus schwarzem Cardstock, die Luftballons aus dem selbstgemachten roten Shimmer-Cardstock gestanzt und sie dann an der Hand des Otters befestigt. 

And here's the little otter - I can imagine him on any kind of card. I colored him with Copics and colored his neckcloth red, matching the colors on my card. Then I added the highlights with a white gel pen and cut the otter out.
For the text I first white heat embossed the small words from the Special Delivery stamp set by LawnFawn onto black cardstock. Then I used the Heartfelt Love die by MFT to die cut the letters for the word love, later replacing the heart shaped o with the otter. I die cut the letters four times from white, once from black cardstock and once from the red shimmer cardstock. I stacked three white layers directly behind the red letters, then added the fourth white layer a bit off to the top right and the black layer a bit off to the bottom left. Then I adhered everything to the background, using foam tape to glue down the otter and the small black cardstock pieces. 
The heart shaped balloons are also  from the Heart Garland Backdrop Portrait die set. I die cut the strings from black cardstock, the balloons from the selfmade red shimmer cardstock and then attached them to the otter's hands.


Ich habe versucht, den Schimmer des Pulvers ein wenig für Euch einzufangen, aber das ist wirklich schwer!
Um die Karte fertig zu stellen, habe ich noch einen weiteren Rahmen aus weißem Cardstock - wieder mit 3D Tape, oben auf den Rahmen mit den Herzgirlanden geklebt und alles auf einen schwarzen Kartenrohling geklebt.

I tried to catch the shimmer of the Nuvo powder on the picture, but that is really hard to do!
To finish the card I die cut another frame from white cardstock and attached it - using foam tape again - on top of the frame with the heart garlands. Then I adhered everything onto a white note card.

Mittwoch, 25. Januar 2023

Create a Smile Januar Moodboard Challenge

 
Hallo Ihr Lieben!
Heute startet die neue Challenge von Create a Smile - und es gibt das erste Moodboard des Jahres 2023:

Hello everyone!
Today a new challenge by Create a Smile is starting - and we're having the first moodboard of the year 2023:


Ihr seht, das Moodboard geht schon ein wenig in Richtung Liebe - schließlich steht der Valentinstag vor der Tür. Aber man kann danach natürlich auch wunderbar eine Karte zu einem anderen Thema machen, so wie ich:

As you can see, the moodboard is kind of love themed - Valentine's isn't that far away anymore. But of course you can also use the moodboard as inspiration for a card with a different theme, just like I did:


Meine Karte dreht sich rund ums Thema Post - und ja, ein paar Herzen haben dann doch darauf Platz gefunden. Aber als Valentinstagskarte würde ich sie definitiv nicht beschreiben.
Ich habe hier mit der größten Briefmarkenstanze aus dem Stanzenset Postage Rectangles ein Stück weißen Cardstock ausgestanzt und dabei nicht nur die Briefmarkenform, sondern auch die eingestanzten Punkte erhalten.

My card evolves all around the theme of mail - and yes, a few hearts found their way onto the card. But I definately wouldn't describe this as a Valentine's card.
I used the largest of the stamp dies from the Postage Rectangles die set to cut a piece of white cardstock into the stamp shape with the dotted details.


Der Briefkasten ist aus dem selben Stanzenset. Ich habe ihn aus rotem Cardstock gestanzt, damit er schön in mein Farbschema passt. Ich habe den Briefkasten drei mal ausgestanzt - einmal habe ich ihn komplett verwendet, einmal nur den oberen Teil und einmal den schmalen Streifen. Ich habe alle Teile - so wie auch die anderen Stanzteile auf meiner Karte - mit Copics schattiert und dann die Briefkastenteile aufeinander geklebt. So entsteht ein dezenter 3D Effekt, ohne dass mit 3D Tape gearbeitet werden muss. Das Posthorn habe ich aus schwarzem Cardstock gestanzt und auf den Briefkasten geklebt.
Die Briefkuverts aus dem Stanzenset DinLang Postage habe ich aus kraftfarbenem Cardstock gestanzt und nach dem Zusammenkleben mit kleinen Herzen versehen. Die kommen ebenfalls im DinLang Postage Stanzenset. Eines der Kuverts habe ich offen gelassen und ein Stück weißen Cardstocks - ebenfalls schattiert - hineingeschoben, auf das ich oben ein hallo aus dem Stempelset Tinte und Feder schwarz aufgestempelt habe.
Das Tintenfass und die Feder sind aus dem selben Stempelset und mit Copics coloriert. Dann habe ich alles ausgeschnitten. Und da ich ein kleines Herz übrig hatte, habe ich das auf das Label des Tintenfasses geklebt. 
Das Bild auf dem Moodboard mit den kleinen Ästen mit den roten Blüten/Blättern hatte es mir von Anfang an angetan. Deswegen habe ich einen der Stempel aus dem Set Floral Decorations verwendet, um solche Äste als Hintergrund auf meine Karte zu bringen. Ich habe immer nur Teile des Stempels rund um die Motive - die ich zu diesem Zweck so, wie ich sie später aufkleben wollte, auf dem weißen Cardstock arrangiert habe - aufgestempelt. Um den Look der Äste des Moodboards nachzuahmen, habe ich Marker verwendet und den Stempel damit eingefärbt - die Äste braun, die Blätter rot. Anschließend habe ich im oberen Bereich noch ein wenig silberfarbene Metallic Watercolor aufgespritzt.
Nun fehlte meiner Karte noch ein Text. Der ist aus dem Stempelset Schreib mal wieder und weiß auf schwarzen Cardstock embosst. 
Teilweise mit 3D Tape habe ich alle Dekoteile auf meinen Hintergrund geklebt und am unteren Rand mit grauen Copics noch einen Schatten unter alles gemalt. 

The mailbox is from the same die set. I've die cut it from red cardstock to make it fit the color scheme of my card - usually mailboxes in Germany are yellow. I die cut three of this mailbox - I used one whole one, from one I only used the upper part and from the last one just the strip above the slit. I used Copics to shade the pieces - as I did for all my die cut pieces on this card - and then glued the pieces together. This way you get a subtle 3D look without using foam tape. I cut the horn from black cardstock and adhered it to the front of the mailbox.
The envelopes are from the DinLang Postage die set. I die cut two from craft colored cardstock and added little hearts from the same die set after putting the envelopes together. I left the flap of one open and tucked a piece of white cardstock - also shaded - inside, onto that I had stamped a hello from the Tinte und Feder stamp set. 
The inkstand and the feather are from the same stamp set. I colored them with Copics and cut them out. And since I had one little heart left, I attached it to the label on the inkstand. 
There's this picture in the moodboard showing little twigs with red flowers/leaves. I loved this at first sight and really wanted to bring that onto my card. So I used a stamp from the Floral Decorations set to stamp those branches on my card. I only used parts of the image each time and stamped them behind the images - that I put onto my card where I wanted to glue them down later to see where I wanted the twigs to be. To get the two tone look I used marker to ink up the stamp - light brown for the twigs and red for the leaves. After I had stamped the twigs I spritzed some silver metallic watercolor over the upper area of the cardstock.
Now my card needed a text. This one is from the Schreib mal wieder stamp set and means exactly that "write again", something we say here in Germany when we want someone to keep in touch. Well, at least we did back in the times where we sent letters instead of text messages. ;) I white heat embossed the text onto black cardstock. 
I attached all the elements to the background, using foam tape for most of them, and then used some grey Copics to create a shadow at the bottom of my elements.


Zum Schluss habe ich den weißen Cardstock schwarz gemattet, das bringt den Briefmarkenrand toll zur Geltung, und alles auf einen weißen Kartenrohling geklebt.

To finish the card I matted the white cardstock black, which brings out the stamp edges wonderfully, and attached it to a white note card.

Dienstag, 24. Januar 2023

Stampcorner Februar-Release Sneak Peek #1

 
Hallo Ihr Lieben!
Der Januar neigt sich schon wieder seinem Ende - Zeit also, Euch mit einigen Sneaks auf das Februar-Release von Stampcorner zu versorgen. Und damit starte ich heute mit dieser Karte.

Hello everyone!
January is already coming to an end - time to give you some sneaks onto the february release by Stampcorner. I am starting those today with this card.

Für meine Karte habe ich im Hintergrund ein Stück Designpapier aus dem Paper Pack 06 von Stampcorner zugeschnitten. Und auch der blau-weiße Streifen mit den braunen und dunkelblauen Ankern ist aus einem Papier aus diesem Pack zugeschnitten. Den Streifen habe ich direkt auf das andere Designpapier aufgeklebt.

For my card I cut a piece from one of the sheets from Stampcorner's Paper Pack 06. And also the blue and white striped paper with the brown and dark blue anchors is from this paper pack. I attached a strip of it directly onto the other patterned paper.


Die süße Katze musste einfach in einen Rahmen - also habe ich einen Polaroid Rahmen aus dunkelblauem Cardstock gestanzt und den Ausschnitt mit einem weiteren Stück des gestreiften Designpapiers hinterlegt. 
Die Katze habe ich mit Copics coloriert, ausgeschnitten und dann in den Rahmen geklebt. Dabei habe ich den unteren Teil des Motivs zwischen Rahmen und Designpapier geschoben, hinter den Ohren habe ich dünnes 3D Tape aufgebracht. So scheint die Katze direkt aus dem Rahmen herauskommen. 
Aus craft farbenem Cardstock habe ich mit einer Stanze von MarianneDesign eine Koralle gestanzt, sie mittig geteilt, so dass ein Teil davon links und rechts des Rahmens zu sehen ist. Die Koralle ist wieder direkt auf den Hintergrund geklebt, für den Rahmen habe ich 3D Tape benutzt.
Das hello habe ich mit einer Stanze von MFT drei mal aus craft farbenem Cardstock gestanzt, die Teile aufeinander geklebt und sie dann auf dem unteren Teil des Polaroids angebracht.
Die beiden anderen Texte sind aus dem Stempelset Kleine Worte, beide sind mit weißem Embossingpulver auf dunkelblauen Cardstock embosst. Das Herzliches ist Teil des Textes Herzliches Beileid. Mir ist schon klar, dass hier englisch und deutsch gemischt sind, aber ich sage so oft hello statt hallo, dass das für mich passt. Das Herzliches habe ich, für den besseren Kontrast, craft farben gemattet, dann habe ich beide Texte aufgeklebt.

This cute cat just had to be put into a frame - so I die cut a Polaroid frame from dark blue cardstock and put another piece of the blue and white striped paper behind the cut out.
I colored the cat with Copics, cut it out and then attached it to the frame. I tucked the lower edge of the image between the frame and the patterned paper, behind the cat's ears I put some thin foam tape. Now it looks like the cat comes out of the frame.
Using a die by MarianneDesign I cut a coral from kraft colored cardstock, cut it into two parts and then put it behind the Polaroid so part of it are visible on the left and right. I attached the coral again directly onto the background, to adhere the Polaroid I used foam tape. 
I die cut the hello three times from kraft paper again, using a die by MFT and stacked the words. Then I attached it to the Polaroid frame.
The other two texts are white heat embossed onto dark blue cardstock. I know that I mixed german and englisch words here, but I say hello as often as hallo - hello in german - so that works for me. The text means happy hello - just because. I matted the first word with some kraft cardstock for a better contrast, than adhered both texts to the card.


Am oberen Rand der Karte habe ich dann noch zwei Streifen aufgeklebt - einer aus dunkelblauem Cardstock, einer aus dem gestreiften Designpapier - und sie mit einem craft farbenen Herz dekoriert. Dann habe ich noch einige silberfarbene Pailetten auf der Karte verteilt, den Hintergrund kraft farben gemattet und alles auf einen weißen Kartenrohling geklebt.

To the top edge of the cardstock I adhered two strips of cardstock - one cut from dark blue cardstock, the other one cut from the blue and white striped patterned paper - and decorated those with a craft colored heart. Then I added a few silver sequins, matted the background kraft and adhered everything onto a white note card.

Sonntag, 22. Januar 2023

Glück in weiß und grün

 
Hallo Ihr Lieben!
Heute habe ich eine Karte voller Glück zu zeigen. Und sie ist nur in weiß, grün und schwarz gehalten. 

Hello everyone!
Today I am  sharing with you a card for good luck. And I only used white, green and black on it.

Für den Hintergrund habe ich mit dem Confetti Hearts Stencil von Create a Smile und Distress Ink Peeled Paint viele kleinen grüne Herzen auf weißen Cardstock aufgewischt. Dann habe ich schwarze Metallic Watercolor in ganz kleinen Punkten aufgespritzt.

For the background I used the Confetti Hearts stencil by Create a Smile and Distress Ink Peeled Paint to fill a piece of white paper with lots of tiny green hearts. Then I spritzed some black Metallic Watercolor over it, making sure the splatters are really small.


Das Wort Glück habe ich mit Buchstaben-Stanzen mit Holzmuster viermal aus weißem Cardstock gestanzt. Die oberste Lage habe ich mit Distress Oxide Twisted Citron von unten her ganz leicht gewischt, so dass die Buchstaben im oberen Bereich weiß blieben. Dann habe ich sie aufeinander geklebt. 
Die süße Maus mit dem Kleeblatt ist von Lili of the Valley. Den Pilz, auf dem sie eigentlich sitzt, habe ich weggeschnitten und dann mit ZIG Markern nur das Kleeblatt grün coloriert. 
Die Kleeblätter im Hintergrund sind mit der Lucky Clovers Stanze von LawnFawn aus Watercolor Cardstock gestanzt und mit den selben ZIG Markern ebenfalls grün eingefärbt. Die Highlights habe ich jeweils mit einem weißen Gelstift gemacht.
Um den Text zu vervollständigen, habe ich das Wort viel aus dem Stempelset Kleine Worte von Stampcorner weiß auf schwarzen Cardstock embosst. 
Ich habe alle Teile auf ein Stück weißen Cardstock geklebt, den ich zuvor mit einem Schneefall-Embossingfolder geprägt habe. Die Kante mit den mehr Schneeflocken habe ich nach unten gesetzt und den Cardstock zusätzlich schwarz gemattet. 

I die cut four each of the letters for the german word luck from white cardstock. One set of letters I lightly inked with Distress Oxide Twisted Citron, keeping the top of the letters white. Then I stacked them. 
The cute mouse with the clover ist from Lili of the Valley. I cut off the mushroom it is sitting on and only used the mouse on my card. Then I used my ZIG markers to only color the clover green.
The clovers in the background are die cut from watercolor cardstock using the Lucky Clovers dies by LawnFawn and then used the same ZIG markers to color them in. For the white details I used a white gelpen.
To complete the text I white heat embossed the word viel - lots of in german -  onto black cardstock.
I attached all elements to a piece of white cardstock, that I had dry embossed with a snowfall embossing folder before. I used the edge with the many snowflakes on the bottom and also matted the cardstock black.


Mit 3D Tape habe ich den kleineren, dekorierten Cardstock auf den Herzhintergrund geklebt, den dann ebenfalls schwarz gemattet und auf einen weißen Kartenrohling geklebt.

With foam tape I attached the smaller, decorated cardstock piece onto the hearts background, then matted that black as well and adhered it to a white note card.

Freitag, 20. Januar 2023

LawnFawnatics Challenge #141

 
Hallo Ihr Lieben!
Das Thema der LawnFawnatics Challenge #141 lautet "lot of hearts". Da liegt eine Valentinskarte natürlich nah. Aber das wollte ich nicht - schließlich kann ich meinen Mann damit ja nicht überschütten. Und Liebhaber habe ich keine... ;) Also habe ich eine Karte mit Herzen gemacht, die aber das ganze Jahr über "einfach so", und ich finde sogar an eine gute Freundin, verschenkt werden kann.

Hello everyone!
"Lots of hearts" is the theme of the LawnFawnatics Challenge #141. Of course a Valentine's card came to my mind first. But I didn't want to make another one - I can't burry my husband in them on february 14th - and I don't have any lovers I could give it to. ;) So I made a card with hearts, that can be given "just because" all year long, and I think, even to a good friend.

Vom Format her ist es letztendlich eine Mini-Slimline Card geworden, und das mit integriertem Flat Shaker. 
Für den Hintergrund habe ich ein Stück weißen Cardstock mit Distress Ink Picked Raspberry, Aged Mahogany, Carved Pumpkin, Mustard Seed, Mowed Lawn, Pine Needles, Peacock Feathers, Chipped Sapphire und Villanious Potion in Regenbogenverlauf gewischt. Um das Muster einzuarbeiten, habe ich eine Stencil mit einer unregelmäßigen Kante aufgelegt - ein Stück gerissenes Papier geht auch - und die Farbe in mehreren Streifen, teils ein wenig überlappend, aufgewischt. So wirkt der Hintergrund noch interessanter, finde ich. Anschließend habe ich noch weißes Copic Opaque White aufgespritzt.

I ended up with a mini slimline card and also turned it into a flat shaker card.
For the background I inked up a piece of white cardstock with Distress Ink Picked Raspberry, Aged Mahogany, Carved Pumpkin, Mustard Seed, Mowed Lawn, Pine Needles, Peacock Feathers, Chipped Sapphire and Villanious Potion in a rainbow look. For the pattern I used a stencil with an uneven edge - you can also use a piece of torn paper - and did several thin strpis per color, overlapping them slightly. This way the background looks even more interesting. After I had finished the inking I spritzed some Copic Opaque White on top.


Bis auf den Text kamen auf dieser Karte keine Stempel zum Einsatz - dafür einige Stanzen. Ich habe die Farbtube aus dem Stanzenset Art Supplies neunmal aus matt-silbernem Metallic-Cardstock gestanzt und dann in jeder Farbe des Regenbogens einmal den Aufleger. Außerdem habe ich gleich noch einige Farbkleckse aus dem selben Set sowie kleine Herzen aus den jeweiligen Farben gestanzt. 
Die Aufleger für die Tuben und Farbkleckse habe ich dann jeweils mit der passenden Distress Ink Farbe, die ich bereites für den Hintergrund benutzt hatte, etwas schattiert. 
Aus weißem Cardstock habe ich dann noch neun kleine Ovale als Hintergrund für die Herzen gestanzt und alle Teile auf ein Stück Vellum geklebt - ich musste hinter den Motiven den Hintergrund ein wenig abschwächen. Einige der Tuben habe ich mit 3D Tape aufgeklebt.
Mit einem weißen Gelstift habe ich einige Highlights hinzugefügt. 

Besides the text I didn't use any stamps on my card - but a few dies. I die cut the color tube from the Art Supplies die set nine times from matte silver metallic cardstock and then the smaller tubeb pieces once from each color of the rainbow. I also die cut a few color splashes from the same die set and little hearts from each color.
I shaded the splashes and the colored pieces of the tubes with the same Distress Ink colors that I had already used on my background.
From white cardstock I die cut nine little ovals as backgrounds for the hearts and then attached all the pieces onto some vellum - I had to tone down the background a bit behind the images. For some of the tubes I used foam tape to adhere them.
The highlights I made with a white gel pen.


Um den Hintergrund habe ich etwas Folie - ein Stück einer Stanzenverpackung - geklebt und vor dem Verschließen der letzten Seite kleine Herz-Konfetti in einem ganz zarten Rosa eingefüllt. Nur die Herzen auf den Farbtuben waren mir zu wenig. 
Den Flat Shaker habe ich schwarz gemattet und auf eine weiße Mini-Slimline Karte geklebt. Obenauf kam dann das Stück Vellum mit den Farbtuben, aufgeklebt mit 3D Tape.
Und dann fehlte noch der Text auf meiner Karte. Dafür habe ich den Text aus dem Stempelset One in a Chameleon Flip Flop weiß auf einen Streifen schwarzen Cardstocks embosst und wieder mit 3D Tape unterhalb des Vellums auf die Karte geklebt.

I wrapped some foil - just a piece cut from the wrapping of a die set - around the background and before closing it on the fourth side putting some small heart confetti in a very soft pink into the pocket. Just the hearts on the color tubes were too few for my taste.
I matted the flat shaker with black cardstock and attached it to a white mini slimline card base. On top I adhere the vellum with the color tube, adhered with foam tape.
Now my card needed a text. I white heat embossed the text from the One in a Chameleon Flip Flop stamp set onto a strip of black paper and glued it under the vellum using foam tape again.

Donnerstag, 19. Januar 2023

Geburtstagsblümchen

 
Hallo Ihr Lieben!
Heute zeige ich auf dem Stampcorner Blog eine Geburtstagskarte. Und die ist von den Farben her schon sehr frühlingshaft ausgefallen. Aber da Blümchen im Mittelpunkt stehen, passt das ja.

Hello everyone!
Today I am sharing this birthday card over at the Stampcorner Blog. Colorwise it is again pretty spring-ish. But since flowers are in the focus, that's perfect.

Hier habe ich aus weißem Cardstock die dritt-größte der Slimline Deckle Edge Stanzen ausgestanzt. Dann habe ich die kleine einzelne Blume aus dem Stempelset Fienchen mit Blume einige Male aufgestempelt und mit klarem Embossingpulver embosst. Da ich ungefähr wusste, auf welcher Höhe sich später mein Text befinden sollte, habe ich hier mit Bleistift ganz sacht eine Linie gezogen und auf der Linie mehr Blumen gestempelt, nach oben hin werden es dann weniger. Dann habe ich den Cardstock mit Distress Oxide Picked Raspberry, Kitsch Flamingo und Spun Sugar gewischt. Unten war mir das dann noch ein wenig zu hell, deswegen habe ich hier auch noch etwas Aged Mahogany aufgewischt. Das ist zwar ein Rotton, wenn man aber ganz leicht nochmal mit Picked Raspberry darüber wischt, wird es ein recht dunkles pink. Dann habe ich noch einige Wassertropfen auf dem Hintergrund verteilt.

Here I die cut the third largest of the Slimline Deckle Edge dies from a sheet of white cardstock. 
Then I used the single flower image from the Fienchen mit Blume stamp set and stamped it onto the cardstock, then clear heat embossed them. Since I already knew where I wanted my text to be later, I drew a light line there with my pencil, stamped more flowers onto that line and fewer ones above it. I inked the cardstock with Distress Oxide Picked Raspberry, Kitsch Flamingo and Spun Sugar. And since it was still a bit too light at the bottom for what I was after, I added a bit of Aged Mahogany as well. That's a quite dark red, but when you go over the color with just a bit of the Picked Raspberry again, it turns into a nice dark pink. Then I spitzed just a bit of water onto the background.
 

 Ich wollte "Geburtstagsblümchen für Dich" als Text für meine Karte.
Die Worte für dich sind aus dem Stempelset Kleine Worte, für das Geburtstags habe ich Stempel aus dem Set Kleine Worte 2 verwendet. Die beiden Stempelsets sind zu meinen absoluten Lieblingen geworden! Nun, es gibt nur einen Stempel für Geburtstag. Um das S dahinter zu stempeln, habe ich den Abschluss-Stempel genommen und nur den letzten Buchstaben eingefärbt. So kann man die anderen Buchstaben prima am bereits gestempelten Geburtstag ausrichten und das S sitzt brav in einer Linie mit dem Rest des Wortes. Die Texte sind mit weißem Embossingpulver auf schwarzen Cardstock embosst.
Die Buchstaben für das Wort Blümchen sind mit dem Lined Letters Alphabet von MFT gemacht. Auch das ist ein Stempelset, das ich auf  keinen Fall mehr missen möchte! Die Buchstaben sind nicht zu klein, dabei aber schmal genug, um auch mal längere Worte zu schreiben. Das Blümchen hätte problemlos auf eine normale Karte - im Querformat - gepasst. Ich habe die Buchstaben mit grüner Tinte gestempelt und ausgeschnitten.

I wanted a "birthday flowers for you" text for my card.
I white heat embossed the words birthday and for you onto black cardstock. For the word flowers I used the Lined Letters stampset by MFT. This is a stamp set I don't want to miss anymore! The letters aren't too small, but still narrow enough to write longer words. The word Blümchen, which is quite long, would easily have fit an A2 card - landscape orientation. I stamped the letters with green ink and cut them out.


Der süße kleine Elefant aus dem Set Blumige Grüße hatte bei mir auch noch keine Tinte gesehen. Ich habe ihn mit Copics coloriert und die Highlights sowie Punkte auf dem Kleid mit einem weißen Gelstift gemacht. Dann habe ich ihn ausgeschnitten. 
Außerdem habe ich noch einige der kleinen Blümchen, die ich bereits für den Hintergrund verwendet hatte, abgestempelt und ein wenig mit Grautönen schattiert und ausgeschnitten.

This cut elephant from the Blumige Grüße stamp set hadn't seen any ink yet... I colored her with Copics and added some highlights and the dots on the dress with a white gel pen. Then I cut her out.
I also stamped a few more of the little flower, that I already used on the background, and lightly shaded them before cutting them out as well.


Die Buchstaben für das Wort Blümchen habe ich dann direkt auf den Hintergrund geklebt und mittig eine Lücke für das Motiv gelassen. Das habe ich dann mit 3D Tape aufgeklebt.
Die einzelnen Blümchen und die schwarzen Cardstockstreifen mit den aufembossten Texten sind jeweils mit dünnem 3D Tape befestigt. Zwischen die Blümchen habe ich dann noch einige grün-irisierende Perlen geklebt und zwei davon auch verwendet, um aus Blumchen dann Blümchen zu machen.
Zum Schluss habe ich alles schwarz gemattet und auf einen weißen Kartenrohling geklebt.

I attached the letters for the word flower directly onto the background, leaving some space inbetween to place the image, that I then adhered with foam tape.
The small flowers and the cardstock strips with the embossed texts are adhered with thin foam tape. Between the flowers I added some green iridescent gems, using two of those as well to turn the U into a Ü since there are no dots in the stamp set I could have used instead.
To finish the card I matted my decorated cardstock black and attached everything onto a white slimline card.

Mittwoch, 18. Januar 2023

Create a Smile Januar Sketch Challenge Reminder

 
Hallo Ihr Lieben!
Vor einer Woche ging ja die Januar Sketch Challenge von Create a Smile online. Und in meinem Post dazu hatte ich ja bereits angekündigt, dass ich mich nicht für ein Motiv entscheiden konnte und deswegen zwei Karten gemacht habe. Es ist mir einfach in letzter Zeit öfter passiert, dass ich mich für das "falsche" Motiv entschieden habe und dann von vorne angefangen habe. Deswegen habe ich diesmal gleich beide Szene, die ich im Kopf hatte, gestaltet - und beide gefallen mir echt gut.

Hello everyone!
A week ago the january sketch challenge by Create a Smile went live. And in my post from last week I already mentioned, that I couldn't decide on a image and created two cards. Lately it happened several times that I went with the "wrong" image when I had two ideas in my head and then started all over. So this time I did both scenes and picked my DT entry later - and this time I really liked both cards.

Diese Karte ist der, die ich Euch letzte Woche gezeigt habe, sehr ähnlich. Wieder habe ich Nuvo Shimmer Powder für den Cardstock im Hintergrund benutzt. Auch hier kam eines der Rounded Corners Stanzteile - diesmal etwas größer - zum Einsatz. Ich habe es mit Distress Oxide Tumbled Glass, Broken China und Uncharted Mariner gewischt und wieder mit der Winter Landscape Stanze ein weiteres der Rounded Corners in drei Schneehügel geteilt. Auch die orange- und türkisfarbenen Fähnchen wiederholen sich.

This card is very much like the one I shared a week ago. Again I used Nuvo Shimmer Powders for the cardstock in the background. I also used the Rounded Corners dies here - this time a larger size - and inked it up with Distress Oxide Tumbled Glass, Broken China and Uncharted Mariner. And again I die cut a second of the Rounded Corners into three snowy hills pieces using the Winter Landscape die set. And also the turquoise and orange banners I repeated on this card.


Und das hier ist die zweite Szene, die ich im Kopf hatte. Ich finde sie nach wie vor klasse, aber sie brauchte einen größeren Hintergrund, und der bedeckte damit fast die komplette Karte. An sich nicht schlimm, die andere Karte war aber dem Sketch getreuer. 
Hier habe ich zwei der Weihnachtsmöwen aus dem gleichnamigen Stempelset verwendet. Die stehende hat eigentlich keine Mütze auf. Damit sie nicht friert, habe ich ihr die Mütze der Geschenke-Möwe aus dem Set aufgesetzt. Der Baumstamm, auf dem die linke Möwe steht, ist aus dem Set Möwen-Gang. Der wunderbar verkehrte Schneemann ist aus dem Set Durcheinander und er bekommt gerade einen Hut aus dem Set Cool Buddies aufgesetzt.
Hier sind alle Motive mit schwarzer Tinte gestempelt und wieder mit Copics coloriert. 
Der Text hier ist aus dem Set Scheiß drauf - ich finde, der passt perfekt zu dem gelangweilten Blick der Möwen! Er ist mit weißem Embossingpulver auf ein Banner aus dunkel türkisfarbenem Cardstock embosst. 
Ich habe alle Elemente meiner Szene auf das gewischte Rounded Corner Stanzteil geklebt und dieses wieder mit 3D Tape auf dem Hintergrund befestigt. Aber da ich hier keine weißen Farbspritzer auf den Schimmer-Hintergrund aufgebracht hatte, fehlte mir irgendetwas. Deswegen habe ich noch einige weiß irisierende Pailetten auf der Karte verteilt.

And this is the second scene I had in mind. I still love it, but it needed a larger background and that covered nearly the whole card. Not a bad thing at all, but the other cards was just closer to the      sketch. 
Here I used two of the seagulls from the Holy Shit stamp set. The one standing originally isn't wearing a hat. To keep it from freezing I gave her the hat the seagull with the presents is wearing. The tree trunk, on which the bird on the left is standing on, is from the Gull Gang stamp set. And the wonderfully wrong snowman from the Puzzled stamp set is about to wear a hat from the Cool Buddies stamp set.
Here I stamped all images with black ink and colored them with my Copics.
The text here means "we're too old for this shit". I white heat embossed it onto a banner cut from dark turquoise cardstock. 
I adhere all elements of the scene to the Rounded Corners die cut and attached that to the background using foam tape. Since I hadn't spritzed any white acrylic paint onto the shimmer background for this card I felt like it was missing something. So I added a few white iridescent sequins instead.