Sonntag, 30. April 2023

Tochter-Geburtstagskarte #1

 
Hallo Ihr Lieben!
Es war mal wieder soweit - unsere Zwillinge hatten Geburtstag. Bisher habe ich ja immer zwei sehr ähnliche Karten in unterschiedlichen Farben gemacht. Dieses Jahr habe ich mich entschlossen, die Karten jeweils individueller auf die beiden anzupassen. Und somit zeige ich Euch heute Karte Nr. 1, für die Tochter im Bio-Master-Studiengang, Schwerpunkt Pflanzen, mit denen auch ihre Bachelor-Arbeit zu tun hatte. 

Hello everyone!
It's that time again - our twins celebrated their birthday. Until last year I always made two nearly identical cards in different colors. This year I've decided to make the card fit more their individual interests and lives. And so I am sharing card #1 today, made for the daughter in a biology master class at university now, main emphasis on plants, which she also did her bachelor paper about.

Für den Hintergrund habe ich den Fern Background von WhimsyStamps mit grauer Tinte auf weißen Cardstock gestempelt. Dann habe ich die einzelnen Farne mit Copics coloriert und Highlights mit einem weißen Gelstift gesetzt. Hat seine Zeit gedauert, aber das Ergebnis gefällt mir wirklich gut!

For the background I stamped the Fern Background by WhimsyStamps with grey ink onto a piece of white cardstock, then colored the ferns in with Copics and added highlights with a white gel pen. It took some time to finish, but I really love the result!


Für die Deko habe ich dann zweimal die 2 mit dem Stanzenset Outline Numbers von MFT gestanzt - jeweils dreimal aus weißem Cardstock und für die oberste Lage aus weißem Glitter-Cardstock. 
Da Pia gerne helle, gedeckte Farben mag, habe ich dann mit dem Vintage Flowers Stempelset von Altenew Blumen in einer Beige- und einer Pink-Kombi gestempelt, ausgeschnitten und auf und unter den Zahlen angeordnet aufgeklebt. Außerdem habe ich mit Stanzen von Magnolia vier kleine Schmetterlinge aus weißem Cardstock ausgestanzt, mit Copics coloriert und ebenfalls aufgeklebt.
Für den Text habe ich eine Hotfoil Plate von Kartenkunst und rose-goldene Folie verwendet, die Texte auf schwarzen Cardstock foliert und anschließend mit 3D Tape unterhalb der Zahlen auf dem Hintergrund angebracht.

For the decorations I die cut two of the 2 using the Outline Numbers die set by MFT - I cut them each three times from white cardstock and for the top layer once from white glitter cardstock.
Since Pia loves light, soft colors, I stamped flowers from the Vintage Flowers stamp set by Altenew using a beige and a pink color combo. Then I cut those out and arranged them under and on top of the numbers. I also die cut four little butterflies from white cardstock using dies by Magnolia, colored them with Copics and attached them to the background.
For the text I used a hotfoil plate by Kartenkunst and rose gold foil. The texts mean "hip hip hoorays" and "heartfelt congratulations". I foiled them onto black cardstock and then adhered them to the background, just under the numbers.


Zum Schluss habe ich eine rose-goldene Steinchen als Deko auf der Karte verteilt und dann alles auf einen weißen Kartenrohling geklebt. Zuerst hatte ich vor, den dekorierten Cardstock schwarz zu matten - auch, um das schwarz der Textstreifen nochmal aufzugreifen. Aber das war mir irgendwie zu dunkel und zu viel, also habe ich die Mattung wieder entfernt und nun diesen etwas breiteren weißen Rahmen auf der Karte, was mir super gefällt, denn die Karte wirkt wunderbar fröhlich, zart und hell.

To finish the card, I added a few rose gold rhinestones and then attached everything to a white note card. I had planned to add a black mat - also to pick up the black of the text strips again. But that seemed too dark and too much, so I removed the mat. Now I have that a bit wider white frame around the decorated cardstock, and I really like it, because it makes the card wonderfully happy, soft and light.

Samstag, 29. April 2023

Stempeleinmaleins - Ausgabe vom 29. April 2023

 
Hallo Ihr Lieben!
Heute gibt es beim Stempeleinmaleins einen neuen Sketch für Euch. Und ich habe danach diese sonnige Karte gemacht. Dafür habe ich den Sketch ein wenig abgewandelt - meine Elemente waren einfach zu groß. Deswegen habe ich ihn von hochkant auf quer gedreht und auch die Position des Textes etwas verändert. 

Hello everyone!
Today we have a new sketch over at Stempeleinmaleins. And I made this sunny card after it. I had to make some changes to the sketch - my elements were just too large. So I changed the orientation from landscape to portrait and also changed the position of the text.

Als Basis habe ich ein Stück weißen Cardstocks verwendet, das noch fertig geprägt auf meinem Schreibtisch lag. Ich habe es mit einem Embossingfolder von Cuttlebug geprägt. Dann habe ich goldene Metallic Watercolor darübergespritzt.

As the base I used a piece of white cardstock, that I had already dry embossed on my table. I had embossed it with an embossing folder by Cuttlebug. Then I spritzed some gold metallic watercolor onto the cardstock.


Aus dem Cardstock habe ich dann mit einer der Elegant Stax Stanzen von MFT dieses oben spitze Fenster ausgestanzt. 
Um den Rahmen darum zu gestalten, habe ich die nächste Größe dieser Stanzen aus goldenem Spiegelcardstock gestanzt und die innere Kante der Stanze mit einem spitzen Bleistift nachgefahren. Entlang dieser Linie habe ich dann mit der Schere geschnitten und so einen schmalen Rahmen mit den tollen Nähten erhalten. Diesen Rahmen habe ich auf den weißen Cardstock geklebt.
Den weißen Cardstock habe ich dann mit einem etwas größeren Stück Cardstock hinterlegt. Auch der war ursprünglich weiß - ich habe ihn erst mit hellerem Gelb vollflächig gewischt, dann habe ich mit der Ray of Light Stencil von MFT und dunkler-gelber Tinte die Strahlen nur in dem Bereich aufgewischt, der später durch das Fenster sichtbar ist. Auch auf den gelb gewischten Cardstock habe ich dann goldene Metallic Watercolor aufgespritzt.

I've die cut a window from this white cardstock, using one of the Elegant Stax dies by MFT.
To create the frame around it, I've die cut the next size of these dies from gold mirror cardstock and traced the inner edge of the die with a sharp pencil. Then I cut along this line with my scissors and ended up with this thin frame with the beautiful stitched. I attached the frame around the window.
Behind the white cardstock I put a slightly larger piece of cardstock. This was white as well - I first completly blended some lighter yellow ink onto it, then used some darker yellow ink and the Ray of Light stencil by MFT to add the rays only in the area, that will be visible through the window later. I spritzed more gold metallic watercolor onto the yellow cardstock as well.


Für meine Deko habe ich die Stunning Starflowers von Altenew in verschiedenen Blautönen gestempelt und mit der Schere ausgeschnitten. Außerdem habe ich aus hell-türkisfarbenem Cardstock zwei Farnblätter mit Stanzen von Spellbinders gestanzt und mit Copics etewas schattiert. 
Meinen Haupttext habe ich so auf den gelben Cardstock gestempelt, dass er im Fenster zu sehen ist. Der Text ist aus dem Set Window Scene: Spring von LawnFawn.
Als Untertext habe ich ein "have a beautiful day" aus dem Set Brighter Days von Concord and 9th weiß auf einen Streifen schwarzen Cardstocks embosst.

For my decorations I stamped the Stunning Starflowers by Altenew with different shades of blue ink, then cut them out with my scissors. I also die cut two fern leaves from light aqua cardstock using dies by Spellbinders, then shaded those a bit with my Copics.
My main text is stamped onto the yellow cardstock so it will be visible in the window later. I used  stamp from the Window Scene: Spring stamp set by LawnFawn for it.
As a subtext I white heat embossed a "have a beautiful day" from the Brighter Days stamp set by Concord and 9th onto black cardstock.


Die verschiedenen Lagen und Elemente meiner Karte habe ich mit 3D Tape zusammengeklebt und als Deko noch einige goldene Pailetten aufgeklebt. Dann habe ich alles auf einen weißen Kartenrohling geklebt.

I glued the different layers and elements of my card together with foam tape and added some gold sequins as decorations. Then I attached it to a white note card.

Freitag, 28. April 2023

Stampcorner Mai-Release #5

 
Hallo Ihr Lieben!
Heute habe ich ein letztes Sneak auf das Stampcorner Mai-Release für Euch. Ja, es ist schon #5 für dieses Release - und trotzdem habe ich einiges noch nicht gezeigt.... Und auf dieser Karte verstecken sich gleich zwei Neuheiten.
 
Hello everyone!
Today I have one last sneak of the may release by Stampcorner. Yes, it's #5 already for this release - and still, there're are still things left, that I haven't shared yet.... And on this card you can see two new items from the release.

Die erste Neuheit seht Ihr im Hintergrund - der Hintergrundstempel. Für den sehe ich wirklich viele Einsatzmöglichkeiten. Mich hat er im ersten Moment am meisten an einen Sommerhimmel mit weißen Wolkenstreifen erinnert. Deswegen habe ich den Stempel erstmal mit klarem Embossingpulver auf weißen Cardstock embosst.
Jetzt war es so, dass ich die Motive meist als erstes coloriere - und irgendwie wirkten die ein wenig eintönig. Also musste etwas Farbe in den Hintergrund und so habe ich den Cardstock im unteren Bereich mit Distress Oxide Cracked Pistacchio, im oberen Bereich mit Kitsch Flamingo, Picked Raspberry und Seedless Perserves gewischt.
Darauf kam dann mit 3D Tape ein Gartenzaun. Den habe ich einfach aus Streifen, geschnitten aus weißem Cardstock gestanzt und zusammengeklebt. Die oberen Enden der Streifen habe ich dann mit der Schere spitz zugeschnitten.
Und auf der linken Seite habe ich dann gleich noch den Text meiner Karte aufgeklebt. Dafür habe ich aus pinkfarbenem Cardstock viermal das Wort hello mit einer Stanze von MFT gestanzt, aufeinander und dann auf den Zaun geklebt.

The first new item you can see in the background - it's a background stamp. I really can see a lot of different ways to use this. First thing I thought was how it reminded me of a blue summer sky with those white strips of thin clouds. So I clear heat embossed it onto a piece of white cardstock.
Well, most times I color the images for my card first - and those looked a bit dull. So I wanted to bring some color to the background and inked the cardstock with Distress Oxide Cracked Pistacchio on the bottom and Kitsch Flamingo, Picked Raspberry and Seedless Preserves on the top.
Then I used foam tape to attache a picket fence to it. I simply cut strips of white cardstock and glued them together, then cut the top of each strip into a triangle shape.
And onto the bottom left of the fence I attached my text. I've die cut the word hello, using a die by MFT, four times from pink cardstock, stacked them and adhered them onto the fence.


Der kleine Bär kommt zusammen mit dem anderen Bären mit dem Schmetterling auf der Hand, den ich Euch bereits gezeigt habe. Er ist, wie alle Motive hier, mit Copics coloriert. Und weil der kleine Bär so süß nach unten schaut, musste dort natürlich ein weiteres kleines Motiv aufgebracht werden. Ich habe mich für diese süße kleine Schnecke aus dem Set You Gnome Me von MFT entschieden. 
Im Hintergrund habe ich ein Blumenbeet vor den Zaun gepflanzt. Dafür habe ich zum einen den Stempel Blumenwiese verwendet und ein dazu einige kleine Blumen aus dem Set Flower Friends von MamaElephant kombiniert. Ich habe alle Motive per Hand ausgeschnitten - die "Blumenwiese" habe ich mittig geteilt und ein wenig auseinander gezogen aufgeklebt - und vor dem Zaun arrangiert. Ich finde, die kleinen Blumen füllen die Lücken zwischen den Stielen der großen Blumen prima.

The little bear comes in one set with the other one with the butterfly on his hand, that I already shared with you. Like all the images on this card did I color him with Copics. And since the little bear is looking so interested down to the ground I had to add a second image here. I went with this little snail from the You Gnome Me set by MFT.
In the background I planted some flowers in front of the fence. I used the stamp Blumenwiese by Stampcorner and combined it with some flowers from the Flower Friends set by MamaElephant. I cut out all images by hand - the image Blumenwiese I cut apart in the middle and glued it down with a bit of a distance - and arranged them on top of the ence. I think, those little flowers fill the gaps between the stems of the larger flowers nicely.


Zum Schluss habe ich dann Bär und Schnecke wieder mit 3D Tape aufgeklebt, ein paar wenige Glitzersteine auf der Karte verteilt und alles auf einen weißen Kartenrohling geklebt. Auf die Mattung habe ich hier bewusst verzichtet, mit einem etwas breiteren weißen Rand wirkt die Karte einfach sommerlicher und fröhlicher.

To finish the card I attached the bear and snail with foam tape, added just a few clear rhinestones to the card and then adhered it to a white note card. I skipped the black mat here because with that slightly wider white frame around it, the whole scene just looks summer-isher.

Donnerstag, 27. April 2023

Für Dich bin ich immer da

 
 Hallo Ihr Lieben!
Für meine Karte, die ich heute auf dem Stampcorner Blog zeige, habe ich nochmal das maritime Stempelset Ahoi Maus aus dem April-Release verwendet. Da gibt es doch  noch die süße Matrosenmaus, die bei mir noch nicht zum Einsatz kam!

Hello everyone1
For this card, that I'm sharing over on the Stampcorner Blog today, I brought out the maritime stamp set Ahoi Maus from the april release again. There's this cute sailor mouse that I hadn't used yet.

Ihr seht schon, auch diese Karte ist ziemlich CAS geworden - irgendwie komme ich auf den Geschmack! Und deswegen gibt es auf dieser Karte auch ziemlich viel weiß zu sehen.
Ich habe ein Stück weißen Cardstock mit der zweitgrößten der A6 Deckle Edge Stanzen ausgestanzt und dann oben mittig einen Kreis daraus gestanzt. 
Dann habe ich den Text aus dem selben Stempelset auf den Aufleger gestempelt. Weil ich einen Teil davon an die Rundung des Kreisausschnitten anpassen wollte, habe ich eine Stamputation vorgenommen - sprich den Stempel mit der Schere vorsichtig auseinander geschnitten. Dann habe ich das "für dich" leicht gebogen in die Stempelhilfe geklebt, den Rest des Textes habe ich unten rechts auf den Cardstock gelegt und ebenfalls mit der Stempelhilfe aufgenommen. Dann habe ich beide mit schwarzer Tinte aufgestempelt.

As you can see, this a pretty CAS card - I seem to finally be able to enjoy making those! And so there's lots of white visible on this card.
I die cut the second largest of Stampcorner's A6 Deckle Edge dies from white cardstdock, then cut a circle from the top center. 
I used a text stamp from the same set, it means "I am always there for you". I wanted to make a part of it match the shape of the circle cut out. So I did a stamputation - meaning I carefully cut of the first line of the text. Then I put it in my Misti and bend it slightly to get it in the shape I wanted. The rest of the text I placed on the bottom right of my cardstock, picked it put with the door of my Misti and stamped both texts with black ink onto the cardstock.


Wieder mit Kreisstanzen habe ich fünf Ringe aus Watercolor Cardstock gestanzt und diese dann per Ink Smooshing mit Distress Ink Worn Lipstick, Spiced Marmalade, Twisted Citron, Salvaged Patina und Shaded Lilac in Regenbogenverlauf eingefärbt. Dabei habe ich mehrere Lagen aufgetragen und die Farben zwischendurch mit einem Embossingföhn getrocknet. 
Die Ringe habe ich dann so auf die Vorderseite eines weißen Kartenrohlings geklebt, dass sie später mittig im Kreisausschnitt des Kartenauflegers sitzen. 
Die süße Maus habe ich mit Copics coloriert und für die Highlights einen weißen Gelstift verwendet. Dann habe ich sie ausgeschnitten und mit dünnem 3D Tape auf die Ringe geklebt.
Aus weißem Glittercardstock habe ich mit Stanzen aus dem Platform Pop-Up Cloud Wrap Around Set von LawnFawn noch zwei Wolken ausgestanzt und diese mit dickerem 3D Tape auf den Aufleger geklebt.

I used circle dies again to die cut five rings from watercolor cardstock and then did some ink smooshing to color them. I used Distress Ink Worn Lipstick, Spiced Marmalade, Twisted Citron, Salvaged Patina and Shaded Lilac to make a rainbow cirle and put down several layers of each color, drying the cardstock with a heat tool inbetween.
I attached the rings to the front of a white card base, making sure they are centered behind the circle cut out of the white carstock with the stamped on text.
I colored the cute mouse with Copics and used a white gel pen for the hightlights. Then I cut her out and attached her with thin foam tape on top of the rings.
Using the clouds from the Platform Pop-Up Cloud Wrap Around die set by LawnFawn I die cut two clouds from white glitter cardstock and used thick foam tape to adhere them to the white cardstock.


Dann habe ich den Kartenaufleger ebenfalls mit dem dickeren 3D Tape auf den Kartenrohling geklebt - so ergebensich verschiedene Ebenen und so wirkt die Karte nicht zu einfach.
Als Deko habe ich dann noch ein paar pinkfarbene kleine Herzen aufgeklebt.

Then I used the thick foam tape again to attach the white cardstock with the cut out window onto the card front - now the card has different layers and doesn't look too simple.
As decoration I added some small pink hearts.

Mittwoch, 26. April 2023

Create a Smile April Moodboard-Challenge Reminder


Hallo Ihr Lieben!
Heute  habe ich einen Challenge-Reminder für die aktuelle Moodboard-Challenge von Create a Smile für Euch. Und wieder war es so, dass ich zwei total unterschiedliche Ideen hatte - und diese Karte war dann, als sie fertig war, meine zweite Wahl. Was aber nicht heißt, dass sie mir nicht gefällt. Im Gegenteil, ich finde sie klasse. Aber die andere Karte fand ich einfach passender. Und deswegen zeige ich Euch diese zweite Karte heute.
 
Hello everyone!
Today I have a challenge reminder for the current Create a Smile Moodboard challenge. And again I had two completly different ideas for this moodboard - and this one was my second choice, once I had finished both. But that doesn't mean that I don't like it. Actually I love it. But I think the other card just represented the moodboard better. And so I am sharing this second card with you today.

Mit der größten der Rounded Corners Stanzen habe ich ein Stück weißen Cardstock ausgestanzt. Den habe ich dann mit Distress Oxide Tattered Rose, Saltwater Taffy und Abandoned Coral gewischt - jeweils oben und unten gegengleich. Dann habe ich die Desert Stencil auf den Cardstock gelegt, knapp darunter den unteren Teil der Karte abgedeckt und mit Black Soot die Uferlinie aufgewischt. Die Linie habe ich dann ein wenig verwischt und außerdem an die Ränder des Cardstocks ebenfalls ganz leicht Black Soot aufgetragen.

I die cut the largest Rounded Corners die from white cardstock. Then I inked that with Distress Oxide Tattered Rose, Saltwater Taffy and Abandoned Coral - about the samt at the top and bottom half of the cardstock. Then I put the Desert stencil onto the cardstock, covered the bottom of it with masking tape, just a bit under the edge of the stencil, and added the shore line with Distress Oxide Black Soot. I used my blending brush to soften the lines a bit and also added a bit of Black Soot to the edges of the cardstock. 


Mit weißem Embossingpulver habe ich dann noch die Sonne und die Wellenlinien im Wasser auf den Cardstock embosst.
Und dann habe ich wild verschiedene Stempelsets kombiniert. 
Der Frosch und das Seerosenblatt sind aus dem Set Springen, die Gummiente und die Wellenlinien sind aus dem Set Ducky, die Rohrkolben aus dem Set Steiler Zahn und die Sonne aus dem Scene Builders Set. Außerdem habe ich den Frosch zusätzlich mit dem Schnorchel, der Taucherbrille und den Schwimmflügeln aus dem Set Beach Party ausgestattet. 
Alle Motive habe ich mit Copics coloriert und Highlights mit einem weißen Gelstift hinzugefügt. 
Von der Sonne habe ich nur den Kreis ausgeschnitten und auf den embossten Kreis geklebt. Auch alle anderen Motive habe ich mit der Schere ausgeschnitten. Aus der Taucherbrille habe ich den inneren Teil ebenfalls herausgeschnitten und von hinten Vellum dagegen geklebt.

I white heat embossed the sun and the wave lines onto the water.
And then I started lots of different stamp sets.
The frog and the waterlilly leave are from the set Jump Up, the duck and the wave lines from the set Ducky, the  cattails from the set Oh Dam and the sun from the Scene Builders set. I also added the snorkel, the goggles and the water wings from the Beach Party Set to the frog.
I colored all images with Copics and added white details with a gel pen. 
From the sun I only cut out the circle and glued it on top of the white heat embossed one. I used my scissors to cut out all the other images as well. From the goggles I also cut out the inner piece and put some vellum behind the cut out.


Dann brauchte meine Karte noch einen Text. Ich wollte etwas ein wenig verrücktes - schließlich ist meine Wahl auf ein "du bist wunderbar verrückt" gefallen. 
Das du habe ich mit der Schattenlayer aus dem Stanzenset Doppeltes Du gestanzt - ingesamt viermal aus schwarzem Cardstock, die Teile habe ich dann aufeinander geklebt.
Für den Rest des Textes habe ich die beiden Stempel "bist wunderbar" und "machst mich verrückt"aus dem Set Alles über Dich kombiniert und weiß auf schwarzen Cardstock embosst.

Then my card needed a sentiment. I wanted something a bit silly - and ended up with "you are wonderfully crazy". 
I die cut the word du - you - with the shadow layer die from the Doppeltes Du die - four times from black cardstock, then stacked them.
For the rest of the text I combined stamps from the set All about You and white heat embossed them onto black cardstock.


Zum Schluss habe ich alle Elemente, teilweise mit 3D Tape, auf den Hintergrund geklebt und alles auf einem weißen Kartenrohling befestigt.

I attached all elements, partly with foam tape, onto the background and adhered the decorated cardstock onto a white card base.

Dienstag, 25. April 2023

Stampcorner Mai-Release Sneak #4

 
Hallo Ihr Lieben!
Mit dem heutigen Sneak auf das Mai-Release von Stampcorner bleiben wir in einer warmen Gegend - ich würde sogar sagen, da ist es noch etwas heißer...
 
Hello everyone!
With today's sneak of the may release by Stampcorner we are staying in a warm area - I'd say, it's even hotter there...
 
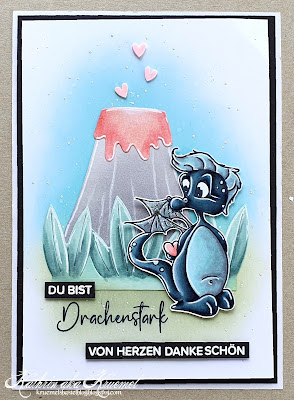
Ich fand, zu dem süßen Drachen würde ein Vulkan perfekt passen.
Für den Hintergrund habe ich ein Stück weißen Cardstocks mit Distress Oxide Bundled Sage und Salvaged Patina gewischt. In der Mitte überlappen die Farben minimal, zu den Rändern hin laufen wie wieder aus. Anschließend habe ich Wasser sowie weiße Metallic Watercolor aufgespritzt.
 
I thought, a volcano would go perfect with this cute little dragon.
For the background I inked a piece of white cardstock with Distress Oxide Bundled Sage and Salvaged Patina. The colors overlap just slighly where they meet, towards the edges I let them fade into the white again. Then I flicked some water and also some white metallic watercolor onto the cardstock.
 

 Der kleine Drache ist mit Copics coloriert, die Flügel habe ich außerdem mit Stickles beglittert. Und der kleine Kerl hat tatsächlich eines der Herzen gefangen, die der Vulkan im Hintergrund ausspuckt. 
Der Vulkan ist mit der Volcano Stanze von MFT gemacht - der Vulkan an sich aus hellgrauem Cardstock, den ich dann von unten her mit Distress Oxide Hickory Smoke gewischt und mit einem weißen Gelstift einige Linien aufgemalt habe. Die Lava ist aus weißem Cardstock gestanzt und mit den selben Copics, die ich auch für das Herz, das der Drache hält, verwendet habe, coloriert. Die Farbe passt auch perfekt zu den drei kleinen Herzen, die ich über dem Vulkan aufgeklebt habe.
Vor den Vulkan habe ich eine Lage prähistorische Pflanzen geklebt. Es ist aus türkisgrünem Cardstock mit der Tropical Leaves Border von LawnFawn gestanzt und mit Copics schattiert. Von unten habe ich ganz zart ein wenig des Bundled Sage aufgewischt.

The little dragon is colored with Copics. I also put some Stickles onto his wings. And this little guy seems to really have caught one of the hearts, the volcano in the background is throwing out.
The volcano is made with the Volcano die by MFT - I cut it from light grey cardstock and inked the bottom with Distress Oxide Hickory Smoke. I also added a few lines with a white gel pen. The lava is cut from white cardstock and then colored with the same markers, that I used to color the heart the little dragon is holding. This color also goes perfectly with those three little hearts, that I glued down above the volcano.
In front of the volcano there are some plants growing. I cut those from greenish-turquoise cardstock using the Tropical Leaves Border die by LawnFawn and then shaded it with Copics. To the bottom edge I added just a hint of the Bundled Sage.


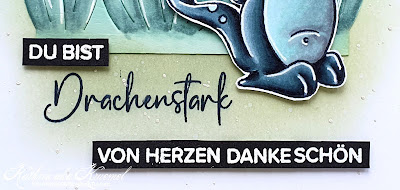
Unter der Szene habe ich den Text der Karte angebracht.
Das Drachenstark ist einer der Texte, der mit dem Drachen im Set kommen. Eigentlich lautet der "du bist drachenstark" - das du bist ist zwischen das D und h bzw. T und K gesetzt. Das passte mir für meine Karte aber nicht. Deswegen habe ich beim Einfärben des Stempels diese Teile abgedeckt und dann nur das wort Drachenstark mit schwarzer Tinte direkt auf den Hintergrund gestempelt.
Für den Rest des Textes kamen wieder die Stempelsets Kleine Worte zum Einsatz. Die Texte sind weiß auf schwarzen Cardstock embosst. Das Du bist habe ich an den unteren Rand der Pflanzenreihe platziert, den Rest des Textes unten quer über die Karte.

Under the scene I added my texts.
The word in the middle is stamped with black ink directly onto the background. The other two texts I white heat embossed onto black cardstock, then glued down the smaller one to the bottom edge of the plants, the other one at the bottom across the card.


Bei dieser Karte habe ich nur für den Drachen sowie die zwei Textstreifen dünnes 3D Tape verwendet, der Rest ist direkt auf den Hintergrund geklebt. Den habe ich dann schwarz gemattet und auf einen weißen Kartenrohling geklebt.

On this card I used thin foam tape only behind the dragon and the two text strips, the rest is adhered directly to the background. I then matted it black and attached everything to a white note card.

Montag, 24. April 2023

Stampcorner Mai-Release Sneak #3

 
Hallo Ihr Lieben!
Der heutige Sneak auf das Mai-Release von Stampcorner bringt uns zurück an den Strand - diesmal allerdings in wärmere Gefilde. Von dort schickt der neue kleine Löwe nämlich Urlaubsgrüße.

Hello everyone!
Today's sneak of Stampconer's may release is taking us back to the beach - but this time in warmer areas. This cute little lion is sending greetings from his vacation there.

Hier habe ich den Hintergrund wieder gewischt - Distress Oxide Gathered Twigs für den Sand, Mermaid Lagoon für das Meer und die Wolken mit einem Wolken-Stencil und Tumbled Glass. Wieder habe ich nur auf den braunen Bereich feine Wassertropfen aufgespritzt, um dem Sand Struktur zu geben. Die Farben habe ich alle hauptsächlich in der Mitte des Cardstocks aufgetragen und zu den Rändern hin auslaufen lassen.

Here I inked the background again - with Distress Oxide Gathered Twigs for the sand, Mermaid Lagoon for the ocean and the clouds with a cloud stencil and Tumbled Glass. And again I flicked some fine drops of water only to the brown inked area to give it a sandy texture. I put down the color quite heavily to the center of the cardstock and let it fade out towards the edges.


Da ich meiner Szene einen tropischen Touch geben wollte, habe ich aus hell-türkis farbenem Cardstock Zweige, die mich an Palmwedel erinnern, ausgestanzt und sie mit Copics etwas schattiert. Zusätzlich habe ich noch einige Hibiskusblüten aus dem Magic Iris Tropical Leaves Stanzenset von LawnFawn gestanzt, ebenfalls mit Copics coloriert und zwischen die Zweige gesetzt. Dann habe ich alles aufeinander und mit 3D Tape in die obere linke Ecke des Hintergrunds gesetzt. So sieht es so wenig aus, als würden die Wedel der Palme, die gleich neben dem Rand der Karte wächst, in die Karte hineinragen.
Außerdem habe ich mit grauer Tinte ein paar Vögel in den Himmel gestempelt. Die sind aus dem Stempelset Matrosen-Freunde 1 - ich habe sie vom dazugehörigen Moin einfach weggeschnitten um sie auch einzeln verwenden zu können.

Since I wanted to add a tropical touch to my card, I die cut some branches, that remind me of palm fronds, from light aqua cardstock and shaded them with my Copics. Then I also die cut some tropical flowers from the Magic Iris Tropical Leaves die set by LawnFawn, colored them with Copics and put them between the fronds. Then I glued the individual pieces together and adhered it with foam tape to the top left corner of my scene. I wanted it to look, like a few of the fronds of that palm, that's growing right outside the edges of my card, are hanging into the scene. 
I also stamped a few grey birds into the sky. Those are originally part of a text stamp, but I cut them off to be able to use them individually.


Und hier ist der kleine Löwe mit seinem Quietscheenten-Schwimmring. Auch er ist mit Copics coloriert. Und da ich von der Karte von gestern noch eine kleine Blume übrig hatte, habe ich die ihm einfach hinters Ohr geklebt.
In den Sand neben dem Löwen habe ich etwas Strandgras gestempelt. Es ist mit dem Bären Norbert aus dem gleichnamigen Stempelset und türkisfarbener Tinte gemacht - den Rest des Stempels habe ich beim Einfärben mit der Tinte einfach abgedeckt. 
Der Löwe bringt auch Texte mit - aber egal wie ich die auf meiner Karte angeordnet  habe, es hat mir nicht gefallen. Und dann fiel mir meine Aloha Stanze von LawnFawn ein. Die war doch perfekt. Ich habe sie einige Male aus weißem und einmal aus dem hell-türkisfarbenen Cardstock gestanzt, dem türkisfarbenen Stanzteil wieder mit Copics einen Ombre-Look gegeben und dann alle Teile aufeinander geklebt. Dabei habe ich von den hinteren Lagen die Schleife des h sowie den oberen Teil des a weggeschnitten, so dass ich diesen Teil über den Löwen setzen konnte. Neben dem gestanzten Wort habe ich eine weitere Hibiskusblüte aufgeklebt.
Und für den kleineren Text darunter kam wieder eines der Stempelsets Kleine Worte zum Einsatz. Ich frage mich, warum ich die immer wieder aufräume. Eigentlich könnte ich sie auch gleich auf meinem Tisch liegen lassen, so oft verwende ich sie. Hier habe ich die Worte mit weißem Embossingpulver auf kraftfarbenen Cardstock embosst.

And here's the little lion with his ducky life saver. He's colored with Copics again. And since I had a little flower from yesterday's card left, I placed that behind the lion's ear.
Into the sand next to the lion I stamped some beach grass. I used part of the image from the stamp set Norber here and turquoise ink - the rest of the image I simply covered when inking the stamp up.
The lion also brings texts in his set, but no matter how I placed those onto my card, I didn't like the look. And then I remembered that Aloha die by LawnFawn, which was perfect. I die cut it several times from white and once from light aqua cardstock, gave the aqua die cut an ombre look with my Copics and then stacked all the words. I cut off the loop of the h and the top of the a of the bottom layers to be able to place it on top of the lion later. And next to the die cut word I placed another tropical flower.
The smaller text underneath means "happy vacation". I white heat embossed the words onto kraft colored cardstock.


Den Löwen habe ich dann mit dünnem 3D Tape, den kleinen Text, genauso wie die Palmwedel oben auf der Karte, mit dickerem 3D Tape. Das aloha habe ich leicht überlappend auf das Motiv geklebt. Zum Schluss habe ich alles schwarz gemattet und auf einem weißen Kartenrohling angebracht.

I attached the lion with thin foam tape, for the small texts I used thick foam tape, as I did for the palm fronds. The aloha I glued down, slightly overlapping the image. Then I matted the cardstock black and adhered everything to a white note card.

Sonntag, 23. April 2023

Stampcorner Mai-Release Sneak #2

 
Hallo Ihr Lieben!
Heute habe ich schon das nächste Sneak auf das neue Stampcorner-Release für Euch. Und heute begrüßen wir den Frühling, und zwar gemeinsam mit diesem süßen Bären aus der Feder von StuffDeluxe.

Hello everyone!
Today I have the second sneak of the new Stampcorner release for you. Let's welcome spring - together with this cute little bear.

Hier habe ich die Mitte eines Stücks weißen Cardstocks ganz zart mit Distress Oxide Cracked Pistacchio und Tumbled Glass gewischt und dann, ebenfalls nur auf die Mitte des Cardstocks, weiße Metallic Watercolor aufgespritzt.

Here I inked the center of a piece of white cardstock very softly with Distress Oxide Cracked Pi
stacchio and Tumbled Glass and then flicked some white metallic watercolor onto the cardstock, also only to its center.


Der süße Bär hat Besuch von einem Schmetterling bekommen, der ganz vorsichtig auf seiner Pfote gelandet ist.
Ich habe den Bären - und alle anderen Motive auf der Karte - mit Copics coloriert und per Hand ausgeschnitten. Dann habe ich ihn mit 3D Tape auf die Karte geklebt. Hinter und rund um den Bären habe ich einige Blumen und Kleeblätter ins Gras geklebt. Die sind aus den Stempelsets Ernstine (Kleeblatt) und Fienchen mit Blume. Und im Himmel flattern noch einige Schmetterlinge mehr. Die sind aus dem Butterfly Kisses Stempelset von LawnFawn.
Und einen Text brauchte die Karte natürlich auch. Das Hej ist ebenfalls aus dem neuen Stempelset. Ich habe es mit türkisfarbener Tinte im Ombre-Look auf weißen Cardstock gestempelt, per Hand entlang der Stempellinien ausgeschnitten und ebenfalls mit 3D Tape aufgeklebt.
Und die beiden anderen Texte sind wieder mit Stempeln aus den Sets Kleine Worte und Kleine Worte 2 zusammengesetzt. Ich habe sie weiß auf schwarzen Cardstock embosst und wieder 3D Tape zum Aufkleben verwendet.

This cute bear got a visit from a butterfly, that landed very carefully on his paw.
I colored the bear - and all the other images - with Copics and cut them out by Hand. Then I adhered the bear with foam tape onto the background. Behind and around the bear I put some clovers and flowers into the grass. And in the sky a few more butterflies are fluttering around. Those are from the Butterfly Kisses stamp set by LawnFawn.
And of course my card needed a text. The hej is also part of the new set by Stampcorner. I stamped it with turquoise ink in an ombre look onto white cardstock, cut it out with my scissors close to the stamped ines and attached it to the card with foam tape.
The two other texts - 'hello spring' and 'so happy you're here' are white heat embossed onto black cardstock and used foam tape again to adhere them to the card.


Zuerst hatte ich vor, ein paar kleine klare Glitzersteine rund um die Motive zu kleben. Aber dann habe ich mich dagegen entschieden, denn das hätte einfach nicht zum klaren Stil der Karte gepasst. Also habe ich den Cardstock mit den Motiven nur schwarz gemattet und alles auf einen weißen Kartenrohling geklebt.

First I had planned to put a few small clear rhinestones down between the images. But then I decided against it, because that just wouldn't have worked with the clean look of this card. So I only matted the cardstock black and attached it to a white note card.

Samstag, 22. April 2023

Stampcorner Mai-Release Sneak #1

 
Hallo Ihr Lieben!
Wo rennt bitte die Zeit hin - es ist schon Ende April, und somit Zeit, Euch ein paar Sneaks auf das Mai-Release von Stampcorner zu geben. Damit starte ich heute mit dieser maritimen Karte. Da ich demnächst ein paar Tage mit Freundinnen nach Rostock fahre, ist das genau das richtige, um sich auf den "hohen Norden" einzustimmen.

Hello everyone!
Where is time going - it's nearly end of april already, and that means, it's time to share some sneaks of the may release by Stampcorner. I am starting with this maritime card. And since I will go on a girls trip to the german coast with a few friends soon, this is exactly the right way to prepare for the days at the sea.

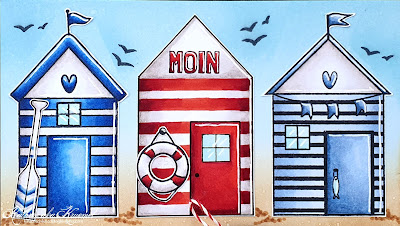
Diese drei Häuser kommen alle in einem Set. Und diese tollen Strandhäuser brauchen natürlich den passenden Hintergrund.
Ich habe hier ein Stück weißen Cardstock mit Distress Oxides eingefärbt - Tumbled Glass von der oberen Kante abwärts, Gathered Twigs von der unteren aufwärts. Etwas unterhalb der Mitte habe ich beide Farben ganz leicht ineinander gewischt. Dann habe ich, vor allem auf den braun gewischten Bereich, feine Wasserspritzer aufgetragen, um  ihm eine leiche Sand-Struktur zu verleihen.

These three houses all come in one set. And those beautiful beach houses of course need a background that fits the maritime theme.
Here I inked up a piece of white cardstock with Distress Oxide - Tumbled Glass from the upper edge downwards, Gathered Twigs from the bottom edge upwards. A bit under the middle of the cardstock I lightly blended both colors into each other. Then I flicked some very fine drops of water onto the cardstock, mainly onto the brown inked area to give it a sandy structure. 


Die Häuser habe ich alle auf weißen Cardstock gestempelt und mit Copics coloriert. Das rot colorierte Haus in der Mitte hat eigentlich breite Streifen, die in der Farbe gestempelt werden, die man eben zum Stempeln verwendet. Da ich zwar schwarze Outlines, aber keine schwarzen Streifen wollte, habe ich dieses Haus mit heller Tinte gestempelt, das Haus quasi no-line coloriert und später die Outlines des Hauses und der Tür mit einem schwarzen Fineliner wieder nachgemalt. Das Herz im Haus links, das Paddel, das Moin im Giebel des mittleren Hauses und auch der Schwimmring sind einzelne Motive aus dem Set, die ich teilweise direkt vor dem Colorieren aufgestempelt, teilweise nach dem Stempeln und Colorieren ausgeschnitten und aufgeklebt habe. Unter dem Schwimmring wird übrigens eigentlich ein Anker auf die Fassade gestempelt.
Anschließend habe ich die Häuser ausgeschnitten und auf den Hintergrund geklebt. Zwischen die Häuser habe ich mit braunen Copics ein paar kleine Punkte als Schatten aufgetupft. Und dann habe ich noch die Möwen aus dem Stempelset Matrosen-Freunde 1 zwischen den Häusern an den Himmel gestempelt. 

I stamped all the houses onto white cardstock and colored them with Copics. The red colored house has some wide stripes, that usually get stamped in the color that you use to stamp the outlines. Well, I wanted black outlines, but no black stripes, so I stamped this house with light ink, colored everything no-line and then re-drew the outlines with a black fineliner again. The heart in the house on the left, the paddle, the text on the red house and the life saver are individual images from the set. I partly stamped them directly onto the houses before coloring them, some I stamped individually, cut them out after I had colored them and then attached them to the houses. On the red house an anchor gets stamped, that I replaced with the life saver on my card.
Then I cut the houses out and adhered them to the background. With some brown Copics I added some fine dots as shadows between the houses. And then I stamped some flying sea birds onto the sky between the roofs.


Natürlich brauchte meine Karte auch einen Text. Im Set ist ein "Ein Tag am Meer" enthalten, das hat aber vom Platz her einfach nicht mehr auf meine Karte gepasst. Also habe ich stattdessen den "Das Meer hat gerufen" Text aus dem Set Auszeit mit weißem Embossingpulver auf blauen Cardstock embosst. Dann habe ich etwas rot-weißes Twine um den unteren Teil der Karte gewickelt, den Cardstockstreifen mit dem Text daran angebunden und als Deko noch einen Muschel-Charm mit festgebunden.
Ganz zum Schluss habe ich den Cardstock noch schwarz gemattet und auf einen weißen Kartenrohling geklebt. 

Of course my card needed a text. There's a "a day at the ocean" text included in this set, but that simply didn't fit onto my card design anymore. So instead I've white heat embossed a "the sea is calling" text onto a strip of blue cardstock. I wrapped some red and white twine around the bottom of my background, tied the text to it and added a little shell shaped charm. 
To finish the card, I just matted the cardstock black and adhered everything to a white note card.

Freitag, 21. April 2023

April-Challenge von Stampcorner

 
Hallo Ihr Lieben!
Wie immer am 20. eines Monats, gibt es auch im April eine neue Challenge von Stampcorner. Diesmal mit dem Thema "Lieblingsstempel von Stampcorner". 

Hello everyone!
As every 20th of the month there's a new Stampcorner challenge in april also. This time we've picked the theme of  "favorite Stampcorner stamp". 

Nun, ich habe, wie bei so ziemlich allen Herstellern nicht "das eine Lieblingsmotiv". Also habe ich ein wenig überlegt und dann diesen Stempel aus dem Set Freunde 2 gewählt. Die Freunde-Stempel finde ich generell herzallerliebst, und weil es mit meine ersten Stampcorner-Stempel waren, liegen sie mir irgendwie besonders am Herzen.
Für den Hintergrund habe ich hier ein Stück Watercolor Paper mit Watercolors in blau eingefärbt - recht dunkel oben und nach unten hin immer heller werdend. Nach dem Trocknen habe ich weiße Metallic Watercolor darüber gespritzt.
Aus dem Stempelset Regenbogen habe ich die beiden Sterne genommen und mit goldenem Embossingpulver grob in einer Reihe an den oberen Rand des Cardstocks gestempelt. Dann habe ich mit einem goldenen Gelstift Schnüre gemalt, an denen die Sterne aufgehängt sind.
An den unteren Rand des Cardstocks habe ich dann quer eine aus weißem Cardstock gestanzte Wolkenbordüre geklebt.

Well, as with nearly every stamp brand I own, I don't have "that one favorite stamp". So I wasn't sure what to use, but then went with this stamp from the Freunde 2 stamp set. I love all the images from the Freunde series, and since those were amongst the first stamp sets by Stampcorner I got, they are kind of extra close to my heart.
For the background I colored a piece of watercolor in blue using watercolors - quite dark at the top of the cardstock, getting lighter towards the bottom. After the cardstock had dried, I flicked some white Metallic Watercolor onto it.
I used the two stars from the Regenbogen stamp set and gold heat embossed a - rough - row of them a bit away from the top edge of the cardstock. Then I used a gold gelly roll to draw strings the stars are hung up with.
Along the bottom edge of the cardstock I adhered a cloud border, die cut from white cardstock. 


 Das süße Motiv mit Hasen und Elefant mit den Sternen habe ich mit Copics coloriert, ausgeschnitten und dann mit dünnem 3D Tape auf die Wolken geklebt.

The cute image with the bunny and elephant with the stars I colored with Copics, cut it out and then adhered it onto the clouds with thin foam tape.

Der Text ist aus dem Stempelset Träumen - ich fand, der passt perfekt zum Motiv. Ich habe ihn mit Versafine Clair Blue Belle zwischen die hängenden Sterne auf den Himmel gestempelt und dabei die Anordnung ein wenig verändert, so dass er zweizeilig ist und besser auf die Karte passt.

The text means "I'll get you the stars from the sky" - which basically means in german I'd do anything for you - and I thought it goes perfectly with the image. I stamped it with Versafine Clair Blue Belle between the stars in the sky. 


Zum Schluss habe ich Teile einer weiteren Wolkenbordüre, wieder mit 3D Tape, auf die erste Wolkenlage geklebt, den Cardstock schwarz gemattet und alles auf einem weißen Kartenrohling angebracht.

In the end I used foam tape again to adhere another layer of clouds on top of the first one, matted the cardstock black and attached everthing to a white note card. 

Donnerstag, 20. April 2023

Danke für Deine Hilfe

 
Hallo Ihr Lieben!
 Für meinen heutigen Post auf dem Stampcorner Blog habe ich nochmal den genialen Biber aus dem April-Release verwendet. Hier ziert er eine Karte, mit der sich für Heimwerker-Hilfe bedankt wird.

Hello everyone!
For my post over at the Stampcorner Blog today I used the great beaver from the april release again. Here I used it on a card, made to say thank you for some help during a house makeover.

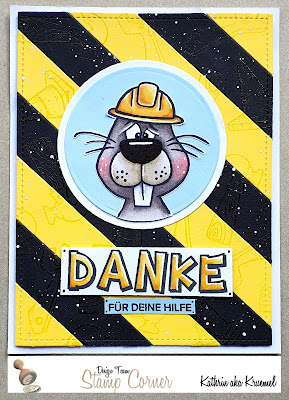
Für den Hintergrund habe ich die Simple Stripes Diagonal Stanze von LawnFawn aus gelbem und schwarzem Cardstock gestanzt und die Streifen abwechselnd aneinander gesetzt. So erinnert der Hintergrund an gelb-schwarzes Absperrband.
Ich habe dann einen Hammer-, einen Schraubenschlüssel- und einen Pylonenstempel von Magnolia genommen und mit klarem Embossingpulver überall auf den Hintergrund embosst. Das ist sehr dezent und kaum merklich, trotzdem wirkt der Hintergrund so interessanter. Anschließend habe ich noch Copic Opaque White darüber gespritzt.

For the background I've cut the Simple Stripes Diagonal die by LawnFawn from yellow and black cardstock, then put the background back together, alternating the cardstock colors. Now it looks like a yellow and black barrier tape.
Then I took a hammer, a wrench and a pylon stamp by Magnolia and clear heat embossed those all over the background. It's very subtle, but makes the background look so much more interesting. I also spritzed some Copic Opaque White over the background.


Den Biber habe ich wieder mit Copics coloriert - und ich bin mir immer nicht sicher, ob er wirklich so glücklich - oder in diesem Fall dankbar ist. Dann habe ich ihn ausgeschnitten und einen aus hellblauem Cardstock gestanzten Kreis geklebt. Den habe ich anschließend noch mit einem weißen Kreis hinterlegt. Die weißen Highlights habe ich mit einem Gelstift gemacht.
Für den Text habe ich das große Danke aus dem Set Danke schwarz auf weißen Cardstock gestempelt und mit Copics gelb gefüllt. Der kleinere Text darunter ist aus dem Stempelset Kleine Worte. Ich habe ihn schwarz auf hellblauen Cardstock gestempelt. Dann habe ich beide Texte untereinander unter dem Motiv aufgeklebt und mit einem schwarzen Fineliner jeweils kleine Punkte als Nägel an die Ecken der Cardstockstücke gemalt. 

I colored the beaver with Copics again - and I am not sure, if he's really so happy - or thankful - as the text on the card suggests. I cut him out with my scissors and attached him to a circle, cut from light blue cardstock. Then I glued a slightly larger kreis cut from white cardstock behind the blue circle. For the highlights on the circle I used a white gel pen.
The text means "thank you for your help". I stamped the large thank you with black ink onto white cardstock and filled the letters with yellow Copics. The smaller text underneath I stamped onto light blue cardstock and then attached both texts under the image to the background. I used a black fineliner to add a small dot to the corner of each cardstock rectangle, indicating some nails there.


Und hier habe ich versucht, für Euch die klar embossten Werkzeuge nochmal besser einzufangen.
Zum Schluss habe ich den Cardstock auf einen weißen Kartenrohling geklebt.

Here I tried to catch the clear embossed tools on the background better.
To finish this card I just adhered the background to a white note card.

Mittwoch, 19. April 2023

Create a Smile April Moodboard Challenge

 
Hallo Ihr Lieben!
Die neue Create a Smile Challenge ist gestartet - und wie Ihr wohl schon erwartet habt, gibt es diesmal wieder ein neues Moodboard für Euch:

Hello everyone!
The new Create a Smile Challenge has started - and as you might already have guessed we have a new moodboard for this challenge:


Die Farbkombi aus Koralle und Grün finde ich klasse und die tropischen Motive, die auf einigen der Bildern zu sehen sind, haben mich sofort zu dieser Karte inspiriert:

I love the color combo of green and coral and those tropical elements, that are shown in some of the pictures, immediately inspired me to make this card:


Für den Hintergrund habe ich ein Stück zart-koralle farbenen Cardstocks genommen und mit der Monstera Stencil sowie Distress Ink Cracked Pistacchio die Blätter aufgewischt. Dann habe ich noch Rustic Wilderness verwendet, um die Blätter an jeweils einer Seite etwas abzudunkeln.
Mit einem weißen Gelstift habe ich die Linien auf die Blätter, mit einem schwarzen Fineliner eine Art Schatten auf den Cardstock gemalt und anschließend weiße Metallic Watercolor über alles gespritzt.

For the background I used a piece of light coral cardstock and added the leaves to it using the Monstera stencil and Distress Ink Cracked Pistacchio. Then I added some Rustic Wilderness to one side of each leave to give it some dimension. 
With a white gel pen I added the detail, with a black fineliner I drew some kind of shadow to one side of each leave, then spritzed white metallic watercolor over everything.


Der Cocktail auf einem der Bilder sah so lecker aus, den musste ich auf meine Karte bringen!
Ich habe das Glas aus dem Stempelset Auf Uns zweimal mit Distress Embossing Glaze Salvaged Patina auf Folie embosst, das selbe habe ich - nur einmal - mit den Eiswürfeln gemacht. Der Strohhalm ist mit Embossing Glaze Saltwater Taffy auf pinkfarbenes Vellum embosst, die Zitronenscheibe und -stücke habe ich mit heller Tinte auf weißen Cardstock gestempelt und anschließend mit Copics in No-Line Technik coloriert. Genauso habe ich auch die Blumen aus dem Stempelset Dicke Freunde coloriert. Ich finde, sie passen perfekt zu einem weiteren der Bilder auf dem Moodboard.
Für den Cocktail habe ich dann zwei Lagen Distress Embossing Glaze in Picked Raspberry - unten - sowie Saltwater Taffy auf Vellum aufgetragen und in der Form der inneren Linien des Glases ausgeschnitten. 
Zu oberst befindet sich eine Lage Folie mit aufembosstem Glas, dann die Lage Vellum. Dahinter habe ich dann den Strohhalm, die Eiswürfel und zwei Limonenstücke gesetzt und das zweite Glas von hinten dagegen geklebt. Zuvor habe ich noch die Zitronenscheibe oben an den Glasrand geklebt.
Mit zwei Lagen klar trocknendem Kleber und Distress Rock Candy Glitter habe ich dem Glas dann noch einen Zuckerrand verpasst.
Aus weißem Cardstock habe ich eine der Rounded Corners Stanzen gestanzt und als Hintergrund für den Cocktail verwendet - der Hintergrund mit den Blättern wäre durch das Glas zu sehr sichtbar gewesen. Oben auf den weißen Cardstock habe ich ein "die Fiesta kann starten" aus dem Set Hut Ab abgestempelt. Darunter habe ich zuerst die ebenfalls ausgeschnittenen Blumen und dann das Cocktailglas aufgeklebt. Unten an das Cocktailglas habe ich ein weiteres Limonenstück gesetzt.
Ebenfalls aus dem Stempelset Auf Uns ist der kleine Spruch, den ich weiß auf schwarzen Cardstock embosst habe.

The cocktail on one of the pictures on the moodboard looked so yummy, I had to put it on my card!
I embossed the glass from the set Auf Uns twice onto acetate with Distress Embossing Glaze Salvaged Patina and did the same with the ice cubes - these I stamped just once. The straw is embossed onto pink vellum with Embossing Glaze Saltwater Taffy, the lemon slice and pieces I stamped with light ink onto white cardstock and then colored them no-line with my Copics. I did the same with the flowers from the Best Bugs stamp set and think, they go perfectly with another pic from the moodboard.
For the cocktail I embossed two layers of Distress Embossing Glaze Picked Raspberry - at the bottom - and Saltwater Taffy onto vellum and then cut it out along the inner lines of the glass.
On top there's one of the embossed glasses, then I added the layer of vellum behind it. Behind that I placed the straw, the ice cubes and two lime pieces and then put the second glass behind everything. Before I put the lime slice to the brim of the glass. 
Using clear drying liquid glue and Distress Glitter Rock Candy I added a sugar coating to the brim of the glass.
From white cardstock I die cut one of the Rounded Corner dies and used that as the backdrop for my cocktail - the background with the leaves would have been visible through the glass. Onto the top of the white cardstock I stamped a "get the fiesta started" from the Llamazing stamp set. Under it I first attached the cut out flowers to the cardstock and then the cocktail on top. To the bottom right I added another piece of lime.
Also from the Auf Uns stamp set is the little subtext, that I white heat embossed onto black cardstock.


Zum Aufkleben der Dekoelemente auf den weißen Cardstock habe ich teilweise 3D Tape verwendet, dann habe ich auch den weißen Cardstock mit 3D Tape auf den Blätterhintergrund geklebt.
Zum Schluss habe ich einige rose-goldene Pailetten um den Cocktail verteilt und alles auf einen weißen Kartenrohling geklebt.

To attach the elements to the white cardstock I partly used foam tape, then I used it again to adhere the white cardstock to the monstera background.
To finish the card, I added a few rose gold sequins around the cocktail and attached everything to a white note card.