Posts mit dem Label sympathy werden angezeigt. Alle Posts anzeigen

Donnerstag, 19. März 2026

Simon Says Stamp IG Challenge im März

 
Hallo Ihr Lieben!
Das Thema der SimonSaysStamp IG Challenge im März ist "monochrom". Nun mag es zwar fast ein wenig offensichtlich sein, da eine Trauerkarte zu machen, denn schwarz/weiß bzw. Grautöne ist ja meist das erste, das einem da in den Sinn kommt. Aber nach einem Todesfall in der Familie fühlte es sich für mich richtig an. 
 
Hello everyone!
The theme of the march IG challenge by SimonSaysStamp is "monochrome". It may be a bit obvious to make a sympathy card as the entry,  because black and white or shades of grey is the first thing that might come to mind. But after the death of a familiy member it just felt right to me.
 
Ich habe hier ein Stück  hellgrauen Cardstocks für den Hintergrund verwendet und darauf dann mit hellgrauer Tinte einen Trauertext von Efco  aufgestempelt. Ich habe ihn zweimal nebeneinander gestempelt, die Naht wird von der Deko verdeckt.
Dann habe ich schwarze Acrylfarbe aufgespritzt. 
 
Here I used a piece of light grey cardstock for the background and stamped a sympathy text onto it using light grey ink. I stamped it two times next to each other, the seam is covered by the decorations. 
Then I added fine splatters of black acrylic paint.
 

Die Deko habe ich mittig auf den Hintergrund geklebt. Ich glaube, es war letztes Jahr, als Kelly Taylor eine Osterkarte gemacht hat, für die sie aus den Holzteilen des Wood Frame Builder Sets von HoneyBeeStamps ein Kreuz zusammengesetzt hat. Die Idee hat mir so gut gefallen, dass ich sie hier nachgemacht habe. Ich habe die Holzteile aus grauem Cardstock gestanzt und mit Ohuhu Markern schattiert. Dann habe ich einen weißen Polychromo flach über den Cardstock gerieben, so dass die Maserung besser hervorkommt, und alles zu einem Kreuz zusammengesetzt.
Hinter das Kreuz habe ich einen runden Rahmen aus schwarzem Cardstock gesetzt, gestanzt aus schwarzem Cardstock mit einer der Stitched Circle Frames von Create a Smile.
Außerdem habe ich ein schwarzes Band über das Kreuz gehängt. Das habe ich aus - etwas gekürzten - Teilen des Vorhangs aus dem Take the Stage Set von MFT aus dunkelgrauem Cardstock gestanzt und ebenfalls mit Ohuhus schattiert. 
 
I attached the decorations centered onto the background. I think it was last year, that Kelly Taylor made an easter card where she used  the wooden pieces from Wooden Frame Builder by HoneyBeeStamps to put together a cross. I liked that idea so much that I copied it formy card. I cut the wooden pieces from grey cardstock and shaded them with Ohuhu markers. Then I used a white Polychromo and dragged it flat over the cardstock to bring out the pattern more and glued everything together to form the cross.
Behind the cross I put a round frame, cut from black cardstock using one of the Stitched Circle Frames by Create a Smile. 
I also draped some black "fabric" over the cross. I created that from some - a bit shortened - pieces from the curtains from Take the Stage by MFT, cutting them from dark grey carstock and shading them with Ohuhu again.
 

 Das Kreuz habe ich dann mit Lilien dekoriert, die ich in echt nicht wirklich mag. Nicht wegen Ihrer Form, sondern wegen des Geruchs. Trotzdem sind sie, neben Callas, die absoluten Trauerblumen für mich. 
Hier habe ich den Flower Lilly Stempel von WhimsyStamps benutzt und die Blüten nach dem Colorieren einzeln ausgeschnitten. Ich habe  sie  mit grauer Tinte abgestempelt, das lässt die Motive weicher erscheinen, und sie dann fast No-Line mit Ohuhus coloriert. 
Der Text darunter ist aus dem With Sympathy Stempelset von AveryElle. Mir  ist klar, dass ich hier deutschen Text im Hintergrund und englisch für  den eigentlichen Text gemischt habe. Aber mir macht das nichts, und so kleine deutsche Trauertexte fehlen mir. Die finde ich alle zu groß. Ich habe den Text hier weiß auf schwarzen Cardstock embosst. 
 
I decorated the cross with lilies, that I don't really like in real life. Not because of their look but their smell. And still, besides Calla they are the perfect sympathy flowers to me.
Here I used the Flower Lilly stamp by WhimsyStamps and cut the flowers out individually after coloring them. I stamped them with grey ink, that makes the images softer, and then colored them with Ohuhu  markers. They nearly look like No-Line coloring.
The text underneath is from With Sympathy by AveryElle. I know that I mixed a german text in the background with an english main text. But it doesn't bother me, and I am really  missing small  german sympathy texts like that. These are all too large  for my taste. I white heat embossed the text onto black cardstock.
 

 Ich habe das Kreuz mit 3D  Tape auf den Hintergrund geklebt und dann auch die Blumen damit auf  dem Kreuz befestigt. Als Deko habe ich dann noch einige schwarze Perlen auf der Karte verteilt und alles auf einen weißen Kartenrohling geklebt.
 
I adhered the cross with foam tape to the background and then also backed the flowers with foam tape. I added some black pearls as decoration and glued the card panel to a white note card.
 

Samstag, 11. Mai 2024

Vatertagskarte mal anders

 
Hallo Ihr Lieben!
Mein Vater ist vor knapp zehn Jahren gestorben und natürlich fehlt er mir, meist in kleinen Momenten, aber an Tagen wie seinem Geburtstag, Weihnachten und Vatertag merkt man es nochmal anders. Eine Vatertagskarte kann ich ihm nicht geben. Aber ich habe diese Karte gewerkelt und dabei an ihn und die vielen schönen Momente mit ihm gedacht. Und das war mir eigentlich das wichtigste. Ich kann ihm die Karte nicht geben und werde sie mir bestimmt auch nicht irgendwo aufstellen oder so, aber kann ich sie zumindest noch als Trauerkarte weiterverwenden.

Hello everyone!
My father died nearly 10 years ago and of course I miss him, mostly in little everday moments. But on special occasions like his birthday, christmas and father's day I miss him especially. I can't give him a father's day card. But I made this one instead, thinking of him and all the happy moments with him all the time while making it. That was the most important thing to me.  I can't give him the card and for sure won't put it on display somewhere in my home but I can use it as a sympathy card instead.

Vom Design her ist die Karte eher einfach - nur diese eine große Rose mit Anhänger auf einem Halo-Hintergrund.
Ich habe hier ein Stück weißen Cardstocks mit Distress Oxide Salvaged Patina, Broken China, Uncharted Mariner und Black Soot gewischt und dabei die hellste Stelle mittig in der oberen Hälfte des Cardstocks platziert. Auf die dunkleren Bereiche habe ich dann Distress Mica Spray Stain Juniper Berry aufgespritzt. 
Und weil der Hintergrund irgendwie noch zu fad aussah, habe ich den Dotted Starburst Hintergrund von Altenew in den Cardstock gestanzt.

The design of this card is kind of simple - just this large rose with a text banner on a halo background.
Here I inked a piece of white cardstock with Distress Oxide Salvaged Patina, Broken China, Uncharted Mariner and Black Soot, placing the lightest area about in the center of the top half of the cardstock. Onto the darker areas I splattered some Distress Mica Spray Stain Juniper Berry. 
The background still looked a bit plain so die cut the Dotted Starburst background by Altenew into it.


Die Rose ist mit dem Lovely Layers Rose Stanzenset von HoneyBee gemacht. Ich habe die einzelnen Teile aus weißem, hellgrauem, dunkelgrauem und schwarzem Cardstock gestanzt, je nachdem, wie weit vorne sie sich befinden. Dann habe ich alles mit Distress Oxide Black Soot bzw. die schwarze Lage mit ein wenig weißer Pigmentfarbe gewischt und einige Highlights mit einem weißen Gelstift angebracht. Außerdem habe ich die geprägten Details - sowie einige zusätzliche Linien - mit einem silbernen Glitter-Gelstift aufgemalt.
Die Rose habe ich dann jeweils nur im unteren Bereich aufeinandergeklebt, so konnte ich die Ränder der Cardstocklagen ein wenig nach oben biegen und der Rose so noch mehr Dimensionalität geben. Nun, das hätte ich vielleicht vor dem Zusammenkleben machen sollen... Es ging trotzdem, nur an den ganz feinen Spitzen habe ich beim "Kräuseln" mit dem Fingernagel an zwei Stellen ein kleines Stück abgerissen. Die Teile konnte ich aber einfach wieder aufkleben und es fällt gar nicht auf. 

The rose is made with the Lovely Layers Rose die set by HoneyBee. I die cut the individual layers from white, light grey, dark grey and black cardstock, depending on how far behind they are once the rose is put together. Then I shaded the pieces with Distress Oxide Black Soot - only on the black layers I used some white pigment ink along the edges - and added a few highlights with a white gel pen. I also traced the debossed details with a silver glitter gel pen and added a few additional ones.
Then I glued the flower head together only in the bottom are, this way I was able to bend the top edges of the layers a bit upwards to give the flower even more dimension. Well, it would have been easier to do that before glueing the layers together.... It still worked, only at the very thin tips I ripped off the cardstock in two spots while curling the paper with my fingernail. But I was able to simply glue those tiny tips back in place.


Stiel und Blätter der Rose habe ich auf dieselbe Art gemacht und das große Blatt links mit einer zusätzlichen Lage Cardstock hinterlegt.
An den Stiel habe ich dann ein Banner gebunden. Das habe ich einmal aus weißem, einmal aus schwarzem Cardstock gestanzt, beide Teile versetzt aufeinander geklebt und auf das weiße Banner den Text aus einem Stempelset von Kulricke mit schwarzer Tinte aufgestempelt. Dann habe ich es mit etwas türkisfarbenem Garn angebunden.

I did the stem and leaves of the rose the same way, adding one additional layer behind the large leave on the left.
I tied a banner to the stem. I die cut it once from white and once from black cardstock and glued the pieces together a bit offset. Then I stamped a "in my thoughts I am with you" text with black ink onto the white banner and tied it to the stem with some turquoise floss.


Bevor ich das Banner angebunden habe, habe ich die Rose auf den Hintergrund geklebt. Hinter die Spitzen der beiden größeren Blätter sowie oben am Blütenansatz habe ich dabei ein wenig dünnes 3D Tape gesetzt. Dann habe ich alles mit weißer Acrylfarbe bespritzt und die Farbe diesmal hauptsächlich auf der Blüte und dem hellen Bereich der Karte verteilt.
Als kleine Deko habe ich noch drei weiße Herzen aufgeklebt, dann den Cardstock schwarz gemattet und alles auf einen weißen Kartenrohling geklebt.

Before I tied the banner to the stem I adhered the rose to the background. I put small pieces of thin foam tape behind the tips of the two larger leaves and the top of the stem. Then I splattered some white acrylic paint onto the card, this time applying the color mostly to the flower and the light areas of the card.
I added three white hearts as decoration, then matted the card panel black and adhered it to a white card base.
 

Sonntag, 24. März 2024

Trauerkarte mal anders


 Hallo Ihr Lieben!
Jetzt hätte ich doch fast die Technique Throwback Thursday Challenge im März verpasst. Zum Glück fiel sie mir gestern ein - und ich habe gleich eine Karte dafür gemacht. Ich war eh gerade auf der Suche nach einer Kartenidee. Diesen Monat dreht sich das Video mit der Aufgabe darum, Cardstock mit Stanzteilen zu prägen. 

Hello everyone!
I nearly missed this month's Technique Throwback Thursday challenge! Luckily I remembered it yesterday - and sat down right away to make a card. I was looking for a card idea anyway. This month's video with the theme is about dry embossing with die cuts.

Ich habe mir gerade einige der Stanzen aus der Nordic-Reihe von Poppystamps gegönnt und die lagen noch auf meinem Tisch (ich mache das gerne mit neuen Sachen um sicherzugehen, dass sei beim sofortigen Wegräumen nicht in Vergessenheit geraten). Die Häschen hätten sich jetzt vor Ostern natürlich angeboten, da fehlte mir aber im ersten Moment die zündende Idee für den Hintergrund und wie ich die Technik dort einbauen könnte. Aber die Vögel haben mich dann inspiriert. Und so ist eine etwas andere Trauer-Karte entstanden - auch wenn sie natürlich eigentlich für die Weihnachtszeit designed sind. 
Für meinen "Embossingfolder" habe ich Wolken ausgestanzt - ein wilder Mix von verschiedenen Firmen. Die habe ich dann in der Größe des schwarzen Cardstocks, denn ich embossen wollte, arrangiert. Und weil mir die Stellen zwischen den Wolken zu leer waren, habe ich auch noch kleine Sternchen ausgestanzt und dazwischen gesetzt. Damit habe ich meinen Cardstock dann geprägt. Und auch wenn das Ergebnis nicht ganz an einen richtigen Embossingfolder rankommt, war ich doch sehr überrascht von der Tiefe und den Details der Prägung. 
Dann habe ich silber-weißliche Metallic Watercolor aufgespritzt.

I just recieved my order with some of the dies from the Nordic series by Poppystamps and those were still on my table (I like to leave them there for a bit of time to make sure that I don't forget about them). The bunnies would have been perfect that close to easter. But I didn't get an idea for the background and how to use the technique with those images. But the birds inspired me and so I made this kind of different sympathy card - even if those birds are actually designed for christmas time.
For my "embossing folder" I die cut clouds - a wild mix of different brands - and arranged them on the black cardstock I wanted to emboss. And because the spaces between the clouds looked too empty I die cut some small stars and used them to fill the cardstock a bit more. Then I used this arrangement to dry emboss my cardstock. The result isn't as crisp as a real embossing folder, but I was really surprised about the depth and the details the embossing showed.
I then added some splatters with a silver-white metallic watercolor.


Blau ist ja eine sehr ruhige Farbe und ich fand, die passt gut zu einer Trauerkarte. Wahrscheinlich war ich auch durch das Beispielbild der Verpackung inspiriert. Also habe ich die Teile eines der Vögel aus vier verschiedenen Tönen blauen Cardstocks gestanzt, für die Schattenlage habe ich weiß benutzt. Die welligen Enden der Details habe ich leicht nach oben gebogen und den Vogel mit dünnem 3D Tape auf die Schattenlage geklebt. 

Blue is a very quiet color and so I thought, it's perfect for a sympathy card. Most likely I was also inspired by the sample shown on the packaging. So I used four different shades of blue to die cut the bird layers from, the shadow layer I cut from white cardstock. I've bent up the edges of the detail layers a bit and adhered the bird with thin foam tape to the shadow layer.


Unter dem Vogel habe ich ein aus gestanzten Buchstaben geschriebenes Peace aufgeklebt und dabei Groß- und Kleinbuchstaben gemischt. Die Buchstaben sind mit den Tall Skinny Alphabet Stanzen von Scrapbook.com gemacht. Ich habe jeweils drei weiße Stanzteile zusammengeklebt und obenauf einen Buchstaben aus matt-silbernem Metallic-Cardstock geklebt.
Für die kleinen Texte darunter habe ich das With Sympathy Stempelset von AveryElle benutzt und die Texte mit schwarzer Tinte auf mittelblauen Cardstock, den ich auch bereits im Vogel benutzt hatte, gestempelt.

Under the bird I wrote a "peace", made from die cut letters and mixing upper and lower case letters. I made them with the Tall Skinny Alphabet dies by Scrapbook.com and stacked three white die cuts for each letter, then put a letter cut from matte silver metallic cardstock on top.
For the smaller subtexts underneath I used the With Sympathy set by AveryElle and stamped them with black ink onto a midtone blue cardstock that I had also used on the bird.


Den Vogel und die gestempelten Texte  habe ich dann wieder mit dünnem 3D Tape auf den Hintergrund geklebt.
Auch wenn es eine Trauerkarte ist, finde ich, dass ein wenig Glitzer nicht schadet. Also habe ich noch ein paar schwarz-blau irisierende Perlen um den Vogel verteilt und dann alles auf einen weißen Kartenrohling geklebt.

I used thin foam tape again to adhere the bird and the stamped texts to the background.
Even with this being a sympathy card I've decided that a bit of bling doesn't hurt. So I put a few black and blue iridescent pearls around the bird, then attached my card panel to a white note card.

Samstag, 20. August 2022

Eine Trauerkarte

 
Hallo Ihr Lieben!
Heute habe ich eine Trauerkarte zu zeigen. Die macht wohl keiner gern, aber manchmal muss es sein. Ich tu mir auch schwer, zu sagen, dass mir eine Trauerkarte gefällt - einfach weil ich dem Anlass geschuldet unpassend finde. 

Hello everyone!
Today I have a sympathy card to share. I guess no one of us wants to make these cards, but sometimes we just have to. With sympathy cards I also have a hard time to say, that I like, how a card turned out - just because it was made for such a sad reason.

Hier habe ich auf ein Stück weißen Cardstock ganz zart Wolken aufgewischt. Dafür habe ich eine Wolkenstencil von MFT und Distress Ink Weathered Wood verwendet. Dann habe ich Distress Oxide Spray in Black Soot mit einem Pinsel über den Cardstock gespritzt.

Here in added some very soft clouds to a piece of white cardstock. I used a cloud stencil by MFT and Distress Ink Weathered Wood for them. Then I used a brush to spritz some Black Soot Distress Oxide Spray over the cardstock.


Die Blumen habe ich mit dem Airbrushed Flowers Stempelset von Altenew gemacht. Die Blätter sind dabei mit einem leicht ins Grün gehende Blau und graublau gestempelt, für die Blüten habe ich ein helleres Blau und Graublau verwendet. Die Blumenmitten sind in Grautönen gehalten.
Ich habe die Blumen und Blätter per Hand ausgeschnitten und teilweise mit 3D Tape auf den Wolkenhintergrund geklebt.
Irgendwie war mir die Karte zu leer. Deswegen habe ich ich mit mattblauer Folie noch ein Hexagon von PinkFresh auf schwarzen Cardstock foliert und nah an der Folie ausgeschnitten, so dass ich einen Rahmen erhalten habe. Den habe ich dann hinter die Blumen gesetzt.
Für den Text habe ich das Wort Beileid mit einem Stanzenset von CraftEmotions mehrfach aus schwarzem Cardstock gestanzt und aufeinandergesetzt auf die Karte geklebt. Für den Rest des Textes habe ich einen Teil eines Stempels von Kulricke weiß auf schwarzen Cardstock embosst und den Cardstock über dem Wort Beileid aufgeklebt.

The flowers are made with the Airbrushed Flowers stamp set by Altenew. I used a slightly green-ish blue and a grey-blue ink for the leaves, for the flowers I used a light blue and the same grey-blue. For the flower centers I went with different tones of grey.
I've cut out the flowers and leaves by hand and glued them onto the cloud background, using foam tape for a few parts.
I felt like the card was too plain. So I used some matte light blue foil to hotfoil one of the hexagons by PinkFresh onto black cardstock, then cut it out close to the foiled edges to end up with a hexagon shaped frame. I put that behind the flowers.
For the text I've die cut the word Beileid several times from black cardstock and stacked them on one of the flowers. The rest of the text - that means "with sympathy" - is white heat embossed onto black cardstock and glued above the die cut word.


Die weißen Bereiche der Blüten habe ich noch mit einem klaren Nuvo Aqua Shimmer Pen beglittert - man kann das auf dem Bild leider nicht so toll sehen. Dafür sieht man die Folierung hier besser.
Als Deko habe ich noch ein paar schwarze Pailetten augeklebt, dann den Cardstock schwarz gemattet und auf einen weißen Kartenrohling geklebt.

I used a clear Nuvo Aqua Shimmer Pen to add some shine to the white areas of the flowers - but that's really hard to catch on camera. But you can see the foiled hexagon better on this picture.
To finish the card I added a few black sequins, matted the cardstock black and glued it onto a white note card.

Mittwoch, 16. Februar 2022

Aufrichtige Anteilnahme

 
Hallo Ihr Lieben!
Es gibt Karten, die möchte man nicht machen müssen, und trotzdem sind es absolute Herzensangelegenheiten, weil einem die Menschen, für die sie gemacht werden, am Herzen liegen. Diese Karte ist so ein Beispiel. Der Mann einer Freundin ist ganz überraschend und viel zu früh gestorben, für sie und ihre Kinder habe ich diese Karte gemacht.

Hello everyone!
There are cards you don't want to have to make, but still they mean a lot to you, because the people you make them for mean a lot. This is one of those cards. A friend's husband died unexpectedly and way too early and I made this card for her and her children.

Der Miss your Smile Stempel und passende Stencil schienen mir perfekt für das, was mir vorschwebte. Eigentlich hatte ich die Karte etwas anders geplant, aber ich wollte von dem Motiv nicht so viel wegschneiden und so habe ich meine Idee über den Haufen geworfen und stattdessen eine Slimline Card gemacht.
Die Kartenbasis und auch den Aufleger, den ich dann schwarz gemattet habe, habe ich aus Perlmutt-Cardstock gemacht. Der schimmert schön edel und ist trotzdem dezent.
Das Blumenmotiv habe ich mit silberfarbenem Embossingpulver aufembosst und dann die Blumen mit der Stencil in vier verschiedenen Grautönen gewischt. Den Schimmer sieht man durch die Tinte trotzdem noch. 
Dann habe ich schwarze Pearl-Watercolor über den Cardstock gespritzt.

The Miss your Smile stamp and matching stencil seemed perfect for what I had in mind. I had planned the card a bit different but didn't want to cut away too much of the image, so I changed my idea and made a slimline card.
The card base and the decorated piece, that I matted black later, are cut from pearlescent cardstock. It has a nice but subtle shimmer, which I liked a lot for this card.
I silver heat embossed the image onto the cardstock and then used the matching stencil set and four different shades of grey to fill it with color. You still see the shimmer through the ink.
Then I spritzed some black pearl watercolor over the cardstock.


Für den Text habe ich das Wort Anteilnahme mit einer Stanze aus dem Set Beileid von CraftEmotions viermal aus schwarzem Cardstock gestanzt, aufeinander- und auf die Karte geklebt.
Darunter habe ich ein kleines Stück des Perlmutt-Cardstocks gesetzt, auf das ich die Wort in aufrichtigter gestempelt habe. Dafür habe ich einen Teil eines Stempels von Kulricke benutzt. Dann habe ich den Streifen ebenfalls schwarz gemattet.

For the text I've die cut the word sympathy four times from black cardstock, stacked them and glued the word onto the card.
Under it I've put a small strip of the pearlescent cardstock, onto which I've stamped the word sincere. I matted this strip of cardstock black again.


Auf diesem Bild kann man den Schimmer ein wenig besser erahnen - der Cardstock ist wirklich schwer zu fotografieren.
Als Deko habe ich ein paar silberne Halbperlen auf dem Motiv verteilt, dann habe ich den dekorierten und gematteten Kartenaufleger mit 3D Tape auf die Kartenbasis geklebt.

On this picture you get a better idea of the shimmer of this cardstock - it's really hard to take a picture of.
As decoration I glued a few silver pearl onto the image, then attached the decorated and black matted piece onto the card base using foam tape.

Dienstag, 25. August 2020

Our Sympathy


Hallo Ihr Lieben!
Wir alle basteln ja am liebsten fröhliche Karten, aber manchmal muss es auch mal eine Trauerkarte sein. Mit dieser Kartenart im Hinterkopf habe ich mir den Lavish Lillies Stempel von MFT gekauft und damit heute eine Karte gemacht, die ich auf dem Stamping-Fairies Blog zeige. Und auch wenn die Lilien für eine Trauerkarte vielleicht traditionell sind, beim Rest der Karte bin ich dann doch etwas andere Wege gegangen.

Hello everyone!
We all love to make happy, colorful cards. But every now and then we have to make a sympathy card. With those in mind I've ordered the Lavish Lillies stamp by MFT and made this card with it, that I'm sharing over at the Stamping-Fairies Blog today. And even if those lillies might be traditionell for sympathy cards, with the rest of the card I went a bit different.


Im Hintergrund habe ich den Floating Petals Hintergrundstempel mit silbernem Embossingpulver auf schwarzen Cardstock embosst. Dann habe ich mit Polychromos die Blätter ganz grob grün eingefärbt. Ich wollte es einfach nicht nur schwarz und silber. Auf dem Foto oben könnt Ihr den Glanz des silbernen Embossinpulvers besser sehen, der der Karte irgendwie einen edleren Look gibt.

In the background I've used the Floating Petals background stamp by MFT and silver heat embossed it onto black cardstock. Then I've brought out my polychromos and roughly colored the petals with greens. I simply didn't want to go with black and silver only there. On the picture above you can see the shine of the silver embossing powder, that adds a elegant touch to the card.


Auch die Lilien sind mit silbernem Embossingpulver auf schwarzen Cardstock embosst, mit Polychromos coloriert - wobei ich hier wirklich ganz einfach gearbeitet habe - und anschließend ausgeschnitten. Da mir hier zu wenig Kontrast zum Hintergrund war, habe ich einen Streifen Vellum auf den Hintergrund geklebt und darauf dann die ausgeschnitten Lilien mit 3D Tape aufgeklebt. Als Deko kamen ein paar klare Glitzersteine um die Blumen herum.

Also the lillies are silver heat embossed onto black cardstock, colored with Polychromos - I really just did a quite rough job here - and then cut out.  Since I thought there wasn't enough contrast between the background and the flowers I've glued a strip of Vellum onto the background and then glued the lillies on top with dimensionals. For decorations I've added a few clear rhinestones.


Auch der Text ist silber embosst. Er ist aus einem Set von Avery Elle. Den schwarzen Cardstock habe ich mit silbernem Spiegelkarton hinterlegt und so auf die Karte geklebt, dass eines der Blätter der Lilie darauf aufliegt.

Also the text ist silver heat embossed. It's from a stamp set by Avery Elle. I've matted the black cardstock with silver mirror cardstock and glued it onto the card, laying one of the lilly leaves on top of it.


Mittwoch, 11. Juli 2018

Dies und Das

In diesem Post möchte ich Euch verschiedene Karte zeigen, die ich mit Stempeln von Scrapbook Forver gemacht habe. Es ist wirklich ein absolut bunter Mix an Themen!

In this post I want to share some cards I made using stamps by Scrapbook Forever - and it's really a wild mix of different themes!


Karte Nr. 1 war eine Geburtstagskarte für einen Mann. Was man mit Silvester-Stempeln nicht alles machen kann.... Auf den schwarzen Cardstock im Hintergrund habe ich mit glitzerndem Embossingpulver explodierende Raketen aufgestempelt. Darauf kam ein Rechteck, auf das ich den Geburtstagshintergrund gestempelt habe.

Card No. 1 was a birthday card for a man. Those New Year's Eve stamps are good for quite a bunch of occasions... Onto the black cardstock I used in the background I've stamped exploding fire works and heat embossed it with glittering embossing powder. Then I've added a rectangle on which I've stamped a birthay texts background.


Die Sektgläser sind mit weißem Pulver auf Vellum embosst. Unter den quasi ausgefüllten Stellen konnte ich gut das 3D Tape verstecken, das ich zum Aufkleben benutzt habe. Quer darüber kam dann noch ein aus silbernem Glitzercardstock ausgestanztes Cheers.

The glasses are heat embossed onto Vellum using white embossing powder. Under those filled in areas I was able to hide the dimensional tape that I used to glue the glasses onto my card. Across I've added a die cut cheers, cut from silver mirror cardstock.


Auch Karte Nr. 2 war eine Geburtstagskarte. Hier habe ich den Hintergrund mit Brushos erstellt und viele kleine Worte, die diverse Wünsche für das neue Lebensjahr darstellen, aufgestempelt.

Also card No. 2 was a birthay card. Here I've used Brushos for the background and added a bunch of different small words that are whishes for the next year to it.


Als Motiv kam die tolle Sonnenblume zum Einsatz Ich habe sie mehrfach abgestempelt, die verschiedenen Blütenblattlagen ausgeschnitten und 3D-mäßig aufeinander gesetzt. So wurde die Blume schön plastisch.

As the image I've used this beautiful sun flower. I've stamped it different times, cut out the different layers of the flower and then used dimensionals to glue it together. That added a wonderful dimension to my card.


Dieses süße Schweinchen zierte Karte Nr. 3. Sofort als ich es sah, wusste ich, dass es in einer Schlammpfütze sitzen muss!
Den Hintergrund habe ich mit Distress Inks und verschiedenen Stanzen kreiert. 

This cute piggy is the image I used for card No.3. As soon as I saw it I knew it needed to sit in a puddle!
The background was made using Distress Ink and different dies.


Das Schweinchen ist mit Copics coloriert. Die Flecken habe ich einfach beim Colorieren dazugemalt, die Pfütze ist handgezeichnet.

The pig was colored in with Copics. I've added the spots while coloring it in, the puddle was handdrawn.

Und auch hierzu gibt es ein Video, denn das Schweinchen kann noch mehr:

And also for this card I made a video because this piggy can do more:


Na, wer da nicht mit ihm lachen muss, der ist ein ordentlicher Miesepeter!

Who doesn't have to laugh with this piggy must be in a really bad mood!

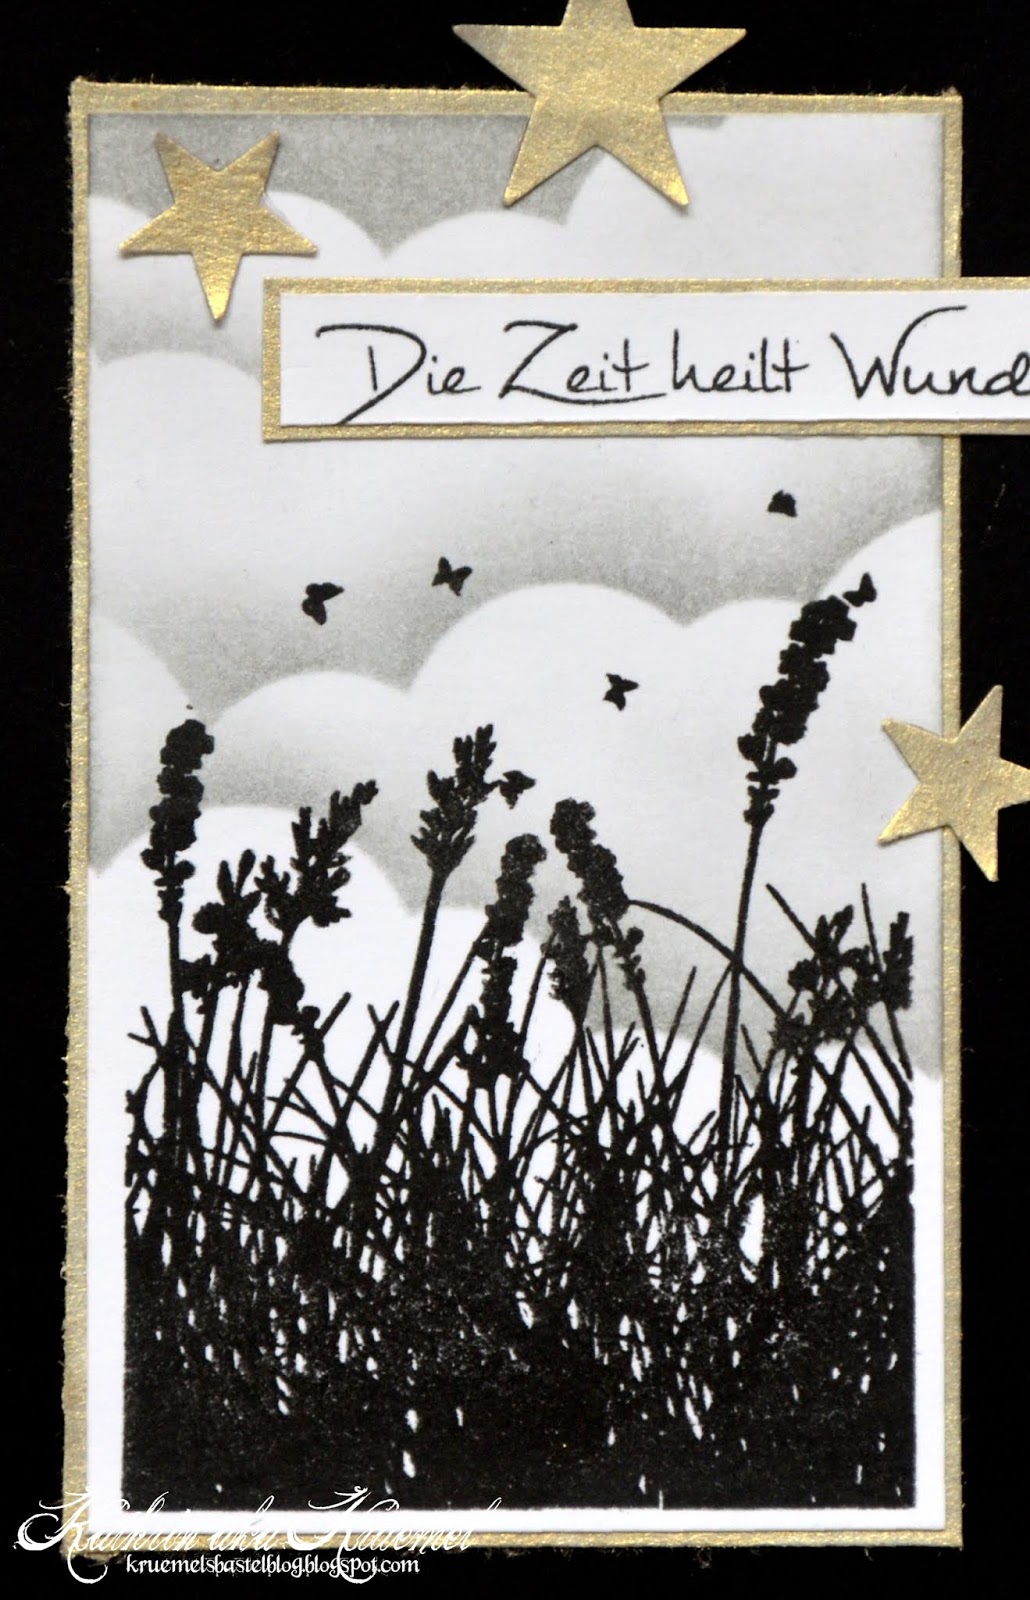
Karte Nr. 4 war eine Trauerkarte - muss leider auch mal sein. Ich hatte Cardstock mit Enchanted Gold Gilding Polish eingefärbt und zum Matten sowie für die Sterne genommen. Ich finde, die passen da gut hin, wobei da die Meinungen geteilt waren.

Card No.4 was a sympathy card - sadly also those cards are needed from time to time. I've covered cardstock with Enchanted Gold Gilding Polish and used this for the matting and the stars. I think the stars look good here, but not everyone was with me there.


Das Motiv habe ich einfach abgestempelt und im Hintergrund ein paar graue Wolken hinzugefügt.

The image was simply stamped and I've added a few grey clouds to the background.


Karte Nr. 5 war wieder eine Geburtstagskarte. Hier habe ich den Hintergrund erst geprägt und dann die erhabenen Stellen mit Gilding Polish betont. Das schimmert so toll! Auf diesen Hintergrund kam dann wieder ein Rechteck, in dass ich wieder die Glückwünsche gestempelt habe.

Card No.5 was another birthday card. Here I've dry embossed the background and then highlighted the raised areas with Gilding Polish again. The shimmer is just amazing! Then I've added another rectangle on which I've stamped the birthday texts again.


Das Motiv, das ich auf einen Kreis aus weißem Cardstock geklebt habe, ist mit Copics coloriert. Die Zuckerstreusel habe ich durch Enamel Accents ersetzt und die Schoolade dick mit Glossy Accents überzogen, damit sie lecker glänzt.

The image, glued onto a circle from white cardstock was colored with Copics. I've replaced the sprinkles with Enamel Accents and covered the chocolat with a layer of Glossy Accents to make it shine.


Und hier habe ich versucht, mal den Schimmer des Gilding Polish einzufangen....

Here I've tried to catch the shimmer of those Gilding Polish on photo....


Karte Nr. 6 dreht sich um die Einschulung. Für mich ist das Thema ja eigentlich zum Glück längst durch - da steht nächstes Jahr dann das Abi an. Aber meine kleine Nichte wird dieses Jahr eingeschult, was es für mich dann irgendwie doch wieder aktuell macht.
Ich habe hier ein Klassenzimmer nachgestellt. Irgendwie kann ich mich nur an gelb gestrichene Klassenzimmer erinnern, also ist das auch in "meinem" Klassenzimmer so.
Das Pult der Lehrerin ist schon für den Unterricht bereit. Ich habe hier den Tisch von Magnolia genutzt (leider muss die Lehrerin stehen) und einige der Accessoires-Stempel von Scrapbook-Forever darauf verteilt.

Card No.6 was albout first day of school. Luckily this time has long passed for me - we are having graduation next year. But my little niece will have her very first day of school this year and that makes this theme somehow interesting to me again.
Here I've created a classroom. When I think back I only remember yellow painted walls so that's what I've chosen for this room as well.
The teacher's desk is already set up for the first lessons. I've used a table die by Magnolia here and put different school accessoires by Scrapbook Forever on it. It's a shame that I didn't think of a chair for the teacher.


Auf die Tafel hat die Lehrerin einen Willkommensgruß geschrieben und darüber ein Banner mit den ersten Buchstaben des ABC aufgehängt. Ich weiß noch, dass in der ersten und zweiten Klasse die Buchstaben an den Wänden hinten. Hier hat die Lehrerin Sterne dazwischen gepackt.

The teacher wrote some encouraging words on the board and hung up a banner with the first letters of the alphabet. I remember that we had the letters hanging on the wall during first and second grade. Here the teacher put some stars in between.


Und bei Karte Nr. 7 - und der letzten für heute - wird es maritim. Ich wollte hier den Look von verwittertem Holz nachmachen. Darum habe ich braunen Cardstock erst geprägt un dann mit türkisfarbenem Gilding Polish bestrichen. Mir gefällt das sehr gut! Hinter diese Bretterwand kamen dann weiterer Cardstock, eine ausgestanzte Uferpflanze und etwas Cheesecloth.

And with card No. 7 - the last one for today - we're getting maritime. I wanted to create the look of wood that has been laying on a beach and in the water for quite some time. So I've taken a piece of brown cardstock, dry embossed it with a wooden pattern and then added turquoise Gilding Polish. I really like how this turned out. Behind this wooden wall I've put more cardstock, a die cut plant and some cheesecloth.


Für die Muschen habe ich das selbe türkisfarbene Polish auf weißen Strukturcardstock aufgetragen und dann die Motive mit weißem Pulver darauf embosst. So sind die äußeren Linien gut erkennbar aber nicht zu hart.

For the shells I've covered some white cardstock with a linnen structure with the same turquoise polish. Then I've heat embossed the shells on it using white embossing powder. Now the lines can easily be seen but aren't too extreme.


Den Text habe ich dann mit zart-goldenem Embossingpulver embosst.


Montag, 21. August 2017

Eine Trauerkarte


Hallo Ihr Lieben!
Heute darf ich Euch wieder die erste meiner Karten für diesen Monat auf dem Vildastamp Blog zeigen. Und diesen Monat habe ich mal zwei "gleiche" Karten gemacht, die aber trotzdem total unterschiedlich sind. Die zweite Karte zeige ich Euch wieder morgen. Heute fange ich mit einer Trauerkarte an, die ja auch mal sein muss...

Hello everyone!
Today I am sharing the first of two cards I made for the Vildastamps Blog this month. And this month I tried to make two cards that are similar in one way and still turned out completly different. I'll share with you the second card over here on my own blog tomorrow, so let's start with a sympathy card. Sadly those are needed every now and then...

Im Hintergrund habe ich ein leicht grau gemustertes Designpapier verwendet, eine breite Spitze darauf gesetzt und etwas Cheesecloth untergebracht.

In the background I used a slightly patterend grey paper and added a wide lace and some cheesecloth.

Ich habe hier die vier Quadrate aus dem Squares, Circle and Star Stempelset abgestempelt und die Farbe absichtlich so verwaschen aufgetragen. Sonst wären die Quadrate zu hart geworden. Dann habe ich sie mit Maskingtape abgedeckt und den Letter Context darüber gestempelt. Und darauf kam dann die große Pusteblume aus dem Silhouette Nature Stempelset. Von der Blüte habe ich ein paar einzelne Samen - auch aus dem Set - wegfliegen lassen.
Als Deko kam dann eine weiße Feder, etwas schwarzes Garn und darauf das ausgestanzte Wort LOVE darauf. Ich hatte sonst nichts passendes an Text da und denke, man erkennt auch so, dass es eine Trauerkarte ist. 
Zum Schluss kamen noch ein paar Glitzersteine und eine weiße Möwe auf die Karte.

Here I stamped the four squares from the Squares, Circle and Star stamp set onto my paper. It was my intention to not have the squares stamped completly because I thought they would look too hard. Then covered it with masking tape and stamped the Letter Context stamp over the squares. On top of that I stamped the big dandelion from the Silhouette Nature stamp set and let a few seeds, also from this set, fly away.
As decorations I added a white feather, some black yarn and on top of that a die cut LOVE. I didn't have any other matching text die and think it is still obvious that this is a sympathy card.
In the end I added a few rhinestones and a white sea gull.


Mittwoch, 1. März 2017

Neue Challenge bei Stamping-Fairies


Hallo Ihr Lieben!
Heute startet die neue Challenge auf dem Stamping-Fairies Blog. Und ich habe den neuen Sketch verwendet, um diese Trauerkarte zu werkeln. Leider braucht man die ja auch immer mal...

Hello everyone!
Today the new challenge over at the Stamping-Fairies Blog is starting. I used the new sketch to make this sympathy card. Sadly we need those every now and then, too...

Ich habe blauen Cardstock für die Basis verwendet und mit schwarzer Acrylfarbe ein paar Spritzer darauf verteilt.

I used a blue card base and added a few speckles using black acrylic paint.


Als Motiv habe ich die Roses von Hampton Art verwendet und in hell-, dunkelgrau und schwarz gestempelt. Die einzelnen Teile sind ausgeschnitten, mit 3D Tape aufeinander gesetzt und mit Glossy Accents überzogen. Darunter ist auch noch etwas Cheesecloth und ein Wasserfarbenhintergrund, den ich mit Distress Ink Weathered Wood abgestempelt habe.

As the image I went with the Roses by Hampton Art using light and dark grey an black for stamping. The different parts have been cut out individually, put together with 3D tape and then covered with Glossy Accents. I also put some cheesecloth and a watercolor background underneath that is stamped with Weathered Wood Distress Ink.


Für den Text habe ich wieder das Well Connected Alphabet von MFT benutzt. Ich liebe dieses Alphabet und wie man damit einfach jedes Wort toll zusammensetzen kann. Das Stamp Perfect Stamping Tool von Hampton Art kam hier genauso zum Einsatz wie beim Stempeln der Rosen.
Unter dem Motiv habe ich dann noch eine Bordüre gesetzt, die ich mit der geraden Kante der Stitched Scallop Basic Edges 2 gestanzt habe.

For the image I used the Well Connected Alphabet by MFT again. I just love this and how you can write any word you want to. The Stamp Perfect Stamping Tool by Hampton Art was used here and for stamping the roses as well.
Underneath the image I've put a border using the straight edge of the Stitched Scallop Basic Edges 2 die set.