Posts mit dem Label giftbag werden angezeigt. Alle Posts anzeigen

Donnerstag, 10. Juli 2025

Packt die Strandtaschen!


 Hallo Ihr Lieben!
Heute habe ich ein paar kleine Strandtaschen zu zeigen. Und die sind mit allem gefüllt, was man am Strand so brauchen kann.
 
Hello everyone!
Today I have some beach bags to share with you. And they are filled with everything you need for a day at the beach.
 
Nun, ich muss ein wenig ausholen. Vielleicht habt Ihr mitbekommen, dass ScrappyTails eine Craft Cruise organisiert hat. Eigentlich eher Bastelplatz auf einer normalen Cruise. Nun, ich habe ganz spontan gebucht. Und das natürlich nicht allein - wir sind zwei Bastler samt unseren Männern und zwei Freundinnen sind auch noch spontan - ohne Basteln - auf den Zug, äh das Schiff, aufgesprungen. Und so geht es nächsten Januar auf Bastelkreuzfahrt durch die Karibik... Ich kann es selbst noch gar nicht glauben.
Da wir alles so spontan gebucht haben, wissen wir noch nicht einmal, wann genau wir fliegen wollen, wie lange wir zusätzlich in den USA bleiben möchten etc. Um all diese Details zu besprechen stand nun ein gemeinsames Treffen an. Und ich habe als Einstimmung für die anderen der Gruppe schon mal die kleinen Strandtaschen gemacht.
 
I have to do a bit of storytime here. Maybe you've heard about the Craft Cruise, that ScrappyTails has organized. Well, it's more crafting on a regular cruise. And  I booked tickets. Of course I won't go alone - we are two crafters with our husbands and two non-crafting friends also jumped onto the waggon - ah, ship. So next january I will be on a craft cruise in the caribbean.... I really can't believe it myself.
We booked so spontaneously that we don't know, when we want to fly over to the States, how much longer we want to stay before and/or after the cruise etc. To talk about all these details we all just met. And for  everyone to be prepared or in the right mood I made little beach bags for everyone except my husband and myself.
 

 Die Taschenstanze hatte ich vor kurzem bei Ama..n entdeckt. Und nach gründlicher Suche, wir alle wissen ja, dass nicht alles bei Ama..n original ist, konnte ich diese Stanze auch von keinem anderen Hersteller finden. Also habe ich sie bestellt. 
Zwei der Taschen habe ich eher "weiblich" gestaltet - eine ist rosa, die andere koralle-rot. 
 
I saw this jelly tote die by Ama..n a little ago. And after searching all over the net - we all know that not everything at Ama..n is original - I really wasn't able to find this die from any other manufacturer or brand. So I bought it.
I made two of those bags more girly - a pink and a coral red one.
 

 Zum Dekorieren aller Taschen, auch der etwas "männlicheren", habe ich Stanzen aus dem Woodland Critter Huggers Add-On Summer Set von LawnFawn benutzt. 
Auf diesen beiden befindet sich je ein Cocktail, ein Sommerhut mit Blume und ein Tuch, das an den Griff gebunden/geklebt ist. Ich habe die meisten Teile aus weißem Cardstock gestanzt und mit Copics coloriert. Für ein paar Elemente habe ich Designpapier benutzt, das ich ebenfalls mit Copics ein wenig schattiert habe.
 
To decorate all the bags, also the more "male" ones, I used dies from the Woodland Critter Huggers Add-On Summer set by LawnFawn,
On each of the girly ones there's a cocktail, a straw hat with a flower and a Bandana, tied/glued to the handle. I cut most of the pieces from white cardstock and colored them with Copics, a few I also cut from patterned paper and used Copics again to shade them a little.
 

 Die beiden "männlicheren" Taschen habe ich aus blauem bzw. hell-lila farbenem Cardstock gemacht. Eine der Taschen ist übrigens ebenfalls für eine Frau, die aber statt Strohhut lieber Baseball-Caps trägt. An diese Tasche habe ich ebenfalls ein Bandana an den Griff gebunden. Das  habe ich bei der einzig "echten" Männertasche weggelassen.
 
The two "boyish" bags I cut from blue and light purple cardstock. One of these is also for a female, but she prefers baseball caps over straw hats. I also tied a bandana to her bag and left that off of the only "real male" bag.
 

 Wie schon erwähnt befindet sich ein Baseball-Cap auf diesen Taschen, außerdem darf auch hier der Cockatil nicht fehlen. 
Gefüllt habe ich die Tasche mit einem Anti-Mücken-Armband, Sonnenschutz-Lippenbalsam, einem aufblasbaren Getränkehalter für den Pool und zwei Lutschern. Die passen jetzt im ersten Moment vielleicht nicht so ins Bild, aber es steht auf jedem ganz groß "Beach Lollies" - das hat sie als Füllung für diese Taschen qualifiziert. Und weil ich ja gerne mal eskaliere, habe ich auch noch aufladbare kleine Ventilatoren für jeden gekauft. Die haben dann aber wirklich nicht mehr in die Taschen gepasst, deswegen habe ich die Taschen auf die Ventilatoren-Boxen gestellt...
 
As I said already there's a baseball cap on these two bags and of course the cocktail has to be there, too.
I filled the bags with a anti mosquito bracelet, some sun protect lip balm, an inflatable drink holder for the pool and two lollipops. Those might seem a bit random at first, but there's "beach lollies" in large letters printed on them, that qualified them. And since I tend to go a bit overboard every once in a while I also bought little re-chargable vans for everyone. But those really didn't fit into those bags anymore and I just put the bag on top... 
 

Freitag, 2. Mai 2025

Oster-Goodies Teil 1


Hallo Ihr Lieben!
Ja, ich weiß, Ostern war vor zwei Wochen. Aber ich hinke einfach hinterher mit dem Zeigen. Und vorenthalten möchte ich Euch meine Oster-Goodies dann auch nicht. 
Normalerweise gibt es bei uns am Ostersonntag immer einen großen Familien-Osternbrunch. Aus verschiedenen Gründen ist der dieses Jahr ausgefallen. Aber zumindest einen kleinen Oster-Kaffee mit Eiersuche für den Enkel haben wir mit dem Teil der Familie gemacht, der nicht gerade irgendwo im Ausland unterwegs war. Und da ich immer ein kleines Goodie für jeden auf den Ostertisch stelle, gab es diesmal eben nachmittags kleine Tüten im Osterlook.
 
Hello everyone!
I know, easter was two weeks ago. But I am just behind with sharing all my cretaions. But I don't want to keep this year's easter goodies from you.
Usually on easter sunday there's always a large family brunch  at our house. We canceled that this year for various reasons. But in the afternoon we had some coffee and cake - and a egg hunt for my grandson - with those that weren't traveling somewhere. At our brunch I always put a little goodie for everyone on the table so I also made some small gift bags in an easter look for said afternoon gathering.
 

 Anfang April war ich auf der Stempelmesse Süd und natürlich konnte ich am Stand von Farbton nicht vorbei. Dort habe ich unter anderem die Stanze für diese Tüte erstanden. Es ist die Kleine Tüte mit Rückwand, wobei ich die von der Größe her genau richtig finde. Und natürlich durfte auch das ein oder andere Textset für das Fenster mit.... Hier habe ich das Zusatzset Schriftstanzen Frühling benutzt.
Die Tüten habe ich aus lacksfarbenem Cardstock mit Leinenstruktur gestanzt. Hinter den vorderen Teil der Verschluss-Lasche habe ich weißen Cardstock gesetzt, die untere Kante habe ich mit einer Scalloped Border Stanze ausgestanzt. Ich fand die farbliche Absetzung hier ganz schön, außerdem habe ich zwischen Lasche und weißem Cardstock einen der Magneten versteckt, die ich zum Verschließen in die Tasche mit eingebaut habe. Der andere Magnet ist im Inneren der Tasche untergebracht.
Oben an die Lasche habe ich noch einen winzigen Ostergruß angebracht. Der Text ist mit einem Stempel aus dem Set Kleine Sprüche von Create a Smile gemacht und weiß auf hellblauen Cardstock embosst. Den habe ich dann mit der Schere zu einem kleinen Banner geschnitten und mit zwei grün-irisierenden Perlen dekoriert. 
 
Beginning of april I visited a stamp fair near Stuttgart and I just had to shop at the booth of Farbton. One of the things I got was this "small" bag. It's the smaller version but I think it's just the right size. I also bought several die sets with texts, that fit inside the window. Here I used the spring one.
I die cut the bags from salmon colored cardstock with a linnen structure. I put some white cardstock behind the front of the flap, using a scalloped border punch to decorate the bottom edge. I liked that white to break up all the salmon here, but I also needed it to hide one of the magnets, that I added to hold the bag closed, between the two cardstock sheets. The other magnet I glued inside the bag.
I added a tiny easter greeting to the flap. The text means "happy easter" and is white heat embossed onto light aqua cardstock. I cut it onto a little banner using my scissors and added two green iridescent pearls as decoration.
 

 Das Fenster in der Taschenfront ist mit einer Art zurückversetztem Schaukasten versehen - super für Deko.
Ich habe die Worte "Hasen" und "Post" aus weißem Cardstock gestanzt und an den Rand des Fensters geklebt. An das T von Post habe ich einen kleine Schleife aus weiß und türkis gestreiftem Twine angebunden.
Den Schaukasten habe ich aus hellblauem Cardstock gestanzt und mit Gras sowie Hasenohren versehen. Auch die sind eine Errungenschaft der Stempelmesse und sind von Steckenpferdchen. Ich habe die Ohren aus weißem, die inneren Teile der Ohren aus lachsfarbenem Cardstock gestanzt.  Die habe ich dann mit Copics ein wenig schattiert. Eigentlich wollte ich die Hasenohren am O und S des Worts Post anbringen, aber dann habe ich mich umentschieden.
Außerdem habe ich aus grünem Cardstock etwas Gras gestanzt, mit Distress Ink Mowed Lawn von unten gewischt und dann Ohren und Gas mit dünnem bzw. dickem 3D Tape in den Schaukasten geklebt. Darüber war dann Platz für zwei kleine rosafarbene Herzen. 
Ich habe den dekorierten Schaukasten hinter den Ausschnitt in der Tüte geklebt und dann um das Fenster herum noch einen hellblauen Rahmen angebracht. Der ist mit der Square Thin Frames Stanze von HoneyBeeStamps gemacht.
 
There's some kind of showcase behind the window in the front of the bag - great for decorations.
I die cut the words "bunny" and "mail" from white cardstock and glued them along the edge of the window. I tied a little bow from white and aqua twine round the T of "post/mail". 
The showcase I cut from light aqua cardstock and decorated it with some grass and bunny ears.  Those are a die by Steckenpferdchen, that I also bought at said stamp fair. I die cut the ears from white, the inner ears from salmon colored cardstock, then shaded just the inner ears with Copics. I originally had planned to adhered  the ears to the O and S of the word "post", but then changed my mind.
I also die cut some grass from green cardstock and shaded it lightly with Distress Ink Mowed Lawn. I adhered the ears and grass with thin and thick foam tape inside the showcase and added two pink clay hearts above the ears.
I glued the decorated showcase behind the window to the bag and then added a frame cut from light aqua cardstock. I used the Square Thin Frames by HoneyBeeStamps for it.
 

 Hier sieht man die Tiefe des Schaukastens nochmal - und ich habe da so viele Ideen. Und wenn ich zeitlich nicht ein wenig knapp dran gewesen wäre, hätte ich bestimmt einen Shaker aus dem Fenster mit den Hasenohren gemacht.... Aber das  mache ich dann eben bei der nächsten Tüte.
 
Here you can see the depth of the showcase - and I have so many ideas for it. If I had decided a bit earlier to make those goodie bags, then I would have turned this showcase with the bunny ears into a shaker... But I will do so on my next bag then.
 

Montag, 2. Dezember 2024

Ein Täschchen zum Geburtstag

 
Hallo Ihr Lieben!
Heute zeige ich Euch ein kleines Täschchen als Geburtstagsverpackung - und darauf seht Ihr Sneak auf eine weitere der Textstanzen aus dem Dezember-Release von Stampcorner. Es wird im Dezember nämlich zwei weitere Releases geben, genau genommen am 2. und 3. Advent.

Hello everyone!
Today I am sharing a little birthday gift bag with you - and you're getting another sneak of one of the new text dies from the december release by Stampcorner. Because there will be two more releases this month, one on the 2nd and one on the 3rd sunday of advent.


Das Täschchen ist mit der Geburtstagstasche-Stanze aus weißem Cardstock gemacht. Mir war ein wenig nach clean and simple - und nicht-weihnachtlichen Farben. Ich selbst habe ja auch kurz nach Weihnachten Geburtstag und ich weiß nicht, ob ich da ein wenig eigen bin, aber mich stört es einfach immer, wenn Karten und Geschenkpapier so aussehen, als wären es Überbleibsel von Weihnachten... Und da bin ich sicher nicht die einzige.

I  made the giftbag from white cardstock using the Geburtstagstasche die. I felt like making something a bit more clean and simple and in non-christmas colors. My birthday is just a few days after christmas and I have no idea if I am special here, but it bothers me when cards and wrapping paper look like leftovers from christmas.... I am sure I'm not the only one.


Auf den unteren Teil der Tasche habe ich kleine türkisfarbene Geburtstagskerzen aufgeklebt, die ich mit einer Stanze von MFT gemacht habe. Passend zu meiner Farbkombi habe ich ein ocker-gelb für die Flammen verwendet. Aus dem selben Cardstock habe ich auch ein paar kleine Sterne als Deko ausgestanzt.
Über die kommplette Tasche habe ich ein Stück ockerfarbenes Band gezogen. Das finde ich optisch immer schön und außerdem hält es die Tasche geschlossen. Aber wenn man sie dann einmal geöffnet hat, ist das Band weg. Um das zu verhindern, habe ich meines auf der Rückseite mit doppelseitigem Tape angeklebt, auf der Vorderseite habe ich ein Wax Seal benutzt. Ja, ich gebe es zu - eigentlich wollte ich dem Wax Seal Hype entgehen. Und ich habe es fast zwei Jahre lang geschafft. Jetzt sind aber doch zumindest ein paar Siegel bei mir eingezogen. Ich bin, was Trends angeht, dann halt doch ab und zu mal ein Spätzünder.... ;) 
Ich habe das Wax Seal mit einem "happy birthday to you" aus helltürkisfarbenem Wachs gemacht und es dann auf einen der Scallop Circles, gestanzt wieder aus dem ockerfarbenen Cardstock, geklebt. Das habe ich dann mit dünnem 3D Tape über dem Band befestigt.

Onto the lower part of the giftbag I glued some light aqua birthday candles, made using a die by MFT. Sticking with my color combo I went with a yellow ochre for the flames. From the same color of cardstock I die cut a few small stars as decoration.
I put a piece of ochre ribbon over the whole the bag. I really think that looks nice and it also keeps the bag closed. But once you open it, the ribbon is gone. To avoid that I adhered mine with doublesided tape to the back of the bag, on the front I used a wax seal. Yes, I admit it. My plan was to not jump onto the wax seal wagon - and I stuck to it nearly two years. But now I fell off that wagon and bought at least a few. Sometimes I am a bit slow when it comes to trends... ;)
I created the wax seal with a "happy birthday to you" from light aqua wax and then adhered it to a scalloped circle, cut from the ochre colored cardstock. Then I glued it with thin foam tape on top of the ribbon.
 

Das Band habe ich dann zur Schleife gebunden und die Texte/Textteile, gemacht mit der bald kommenden Stanze, befindet. Die Worte sind hier vertikal und ich finde die Ausrichtung zur Abwechslung wirklich schön.  Die Schattenlagen, die die Stanze ebenfalls ausstanzt, sind aus weißem, die Worte an sich aus helltürkis farbenem Cardstock gestanzt. Oben an den Rand der Schattenlage habe ich zwei Ringe, gestanzt aus ockerfarbenem Cardstock, angeklebt und dort jeweils ein Stück weiß-türkis gestreiftes Twine angebunden. Damit habe ich die Worte am Band aufgefädelt.

I tied the ribbon to a bow and added the text from the upcoming 2nd december release to it. The words are vertical and I really think that's a nice change. The shadow layers, that the die creates as well, are cut from white, the words from light aqua cardstock. I glued a little ring, cut from the ochre cardstock, to the back of each shadow layer and put some white and light aqua twine through them, then I attached them to the bow.

Donnerstag, 28. November 2024

Eine Tasche im Nikolauslook

 
Hallo Ihr Lieben!
Heute zeige ich auf dem Stampcorner Blog eine Tasche im Nikolauslook. Die kann entweder als kleines Nikolausgeschenk oder aber als "Türchen" #6 eines Adventskalenders dienen, so ganz habe ich mich da selbst noch nicht entschieden. Aber es sind ja noch ein paar Tage...

Hello everyone!
Over on the Stampcorner Blog I am sharing  a little gift bag in a St. Nick look. I can either be used as a little gift for Nikolaus or as "shutter" #6 for an advent calendar. I still haven't decided that myself, but I have a few days left to do so...

Basis war hier natürlich die Geburtstagstaschen-Stanze von Stampcorner. Die macht sich aber auch im weihnachtlichen Look super. 

Of course the base here is made with the Geburtstagstasche die by Stampcorner - the name means "birthday bag". But the christmas look suits it fine as well.


Ich habe die Tasche aus rotem Cardstock gestanzt und dann im Nikolauslook dekoriert. Ich habe dafür Teile der Christmas Crew Santa Stanze von MFT benutzt, aber man kann die Teile auch ganz einfach per Hand schneiden oder Stanzen anderer Firmen kombinieren.

I die cut the bag from red cardstock and then decorated it in a Nikolaus look. I used some of the Christmas Crew Santa die set by MFT here but you can easily cut them by hand or combine dies by other manufacturers, too.


Oben habe ich der Tasche eine Nikolausmütze aufgesetzt, die ich mit Ilexblättern und goldenen Beeren verziert habe. 
Unter dem Griff befinden sich Bart und Schnurrbart des Nikolaus. Ich habe hier graue Polychromos benutzt, um einen "haarigen" Look zu erzeugen.
Und damit sich Bommel und Pelzrand der Mütze noch etwas mehr vom Bart abheben, habe ich sie mit einem Nuvo Aqua Shimmer Pen beglittert.
Damit man auch nicht unartig in die Tüte hineinluschern kann bevor die Zeit dazu gekommen ist, habe ich ein Stück weißes Band mit goldenen Kanten links um das Griffloch gewickelt und zu einer Schleife gebunden.

I added a Nikolaus' hat to the top of the bag and decorated it with some holly leaves and gold berries.
Under the handle there's the beard and mustache. I used grey Polychromos to add some "hairy" details to both pieces.
And to make the pompom and furry brim of the hat look even more different from the beard I used a Nuvo Aqua Shimmer Pen to add glitter to those pieces.
To make sure you can't be naughty and get a peak ahead of time of what's inside the bag I wrapped a piece of white ribbon with gold edges around the left side of the handle and tied it to a bow.


Unten habe ich einen Streifen schwarzen Cardstocks auf die Front der Tasche geklebt und seitlich jeweils ein kleines Stück um die Kante herumgebogen und dort festgeklebt. So wirkt der Gürtel etwas realistischer. Und natürlich durfte eine Schnalle nicht fehlen. Die habe ich aus goldenem Glitter-Cardstock gestanzt.
Ebenfalls aus goldenem Glitter-Cardstock habe ich eine 6 - die natürlich für den 6. Dezember steht - gestanzt und dafür eine Stanze aus dem neuen Zahlen-Stanzenset verwendet. Die Zahl habe ich mit zwei Tannenzweigen und ebenfalls goldenen Beeren verziert.
Beim Aufkleben aller Elemente kam dünnes und dickes 3D Tape zum Einsatz, das wirkt einfach schöner als nur flach aufgeklebt.
Vorne, mittig auf die Tasche, habe ich dann noch "Geschenke für dich" aus dem Set Geschenke mit weißem Embossingpulver aufembosst. Offenbar war der Empfänger in den Augen des Nikolaus im letzten Jahr artig gewesen.... ;)

To the bottom of the bag I glued a strip of black cardstock and folded a small end around the edge of each side, glueing it down there. This makes the belt look more realistic. And of course it needed a buckle, that I cut from gold glitter cardstock.
Also from gold glitter cardstock I die cut a number 6 - of course that repesents december 6th - using one of the dies from the new numbers die set. I decorated the number with two pine branches and more gold berries/pearls.
I used thin and thick foam tape to adhere the different elements. In my opinion this look so much prettier than just adhering them flat.
To the front center of the bag I white heat embossed a "gifts for you" saying. Seems like Santa thinks that the recipient of the bag has been nice this year... ;)

Donnerstag, 31. Oktober 2024

Heute ist Halloween!

 
Hallo Ihr Lieben!
Endlich ist Halloween! Und ich konnte einfach nicht anders, als an diesem Tag ein Halloween-Projekt für meinen Post auf dem Stampcorner Blog zu werkeln. Und wer weiß, ein wenig Zeit ist es ja noch, bis es dunkel wird - vielleicht braucht jemand noch eine kleine Idee um die Süßigkeiten schön zu verpacken.

Hello everyone!
It's finally Halloween! And I just couldn't resist and made another Halloween project for my post over on the Stampcorner Blog today. Who knows, it's still some time until it's getting dark and maybe a few of you are still looking for an idea for how to wrap all those candies nicely. 

Ich habe eine kleine Tasche gemacht, die mit einem schaurig-schön dekorierten Tag verziert ist. 

I made a little bag, that I attached a spookily cute decorated tag to.


Die Tasche ist mit der Geburtstagstasche-Stanze gemacht. Ich habe sie aus grünem Designpapier mit großen, farblich fast identischen Punkten gestanzt. Dann habe ich mit Memento Bamboo Leaves das Boo! aus dem Set Süßes oder Saures kreuz und quer über die Tasche gestempelt.
Die Ränder der Tasche habe ich ein wenig mit Distress Ink Black Soot gewischt und dann schwarze Metallic Watercolor aufgespritzt.

I used the Geburtstagstasche die here. I die cut it from green patterned paper with dots, that are just slightly lighter than the color of the paper. I used Memento Bamboo Leaves to stamp the Boo! from the Süßes oder Saures stamp set all over the bag.
I inked the edges of the bag lightly with Distress Ink Black Soot and then added splatters of black metallic watercolor.


Dekoriert habe ich die Tasche, wie schön erwähnt, mit einem Tag. Den habe ich mit einer der Tag-Stanzen aus schwarzem Cardstock gestanzt. Dann habe ich mit weißer Stempeltine einen Teil des Grunge 3 Stempels aufgestempelt.
Mit den Alphabet-Stanzen habe ich dann die Buchstaben für das Wort EEK aus lilafarbenem Cardstock sowie das E einmal aus dem selben Designpapier, das ich auch für die Tasche verwendet habe, ausgestanzt. Die lilafarbenen Buchstaben habe ich mit Villainous Potion, das grüne E mit Peeled Paint von unten her gewischt.
Die Deko ist mit dem Vault Wicked Set von Sizzix gemacht. Ich habe die Teile ausgestanzt und dann mit Copics und einem weißen Gelstift schattiert. Der Mond ist aus Vellum, die Fledermaus aus lilafarbenem Glittercardstock gemacht. Diese Deko habe ich dann oben an dem grünen E angeklebt.

Like I already mentioned did I decorate my bag with a tag. I made that from black cardstock using one of the tag dies by Stampcorner. Then I stamped part of the Grunge 3 stamp onto it.
Using Stampcorner's alphabet dies I die cut the letters for the word EEK from purple cardstock and one E also from the same green patterened paper that I had used for the bag. I shaded the purple letters with Villainous Potion, the green E with Peeled Paint.
The deco elements are made with the Vault Wicked set by Sizzix. I cut the pieces out and then shaded them with Copics and a white gel pen. The moon I die cut from vellum, the bat is cut from purple glitter cardstock.


Ich habe alle Elemente mit dünnem und dickem 3D Tape auf dem Tag befestigt. Dann habe ich eine Schleife aus weißem Band und grünem Organzaband gebunden und sie mit Hilfe von lila Twine, das ich um den Griff der Tasche gewickelt habe, an die Tasche angebunden.

I used thin and thick foam tape to adhere the decoration to the tag. Then I tied a bow from white ribbon and green organdy ribbon and used some purple twine, that I wrapped around the handle of the bag, to attach the tag to the bag.


Ein kleiner Text durfte dann auf der Tasche auch nicht fehlen. Es sind dann sogar zwei geworden. Beide sind aus dem Itty Bitty Boos Set von MFT und wieder mit Bamboo Leaves auf weißen Cardstock gestempelt. Das kleine Got Candy? habe ich unten auf dem Tag angebracht. Das Happy Haunting habe ich schwarz gemattet und mit dünnem 3D Tape unten auf die Tasche geklebt.
Als Deko habe ich dann noch ein paar kleine goldene Sterne aufgeklebt. Und als letzten Schritt habe ich zwei Klettpunkte innen, direkt unter den Griffen, in die Tasche geklebt, die sie dann geschlossen halten.

I decided, that my bag needed a little text. I ended up using even two. Both are from the Itty Bitty Boos set by MFT and stamped with the Bamboo Leaves ink again onto white cardstock. I adhered the Got Candy? text to the bottom of the tag. The Happy Haunting I matted black and attached it with thin foam tape to the bottom of the bag front.
I added a few gold star confetti as decoration and, as the last step, glued a velcro dot inside the bag, directly below the handles. It makes sure the bag stays closed securely.

Donnerstag, 10. Oktober 2024

Tasche im Mumien-Look

 
Hallo Ihr Lieben!
Auch für meinen Beitrag auf dem Stampcorner-Blog heute habe ich etwas Halloween-iges gebastelt: eine Geschenktasche, die mit Süßigkeiten gefüllt das perfekte Mitbringsel zur Halloweenparty ist.

Hello everyone!
Also for the project, that I'm sharing over on the Stampcorner Blog today, I made something Halloween-y: a little gift bag, that's the perfect gift to bring to a Halloween party.

Basis für die Tasche war hier die Geburtstags-Taschen Stanze aus dem Oktober-Release. Die hat eine tolle Größe sowohl für Deko, also auch um Kleinigkeiten darin zu verpacken. 

I used the Geburtstagstasche die from the october release to create the base here. It has a great size - there's room for decorations and also for some nice treats to put inside.


Die Tasche  habe ich aus weißem Cardstock gestanzt. Um den Mumienlook zu erzeugen, habe ich etwa 1 cm breite Streifen weißen Cardstocks zugeschnitten und an den Rändern etwas eingefärbt, schließlich liegt so eine Mumie jahrtausendelang in ihrem Sarkophag. Ich habe Distress Ink Lost Shadow sowie Memento Toffee Crunch benutzt und beide Kissen einfach direkt an die Ränder bzw. teilweise auch oben auf die Streifen gedrückt. Dann habe ich die Streifen kreuz und quer über die Tasche geklebt. Den Bereich des Griffes habe ich mit der Schere wieder freigeschnitten. Die Deko habe ich übrigens nur auf der Vorderseite der Tasche gemacht.
Mit einem schwarzen Stempelkissen habe ich dann noch die Spinne aus dem Set Süßes oder Saures einigeMale auf die Tasche gestempelt.

I die cut the bag from white cardstock. To create the mummy look I cut about 1 cm wide strips of white cardstock and inked the edges, because a mummy lies thousands of years in a sarcophagus. I used Distress Ink Lost Shadow and Memento Toffee Crunch and pressed the ink pads directly to the edges and - partly - also on top of the strips. Then I glued them across the bag, overlapping and a bit crooked. I used my scissors to cut out the handle again. And I only did the decorations on the front of the bag.
Using a black ink pad I stamped the spider from the Süßes oder Saures set several times onto the cardstock strips.


Für die Deko - und gleichzeitig Text - auf der Tasche habe ich mich mal nicht für ein Motiv entschieden. Stattdessen halten zwei Hände ein Schild mit einem großen BOO darauf in die Luft.
Die Hände habe ich mit den Sign of the Times Stanzen von MFT gemacht. Ich habe sie aus hellem hautfarbenem Cardstock gestanzt und mit Copics schattiert, die Highlights sind mit einem weißen Gelstift gemacht. Dabei habe ich Fignernägel aufgemalt, die natürlich schön dreckig sein mussten. Die Arme habe ich außerdem ebenfalls mit kleinen Reststücken der weißen Mumien-Streifen beklebt. Dann habe ich sie hinter die unteren Streifen auf der Tasche geklebt. 
Das Schild besteht aus einem Stück braunen Cardstocks, auf das ich das BOO aufgeklebt habe. Das ist mit dem ebenfalls neuen Stanzenset Alphabet und schwarzem Cardstock gemacht. Aus grünem Cardstock habe ich noch dreimal den herablaufenden Glibber aus dem Build a Cauldron Set von LawnFawn gestanzt, ebenfalls mit Copics schattiert und oben auf die Buchstaben geklebt. Die Überstände habe ich dann weggeschnitten. Außerdem habe ich den Glibber etwas beglittert.

For the decoration - and at the same time text - on my bag I didn't go with an image here. Instead there are two hands holding a sign with a large BOO written on it. 
I made the hands using the Sign of the Times dies by MFT. I die cut them from light skin colored cardstock and shaded them with Copics, the highlights I added with a white gel pen. And I just had to add some fingernails, that of course had to be pretty dirty. I used little left over pieces of the mummy strips to cover the arms as well, then tucked them behind the lower strips on the bag.
The sign I made from a piece of brown cardstock, onto that I glued the BOO. I made that using the also new alphabet die set and black cardstock. From green cardstock I also die cut the dripping goo from the Build a Cauldron set by LawnFawn three times, again shaded it with copics and adhered it onto the letters. I cut off the overhang and also added some glitter to the goo.


Das Schild habe ich an den Händen befestigt, oben steht es ein wenig ab. Hinter das Schild habe ich dann ein Stück Cheesecloth geschoben und davon auch einen Streifen benutzt, um die Tasche oben mit einem Knoten zu verschließen. 
Die Tasche habe ich mit verschiedenen Leckereien gefüllt und dann obenauf noch einige schwarze Papierstreifen eingefüllt, die überall schön überstehen.

The sign I attached to the hands, at the top it stands up a bit. I put a piece of cheesecloth behind the sign and also used a strip of it to close the bag, tying it to a knot.
I filled the bag with different treats and then put some black paper strips on top, that are now standing out in all directions.

Donnerstag, 30. November 2023

Eine Tasche Winterzauber

 
Hallo Ihr Lieben!
Kleine Verpackungen kann man immer gut gebrauchen, nicht nur zu Feier- oder Festtagen. Und eine solche Verpackung im winterlichen Look zeige ich heute auf dem Stampcorner Blog.

Hello everyone!
Little gift bags and boxes are always handy, not just for holidays or other celebrations. Today over on the Stampcorner Blog I am sharing such a gift bag in a wintery look. 

Damit die Tasche an sich schon mal einen winterlichen Look hat, habe ich die Teile mit der Taschen-Stanze aus einem der Bögen aus dem 12" Paper Pack 1 ausgestanzt. Das hellblaue Papier mit den weißen Schneeflocken ist wunderbar dezent und frostig. 
Den oberen Teil mit dem Henkel habe ich noch vier weitere Male aus weißem Cardstock gestanzt, nur die Henkel abgeshnitten und jeweils von vorne und hinten auf die Henkel der Tasche geklebt. Das macht sie nicht nur stabiler, sondern setzt sie auch farblich ab. 

To give the bag itself a wintery look I die cut the gift bag using the Tasche die from one of the sheets of the 12" Paper Pack 1. The light blue paper with the white snowflakes is wonderful soft and frosty.
I die cut the top of the bag four more times from white cardstock, cut off the handles and attached them to the handles of the bag. That does not only make them stronger, it also adds a nice touch with their different color.


Für die Deko habe ich die Schneeflocke S von Farbton aus weißem Cardstock gestanzt. Die kann man ja mittig halbieren, so dass sie flacher sind. Gleichzeitig hat  man so mit nur einmal kleben gleich zwei Schneeflocken. Um sie in der Größe unterschiedlich zu machen, und weil mir zwei Schneeflocken zu groß für die Tasche waren, habe ich von einer einfach die äußeren Strahlen mit der Schere weggeschnitten und so eine kleinere Schneeflocke erhalten. Beide Schneeflocken habe ich in der Mitte mit etwas Wasser und Distress Ink Spray Prize Ribbon besprüht, nach dem Trocknen habe ich dann in die Mitter der Schneeflocken eine matt-silberne Pailette sowie eine weiße Perle aufgeklebt. An der Rückseite habe ich jeweils ein Stück weißes Twine angeklebt und die Enden, um die Henkel gewickelt, zu einer Schleife gebunden. Zusätzlich habe ich die Schneeflocken auf der Tasche angeklebt, damit sie schön gerade hängen.
Für den Text habe ich die neue Winterzauber-Stanze aus dem November-Release verwendet. So ist der Text auch schön neutral, so dass die Tasche auch für ein spontanes Geschenk verwendet werden kann. Ich habe ihn aus weißem Cardstock gestanzt und von unten mit Prize Ribbon gewischt. Dann habe ich zwei weitere weiße Stanzteile als Verstärkung dahinter geklebt und für den  I-Punkt einen kleinen Glitzerstein aufgeklebt.

To decorate the bag I used the Schneeflocke S die by Farbton to create the snowflakes from white cardstock. By cutting them apart, you can not only make the snowflake more flat, you also end up with two in just one step. To get two different sized snowflakes, and also because two of the large ones were too much for the bag, I cut off the outer tips of one of the snowflakes using my scissors. I sprayed a bit of water and some Distress Ink Spray Prize Ribbon onto the center of each snowflake, after they had dried I placed a matte silver sequin and a white pearl in the center. I glued a piece of white twine to the back of each snowflake, wrapped the other end around the handle and tied it to a bow. And to make sure the snowflakes are hanging down straight I also glued them to the bag.
For the text I die cut the word "magic of winter" from white cardstock - it's a wonderfully neutral text and so it can be used for any occasion. I die cut it from white cardstock and inked the bottom with Prize Ribbon. Then I backed it with two more die cut words, attached it to the bag and added a little clear rhinestone as the tittle.


In die Tasche habe ich dann nach dem Befüllen oben dunkelblaue Papiershredder gefüllt, die ich aus der Tasche habe herausschauen lassen. 
Da ich den rechten Schlitz für das Band zum Verschließen der Tasche mit einer der Schneeflocken überdeckt habe - und eine weitere Schleife hier doof ausgesehen hätte - habe ich mir einen anderen Verschluss überlegt. Dafür habe ich einen Kreis aus dem selben Designpapier gestanzt und zwei parallele Falzlinien über ihn gezogen. Das eine Ende habe ich hinten an die Tasche geklebt, an den vorderen Teil und innen in die Tasche habe ich einen Magneten geklebt, der die Lasche und Tasche geschlossen hält.

After I had filled the bag I filled the top with some dark blue shredded paper that I let hang out of the top of the bag.
Since I had covered the right slid for the ribbon to tie the bag closed with one of the snowflakes - and also because another bow would have looked strange here - I came up with a different way to close the bag. I die cut a circle from the same patterned paper I had used for the bag and scored two parallel lines into it. One end I glued to the back of the bag, behind the other end and inside the bag I glued small magnets, that hold the flap and the bag closed.


Ganz zum Schluss habe ich noch einige matt-silberne Pailetten vorne auf die Tasche geklebt.

To finish the bag I adhered some matte silver sequins to the front as decoration.

Donnerstag, 26. Mai 2022

Glück in einer Tüte - äh Tasche

 
Hallo Ihr Lieben!
Unter den Mai-Neuheiten von Stampcorner waren auch zwei Stanzensets, und die wollten auch endlich verwendet werden. So geschehen auf dieser Tasche, die ich heute auf dem Stampcorner Blog zeige.

Hello everyone!
The may release by Stampcorner also included two die sets, and I hadn't used those yet. Until today - they are both used on this little bag, that I'm sharing over at the Stampcorner Blog today.

Momentan stehen ja recht viele Abitur- und Abschlussprüfungen an. Da kann man einen kleinen Glücksbringer immer gebrauchen. Bei mir steckt der nicht nur in der Tasche, sondern auch darauf.

At the moment many end of year test are written. So it never hurts to have a lucky charm at hand to give away. Here this lucky charm is not only put inside the bag, but also onto it.


Ich habe hier die Taschen-Stanze von Stampcorner benutzt, um die Tasche aus grünem Cardstock auszustanzen. Dann habe ich mit Distress Ink Mowed Lawn und Rustic Wilderness sowie dem Clover Background Stencilset von LawnFawn das Kleeblatt-Muster aufgewischt. Dabei habe ich den Henkel ausgespart. Naja, fast, ein paar kleine Pünktchen sind doch darauf gelandet...
Anschließend habe ich auch noch Copic Opaque White, gemischt mit einem kleinen bisschen Wasser, darüber gespritzt. Das trocknet so schnell, dass die Distress-Tinte darunter gar keine Chance hat, es zu verfärben. Deswegen nutze ich es sehr gerne auf  Distres-Produkten.
Anschließend habe ich die Tasche zusammengeklebt, durch die Schlitze oben rotes Band gezogen und zur Schleife gebunden, um die Tasche geschlossen zu halten.
Dann habe ich noch das große Kleeblatt aus dem Stempelset Glücksset vorbereitet, da ich es später als Deko auf meine Tasche aufkleben wollte. Ich habe es wieder mit Distress Ink gestempelt, diesmal aber noch Twisted Citron als hellste Farbe dazu kombiniert. Ich habe das komplette Kleeblatt in Twisted Citron gestempelt, dann von außen her etwas mehr als die Hälfte der Blätter mit Mowed Lawn eingefärbt und mit einem Blending Tool die Farbe am Übergang ein wenig verteilt und das Kleeblatt anschließend auf das hellere gestempelt. Den Schritt habe ich dann nochmal mit Rustic Wilderness wiederholt und hier nur den äußersten Rand der Blätter eingefärbt. So bekommt das Kleeblatt eine tolle Tiefe. Die weißen Linien habe ich dann mit einem weißen Gelstift aufgemalt und sofort ein wenig mit dem Finger verwischt, so dasss sie nicht so hart sind.

Here I used the bag die by Stampcorner to die cut the bag from green cardstock. Then I used Distress Ink Mowed Lawn and Rustic Wilderness as well as the Clover Background stencil set by LawnFawn to add a clover pattern all over my bag pieces. I left out the handles, well, at least I tried. A few tiny spots went on those as well.
Next I spritzed some Copic Opaque White, mixed with just a drop of water, over the cardstock. It dries so quickly, that the Distress Ink has no chance to stain the white color. That's why I love to use this white on any Distress product.
Then I put the bag together, tied some red ribbon through the slits at the top and tied it to a bow to keep the bag closed.
And then I also prepared the large clover image since I had planned to use it on my by later on. Again I stamped it with Distress Ink, but this time added Twisted Citron as my lightest color. I stamped the whole image with the Twisted Citron, then inked up a bit more than half of the leaves with the Mowed Lawn, leaving the center without this color. I used a blending tool to soften the edge of the ink on the stamp, then stamped it over the lighter image. I repeated this step with Rustic Wilderness, only inking up the edge on the outer edges of the leaves. This way the clover gets some wonderful depth. I added the white lines with a white gel pen and went over the ink with my finger before it had dried to soften those white lines a bit. 


Und dann kamen endlich die neuen Stanzen zum Einsatz. 
Mit der zweitkleinsten der A6 Wave Stanzen habe ich den Aufleger mit dem gewellten Rand aus weißem Cardstock gestanzt. 
Per Hand habe ich dann ein Rechteck aus grünem Cardstock geschnitten und zwar so, dass man den tollen gestitchten Rand innen noch sehen kann. Den grünen Cardstock habe ich an den Rändern wieder mit Mowed Lawn und Rustic Wilderness gewischt.
Für den Text habe ich das Wort Glück mit dem Viel Glück Stanzenset gestanzt - das viel hätte gestanzt zu viel Platz auf meinem Aufleger gebraucht. Ich habe es dreimal ausgestanzt, aufeinander und dann auf den Aufleger geklebt.
Ergänzt habe ich den Text dann mit verschiedenen Stempeln aus dem Stempelset Kleine Worte, die ich neben und unter dem gestanzten Glück mit weißem Embossingpulver aufembosst habe.
Den Aufleger habe ich dann auf die Tüte geklebt und oben rechts das zuvor gestempelte und inzwischen per Hand ausgeschnittene Kleeblatt mit 3D Tape darüber geklebt.
Und dann wollte ich noch einen kleinen Farbklecks auf meiner Tasche. Was passt besser zum Thema Glück und zu Kleeblättern, als Marienkäfer? Ich habe hier die beiden kleinen Käfer aus dem Stempelset Ladybug verwendet. Sie sind mit Copics coloriert, ausgeschnitten und ebenfalls mit 3D Tape auf das Kleeblatt bzw. links unten neben das gestanzte Wort Glück geklebt.

And then I finally brought out those new dies.
I used the second smallest of the A6 Wave die set to die cut the rectangle with the wavy edges from white cardstock.
I cut a slightly smaller rectangle from green cardstock to put on top of the white wavy one, making sure the great stitched lines stay visible. Then I inked up the edges of the green rectangle with Mowed Lawn and Rustic Wilderness again.
For the text I've die cut the word luck three times from white cardstock, stacked it and glued it onto the green rectangle. 
I finished my text with some tiny word stamps, that I've white heat embossed to the top left and under the die cut word directly onto the green cardstock, so now it reads "good luck and all the best". 
I glued the rectangles onto the bag and then put the now fuzzy cut clover over the top right edge with foam tape.
And then I wanted a little bit of color on my bag. What goes better with the theme of luck and clovers than ladybugs? I stamped  the two small ladybugs from the Ladybug stamp set, colored them with Copics and glued them onto the clover and to the bottom left of the die cut word, again using foam tape.

Freitag, 28. Januar 2022

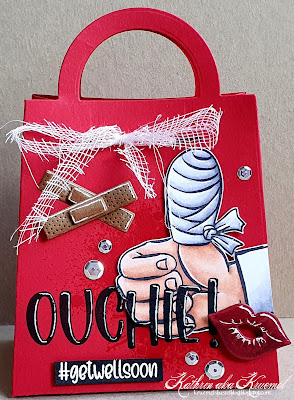
Eine Tasche als Gute-Besserungs-Geschenk

 
Hallo Ihr Lieben!
Mit meinem heutigen Post gebe ich Euch eine Vorschau auf eine der Neuheiten, die es mit dem Februar-Release von Stampcorner geben wird: eine Taschen-Stanze! Sie ist nicht zu klein, so dass doch einiges hineingeht, aber auch nicht so groß, dass sie zu wuchtig wird und wirkt. 
Ich habe sie hier verwendet, um ein kleines Gute-Besserungs-Geschenk zu werkeln.

Hello everyone!
With this post I'm giving you a sneak at one of the new items from Stampcorner's february release: a bag die! It's not too small, so there's plenty of room in it, but also not too large to look gigantic. 
I used it here, to create a little get well gift.


Die Tasche habe ich aus rotem Cardstock gestanzt - rot und weiß sind für mich immer noch die klassischen Gute-Besserungs- bzw. Krankheitsfarben. 
Für die Deko kamen einige der neuen Artikel von WhimsyStamps zum Einsatz. Die passten einfach wie die Faust aufs Auge - oder in dem Fall Hammer auf Daumen. ;)

I've die cut the bag from red cardstock - red and white are still the classical get well colors to me.
To decorate the bag I've used a few items from the latest WhimsyStamps release - they were just perfect here and fit like "hammer on the thumb". ;)


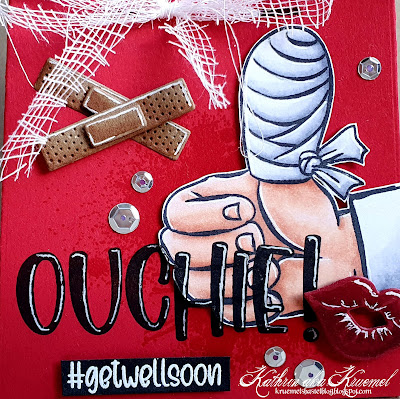
Die Hand mit dem verbundenen Daumenist aus dem Stempelset ManFlu und mit Copics coloriert. Aus dem selben Set ist auch der kleine #getwellsoon Text. Den habe ich mit weißem Embossingpulver auf schwarzen Cardstock embosst, dann habe ich den Streifen mit 3D Tape auf die Tasche geklebt.
Und das große Ouchie! ist aus dem Set Big BooBoo. Ich habe es erst auf die - noch nicht zusammengeklebte - Tasche gestempelt, dann das colorierte Motiv an seinen Platz gelegt und den überlappenden Teil des Textes auch dort aufgestempelt. So ergeben sich keine Linien an den Höhenunterschieden, wo der Stempel nicht bis an die Kante stempelt.
Nur ganz leicht auf den Bildern zu erkennen ist, dass ich hinter die Hand noch zwei der Kleckse aus dem Stempelset Kleckse mit Distress Ink Festive Berries aufgestempelt habe. In echt sind die besser erkennbar. Aber ohne fehlte der Tasche irgendwas.
Für die Pflaster und den Kussmund habe ich Stanzen aus dem Set Slimline Big BooBoo Stanzenset benutzt. Die Teile sind aus braunem bzw. rotem Cardstock gestanzt und anschließend mit Copics und einem weißen Gelmarker noch ein wenig schattiert. 
Um die Tasche zu verschließen, habe ich einen dünnen Streifen Cheesecloth/Verbandsmull zugeschnitten und durch die Schlitze in der Tasche gefädelt. So passt auch die Schleife zum Thema.  
Ganz zum Schluss habe ich noch ein paar silberne Pailetten als Deko aufgeklebt. So ganz ohne Bling kann ich halt nicht...

The image of the insured hand is from the ManFlu stamp set and colored with Copics. The #getwellsoon text is from the same set. I white heat embossed it onto a strip of black cardstock and glued that onto the bag with dimensionals.
It's hard to see on the pictures - it is way better visible in real life - that I stamped a few splotches onto the bag, right under the hand, with Distress Ink Festive Berries. I felt like the bag was too plain without those.
The big Ouchie! is from the Big BooBoo stamp set. I stamped it onto the - not yet glued together - bag, then put the colored image in place and stamped the text again. This way I don't end up with any broken stamp lines where the stamp can't stamp properly due to the different heights of the papers. 
For the band aid and the kissing mouth I used dies from the Slimline Big BooBoo die set. The pieces are cut from brown and red cardstock, then I used Copics and a white gel pen to add some shading to them. 
To keep the bag closed I've cut a strip from cheesecloth and tied it through the slits in the bag. Now even the bow goes with the theme of the bag.
In the end I added a few silver sequins as decoration - I just can't do without at least a bit of bling...

Donnerstag, 1. Juli 2021

Eine Wundertüte!

 
Hallo Ihr Lieben!
Für meinen heutigen Post auf dem Stampcorner Blog habe ich mal wieder eine Knalltüte gemacht - bzw. in diesem Fall eine Wundertüte. Und die ist neben Konfetti noch mit Gutscheinen in Form von kleinen Zettelchen gefüllt.

Hello eveyone!
For my post over at the Stampcorner Blog today I've made a "surprise bag" again. In this case it's filled not only with confetti but also with little vouchers that I've written onto small piecs of paper and folded them up.


Auf dem ersten Bild hatte ich die Tüte ein wenig aufgezogen - nein, natürlich nicht aufgeblasen, soll ja noch verschenkt werden! Hier ist sie wieder flach gedrückt, so kann man sie besser sehen.
Ich habe eine Butterbrottüte verwendet und oben ein wenig eingekürzt. Dann habe ich sie mit dem tollen Tape von Stampcorner oben rundum zugeklebt und dabei ein kurzes Stück eines Papierstrohhalmes mit eingearbeitet. Um das habe ich ein wenig grünes Twine gewickelt und zur Schleife gebunden. 
Um an den Inhalt zu kommen, muss die Tüte durch den Strohhalm aufgeblasen und dann "zerknallt" werden. Das gibt einen schönen Konfettiregen.... ;) 
Natürlich muss die Tüte vor dem Zuklebe gefüllt weden!

On the first picture I had pushed the bag a bit so it looks like blown up. Of course I didn't blow it up since I want to give this away as a gift and no one wants an already used paper straw.
I used a thin lunch paper bag here and cut off a bit at the top. Then I closed the top with Sticky Tape and included a small piece of a paper straw while glueing it closed. Around the paper straw I've wrapped a piece of light green twine and tied it to a bow.
To get to the content of the bag it has to be blown up through the paper straw and then get banged. That makes a great shower of confetti.... ;)
Of course the bag need to be filled before you glue it closed!


Und jetzt endlich mal zur Deko meiner Tüte! Butterbrottüten sind ja ein wenig beschichtet - das Wischen darauf geht super, die Stempelfarbe perlt aber ein wenig. Ich wollte aber auch nicht embossen, da ich Angst hatte, dass das dünne Papier sich zu sehr wellt.
Ich habe von der Ecke unten links die Tüte mit Distress Oxide Broken China, Evergreen Bough und Cracked Pistacchio gewischt. Dann habe ich den WTF Background von WhimsyStamps mit schwarzer Tinte daraufgestempelt. 
Die geniale Schnecke ist aus dem Stempelset Nur kein Stress von Stampcorner. Die schaut so schön freudig überrascht, dass sie einfach perfekt für die Tüte war. Ich habe sie mit Copics coloriert, ausgeschnitten und aufgeklebt. 
Die Text sind aus dem selben Stempelset. Ich habe sie mit weißem Embossingpulver auf schwarzen Cardstock embosst, ausgeschnitten und ebenfalls aufgeklebt.
Und das Wundertüte ist mit einer der eigenen Stanzen, die es jetzt ganz neu bei Stampcorner gibt, gemacht. Ich habe sie einmal aus schwarzem und einmal aus weißem Cardstock gestantzt, versetzt übereinander und dann auf die Tüte geklebt. Statt eines weißen Gelpens habe ich diesmal Highlights mit einem glitzernden Gelpen, ebenfalls von Sakura, gemacht. 
Als Deko habe ich die Sternstanzen aus dem Hearts and Stars Skinny Tag von LawnFawn benutzt, Sterne aus hellgrünem und türkisfarbenem Cardstock gestanzt und auf die Tüte geklebt. Dazwischen habe ich dann noch ein paar silbern glitzernde Nuvo Drops gesetzt.

And now finally about the decorations on my bag. Those bags have some kind of thin coating - blending color is pretty easy on those, but stamp ink tends to pool up a bit. But I didn't dare to heat emboss on the bag because I was afraid the thin paper would warp too much.
I started at the bottom left corner and inked up a portion of the bag with Distress Oxide Broken China, Evergreen Bough and Cracked Pistacchio. Then I stamped the WTF Background by WhimsyStamps over it with black ink.
The great snail is from a stamp set from Stampcorner's june release. She looks so happily surprised that she was just perfect for my bag. I colored the snail with Copics, cut her out and then glued her onto the bag. 
The small words are from the same stamp set - I don't think those need translation. I've white heat embossed them onto black cardstock, cut them out and glued them down.
The die cut word means "surprise bag" - these are pretty common here in Germany. You can buy them in the magazin section of stores and they are available for boys and girls, different ages.... You never know what's inside and kids love them. Even if the content is mostly of no use. I've die cut the word once from black and once from white cardstock, stacked them just a bit off glued them onto the bag. For a change I didn't use a white gel pen but a glittery one, also by Sakura, for the  hightlights.
For decorations I used the star dies from the Hearts and Stars Skinny Tag die by LawnFawn and cut stars from light green and turquoise cardstock. Then I glued those onto the card and added a few silver glittery Nuvo Drops in between.