Mittwoch, 31. August 2022

Geburtstagskarte für den Tochter-Freund

 
Hallo Ihr Lieben!
Der Freund meiner Tochter hatte Geburtstag, und da wollte ich natürlich auch eine Karte zum Geschenk machen. Männerkarten.... Diesmal war ich aber total inspiriert von einer Karte, die Ashley Tucker für den MFT YouTube Kanal gemacht hat. Allerdings habe ich das Design natürlich passend abgewandelt, auch, weil ich einige der benutzten Produkte nicht habe.

Hello everyone!
The boyfriend of one of my daughter's celebrated his birthday, and of course I wanted to give him a card with his gift. Male cards.... But this time I was highly inspired by a card, Ashley Tucker made for the MFT YouTube channel. Of course I changed the design, also because I didn't have some of the products she used.

Die Kartenbasis ist weiß, darauf befindet sich ein etwas kleineres Stück schwarzen Cardstocks.
Wiederum darauf ist ein Stück dunkelgrauen Cardstocks, auf den ich Brushstrokes klar aufembosst habe. Dafür habe ich Stempel von MarianneDesign sowie welche aus dem Abstract Art Stempelset von MFT kombiniert. Außerdem habe ich silberfarbene Spritzer mit Metallic Watercolor aufgespritzt.
Und darauf kamen dann die tollen Kerzen aus dem Wish Big Stanzenset von MFT. Die habe ich aus Cardstock in hellgrün, dunkelgrün, hellem türkis, hellblau und dunkelblau gestanzt. Die Flammen sind aus silberfarbenem Spiegelcardstock. 

The card base is white, on top is a slightly smaller piece of black cardstock. 
On top of that black cardstock there's an even smaller rectangle cut from dark grey cardstock. I clear heat embossed brush strokes onto it, combining stamps by MarianneDesign and from the Abstract Art stamp set by MFT. I also spritzed some silver metallic watercolor over the embossing.
And then I attached those amazing candles from the Wish Big die set by MFT onto the background. I've die cut the candles from light green, dark green, light turquoise, light blue and dark blue cardstock, the flames are cut from silver mirror cardstock.


Quer über die Kerzen habe ich den Text meiner Karte aufgeklebt.
Das birthday ist aus dem Big Scripty Word Set von LawnFawn. Ich habe es weiß auf schwarzen Cardstock embosst und mit der dazugehörigen Stanze ausgestanzt. Außerdem habe ich es mit vier Stanzteilen aus schwarzem Cardstock hinterlegt.
Der übrige Text ist mit Stempeln aus dem All About You Stempelset von MFT gemacht. Die habe ich einfach schwarz auf weißen Cardstock gestempelt.
Und da der Freund meiner Tochter Hühner liebt, musste ich unbedingt das Partyhuhn aus einem der Stempel aus dem Happy Birthday Herd Set von MFT mit unterbringen. Ich habe es abgestempelt, ganz dezent mit Copics schattiert - coloriert kann man hier fast nicht sagen - aus der Szene drumherum ausgeschnitten und oben auf den Cardstock mit dem aufgestempelten Happy aufgesetzt. 
Als Deko habe ich einige Enamel Dots, passend zu den Farben der Kerzen, verwendet. 
Und für etwas Kontrast auf der Karte habe ich mit einem weißen Gelstift einen gestitchten Rand auf den grauen Cardstock gemalt.

Across the candles I added my text.
The birthday is from the Big Scripty Words set by LawnFawn. I've white heat embossed it onto black cardstock, then cut it out with the matching die. I also put four more black die cuts behind the word.
The rest of the text is made using stamps from the All About You stamp set by MFT. I simply stamped those black onto white cardstock.
And since my daughter's boyfriend loves chickens I just had to include the little party chick from one of the stamps from the Happy Birthday Herd stamp set by MFT. I stamped it, lightly shaded it with Copics - you really can't call that coloring here -, cut it out of the scene and then sat it on top of the cardstock strip with the stamped on happy.
I used a few Enamel Dots, chosen to match the colors of my candles, as embellishments.
And then I drew a stitched edge onto the grey cardstock, using a white gel pen.


Hier kann man den Glanz der Flammen und der silbernen Spritzer besser sehen. 
Zum Schluss habe ich dann nur noch den grauen Cardstock mit der Deko mit 3D Tape auf die Karte geklebt.

Here you can see the shine of the flames and the silver splatters a bit better.
In the end I attached the grey cardstock with the decorations onto the card, using foam tape for some dimension.

Dienstag, 30. August 2022

LawnFawnatics Challenge #131

 
Hallo Ihr Lieben!
Heute zeige ich Euch meine Karte für die LawnFawnatics Challenge #131. Change the scene ist das Thema. Und da die Challenge über drei Wochen geht, konnte ich abwarten, bis meine Bestellung aus dem neuen Release angekommen ist, so dass ich es gleich verwenden konnte. Entstanden ist diese etwas andere Halloween-Karte.

Hello everyone!
Today I am sharing with you my entry for the LawnFawnatics Challenge #131. Change the scene is the theme. And since this challenge runs three weeks, I was able to wait until my order from the new release arrived - and use it right away. So I made this a bit unusual Halloween card.

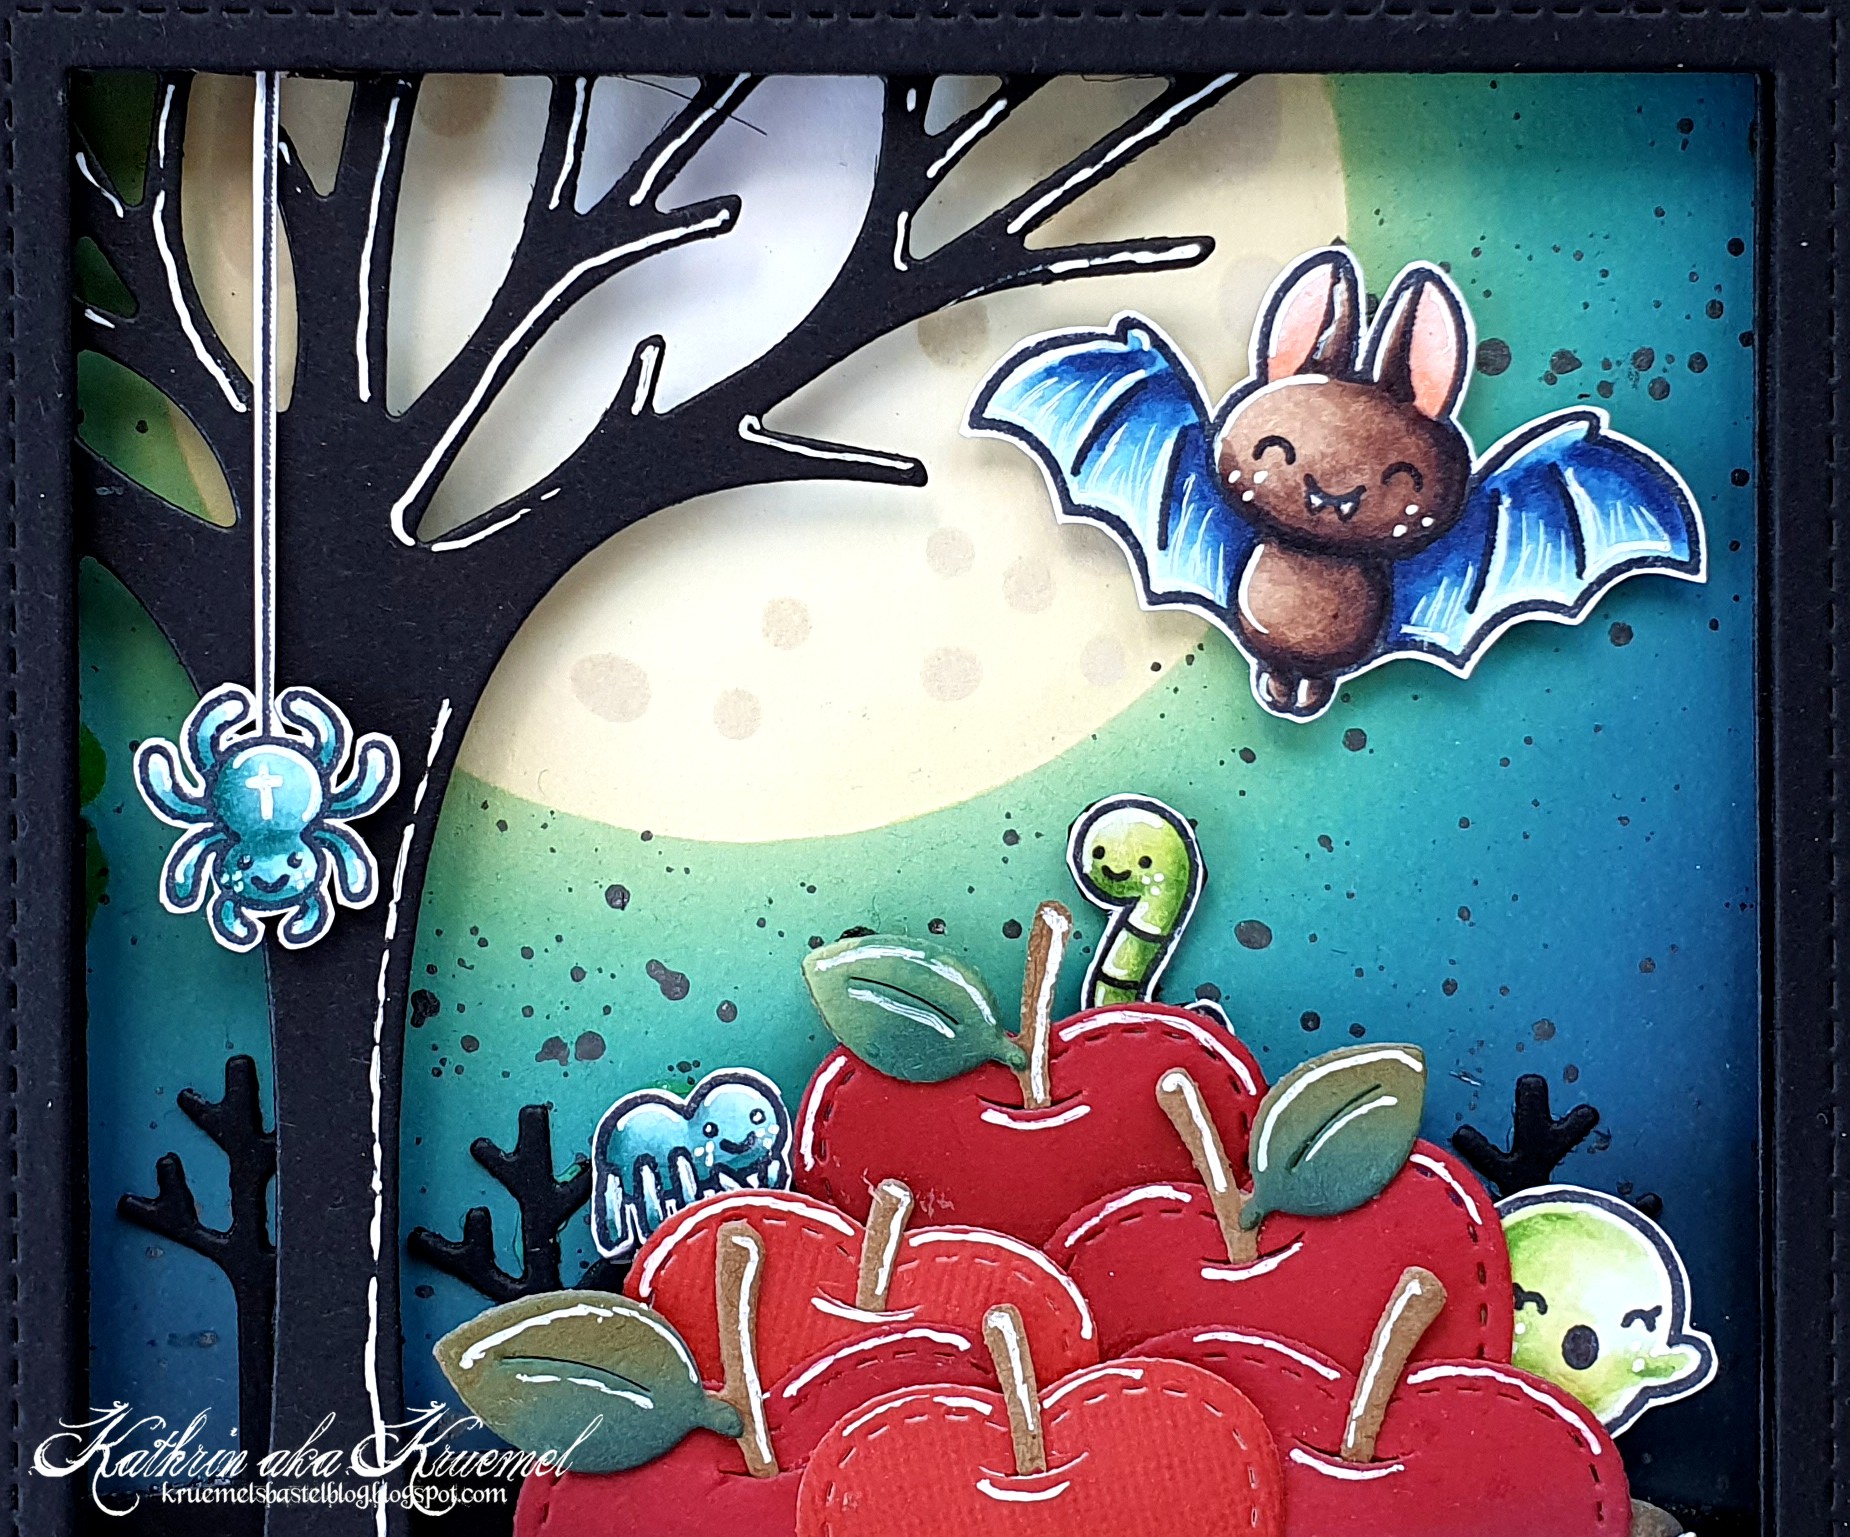
Ja, auf meiner Karte gibt es Äpfel statt Kürbissen. Auch wenn einer der Äpfel das wohl nicht so ganz mitbekommen hat und sich fröhlich als Jack-o-Lantern gibt.... Und so ändert sich die Karte, wenn man oben am Tab zieht:

Yes, there are apples instead of pumpkins on my card. Seems like one of the apples didn't get that and is playing Jack-o-Lantern... And this is, how the scene changes, when you pull the tab at the top edge of the card:


Zwischen bzw. hinter den Äpfel erscheinen ein Wurm, ein Geist und eine Spinne. Na, ob ich da noch zugreifen wollen würde...?
Für meine Karte habe ich erst den Hintergrund gestaltet. Vom Mond hätte eigentlich mehr zu sehen sein sollen, aber ich hatte einen Denkfehler - wenn man die Stanze mit dem Baum verkehrt herum vor sich liegen hat, dann kann es schon passieren, dass man den Mond dann links aufwischt, obwohl der Baum nach dem Stanzen links ist.... 
Ich habe hier die neue Nighttime Sky Stencil von LawnFawn benutzt. Erst habe ich die runde Stencil auf ein Stück weißen Cardstock gelegt und den Himmel mit Distress Oxide Twisted Citron, Lucky Clover, Uncharted Mariner und Black Soot gewischt und schwarze Metallic Watercolor aufgespritzt. Dann habe ich das Gegenstück aufgelegt und den Mond mit Antique Linen gewischt. Die Krater habe ich dann mit Old Paper hinzugefügt. 
Auf den fertigen Himmel kam dann eine Reihe kahler Bäume, gemacht mit der ebenfalls neuen Simple Stitched Tree Border Stanze und schwarzem Cardstock. 
Für den Baum habe ich die Leafy Tree Backdrop Portrait ebenfalls aus schwarzem Cardstock gestanzt, ganz obenauf kam noch eine der Simple Stitched Rectangle Frames, auch die aus  schwarzem Cardstock gestanzt. Die Rahmen sind jeweils mit aufgedoppeltem 3D Tape aufgeklebt - die Tiefe brauchte ich für meinen Ziehmechanismus. Den habe ich mit der Let's Toast Pull Tab Stanze gemacht, da meine Motive etwas höher stehen, habe ich den Ziehtab etwas gekürzt. Und damit sich drei Motive gleichzeitig auf und ab bewegen, habe ich den Wurm direkt am Mechanismus angeklebt, die anderen beiden Motive befinden sich am Ende kleiner Folienstreifen, die am Mechanismus angeklebt sind.

Between or behind the apples a worm, a ghost and a spider show up. Well, I'm not sure if I would want to grab one of those apples anymore...
For my card I first created the background. I wanted to be more of the moon visible, but I made a dumb mistake - I had the die with the tree laying on top of me with the cutting side up. So I did my moon on the left side of the cardstock, not realizing that the tree on the die cut piece would be one the left as well...
I used the new Nighttime Sky stencil by LawnFawn here. First I put the round stencil down onto a piece of white cardstock and inked the sky with Distress Oxide Twisted Citron, Lucky Clover, Uncharted Mariner and Black Soot and spritzed some black metallic watercolor on top. Then I put down the "real" stencil and inked the moon with Antique Linen, adding the craters with Old Paper.
Onto the finished sky I glued a row of bare trees, made with the also new Simple Stitched Tree Border die and black cardstock.
For the tree I used the Leafy Tree Backdrop Portrait die and cut it from black cardstock, as the top layer I attached one of the Simple Stitched Rectangle Frames, again cut from black cardstock. Both frames are attached to the background with doubled up foam tape - I needed that depth for my mechanism. I made this with the Let's Toast Pull Tab die set, since my images are a bit higher on the card I shortened the pull tab a bit. To have three moving images instead of just one, I glued the worm directly to the mechanism and attached two strips of acetate to it, onto which I glued the other images.


Im oberen Bereich der Karte habe ich eine der Fledermäuse sowie die Spinne am Faden aus dem neuen Fangtastic Friends Stempelset. Alle Motive auf der Karte sind mit Copics coloriert. Ich wollte, dass meine Fledermaus ein wenig ins Farbkonzept passt und habe sie deswegen mit braunem Körper und blauen Flügeln coloriert. 

To the top area of the card I attached one of the bats and the spider from the new Fangtastic Friends stamp set. All images on the card are colored with Copics. I wanted my bat to match the colors on my card so I used browns for her body and blues for the wings.


Der Korb voller Äpfel ist mit der Build-a-Barrel: Apple Stanze gemacht. Der Korb selbst ist aus braunem Cardstock gestanzt und mit Distress Oxide Walnut Stain und Black Soot schattiert. Die metallene Umrandung ist aus matt-silbernem Metallic Cardstock gestanzt. Ich wollte, dass der Korb so ausssieht, als stände er schon einige Zeit im Freien. Deswegen habe ich verschiene rot-braune Copictöne benutzt und mit kleinen Punkte Rost aufgetupft.
Die Äpfel sind aus zwei verschiedenen Tönen roten Cardstocks gestanzt und mit Distress Ink Aged Mahogany bzw. Fired Brick schattiert. Die Blätter, aus zwei verschiedenen grünen Cardstocken gestanzt, sind mit Lucky Clover und Black Soot gewischt. Für die Highlights auf allen Motiven habe ich wieder einen weißen Gelstift verwendet. 
In den Apfel, der vor dem Korb liegt, habe ich ein Kürbisgesicht gestanzt und das dann gelb hinterlegt. Hier musste ich fremdgehen - sollte es von LawnFawn nur ein Kürbisgesicht als Stanze geben, dann habe ich die nicht. Die hier verwendete Stanze ist von MFT und von der Größe her fast perfekt. 
Für den Geist habe ich einen der Geister aus einem der Stempel aus dem Simply Celebrate Fall Stempelset ausgeschnitten, der Wurm hinter dem obersten Apfel ist aus dem Set A Bug Deal und die Spinne wieder aus dem Fangtastic Friends Set. Vor dem Kürbis befindet sich noch ein kleiner Wurm, der ist aus dem Set Purr-fectly Wicked Add-On.
Vor den Baum habe ich noch ein Holzschild aus dem Apple-solutely Awesome Stempelset aufgestellt, auf das ich ein BOO!, wieder aus dem Set Fangtastic Friends, aufgestempelt habe. 
Vor meine Deko habe ich eine Lage Gras gesetzt. Das ist aus grünem Cardstock gestanzt und wieder mit Lucky Clover und Black Soot gewischt. 
Und oben quer über den Rahmen habe ich dann meinen Text aufgeklebt.  Dafür habe ich Stempel aus den Sets Apple-Solutely Awesome und Costume Party kombiniert und mit weißem Embossingpulver auf schwarzen Cardstock embosst.

The barrel full of apples is made with the Build-a-Barrel: Apple die set. I've cut the barrel from brown cardstock and shaded it with Distress Oxide Walnut Stain and Black Soot. The metall rings are cut from matte silver cardstock. I wanted it to look like the barrel has been standing outside for quite some time. So I used different shades of reddish-brown Copics and made small dots onto the metallic cardstock to make it look rusty.
The apples are cut from two different shades of red cardstock and shaded with Distress Ink Aged Mahogany and Fired Brick. The leaves, cut from two shades of green cardstock, are shaded with Lucky Clover and Black Soot. For the highlights on all the images I used a white gel pen.
I die cut a jack-o-lantern face into the apple that is laying outside the barrel. I had to use a die by MFT here, because if there is a die by LawnFawn that just cuts such a face without any shape around it, then I don't have it. But this one is nearly perfect in size.
For the those I cut out one of the ghosts from the Simply Celebrate Fall stamp set, the worm behind the apple on top is from the A Bug Deal set and the spider again from the Fangtastic Friends stamp set. There's another small worm crawling by the Jack-o-Lantern apple, which is from the Purr-fectly Wicked Add-On stamp set.
I added a sign in front of the tree - the sign is from the Apple-Solutely Awesome stamp set and I stamped a BOO! from the Fangtastic Friends set onto it. 
On top of my scene I glued a layer of grass, cut from green cardstock and again shaded with Lucky Clover and Black Soot. 
And across my card, on top of the rectangle frame, I attached my text. I combined stamps from the sets Apple-Solutely Awesome and Costume Party here and white heat embossed it onto black cardstock.

Montag, 29. August 2022

Eine Babykarte zur Geburt

 
Hallo Ihr Lieben!
Eine meiner Töchter hat mich gebeten, zwei Babykarten zur Geburt zu machen. Einmal für einen kleinen Jungen, einmal für ein kleines Mädchen. Da sich die beiden Neu-Eltern-Paare nicht kennen und mein Vorrat an Stempeln und Stanzen zum Thema Baby eher dünn ist, habe ich beschlossen, beide Karten fast identisch zu machen und nur Details wie Farben und einige andere Kleinigkeiten auszutauschen. Clean und Simple war der Plan. War. Denn dann kam Jennifer McGuire - ich habe beim Basteln meist YouTube Videos laufen - und hat eine Idee für eine See Through Window Easel Card gepostet. Und zack, da waren alle Pläne über den Haufen geworfen und die Karten sind dann doch etwas aufwändiger geworden. 
 
 Hello everyone!
One of my daughters asked me to make two baby cards - one for a little girl and one for a little boy. Since the parents of these babies don't know each other and my stock on baby themed stamps and dies is pretty limited, I've decided, to make both cards quite identically, just doing some smaller changes like colors and a few small details. Clean and simple was what I had in mind. Was. Leave it to Jennifer McGuire to make me change those plans. When crafting I'm wachting craft videos on YouTube most of the time. And just when I sat down to make the cards she posted a video about how to make a See Through Window Easel Card. Boom - there went my plans for clean and simple cards.

Heute zeige ich Euch erstmal nur die Jungen-Variante - das kleine Mädchen ist noch nicht da und so kenne ich auch den Namen noch nicht. 
Für den Hintergrund habe ich mit der Quilted Backdrop Stanze von LawnFawn das Muster in ein Stück weißen Cardstocks gestanzt und kleiner geschnitten. Dann habe ich das Oval aus der Mitte gestanzt und alles mit mittelblauem Cardstock hinterlegt, aus dem ich an der selben Stelle ebenfalls ein Oval gestanzt habe.

Today I'm only going to share the boy's card - the little girl is due any day now but I don't know the name the parents have picked for her yet.
For the background I've die cut the pattern with the Quilted Backdrop die by LawnFawn from some white cardstock, then cut that smaller and die cut the oval from the center. Then I matted the piece with some middle blue cardstock, also with a oval die cut from the same spot.


Hinter den Lagen mit den ausgestanzten Ovalen befinden sich noch 3 Lagen weißen Cardstocks, ebenfalls mit ausgestanztem Oval. Zwischen diese Lagen habe ich einmal ein Stück blau-weißes Twine geklebt, einmal befindet sich Folie dazwischen. 
Am Twine habe ich einen kleinen Babybody aufgehängt. Der ist mit einer Stanze von Magnolia aus hellblauem Cardstock gestanzt, für den Kleiderbügel habe ich matt-silbernen Metallic Cardstock verwendet. Das Stanzteil ist nur mit dem Kleiderbügel am Twine befestigt, so dass der Body hin und her schwingt, wenn man die Karte bewegt.
Am unteren Rand des Ovals habe ich einige Babymotive aufgeklebt. Die sind mit Stanzen aus weißem Cardstock gemacht und mit Copics coloriert.

Behind the cardstocks with the cut out oval I put three more layers cut from white cardstock, from which I've also die cut the oval. Between those layers I've put a piece of blue and white twine and some acetate.
I've hung up a onesie onto the twine. I've made that using light blue cardstock and a die by Magnolia. The hanger is cut from matte silver metallic cardstock. I've only attached the onesie to the twine, so it swings when the card is moved.
To the bottom of the oval I've attached a few baby items. They were die cut from white cardstock and colored with Copics.


Klappt man die Karte auf, befindet sich im Inneren mittelblauer Cardstock mit einem kleinen Text, der bei geschlossener Karte vom Body verdeckt wird. 
Der blaue Cardstock ist eine weitere Karte, die man nach oben hin aufklappen kann. Hier ist genug Platz für eine persönliche Nachricht - die man aber dann bei aufgestellter Karte nicht sieht.

When you open the card there's some middle blue cardstock inside onto which I've glued a small text, that is covered by the onesie when the card is closed.
The blue cardstock is another top folding note card where you can write a personal message inside that won't be visible when the card is propped up.


Und so sieht die Karte dann mit aufgestelltem Easel Teil aus. Durch das Oval kann man hindurchschauen und der Body scheint frei in der Luft zu hängen.

And this is what the card looks like when the easel is propped up. You can see through the oval and the onesie seems to hang just on the twine.


Hier kann man den Effek nochmal wunderbar sehen. 
Für den Text auf der Karte habe ich ein Hallo mit dem Lemon Alphas Stanzenset von Create a Smile gestanzt - drei Lagen aus weißem Cardstock, eine Lage aus dunkelblauem. Die habe ich dann gestackt und an die Rundung des Ovals angepasst oben auf der Karte angeklebt.
Der Name des kleinen Jungen sollte natürlich mit auf die Karte. Dafür habe ich das Henry's ABCs Stanzenset von LawnFawn verwendet und die Buchstaben jeweils dreimal aus hellblauem Cardstock und einmal aus dunkelblauem Cardstock gestanzt. Die hellblauen Lagen sind aufeinander geklebt und bilden, leicht versetzt aufgeklebt, die Schattenlage für die dunkleren Buchstaben. 
Damit der Easel stehenbleibt, habe ich auf der mittelblauen Karte im Inneren einen weißen Kreis mit einem aufgestempelten "schön, dass du da bist" angebracht. Der Kreis ist dunkelblau gemattet und mit 3D Tape aufgeklebt. Daneben habe ich zwei kleine hellblaue Sterne, gemacht mit der Hearts and Stars Skinny Tag Stanze von LawnFawn aufgeklebt. Die sieht man bei geschlossener Karte durch das ovale Fenster rechts und links neben dem Body.
Zum Schluss habe ich als Deko noch einige hellblaue Perlen mit aufgeklebt.
Die Mädchenvariante reiche ich Euch dann bald nach!

Here you can see the window effect again.
For the text I've die cut the letters for the word hello using the Lemon Alphas die set by Create a Smile - I've cut them three times from white and once from dark blue cardstock. Then I stacked them and glued them above the oval onto the card, following the shape of the oval.
Of course the boy's name should be included on the card. So I've die cut the letters for it three times from light blue and once from dark blue cardstock, using the Henry's ABCs die set by LawnFawn. The stacked light blue letters create the shadow for the dark blue ones, that I glued on top moving them a bit to the top right.
To make the easel stand savely I've glued a circle with a "so happy you're here" text onto the middle blue card on the inside. I've matted that white circle dark blue and used foam tape to glue it down. Next to it I've put two small light blue stars, cut with a die from the Hearts and Stars Skinny Tag die by LawnFawn. When the card is closed, those stars are visible through the window and are to the left and right of the onesie.
In the end I've added a few light blue pearls as embellishments.
And soon I will share the girl's version with you.

Samstag, 27. August 2022

Stempeleinmaleins - Ausgabe vom 27. August 2022


Hallo Ihr Lieben!
Die Sommerpause ist vorbei, deswegen startet das Stempeleinmaleins heute wieder mit einem neuen Sketch. Und das ist meine Umsetzung.
 
Hello everyone!
Summer break is over, so Stempeleinmaleins is back with a new sketch for you today. And this is the card I made after it.
 
 Wir legen die Themen und vor allem Sketche meist einige Zeit im Voraus fest, und so ist diese Karte bereits Ende Juni entstanden. Damals kam die geniale Jungs-Serie von PrettyPinkPosh auf den Markt. Bagger, Autos, Dinos - alles, was die Herzen kleiner Jungs höher schlagen lässt. Und da mein Enkel and keinem Bagger, Bus oder Auto vorbei kann, ohne begeistert schauen zu müssen, war diese Serie für mich ein Must Have. Und die wollten dann auch gleich eingeweiht werden.
In dem Release gibt es mehrere dreilagige Stencils, den Layered Construction Trucks Stencil habe ich hier gleich mal für den Hintergrund eingeweiht. Ich habe die verschidenen Baufahrzeuge, Erde und Pylonen mit einer Mitschung aus Distress Ink und Distress Oxide eingefärbt. Zum Einsatz kamen Spiced Marmalade, Mustard Seed, Pumice Stone, Hickory Smoke, Black Soot, Frayed Burlap und Salvaged Patina. Den weißen Streifen auf der Pylone habe ich mit weißer Stempeltinte auf die orangefarben gewischte Pylone aufgetragen. Anschließend habe ich aus dem Stempelset Across the Miles, ebenfalls von PrettyPinkPosh, die Worte Beep und Vroom einige Male mit schwarzer Tinte in die Zwischenräume gestempelt und ein wenig Distress Ink Frayed Burlap, gemischt mit etwas Wasser, über den Hintergrund gespritzt.

Usually we pick our themes and especially sketches some time ahead, and so this card was already made end of june. That's when PrettyPinkPosh released their great boys' series. Constructions trucks, cars, dinosaurs - it includes so much that makes little boys happy. Since my little grandson can't pass a bus, excavator or car withouth squealing from joy of course this release was a must have for me. And I just had to use them right away. 
In this release there are also several 3 layer stencils, I used the Layered Construction Trucks stencil for the background of this card. I've inked the different trucks, the piles of dirt and the pylons with a combination of Distress Ink and Distress Oxide. I used Spiced Marmalade, Mustard Seed, Pumice Stone, Hickory Smoke, Black Soot, Frayed Burlap and Salvaged Patina. In Germany pylons are orange with a white band. So I added the band with white ink after I had done the whole pylons in orange. Then I used the beep and vroom stamps from the Across the Miles stamp set, also by PrettyPinkPosh, and stamped the words into the open spaces of the background, then mixed some Distress Ink Frayed Burlap with a bit of water and spritzed it onto the cardstock.


Als Motiv für die Karte habe ich den Bagger sowie zwei Erdhaufen, die Schaufe und eine weitere Pylone, alle aus dem Set Construction Trucks, verwendet. Sie sind mit Copics coloriert, ausgeschnitten und mit 3D Tape auf ein Stück Vellum geklebt, um das ich einen schmalen Rahmen aus schwarzem Cardstock geklebt habe. Dann habe ich alles wiederum mit 3D Tape auf den Kartenhintergrund geklebt. Das Vellum tönt den Hintergrund hier ein wenig runter, so dass die Motive nicht untergehen.
Vom Auspuffrohr - ich denke mal, das ist es - habe ich noch drei kleine weiße Wölkchen aufsteigen lassen.

As the image for this card I've picked the excavator, two piles of soil, a shovel and another pylon from the Construction Trucks stamp set. All images are colored with Copics, cut out and then glued with foam tape onto a piece of vellum. Before I had put a thin frame, cut from black cardstock, onto the vellum. The vellum tones the background down a bit so the individual images don't get lost in the quite busy background.
I decided to glue three tiny clouds to the exhaust pipe - I think that's what this piece on the roof of the excavator is.


Den Text für die Karte habe ich auf mehrere Streifen gelben Cardstocks verteilt. Ich habe hier Stempel aus dem Set Let's Work Together von MFT verwendet und sie mit schwarzer Tinte aufgestempelt. Dabei habe ich den Wortteil friend von friendship durch ein aus schwarzem Cardstock gestanztes Wort friend ersetzt. 
Die Streifen sind mit dünnerem 3D Tape auf den Hintergrund geklebt, die Enden habe ich unter dem schwarzen Rahmen um das Vellum versteckt. 
Da die gelben Streifen allein fast ein wenig Kontrast hatten, habe ich noch jeweils einen Rahmen mit einem schwarzen Fineliner aufgemalt.

The text for this card is put onto several strips cut from yellow cardstock. I used stamps from the Let's Work Together stamp set by MFT here and stamped them with black ink. I replaced the word part friend from the word friendship with a die cut friend, cut from black cardstock.
The strips are glued onto the background with some thinner foam tape, the right ends are hidden under the frame on top of the vellum.
Since the yellow strips didn't have enough contrast I decided to also use a black fineliner and draw a thin frame onto each strip.


Den kompletten Cardstock habe ich dann schwarz gemattet und auf einen weißen Kartenrohlig geklebt. Als Deko habe ich ein paar schwarze Glitzersteine aufgeklebt, außerdem habe ich das gestanzte Wort friend sowie die Abgaswölkchen über dem Bagger mit einem Nuvo Glitter Aqua Marker beglitzert.

I matted the complete cardstock black and glued it onto a white note card. 
To decorate my card I added a few black rhinestones and used a Nuvo Glitter Aqua Marker on the die cut word friend and the tiny exhaust clouds.

Freitag, 26. August 2022

Noch ein Sneak!


Hallo Ihr Lieben!
Am Montag habe ich Euch ja bereits ein Sneak auf die neuen Stempel von Stampcorner gezeigt. Heute zeige ich Euch ein weiteres neues Stempelset - und es ist herbstlich! Da freue ich mich besonders drüber, denn ich stecke bereits mitten im Herbst, zumindest wenn es ans Basteln geht.
 
Hello everyone!
Monday I've shared a sneak of one of the new stamps that will be available at Stampcorner in September.  Today I am sharing another new stamp set - and it has a fall theme! I am so happy about that, because I am already deep into fall, at least craft wise.

Hier habe ich für den Hintergrund Distress Ink Peacock Feathers und Salvaged Patina so auf weißen Cardstock aufgewischt, dass die Farben zu den Rändern hin auslaufen, und dann goldene Metallic Watercolor ganz dezent darüber gespritzt. Und weil ich von der Farbe noch etwas auf dem Pinsel hatte, habe ich damit ganz spontan den Boden meiner Szene auf die Karte gemalt. Dabei habe ich die Farbe recht verdünnt aufgetragen, so dass der Boden halb transparent aussieht, trotzdem hat er einen tollen Schimmer.
Auf den getrockneten Hintergrund habe ich dann ein paar Birkenstämme geklebt. Die  habe ich mit einer Stanze von MarianneDesign aus weißem Cardstock gestanzt und von unten her mit Distress Oxide Gathered Twigs gewischt. Auch hier habe ich die Farbe nach oben hin ins Weiß übergehen lassen, so dass die Bäume zum Kartenhintergrund passen.

Here I inked up a piece of white cardstock with Distress Ink Peacock Feathers and Salvaged Patina, letting the ink fade out towards the edges, and then put some tiny splatters of golden metallic watercolor on top. Since I had some of this color left on my brush, I decided to use it to create  the ground for my scene. I used quite a lot of water when putting the color down, so the ground looks kind of translucent but has this wonderful shimmer.
Onto the dried background I attached some birch trees. I've die cut these from white cardstock with a die by MarianneDesign and then inked them up with Distress Oxide Gathered Twigs. Again I let the color fade into the white at the top of the trees, so they match the background on my card.


Und hier sind zwei der tollen Motive aus dem neuen Set. Ich finde sie so zuckersüß gezeichnet und auch das Colorieren hat wahnsinnig viel Spaß gemacht. Aber das Set bekommt Ihr die nächste Zeit noch öfter zu sehen.... ;)
Ich habe die Motive mit Copics coloriert, ausgeschnitten und auf den Hintergrund geklebt. Die Blätter habe ich auf ein Reststück Watercolor Paper gestempelt, das ich zuvor mit Distress Inks und Wasser eingefärbt und von einer anderen Karte übrig hatte. Dann habe ich sie ebenfalls ausgeschnitten und auf dem Boden verteilt. Einige Blätter durften auch durch die Luft fliegen. 
Der Text ist aus dem Freunde 1 Set von Stampcorner. Ich habe die Anordnung beim Abstempeln ein wenig verändert und den Text weiß auf schwarzen Cardstock embosst.

And here are two of the cute images from the new set. I just love them and coloring them was so much fun. And you'll see cards made with this set quite often these coming weeks.... ;)
I colored the images with Copics, cut them out and glued them onto the background. The leaves are stamped onto some cardstock that I had left over from another card and that I had colored with Distress Inks and lots of water. Then I cut those out as well and put them to the critters' feet. A few of them are also flying through the air.
The text means "friendship doesn't have to be perfect, just true". I've white heat embossed it onto some black cardstock.


Wie man sehen kann, habe ich wieder 3D Tape in zwei verschiedenen Dicken verwendet, um die Karte zusammenzukleben. 
Als Deko habe ich einige matt-goldene Pailetten aufgeklebt. Dann habe ich alles schwarz gemattet und auf einen weißen Kartenrohling geklebt.

As you can see I used foam tape in two different thicknesses again to put my scene together. 
As embellishments I picked some matte golden sequins and glued them onto the card. Then I matted my cardstock black and glued it onto a white note card.

Donnerstag, 25. August 2022

Hallo Lieblingsmensch

 
Hallo Ihr Lieben!
Manchmal möchte man auch gerne mal einfach so eine Karte verschicken - ohne besonderen Anlass. Und eine solche "Einfach-So-Karte" zeige ich heute auf dem Stampcorner Blog.

Hello everyone!
Sometimes we want to send out a card just because - without a special occasion being the reason. And such a "just-because-card" is, what I'm sharing over at the Stampcorner Blog today. 

Nun, bei dieser Karte hatte ich mir zudem selbst eine Challenge gestellt: white space. Ich liebe Karten mit kompletten Szenen, aber das Designelement weiß kommt da dann doch oft zu kurz. Und das wollte ich hier mal einsetzen.
Ich habe ein Stück weißen Cardstock schwarz gemattet und auf einen weißen Kartenrohling geklebt. 
Mit der Herzen-Stencil Nr. 30 und einem kleinen Blending Brush habe ich im unteren Bereich erst einige Herzen und Punkte mit Distress Ink Spun Sugar aufgewischt. Dann habe ich den Stencil verschoben und einige weitere Herzen und Punkte in Victorian Velvet hinzugefügt und dabei darauf geachtet, dass sich einige der Element überlappen. Zum Füllen habe ich dann noch einige zusätzliche Punkte aufgewischt. 
Anschließend habe ich goldene Metallic Watercolor über den Cardstock gespritzt und dabei den Hauptteil der Kleckse wieder im unteren Bereich der Karte aufgetragen.

Well, with this card I also gave myself a challenge: white space. I love cards with one complete scene, but the design element white space is hard to include there. So I wanted to make a card with lots of white/free space.
I've matted a piece of white cardstock black and glued it onto a white note card. 
I used a heart stencil and a small blending brush to stencil some hearts and dots onto the bottom half of the card with Distress Ink Spun Sugar. Then I moved the stencil and added more dots and hearts with Victorian Velvet, making sure some of the elements overlap. Then I added a few more dots just where I thought I needed them.
I used golden metallic watercolors for the speckles, spritzing the main part of them onto the bottom of my card again.
 

 Mit der Lieblingsmensch-Stanze habe ich drei Lagen aus weißem sowie die Toplage aus matt-goldenem Spiegelcardstock gestanzt und alles aufeinander geklebt. Dann habe ich noch eine schwarze Mattung per Hand zugeschnitten. Wer sich da frei Hand schwer tut - einfach die Stanze auf ein Stück Cardstock legen, die Außenkante mit einem spitzen Bleistift nachfahren und anschließend entlang der Linie ausschneiden - so passt die Mattung perfekt. Ich habe das gestackte Wort auf die Mattung geklebt und dann alles mit dickem 3D Tape auf dem Hintergrund befestigt.
Für den kleinen Text kamen zwei Stempel aus dem Set Kleine Worte zum Einsatz. Ich habe sie mit weißem Embossingpulver auf schwarzen Cardstock embosst, ausgeschnitten und mit dünnerem 3D Tape über und unter das gestanzte Wort geklebt.
Natürlich durfte ein wenig Deko nicht fehlen. Und weil es so viel Spaß gemacht hat, die Karte mit den kleinen Motive, die ich Euch vor einiger Zeit gezeigt habe, zu machen, habe ich auch hier wieder zu solchen gegriffen: die Blumen aus dem Set Glücksbringer. Die kleinere Blüte ist ein extra Stempel, die größere hält eigentlich ein Gnom in der Hand. Aber den habe ich einfach weggelassen. Ich habe die Blümchen mit Copics coloriert, einige Details mit einem weißen Gelstift hinzugefügt und sie dann ebenfalls mit dem dünneren 3D Tape unter das gestanzte Wort samt Mattung geklebt. 

I used the "favorite human" die and die cut it three times from white cardstock and once from matte golden metallic cardstock for the top layer and glued them all on top of each other. Then I used my scissors to cut the black matting. If you have a hard time cutting it in a even distance to the word by hand - simply place the die on your cardstock, use a sharp pencil to trace the outline and cut it out along those pencil lines - this way the matting always has the perfect size. I glued the stacked word onto the matting and then used thick foam tape to glue it onto the background.
The smaller text means "hello"  and "you're awesome". I've white heat embossed it onto black cardstock strips and then used thinner foam tape to glue the words above and under the die cut word.
Of course my card neede a bit of embellishing. And since I had so much fun using those small images on the card I've shared with you a little time ago, I used small images again on this card: tiny flowers. I've colored them with Copics, added some details with a white gel pen and then used the thin foam tape again to put the flowers partially under the die cut word including matting.


Zum Schluss habe ich mit einem schwarzen Fineliner einen Rahmen per Hand auf den Cardstock gemalt und außerdem einige matt-goldene kleine Pailetten aufgeklebt.

In the end I used a black fineliner to hand draw a frame onto the cardstock and glued down a few small matte golden sequins.

Mittwoch, 24. August 2022

Create a Smile Sketch Challenge August 2022

 
Hallo Ihr Lieben!
Heute startet auf dem Create a Smile Blog die Sketch-Challenge für August 2022. Und wie immer hat mich der Sketch sofort inspiriert - entstanden ist danach diese Karte.

Hello everyone!
Today starts the august sketch challenge over at the Create a Smile Blog. And as usual the sketch inspired me immediately. This is the card I made following it.


Ich habe ein wenig überlegt, wie ich die Streifen im Hintergrund darstellen soll. Und dann kam mir die Idee, etwas auszuprobieren, das ich noch nie gemacht habe vom Effekt aber echt toll finde. Und das sieht dann so aus:
 
I wasn't sure first what to make the striped background from. And then I came across a background technique that I had never made before but really like the effect it creates. And this is what it looks like:
 

 Im Hintergrund habe ich die Faux Dip Dye Technik angewendet. Dafür werden immer dunkler werdende Streifen Watercolor leicht überlappend mit einem Pinsel auf  Cardstock gemalt. Man kann dabei natürlich auch Farbverläufe mit unterschiedlichen Farbtönen gestalten, ich habe mich aber für Rottöne entschieden. Ich glaube, ich brauchte mal eine Abwechslung von den klassischen Sommer-Farbkombis. Trotzdem finde ich die Karte noch sommerlich.
Ich habe hier mit den Distress Ink Re-Inkern in Tattered Rose, Abandoned Coral und Aged Mahogany gearbeitet. Jede Farbschicht habe ich vor dem Auftrage der nächsten mit dem Fön getrocknet, damit die Farben übereinander liegen und nicht ineinander verlaufen. Nach der dunkelsten Farblage habe ich dann einige wenige Wassertropfen auf dem Hintergrund verteilt.
Aus dem Cardstockstück, das eigentlich ein bisschen größer war, habe ich dann mit einer der Stitched Rectangle Frames Stanzen ein Rechteck ausgestanzt, eine Lage 3D Tape darunter geklebt und alles auf einen weißen Kartenrohling geklebt. Ich habe hier bewusst eine etwas kleinere Rechteck-Stanze benutzt, um einen breiten weißen Rand rund um das doch recht farbintensive Rechteck zu erhalten.

For the background I used the Faux Dip Dye technique. You layer strips of watercolor slightly overlapping onto some watercolor paper, getting darker with each strip. Of course you can also change the color but I decided to go with just reds here. Guess I needed a break from all the traditional summer color combos. But I still think this card looks pretty summer-ish.
I used Distress Ink re-inkers in Tattered Rose, Abandoned Coral and Aged Mahoganny. I dried each layer with my heat gun before putting down the next next so the colors overlap and don't run into each other. After I had finished the darkest layer, I splattered just a few dropslets of water onto the cardstock.
Then I used one of the Stitched Rectangle Frames dies to cut a rectangle from my background, that originally was a bit larger, then put foam tape onto the back and glued it onto a white note ard. I picked a slightly smaller rectangle die on purpose, so I'd end up with a wider white edge around the pretty intense background.


Und hier ist das süße, eisschleckende Schwein aus dem Saumäßig Stempelset, um das herum ich die komplette Karte gestaltet habe. Bevor der Sommer zu Ende geht, wollte ich das unbedingt noch einsetzen. Ich habe es mit Copics coloriert, ausgeschnitten und das Eis mit einer dicken Lage Glossy Accents überzogen.
Hinter dem Schwein befindet sich einer der Stitched Circle Frames - einmal aus weißem Cardstock gestanzt und mit samt dem Rahmen benutzt, einmal aus hellblauem Cardstock und ohne den Rahmen. Unter den hellblauen Kreis habe ich noch drei weitere weiße geklebt, um für etwas mehr Höhe auf der Karte zu sorgen.
Das Schweinchen ist mit 3D Tape auf den Kreis geklebt, daneben habe ich zwei Banner, beide mit Stanzen aus dem Useful Banners Stanzenset aus weißem Cardstock gestanzt, aufgeklebt. 
Auf dem breiteren Banner habe ich mit Buchstaben, die ich mit dem Cherry Lowercase Alphabet Stanzenset aus hellblauem Cardstock gestanzt habe, das Wort Eis geschrieben. Die Buchstaben sind auf das Banner geklebt und ebenfalls mit Glossy Accents überzogen.
Auf das kleine Banner habe ich einen der Texte aus dem Stempelset Stempelsüchtig in schwarz aufgestempelt. Das große Banner ist unter den Kreis, das kleinere oben auf den Kreis geklebt.
Auch den Kreis mit dem Motiv und den Bannern habe ich mit 3D Tape auf die Karte geklebt. Unter den Kreis habe ich noch eine kleine weiße Wolke geschoben, eine weitere schwebt über dem  Schweinchen. Und dann brauchte ich noch die Sonne - Wolken und Sonne sind übrigens mit dem Stanzenset Weather gemacht. Eine weiße Sonne war mir zu fad, deswegen habe ich ein weiteres Stück Watercolor Cardstock ganz leicht mit Distress Ink Tattered Rose eingefärbt und daraus die Sonne gestanzt. So hebt sie sich ein wenig von den Wolken ab, ist aber trotzdem noch dezent. 
Als Deko habe ich dann noch einige klare Enamel Dots mit silbernem Glitzer auf der Karte verteilt, ich finde, die passen geben nochmal einen eisigen Look. 

And here's the cute piglet enjoying his popsicle from the Pig Out stamp set, that I created my card around. I really wanted to use it before summer ends. I colored him with Copics, cut him out and put a thick layer of Glossy Accents onto the popsicle. 
Behind the piglet I've used one of the Stitched Circle Frame dies - once die cut from white cardstock and used with the frame, once cut from blue cardstock and used without the frame. I glued three more white circles under the blue one to add some dimension to my card.
The piggy is glued onto the circle using foam tape, next to it I've added two banners, both cut with dies from the Useful Banners die set. Onto the wider banner I wrote the word icecream with die cut letters. I've cut those from the same blue cardstock I had also used for my circle, using the Cherry Lowercase Alphabet die set, glued them onto the banner and covered these with some Glossy Accents also.
Onto the smaller banner I stamped the rest of the text, using a stamp from the Stempelsüchtig stamp set. So now the complete text reads "you can never have too much icecream". 
I glued the circle with the image onto the background using foam tape again, then tucked the wider banner under it and glued the smaller one on top. I glued two white clouds onto my card, putting one just a bit under the circle. And then my card needed a sun. I've die cut this using a die from the Weather die set. I didn't like a white sun so I used the Tattered Rose Distress Ink again and very lightly colored the white cardstock in. Now there's some contrast to the two clouds but the sun is still more in the background.
To finish my card I added a few clear enamel dots with silver glitter. I thought, this goes perfectly with the ice cream.

Montag, 22. August 2022

Sneak gefällig?

 
Hallo Ihr Lieben!
Normalerweise gibt es die Sneaks auf das Stampcorner-Release des nächsten Monats ja etwas später. Aber da die Katze aus dem Sack ist, dass es im September ein Stempelset mit Motiven von StuffDeluxe geben wird, wollen wir Euch nicht weiter auf die Folter spannen. Und deswegen gibt es bereits heute eine Vorschau auf das September-Release von Stampcorner. 

Hello everyone!
Usually we are not that early with sneaks for next month's release. But since the bomb has dropped that there will be a set with images designed by StuffDeluxe, we want to let you know which images are included in the set. And so I am sharing a little sneak with you today.
 
Das Stempelset ist eigentlich vom Thema her eher maritim. Ich bin irgendwie schon total im Herbst-Modus, aber man kann ja jedes Motiv passend machen, oder? Und wenn es dann noch so eine süße kleine Ente ist, dann fällt das doch wirklich leicht. 
Ich habe hier mit Distress Ink Stormy Sky den Hintergrund auf Watercolor Cardstock gemalt und anschließend etwas von der unverdünnten Tinte darüber gespritzt. Später habe ich alles schwarz gemattet und auf einen weißen Kartenrohling geklebt.
 
The stamp set has a maritime theme. I am completly in a fall mood, at least when it comes to crafting. But luckily we can make each image fit each theme. And when the image is such a cute duck, then this is really easy.
Here I used Distress Ink Stormy Sky to create the background on watercolor paper, then spritzed some of the pure ink over it. Later I've matted the cardstock black and glued it onto a white note card.
 

 Und hier könnt Ihr die süße Ente genauer sehen. Sie kommt allerdings ohne den Regenschirm, den habe ich hinzugefügt.
Ich habe die Ente abgestempelt und mit Copics coloriert. Der Regenschirm ist aus dem Set Beary Rainy Day von LawnFawn. Er ist teilweise mit Copics coloriert, die Oberseite des Schirms habe ich mit Paper Piecing gestaltet. Die Schattierung habe ich wieder mit Copics hinzugefügt. Dafür habe ich ein Design aus einem ebenfalls neuen Paper Pad verwendet. 
Die kleine Ente steht bei mir in einer Pfütze. Ich habe den Umriss der Pfütze grob mit einem Bleistift aufskizziert und alles drumherum abgedeckt. Dann habe ich das Motiv gespiegelt darauf gestempelt - natürlich nur soweit, wie auch die Pfütze reicht. Das gleiche habe ich mit dem Blatt gemacht. Anschließend habe ich auch hier das Motiv mit Copics coloriert und darüber eine Lage hellen Blau-Grüns gelegt. Anschließend habe ich alles mit Glossy Accents überzogen.
Nach dem Trocknen habe ich die Pfütze ausgeschnitten, einige Highlights mit einem weißen Gelstift dazugemalt und die komplette Ente sowie das Blatt passend zur Spiegelund aufgeklebt. Dann musste ich das komplette Motiv nur noch auf meinen Hintergrund kleben. 
Rund um die Ente habe ich einige Herbstblätter aufgeklebt. Oops, die sind ja aus einem weiteren der September-Sets. Da habe ich Euch doch mit einer Karte fast alle Neuheiten verraten.... 
Zum Schluss fehlte noch ein Text. Dafür habe ich das Wort Glücksgefühlt aus dem Stempelset Glücksset mit schwarzer Tinte direkt auf den Hintergrund gestempelt. Irgendwie wirkte meine Ente ein wenig traurig und ich wollte der Karte etwas positives geben. Und was gibt es schöneres, als nach einem Regenguss Spazieren zu gehen und die Spiegelungen der Natur in den Pfützen zu bewundern.

And here you get a closer look at the little duck. She comes without the umbrella, I added that to the image because I wanted to give it a fall-ish touch.
I stamped the duck and colored her with Copics. The umbrella is from the Beary Rainy Day stamp set by LawnFawn. I colored parts of it with Copic, for the top I did some paper piecing. Again I added some shading with Copic here. And I used a sheet from an also new paper pad.
Thelittle duck is standing in a puddle. I did a rough sketch of the puddle and covered the area around it with some sticky notes. Then I mirror stamped the image onto it - only until the edge of my sketched puddle. I did the same with the leaf. 
Then I colored those images again with Copics and added a layer of a light blue-ish green over it. And then I covered everything with a thick layer of Glossy Accents.
After that had dried I've cut out the puddle, added a few highlights with a white gel pen and glued the duck image and the leaf down matching the mirrored images. Then I only needed to put the whole image onto my watercolored background.
Around the duck I've added some fall leaves. Oops, these are from another new set. Seems like I've shown a bit of nearly everything from this release with just one card....
In the end my card needed a text. I stamped the word happiness directly onto the card using black ink. My duck looked a bit sad and I wanted to give this card a positive touch. And it's such a nice thing to go out for a walk after some rain and look at the mirrorings in the puddles.

Samstag, 20. August 2022

Eine Trauerkarte

 
Hallo Ihr Lieben!
Heute habe ich eine Trauerkarte zu zeigen. Die macht wohl keiner gern, aber manchmal muss es sein. Ich tu mir auch schwer, zu sagen, dass mir eine Trauerkarte gefällt - einfach weil ich dem Anlass geschuldet unpassend finde. 

Hello everyone!
Today I have a sympathy card to share. I guess no one of us wants to make these cards, but sometimes we just have to. With sympathy cards I also have a hard time to say, that I like, how a card turned out - just because it was made for such a sad reason.

Hier habe ich auf ein Stück weißen Cardstock ganz zart Wolken aufgewischt. Dafür habe ich eine Wolkenstencil von MFT und Distress Ink Weathered Wood verwendet. Dann habe ich Distress Oxide Spray in Black Soot mit einem Pinsel über den Cardstock gespritzt.

Here in added some very soft clouds to a piece of white cardstock. I used a cloud stencil by MFT and Distress Ink Weathered Wood for them. Then I used a brush to spritz some Black Soot Distress Oxide Spray over the cardstock.


Die Blumen habe ich mit dem Airbrushed Flowers Stempelset von Altenew gemacht. Die Blätter sind dabei mit einem leicht ins Grün gehende Blau und graublau gestempelt, für die Blüten habe ich ein helleres Blau und Graublau verwendet. Die Blumenmitten sind in Grautönen gehalten.
Ich habe die Blumen und Blätter per Hand ausgeschnitten und teilweise mit 3D Tape auf den Wolkenhintergrund geklebt.
Irgendwie war mir die Karte zu leer. Deswegen habe ich ich mit mattblauer Folie noch ein Hexagon von PinkFresh auf schwarzen Cardstock foliert und nah an der Folie ausgeschnitten, so dass ich einen Rahmen erhalten habe. Den habe ich dann hinter die Blumen gesetzt.
Für den Text habe ich das Wort Beileid mit einem Stanzenset von CraftEmotions mehrfach aus schwarzem Cardstock gestanzt und aufeinandergesetzt auf die Karte geklebt. Für den Rest des Textes habe ich einen Teil eines Stempels von Kulricke weiß auf schwarzen Cardstock embosst und den Cardstock über dem Wort Beileid aufgeklebt.

The flowers are made with the Airbrushed Flowers stamp set by Altenew. I used a slightly green-ish blue and a grey-blue ink for the leaves, for the flowers I used a light blue and the same grey-blue. For the flower centers I went with different tones of grey.
I've cut out the flowers and leaves by hand and glued them onto the cloud background, using foam tape for a few parts.
I felt like the card was too plain. So I used some matte light blue foil to hotfoil one of the hexagons by PinkFresh onto black cardstock, then cut it out close to the foiled edges to end up with a hexagon shaped frame. I put that behind the flowers.
For the text I've die cut the word Beileid several times from black cardstock and stacked them on one of the flowers. The rest of the text - that means "with sympathy" - is white heat embossed onto black cardstock and glued above the die cut word.


Die weißen Bereiche der Blüten habe ich noch mit einem klaren Nuvo Aqua Shimmer Pen beglittert - man kann das auf dem Bild leider nicht so toll sehen. Dafür sieht man die Folierung hier besser.
Als Deko habe ich noch ein paar schwarze Pailetten augeklebt, dann den Cardstock schwarz gemattet und auf einen weißen Kartenrohling geklebt.

I used a clear Nuvo Aqua Shimmer Pen to add some shine to the white areas of the flowers - but that's really hard to catch on camera. But you can see the foiled hexagon better on this picture.
To finish the card I added a few black sequins, matted the cardstock black and glued it onto a white note card.

Donnerstag, 18. August 2022

Warum nicht mal andersrum?

 
Hallo Ihr Lieben!
Momentan mache ich oft Karten mit großen Blumenmotiven - und dabei sind mir schon öfter Karten begegnet, bei denen der Hintergrund farbenfroh, das Motiv aber nicht coloriert und somit nur schwarz-weiß war. Als ich nun die Idee zu dieser Karte hatte, fiel mir auf, dass Papierboot, Möwen und Wolken ja auch hauptsächlich weiß sind. Und da dachte ich mir, warum die Motive nicht mal nur minimal in Grautönen colorieren und die Farbe hauptsächlich im Hintergrund verwenden? Nun, auch da findet sich einiges an weiß - aber hier ist die Karte, die nach dieser Idee entstanden ist. Und die zeige ich heute auf dem Stampcorner Blog.

Hello everyone! 
I love making cards with larger floral images lately - and have seen several with a colorful background and an uncolored black and white image. So when I had the idea for this card I realized, that the paper boat, the seagulls and the clouds are mainly white. And so I've decided to make a card with the images just lightly colored in greys and the color just in the background. Well, I used quite some white there as well - but this is how the card turned out. And I'm sharing it over at the Stampcorner Blog today. 

Mit gefällt die Karte wirklich super. Und obwohl das Türkis eigentlich nur für den Text und die beiden Wellenlagen genutzt wurde, ist der Fokus der Karte auf den Motiven.

I really love the outcome of this card. And even with using the color just for the die cut text and the two layers of waves the focus is still on the images.


Am Himmel wollte ich dezente Sonnenstrahlen. Deswegen habe ich die Heavenly Glow Stencil von MFT benutzt, sie aber nicht mit Farbe gewischt, sondern in der Big Shot geprägt. Eigentlich wollte ich noch ein wenig Farbe darüber wischen, habe mich dann aber dagegen entschieden, denn so gefiel mir der Effekt besser. Man kann es auf dem Bild nicht ganz so toll erkennen, aber ich habe die Cardstockseite mit den eingeprägten Strahlen nach oben gelegt und dann zumindest ein paar türkisfarbene Spritzer mit Metallic Watercolor darüber gemacht.
Die Wolken sind aus dem Stempelset Möwen Pups. Sie sind nur mit Copics in C02 und C00 am unteren Ende ein wenig schattiert, dann habe ich sie ausgeschnitten und mit 3D Tape auf die Karte geklebt.

I wanted some subtle rays in the sky. So I used the Heavenly Glow stencil by MFT but didn't put ink through it, instead I've used it to emboss the cardstock in my Big Shot. I had planned to add a soft layer of color over it, but then decided against it because I liked the effect better that way. It's hard to see on the picture, but I used the cardstock with the debossed rays showing. Then I decided to spritz at least a few drops of a turquoise metallic watercolor onto the sky.
The clouds are lightly shaded at the bottom just with a C02 and C00 Copic marker, then I've cut them out and glued them onto the card with foam tape.


Die beiden Wellenlagen habe ich aus dunklerem und hellerem türkisfarbenem Cardstock gestanzt und die Spitzen der Wellen mit einem weißen Gelstift ein wenig mit Schaum versehen.
Zwischen die beiden Wellenlagen habe ich das Wort Ankerplatz gesetzt. Das ist aus einem mittleren Türkiston gestanzt - ich habe es dreimal gestanzt und die Teile aufeinander geklebt. Darunter befindet sich eine schwarze Schattenlage, die ich per Hand ausgeschnitten habe. 
Rund um das Wort habe ich dann die Motive sowie einen weiteren Text verteilt. 
Die beiden Möwen sind wieder aus dem Set Möwen Pups. Neben den C02 und C00 Markern habe ich nur noch die Nummer 100, C7, C4 und C1 für alle Motive verwendet. 
Das Papierboot und der kleine Text sind aus dem Set Matrosen Freunde 2, der Anker aus dem Set Matrosen Freunde 1. 
Ich habe die Motive ausgeschnitten und rund um den Text verteilt. Am Anker habe ich dabei ein Stück türkis-weißes Twine angebunden, dessen anderes Ende ich hinter dem t habe verschwinden lassen.
Der Text ist mit weißem Embossingpulver auf schwarzen Cardstock embosst, ausgeschnitten und dann ober- und unterhalb des gestanzten Textes aufgeklebt.
Die Möwe links unten war übrigens ein Last-Minute-Einfall, die war gar nicht eingeplant, aber irgendetwas fehlte hier. Und da hat sich ein kleiner Freund für die Möwe, die so gechillt auf dem Wort Ankerplatz liegt, doch angeboten.

The two layers of waves are die cut from some darker and lighter turquoise cardstock, then I used a white gel pen to add some foam to the peaks of the waves.
Between the two layers of waves I've put a die cut word. I've die cut the word itself three times from a middle tone of turquoise cardstock, then stacked those and added a black shadow layer, that I had cut by hand. 
Around the word I've arranged the images and another text.
To color the images besides the already mentioned C02 and C00 marker I only added a 100, C7, C4 and C1 marker.
The paper boat and the smaller text are from the Matrosen Freunde 2 set, the anchor is from the set Matrosen Freunde 1. The small text means "who has the sea, needs less", but the german word Meer for sea sounds exactly like "mehr" - more-, so it is a play of words with the sentiment "who has more, needs less". I've white heat embossed the text onto strips of black cardstock and glued those above and under the die cut word, which, by the way, means anchorage.
The little seagull on the bottom left war a last minute idea that I hadn't planned initially. But I felt like there's something missing in that area of the card and so a little friend for the seagull, that's relaxing on the die cut word, seemed appropriate.


Die verschiedenen Lagen und Motive der Karte habe ich wieder mit 3D Tape aufgeklebt. Anschließend habe ich alles schwarz gemattet und auf einen weißen Kartenrohling geklebt.
Und glaubt es oder nicht - auf dieser Karte findet sich nicht ein einziger Glitzerstein oder Pailette! Eine absolute Rarität auf meinen Karten.... ;)

I glued the different layers and images together with foam tape. Then I've matted the cardstock black and glued it onto a white note card.
And believe it or not - there's not a single rhinestone or sequins on this card! A really rare thing with my cards.... ;)