

Hallo Ihr Lieben!
Am Samstag habe ich Euch ja bereits zwei Karten mit dem selben Stempelset gezeigt. Heute nun sind zwei Karten mit der selben Hintergrundstanze dran. Diesmal war es allerdings so, dass mir meine eigentliche Idee nicht mehr gefallen hat, als ich sie so vor mir liegen hatte. Also habe ich die Teile kurzerhand auf zwei Karten verteilt - natürlich noch mit dem ein oder anderen Zusatzelement. Soweit nicht anders erwähnt, sind alle Stanzen und Stempel von Altenew, die passten vom Stil her einfach super zusammen.
Hello everyone!
On saturday I've shared two cards using the same stamp set. Today I have two cards on which I used the same background die. But this time it's because I simply didn't like my original idea anymore once I had it all laying together. So I simply split the elements onto two cards - of course with using a few extra pieces. If not mentioned otherwise I used dies and stamps by Altenew, they just went so perfectly together.

Angefangen hat alles mit diesem Hintergrund. Ich habe die Scallop Cover Stanze von Altenew verwendet und wollte sie ähnlich eines Regenbogens gestalten. Ich habe mich für helles Gelb, Grün und Grau-Türkis entschieden. Ich habe die Stanze einmal aus jedem der Cardstocks gestanzt und einmal zusätzlich aus weißem Cardstock. Dann habe ich drei der Stanzen aufeinander geklebt, die weiße Lage zuoberts, und in den Hintergrund dann die ausgestanzten Bögen in Gelb in die größten, in Grün in die mittleren und in grau-türkis in die kleinsten Bögen eingeklebt. Mit dem Ergebnis war ich bis dahin super zufrieden. Dann wollte ich den Regenbogen eingentlich durch blaue und lilafarbene Blumen fortsetzen - und da verließen sie mich. Es hat mir einfach nicht gefallen...
It all started with this background. I used the Scallop Cover die by Altenew and wanted to create some kind of rainbow background with it. I went with a light yellow, green and greyish turquoise, die cut the background once from each color and in addition to that also once from white cardstock. Then I stacked three of these, using the white die cut as my top layer, and then glued the small inlay pieces into the stacked outline background. I used the yellow for the largest bows, green for the second largest and turquoise for the smallest. And I really liked that background! I had planned to continue the rainbow colors with blue and purple flowers - and that's when I realized that I simply didn't like that.

Also habe ich mich kurzerhand umentschieden und die Circled Greetings Hello Stanze einige Male aus weißem Cardstock gestanzt. Mit einer etwas größeren Kreisstanze habe ich die Außenlinie gestanzt und außerdem einen Kreis aus hellblauem Cardstock gestanzt. Diese Teile habe ich dann alle aufeinander geklebt.
Als Deko habe ich oben rechts einen Schmetterling, gemacht mit dem Dream Big Stempelset, aufgeklebt. Dabei ist der Körper direkt oberhalb des L auf den Kreis geklebt, hinter den oberen Rand der Flügel habe ich 3D Tape geklet, so bekommt der ansonsten flache Schmetterling etwas mehr Dimension.
Als Deko kamen noch ein paar Blumen auf die Karte. Die Blätter sind mit Stempeln aus dem Airbrushed Flowers Stempelset gestempelt, für die kleinen Blüten habe ich eine der Stencils aus dem Lush Garden Kit verwendet. Um schwarze Außenlinien zu erhalten, habe ich einfach entlang der größten Lage mit einem schwarzen Fineliner die Außenlinien nachgemalt. Klar, sieht nicht aus wie gestempelt, aber so gefällt es mir trotzdem besser.
Die Texte sind aus dem Snapdragon Stempelset und weiß auf schwarzen Cardstock embosst.
So I changed my mind and die cut the Circled Greetings Hello die several times from white cardstock. I used a larger circle die to cut the outer circle shape and used the same day to cut a background layer - just a plain circle - from light blue cardstock. Then I glued all of them on top of each other.
To decorate this card I glued a butterfly to the top right of the circular text, made using the Dream Big stamp set. I glued the body directly onto the background circle, making it look like it's sitting on the loop of the L, and used foam tape behind the tips of the wings. This adds some dimension to the otherwise flat image.
I also added a few flowes to the card. The leaves are made with the Airbrushed Flowers stamp set, for the blossoms I used one of the stencils from the Lush Garden Kit. To get the black outlines of the flowers I simply used a black fineliner and followed the outlines of the largest flower image on the stencil. Of course you see that those aren't stamped, but I still like them better with the black outlines than without any lines.
The texts on this card are from the Snapdragon stamp set and white heat embossed onto black cardstock.
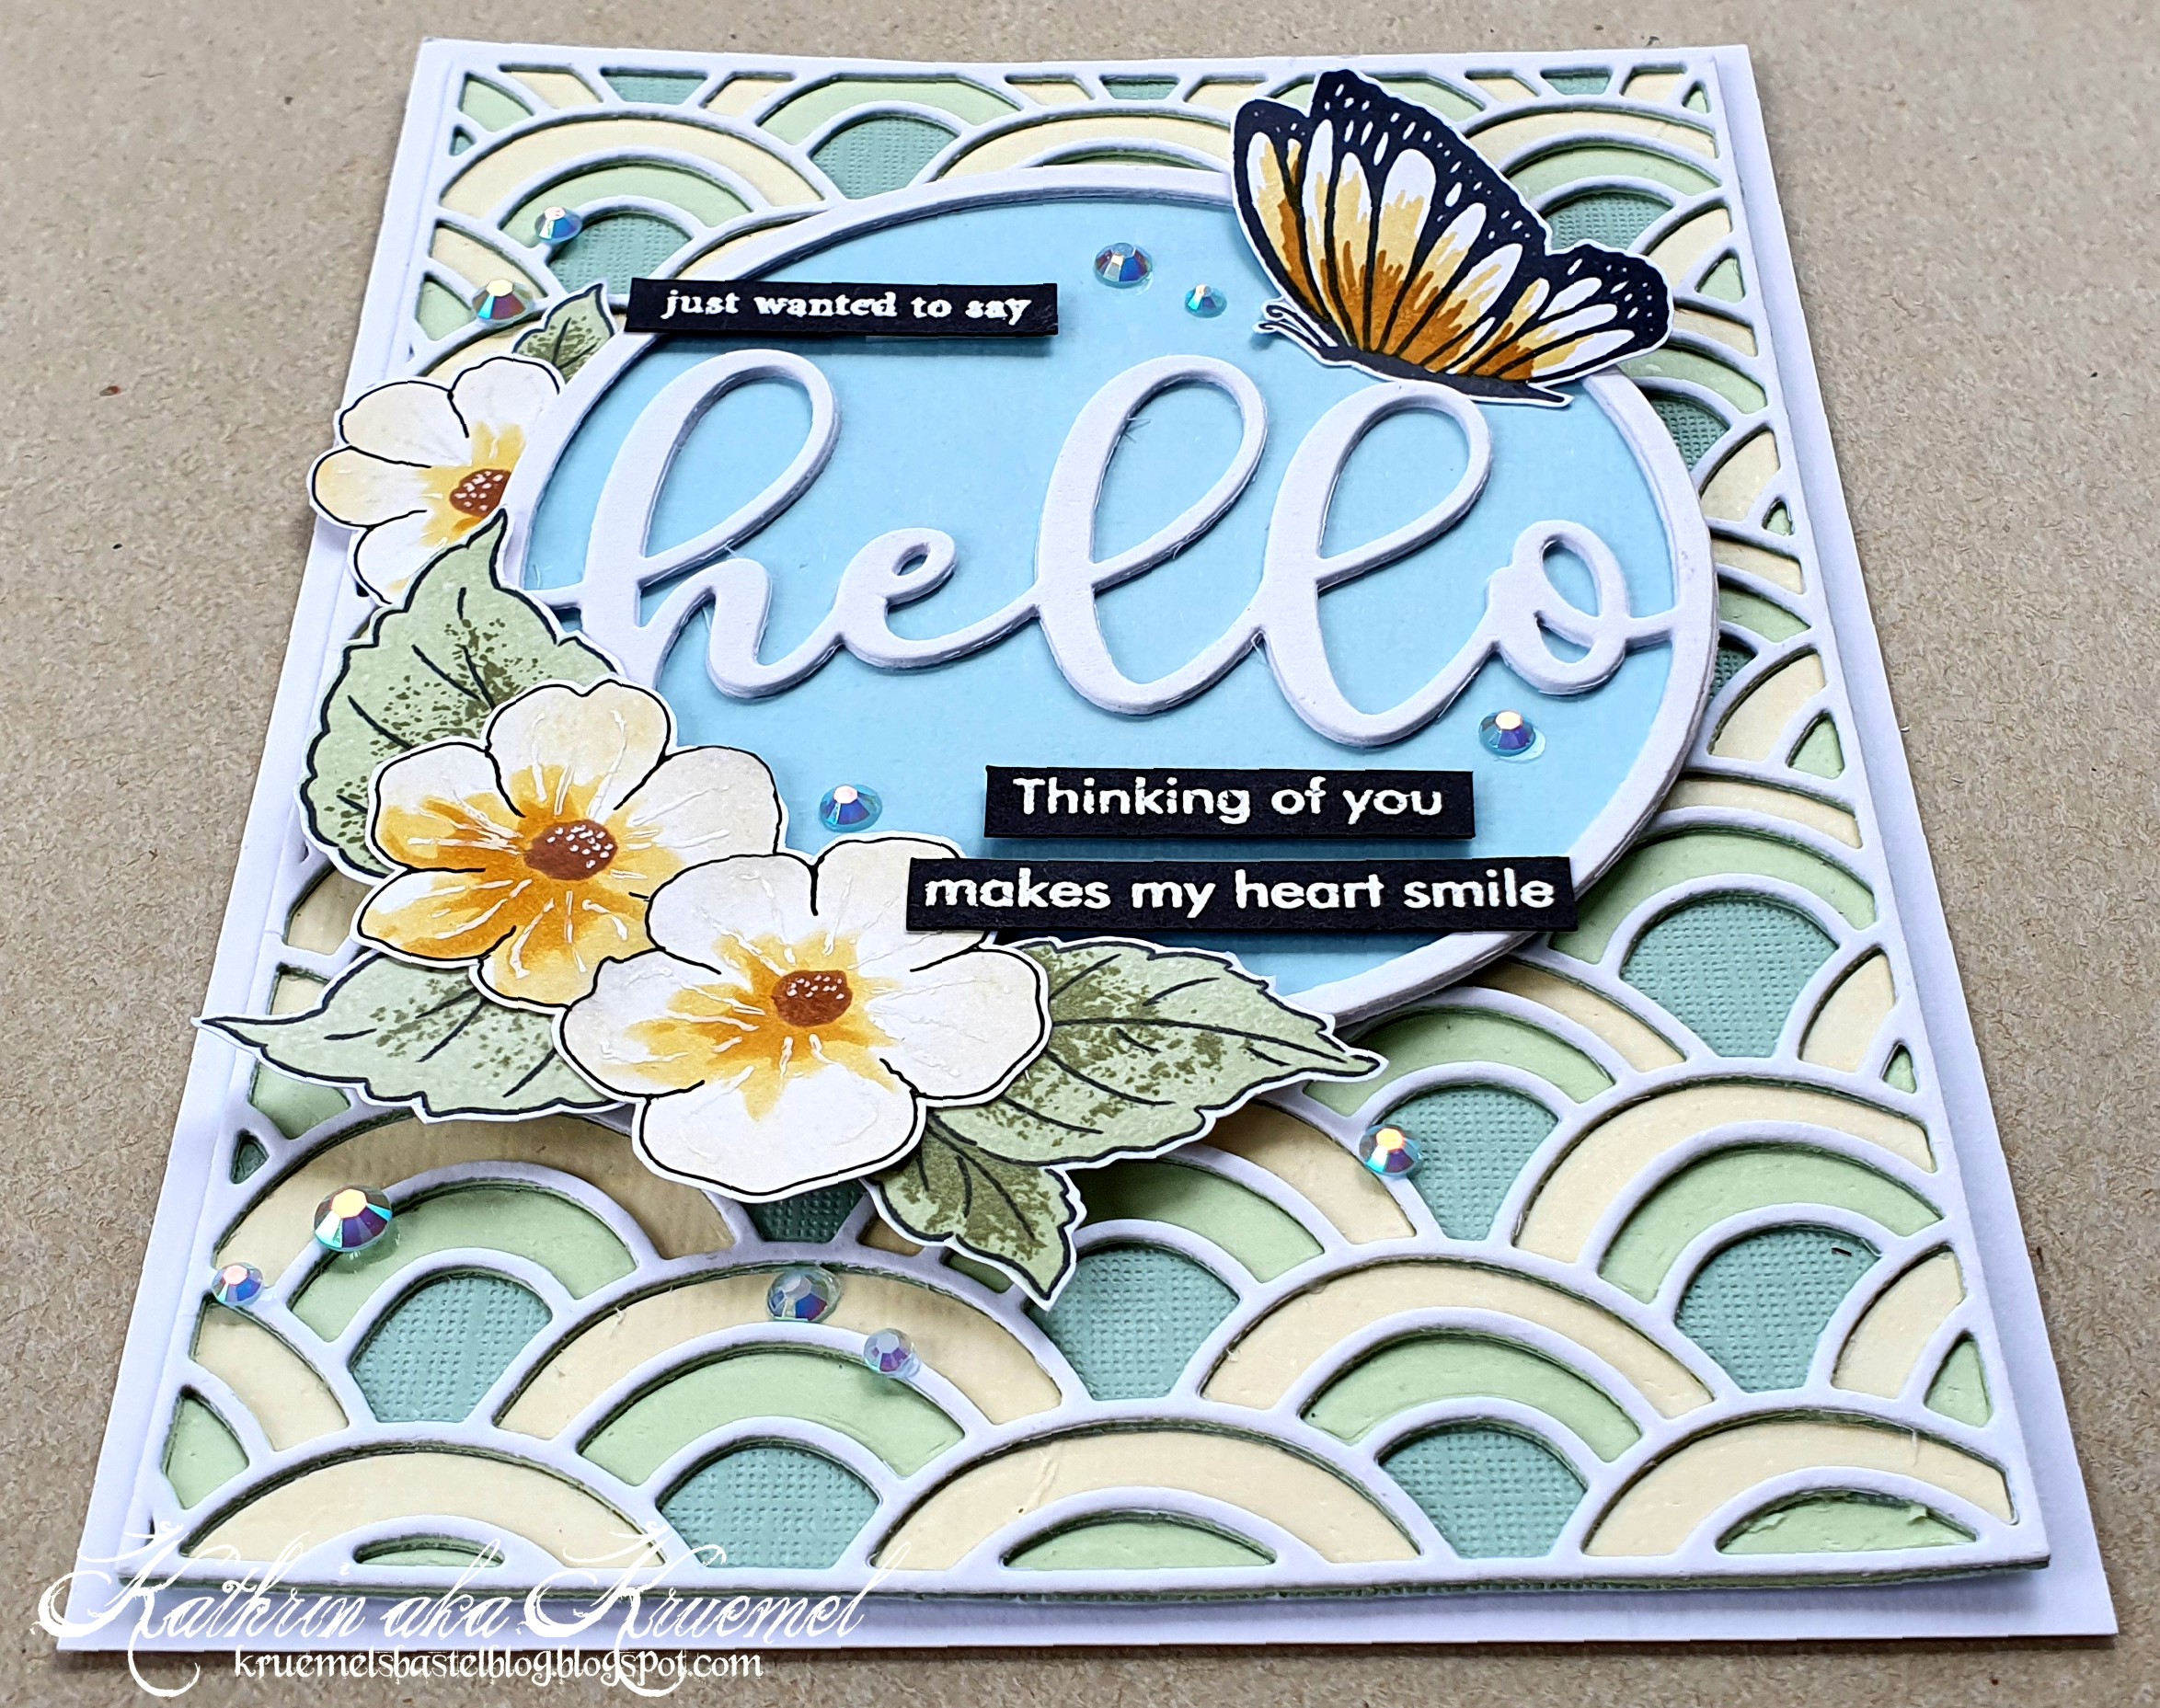
Wie fast immer habe ich alle Lagen mit 3D Tape aufeinander geklebt. Als Deko kamen noch ein paar hellblaue, irisierende Glitzersteine auf die Karte.
As so often I glued the layers together with foam tape. Then I added a few light blue iridescent rhinestones to the card.

Auf der zweiten Karte habe ich dann die Blumen verarbeitet, die ich eigentlich auf den Regenbogen-Hintergrund setze wollte.
Ich hatte noch das hellgelbe Scallop Cover Stanzteil von der ersten Karte übrig - dort hatte ich ja nur drei Lagen des Hintergrunds aufeinander geklebt. Den habe ich dann hier verarbeitet und auf ein Stück hellblauen Cardstock geklebt.
On the second card I used the flowers that I had planned to use on the rainbow-like background.
I had the light yellow Scallop Cover die cut left from the first card - as mentioned I only used three layers there. So I used the yellow one here and glued it onto a piece of light blue cardstock.

Die tollen Lupinen sind mit lilafarbenen Tinten mit dem Stempelset Snapdragon gemacht und mit der passenden Stanze ausgestanzt.
Die Blätter und blauen Blüten sind mit Stempeln aus dem Set Airbrushed Flowers gemacht und per Hand ausgeschnitten - da habe ich die Stanzen (noch) nicht.
Für den Text habe ich dann Stempel aus dem Set Spring von HoneyBeeStamps benutzt und mit einem ausgestanzten Und-Zeichen kombiniert. Die Texte sind weiß auf schwarzen Carstock embosst. Das Und-Zeichen habe ich mit einer Stanze aus einem Set von StudioLight mehrmals aus schwarzem Cardstock gestanzt und wieder aufeinander geklebt.
Als Deko habe ich wieder einige Glitzersteine aufgeklebt, diesmal in blau-irisierendem Schwarz.
Those beautiful snapdragons are stamped with different tones of purple using the Snapdragon stamp set, then I cut them out with the matching dies.
The leaves and blue flowers are made with the Airbrushed Flowers set and cut out by hand - I don't have the matching outlines (yet).
For the text I combined some words from the Spring stamp set by HoneyBeeStamps and combined them with a die cut ampersand. The texts are white heat embossed onto black cardstock. The ampersand is die cut several times from black carstock using a die by StudioLight and then stacked again.
To embellish this card I used some rhinestones again, this time in a blue iridescent black.

Auch hier kam wieder 3D Tape beim Zusammenkleben der Karte zum Einsatz. Außerdem sieht man hier, dass ich auf den hellblauen Cardstock im Hintergrund ganz am Anfang noch Liquid Pixie Dust von InkOn3 aufgespritzt habe - eine fast durchsichtige aber toll schimmernde Glitzerfarbe.
And once again I used foam tape to put the card together. On this picture you can also see, that I spritzed some Liquid Pixie Dust by InkOn3 onnto the light blue cardstock before glueing the Scallop Cover down - a nearly clear but wonderful shimmery liquid glitter/color.