Sonntag, 30. Juli 2023

July Technique Throwback Challenge

 
Hallo Ihr Lieben!
Momentan ist so viel los, da hätte ich beinah die Technik Throwback Thursday Challenge von Juli verpasst. Beinahe, denn quasi in letzter Minute habe ich diese Karte gewerkelt. Das Thema diesen Monat ist das Stenciled Stamping Technique Video von Jennifer McGuire.

Hello everyone!
Life's so busy at the moment, I nearly missed the Technique Throwback Challenge of july. Nearly, because last minute I made this card. The theme this month is Jennifer's Stenciled Stamping Technique video.

Nun, ich mag ja diese Challenges, denn sie holen mich wirklich oft aus meiner Komfortzone heraus. Aber diese Karte war eine echte Herausforderung. Zuerst gefiel mir die Farbkombi nicht (ich hatten den Hintergrund erst in Gelb- und Orangetönen gestaltet), dann hat das mit dem Stenciled Stamping im Hintergrund nicht so funktioniert, wie geplant. Lag wohl daran, dass ich einen Gummi- und keinen Clearstamp verwendet habe (versucht mal einen Stencil mit Klebeband aufklappbar im Misti anzubringen, wenn er gleichzeitig auf einen Gummistempel passen soll). Aber im Endeffekt kann man die Herzen dann doch erkennen. 
Ich habe den Pop-Up Sunburst Stempel von PinkFresh für den Hintergrund verwendet. Hier kann man jede Strahle einzeln entnehmen - oder auch stempeln. Ich habe jeden zweiten entfernt und die anderen mit hellrosa Tinte abgestempelt. Dann habe ich die anderen Strahlen eingesetzt und in dunklerem Pink gestempelt. Dann habe ich mit einem Herzenstencil und Distress Oxide Victorian Velvet die Herzen auf die Strahlen aufgebracht. 

I really like these challenges, because they make me leave my comfort zone. But this card was a real challenge. First I didn't like my color choices (I had done the background in yellows and oranges), then the Stenciled Stamping didn't work as planned. Most likely because I used a rubber instead of a clear stamp. Try to hinge a stencil into your Misti to use with a rubber stamp - the stamp is way too thick for that). But in the end you can recognize the hearts on the background.
I used the Pop-Up Sunburst stamp by PinkFresh for the background. Here you can remove every single ray  and stamp them individually. I removed every other ray and stamped the remaining ones with light pink ink. Then I switched the rays with the not yet used ones and stamped those with a darker pink. Then I added the hearts with a heart stencil and Distress Oxide Victorian Velvet.


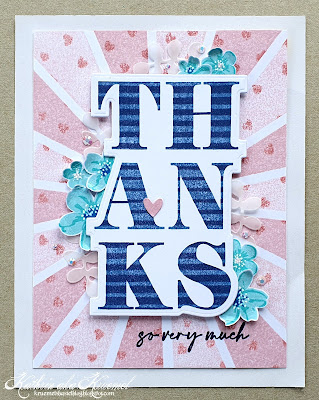
Mittelpunkt der Karte ist der große Text. Und da das mit der Stenciled Stamping Technik so ganz funktioniert hatte, wollte ich es doch gleich nochmal probieren, diesmal mit einem Clearstamp. Da kamen das Jumbo Sentiments Set von TheTon wie gerufen. Ich habe das Thanks erst mit blauer Tinte abgestempelt und dann das Muster  mit dem Sphere Stencil von Altenew und Distress Oxide Chipped Sapphire aufgetragen. Und diesmal hat es perfekt funktioniert. Dann habe ich den Text mit der passenden Outlinestanze ausgestanzt.
Weil ich den Bereich zwischen A und N so nackt fand, habe ich hier noch ein kleines Herz aufgeklebt. Das habe ich aus einem Stück weißen Cardstock gestanzt, den ich vorher mit dem dunkler pinken Stempelkissen eingefärbt habe.
Die Blumen sind aus dem Vintage Flowers Stempelset von Altenew. Ich habe sie in Türkistönen gestempelt - entweder mit blauer oder pinker Mitte. Dort habe ich mit einem weißen Gelstift einige Highlights aufgetupft. Zwischen die Blumen habe ich dann noch ein paar Zweige, gestanzt aus Vellum, geschoben.
Direkt auf den Hintergrund habe ich dann mit blauer Tinte noch ein "so very much", ebenfalls aus dem Jumbo Sentiments Set, aufgestempelt.

The center of this card is the large text. And since the Stenciled Stamping didn't work as hoped on the background, I decided to try it again, this time using a clear stamp. So the Jumbo Sentiments by TheTon were perfect. I stamped the thanks with blue ink and then added the pattern using Distress Oxide Chipped Sapphire and the Sphere stencil by Altenew. This time it worked like charm. And then I cut out the text using the matching die.
Because I thought the area between the A and N was too plain I added a small heart there. I die cut that from a piece of white cardstock, that I had inked with the darker pink ink pad.
The flowers are from the Vintage Flowers stamp set by Altenew. I stamped them in aquas, adding either a pink or a blue center. Then I added a few highlights with a white gel pen. Between the flowers I put a few branches, cut from vellum. 
Directly onto the background I also stamped a "so very much", again from the Jumbo Sentiments set, using blue ink.


Ich habe die Blüten mit dünnem, den Text mit dickem 3D Tape auf den Hintergrund geklebt. Dann habe ich einige pink-irisierende Steinchen auf der Karte verteilt.
Zum Schluss habe ich alles noch auf einen weißen Kartenrohling geklebt.

I attached the flowers with thin, the text with thick foam tape. Then I added a few pink iridescent rhinestones to the card.
To finish it, I just attached it to a white note card.

Samstag, 29. Juli 2023

Stampcorner August-Release Sneak #3

 
Hallo Ihr Lieben!
Ein letztes Sneak auf das August-Release von Stampcorner habe ich noch für Euch. Und diesmal habe ich keinen Stempel, sondern eine neue Stanze verwendet.

Hello everyone!
I have one last sneak on Stampcorner's august release for you. And this time I didn't use a new stamp set, but a new die. 

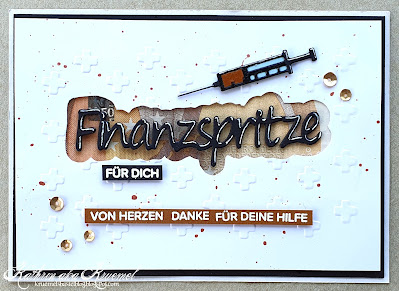
Geht es Euch aus so, dass Ihr immer auf der Suche nach etwas kreativeren Verpackungen für ein Geldgeschenk seid, als das obligatorische Kuvert? Aber eine Box ist auch nicht immer die richtige Lösung. Eine Idee zeige ich Euch heute mit dieser Karte.

Ich habe kleine Kreuze in ein Stück weißen Cardstock geprägt und dafür einen Embossingfolder von Magnolia verwendet. Der war mal ein einem derer Kalender. Passend zum geplanten 50er habe ich dann rostrote Metallic Watercolor auf den Cardstock gespritzt.

I used an embossing folder by Magnolia to dry emboss some crosses into a piece of white cardstock. It was in one of their calendars a few years ago. Matching the bill I planned to give with this card I flicked some rust red metallic watercolor onto the cardstock.


Hier seht Ihr die neue Finanspritze-Stanze. Es gibt im Release auch einen Spritzen-Stempel, den habe ich aber nicht. Also habe ich mir anders beholfen. Aber auch das Wort an sich ist wunderbar vielseitig einsetzbar. 
Ich habe das Wort viermal aus schwarzem Cardstock gestanzt und die Teile aufeinander geklebt. Auf den Hintergrund habe ich die Stanze gelegt - Text nach unten - und sie mit einem Stift nachgefahren. Dann habe ich mich an dieser Linien orientiert und mit etwas Abstand dazu ein Fenster in den geprägten Cardstock gesschnitten. Das habe ich dann von hinten mit Folie hinterlegt und das gestanzte Wort darauf geklebt. 
Als Deko habe ich eine Spritze aus schwarzem Cardstock gestanzt und mit blau bzw. gelb-braunem Cardstock gefüllt. Die habe ich oben über dem Wort auf den Cardstock geklebt. 
Darunter befinden sich die Texte - ein kleineres für dich direkt unter dem gestanzten Wort und etwas weitere unten noch ein längerer Text. Die habe ich jeweils mit Stempeln aus den Sets Kleine Worte und Kleine Worte 2 gestempelt und weiß embosst. 

Here you see the new word die - here in Germany we call a bit of money you give someone a "financial shot", and that's what the text says. 
I die cut the word four times from black cardstock and stacked the die cuts. Then I laid the die - text facing down - onto my background and used a pencil to draw the outlines of the die onto the cardstock. Using this line as a guide, I cut a window into the cardstock. Behind the window I put a piece of acetate and glued the die cut word onto it. 
To decorate the card I die cut a syringe from black cardstock and filled it with light blue and brown-yellow cardstock. Then I attached it to the background, putting it above the window.
Under the window I placed two texts - a smaller "for you" directly under the window and a "heartfelt thanks for your help" a bit further down. I white heat embossed those texts onto the cardstock strips.


Als Deko habe ich dann noch einige Pailetten auf der Karte verteilt, den Cardstock schwarz gemattet und auf einen weißen Kartenrohling geklebt. Aus der schwarzen Mattung und dem Kartenrohling habe ich jeweils ein rechteckiges Fenster gestanzt, so dass man das Geld, das sich in einem Fach innen in der Karte befindet, auch durch das Fenster sehen kann. Wenn Ihr wissen wollt, Wie genau das Geld dort eingebaut ist und natürlich auch, wie man es herausnehmen kann, dann schaut Euch unbedingt das Video "Creative Cards with Money or Gift Cards" von Jennifer McGuire, gepostet im Juni 2023, an (darin gibt es noch mehr tolle Ideen für Geld-/Gutscheingeschenke).

To decorate the card I added a few sequins, then matted the cardstock black and attached it to a white note card. I die cut a rectangle from both the black mat and the note card so you can see the money, that's actually put into a pocket on the inside of the card. If you want to know exactly how that is done and of course also how it can be taken out then you really should watch the "Creative Cards with Money or Gift Cards" video by Jennifer McGuire, posted in june 2023 (and there are even more amazing ideas shown in the video).

Freitag, 28. Juli 2023

have a happy summer


Hallo Ihr Lieben!
In einer FB-Stempelgruppe wurde dazu aufgerufen, doch mal den "SuS" anzugehen - den "Stapel unbenutzter Stempel". Und sind wir ehrlich, den haben wir doch alle. Aber die Idee finde ich klasse und es war genau die Motivation, die ich gerade brauchte.
Nun, es hat sehr lange gedauert, bis ich einen Stempel gefunden habe,  den ich noch nicht benutzt habe. NICHT! Schwieriger war es eher, sich für einen dieser Stempel zu entscheiden. Letztendlich ist die Wahl auf gleich zwei Sets gefallen, die aber perfekt zusammen passen: das Layering Wisteria und das Layering Wisteria Add-On von HoneybeeStamps.
 
Hello everyone!
In a FB stamping group they asked to go use our "pouf" - the "pile of unused stamps". And honestly, I think we all have that. I really love the idea and it was exactly the motivation I needed.
Well it took me a long time to find a stamp I hadn't used yet - NOT! It was more difficult to decide, which of these stamps I wanted to use. Then I went with not one, but two unused sets: the Layering Wisteria and the Layering Wisteria Add-On by HoneybeeStamps. 
 
Für den Hintergrund habe ich ein Stück hellgrauen Cardstocks mit einem Mauer-Embossingfolder von SU geprägt. Hier habe ich zuvor die Seite, mit dem erhabenen Muster - das später eingeprägt wird - mit einem weißen Stempelkissen betupft. Nach dem Prägen habe ich weiße Acrylfarbe sowie silberfarbene Metallic Watercolor aufgespritzt. 
Dann habe ich mit einer der Diamond Plate Layering Coverplate Stanzen von TheTon aus weißem Cardstock den Aufleger aus weißem Cardstock gestanzt. Ich wollte, dass das ganze später aussieht wie ein Rankgitter vor einer alten Hausmauer.
 
For the background I dry embossed a piece of light grey cardstock with a brick wall embossing folder by SU. Before running it through my BigShot, I dabbed some white ink onto the raised side of the folder - the pattern that will be pressed into the paper. Afterwards I flicked some white acrylic paint and some silver metallic watercolor onto the cardstock.
Then I used one of the Diamond Plate Layering Coverplate dies by TheTon to cut the topper from white cardstock. I wanted those two layers to look like a lattice in front of an old brick house.
 

 Dann kamen die besagten Stempel aus dem SuS zum Einsatz. Ich habe die Blüten aus beiden Sets in Lilatönen gestempelt und mit der passenden Stanze ausgestanzt. Dann habe ich sie übereinander gelegt und dazwischen einige grüne Ranken herabhängen lassen (die Blätter in dem Stempelset sind mir einfach zu groß zu den Blüten). Die sind mit der Weeping Willow Tree Stanze von MemoryBox gemacht - ich habe einfach die Teile herausgeschnitten, die passten und sie auf, zwischen und hinter den Blüten arrangiert. 

Then I used those staps from the POUF. I stamped the flowers from both sets using purple inks and cut them out with the matching die. Then I layered them and added a few green tendrils inbetween (the leaves in the set are simply too big compared to the flowers in my opinion). I used the Weeping Willow Tree die by MemoryBox to cut those - then I simply cut out the pieces I wanted to use and arranged them on top, between and under the flowers.


Und weil mich die Blüten verkehrt herum an Lupinen erinnerten, habe ich davon auch noch gleich ein Beet angelegt und die Spitzen von unten in die Karte ragen lassen. Die habe ich dann in Blautönen gestempelt. Auch hier habe ich grüne Pflanzen(teile) zwischen die Blüten gesetzt, diesmal mit der Bayou Backdrop Stanze von LawnFawn aus heller grünem Cardstock gestanzt.
Für den Text habe ich das Wort Summer mit der SummerVibes Stanze von Create a Smile einige Male aus dunkelblauem Cardstock gestanzt, die Teile aufeinander geklebt und mit Stickles ein wenig beglittert. Die kleineren Texte darüber sind aus dem Elephant Parade Add-On Set von LawnFawn und mit blauer Tinte gestempelt.

And since the flowers turned upside down reminded me of lupins, I planted a few of those as well and let the tips grow into the bottom of my card. I stamped these with blue inks and again I put some green leaves between the flowers. This time I die cut them with the Bayou Backdrop by LawnFawn from a lighter green cardstock.
For the text I die cut the word summer using the SummerVibes die by Create a Smile. I cut it a few times from dark blue cardstock, stacked the pieces and then added a bit of Stickles. The smaller texts above it are from the Elephant Parade Add-On set by LawnFawn and stamped with blue ink.


Mit dünnem und dickem 3D Tape habe ich die Blüten auf das Rankgitter geklebt und alles mit weißer Acrylfarbe bespritzt. Dann habe ich mit dünnem 3D Tape das Gitter auf der Mauer befestigt und die Texte angebracht. 
Zum Schluss habe ich noch 5 schwarz-blau irisierende Glitzersteine hinzugefügt und alles auf einen weißen Kartenrohling geklebt.

Using thin and thick foam tape I attached the flowers to the lattice and flicked some white acrylic paint onto the pieces. Then I used thin foam tape again to attach the lattice to the brick wall and added the texts.
To finish the card, I added only 5 blue-black iridescent rhinestones and put everything onto a white note card.
 

Donnerstag, 27. Juli 2023

Spaß in der Pfütze

 
Hallo Ihr Lieben!
Heute zeige ich auf dem Stampcorner Blog diese Karte. Die Idee dazu kam mir, als ich das Innenteil, das mit der Hintergrundstanze, die es zum 7jährigen Geburtstag von Stampcorner gab, aus der Mitte herausgestanzt wird, vor mir auf dem Tisch liegen hatte. Es erinnerte mich sofort an eine Pfütze, und so ist diese Karte damit entstanden.

Hello everyone!
Today I am sharing this card over on the Stampcorner Blog. I got the idea from the inner piece, that the background die, that was released for Stampcorner's 7th birthday, cuts, and that I had left on my table. I didn't want to throw it away and it reminded me of a puddle. So I made this card with it.

Für den Hintergrund habe ich ein Stück weißen Cardstocks mit Distress Oxide Tumbled Glass und einer Wolkenstencil von MFT gewischt. Dann habe ich silberfarbene Metallic Watercolor darüber gespritzt.

For the background I inked some clouds with Distress Oxide Tumbled Glass and a cloud die by MFT onto a piece of white cardstock. Then I flicked some silver metallic watercolor on top.


Das Innenteil der Hintergrundstanze hatte ich aus blauem, strukturiertem Cardstock gestanzt. Es war von meiner Sneak-Karte übrig. Ich habe die Ränder ein wenig mit einem Sanding Block bearbeitet.
Der süße Elefant aus dem Set Sweetie hat die Pfütze gesehen und dümplet nun mit seinem Boot darauf herum. Zusätzlich hat er ein kleines Papierboot aus dem Set Meerverliebt im Schlepptau.
Die Motive habe ich mit Copics coloriert und per Hand ausgeschnitten. Vor und hinter der Hand habe ich ein kleines Loch in den Cardstock gestochen und ein wenig weißes Twine durchgezogen. Das hintere Ende habe ich dann am Papierboot befestigt.
Mit einem Cutter habe ich zwei Schlitze in die Pfütze geschnitten und die Motive dort hineingesteckt. Drumherum habe ich mit einem weißen Gelstift einige Wellen aufgemalt. Dann habe ich die Pfütze samt Motiven auf den Hintergrund geklebt. Und damit der Elefant nicht so einsam ist, habe ich noch drei kleine Schmetterlinge aus dem Buttefly Kisses Set von LawnFawn am Himmel verteilt.

I had die cut the inner piece of the background die from blue, structured cardstock. It was left over from my sneak card. I used a sanding block to lightly distress the edges.
The cute elephant from the Sweetie stamp set saw the puddle and is now floating on it in his boat. He also brought a paper boat, that's from the Meerverliebt stamp set.
I colored the images with Copics and cut them out. On both sides of the elephant's hand I pierced two holes in the paper and put some white twine through them, attaching the other end to the paper boat.
I used a cutter to cut two slits into the puddle and put the images into them. Then I drew some waves with a white gel pen and adhered the puddle and images to the background. And since the elephant looked a bit lonely, I added three butterflies from the Butterfly Kisses stamp set by LawnFawn to the sky.


Und dann brauchte meine Karte einen Text. Irgendwie wollte nichts so recht passen. Also habe ich mir selbst einen zusammengebastelt. 
Mit dem Henry's ABC Stanzenset von LawnFawn habe ich die Buchstaben für das Wort Pfütze einmal aus schwarzem und einmal aus weißem Cardstock gestanzt. Die weißen Buchstaben habe ich mit Coipcs ein wenig grau schattiert und dann leicht versetzt auf die schwarzen Buchstaben geklebt. Als Ü-Punkte habe ich zwei silberne Pailetten verwendet.
Den Rest des Textes habe ich mit einem Dymo geschrieben - den Look mag ich sehr. Dann habe ich alles auf der Karte arrangiert.

And then my card needed a text. Since I wasn't able to find anything I liked with my idea, I created one myself.
Using the Henry's ABC die set by LawnFawn I die cut the letters for the german word for puddle once from black and once from white cardstock. I used my Copics to shade the white letters grey and then attached them to the black letters, just a bit offset. For the dots on the U I used two silver sequins.
For the rest of the text I used my Dymo - I really love the look. Then I attached everything onto my card so now the text means "even a puddle can be an ocean". 


Man kann es nur ganz leicht sehen - aber ich habe mich ganz zum Schluss entschlossen, die gestanzten Buchstaben zusätzlich mit einem Aqua Shimmer Pen von Nuvo etwas zu beglittern.
Dann habe ich alles schwarz gemattet und auf einen weißen Kartenrohling geklebt.

You can only see it slightly, but last minute I decided, to cover the die cut letters with an Aqua Shimmer Pen by Nuvo.
Then I matted everything black and attached it to a white note card.

Dienstag, 25. Juli 2023

Stampcorner August-Release Sneak #2

 
 Hallo Ihr Lieben!
Heute habe ich ein weiteres Werk mit einem Sneak auf das August-Release von Stampcorner. Und wir bleiben bei den Mäusen, aber diese hier ist etwas anders.
 
Hello everyone!
Today I have another card with a sneak of Stampcorner's august release. We keep with the mice, but this one is a bit different.  

Ich habe überlegt, wie ich mal eine andere Anordnung der Elemente auf meiner Karte machen könnte - und habe mich dazu entschieden, zwei gegenüberliegende Ecken zu dekorieren. Zuvor habe ich allerdings am Rand meines weißen Cardstocks rundum einen Streifen von 0,5 cm mit Masking Tape abgeklebt. So entsteht ein etwas subtilerer Rahmen.
Dann habe ich eine Wolkenschablone von MFT verwendet und jeweils schräg in die obere rechte sowie untere linke Ecke damit und mit Distress Oxide Tumbled Glass kleine Wolken aufgewischt. 
Ich kann ja momentan kaum ohne Farbspritzer. Also habe ich hier ein wenig hellrosafarbene Metallic Watercolor aufgespritzt und dabei den mittleren Bereich ausgespart, so dass die Spritzer nur in den Bereichen mit den Wolken sind.

I felt like doing a bit of a different layout for this card - and decided, to decorate two corners. Before I covered a strip of about 0,5 cm on each edge of a piece of white cardstock with masking tape. This creates a nice but kind of subtle frame.
Then I used a cloud stencil by MFT and inked some clouds to the upper left and bottom right corner of my cardstock using Distress Oxide Tumbled Glass.
Since I can't seem to live without speckles on my cards at the moment I added a few light pink ones to the cardstock, keeping them only in the areas where I inked down the clouds and leaving the center - nearly - without.


Die süße Maus ist wieder aus der Feder von Peaky Needles. Ich habe sie mit Copics coloriert - Mausgrau mit Pink und etwas blau im Kuvert. Dann habe ich sie ausgeschnitten. Und auch wenn die Maus ob des lieben Briefes bestimmt im 7. Himmel ist, ich wollte sie dann doch nicht darin schweben lassen. Also habe ich eines der Oval Shadows von MFT aus dunkelgrauem Cardstock gestanzt und die Maus daraufgestellt. Dann habe ich beides mit dünnem 3D Tape auf die Wolken unten links auf der Karte geklebt und dabei das Ohr und das Oval etwas über den aufgewischten Rahmen überstehen lassen.

The cute mouse is once again drawn by Peaky Needles. I colored her in with Copics - a mouse-y grey, pink and a bit of blue for the envelope. And even if the mouse seems to be over the moon because of the letter she got, I didn't want to float her in the clouds. So I die cut one of the Oval Shadows by MFT from dark grey cardstock and used that for the mouse to stand on. I attached her with thin foam tape onto the clouds in the bottom left corner of my card, letting the ear and oval go over the inked on frame.


Oben rechts auf der Karte schwebt gerade ein weiterer Brief ein. Der Brief ist aus dem selben Stempelset wie die Maus, für die Herzen habe ich Stempel eines weiteren der neuen Sets verwendet und sie pink abgestempelt - unten etwas dunkler als oben. Ballons und Kuvert habe ich wieder mit Foam Tape aufgeklebt, dann habe ich mit einem grauen Multiliner Linien dazwischen gezogen, so dass der Brief an den Ballons zu hängen scheint. Die Schleifen an den Ballons habe ich wieder aufgemalt, auf dem Kuvert sah das aber irgendwie doof aus. Also habe ich aus grauem Twine eine kleine Schleife gebunden und sie stattdessen aufgeklebt. 
Links daneben habe ich den Text aufgestempelt - so wirkt die Karte nicht gar so symmetrisch. Auch er ist aus dem Stempelset mit der Maus und ich habe ihn mit grauer Tinte direkt auf den Cardstock gestempelt.

On the top right of the card another letter is floating in. The letter is from the same stamp set as is the mouse, for the balloons I used stamps from another one of the new stamp sets. I stamped those with pink ink, making them a bit darker at the bottom, and adhered the letter and the balloons with foam tape again. Then I used a grey Multiliner to draw some lines between the balloons and letter, now they seem attached. I drew some bows onto the balloons and also tried that on the letter, but it looked weird. So I made a little bow from grey twine instead and glued that onto the letter.
To the left of the balloons and letter I added my text, this way the card doesn't look too symmetical. It means "mail for you" and is stamped directly onto the cardstock with grey ink.


Dann habe ich dann einige kleine rosafarbene Pailetten-Herzen neben den Motiven verteilt, den Cardstock hellblau gemattet und alles auf einen weißen Kartenrohling geklebt.

Then I added a few small pink heart confetti next to the images, matted the cardstock light blue and attached everything to a white note card.

Sonntag, 23. Juli 2023

Summertime is the time for traveling

 
Hallo Ihr Lieben!
Sommerzeit ist Reisezeit - auch für die kleinen Mäuse von LawnFawn. Und davon handelt diese Karte, die ich Euch heute zeige. Die Idee kam mir, als ich eines der Stanzensets aus dem neuen Release von Concord and 9th gesehen habe. Darin sind Flugzeugfenster in zwei Größen sowie für die kleineren sogar ein passender Slider-Mechanismus enthalten. Sofort hatte ich diese Karte im Kopf. Aber erstens habe ich das Release noch in keinem europäischen Shop gesehen und zweitens - wie oft mache ich eine Karte mit Flugzeugfenstern? Also habe ich geschaut, was ich so da habe, mit dem ich den Look in etwa nachmachen könnte.

Hello everyone!
Summertime is the time for traveling - also for those little mice by LawnFawn. And that's what this card I'm sharing with you today is all about. I got the idea whenI saw one of the die sets from the latest release by Concord and 9th. It includes plane windows in two different sizes and for the smaller ones even a slider mechanism. But this release hasn't made it to any shop in Europe yet and also I asked myself, how often I'd make a card with it. So I shopped my stash instead, looking for dies I could use to re-create the look.

Ich habe hier ein Stück Designpapier mit winzigen Sternchen für die Wand in meinem Flugzeug verwendet, der Boden ist aus dunkelblauem Cardstock gemacht.
Das Flugzeugfenster ist mit dem Stanzenset Essential Modern Ovals von Spellbinders gemacht - damit das Fenster auf meine Karte passt und auch einem Flugzeugfenster mehr ähnelt, habe ich die Ovale in der Höhe durch Partial Diecutting etwas in der Höhe verkürzt. Ich habe einen breiteren Ring aus grauem und einen schmäleren aus weißem Cardstock gestanzt und sie aufeinander geklebt.
Aus dem Designpapier habe ich ein Oval in einer Zwischengröße gestanzt und dann den ausgestanzten Ring darüber geklebt.
Für das Fensterrollo habe ich nur den unteren Bogen eines etwas größeren Ovals gestanzt, die Seiten nach oben mit dem Papierschneider verlängert und das Oval hinter das Fenster gesetzt. Der Griff ist mit einer der Formen aus dem Stanzenset Shadows and Flowers von Create a Smile gestanzt - ich habe vier Teile aufeinander gesetzt -, ihn auf das Fenster geklebt und dann mit grauer Tinte einen Pfeil sowie die Worte Slide und Open aus dem Set Interactive Labels von MFT über dem Griff aufgestempelt. 

I used a patterned paper with tiny stars for the walls of my plane, the floor is cut from a piece of dark blue cardstock.
The plane window is made using the Essential Modern Ovals dies by Spellbinders - to make the window fit my card and also to make it look more like a plane window I made the ovals a little less tall by doing some partial diecutting. I die cut a wider ring from grey and a smaller ring from white cardstock and glued them on top of each other. Then I cut another oval into the patterned paper using a die sized inbetween the ones I used for the window frames and then glued the rings around the cut out in the patterned paper.
For the shutter I only die cut the lower arch using an oval die a bit larger, then used my paper trimmer to make the straight sides a bit longer and put the panel behind the patterned paper. The handle is made using a die from the Shadows and Flowers die set by Create a Smile - I cut four of these and stacked them. I attached the handle to the shutter and then stamped an arrow and the words slide and open above the handle with light grey ink, using stamps from the Interactive Labels by MFT.


Aus irgend einem Grund haben sich alle Fluggäste um das Fenster herum versammelt. Es muss da wirklich etwas besonderes zu sehen geben, wenn sogar die Stewardess in ihrer blauen Uniform dort am Fenster steht und hinaus schaut. Und warum  habe ich das Gefühl, dass auf diesem Flug keiner das Entertaiment-Angeot nutzen wird?
Ich habe Mäuse von jeder Menge Stempelsets von LawnFawn verwendet - ich habe keine Ahnung mehr, welche Sets jetzt tatsächlich zum Einsatz kamen. Ich habe einfach alle Sets, in denen Mäuse enthalten sind - herausgeholt, die am besten passenden abgestempelt, mit Copics coloriert und ausgeschnitten. 
Um die Sitze zu gestalten habe ich das Sofa aus dem Set Window Scene Winter verwendet - ich habe die linke Seite ohne Rückenlehne gestempelt, den Stempel etwas verschoben und dann die rechte Seite ohne Rücken- und Seitenlehne gestempelt. Auf diese Weise habe ich vier Sitze gestempelt, sie wieder mit Copics coloriert und ausgeschnitten. Schauen die Sitze nicht super gemütlich aus? Ich wünschte, in richtigen Flugzeugen wären sie genau so.
Zuerst habe ich die Sitze mit dünnem 3D Tape auf den Boden des Flugzeugs geklebt und dann alle Mäuse darauf verteilt, wobei ich einige wieder mit dem dünnen 3D Tape aufgeklebt habe.
 
For some reason all the passengers on the plane are gathering around the window. There must be something special to see out there, when even the flight attendant in her blue dress is standing there, looking out the window. And why do I have the feeling, that no one on this plane is going to use the entertainment system during this flight?
I used mice from a bunch of different stamp sets - I brought out all the LawnFawn sets that include mice and have lost track of which ones I used. I stamped them all, colored them with Copics and cut them out. 
To create the seats I used the sofa image from the Window Scene Winter stamp set - I stamped the left side without the back, then moved the stamp and stamped the right side without the back and side. I did four of these this way, colored them with Copics, too, and cut them out. Don't those look cozy - I wish, seats in real planes would be like that!
I attached the seats onto the floor of the plane using thin foam tape, then glued down all those mice, using thin foam tape again to adhered some of them.


Vielleicht habe Ihr es Euch schon gedacht - das Rollo am Fenster lässt sich natürlich wirklich nach oben schieben. Sobald es ein klein wenig geöffnet ist, erscheint oben am Rand der Karte der Text. Der ist aus dem Set Just Plane Awesome und lautet eigentlich you're just plane awesome - das just musste ich rausmaskieren, mein Rollo war einfach nicht breit genug. Ich habe den Text mit schwarzer Tinte auf das Rollo gestempelt und dabei darauf geachtet, dass es nicht unten im Fenster zu sehen ist, wenn das Rollo geschlossen ist.

Maybe you already guessed it - the shutter can be slit open. As soon as it's opened a bit, the text of my card appears at the top edge of the card. It's from the Just Plane Awesome set, and originally it reads you're just plane aweseome. I had to mask out the just, my shutter piece just wasn't wide enough. I stamped the text with black ink onto the shutter, makind sure it won't be visible when it's shut closed.


Und wenn man das Rollo dann ganz öffnet, wird auch klar, warum alle am Fenster stehen. Es gibt doch immer diese eine Person - oder Maus - der einfach in ein Flugzeug steigen und den Piloten die Arbeit machen lassen einfach nicht abenteuerlich genug ist. Also hat er selbst einen Papierflieger bestiegen und fliegt nun neben dem Flugzeug her. Warnung! Macht das nicht zu Hause nach - zumindest nicht, wenn Ihr keine Maus seid, nicht mindestens fünf Jahre Papierflieger-Mechanik studiert und zudem einen Pilotenschein habt! ;)

And when the shutter is opened completly it becomes clear, why everyone is looking out that window. There's always that one person - or mouse - that thinks, just boarding a plane and letting the pilot do all the work just isn't fun enough. So he created himself a paper plane and is now flying besides the big plane. Warning! Don't try that at home - at least not, if you aren't a mouse, studied at least five years of paper plane engineering and have a pilot license! ;)


Hinter das Fenster - und gleichzeitig als meine Mattung - habe ich hellblauen Cardstock gesetzt, in den ich mit dem Head in the Clouds Embossingfolder von Spellbinders Wolken geprägt habe. Die habe ich dann mit Polychromos etwas weiß gefüllt - wenn man den Cardstock dazu zurück in den Embossingfolder legt, werden die Wolken beim Colorieren auch nicht wieder plattgedrückt. Mit einem weißen Gelstift habe ich einige Highlights aufgemalt und außerdem mit einem Copic Schatten unter die Wolken gesetzt.
Die abenteuerlustige Maus samt Kind in ihrem Papierflieger ist aus dem Set Just Plane Awesome und wiederum mit Copics coloriert. Darüber befindet sich eine Sprechblase, in die ich ein winziges Hello aus dem Set Elephant Parade gestempelt habe. Darunter klebt ein kleines hellblaues Pailetten-Herz.
Sprechblase und Maus sind dann wieder mit dünnem 3D Tape auf die Wolken geklebt.
Hinter das Fenster, an die Rückseite des Designpapiers, habe ich noch ein Stück Folie gesetzt - so bekommt das Fenster eine echte Scheibe, gleichzeitig entsteht so eine Fläche, auf der das Rollo gleiten kann ohne nach unten abzusacken. Der Griff am Rollo fungiert hier als Stopper, sowohl für die geöffnete als auch die geschlossene Position.

Behind the window - and also as my mat - I used a piece of light blue cardstock, that I dry embossed some clouds into using the Head in the Clouds embossing folder by Spellbinders. I used a white Polychromo to fill them - when you put the cardstock back into the folder while doing the coloring there's no chance that the clouds get pushed back. I added a few highlights with a white gel pen and shadows under the clouds with a light blue Copic.
The adventurous mouse with her son in the paper plane is from the Just Plane Awesome set and again colored with Copics. Above it I placed a little speech bubble into that I stamped a tiny hello from the Elephant Parade stamp set. Under the text I added a tiny light blue heart confetti. To adhere the mouse and the speech bubble onto the cloud background I used thin foam tape again.
Behind the window, to the back of the patterned paper, I put a piece of acetate - this way the window really gets a window pane and at the same time I created a layer for my shutter to slide on without falling down onto the background. The handle on the shutter works as a stopper here for both the opened and the closed position.


Um das Designpapier mit all den Motive auf den Wolkenhintergrund mit der Maus im Papierflieger zu befestigen, habe ich dickeres 3D Tape verwendet. So ist für alle Motive genug Platz. Und hier könnt Ihr auch die Fensterscheibe aus Folie nochmal besser erkennen.

To attach the patterned paper with all the image to the cloud background with the mouse in the paper plane I used some thicker foam tape. This way, there's enough height for all the images. And here you can also see the window pane made from acetate clearly.

Samstag, 22. Juli 2023

Stampcorner August-Release Sneak #1

 
Hallo Ihr Lieben!
Der Sommer rast irgendwie dahin - es ist schon fast August. Das bedeutet aber auch, dass das nächste Release von Stampcorner vor der Tür steht. Und ich gebe Euch heute ein erstes Sneak darauf.
 
Hello everyone!
Summer is passing fast - it's nearly august already. But that also means, that there's a new Stampcorner release coming soon. And I am sharing my first sneak with you today.
 
 Auf meiner Karte habe ich gleich zwei neue Produkte verarbeitet - einen davon könnt Ihr im Hintergrund sehen. Es ist ein Strahlenhintergrund. Und den finde ich absolut klasse, denn man kann ihn so vielseitig einsetzen!
Hier habe ich ihn erst mit rosafarbener Tinte auf ein Stück weißen Cardstocks gestempelt - dabei habe ich die äußeren Bereiche mehrfach gestempelt, um die Strahlen dort etwas abzudunkeln. Dann habe ich zwei Lagen klaren Embossingpulvers darüber. Beim Stempeln der zweiten Lage bin ich offenbar mit meinem Papier ein klein wenig im Misti verrutscht, deswegen haben meine Strahlen außerdem einen leichten weißen Schatten, aber das stört mich gar nicht.
Dann habe ich den weißen Cardstock um die nun versiegelten Strahlen von der Mitte her mit Distress Ink Barn Door, Lumberjack Plaid und Aged Mahogany gewischt und ganz am Rand noch ein klein wenig Black Soot dazugefügt. 
Und weil mir der Hintergrund so zwar super gefallen hat, aber er mir für dieses Motiv doch etwas zu knallig war, habe ich noch das Wonky Stitched Window als Aufleger aus Vellum gestanzt. Das werdet Ihr demnächst nochmal sehen - ich hatte nämlich nicht gemerkt dass ich zwei Lagen Vellum auf einmal verwendet habe und so zwei Hintergründe gestanzt habe. Zum Wegwerfen natürlich viel zu schade, mal sehen, was mir damit einfällt.

On my card I used two of the new products - one of them you can see in the background. It's this radiating rays stamp. I absolutely love this because I think you can use it for so many different types of cards!
Here I stamped it with pink ink onto a piece of white cardstock - I stamped the outer areas several times to darken the rays a bit on the outside. Then I put two layers of clear embossing powder on top. When I stamped the image for my second layer of embossing powder I accidently moved the cardstock just a smitch in my Misti so the rays also have a tiny white shadow, but it didn't bother me.
Next I inked the white cardstock around the now trapped rays with Distress Ink Barn Door, Lumberjack Plaid and Aged Mahogany and also added a bit of Black Soot just to the very outer corners.
And since I really liked the background but thought, it was a bit too much for this image, I die cut the Wonky Stitched Window from Vellum, to put it on top. You'll see one of these be used again soon - because I hadn't noticed, that I had put two sheets of vellum into my Big Shot and so I ended up with two die cut backgrounds. And of course the left over one is way too nice to be thrown away. We'll see what I come up with for that.


Und hier ist eines der süßen Motive aus einem der neuen Sets. Ich finde diese Maus einfach zu knuffig. Sie ist mit Copics coloriert und anschließend per Hand ausgeschnitten. Den Luftballon habe ich noch mit einer Lage Glossy Accents versehen.

And here's one of the cute images from one of the new sets. I just love this little mouse. I colored her with Copics and then cut her out by hand. I also added a layer of Glossy Accents onto the balloon.


Und dann habe ich eine schon ältere Hello-Stanze von MFT benutzt um das große Hello auszustanzen - Ihr könnt aber natürlich genauso gut ein Alphabet-Set dafür verwenden. Ich habe das Wort viermal aus hellrosa farbenem Cardstock gestanzt und sie aufeinander geklebt. Mittig und quer darauf habe ich dann noch das Wort Lieblingsmensch aus dem Set Gute Wünsche aufgeklebt. Das ist mit roter Tinte auf weißen Cardstock gestanzt und wieder per Hand ausgeschnitten. 
Dann habe ich die Worte auf das Vellum geklebt und dieses dann mit dünnem 3D Tape auf dem Hintergrund befestigt. dabei habe ich das Tape hinter den gestanzten Buchstaben versteckt. Mittig in das Loch kam dann die kleine Maus mit dem Ballon. 

And then I used an older hello die by MFT to cut the big hello - but of course it can be done with an alphabet die set as well. I die cut the word four times from light pink cardstock and stacked them. Across the center of the word I added a stamped "favorite person". It's stamped with red ink onto white cardstock and again cut out by hand.
Then I adhered the words to the Vellum and then attached that with thin foam tape onto the background, hiding the tape behind the die cut letters. In the center of the cut out in the vellum I put the little mouse.


Als Deko habe ich dann noch ein paar weiße Herzen und kleine pinkfarbene Steinchen auf der Karte verteilt. Die brauchte ich vor allem, um das Vellum auch im oberen Bereich etwas anzuheben - unten war es ja bereits mit dem 3D Tape aufgeklebt. Von den Herzen habe ich jeweils eins auf und hinter das Vellum geklebt, das gleiche habe ich dann auch mit den beiden Steinchen am oberen Rand getan. Schon war das Vellum komplett angehoben.
Zum Schluss habe ich alles nur noch auf einem weißen Kartenrohing geklebt.

To decorate the card I added a few white hearts and small pink rhinestones. Actually I mainly needed those to raise the upper half of the vellum - on the bottom it was already raised by the foam tape behind the word. So I attached the hearts to both the top and back of the vellum and did the same with the two rhinestones at the top edge. That's an easy way to make sure you don't see any foam tape behind the small embellishments.
To finish the card I mounted it onto a white note card.

Freitag, 21. Juli 2023

Stampcorner Juli-Challenge

 
Hallo Ihr Lieben!
Es ist Zeit für eine neue Stampcorner-Challenge. Und diesmal haben wir uns für Euch ein Moodboard ausgesucht. Es ist in wunderbar hellen Farben gehalten, die für mich perfekt zur Leichtigkeit des Sommers passen. 
 
Hello everyone!
It's time for a new Stampcorner Challenge. This time we picked a moodboard for you. It shows beautiful light colors, that go perfectly with  easy going we love for summer.

Ich habe mich von einem der Bilder inspirieren lassen und erstmal einen Streifen in ganz hellem Grau mittig von oben nach unten auf ein Stück weißen Cardstocks aufgebracht. Dafür habe ich Nuvo Shimmer Powder Lunar Rocket verwendet und mehrere Lagen durch Ink Smooshing aufgetragen. Dabei habe ich die Intensität der Farbe bei jeder Lage ein wenig erhöht. 
Da eines der Bilder des Moodboards eine tolle weiß-hellrosafarbene Pfingstrose zeigt, habe ich dann meinen Stempelfundus durchforstet und bin auf die tolle Peony Perfection von MFT gestoßen.  Die habe ich dann dreimal mit Distress Ink Lost Shadow auf den Hintergrund gestempelt. So wirkt der etwas interessanter, ohne dass er zu sehr vom Motiv ablenkt.

I got inspiration from one of the pictures and so first I used my Lunar Rocket Nuvo Shimmer Powder to do some ink smooshing and added several layers of it in a strip down the center of the cardstock. I added a bit more powder for each layer to get more intensitiy in color.
Since one of the pictures shows a beautiful white and pink peony I went through my stamps and came across the great Peony Perfection stamp by MFT. I stamped it three times along the edge of the cardstock using Distress Ink Lost Shadow. It makes the backround more interesting without taking too much attraction from the main image.


Als Motiv habe mich für die süßen Bären aus dem Set Bärenliebe entschieden. Ich habe es ganz zart mit Copics coloriert und ausgeschnitten.
Hinter das Motiv habe ich dann den Big Hugs Circle Frame von MFT gesetzt - dreimal gestanzt aus Taupe-farbenem Cardstock und aufeinander geklebt. Dann habe ich noch zwei der Love Speech Bubbles von MFT aus hellrosanem Cardstock gestanzt und ebenfalls auf den Rahmen geklebt. 
Hinter diese Teile habe ich dann ein Quadrat aus Vellum gesetzt, einfach, um etwas Ruhe hinter dem Motiv zu schaffen. Dann habe ich alles mit dünnem 3D Tape auf dem Hintergrund befestigt. 

For the image I went with the cute bears from the Bärenliebe set. I colored it quite softly with my Copics, then cut it out.
Behind the image I put the Big Hugs Circle Frame by MFT - die cut three times from taupe cardstock and layered. Then I added two of the Love Speech Bubbles by MFT, die cut from light pink cardstock.
Behind all those pieces I put a square cut from vellum, just to make the background behind the image a bit less busy, and adhered everything onto the background with thin foam tape.


Dann fehlten noch die Texte auf meiner Karte.
Das Wort Bärenumarmung ist ebenfalls aus dem Set Bärenliebe, die beiden anderen Texte sind aus dem Set Kleine Worte. Alle sind mit Lost Shadow auf weißen Cardstock gestempelt, ausgeschnitten und mit dünnem 3D Tape auf den Hintergrund geklebt.
Als Deko habe ich dann noch einige klare Glitzersteine sowie unten, an den Text von Herzen, eines der Herzen, das mittig aus den Sprechblasen gestanzt wird, aufgeklebt.
Ich habe hier auch versucht, den Schimmer des Nuvo Powders etwas einzufangen - gar nicht leicht, vor allem bei dieser hellen Farbe. Aber in echt ist er natürlich wunderbar sichtbar.

Then my card needed a text.
I stamped several - a bigger bear hug and two smaller ones meaning for you and from the heart - with Lost Shadow onto white cardstock. Then I cut them out and adhered them with thin foam tape.
To decorate the card I added a few clear rhinestones and, close to the from the heart text, one of the small hearts, that get die cut from the center of those speech bubbles.
I also tried to catch the shimmer of the Nuvo powder here - really not easy to do, especially with this light color. But in real life it is pretty clear to see.
 

Donnerstag, 20. Juli 2023

Lust auf Meer?


 Hallo Ihr Lieben!
Na, fahrt Ihr im Urlaub ans Meer? Oder seid Ihr schon wieder zu Hause? Habt Ihr Lust auf Meer? Das fragt die kleine Maus auf meiner Karte, die ich heute auf dem Stampcorner-Blog zeige.

Hello everyone!
Are you going to the beach for vacation? Or have you already come back home? Do you want to go to the beach? That's what the little mouse on this card, that I'm sharing over on the Stampcorner Blog today, is asking. 

Auf meiner Karte habe ich eine weitere Maus aus dem Stempelset Meeresrauschen aus dem Juli-Release verwendet. Jetzt im Sommer passt maritim doch irgendwie immer. Und trotzdem war mir nicht nach einer klassischen Strandszene, weswegen meine Karte dann so ausgefallen ist.

On my card I used another mouse from the stamp set Meeresrauschen from the july release. I think, maritime is perfect for summer cards. But I didn't feel like doing a beach scene and so I made this card instead.


Für den Hintergrund habe ich den Pinselstrich aus dem Set Kleckse mit dunkelblauer Tinte mehrfach neben- und untereinander gestempelt und ihn dabei immer wieder um 180° gedreht. Die Motive überlappen sich in der Mitte leicht und das sieht man natürlich. Da ich aber wusste, dass diese Stellen vom Motiv verdeckt werden, habe ich mich darum nicht groß gekümmert.
Zwischen die dunkelblauen Streifen habe ich dann dreimal das Wort Meeresrauschen aus dem gleichen Stempelset gesetzt - könnt Ihr es sehen? Es ist eher dezent, denn ich habe das Wort mit weißem Embossingpulver aufembosst und es ist nur auf den dunkelblauen Stellen gut erkennbar. 
Und dann habe ich beschlossen, die Seesterne aus dem Stempelset Cool Summer ebenfalls in meinen Hintergrund zu integrieren. Im Nachhinein bin ich mir immer noch nicht sicher, ob das eine gute Idee war oder nicht. Aber immerhin bilden sie eine Brücke zum Motiv, auf dem ja auch ein Seestern ist, und natürlich farblich. Ich habe die Seesterne mit Distress Embossing Glaze Saltwater Taffy aufembosst. Auch sie sind nur an den weißen Cardstockstellen gut sichtbar, da Glaze ja durchscheinend ist.
Für den Rettungsring, der den Rahmen für die Maus bildet, habe ich zwei Ringe gestanzt - einmal aus rotem und einmal aus weißem Cardstock. Dafür habe ich einfach zwei Kreisstanzen verwendet. Aus dem roten Ring habe ich zwei Viertel ausgeschnitten und oben auf den weißen Ring geklebt. Von hinten habe ich dann noch etwas Twine rund um den Ring befestigt, wie es sich für so einen Rettungsring natürlich gehört.
Die süße Maus habe ich mit Copics coloriert, Highlights mit einem weißen Gelstift gesetzt und sie dann ausgeschnitten. Dann durfte sie hinter den Rahmen schlüpfen - die Spitze des unteren Arms des Seesterns habe ich oben über den Rettungsring geklebt.

For the background I stamped a brushstroke image onto white cardstock using dark blue ink, turning the stamp 180 degrees inbetween stamping. The strokes overlap in the middle of the cardstock and of course that's noticable. But since I knew these areas will be covered by my image I didn't care much about it.
Between the dark blue strokes I stamped the word "sound of the sea" three times - can you see it? It's very subtle since I white heat embossed it onto the cardstock and so it's only clearly visible on top of the dark areas.
And then I decided, to also add a few star fish to my background. I still am not sure if this was a good idea or not. But at least they create a bridge between the background and the image - colorwise and also because the mouse is holding a star fish as well. I heat embossed the star fish with Distress Embossing Glaze Saltwater Taffy. And again those are only visible clearly on the white areas, because Distress Glaze is translucent. 
For the life saver, that I used as a frame for my image, I die cut two rings, once from white and once from red cardstock. I simply used two circle dies for this. Then I cut two fourth of the red ring off and attached those on top of the white ring. To the back I glued a piece of brown twine to make my life saver look more realistic. 
The cute mouse I colored with Copics, added highlights with a white gel pen and then cut her out. I placed her behind the life saver frame and put the bottom arm of the star fish on top of the life saver.


Den Text hatte ich eigentlich erst direkt mit blauer Tinte auf den weißen Cardstock gestempelt, aber irgendwie gefiel mir das nicht. Also habe ich aus dunkelblauem Cardstock eines der Banner gestanzt, das Stanzteil mit Copics leicht schattiert und den Text weiß darauf embosst. Der Stempel wollte sich einfach nicht so biegen lassen, dass der Text schön aufs Banner passt - also habe ich das Wort Meer einfach weggeschnitten und etwas gedreht wieder angesetzt, schon klappte es. 

First I had stamped the text directly onto the white cardstock, using blue ink. But I just didn't like that. So I die cut a banner from dark blue cardstock, shaded it with my Copics and then white heat embossed the text onto it. 


Maus und Rettungsring habe ich mit dickem 3D Tape auf den Hintergrund geklebt, das Banner direkt mit Flüssigkleber, um den darunter gestempelten Text komplett zu überdecken. Dann habe ich als Deko noch einige klare Pailetten auf der Karte verteilt, den Cardstock schwarz gemattet und dann auf einen weißen Kartenrohling geklebt.

I used thick foam tape to attach the mouse and life saver to the background, the banner I glued down directly using liquid glue to make sure, the stamped text underneath is fully hidden. Then I added a few clear sequins for decoration, matted the cardstock black and adhered everything to a white note card.

Mittwoch, 19. Juli 2023

LawnFawnatics Challenge #153 - Christmas in July

 
Hallo Ihr Lieben!
Christmas in July ist das Thema der 153. LawnFawnatics Challenge. Urgh, war meine erste Reaktion. Ich tu mich ja total schwer damit, bei 35 Grad und strahlendem Sonnenschein im Bikini Weihnachtskarten zu machen! Da Christmas in July aber überall in der Bastelwelt, auch bei den Produktherstellern, Thema ist und ich beim Basteln meist YouTube-Videos von Stemplern laufen habe, von denen jetzt im July viele mit Weihnachtsmusik hinterlegt sind, war ich fast schon ein wenig in Weihnachtsstimmung. Das Design meiner Karte stand dann auch recht schnell fest, und so ist diese Weihnachtskarte, mitten im Sommer, entstanden. Und es hat sogar Spaß gemacht!

Hello everyone!
Christmas in July is the theme of the 153rd LawnFawnatics challenge. Ugh, that was my first reaction. I really have a hard time sitting in my craftroom wearing a bikini, with the sun shining bright and the temperatures being around 35° Celsius and create christmas cards! But since christmas in july is a theme all over in the crafting world, als with new products, and I always watch crafty videos on YouTube while making cards and many of those videos now have christmas music playing, I nearly was in a christmas mood. And then the idea for the card also came pretty quickly to my mind. And so I made a christmas card in the middle of summer and even had fun doing it!

Für meine Tapete habe ich ein Stück Designpapier aus dem Let it Shine Starry Skies Paper Pad verwendet und etwas kleiner als meinen Kartenrohling zugeschnitten. Am Rand habe ich es mit etwas Distress Ink Peacock Feathers ein wenig abgedunkelt.
Der Boden ist aus einem Streifen des weißen Woodgrain-Cardstocks von LawnFawn gemacht, auf den ich ganz leicht Distress Ink Lost Shadow aufgewischt habe, um das Muster besser rauszubringen. 
Später habe ich dann aus dem Designpapier ein Rechteck geschnitten, hinter das ich meine Winterlandschaft gesetzt habe.

For the tapestry I used one of the papers from the Let it Shine Starry Skies paper pad and cut it a bit smaller than my card base. Then I used Distress Ink Peacock Feathers to darken the edges a bit.
The floor is made using a strip of the white woodgrain cardstock by LawnFawn, that I softly applied some Distress Ink Lost Shadow onto to bring out the pattern a bit better.
Later I cut a rectangle from the center of the pattnered paper and put the snowy landscape behind it.


Die Szene hinter dem Fenster ist mit dem Window Scene Winter Set gemacht. Alle Motive hier sind mit Copics coloriert, nur den Himmel habe ich mit Distress Oxide Weathered Wood gewischt. Dann habe ich weiße Acrylfarbe als Schneeflocken aufgespritzt. Entlang der oberen Kante des Schneehügels habe ich ein wenig Stickles aufgetragen.
Das Fenster, durch das die Szene zu sehen ist, ist mit der Window Frame Stanze aus weißem Cardstock gestanzt und ebenfalls mit Copics etwas schattiert. Außerdem habe ich von hinten eine Lage Folie als Fensterscheibe dagegen geklebt.
Oben am Fensterrahmen hängt eine kleine Lichterkette aus dem Build-a-House Gingerbread Add-On Set aufgehängt. Und innen am Fenster hängt ein Tannenkranz, gemacht mit der Mini Wreath Stanze. Auch hier habe ich alle Teile aus weißem Cardstock gestanzt und mit Copics coloriert. Den Kranz habe ich außerdem mit einigen kleinen türkisfarbenen Steinchen geschmückt. 
Durch das Fenster schauen ein paar neugierige Waldtiere auf die Weihnachtsvorbereitungen im Inneren des Hauses. Die Tiere sind aus dem Simply Celebrate More Critters Set - ich habe nur diese drei aus der Reihe verwendet, da für mehr einfach kein Platz war, ohne sie zu sehr abzuschneiden. Rentier und Bär tragen Mützen aus dem Set Ugly and Bright. 
Später kam mir dann die Idee, die kleinen Tierchen auch noch etwas sagen zu lassen. Nur wie, ohne entweder zu viel der Szene zu verdecken oder Teile der Sprechblasen vom Fenster verdecken zu lassen. Vellum war die Lösung. Ich habe Sprechblasen aus den Sets Pool Party und Ugly and Bright mit schwarzer Tinte auf das Vellum gestempelt und dann die Texte, ebenfalls aus dem Set Ugly and Bright, hineingestempelt. Da Tinte auf Vellum ja quasi nicht trocknet, habe ich dann klares Embossingpulver aufgestreut und geschmolzen. Die Linien sind dadurch nicht ganz so klar, als hätte ich sie auf normalen Cardstock gestempelt, aber ich finde, die kleinen Texte sind immer noch gut lesbar. Zum Aufkleben habe ich dann die ausgeschnittenen Sprechblasen von hinten mit dem Xyron mit Kleber versehen, so sieht man keine unschönen Klebestellen durch das Vellum. 

The scene behind the window is made with the Window Scene Winter set. I colored all images with Copics, only the sky is ink blended with Distress Oxide Weathered Wood. Then I spritzed some white acrylic paint as falling snow over the scene. Along the top edge of the snowy hill I added a bit of Stickles.
The window, that the scene can be seen through, is made with the Window Frame die and white cardstock. Then I shaded it with Copics and also put a piece of acetate behind it as the window glass.
Outside on the window there's a string of lights hanging down, made using a die from the Build-a-House Gingerbread Add-On set. And inside there's a wreath hanging at the window, made with the Mini Wreath die set. Again I cut all pieces from white cardstock and colored them with Copics. I also decorated the wreath with a few tiny aqua rhinestones.
Through the window a few curious critters are looking inside the room and all the christmas preparations going on in there. The animals are from the Simply Celebrate More Critters Set - I only used those three from the row since there wasn't enough room to add more without having to cut off too much of them. Reindeer and bear are wearing hats from the Ugly and Bright stamp set.
Later I got  the idea to also let those critters say something. But how, without either covering too much of the scene or covering parts of the speech bubbles with the window. Vellum was the solution. I stamped the speech bubbles from the sets Pool Party and Ugly and Bright with black ink onto the vellum, then stamped the texts from the Ugly and Bright set into them. And since ink never really dries on vellum, I covered the stamped images with clear embossing powder and melted it. Well, the lines aren't as crisp as if they'd be stamped onto regular cardstock, but I think, even those small texts are still legible. To attach the bubbles, I ran them through my Xyron so you don't see any glue through the vellum.


Im Inneren des Zimmers steht ein geschmückter Weihnachtsbaum auf einer Decke. Beide sind aus dem Set Christmas Dreams. Die Christbaumkugeln und die Sternspitze sind mit Glossy Accents überzogen. Außerdem habe ich mit einem klaren Gellyroll Glitterstift - der eher wie ein zartes Silber wirkt - kleine Girlanden aus Punkten aufgemalt. Vor dem Baum liegen schon einige festlich verpackte Geschenke aus dem selben Set. 
Und hier unten war dann auch Platz für meinen Text. Der ist aus dem Tiny Christmas Set und weiß auf schwarzen Cardstock embosst. 

Inside the room there's a decorated christmas tree on a christmas tree ceiling. Both are from the Christmas Dreams stamp set. I covered the baubles and the star topper with Glossy Accents. And I also added some garland of tiny dots using a clear Gellyroll glitter pen, that looks more like a light silver. Under the tree there are already some nicely wrapped christmas gifts, that come from the same set.
And here at the bottom of my card there was room for the text of my card. It's from the Tiny Christmas set and white heat embossed onto black cardstock.


Nun musste ich alles nur noch zusammensetzen. Die Winterlandschaft habe ich mit 3D Tape hinter das Fenster gesetzt und somit auch das Designpapier mit 3D Tape auf dem Kartenrohling befestigt. Tannenbaum, Geschenke und Text sind mit dünnerem 3D Tape aufgeklebt.
Und hier kann man auch die Fensterscheibe und die Punkte-Girlanden am Tannenbaum besser sehen.

Now I only had to put everything together. I put the snowy landscape with foam tape behind the window and also used foam tape to attach the patterned paper to the card base. For the tree, the gifts and the texts I used thinner tape.
And here you can also see the window pane and the dotted garland on the tree better.