Samstag, 30. April 2022

Stempeleinmaleins - Ausgabe vom 30. April 2022

 
Hallo Ihr Lieben!
Es ist wieder Zeit für einen neuen Sketch beim Stempeleinmaleins. Und das ist die Karte, die ich danach gewerkelt habe. 

Hello everyone!
It's time for a new sketch over at Stempeleinmaleins. And this is the card I made following it.

Ja, es wird wieder blumig. 
Hier habe ich mit einer der Diamond Plaid Layering Plates von The Ton aus silberfarbenem Spiegelcardstock das zarte Rautenmuster für den Hintergrund gestanzt.
Mit 3D Tape habe ich weißen Cardstock dahinter geklebt, den ich zuvor mit hell-silberfarbener Metallic Watercolor bespritzt habe. Dann habe ich die beiden Lagen auf einen Kartenrohling aus hell-türkis farbenem Cardstock geklebt.

Yes, it's getting floral again today.
Here I've die cut one of the  Diamond Plaid Layerinng Plates by The Ton from silver mirror cardsdtock to create the soft diamond pattern for the background.
I used foam tape to glue it onto some white cardstock, that I had spritzed some light silver metallic watercolor onto. Then I glued both layers onto a card base, cut from light turquoise cardstock.


Die beiden schräg aufeinander gesetzten Rechtecke im Sketch habe ich durch zwei identische Panele dargestellt. Dafür habe ich den Floral Focus Hintergrundstempel von PinkFresh mit dunkelgrauer Tinte auf weißen Cardstock gestempelt und mir dann die beiden am besten passenden Stellen daraus ausgeschnitten. Im Nachhinein muss ich sagen, dass ich da gar nicht so sehr hätte drauf achten müssen, denn man sieht eh nicht mehr viel davon auf der fertigen Karte. Außerdem habe ich hier ein kleines Stück Vellum mit aufgeklebt, in das ich mit der Diamond Piercing Plate von TayloredExpressions ebenfalls ein Rautenmuster eingeprägt habe. Allerdings wurde das Stück dann so klein, dass man das Muster so gut wie nicht mehr erkennen kann.
Die tolle Blume ist mit der Lovely Layers Anemone Stanze von HoneybeeStamps gemacht. Ich habe die Blume aus drei verschiedenen Stufen türkisfarbenen Cardstocks gestanzt, die Mitte aus Gelb- und Brauntönen und die Blätter natürlich grün. Dann habe ich alle Teile mit Copics und einem weißen Gelpen schattiert und die Teile mit 3D Tape aufeinander geklebt.
Den Text habe ich aus einer Kombi aus embosstem und gestanzten Text gemacht. Das sending you ist aus dem Stempelset Big Pickup Cab von Honeybeestamps, weiß auf schwarzen Cardstock embosst und wieder mit 3D Tape aufgeklebt.
Das Wort sunshine ist mit einer Stanze von MFT gemacht. Ich habe es mehrfach aus schwarzem Cardstock sowie einmal aus silberfarbenem Spiegelcardstock gestanzt. Die Lagen habe ich alle aufeinander geklebt und dabei die unterste schwarze Lage ein wenig nach rechts oben versetzt, so dass ein kleiner Schatten entsteht. 
 
For te two rectangles in the sketch I stamped the Floral Focus background stamp by PinkFresh with dark grey ink onto white cardstock, then cut out the two parts that I thought fit my card best. Well, after the card was finished I realized that I could have used any part of the stamp because the pattern isn't really visible anymore on the finished card. I also added a small piece of vellum, into that I've cut a diamond pattern as well, using the Diamond Piercing Plate by TayloredExpressions. But I had to cut the piece so small, that the pattern isn't really visible anymore.
The great flower is made with the Lovely Layers Anemone die by HoneybeeStamps. I've cut the flowers from three different shades of turquoise cardstock, the flower center from yellows and brown and of course the leaves from green cardstock. Then I shaded all parts with Copics and a white gel pen and glued the flowers together with foam tape.
The text is made from a combination of embossed and die cut texts. The sending you is from the Big Pickup Cab stamp set by HoneybeeStamps. I've white heat embossed onto black cardstock and then glued the strips down with foam tape again.
The word sunshine is made with a die from MFT. I've die cut it several times from black cardstock and once from silver mirror cardstock. I stacked all layers, moving the bottom black one a tad bit to the top right to create a little shadow.


Auf diesem Foto kann man die verschiedenen Lagen und die Tiefe der Karte besser erkennen.
Als Deko habe ich zum Schluss noch einige schimmernde türkisfarbene Perlen auf der Karte verteilt.

On this picture you get a better look at the different layers and the depth of this card.
As decoration I added a few shimmery turquoise pearls to the card.

Freitag, 29. April 2022

Mai-Sneak, Teil 2

 
Hallo Ihr Lieben!
Bereits am Montag habe ich Euch ja schon ein Sneak auf das Mai-Release von Stampcorner gegeben. Heute gibt es eine weitere Vorschau. Und diesmal ist meine Karte non-cute.

Hello everyone!
On monday I've already shared a sneak of the may release by Stampcorner. Today I have another one for you, and this time I've made a non-cute card.

Ich finde diesen "Sternen-Swirl" einfach klasse. Auf meiner Karte ist er immer nur teilweise zu sehen - es ist aber eigentlich ein kleiner Stern in der Mitte mit davon in alle Richtungen kreisförmig weggehende Strahlen sowie weitere Sterne am Ende der Strahlen.
Ich habe den Stempel hier mehrfarbig abgestempelt - von gelb in der Mitte über grün und türkis bis zu hellblau in den äußeren Bereichen. Auf diese Weise habe ich den Stempel dreimal auf ein Stück weißen Cardstock gestempelt und das Motiv anschließend klar embosst. Dann habe ich den Cardstock mit Distress Oxide Chipped Sapphire und Black Soot gewischt, heller in der Mitte und schwarz an den äußeren Rändern.
Dann habe ich mit einer der Deckle Frames Stanzen den mittleren Bereich aus dem Cardstock ausgestanzt. Mit der nächst größeren Stanze aus dem Set habe ich dann eine Mattung aus goldenem Spiegelcardstock gestanzt und den mittleren Bereich damit hinterlegt, bevor ich ihn mit 3D Tape wieder zurück an seinen Platz geklebt habe.

I just love this "star swirl" image. On my card you can't see the full size and pattern of it - there's a small star in the middle, some kind of rays leading away from it in a circle and then more stars at the end of the rays.
I stamped the image in several colors - I started with yellow in the center, then went from green and turuqoise to blue on the outer stars. I stamped the images like this three times onto a piece of white cardstock, then heat embossed over the colors with clear embossing powder. Then I inked up the cardstock with Distress Oxide Chipped Sapphire and Black Soot, keeping the ink lighter in the center and black on the outer edges.
Then I used one of the Deckle Frames dies to cut out the center area from this background. I used the next larger die of this set to cut a matting from golden mirror cardstock, glued that behind the cut out area and then glued those two layers back into their place in the original background using foam tape.
 

 Der Text ist ebenfalls aus diesem neuen Stempelset, das übrigens Wünsche heißt. Ich habe ihn hier nur etwas anders angeordnet abgestempelt und das Wort Sterne durch eines aus gestanzten Buchstaben ersetzt. 
Die gestempelten Teile sind weiß auf den Hintergrund aufembosst. Für das Wort Sterne habe ich die Buchstaben mit dem Henry's ABC Stanzenset von LawnFawn aus helltürkisfarbenem Cardstock gestanzt und zwischen die embossten Texteile geklebt. Dann habe ich mit einem weißen Gelpen Highlights auf sowie kleine Punkte um die Buchstaben gemalt.
Dann habe ich noch mit einem goldenen Gelstift einen Rahmen um diesen Bereich der Karte gemalt. 

The text means "I'd pick the stars from the sky for you". I white heat embossed most of the text onto the background. For the word stars I've die cut the letters from light turquoise cardstock with the Henry's ABC die set by LawnFawn and glued them between the heat embossed text parts. Then I added some highlights onto the letters and some tiny dots around them with a white gel pen.
In the end I used a golden gel pen to draw a frame around this area of the card.


Und wieder mal gibt es das schon bekannt "ich möchte Euch so gerne den Glanz auf der Karte zeigen" Foto. Von oben klappt das einfach nicht, egal, woher das Licht kommt.

And again I've taken the by now well known "I want to show you the shine on this card so badly" picture. That just doesn't show when I take the picture from above, no matter where the light source is.

Donnerstag, 28. April 2022

Bin unterwegs!

 
Hallo Ihr Lieben!
Kennt Ihr das - Ihr fangt eine Karte an und dann passt nichts so, wie Ihr es Euch vorgestellt habt und am Ende sieht sie so ganz anders aus als geplant? So ging es mir mit dieser Karte, die ich heute auf dem Stampcorner Blog zeige.

Hello everyone!
Did it ever happen to you - you start a card and then nothing fits as planned and in the end the card looks so much different than what you had in mind? That's what happened to me with this card, that I'm sharing over at the Stampcorner Blog today. 

Eigentlich hatte ich die Karte als One-Layer-Card geplant. Nachdem Motiv und Text gestempelt und coloriert waren, war mir aber viel zu viel weiß auf der Karte übrig. Es sah einfach fad aus. Also habe ich das "zu viel" weggeschnitten und saß da mit einem Format, das so gar nirgends passen wollte, zu klein für eine normale Karte, zu hoch für eine Mini-Slimline Karte. Also habe ich doch wieder mit Stanzen etc. aufgefüllt.
Ich habe ein Design aus dem Paper Pack 01 von Stampcorner so zugeschnitten, dass es etwas kleiner als eine Standard-Karte war. Das bildet den Hintergrund zu meinem Motiv.
Aus schwarzem Cardstock habe ich eine der Lace Edge Stanzen gestanzt und dann mit dem Papierschneider das mittlere Stück herausgeschnitten, so dass ich einen Rahmen für mein Motiv hatte. Ich habe den Cardstock mit dem Motiv von hinten gegen den Rahmen geklebt und dann fehlte definitiv Deko. 
Mein eigentlicher Plan war, hier den Spring Flowers Background von LawnFawn zu verwenden. Die Blüten und Blätter ragen aber so weit nach innen, dass zu viel des Motives und Textes verdeckt worden wäre. Also habe ich die zusätzlichen Blüten aus dem Set aus gelbem Cardstock gestanzt, mit Copics und einem weißen Gelstift schattiert und diese am Rand des Rahmens verteilt. Und weil farblich irgendwie die Verbindung zum Motiv fehlte, habe ich die Blüten auch noch einmal aus dunkel-türkisfarbenem Cardstock gestanzt, ebenfalls mit Copics schattiert und unter den Rahmen und die gelben Blüten gesetzt. So gefiel mir das dann endlich. 
Den Rahmen mit Motiv habe ich dann mit 3D Tape auf den Hintergrund geklebt.

I had planned to make a One Layer Card. After I had stamped and colored the image and text there was way too much white left on the card. It just looked boring. So I cut off the "too much white" and ended up with a cardstock size, that didn't fit anything. It was too small for a regular card and too tall for a Mini Slimline Card. So I picked dies again to finish the card.
I've cut a piece from the Paper Pad 01 by Stampcorner and cut it a bit smaller than a card base to create a background for my card.
From black cardstock I've die cut one of the Lace Edge dies and then used a cutter to cut out the inner part to create a frame. I glued the cardstock with the image behind the frame and then needed some decorations.
I had planned to use the Spring Flower Background die by LawnFawnn. But the flowers and leaves went that much into the frame that a lot of the image and text would have been covered. So I used the individual flowers that come in the set instead and die cut them from light yellow cardstock. I shaded them with Copics and a white gel pen and glued them on top of the frame. Now I felt like I needed some color to bring the card design and the image together colorwise. So I've die cut the same flowers again from dark turquoise cardstock, shaded them again with Copics and glued them under the frame and the yellow flowers. Now I finally liked the card.
I glued the frame with the image onto the patterned paper with foam tape.


Und hier ist das Motiv, für das ich mich entschieden habe - die süße Maus auf der Rennschnecke aus dem Stempelset Sausemaus. 
Ich habe es einnmal recht weit links auf den Cardstock gestempelt und zusätzlich den Brief, den eigentlich der Igel aus dem selben Set in der Hand hält, hinter den Rücken der Maus gestempelt. Anschließend habe ich das bereits gestempelte Motiv maskiert, den Cardstock in meinem Stempeltool ein wenig nach links verschoben und das Motiv ein weiteres Mal abgestempelt, ohne den Stempel neu einzufärben. Diesen Schritt habe ich ein weiteres Mal wiederholt und so drei Abdrücke in unterschiedlicher Intensität erhalten. Nun sieht es so aus, als würde die Schnecke samt Maus ganz schnell über die Karte flitzen.
Da ich ja eine One-Layer-Card geplant hatte und der Cardstock, den ich zum Colorieren mit Copics verwende, dann zu dünn gewesen wäre, habe ich anderen Cardstock verwendet und darum das Motiv mit Polychromos coloriert. Dabei habe ich auch die Coloration in verschiedenen Intensitäten gemacht, so dass sie zu den Stempellinien passt.
Am Himmel habe ich noch ein paar Wolken mit weißem Embossingpulver aufembosst. Die sind Teil des Motivs der Maus, die Rauchzeichen gibt, ebenfalls aus dem Sausemaus Stempelset. 
Der "bin unterwegs" Text ist auch aus dem Stempelset Sausesmaus. Für den kleineren Text darunter habe ich verschiedene Stempel aus dem Set Kleine Worte kombiniert und dabei das einfach zwischen den ich hab's vergessen Text gestempelt.

And here's the image I had picked - the cute mouse on the racing snail.
I stamped it once onto a piece of white cardstock, placing it more on the left side of the cardstock. I also added the little letter behind the mouse's back. Then I masked off this image, moved the cardstock a bit to the left in my stamping tool and stamped the image again, without inking up the stamp again. I repeated this step and so ended up with three images in different intensities. Now it looks like the snail and mouse are racing across the card.
Since I had planned to make a One Layer Card and the cardstock that I usually use to color with Copics would have been too thin I decided to use a different kind of cardstock  and color the images with my Polychromos. When coloring the images I made the intensities match the intensities of the stamped lines.
I white heat embossed a few tiny clouds onto the sky.
The text means "I'm on my way". The smaller subtext means "I just forgot about it - I'm sorry". 

Mittwoch, 27. April 2022

You're all kinds of amazing


 Hallo Ihr Lieben!
Kennt Ihr das - Ihr habt eine Idee und wollte die unbedingt umsetzen, auch wenn Ihr die Karte gerade eigentlich gar nicht braucht? So ging es mir mit dieser Karte, die ich Euch heute zeige.

Hello everyone!
Do you sometimes have an idea for a card that you really want to make, even if you don't actually need one of these at the moment? That's what happened to me with this card, that I'm sharing with you today.

Ich habe hier zuerst für den Hintergrund mit der Art Deco Hotfoil Plate von PinkFresh das Muster mit holographischer silberner Folie auf weißen Cardstock foliert. Dann habe ich einige der Bereiche mit Distress Ink Stormy Sky und Old Paper gefüllt.
Um die Platte an das breitere, dafür niedrigere deutsche Format anzupassen, habe ich den Hintergrund mit einer der Stitched Rectangle Frames Stanzen von Create a Smile ausgestanzt. Das Muster läuft auf dem schmalen Rahmen, den die Stanze ebenfalls stanzt, fort. Den habe ich mit Distress Oxide Chipped Sapphire ganz dunkel blau eingefärbt - von der Folierung lässt sich die Farbe einfach wegwischen, so dass sie trotzdem wunderbar zur Geltung kommt. 
Den Hintergrund habe ich dann schwarz gemattet und auf einen weißen Kartenrohling geklebt.

For the background I've foildet the Art Deco Hotfoil Plate by PinkFresh onto some white cardstock, using silver holographic foil. Then I filled in some of the pattern pieces with Distress Ink Stormy Sky and Old Paper.
To make the foiled piece match the wider but shorter german card size I used one of the Stitched Rectangle Frames by Create a Smile to cut it down. It does also cut a thin frame, on which the pattern continues here. I used Distress Oxide Chipped Sapphire to make that a really dark blue - you can simply wipe off the ink from the foiled areas so they still are visible nicely.
I matted the background black and glued it onto a white note card.


Mit einer der Stanzen aus dem Blueprints 33 Stanzenset von MFT habe ich dann aus holographischem Cardstock von LawnFawn das Sechseck als Aufleger ausgestanzt. Auf dem ersten Bild wirkt es sehr gelb-orange, hier sieht man, dass es in allen Farben des Regenbogens schimmert, je nach Lichteinfall. Dieses Sechseck habe ich mit 3D Tape auf den Hintergrund geklebt.

With one of the dies from the Blueprints 33 die set by MFT I've die cut the hexagon from a sheet of holographic cardstock by LawnFawn. On the first picture it looks pretty yellow-orange-ish. But here you get the idea that I really shimmers in all colors of the rainbow, depending on at what angle the light hits it. I glued  this hexagon onto the background using foam tape.


Haupt-Dekoelement auf der Karte ist definitiv diese tolle Blume. Ich habe sie mit der Lovely Layers Coneflower Stanze von HoneybeeStamps aus dunkel-, hellblauem, gelbem und grünem Cardstock gestanzt. Damit die Blume nicht so flach wirkt, habe ich die Lagen mit Distress Oxide eingefärbt, die unteren Lagen dunkler, die oberen immer heller werdend. Ich habe dafür Black Soot, Chipped Sapphire, Faded Jeans und Stormy Sky benutzt. Die Blütenmitte ist mit Vintage Photo, Rusty Hinge und Wild Honey gewischt, für die Blätter habe ich Bundled Sage, Mowed Lawn und Rustic Wilderness benutzt. Mit einem weißen Gelstift habe ich außerdem ein paar Highlights auf- bzw. Details nachgemalt. 
Die hintere Lage der Blütenmitte, von der man nur das kleine Stück im oberen Bereich sieht, habe ich einfach mit einem dunkelbraunen Copic eingefärbt.
Für den Text habe ich das Wort hello mit der Little Hello Stanze von MFT einige Male aus hellgelbem sowie einmal aus schwarzem Cardstock gestanzt. Die gelben Stanzteile habe ich aufeinander geklebt und die oberste Lage mit Distress Oxide Vintage Photo, Rusty Hinge und Wild Honey gewischt. Das aus schwarzem Cardstock gestanzte Wort habe ich etwas versetzt als Schatten hinter die gestackten Teile geklebt.
Der zweite Text ist aus dem Stempelset Anything but Basic Friendship Stempelset von MFT. Ich habe ihn weiß auf schwarzen Cardstock aufembosst und ihn dann zusammen mit dem gestanzten Wort auf dem Sechseck aus Holografie-Cardstock aufgeklebt. 
Die Blüte habe ich dann mit 3D Tape neben dem Sechseck befestigt. 
Unter das Sechseck habe ich noch zwei gestanzte Blätter/Zweige, gemacht mit einer Stanze von Decotime, geschoben. Auch die habe ich mit Distress Oxides schattiert.
Ganz zum Schluss habe ich noch einige schwarze Glitzersteine auf der Karte verteilt.

Main deco element on this card is this beautiful flower. I've die cut it with the Lovely Layers Coneflower die by HoneybeeStamps, cutting it from dark and light blue, yello and green cardstock. To add even more depth to it I've inked the layers with Distress Oxides, the bottom layer the darkest, then lighter towards the top. I used Black Soot, Chipped Sapphire, Faded Jeans and Stormy Sky. The flower center is shaded with Vintage Photo, Rusty Hinge and Wild Honey, for the leaves I've used Bundled Sage, Mowed Lawn and Rustic Wilderness. 
To add some highlights and re-draw some of the details I've used a white gel pen. 
The solid layer of the flower center, that's only visible in one tiny area at the top of the flower, I simply colored with a dark brown Copics marker. 
For the text I've die cut the word hello several times from yellow and once from black cardstock, using the Little Hello die by MFT. Then I stacked the yellow pieces and inked up the top layer with Distress Oxide Vintage Photo, Rusty Hinge and Wild Honey. I glued the word cut from black cardstock as a shadow layer behind the stacked die cuts, moving it a bit to the top and right.
The second text is from the Anything but Basic Friendship stamp set by MFT. I've white heat embossed it onto black cardstock and then glued the cardstock strip and the die cut word onto the hexagon cut from the holographic cardstock.
To glue the flower next to the hexagon I've used some pieces of foam tape.
I also slid two die cut leaves, cut with a die by Decotime and also shaded with Distress Oxides, under the hexagon.
In the end I added a few black rhinestones to the card.

Montag, 25. April 2022

Mai-Sneak, Teil 1

 
Hallo Ihr Lieben!
Mit der heutigen Karte gebe ich Euch schon mal ein Sneak auf das Mai-Release von Stampcorner. Aber pst, leise sein, hier schläft jemand...

Hello everyone!
With this card I'm giving a little sneak at the may release by Stampcorner. But please, be quiet, there's someone sleeping here...

Für diese Karte habe ich meine Distress Spray Stains rausgeholt und ein Stück Watercolor Paper mit Twisted Citron, Peacock Feathers und Chipped Sapphire eingesprüht. Nach dem Trocknen habe ich dann weiße Acrylfarbe darüber gespritzt.
Das Cardstockstück ist schwarz gemattet und auf einen weißen Kartenrohling geklebt.

For this card I brought out my Distress Spray Stains and sprayed a piece of watercolor paper with Twisted Citron, Peacock Feathers and Chipped Sapphire. After the color had dried I spritzed some white acrylic paint on top.
I matted the background with black cardstock and then glued it onto a white note card.


Und hier könnt Ihr es richtig sehen - es ist eines von mehreren absolut goldigen Motiven aus einem der neuen Sets. Ich weiß noch nicht mal, wie es heißen wird. 
Ich habe den süßen Marienkäfer, der da ein Schläfchen auf dem Mond hält, mit Copics coloriert und einige Highlights mit einem weißen Gelstift hinzugefügt. Die schwarzen Bereiche am Kopf, die Fühler und die Nase habe ich dann mit Glossy Accents überzogen.
Nach dem Ausschneiden habe ich es auf den Hintergrund geklebt und dabei ein paar fluffige Wolken, gestanzt aus Vellum, hinter, vor und über das Motiv gesetzt.

And here you get a better look - this is one of several really cute images from one of the new sets. I don't even know its name yet.
I colored this little ladybug, that's deeply sleeping on the moon here, with Copics and added some highlights with a white gel pen. Then I covered the black areas of its head, the antennas and the nose with Glossy Accents.
After I had fuzzy cut it out I glued the image onto the background and added a few fluffy clouds, die cut from Vellum, behind, on top and above it.


Und nun fehlte noch ein passender Text. Und da hat sich doch ein weiteres der neuen Sets mit auf die Karte geschummelt! Okay, ein kleiner Teil davon.
Die oberen beiden Texte sind weiß auf schwarzen Cardstock embosst. Der obere Teil ist ein Teil eines Textes aus einem weiteren neuen Stempelset, der untere ist aus dem Set Danke.
Und das Träume ist aus dem Set Träume. Das habe ich golden auf weißen Cardstock embosst und mit Copics in grün und türkis coloriert - passend zum Bereich des Himmels hinter dem Motiv.
Ganz zum Schluss habe ich mit einem weißen Gelstift noch einen Rahmen auf den Cardstock gemalt. Der war noch ein wenig feucht, so dass der Rahmen die Farbe des Hintergrunds ein wenig angenommen hat. Aber so ist er nicht zu auffällig.

And now I needed a matching text - this one means "take time for you dreams". 
I white heat embossed the two top text parts onto black cardstock, the big word dreams is golden heat embossed onto white cardstock and then colored in turquoise and green with my Copics, matching the colors in the sky behind the image.
In the end I used a white gel pen again to hand draw a frame onto the cardstock. That was just a little bit damp and so the white gel ink got tinted a light blue. But I like that, it makes the frame not too prominent.

Sonntag, 24. April 2022

Karte mit Geheimbotschaft die Zweite

 
Hallo Ihr Lieben!
Gestern haben wir Euch beim Stempeleinmaleins die Karte mit Geheimbotschaft zeigt. Mich hat es doch ein wenig gewurmt, dass meine erste Karte in einigen Bereichen so unperfekt war. Deswegen habe ich mich hingesetzt und eine weitere Karte mit Geheimbotschaft gemacht. Und die zeige ich Euch heute. Und mit dieser Variante bin ich dann doch sehr zufrieden.

Hello everyone!
Yesterday we from Stempeleinmaleins shared the Secret Message Card tutorial with you yesterday. I felt kind of unhappy about how my first card turned out. So I sat down and made another one. And this I'm sharing with you today. And I am really happy with how this one turned out.

Hier habe ich die Karte aus weißem Cardstock gewerkelt. 
Auf die vorderen beiden Klappen habe ich weißen Cardstock geklebt, auf den ich zuvor mit der Layering Candles Stencil von Pretty Pink Posh sowie Distress Ink Salvaged Patina, Broken China, Peacock Feathers, Mowed Lawn und Twisted Citron sowie Mustard Seed und Wild Honey für die Flammen die Kerzen aufgewischt habe. Ich liebe dieses Stencil Set und werde es noch oft benutzen! Die weißen Cardstockstücke sind dunkeltürkis gemattet.
Auch hier habe ich statt einer Banderole wieder zwei Laschen an der Rückseite der Karte befestigt. Vorne überlappen sie und werden durch zwei Magnete zusammengehalten. Die  sind ebenfalls aus dunkeltürkisfarbenem Cardstock geschnitten.

Here I made my card from white cardstock.
Onto the two front flaps I've glued some white cardstock onto that I've inked the candles using the Layering Candles Stencil by Pretty Pink Posh and Distress Ink Salvaged Patina, Broken China, Peacock Feathers, Mowed Lawn and Twisted Citron, as well as Mustard Seed and Wild Honey for the flames. I just love this stencil and know that I'll use it really often! The white cardstock pieces are matted with some dark turquoise cardstock.
Again I didn't make a sleeve to hold my card closed but glued two cardstock strips to the back to use as flaps. They hold together due to two little magnets I've added. Again I've cut those from dark turquoise cardstock.


Auf den Cardstockstreifen habe ich wieder einen Kreis für das Motiv und um die Magnete zu verstecken angebracht. Auch der ist aus türkisfarbenem Cardstock gestanzt und schwarz gemattet. Mit einem weißen Gelpen habe ich eine Naht aufgemalt.
Das Motiv hier ist einer der genialen Geier aus dem Old Buzzard Stempelset von WhimsyStamps. Ich habe es mit Copics coloriert, ausgeschintten und aufgeklebt.
In die Krallen habe ich dem Geier ein gestanztes Oops! gegeben. Es ist aus grünem Cardstock gestanzt und mit Copics coloriert.

I glued a circle onto the flaps to hide the magnets and have room for an image. Again I've die cut it from dark turquoise paper and matted it black. I also added some faux stitching with a white gel pen to it.
The image here is one of the birds from the great Old Buzzard stamp set by WhimsyStamps. I've colored him with Copics, cut him out and glued him onto the circle.
I added a die cut Oops! to the circle and made it look like the bird is holding the word. I've die cut it from green cardstock and shaded it with Copics.


Und so sieht die Karte nach dem Öffnen aus. 
Ich habe hier auf die Innenseite den WTF Background von WhimsyStamps gestempelt. Das habe ich vor dem Einschneiden des Cardstocks gemacht und dabei drei der Rechtecke - zwei links und eins rechts - maskiert, so dass dort der Hintergrund nicht aufgestempelt wird, sonst hätte man ihn auch bei der Geheimbotschaft gesehen. Die nicht bestempelten Bereiche werden von den Cardstockstreifen überdeckt, auf die ich den Hintergrund ebenfalls gestempelt habe. 
Ich habe den Bereich mit Distress Ink Salvaged Patina und Peacock Feathers gewischt und oben und unten etwas Black Soot hinzugefügt. 
Auch auf die beiden Klappen habe ich den Hintergrund - mit den selben Farben gewischt - aufgeklebt, ihn hier aber grün gemattet.
In den mittleren Bereich kam dann der Text "Was freut sich und stinkt?". Auf die Idee kam mein Mann, der meinte, diese Karte wäre perfekt für einen Flachwitz. Die Karte ist ja flach, man kann die Scherzfrage auf den ersten und die Antwort auf den geheimen Bereich stempeln. Und die Idee hat mir so gut gefallen, dass ich sie hier umgesetzt habe.

And this is the opened card.
Here I stamped the WTF Background by WhimsyStamps onto the inside. I did that before I've cut the slits for the panels that you slide in - and masked of three of the rectangels, two on the left and one of the right. This way I'm making sure the area with the secret message doesn't show any of the stamped background. The areas that I didn't stamp on are the ones that are hidden behind the two cardstock strips, onto those I stamped the background as well.
I've inked up the area with Distress Ink Salvaged Patina and Peacock Feathers, adding a bit of Black Soot to the top and bottom edge.
I also glued cardstock strips with the same background - and inked with the same colors - to the flaps, but added some green matting to those.
Into the middle area I've glued a text. Actually, this is a kind of silly joke. It means "what's happy and stinks". My husband got the idea. Here we call some bad jokes "flat jokes", and since a card was flat it would fit, he said. Also, you could put the fun question onto the inside and then the answer onto the secret message area. I really liked his idea and so used it on this card.


Und so sieht dann der Bereich mit der Geheimbotschaft aus - hier die Auflösung der Scherzfrage mit Motiv sowie einem Geburtstagsgruß.
Die Konfetti habe ich mit den Confetti Stencils von MFT aufgewischt. Es ist ein zweiteilliges Stencilset. Für den einen Stencil habe ich Distress Ink Mowed Lawn und Twisted Citron, für den anderen Salvaged Patina und Peacock Feathers verwendet. Dann habe ich den weißen Cardstock rundherum ganz leicht mit Broken China gewischt.

And this is the area with the secret message - here the answer to the fun question, an image and a greeting. We call the one having a birthday a "Geburtstagskind" - birthday child, no matter how old the person is. Well, a "Gefurztagskind" can't really be translated. It's a pun playing with the wird birthday and fart and I'm pretty sure you have no idea what I'm talking about. I'm just trying to make you see that there's a reason why I used that image. But in general - stamping "let's have a farty" would kind of be what I'd have used in english, it just wouldn't go with the text on the inside of the card.
I used the Confetti stencils by MFT to add the confetti to the upper are of the card. It's a set of two stencils, I used Mowed Lawn and Twisted Citron with one of them and Salvaged Patina and Peacock Feathers with the other one. Then I inked up the edges of the cardstock with Broken China.


Der Text "das Gefurztagskind" sowie das pupsende Stinktier sind beide aus dem Set Gefurztagskind von Create a Smile. Das für habe ich einfach nicht mit abgestempelt.
Das Stinktier ist mit Copics coloriert, für die Stinkwolke habe ich ein giftiges Grün verwendet.
Der Text darunter ist mit einer Kombi aus SU-Stempeln - die beiden kleineren Texte - sowie einem schön geschwungenen Glückwunsch aus dem Set Gute Wünsche von Stampcorner gemacht.
Zum Schluss habe ich hier mit einem schwarzen Fineliner einen Rahmen aufgemalt.

The image is from Create a Smile, as is the text on the top. I colored the skunk with Copics and used a bright green for the "stinky cloud".
Under it I've stamped a "very happy birthday to you" greeting with black ink.
In the end I've used a black fineliner to hand draw a frame around this page.

Samstag, 23. April 2022

Stempeleinmaleins - Ausgabe vom 23. April 2022

 
Hallo Ihr Lieben! 
Beim Stempeleinmaleins zeigen wir Euch heute eine Karte mit Geheimbotschaft.
Ich bin ehrlich, die Karte hat mich vor einige Herausforderungen gestellt. Das liegt aber nicht an der Anleitung oder der Kartenart an sich, die sind super verständlich und auch schnell gemacht. Mein Problem war einfach, dass ich ja eher der "Lage auf Lage Typ" bin. Und das geht hier nicht. Ich habe trotzdem einiges probiert, und nicht alles hat geklappt... Aber auch meine Karten sind nicht immer perfekt, und das darf dann auch mal gezeigt werden - dazu gleich mehr.

Hello everyone!
Over at Stempeleinmaleins we are sharing a tutorial for this card with a hidden message today.
Honestly, this card was a real challenge to me. That's not due to the tutorial or the card itself, these are pretty easy to understand and make. My problem was that I'm the "add some more" type of card maker, which doesn't work with this card. I tried some things and not all of them worked... Also my cards are sometimes not perfect and I think I should share that - but more about that a little later.

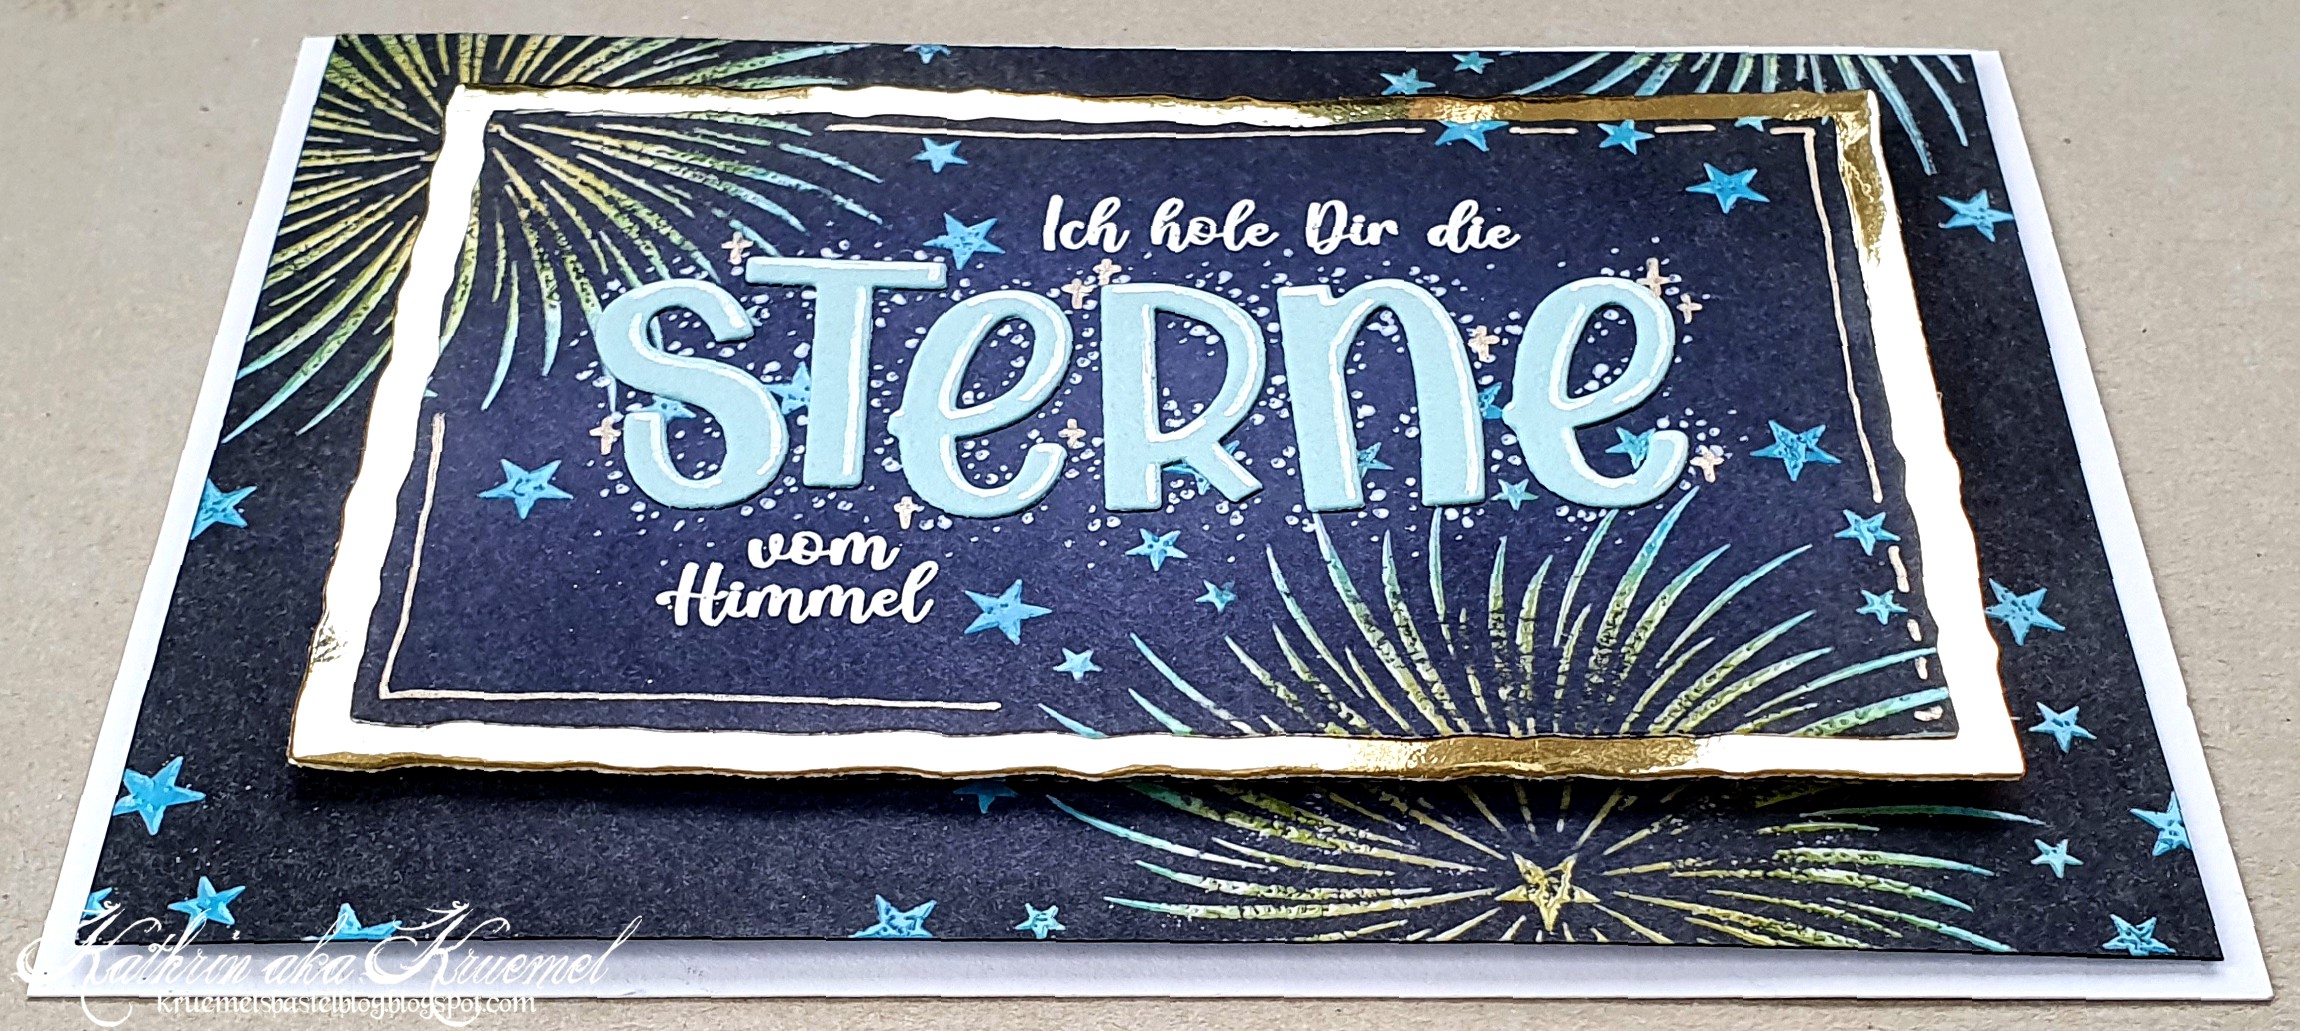
Oben seht Ihr die Front meiner Karte.
Ich habe statt einer Banderole zwei Streifen Cardstock hinten an der Karte befestigt, die vorne überlappen und mit einem Magneten zusammengehalten werden und somit die Karte geschlossen halten.
Die Karte selbst habe ich aus dunkelblauem Cardstock gewerkelt. Auf die beiden Teile der Vorderseite habe ich den Rays Slimline Stempel von ImpressionObsession golden aufembosst. Das habe ich getan, als die Karte bereits zusammengebaut war, wodurch sie uneben war und der Stempelabdruck im unteren Bereich nicht perfekt wurde. Aber die Karte an sich ist so unperfekt, da passte das sogar und ich habe nicht nachgebessert.

Above you see the front/outside of my card.
Instead of a sleeve I attached two strips of cardstock to the back of my card, that overlap on the front and get held together with two magnets that keep the card closed.
I've made the card itself from dark blue cardstock. Onto the two front flaps I golden heat embossed the Rays Slimline stamp by ImpressionObsession. I did that after I had put the card together, what made it pretty uneven and I didn't get a perfektly stamped image at the bottom of the card. But the whole card is so imperfect, that I decided to leave it like that.


Auf die Streifen mit den Magneten habe ich Kreise aufgeklebt. Auf den unteren Streifen kam ein kleinerer Kreis, um den Magneten zu verdecken.
Auf dem oberen, später sichtbaren Streifen habe ich einen größeren Kreis mit ausgestanzten Sternen aus dunkelblauem Cardstock aufgeklebt. Den habe ich mit der Starry Circle Stanze von MFT ausgestanzt und mit einem etwas größeren Kreis aus weißem Cardstock hinterlegt.
Text und Zaubererhut sind von Kulricke, den Hut habe ich mit Copics coloriert. Der Text ist schwarz auf weißen Cardstock gestempelt, dann habe ich den Hut über die Ecke des Cardstocks geklebt und den weißen Cardstock mit matt-goldenem Metallic-Cardstock gemattet. 

Onto the two cardstock strips that hold the card closed I glued down circles. I used a smaller one on the one that's hidden, just to cover the magnet.
Onto the top one that's visible later I glued a larger circle with cut out stars, cut from dark blue cardstock. I used the Starry Circle die by MFT, then cut a slightly larger circle from white cardstock to mat the blue one with.
The text means "life is full of magic" and is by Kulricke, as is the hat. I used Copics to color the hat and stamped the text onto a piece of white cardstock. Then I cut the hat out, glued it over the corner of the white cardstock and matted that with matte golden metallic cardstock. 


So sieht die Karte aus, wenn man die beiden Flügel der Vorderseite öffnet.
Hier ging es mit den Fehlern los. Ich habe die Karte hier mit goldener Folie und der Celestial Stars Background Hotfoil Plate von Spellbinders foliert. Eigentlich kein Thema, aber sie ist doch um einiges dicker als nur eine Lage Cardstock. Ich musste die Karte aber folieren, nachdem sie zusammengebaut war, um einen fortlaufenden Hintergrund zu erhalten.  Durch die Dicke sind viele Stellen, die eigentlich nicht foliert werden sollen, ebenfalls mit Folie überzogen worden. Kleinere solcher Stellen kann man eigentlich super mit einem Sand Eraser wegradieren. Aber hier war es wirklich fast der ganze Cardstock. Ich habe es trotzdem versucht, die Folierung war aber so stark, dass ein heller Schimmer der Folierung nicht wegzubekommen war. 
Außerdem hat sich natürlich die Hotfoil Plate wie ein Embossingfolder durch alle Lagen Cardstock abgedrückt. Gut, dann sind eben auch auf den undekorierten Seiten hier ein paar Sterne zu sehen.
Ich habe dann einfach weiße Acrylfarbe über den Cardstock gespritzt und finde, nun sieht es fast ein wenig wie eine Galaxie aus. 
Für den Text habe ich einzelne Buchstaben mit dem Hip Hip Yay Alphabet von MFT golden auf Watercolor Cardstock embosst und dann mit einem Zig Marker in einem dunklen Grau-Blau von unten her schattiert. Dann habe ich die Buchstaben einzeln ausgeschnitten und auf den Cardstock geklebt.
Mit einem weißen Gelpen habe ich noch einen Rahmen um die "Galaxie" gemalt.

This is what the card looks like, when you open up the two front flaps.
And that's where the problems started. I did some foiling with golden foil and the Celestial Stars Background hofoil plate by Spellbinders here. Usually not a problem, but this card is quite thicker than the usual sheet of cardstock. But I had to do the foiling when the card is assembled to have a continuos background. Due to the thickness I ended up with lots of overfoiling in the areas, that shouldn't have been foiled. It's pretty easy to erase smaller spots of overfoiling with a Sand Eraser. But here nearly all the blue cardstock was foiled. I still tried it, but there was a shadow left that I couldn't get rid of.
Also, the hotfoil plate pressed into all the layers of cardstock, like an embossing folder. So I also have some dry embossed stars on the not decorated flaps.
I simply spritzed some white acrylic paint over the star background and think, it kind of looks like a galaxy now.
For the text, that means "open sesame", I golden heat embossed the individual letters onto some watercolor cardstock, using the Hip Hip Yay Alphabet by MFT. Then I shaded them from the bottom with a dark grey-ish blue Zig marker, cut them out and glued them onto the card.
I also used a white gel pen to add a white frame around the "galaxy". 


Knickt man die Karte in der Mitte nach hinten, kann man wie von Zauberhand eine weitere Lage der Karte aufklappen. Und die sieht bei mir so aus. Ihr seht schon, das Thema Magie zieht sich durch die ganze Karte!
Nun hätte man denken können, dass ich vom Folier-Desaster auf der ersten inneren Lage gelernt hätte. Denkste, ich habe anschließend auch diese Lage foliert. Diesmal habe ich die Slimline Confetti Hotfoil Plate von Spellbinders und golden-glitzernde Folie verwendet. Die Karte hat hier unterschiedliche Dicke - und rechts mehr als links. Deswegen habe ich nur rechts etwas Overfoiling, dafür wurde eines der Konfetti ausgestanzt - und auf der linken Seite sowie im oberen Bereich sind einige der Konfetti nicht richtig foliert. Naja, wenn schon unperfekt, dann richtig!
Auch hier habe ich einen weißen Rahmen mit einem Gelpen aufgemalt.

When you fold the card backwards along the center fold, another layer folds open magically. And mine looks like that. As you can see, I used a magical theme throughout the whole card!
Well, you could think that I learned from the foiling catastrophe on the first inner layer. But no, I decided to also foil this second inner layer. This time I used the Slimline Confetti Hotfoil plate by Spellbinders and some glittery golden foil. Here the card has different thicknesses - and more on the right than on the left side. That's why there's only a bit of overfoiling on the right side, but the hotfoil plate also cut out one of the confettis here. And on the left side and top a few of them aren't foiled properly. Well, if I go imperfect, than I do it thoroughly!
Also here I drew a frame with a white gel pen around the scene.


Der Text ist hier eine Kombination aus Stempeln von SU, die ich mit Faded Jeans Archival Ink auf weißen Cardstock gestempelt habe, sowie weiteren golden embossten Buchstaben. Hier musste ich einen der Textstreifen sowie das U von zauberhaft mittig teilen, da die Anordnung sonst nicht gepasst hätte, die Karte hier aber gefaltet werden muss.
Außerdem durften hier dann doch noch zwei Motive auf die Karte. Die sind aus dem Abracadabra Stempelset von MFT. Ich habe sie mit Copics coloriert, ausgeschnitten und aufgeklebt. Vom Zauberstab des Bären aus habe ich dann noch einen Glitter-Schnörkel über die Karte gezogen. Dafür habe ich einfach viele kleine Punkte mit einem weißen Gelstift aufgebracht.

The text here means "you are truly magical" and is made with a combination of stamps by SU, stamped onto white cardstock with Archival Ink Faded Jeans, and more of the golden heat embossed letters. I had to cut apart one of the text strips and the U since my placement wouldn't have worked otherwise, but the card needs to be folded there.
And I also decided to add two more images here. Those are from the Abracadabra stamp set by MFT. I colored them with Copics, cut them out and glued them onto the card. From the magician's wand I added a magical flourish across the card. I simply added lots of small dots with a white gel pen.

Freitag, 22. April 2022

April-Challenge bei Stampcorner

 
Hallo Ihr Lieben!
Die April-Challenge von Stampcorner ist gestartet. Diesmal haben wir das Thema Slimline gewählt. Dabei könnt Ihr selbst entscheiden, ob Ihr eine normale oder eine Mini Slimline Card macht. Ich habe mich für das größere "normale" Format entschieden und diese Karte gewerkelt.

Hello everyone!
Stampcorner's april challenge has started. This time we picked the theme of slimline. It's up to you if you make a regular or a mini slimline card. I went with the larger regular one and made this card.

Auch wenn meine Karte recht düster bzw. dunkel ist - es ist eine Geburtstagskarte. Und ich finde, die geht auch gut in dunkel.
Den dekorierten Cardstock habe ich mit der zweitgrößten der Slimline Deckle Edge Stanzen von Stampcorner ausgestanzt und nach dem dekorieren auf eine Slimline Card, geschnitten aus schwarzem Cardstock, geklebt. Innen habe ich hellen Cardstock eingeklebt, so dass ich die Karte gut beschreiben kann.

Even if this card looks pretty dark - it's a birthday card. And I don't see a reason why I shouldn't make a dark card for a birthday.
I've used one of the Slimline Deckle Edge dies by Stampcorner to cut the cardstock that I decorated later, then glued it onto a slimline card base, cut from black cardstock. To be able to write a message inside I've glued white cardstock to the inside.


Auch wenn man es nicht mehr wirklich sieht - den Aufleger habe ich aus hellrosa farbenem Cardstock gestanzt! 
Dann habe ich die Blüten aus dem Stempelset Dahlia so oft mit schwarzer Tinte aufgestempelt, dass der Cardstock vollflächig damit gefüllt war. 
Um die Blüten zu colorieren, habe ich Polychromos verwendet. Da die Blüten durch den rosafarbenen Cardstock bereits farbig waren, hat etwas dunkles Rot, ein mittlerer und ein heller Rosaton sowie Weiß gereicht, um die Blüten toll zu schattieren. So richtig kommen die Blumen aber erst dadurch zur Geltung, dass ich nach dem Colorieren/Schattieren den Bereich rund um die Blüten mit einem schwarzen Copic Marker eingefärbt habe. Das lässt die Blüten wunderbar strahlen.
Als nächstes habe ich alle Blüten mit Masking Tape abgedeckt und auf den nun schwarzen Hintergrund mit weißer Stempelfarbe den Grunge Stempel aufgestempelt habe. Da er vom Design her ein wenig unterbrochen ist, fällt auch gar nicht auf, dass ich ihn für die Slimline Größe zweimal abstempeln musste, eine Nahtstelle sieht man nicht.
Zum Schluss habe ich auch noch weißes Copic Opaque White über den Cardstock gespritzt.

Even if you don't see it here anymore - I've die cut the cardstock that I glued onto the black card base from a light pink colored cardstock.
Then I filled the cardstock piece with flowers from the Dahlia stamp set, stamped with black ink.
To color the flowers I used Polychromos. Since they were already pink due to the pink cardstock just a dark red, a middle and light pink and a white pencil were enough to add the shading to the flowers. But they really pop due to the fact that I used a black Copic marker to fill the spaces between the flowers which brings out the flowers wonderfully.
Next I covered all flowers with masking tape and stamped the Grunge background stamp with white ink onto the black colored areas. Since the stamp has some open areas it really didn't matter that I had to stamp the background twice to fill the slimline size - you don't see a seam.
In the end I also spritzed some Copic Opaque White over the cardstock.


Nun brauchte meine Karte noch einen Text. 
Ich habe hier zuerst das Wort Geburtstagskind mit der Geburtstagskind-Stanze von Stampcorner einige Male aus weißem Cardstock gestanzt und die Stanzteile aufeinander geklebt.
Die übrigen Texte sind aus dem Stempelset Kleine Worte. Ich habe sie jeweils mit weißem Embossingpulver auf schwarzen Cardstock embosst und die Cardstockstreifen dann ober- und unterhalb des gestanzten Textes auf die Karte geklebt.
Als weitere Deko habe ich noch ein paar weiß-irisierende Perlen um den Text verteilt. Die sieht man hier nicht so doll, da sie durch den Lichteinfall auf dem Bild genau in ihrer dunkelsten Schattierung glänzen....

Now my card needed a text.
I've die cut a word several times from white cardstock and stacked those.
The rest of the text - that means "hello birthday girl/boy, very happy birthday, let's celebrate you" - is white heat embossed onto black cardstock, then I glued the cardstock strips above and under the die cut word. 
I also added some white iridescent pearls around the text. But you can't really see those on the picture. Due to from where the light came when I took the picture they are just showing their darkest shade on the photo....

Donnerstag, 21. April 2022

Heute mal clean and simple

 
Hallo Ihr Lieben!
Heute wird es mal Clean and Simple - für mich ja eher untypisch, bin ich doch eher der "mehr und noch mehr" Typ. Aber bevor ich mich jetzt mit fremden Federn schmücken, die Designidee zu dieser Karte, die ich heute auf dem Stampcorner Blog zeige, habe ich von Yana Smakula abgekupfert, die eine ähnliche Karte mit Möhren zu Ostern gemacht hat. Aber die Idee hat mir so gut gefallen, dass ich sie adaptieren und selbst ausprobieren musste. 

Hello everyone!
Today I'm going clean and simple - not my usual type of card since I'm more a "more and even more" type of card maker. But Yana Smakula made a similar easter card with carrots and I just had to try it and make my own version of her card because I liked it so much. And so I'm sharing this one over at the Stampcorner Blog today. 

Ich habe meinen Mädels früher, als sie noch in der Schule waren, an Tagen, an denen wichtige Proben oder solche in Hassfächern anstanden, gerne kleine Zettel mit Viel-Glück-Botschaften in die Brotboxen gepackt. Da sie inzwischen studieren und nicht mehr zu Hause wohnen, geht das natürlich nicht mehr. Aber für wichtige Prüfungen gibt es trotzdem eine Karte.
Die Karte besteht aus einem weißen Stück Cardstock, das schwarz gemattet und dann auf einen weißen Kartenrohling geklebt ist. Obenauf befinden sich nur ein Text und ganz viele kleine Marienkäfer als Glücksbringer.

When my girls were younger and still in school, I used to sneak little notes into their lunch boxes on days where they had to write important tests, or those on subjects they didn't like that much. Since they are at different Universities now and don't live at home anymore, that's no longer possible. But for important test I still like to send them a card to wish them luck.
The card is made from a piece of white cardstock, that's matted black and then glued onto a white note card. It's decorated with just a text and a bunch of little ladybugs as lots of lucky charms.


Der kleine Marienkäfer ist aus dem Set Glücksbringer - für diese Kartenart eignet sich so gut wie jedes kleine Motiv. Ich habe den Marienkäfer 25 mal abgestempelt und mit Copics coloriert. Die Highlights sind mit einem weißen Gelpen gemacht. Dann habe ich sie alle einzeln per Hand ausgeschnitten. Ja, das hat hier ein wenig gedauert, aber das Ergebnis ist es wert. Und sonst macht die Karte ja nicht so viel Arbeit, da kann man das schon mal machen.
Ich habe die Käfer in verschiedenen Richtungen reihenweise auf die Karte gelegt und zwischendrin einen Streifen für meinen Text freigelassen.
Die Texte sind eine Kombination aus den Itty Bitty Texten und dem Set Gute Wünsche. Ich habe die Stempel in meine Stempelhilfe gelegt und dann mit Versafine Clair Nocturne direkt auf den weißen Kartenaufleger gestempelt. 

The little ladybug is from the stamp set Glücksbringer - for this card you can use any small image. I stamped 25 of these ladybugs and colored them with Copics. For the highlights I used a white gel pen. Then I fuzzy cut them out. Yes, that took some time but the effect is worth it. And since the rest of the card was pretty quickly done I didn't mind the extra work.
I laid the ladybugs out on my cardstock in rows, making them face into different directions. I also left a empty space on in between the rows for my text.
The text means "lucky charms for you - thinking of you". I put the stamps into my Misti and then stamped the texts directly onto the white card panel using Versafine Clair Nocturne.


Die einzelnen Marienkäfer sind dann mit kleinen Foamdots einzeln auf die Karte aufgeklebt. Um optisch für noch mehr Tiefe zu sorgen, habe ich jeweils unter die Marienkäfer einen kleinen Schatten mit einem grauen Copic hinzugefügt.

All of the ladybugs are glued onto the card with dimensionals. To add even more depth, I used a grey Copic to draw a little shadow under each of them.

Mittwoch, 20. April 2022

Create a Smile Moodboard Challenge

 
Hallo Ihr Lieben!
Heutet startet eine neue Create a Smile Challenge, und diesmal haben wir wieder ein Moodboard für Euch:

Hello everyone!
Today we are starting a new Create a Smile Challenge, and this time we have a new moodbard for you:


Ist das nicht eine tolle Sammlung frühlingshafter und sonniger Bilder, die gute Laune machen? Ich bin ja eigentlich nicht so der Orange-Liebhaber, aber hier hatte ich richtig Lust auf die Farbe. Und das ist die Karte, zu der mich das Moodboard inspiriert hat:

Isn't this a wonderful collection of spring-ish and sunny pictures, that put you in a happy mood? Usually I'm not the biggest fan of orange, but here I couldn't wait to use the color. And this is the card, the moodboard inspired me to make:


Ja, es ist viel los auf meiner Karte - so wie gerade auch im Garten! 
Für den Hintergrund habe ich den Splotch Stencil auf weißen Cardstock gewischt - außen mit  Distress Oxide Squeezed Lemonade, innen mit Barn Door und für den Übergang habe ich ein wenig Wild Honey mit eingearbeitet. Ich habe mit Blending Brushes gearbeitet und nach dem Aufstenciln die Farbe am äußeren Rand ein wenig verwischt, damit die Kanten nicht so hart sind. Dann habe ich noch orange-goldene Metallic Watercolor über den Cardstock gespritzt, so sind auch die weißen Bereiche ein wenig dekoriert, da das Stencilmotiv doch von meinen Stempelmotiven recht verdeckt wird.
Den weißen Cardstock  habe ich dann grün gemattet und auf einen weißen Kartenrohling geklebt.

Yes, there's lots going on on my card - just like in our garden!
For the background I've stenciled the Splotch stencil onto a piece of white cardstock - I used Distress Oxide Squeezed Lemonade on the outer parts, Barn Door for the center and then added some Wild Honey for a smooth blending. I used Blending Brushes and after the splotch was stenciled on I used one of the brushes to add blend the colors just a bit into the white and soften the edges a bit. Then I spritzed some orange-gold metallic watercolor over the background to fill in the large white areas since quite a lot of the stenciled area gets covered by the stamped images.
I matted the white cardstock green and glued it onto a white card base.


Auf den Untergrund habe ich dann erst einen Rahmen geklebt - gestanzt mit einer der Stitched Rectangle Frames aus matt-goldenem Metallic Cardstock. In den Rahmen - und an einigen Stellen darüber hinausragend - habe ich dann die Motive aufgeklebt.
Die großen, orangefarben colorierten Motive sind aus dem Stempelset Cosmea. Das Vogelhaus und die beiden Vögelchen sind aus dem Set Piep, und unten habe ich dann noch gelbe Blumen an den Stempen des Vogelhauses gesetzt, die aus dem Set Bloomy sind.
Ich habe alle Motive mit Copics coloriert und mit einem weißen Gelpen einige Highlights hinzugefügt. Beim Aufkleben habe ich die hintersten Motive direkt auf den Hintergrund, das Vogelhaus, eine der gelben Blumen und den oberen Vogel mit dünnem, die restlichen Motive mit dickem 3D Tape geklebt. So erhält die Szene eine tolle Tiefe.
Der Text ist ebenfalls aus dem Set Piep. Ich habe ihn weiß auf grünen Cardstock embosst, in mehrere Teile geschnitten und wieder mit 3D Tape aufgeklebt.

Onto the background I first glued down a frame - die cut from matte gold metallic cardstock with one of the Stitched Rectangle Frames. Into the frame - and overhanging it in a few areas - I added the images.
The large, orange colored flowers are from the set Cosmea. The bird house and the birds are from the set Tweetheart and then I added a few yellow flowers from the set Bloomy to the bottom of the birdhouse post.
I colored all images with Copics and added a few highlights and details with a white gel pen.
I glued the base layer of images directly onto the background, then used thinner foam tape to glue down the bird house, the bird in the top area and one of the yellow flowers, and thicker foam tape for the rest of the images. This way the scene gets a nice depth.
The text is also from the set Tweetheart. I've white heat embossed it onto green cardstock, cut it into four pieces and then glued those onto the card, again using foam tape.