Donnerstag, 30. September 2021

Süßes oder Saures

 
Hallo Ihr Lieben!
Ich bin so verliebt in das Halloween-Stempelset von Stampcorner, dass ich Euch heute auf dem Blog gleich noch eine weitere Karte zeigen möchte. Diesmal allerdings ohne niedliches Motiv, auch wenn es schwer gefallen ist. Dafür kam der tolle Text aus dem Set zum Einsatz.

Hello everyone!
I am so in love with the Halloween stamp set by Stampcorner, that I'm sharing another card made with it over at the Blog today. This time I didn't use any of the cute images from the set - even if it really was hard not to. Instead I made the great text the star of the card.

Hier kam auch wieder der tolle Mauerhintergrund zum Einsatz - diesmal aber mit weit weniger Lagen Farbe gemacht. Ich habe hier gleich hellgrauen Cardstock benutzt und die Mauer mit Versafine Clair Morning Mist darauf gestempelt. Dann habe ich den Cardstock in meinem Stempeltool ein wenig nach oben und rechts verschoben und die Mauer ein wenig versetzt mit weißer Stempeltinte erneut abgestempelt. Ja, ich habe vom letzten Mal gelernt... ;)
Die Ränder der Mauer habe ich dann ein wenig mit Distress Oxide Black Soot abgedunkelt. Dann habe ich den Cardstock schwarz gemattet und auf einen weißen Kartenrohling geklebt.

Again I used the great brick wall stamp on this card - but this time it took me way less layers of ink to get the look I wanted. Here I started with light grey cardstock and stamped the wall onto it with Versafine Clair Morning Mist. Then I moved the cardstock a bit to the top and right in my stamping tool and stamped the wall again with white ink. Yes, I learned from last time... ;)
I used Distress Oxide Black Soot to darken the edges of my cardstock a bit. Then I matted my cardstock black and glued it onto a white note card.


Hier habe ich die Mauer so abgestempelt. dass sich der Bereich ohne Fugen unten befindet. Den habe ich dann benutzt, um den Text aufzustempeln. 
Ich habe ihn mit Versafine Clair Nocturne gestempelt, damit er auch schön dunkel wird. Dann habe ich mir eine Maske gemacht, so dass nur der Text erneut gestempelt wird, und ihn mit Embossing Ink aufgestempelt. Anschließend habe ich ihn mit schwarzem, glitzernden Embossingpulver bestreut und das Pulver geschmolzen. 
Den Kürbis habe ich mit orangefarbener Tinte ein weiteres Mal auf weißen Cardstock gestempelt, ausgeschnitten und über den schwarz gestempelten Kürbis geklebt. Mit einem braunen Fineliner habe ich den Stiel angemalt sowie ein paar Details hinzugemalt. Dann habe ich zwei unterschiedlich große, kleine Wackelaugenaufgeklebt.
Mittig über den Text habe ich einen der Stempel aus dem Stempelset Kleckse mit grüner Tinte aufgestempelt und dabei Versafine Clair Green Oasis verwendet. Vom Embossingpulver kann man die Farbe problemlos wieder abtupfen. 
Um den Text ein wenig hervorzuheben, habe ich mit einem weißen Gelpen noch eine Art weißen Schatten aufgemalt. 

Here I stamped the wall so the area without joints is in the lower half of the card. I used that as the background for my text, which means "trick or treat" in german.
I stamped the text with Versafine Clair Nocturne to get a really dark image. Then I created a mask that covered everything but the text and stamped that again with embossing ink. I covered it with a black, glittery embossing powder and melted it.
I stamped the pumpkin again onto white cardstock with orange ink, cut it out and glued it on top of the black stamped pumpkin. I added the details with a brown fineliner and also colored over the stem with it. Then I added two small googly eyes in different sizes to the pumpkin.
Across the text I stamped a big splotch using Versafine Clair Green Oasis. You can simply dab off the color from the embossed areas.
To make the text stand out a bit I added some kind of white shadow behind it with a white gel pen.


Von Anfang an wusste ich, dass ich eine Art grünen Schleim von der Oberkante meiner Karte herablaufen wollte. 
Ich habe Distress Oxide Mowed Lawn mit Wasser gemischt und mit einem Pinsel die Farbstreifen aufgemalt. Da mein grauer Cardstock kein Watercolor Cardstock war, musste ich aufpassen, dass sich die Oberfläche nicht ablöst, also konnte ich nicht so viele Lagen übereinander legen, wie ich gerne gewollte hätte. Und durch die weißen Pigmente in den Oxides wirkte der Schleim irgendwie nicht so strahlend, wie es mir vorschwebte. Also habe ich die Farbe gut trocknen lassen und dann meine Polychromos ausgepackt. Ich habe die "Schleimspur" dann mit 174 - Light Green, 266 - Permanent Green und 165 - Juniper nachgemalt, so sah er wunderbar leuchtend aus. Anschließend habe ich den Schleim noch mit Glossy Accents überzogen.
Zum Schluss habe ich ein paar orangefarbene und schwarze Pailetten auf der Karte verteilt und auf die untere linke Ecke noch ein wenig Cheesecloth geklebt. Es handelt sich hier um zwei kleine Stücke, eines davon habe ich mit Distress Oxide Crackling Campfire und Wasser orange eingefärbt.

When making this card I knew from the beginning that I wanted some kind of drippy goo drip down the top edge of my card.
I mixed Distress Oxide Mowed Lawn with water and then added the color to the card with a brush. Since this grey cardstock wasn't a watercolor cardstock I had to be very careful to not destroy its top layer. So I wasn't able to put as many layers of color down as I wanted. And due to the white pigments the color didn't look as bright as I had planned. So I let the color dry completly and then brought out my Polychromos. I re-drew the goo with 174 - Light Green, 266 - Permanent Green and 165 - Juniper and ended up with a wonderfully bright "slime". Then I also covered it with some Glossy Accents.
In the end I added a few orange and black sequins and glued some cheesecloth to the bottom left corner of my card. These are two tiny pieces, one of them I dyed with Distress Oxide Crackling Campfire and water.


Und hier könnt Ihr das Glossy Accents besser sehen, das dem "Schleim" einen schön feucht-glitschigen Look gibt. 

And here you get a better look at the Glossy Accents, that adds a great wet and squidgy look.

Mittwoch, 29. September 2021

Congrats!

 
Hallo Ihr Lieben!
Der Freund einer meiner Töchter hat seine Bachelorarbeit abgegeben und somit sein Studium - und das mit Bravur - abgeschlossen. Als Glückwunsch habe ich ihm diesen kleinen Tag gewerkelt, den wir an eine Flasche "Blubberwasser" gebunden haben.

Hello everyone!
The friend of one of my daughters just finished university - and he did an amazing job. To congratulate him I made this little tag, that we tied to a bottle of champagne.
 
Ich habe hier zwei Stanzen aus dem Mini Slimline and Envelope Stanzenset von CarlijnDesign verwendet, um den weißen Hintergrund und den roten Topper aus Cardstock auszustanzen. Auf den roten Cardstock habe ich dann den Cosmic Half Tone Background von WhimsyStamps mit goldenem Embossingpulver aufembosst, naja, zumindest einen kleinen Teil davon.
Das Congrats ist mit einer Stanze von MFT aus schwarzem Cardstock gestanzt, den weißen Schatten habe ich per Hand zugeschnitten. Außerdem habe ich ein paar Highlights mit einem weißen Gelpen aufgemalt.
Den Text habe ich mit einem Stempel aus dem Set Year Ten von LawnFawn ergänzt. Ich finde den einfach klasse, vor allem in Kombination mit dem "schlauen Keks" aus dem selben Stempelset. Ich habe den Text mit weißem Embossingpulver auf einen Streifen schwarzen Cardstocks embosst und unter dem gestanzten Wort aufgeklebt.
 
Here I used two dies from the Mini Slimline and Envelope die set by CarlijnDesign to die cut the white base and red topper. Onto the red cardstock I golden heat embossed the Cosmic Half Tone Background by WhimsyStamps, well, at least a small part of it.
The congrats is die cut with a die by MFT. I've die cut it from black cardstock and hand cut the white shadow. I also added a few highlights with a white gel pen.
The text is completed with a stamp from the Year Ten stamp set by LawnFawn. I just love this one, especially in combination with the "smart cookie" image from the same set. I white heat embossed the text onto a strip of black cardstock and glued it under the die cut word.
 

 Keks, Graduation Cap und das Diplom sind alle einzeln abgestempelt, mit Copics coloriert, ausgeschnitten und aufeinander geklebt. Die Schokostücke im Keks habe ich noch mit einem schwarzen Glaze Pen von Sakura überzogen. 
Das Wort congrats habe ich mittig im O auseinander geschnitten, so konnte ich den Abstand zwischen c und n soweit verbreitern, dass der Keks auch gut hineinpasst und keinen Buchstaben zu sehr verdeckt. Auf diese Lücke habe ich den Keks dann aufgeklebt.
Und um diesen Bereich noch ein wenig hervorzuheben, habe ich noch eine der "Sprechblasen" - wobei das ja eher keine ist - aus dem Stanzenset Speech Bubbles von WhimsyStamps aus goldenem Spiegelcardstock gestanzt und hinter den Keks geklebt.

Cookie, graduation cap and diploma are all stamped individually, colored in with Copics, cut out and then glued together. I covered the chocolat pieces in the cookie with a black Glaze pen by Sakkura to give them a yummy shine.
I cut the word congrats apart in the center of the o to make the distance between the c and n wider so my cookie would fit in it without covering any of the letters. I glued the cookie into that gap.
And to highlights this area a bit more I die cut one of the speech bubbles - even if it doesn't look like one to me - from the Speech Bubbles die set by WhimsyStamps from golden mirror cardstock and glued it behind the cookie.

Dienstag, 28. September 2021

Halloween-Treatbox im Grablook

 
Hallo Ihr Lieben!
Weiter geht es mit den Halloween-Projekten von mir. Ich liebe es, dieses Thema zu verbasteln, und die Zeit, es umzusetzen ist immer so kurz. Heute zeige ich auf dem Stamping-Fairies Blog diese Box im Grab-Look.

Hello everyone!
I'm continueing sharing Halloween projects. I love to make crafts for this holiday, and time to do so is always so short. Today I am sharing this box in a tomb look over at the Stamping-Fairies Blog.

Ich habe hier mal ein wenig außerhalb meiner Komfortzone gewerkelt und Dinge wie Crackling- und Modelling Paste verwendet. Aber wirklich Mixed Media ist mein Projekt dann auch nicht. Ich gehe eben doch einfach in eine andere Richtung.
Achtung, der Post enthält viele Bilder!

I worked a bit out of my comfort zone here, using things like Crackling and Modelling Paste. But it isn't really Mixed Media. I am just a "cute" crafter.
Just a warning, this post contains a lot of pictures!


Für den Hintergrund habe ich eine uralte Tag-Stanze von MFT benutzt: den Vertical Frame. Die Stanze war einfach perfekt, stanzt sie doch die äußere Form und gleichzeitig aus der heraus die andere innere. Die habe ich ein paar Mal aus grauem Cardstock gestanzt und alle äußeren Teile aufeinander geklebt. Dahinter habe ich dann ein Tag ohne Ausstanzung, einfach per Hand zugeschnitten, gesetzt.
Für das RIP habe ich die inneren Teile der Alphanumeric Uppercase Shadow Stanzen von Sizzix benutzt, ebenfalls mehrfach gestanzt, aufeinander und dann in den Rahmen geklebt.
Den so entstandenen Grabstein habe ich an die innere Rückseite einer einfachen, oben offenen Box geklebt. Die Box ist einfach per Hand zugeschnitten und ist 2,5" breit, 1" hoch und 1 1/4" tief.

For the background I used a very old tag die by MFT: the Vertical Frame. The die was just perfect since it cuts the outer form and at the same time the inner one with a different shape. I've die cut it several times from dark grey cardstock, glued the outer frames on top of each other and then put a tag without a cut out inner piece behind it all, simply cutting this tag by hand. 
For the RIP I used the inner parts of the Alphanumeric Uppercase Shadow die set by Sizzix, also die cut several time, stacked and then glued onto the whole tag.
I glued this "tombstone" to the inner back of a simple, open box. The box is made by hand and measures 2,5" wide, 1" tall and 1 1/4" deep.


Zur weiteren Dekoration gleich mehr - aber auf diesem Bild kann man den Besen gut sehen, den ich rechts an den Grabstein gelehnt habe.
Ich habe die gerade der Fringed Scallop Border zweimal aus dünnem Packpapier gestanzt und ein wenig mit Distress Oxide Black Soot eingefärbt. Dann habe ich zuerst am unteren Ende eines Schaschlickspießes die erste der Bordüren herumgewickel angeklebt, oberhalb dann den zweiten. Den Holzspieß habe ich ebenfalls mit Black Soot ein wenig eingefärbt, um die aufgewickelte Bordüre habe ich am oberen Ende noch eine orangefarbene Schleife angebracht. Biegt man die Borsten ein wenig auseinander, dann ergibt das einen tollen dreidimensionalen Besen.

I'll talk more about the decorations soon - but on this picture you can see the broom, that I put next to the tombstone, pretty good.
I used the straight of the Fringed Scallop Border die set twice from light packing paper and inked those up a bith with Distress Oxide Black Soot. Then I wrapped one of them around the lower end of a wooden stick and the other one a bit above that. I colored the broom stick with some Black Soot and tied an orange bow around the upper end of the area where I wrapped the borders around the stick. When you bend the fringes outwards you end up with a great three dimensional broom.


Und hier kommen wir jetzt zu den schon erwähnten Pasten. 
Das innere des Grabsteins habe ich mit Black Soot ein wenig abgedunkelt, dann habe ich schwarze Acrylfarbe über den kompletten Stein gespritzt. 
Auf den Rahmen und die Buchstaben habe ich ein wenig der Texture Paste Crackle von Ranger aufgetragen und auf die noch feuchte Paste Distress Embossing Glaze Hickory Smoke aufgestreut.
Ich wollte Moos auf der Oberseite des Grabsteins und der Buchstaben, deswegen habe ich hier Texture Paste Opaque aufgetragen und auch hier in die noch feuchte Paste Embossing Glaze Rustic Wilderness eingestreut. Nach dem Trocknen der Paste, kann man das Glaze-Pulver ganz einfach schmelzen, ohne dass die Pasten Blasen werfen. In die Crackle Paste läuft das geschmolzene Pulver wunderbar in die Cracks. 
Hinter dem Grabstein habe ich noch zwei der Cloud Cover, gestanzt aus Vellum, angebracht. 

And here we get to the pastes.
I inked up the inner area of the tombstone with Black Soot and then spritzed some black acrylic paint over the complete gravestone.
Onto the frame and the letters I randomly added some Texture Paste Crackle by Ranger and put some Distress Embossing Glaze Hickory Smoke on top of the still wet paste. Since I wanted some moss on top of the tombstone and the letters, I put down some Texture Paste Opaque here and again covered the wet paste with Embossing Glaze Rustic Wilderness. After the pastes have dried you can simply melt the Embossing Glaze without the pastes bubbling up. The glaze melts into the cracks of the Crackle Paste, making a great effect.
I added two of the Cloud Covers, die cut from vellum, behind the tombstone.


Die Box habe ich ebenfalls wie oben erwähnt "behandelt".
In die Box kam einer der Jack'O'Lanterns von MFT. Ich habe einen aus orangefarbenem Cardstock gestanzten Kürbis mit Copics ein wenig schattiert und leicht versetzt einen weiteren, aus schwarzem Cardstock gestanzten Kürbis geklebt. Hinter die Ausstanzungen des Gesichts habe ich gelbes Vellum geklebt. Dahinter befindet sich ein kleines elektrisches Licht, das ich in einer schwarzen Hülle versteckt habe, so dass nur das Gesicht des Kürbis leuchtet.
Neben den Kürbis habe ich zwei Knochen gesetzt.
Und weil der Besen da ja nicht von selbst hingekommen sein kann, habe ich mit dem Everything but the Broom Stanzenset von MFT noch die Hexen-Beine und -Schuhe ausgestanzt. Die Schuhe habe ich ein wenig in ein weißes Stempelkissen gedrückt, so dass etwas Kontrast zum Grabstein erkennbar ist. Die Schuhschnallen habe ich weggelassen und stattdessen zwei weitere Schleifen aus orangefarbenem Twine um die Schuhe gewickelt. Dann habe ich die Beine mitsamt Schuhen so in die Box geklebt, dass es so aussieht, als würde die Hexe gerade kopfüber ins Grab springen.
Vorne an die Box kam noch einer der Texte aus dem Stempelset Itty Bitty Boss. Den habe ich mit weißem Embossingpulver auf schwarzen Cardstock embosst und die Ränder vor dem Aufkleben mit 3D Tape ebenfalls ein wenig in ein weißes Stempelkissen gedrückt.

I treated the box the same way as I did the tombstone.
I glued one of the Jack'O'Lanterns by MFT into the box. I've die cut one from orange cardstock and shaded it with my Copics, then glued another one, cut from black cardstock, a bit offset behind the orange one. Behind this I glued a piece of yellow vellum. I've put an electric light behind the pumpkin, hiding it in a small box so only the pumpkin's face lights up.
Next to the pumpkin I added two die cut bones.
And since the broom didn't end up there by itself, I used the Everything but the Broom die set by MFT to die cut the witche's legs and shoes. I pressed the shoes into a white ink pad to create some contrast to the dark grey tombstone behind it. I also left out the shoe decorations and instead tied another piece of orange twine around each, tieing it to a bow. Then I glued the legs with shoes into the box so now it looks like the witch is just diving into the open tomb.
To the front of the box I added one of the sayings from the Itty Bitty Boss stamp set. I white heat embossed it onto a strip of black cardstock and again pressed the edges into a white stamp pad before glueing it to the box with dimensionals.


Und so sieht es dann aus, wenn die leuchtende Box in einem abgedunkelten Raum steht. Ziemlich gruselig, oder?

And this is what it looks like when the lit up box is standing in a nearly dark room. Pretty eerie, isn't it?


Sorry, ich musste für die Bilder ins Badezimmer gehen - der Raum, der am einfachsten abgedunkelt werden kann - und die Fliesen haben das Licht reflektiert. Aber auf den Bildern macht das gleich noch mehr her.

Sorry, I had to go into the bathroom to take the pictures - the room that's the easiest to darken up quickly - and the tiles reflected the light. But I think, that makes those pics look even better.

Montag, 27. September 2021

Eine Karte zur Taufe


Hallo Ihr Lieben!
 Gestern waren wir auf eine Taufe eingeladen - natürlich musste da eine Karte her....

Hello everyone!
Yesterday we were invited to a christening - and of course I made a card to go with the gift...

Die Karte hat mich ganz schön herausgefordert. Wir selbst haben mit der Kirche nicht so viel am Hut. Deshalb hatte ich auch so gut wie nichts an Stempeln oder Stanzen zu diesem Thema zu Hause. Aber ich habe trotzdem eine passende Karte zustande gebracht. Allerdings hat es mich einiges an Überlegen gekostet. Die zündende Idee hatte ich dann, nachdem ich ein Video von Jennifer McGuire gesehen hatte. Aber dazu gleich mehr.

This card was a real challenge to me. Our family is not much involved with church. So I didn't have many stamps and dies. But I think my card turned out pretty good. It took me lots of thinking and I had the idea that got me started after watching a video by Jennifer McGuire. But I'll tell you more about that a little later in this post.


Die Kartenbasis habe ich aus rosafarbenem Cardstock geschnitten, darauf kam der Quilted Backdrop von LawnFawn, gestanzt aus weißem Cardstock. 
Im unteren Bereich habe ich ein gestanztes "Gott schütze Dich" aufgeklebt - die oberste Lage ist aus goldenem Spiegelcardstock, darunter befinden sich drei Stanzteile aus rosafarbenem Cardstock. 
Außen habe ich mit einem goldenen Gelpen einen Rahmen aufgemalt.

I've cut the card base from soft pink cardstock, then glued the Quilted Backdrop by LawnFawn, die cut from white cardstock, on top.
In the lower area of the card I glued down a die cut "may god protect you" - the top layer is cut from golden mirror cardstock, underneath there are 3 more die cuts from light pink cardstock.
Close to the edge I drew a frame with a golden gel pen.


Auf den Hintergrund habe ich mit hellrosafarbener Tinte einen Wasserfarbenhintergrund aufgestempelt. Der Stempel ist von Marianne Design - und ich liebe ihn, denn ich selbst bekomme das mit richtigen Wasserfarben nie so hin. 
In der Mitte der Karte befindet sich ein Kreuz, gestanzt aus goldenem Spiegelcardstock. 
Neben das Kreuz habe ich einen "zur Taufe herzlichen Glückwunsch" Text aufgestempelt. Ich habe dafür zwei Stempel von Charlie und Paulchen kombiniert.
Quer über die Karte habe ich kleine weiße Blüten sowie goldene Glitzer-Dots aufgeklebt.

Onto the background I stamped a watercolor wash image with light pink ink. I used a stamp by Marianne Design here - and I love this because I never get those done like that with regular watercolor.
In the middle of the card I added a cross, die cut from golden mirror cardstock.
Next to the cross I stamped a baptism text. And across the card I glued different small flowers and golden glitter drops.


Und hier kommt Jennifer McGuire ins Spiel. Sie hatte an dem Tag, an dem ich die Karte gemacht habe, eine Video für eine Lined-Up Window Design Karte gepostet. Ich habe die Technik hier abgewandelt, aber das war es, was mir die Idee zur Karte gegeben hatte.
Im Inneren der rosafarbenen Karte befindet sich eine weitere, aufklappbare Karte. Und auf der befindet sich ein Motiv, das durch ein Fenster in der rosafarbenen Karte zu sehen ist. Jennifer embosst die Outlines eines Motives auf die Folie, die sich im Fenster der rosafarbenen Karte befindet, und setzt das colorierte Motiv auf die weiße Karte. Ich habe hier mit Stanzteilen gearbeitet, aber die Idee zu dieser Karte kam mir durch das Video.
Ich habe aus der rosafarbenen Karte ein Kreuz ausgestanzt, das Fenster mit Folie hinterlegt und dann ein schmales Kreuz oben auf die Folie aufgeklebt. Zuerst hatte ich ein rosafarbenes Kreuz verwendet, das hat mir aber nicht gefallen und ich habe ein aus goldenem Spiegelcardstock gestanztes Kreuz darüber geklebt. So ist die Innenseite der rosafarbenen Karte aber zufällig einheitlich rosa, was ja dann auch schön aussieht.

And this is where Jennifer McGuire came to the rescue. The day I made this card she posted a video for a Lined-Up Window Design card. I did her idea differently, but it was her video that gave me an idea for where to start with this card.
Inside the pink card there's another card, that also can be opened. And on the front of this card there's an image, that can be seen through a window cut into the pink card. Jennifer embossed the outlines of the image onto the acetate that's put behind the window, then added the colored/stenciled image to the front of the white card on the inside. I used die cuts here, but I got the idea for this card from her video.
I've die cut a cross from the pink card, put some acetate behind it and then glued another, thinner cross on top of the acetate. First I had cut this thin cross from pink cardstock, but didn't like how that looked, so I glued one die cut from golden mirror cardstock on top. And that way when you look at the inside of the card it all apears pink, which is a nice effect.


Auf der Front der weißen Karte habe ich ein filigranes Kreuz, das ich mit einem weißen gefüllten Kreuz hinterlegt habe, aufgeklebt. Dahinter habe ich einen Strahlen-Kreis golden aufembosst, die Mitte habe ich ganz leicht pink gewischt.
Unter dem Kreuz befindet sich ein aufgestempelter Text. Die Kreuze und der Text sowie die Strahlen sind alle von SU. 
Zum Schluss habe ich auch hier noch einen goldenen Rahmen mit einem Gelpen aufgemalt.

To the front of the card I glued a cross with a lace pattern, that I've matted with a solid cross die cut from white cardstock. Behind it I golden heat embossed a circle of rays and inked up the center of this circle with soft pink ink.
Under the cross I stamped down a bible verse. The crosses and text and also the circle of rays are all by SU.
In the end I added a golden frame, made with a golden gel pen, here as well.


Und hier habe ich noch ein weiteres Bild um Euch zu zeigen, dass ich auch hier goldenen Spiegelcardstock für das Kreuz verwendet habe, aber der ist von oben immer so schlecht zu fotografieren...

And here I have another card to show that I used golden mirror cardstock for the cross again. But this cardstock is always so hard to take a picture of from above...

Samstag, 25. September 2021

Stempeleinmaleins - Ausgabe vom 25. September 2021

 
Hallo Ihr Liebe!
Heute gibt es wieder einen neuen Sketch beim Stempeleinmaleins - und das ist meine Karte danach.
 
Hello everyone!
Today we have a new sketch for you over at Stempeleinmaleins - and this is the card I made after it.
 
Der Sketch zeigt eine quadratische Karte. Die habe ich geliebt - mache sie inzwischen aber, warum auch immer, nur noch sehr selten. Irgendwie sind mir die A2 Karten lieber. Also habe ich den Sketch dazu passend abgeändert. Das Oval, das eigentlich quer in der Mitte des Sketches aufgemalt ist, passte dann aber auf meine Hochkant-Karte nicht mehr. Schon seit einiger Zeit hatte ich diese Baumscheiben Stanze von Catherine Pooler - und für meine Herbstkarte hat sie so toll gepasst, dass ich das Oval damit ersetzt habe.
Im Hintegrund habe ich dunkelrotes Designpapier mit dezentem orangefarbenem Muster verwendet. 
Im Sketch sind in den beiden gegenüberliegenden Ecken die Bereiche für den Text markiert. Der befindet sich bei mir auf der Baumscheibe. Also habe ich dort stattdessen einen Schreibschrift-Hintergrund Stempel mit weißer Tinte aufgestempelt. 
Ich habe die Ränder des Designpapiers noch ein wenig mit einem Distressing Tool angerauht und es dann auf einen weißen Kartenrohling geklebt.

The sketch shows a squre card. I loved those - but rarely make them anymore, I have no idea, why. I just seem to like the regluar sized cards better. So I changed the sketch a bit to make it fit my card size. The oval, that's drawn in the middle of the sketch, didn't fit on my top fold card. I have this Wood Slice die by Catherine Pooler since quite some time now - and it was the perfect fit for my fall card, so I replaced the oval with it.
In the background I used some burgundy patterned paper with a soft orange pattern. 
In the sketch, the top left and bottom right corners are designated for the text. Well, mine is on the wood slice. So I used a script background instead and stamped part of it onto those corners, using white ink.
I used a distressing tool to roughen the edges of the patterned paper a bit, then glued it onto a white note card.


Die Baumscheibe besteht aus zwei Teilen - ein größerer Bereich, den ich aus dunkelbraunem Cardstock gestanzt habe. Die Ränder habe ich ein wenig in ein weißes Stempelkissen gedrückt. 
Der kleinere Bereich mit den Baumringen ist aus hellbraunem Cardstock gestanzt. Vor dem Stanzen habe ich vorsichtig braune Tinte auf die Stanze aufgetragen, so dass die geprägten Bereiche gleich mit eingefärbt werden. 
Unter die Baumscheibe habe ich ein paar Äste aus dunkelbraunem Cardstock, einen Zweig mit goldenen Beeren und zwei bunte Blätter geklebt. Die  habe ich aus weißem Cardstock gestanzt und mit Distress Spray Stain Squeezed Lemonade, Candied Apple und Mowed Lawn eingefärbt. Leider hatte ich kein Watercolor Paper verwendet, so dass die Farben nicht ganz so schön verlaufen sind, wie ich es gewollte hätte. Aber sie haben trotzdem einen tollen Herbstlook, finde ich.
Oben auf die Baumscheibe habe ich noch zwei Eicheln geklebt.
Und dann kam der Text. Dafür habe ich ein hello aus cremefarbenem Designpapier mit kleinen goldenen Folienpunkten ausgestanzt. Für das Wort Fall habe ich das Finley's ABC von LawnFawn und einen grünen Bogen aus derem Watercolor Wishes Rainbow Paperpad verwendt. Außerdem habe ich sie ein weiteres Mal aus dunkelbraunem Cardstock gestanzt, wie auch das hello, und die Teile jeweils ein wenig versetzt übereinander geklebt. Und weil der Herbst ja der goldene Monat ist, wollte ich noch ein paar goldene Akzente auf die Buchstaben des Wortes Fall aufbringen. Dafür habe ich "tacky when dry glue" von TCW auf das untere Drittel der Buchstaben aufgetragen und nach dem Trocknen goldene Folie darauf abgedrückt. 
Bevor ich die Baumscheibe mit Deko auf das Designpapier geklebt habe, habe ich ein großes Stück Cheesecloth aufgelegt, darauf kam die Baumscheibe. Und zum Schluss habe ich noch ein paar goldene Glitzer-Dots auf der Karte verteilt.

The Wood Slice die set contains two dies - a larger one that I die cut from dark brown cardstock. I pressed the edges into a fairly dry white ink pad to lighten them up a bit.
The smaller area with the tree rings is die cut from light brown cardstock. Before die cutting it, I put some brown ink onto the die so the debossed areas get inked up while die cutting.
Under the wood slice I put a few branches cut from dark brown cardstock, a branch with golden berries and two colorful leaves. I've die cut those from white cardstock and then dyed them with Distress Spray Stain Squeezed Lemonade, Candied Apple and Mowed Lawn. Well, I didn't think of die cutting the leaves from watercolor paper so the paper soaked up a the color a bit too fast. But I still think they got a pretty fall-ish look.
On top of the wood slike I glued two acorns.
And then I needed a text. I die cut the word hello from a cream colored patterened paper with golden foiled dots. For the word fall I used the Finley's ABCs die set by LawnFawn and a green sheet from the Watercolor Wishes Rainbow paper pad. I also die cut the letters and the word again from dark brown cardstock and glued all pieces on top of each other a bit offset. And since fall is also called the golden season I wanted to add a bit of a shine to the word fall. I covered the lower third of my letters with TCW's Tacky when Dry Glue and after that had dried, pressed some golden foil onto it.
Before I glued the decoration onto the patterned paper I put down a big piece of cheesecloth, then added the decorations. And in the end I glued down a few golden glitter dots in a few areas of my card.

Freitag, 24. September 2021

Eine Box zum 50. Geburtstag

 
Hallo Ihr Lieben!
Ich wurde gebeten, eine Box zum 50. Geburtstag zu machen. Das Thema für das Innenleben ist eventuell ein wenig ungewöhnlich, aber ich bin mit der Umsetzung absolut happy.

Hello everyone!
I was asked to make an explosion box for a 50th birthday. The inside theme is a bit different, but I really like how this turned out.


Aber erstmal zum Äußeren der Box.
Ich habe das Unterteil aus weißem Cardstock gestaltet und mit dunkelblauem Cardstock beklebt. Aus dem habe ich mittig einen kleinen Kreis ausgestanzt, in den kam eine aus goldenem Spiegelcardstock gestanzte 50. Und weil das trotz der mit goldenem Gelpen aufgemalten Linien, ein wenig fad aussah, habe ich noch einen Ring mit gezackten äußeren Linien aus goldenem Glittercardstock gestanzt und um den ausgestanzten Kreis geklebt. Die Seitenteile sind alle identisch gearbeitet.
Den Deckel habe ich aus dunkelblauem Cardstock gemacht und um den Rand ein Stück weißes Band gewickelt und vorne zur Schleife gebunden. 

But first about the outside of the box.
I've made the bottom of the box from white cardstock and covered it with dark blue cardstock. From this I had die cut a circle from the center and glued a 50, die cut from golden mirror cardstock, onto each. Allthough I added some golden lines with a gold gel pen it still looked too plain to me. So I also die cut some rings with zig zag edges from golden glitter cardstock and glued those around the cut out circles. All sides are decorated identically.
I made the lid from dark blue cardstock and wrapped a piece of white ribbon around the edge, tieing it to a bow on the front.


Auf den Deckel habe ich ein Stück weißen Cardstock geklebt. Darauf habe ich einen Shaker gesetzt, der mit blauen und goldenen Sternen, 5 und 0 aus goldenem Spiegelcardstock sowie kleinen blauen Kügelchen gefüllt ist. Für den Shaker habe ich mehrere Ringe aus dunkelblauem Cardstock aufeinander geklebt und von außen zieharmonika-artig gefalzten Cardstock rundherum angeklebt, so dass ich eine Rosette mit Shaker-Mitte erhalten habe. Auf die Falzungen der Rosette habe ich goldene Folie abgedrückt - nur im inneren Bereich - und dann die Naht zwischen Rosette und Ringen mit einem weißen Ring mit gewelltem Rand überdeckt.
Auf den Shaker habe ich ein kleines Happy, golden auf dunkelblauen Cardstock embosst, aufgeklebt.
Für das Birthday habe ich die Happy Birthday Stanze von MFT benutzt. Ich habe das i herausgeschnitten und durch eine  Kerze, gemacht mit der Birthday Candle Stanze von MFT ersetzt. Die habe ich aus gestreiftem Designpapier gestanzt, die Flamme ist aus goldenem Spiegelcardstock gemacht. 
Das Wort Birthday und die Kerze samt Flamme sind jeweils ein paar Mal gestanzt und aufeinander geklebt, so dass das Wort mehr Dimension erhält.
Das Wort mit der Kerze habe ich dann quer über die Rosette geklebt und oben rechts habe ich noch ein Geburtstagsbanner, gestanzt aus hellblauem Designpapier mit goldenen Folienpünktchen, gesetzt.

Onto the lid I glued a piece of white cardstock, then put a shaker on top. I filled that with blue and golden stars, 5 and 0 die cut from golden mirror cardstock and some tiny blue beads. For the shaker I've stacked a few rings, die cut from dark blue cardstock, and glued 3 accordion folded strips of paper to the outer edge of the ring to create a paper rosette with the shaker in the center. 
I added some golden foiling to the center of the rosette and covered the seam between the ring and the rosette with a white ring with a scalloped edge.
Onto the shaker I glued a small strip of dark blue cardstock, onto which I've golden heat embossed the word happy.
For the word birthday I used the Happy Birthday die by MFT and replaced the i with a candle, die cut witht he Birthday Candle die by MFT. I've die cut it from striped patterened paper, the flame is cut from golden mirror cardstock.
The word birthday and the candle with flame are all die cut several time and stacked on top of each other to add some dimension.
I glued the word with the candle on top of the rosette and added a little birthday banner to the top right, die cut from light blue patterned paper with small golden foiled dots.


Und das ist die geöffnete Box. Und ja, das Wolf-Thema mag ein wenig eigenwillig wirken... Das Geburtstagskind bekam einen Gutschein für einen Sportartikel-Hersteller, der einen Wolf bzw. dessen Pfotenabdruck als Logo hat. Darum sollte das Thema Wolf umgesetzt werden. Aber die Idee, wie das Innere aussehen soll, hatte ich recht schnell.

And this is the opened box. Yes, the wolf theme may seem a bit strange first... The birthday gift was a voucher for a sport's accessoires company, that has a wolf or its foot print as a logo. So a wolf should be included. The idea for this inside formed pretty fast in my head.


Ich habe hier eine Waldlichtung gestaltet, auf der ein Wolf steht und den Vollmond anheult. 
Dafür habe ich im Hintergrund den Nachthimmel mit Distress Oxide Prize Ribbon, Chipped Sapphire und Black Soot gewischt und weiße Acrylfarbe für die Sterne aufgewischt. 
Die Berge sind aus hell- und dunkelgrauem Cardstock mit einer der Kingdom Trio Stanzen von MamaElephant gestanzt und schräg in die Box geklebt. Die Kanten habe ich ein wenig mit weißer Stempelfarbe betont.
Der Mond ist auf einem Streifen Cardstock hinter der hinteren Bergkette angebracht.
Für die Baumlagen habe ich erst zweimal eine Baumreihe von Sizzix aus schwarzem Cardstock gestanzt, davor kamen einzelne Bäume von Sizzix und JoyCrafts, die Büsche sind mit einer Stanze von Magnolia gemacht. Damit die Bäume sich ein wenig voneinander abheben, habe ich sie mit Distress Oxide Pine Needles, Peeled Paint, Forest Moss und Mowed Lawn betupft und teilweise auch noch ein wenig weiße Stempelfarbe hinzugefügt. Dann habe ich sie mit 3D Tape aufeinander und vor die Berge geklebt. 
Mit den selben Tinten habe ich auch den Boden der Waldlichtung gestaltet und sie einfach unregelmäßig übereinander aufgetupft. 
Der Wolf ist mit dem Howling Wolf Stempelset von HeroArts gemacht. Das ist ein Layering-Stempelset, so dass sich mit dreimal stempeln ein quasi perfekt colorierter Wolf ergibt. Ich habe ihn mit verschiedenen grauen Stempeltinten auf beige-grauen Cardstock gestempelt und ein paar einzelne Haare mit einem feinen weißen Gelpen hinzugefügt. 

Here I created a clearing with a wolf howling at the full moon.
For the nightsky in the background I've inked up some white cardstock with Distress Oxide Prize Ribbon, Chipped Sapphire and Black Soot and spritzed the stars over it with some white acrylic paint.
The mountains are die cut from light and dark grey cardstock using one of the dies from the Kingdom Trio die set by MamaElephant. I inked up the tod edges with a white ink pad and then glued the mountains across the box.
The moon is attached to a strip of cardstock, then glued into the box behind the mountains.
For the trees I first die cut a tree border by Sizzix twice from black cardstock, in front of that I've added some individual trees by Sizzix and JoyCrafts, the bushes are made with a die by Magnolia. To make the individual trees better visible I dabbed some Distress Oxide Pine Needles, Peeled Paint, Forst Moss and Mowed Lawn onto them and also added some white ink to a few areas. Then I stacked them with dimensionals and glued them to the mountains.
I used the same inks to create the grass in the clearing, simply dabbing the ink on randomly.
The wolf is made with the Howling Wolf stamp set by HeroArts. It's a layering stamp set, so by stamping three times I ended up with a nearly perfectly colored wolf. I used different shades of grey ink onto some grey-ish brown cardstock and added a few details with a fine white gel pen.


Hier kann man die einzelnen Lagen der Szene besser sehen.
Auf das Gras der Waldlichtung habe ich mit schwarzem Embossingpulver den Pfotenabdruck aus dem Toucan Do It Stempelset von LawnFawn ein paar Mal schwarz aufembosst und die Krallenabdrücke mit einem schwarzen Glaze Pen per Hand hinzugefügt. 
Und dann habe ich hier noch ein ganz kleines Banner mit dem Text "Kein Grund zu Heulen" aufgeklebt. Das ist natürlich aufs Alter bezogen, aber ich fand die Idee in Kombination mit dem Wolf einfach zu witzig. Den Text habe ich einfach am PC geschrieben und ausgedruckt.

Here you get a better look at the different layers of my scene. 
Onto the clearing I black heat embossed the paw print from the Toucan Do It stamp set by LawnFawn, then used a black Glaze Pen to add the claws by hand.
And then I added a little banner saying "no need to howl" here. It goes perfectly with the wolf, but here we also use "howling" as a word for crying. Of course that's related to the age in this case, but I just liked the pun in combination with the wolf too much to not include it here. I wrote the text with my PC and printed it out.


Auf einer der aufklappenden Seite habe ich die Tasche für den Gutschein integriert. Dekoriert habe ich sie mit einem weißen Banner, auf das ich das Wort kleiner gestempelt  habe und dann ein aus goldenem Spiegelcardstock gestanztes Wunscherfüller aufgeklebt. Dafür habe ich eine Stanze von Kulricke verwendet.
Und weil das noch ein wenig nackig aussah, habe ich etwas feines goldenes Band ein paar Mal zum Kreis gelegt und unter dem Banner mit aufgeklebt.

On one of the opening flaps I created a pocket for the gift card. I decorated it with a white banner, onto which I stamped one word, then glued a die cut word underneath so the text here means "to fullfill your wish". I don't think there's a direct translation to this text. I've die cut the word from golden mirror cardstock.
And since this flap still looked a bit plain, I added some fine golden yarn here.


Und auf dem anderen Seitenteil ist dann Platz für alle Schenkenden, um zu unterschreiben.
Da noch ein Geburtstagsglückwunsch fehlte, habe ich den hier mit untergebracht. 
Die Worte Herzlichen und von uns allen sind mit dunkelblauer Tinte gestempelt, dazwischen habe ich das Wort Glückwunsch aufgeklebt, gestanzt aus goldenem Spiegelcardstock mit einer Stanze von CreateASmile.

And on the other flap there's room for everyone to sign.
Since I missed a birthday greeting on my box, I added this here. I stamped part of the saying with dark blue ink and completed it with a word, die cut from golden mirror cardstock. The text means "heartfelt congratulations from all of us". 

Donnerstag, 23. September 2021

LawnFawnatics Challenge #109

 Hallo Ihr Lieben!
Es gibt wieder eine neue LawnFawnatics Challenge. Und hurra, das neue Release von LawnFawn ist da! Oh, ich bin dezent eskaliert, es ist so voller toller Stempel und Stanzen und anderem. Und dann saß ich vor dem "Berg" und musste mich entscheiden, was ich als erstes verwende. Das Thema der neuen Challenge ist Awesome Autumn. Nun, es sind tolle Herbstsets im Release. Aber sofort, als ich die Vorstellung der Flippy Flappy Stanze sah, hatte ich eine Idee, und die wollte ich als erstes ausprobieren. Und so ist diese Halloweenkarte entstanden. Wie gut, dass Halloween im Herbst ist - und einige aus dem DT auch Halloweenkarten für ihre Challenge-Inspiration gemacht haben. So kann ich sicher sein, dass meine Karte passt.

Hello everyone!
There's a new LawnFawnatics Challenge. And hooray, LawnFawn's new release is here! Well, I escalated quite a bit with my shopping - there are just too many great stamps and dies and other stuff in this release. And then I had this pile of stuff in front of me and had to decide what to use first. The theme of this new challenge is Awesome Autumn. There are great fall stamps included in this release. But when I saw the introduction video for the Flippy Flappy die set, I had an idea in mind, and wanted to try that first. And so I made this Halloween card. Luckily, Halloween is in autumn - and some of their DT members also made Halloween cards as inspiration for this challenge. So I can be sure my card meets the theme.

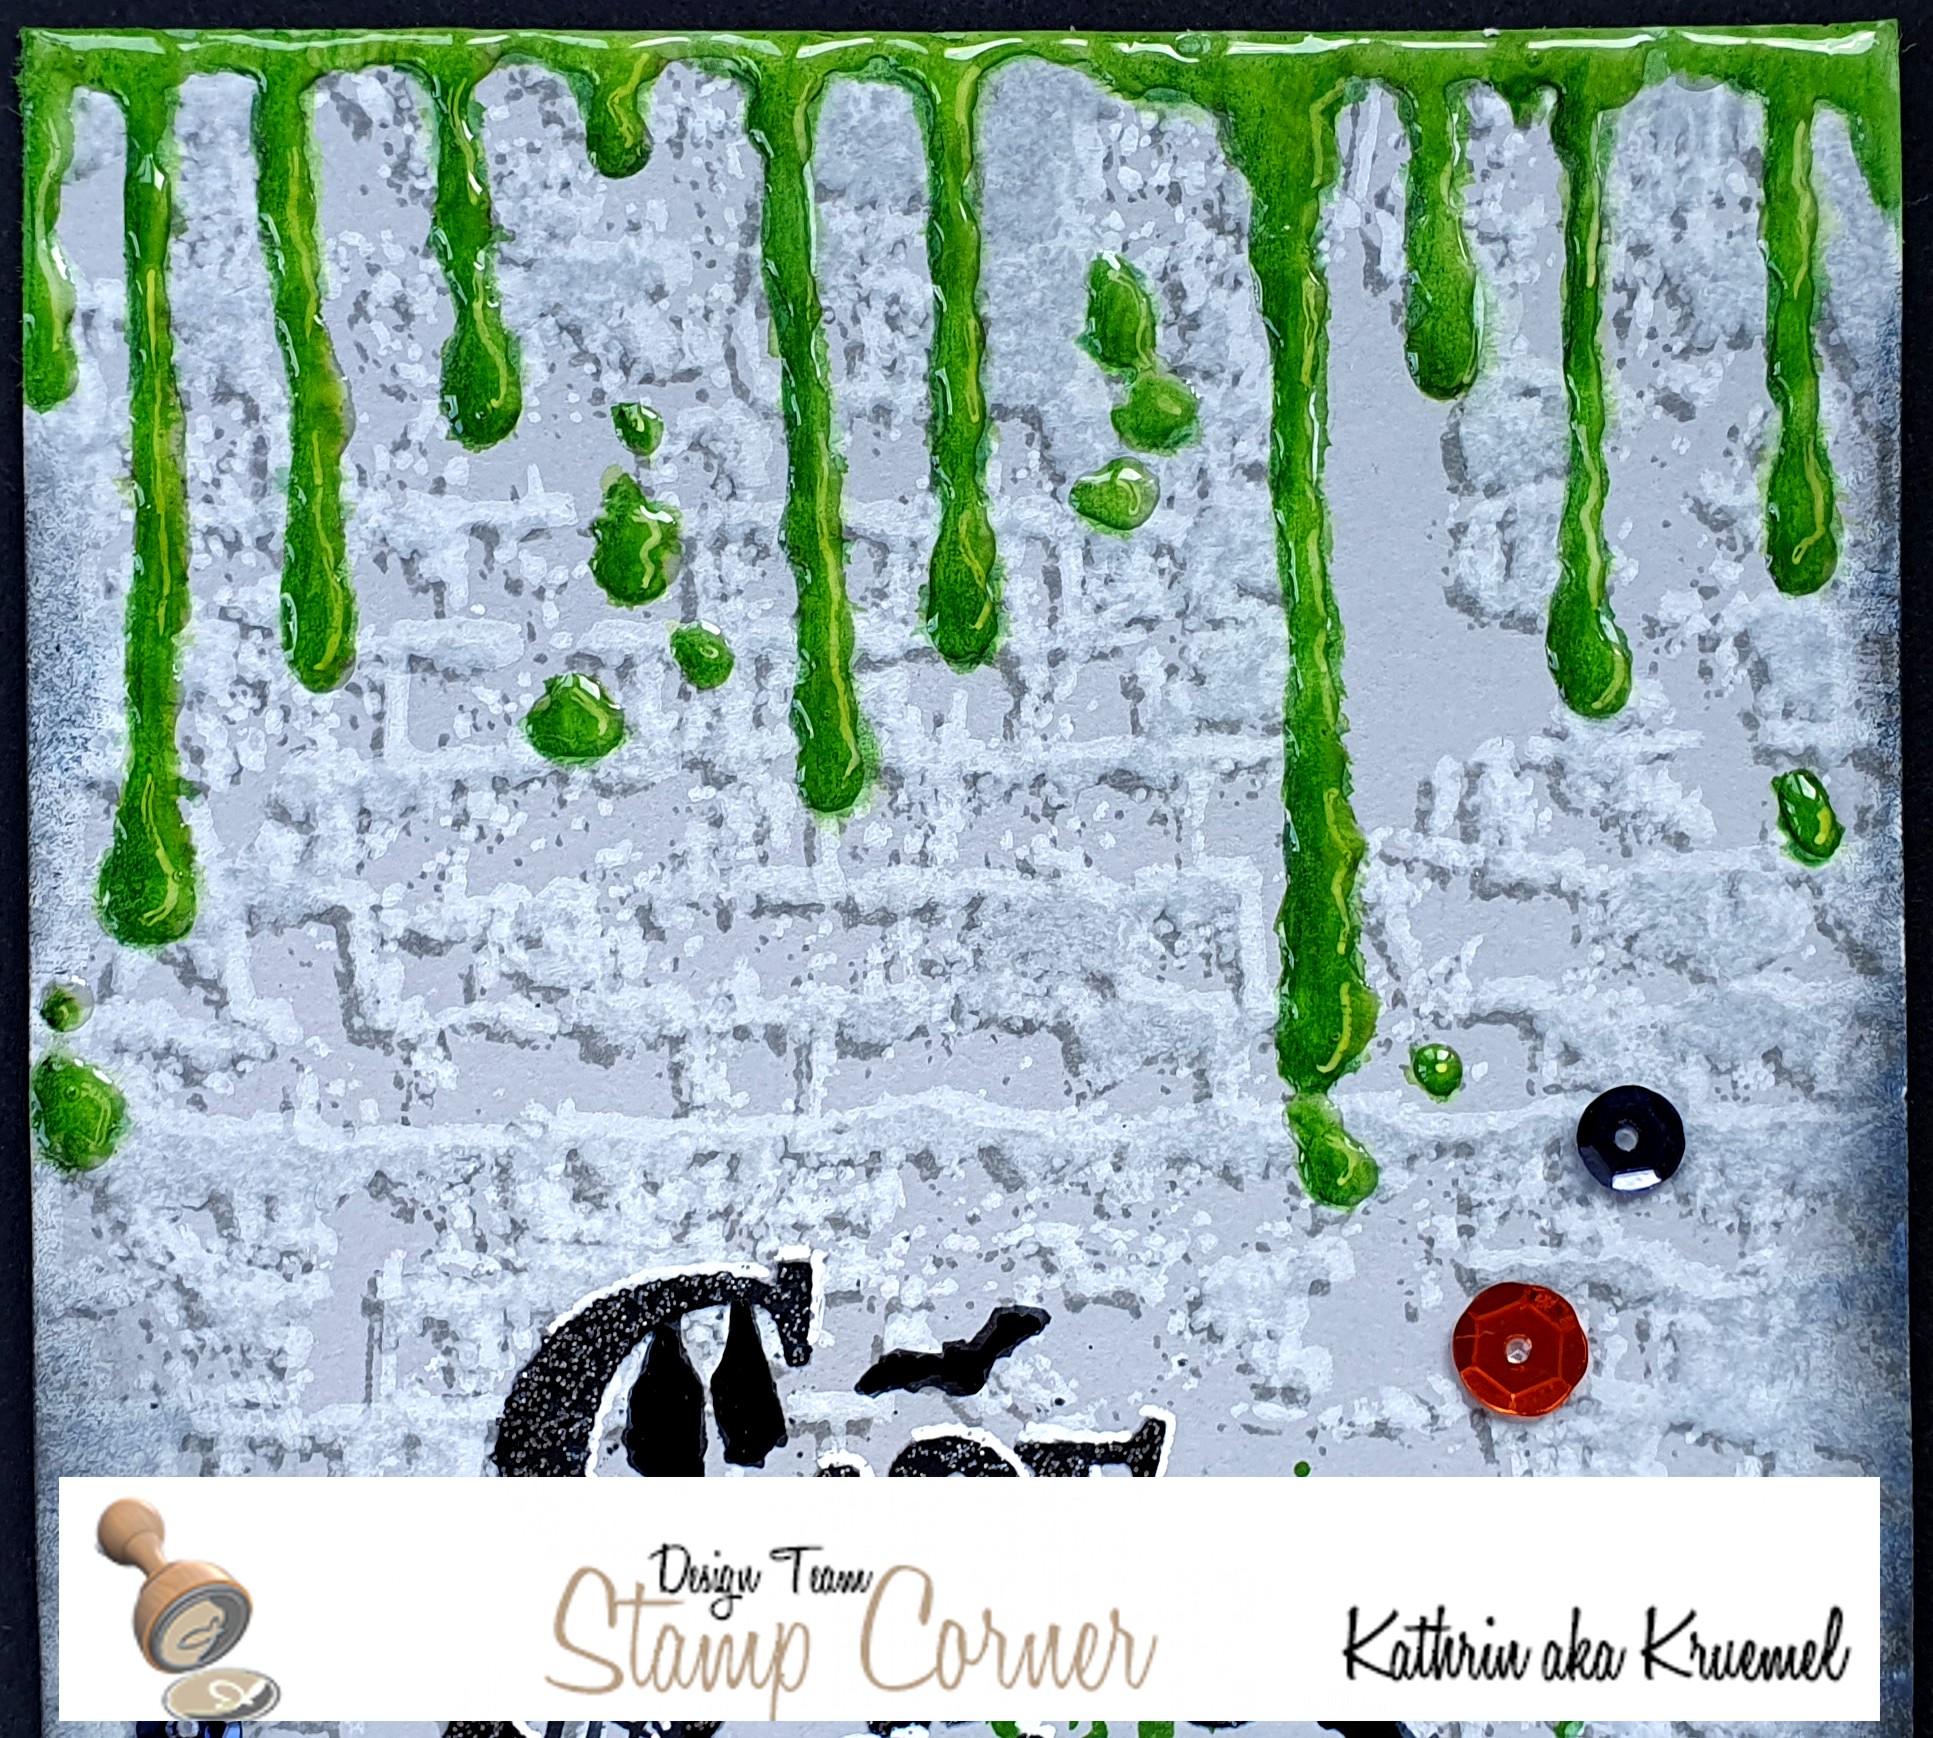
Ich habe für meine Karte ein Stück weißen Cardstocks mit Distress Oxide Twisted Citron, Peacock Feathers und Black Soot gewischt, dann habe ich schwarze und silberne Metallic-Watercolor darüber gespritzt. 

For my card I inked up a piece of white cardstock with Distress Oxide Twisted Citron, Peacock Feathers and Black Soot, then put some splatters of black and silver metallic watercolors on top.


Ich habe die ebenfalls neue Giant Happy Halloween Stanze verwendet, um den Text für meine Karte auszustanzen. Ich habe ihn einmal aus schwarzem Cardstock, einmal aus blauem Glitter-Cardstock ausgestanzt und die beiden Worte voneinander getrennt, so dass ich sie weiter auseinander auf meiner Karte aufkleben konnte. Außerdem habe ich, wie Ihr gleich noch sehen werdet, das O aus Halloween herausgeschnitten und durch einen Hexenkessel ersetzt. Der bildet das Zentrum meiner Karte.
Auf dem Happy habe ich einige Süßigkeiten aus den Stempelsets Costume Party und Purrfectly Wicked Add-On verteilt. 
Der Rabe, der auf dem Hut der Hexenkatze links sitzt, ist aus dem Set Happy Harvest.
Und auf der rechten Seite des Wortes habe ich noch ein fliegendes Buch angebracht. Das Buch ist aus dem Set Purrfectly Wicked, die Flügel gehören eigentlich der Eule aus dem Set Special Delivery. Ich habe sie hinter das Buch geklebt. Und weil ich es süß fand, wenn das Buch irgendetwas transportiert, habe ich noch den Frosch aus dem Set Tiny Fairytale daraufgesetzt. Die "Flugspur" aus dem Stempelset Scripty Autumn Sentiments habe ich dann mit weißer Stempelfarbe direkt auf die Karte gestempelt.

Here I used the also new Giant Happy Halloween die to die cut the text for my card. I've die cut it once from black cardstock, once from blue glitter cardstock, and also separated both words. So I was able to glue them onto my card a bit further apart. And, as you'll see in just a minute, I also cut out the O of the word Halloween and replaced it with a cauldron. This one is the center of my card.
I glued a few candies from the stamp sets Costume Party and Purrfectly Wicked Add-On.
The crow, that's sitting on top of the cat witch's hat, is from the Happy Harvest stamp set.
To the right of the word happy I also glued down a flying book. The book is from the Purrfectly Wicked stamp set. The wings originally go with the owl from the Special Delivery set. I glued them behind the book. And since I thought it would be cute if the book would transport something I also put the frog from the Tiny Fairytale stamp set onto it. The trail from the Scripty Autumn Sentiments set is stamped with white ink directly onto the card.


Hier seht Ihr das Wort Halloween. Mit dem Hexenkessel als O passt es gerade noch gut auf meine Karte. 
Oben auf dem Wort befinden sich zwei der Katzen aus dem Set Purrfectly Wicked, auch der große Hexenhut ist aus diesem Set. Der Hut der kleinen Hexe ist aus dem Set Holiday Party Animal. Und weil auch Katzen, selbst wenn sie Hexen sind, zu Halloween nicht einfach Katzen sind, habe ich den beiden jeweils noch Flügel aus dem Stempelset Booyah verpasst.
Die linke Katze hält eine Spinne, ebenfalls aus dem Set Booyah, in der Hand, die sich gerade an einem Faden abseilt. 
Hinter der rechten Katze habe ich einen Kürbis sowie eine Flasche "Frosch-Atem" aufgebracht. Passend zum Farbschema meiner Karte, habe ich die Kürbisse mal nicht orange, sondern eher weiß-grün coloriert.
Auch am Wort Halloween habe ich einige Dinge, die zu Halloween passen, aufgeklebt. Da wäre die Kerze aus dem Set Christmas Dreams, ein weiterer kleiner Kürbis - ebenso wie der Große aus dem Set Happy Harvest -, sowie eine weitere Flasche, einen Kristall und einen Löffel, alle aus dem Set Purrfectly Wicked.
Alle Motive auf der Karte sind mit Copics coloriert.

Here you see the word Halloween. With the cauldron as the O it just fits across my card.
On top of the word I placed two cats from the Purrfectly Wicked stamp set, also the big witch's hat is from this set, The hat the other witch is wearing is from the Holiday Party Animal set. And since cats, even if they are witches, just aren't cats on Halloween, I gave both of them some wings from the Booyah stamp set.
The cat on the left is holding a spider, also from the set Booyah, in her paw.
Behind the cat on the right I added a pumpkin and a bottle of "frog breath". Matching the colors of my card I didn't use orange for my pumpkins here, but went with a green-white combo.
Also at the bottom of the word Halloween I glued down a few items that go great with Halloween. There's the candle from the Christmas Dreams set, another smaller pumpkin - like the big one from the set Happy Harvest also -, another bottle, a crystal and a spoon, all from the stamp set Purrfectly Wicked.
All images on my card are colored with Copics.


Den Hexenkessel habe ich nochmal extra für Euch fotografiert.
Dahinter könnt Ihr übrigens die neue Glow in the Dark Paste sehen - die leuchtet wirklich toll! Und die durfte auf meiner Karte nicht fehlen! Ich habe sie durch einen strahlenförmigen Stencil aufgetragen und sie bringt auch den Distress Oxide Hintergrund hier nochmal so richtig zum Leuchten.
Der Kessel und sein Inhalt sowie der Glitzer darüber sind alle aus den Sets Purrfectly Wicked und Purrfectly Wicked Add-On. Es gibt verschiedene Füllungen für den Kessel. Ich habe zuerst nur die unteren Blasen einer Blubberfüllung in den Kessel gestempelt, sie maskiert und dann die Würmer darüber gestempelt. Dann habe ich auch die maskiert und dahinter noch einige Blasen gestempelt. 
Den glitzernden Rauch habe ich mit silber-glitzerndem Embossingpulver auf Vellum embosst, ausgeschnitten und hinter den Kessel geklebt.
Oh, und seht Ihr - einem Wurm ist es doch glatt gelungen, aus dem Kessel zu entkommen! Na, wir wünschen ihm viel Glück, oder?
Ich fand, unter dem Kessel müsste ein mystisches Feuer brennen. Ich habe das Lagerfeuer-Motiv aus dem Set S'More the Merrier benutzt und die große Flamme hinter dem Kessel versteckt. Zu warm soll es den Würmern ja auch nicht werden...
Neben dem Kessel steht noch eine Schüssel voller Süßigkeiten aus dem Stempelset Booyah.

I took an extra photo of the cauldron for you.
Behind it you can see the new Glow in the Dark Paste - and it glows really great! I just had to add it to this card. I used a ray stencil through which I put the paste down - and it also makes my Oxide background glow even more in those areas where I applied it.
The cauldron, its filling and the glitter above it are all from the sets Purrfectly Wicked and Purrfectly Wicked Add-On. There are different stamps which you can use to fill the cauldron. I first only stamped the bottom bubbles from a bubble filling image, then masked those and stamped the worm on top. Then I masked those as well and added a few more bubbles behind the worms. 
The glittery smoke is heat embossed with a silver glitter embossing powder onto vellum, cut out and glued behind the cauldron.
Oh, and can you see that one worm made it to escape the cauldron? Well, I guess we wish him the best of luck, right?
I thought, there had to be a fire burning under the cauldron. I used the bonfire image from the S'More the Merrier stamp set and hid the big flame behind the cauldron. We don't want those worms to get too hot, right?
Next to the cauldron I placed a bowl filled with candy, which is from the Booyah stamp set.


Und jetzt kommen wir zur Flippy Flappy Stanze und meiner Idee, die ich unbedingt probieren wollte. Zieht man an den blauen Tabs, von denen es zwei auf meiner Karte gibt, fährt ein Tab unter der Karte heraus und ein Motiv klappt über die Karte. Den Mechanismus kann man auch für Texte oder Gutscheinkarten benutzen.
Auf dem Tab habe ich einen der Texte aus dem Stempelset Purrfectly Wicked Add-On aufgebracht. Den habe ich auf grünen Cardstock gestempelt und aufgeklebt. Allerdings habe ich die Worte hier ein wenig verdreht - eigentlich lautet der Text "No tricks, just treats". Aber verändert passt er besser zu dem Motiv, das herausklappt.

And now let's talk about that Flippy Flappy die and the idea I really wanted to try.
When you pull the blue tabs, of which are two on my card, a tab comes out from under the card and an image pops on top of the card. You can use that mechanism also for sentiments or gift cards.
I added a text from the Purrfectly Wicked Add-On stamp set onto this tab. I stamped it onto green cardstock and glued it down. But I changed the words a bit - originally it reads "No tricks, just treats". But this changed version goes better with the image that pops onto my card.


Der süße Poof-Stempel ist ebenfalls aus dem Set Purrfectly Wicked. Er sah ein wenig verloren aus, wenn ich ihn alleine auf den Folienstreifen geklebt habe. Also habe ich noch eine der "Wolken" der Speech Bubbles Stencil mit einem silbernen Glitter-Gelpen auf Vellum nachgemalt, ausgeschnitten und von hinten gegen die Folie geklebt.
Und Poof - in Kombination mit dem Text sind alle Hoffungen auf Süßes zu Halloween in Rauch aufgelöst...

The cute poof stamp is also from the Purrfectly Wicked stamp set. It looked a bit lost glued onto the strip of acetate without anything else. So I traced one of the "clouds" from the Speech Bubble Stencil with a silver glitter gel pen onto vellum, cut it out and glued it behind the acetate.
And poof - in combination with the text all hopes for candies for christmas just dissolved into smoke...


Aber man soll die Hoffnung nicht zu früh aufgeben! Zieht man zweiten Tab, poppt eine kleine Tafel Schokolade unter der Karte hervor. Und das war es auch, was ich unbedingt probieren wollte: sehen, ob man auch etwas Süßes mit dem Mechanismus hervorpoppen lassen kann. Und es geht! Allerdings darf die Süßigkeit wirklich nur ganz dünn sein - meine Schokolade, die schon sehr dünn ist, hat gerade noch funktioniert. Ich musste sie ein wenig vom Falz des Mechanismus entfernt aufkleben um die Höhe der Schokolade auszugleichen. Außerdem musste ich die Szene meiner Karte mit vier aufeinander geklebten Streifen 3D Tape aufkleben, damit der Mechanismus gut funktioniert.
Und hier habe ich den Text dann auch in seiner Ursprungsform verwendet.

But don't give up hope too early! When you pull the other tab, a small chocolate pops out from under the card. And that's what I wanted to try so badly: see if you can let some candy pop out. And it works! But the candy has to be really thin - my chocolat, that's very thin, worked but shouldn't have been any thicker. I had to glue it down a bit away from the fold in the mechanism to make up for the height of the chocolat. And I also had to use 4 stacked strips of foam tape for glueing my scene down to keep the mechanism working.
Here I also used the same sentiment, but this time in it's original version.


Und so sieht meine komplette Karte dann aus, wenn beide Tabs herausgezogen sind. 
Das einzige was ich vergessen habe, zu fotografieren, ist die Karte bei Dunkelheit, so dass Ihr das Leuchten der Paste sehen könnt...

And this what my card looks like when both tabs are pulled out.
The only thing I forgot to take a picture of is the card put in a dark room, so you can see the glow of the paste....

Mittwoch, 22. September 2021

2021 Card Design Superstar Contest - Karte 3

 
Hallo Ihr Lieben!
Heute zeige ich Euch meine dritte und letzte Karte für den Card Design Superstar Contest 2021 auf dem MFT Blog. Das hier ist meine Karte für die Innovation Master Kategorie, in der es um interaktive Karten und besondere Kartenformen geht.
 
Hello everyone!
Today I am sharing with you my third and last card for this year's Card Design Superstar Contest over at the MFT blog. This is my card for the Innovation Master category, which is all about interactive cards and fun fold cards.
 
 Interaktiv mache ich ja super gerne. Und weil ich mit meinen Karten irgendwie eine Reise durch die letzten Monate des Jahres gemacht habe - erst Herbst, dann Halloween - war irgendwie klar, dass meine letzte Karte eine Weihnachtskarte werden würde. Auch wenn sie auf den ersten Blick nicht unbedingt so aussieht.

I love to make interactive cards. And since I made some kind of journey through the last months of the year with my creations - first fall, then Halloween -, it was somehow clear that my last card would be a christmas card. Even if it doesn't look completly like it at first sight.


So sieht die Karte auf den ersten Blick aus.
Ich habe aus dem Wallpaper Patterns Paper Pad einen Bogen mit leichtem Muster gewählt und passend zugeschnitten. Die Ränder habe ich mit Distress Oxide Hickory Smoke  nur ein wenig schattiert. Äh, das hätte ich mal machen sollen, bevor ich die Karte zusammengeklebt hatte. Aber ich hatte es irgendwie total vergessen. So wirkt das Grau ein wenig fleckig, allerdings in Wirklichkeit nicht so extrem wie hier auf dem Bild.

This is my card at first look.
I picked a paper with just a light pattern from the Wallpaper Patterns paper pad and cut it the size I wanted my card to be. I inked up the edges just a bit with Distress Oxide Hickory Smoke. Well, that was the plan. I should have done that before glueing the card together. But I totally forgot about it while making the card. So the grey looks a bit splotty, but in real life it's not as extrem as it seems on this picture.


Das Fenster ist mit der Window Stanze von MFT gemacht. Ich habe das Fenster aus weißem Cardstock gestanzt und mit Copics ein wenig schattiert. In das Designpapier habe ich etwa mittig ein Rechteck ausgeschnitten, das ein wenig größer als die beiden Fensterflügel ist, so dass ich das Fenster auf das Designpapier kleben konnte.
Um das Fenster habe ich eine Weihnachtsgirlande gehängt. Dafür habe ich die beiden Tannenzweige aus dem Stempelset Handlettered Holiday Greetings einige Male aneinander auf weißen Cardstock gestempelt und mir vorher eine Linie gemalt, damit die Girlande gut um das Fenster herumpasst. Ich habe zwei verschiedene Grüntöne zum Stempeln benutzt und die Zweige schön überlappend gestempelt. Das Ausschneiden per Hand war dann ein wenig frickelig, ging aber doch ganz gut. Für die Christbaumkugeln, die in der Girlande hängen, habe ich die Beeren aus dem selben Stempelset zweckentfremdet. Sie sind mit türkisfarbener Tinte gestempelt und anschließend mit Glossy Accents überzogen. Zwischen die Kugeln habe ich noch einige kleine, sechseckige Pailetten in grün und türkis verteilt. Die Schleife, mit der ich die Girlande in der Mitte verziert habe, habe ich einfach von einem der Geschenke aus dem Stempelset Secret Santa abgeschnitten.
Vor dem Fenster steht ein Mädchen und schaut dem Schneefall draußen zu. Ich habe hier eines der Mädchen aus dem Stempelset Friendship at first Sip benutzt. Um sie von hinten zu zeigen, habe ich "inner masking", wie ich es nenne, betrieben. Ich habe mir eine Maske hergestellt, die nur die äußeren Linien des Stempels abdrückt. Da wohl kaum jemand zu Hause eine Umhängetasche trägt, habe ich die auch noch wegmaskiert und die fehlenden Linien im Motiv dann per Hand hinzugefügt. Coloriert habe ich sie mit Copics.

The window is die cut with the Window die by MFT. I've die cut it from white cardstock and added some shading with Copics. Then I cut a rectangle from about the center of the patterned paper, just slightly bigger than the two inner parts of the window, so I was able to glue the window onto the patterned paper.
Around the window I hung up a christmas garland. I used the two spruces from the Handlettered Holiday Greetings stamp set and stamped it several times onto white cardstock. I had drawn a pencil line so my garland would fit around the window nicely. I used two different tones of greens to stamp the spruces and overlapped them. Fussy cutting this garland was a bit tricky, but it worked. For the baubles, that are used to decorate the garland, I simply used the berry images from the same stamp set. I stamped them with turquoise ink and then covered them with Glossy Accents. Between the baubles I put a few small, hexagon shaped sequins in green and turquoise. The bow I added to the top center is cut off of one of the presents from the Secret Santa stamp set.
And in front of the window this girl is standing and watching the snow fall outside. Here I used one of the images from the Friendship at first Sip stamp set. For the back view of her I did some "inner masking", as I call it. I made myself a mask that covers all the inner pieces and only stamps the outer lines. Since most people won't carry a hand bag at home I masked that off as well and after stamping I added the missing lines by hand. The coloring is done with Copics.


Natürlich lassen sich die Fensterflügel öffnen. Damit das Fenster auch so schön aussieht, habe ich die Fensterflügel nochmal ausgestanzt und auf die Rückseite des ausgestanzten Fensters geklebt. Dazwischen habe ich eine Fensterscheibe eingebaut. Dafür habe ich ein paar Mica-Flakes einlaminiert und zwar so, dass sie jeweils nur am unteren Ende der einzelnen kleinen Scheiben liegen. Das sieht so toll nach Eisblumen aus. Die Laminierfolie habe ich zwischen die beiden ausgestanzten Fensterflügel geklebt. Außerdem habe ich außen auf das Fenster noch ein wenig 3D Paste auf die Streben aufgetragen, so als hätte der Wind ein wenig Schnee dorthin geweht.

Of course the window can be opened. To make also this side of the window look nice I've die cut the inner window pieces again and glued them onto the back of the original window.
Inbetween I added some window panes. I laminated a few Mica Flakes, making sure they are only placed at the bottom of each individual window pane. That creates the look of a thin layer of ice on the window panes. I glued the laminated sheet between the two pieces of each window. I also added some white paste to the outside of the window, like the wind blew a bit of snow there.


Natürlich sollte das Mädchen auch bei geöffnetem Fenster schön aussehen. Also habe ich hier den eigentlichen Stempelabdruck verwendet, ebenfalls mit weg-maskierter Handtasche. Hier sieht man auch, dass sie, während sie dem fallenden Schnee zusieht, eine Tasse heißen Kaffees genießt. Ich habe beide Teile des Mädchens ausgeschnitten und jeweils mit der colorierten Seite nach außen aufeinander geklebt. Dann habe ich sie am Fenster befestigt.
Hier sieht man auch die Eisblumen und den Schnee auf den Fensterstreben nochmal gut.

Of course the girl looking outside of the window should also look good when the window is opened. So I used the real image here, also with the bag masked off. Now you can also see that she's enjoying a cup of hot coffee while she watches the snow fall. I cut out both images of the girl and glued them on top of each other, the colored side being visible on each side. Then I attached her to the left window.
Here you also get a good look at the layer of ice and the soft coat of snow on the window.


Durch das Fenster sieht man die verschneite Landschaft mit Bäumen und einem kleinen Schneemann. Für die verschneiten Hügel habe ich die Stitched Hills ein paar Mal aus weißem Cardstock gestanzt und hintereinander geklebt.
Der kahle Baum links is aus dem Stempelset Warm Feathered Hugs. Auch den habe ich per Hand ausgeschnitten und dabei an einigen Stellen oben auf den Ästen etwas weißen Cardstock stehen lassen, so dass es aussieht als läge Schnee darauf.
Der kleine Schneemann ist aus dem Stempelset Merry Christmoose und steckt eigentlich in einer Schneekugel. Ich habe ihn daraus befreit und zusammen mit den beiden Tannen aus dem Stempelset Fox and Friends ebenfalls in meine Landschaft gesetzt.

Through the window you can see the snowy land with trees and a little snowman. 
For the hills I've die cut the Stitched Hills a few times from white cardstock and stacked them on top of each other.
The bare tree on the left is from the Warm Feathered Hugs stamp set. Again I've fussy cut it and left a bit of the white cardstock in some areas on top of the branches so it looks like they are covered with snow.
The little snowman is from the Merry Christmoose stamp set - and originally he's stuck in a snow globe. I freed him from that and glued him together with the two trees from the Fox and Friends stamp set into my scene.

Und jetzt zeige ich Euch erst mal ein Video vom interaktiven Teil der Karte:

And before I will tell you more I am going to show you a card of the interactive part of this card:


Die Idee hinter meiner Karte war, dass das Mädchen am Fenster steht und dem fallenden Schnee zuschaut, während es draußen dunkel wird. Und ganz langsam werden aus den weißen Schneeflocken plötzlich goldene Glitzerpunkte und am Himmel erscheint ein Weihnachtsgruß.

The idea behind this card was the story of a girl standing at the window, watching the snow fall, while it's getting dark outside. And all of a sudden the white snowflakes slowly turn into golden glitter and a christmas greetings is written in the sky.


Für den Himmel habe ich einen Streifen Kopierpapier mit Distress Oxide Stormy Sky, Faded Jeans, Chipped Sapphire und Black Soot eingefärbt. Darauf habe ich dann erst die Texte golden aufembosst. Das HoHoHo aus dem Stempelset Handlettered Holiday Greetings ist mit glitzerndem Embossingpulver embosst, für den Text darunter, der aus dem Stempelset Itty Bitty Holiday ist, habe ich normales goldenes Embossingpulver verwendet. Ich hatte Angst, dass er mit dem glitzernden Pulver aufgrund der kleinen Größe eventuell nicht gut lesbar sein würde.
Ich habe den Text mit Masking Tape abgedeckt und dann die goldenen Punkte wieder mit dem glitzernden Embossingpulver aufembosst. Dafür habe ich den Snowfall Background Stempel benutzt. Anschließend habe ich meinen Papierstreifen um 180 Grad gedreht und den Snowfall Background nochmal von der anderen Seite her aufgestempelt, diesmal habe ich die Punkte weiß embosst, so dass sie wie Schnee aussehen. Da der Stempel an der eigentlich oberen Seite recht dicht mit Punkten besetzt ist, die nach unten hin weniger werden, konnte ich so beide Punktfarben schön ineinander übergehen lassen. So mischen sich erst ein paar goldene Punkte zwischen die weißen Schneeflocken, werden immer mehr bis am Ende nur noch goldene Punkte zu sehen sind.
Der Papierstreifen ist an den beiden Papierstrohhalmen befestigt, durch die er sich nach unten - und natürlich auch oben - abrollen lässt.
 
For the sky I used a strip of copy paper and inked it up with Distress Oxide Stormy Sky, Faded Jeans, Chipped Sapphire and Black Soot. First I heat embossed the texts onto it. 
For the HoHoHo from the Handlettered Holiday Greetings stamp set I used some golden glitter embossing powder. For the phrase underneath, which is from the Itty Bitty Holiday stamp set, I went with regular golden embossing powder. Due to the size I was a bit afraid that it wouldn't be clear enough to be read when I used the glittery powder. 
I covered the texts with masking tape and then heat embossed the golden dots around it, again using the glittery embossing powder. I used the Snowfall Background stamp here. 
Then I turned my paper strip 180 degrees and stamped the Snowfall Background again from this end, this time using white embossing powder to make them look like snowflakes. Since the stamp has quite a few dots on the - original - top edge that get less and less towards the bottom I was able to make those two colors of dots kind of blend into each other. So first there are just a few golden dots between the white snowflakes, then there are more and more until they are all golden glitter dots.
I attached the paper strip to the two paper straws, now it can be rolled down - and of course also up - by turning the paper straws.