Dienstag, 30. Juli 2019

Tropischer Sommer


Hallo Ihr Lieben!
Wettertechnisch sind wir ja schon in tropischen Bereichen unterwegs. Jetzt haben die Tropen auch den Weg auf meine Karte, die ich heute auf dem Stamping-Fairies Blog zeige, gefunden.

Hello everyone!
The weather here is nearly tropical. Now I've also picked this as the theme of this card that I'm sharing over at Stamping-Fairies Blog today.

Ich gestehe, zu dem Design wurde ich inspiriert, als ich bei Herrn Google Sommerbilder suchte. Da tauchte unter anderem eine ähnliche Grafik in der Bildersuche auf. Das geht auch auf Karte, dachte ich.
Für den Hintergrund habe ich weißen Cardstock mit Distress Oxide Cracked Pistacchio und Tumbled Glass gewischt und mit der Circle Stencil von MFT und weißer Stempelfarbe ein paar Bokeh-Flecken darauf verteilt. Das habe ich dann schwarz gemattet und auf eine weiße Kartenbasis geklebt.

I have to admit that I was inspired to make this card while looking for summer pictures over Google. Amongst others a graphic of a similar picture popped up. I've decided that this could also be turned into a card.
For the background I've used Distress Oxide Cracked Pistacchio and Tumbled Glass to color a piece of white cardstock in. Then I've used the Circle Stencil by MFT and white ink to add a few Bokeh dots. I've matted this panel with black cardstock and glued it onto a white cardbase.


Für die tropische Deko habe ich die verschiedenen Blätter aus dem Stanzensest Wild Greenery von MFT aus Cardstock in unterschiedlichen Grüntönen gestanzt und übereinander gelegt. Das Monstera-Blatt ist aus dem Stanzenset Tropical von Sizzix.
Auf die Blätter habe ich das Wort Summer, gestanzt aus einzelnen Buchstaben und aus weißem Cardstock, aufgeklebt. Damit sie nicht so fad aussehen, habe ich sie mit ein wenig klarem Glitzer überzogen. Das sieht man auf dem Bild leider nicht so toll.  
Der Tukan sowie die Blumen sind aus dem Stempelset Polynesian Paradise von MFT. Sie sind mit Copics coloriert, ausgeschnitten und zwischen den Blättern verteilt. Der Tukan tront auf dem R - und ich habe ihm ein lustiges Wackelauge aufgeklebt.

For the tropical decorations I've die cut the different leaves from the Wild Greenery die set by MFT from different tones of green. The Monstera leave is from the Tropical die set by Sizzix.
Onto the leaves I've glued the word summer, put together from individual letters cut from white cardstock. The letters are also covered with a hint of clear glitter but I wasn't able to really catch that on picture.
The toucan and the flowers are from the Polynesian Paradise stampset by MFT. They were colored in with Copics, cut out and put inbetween the leaves. The toucan took its place on top of the R - and I've given him a goggly eye.


Montag, 29. Juli 2019

Alleine im Regen...?


 Hallo Ihr Lieben!
Es geht weiter mit den Neuheiten von SF Stamps - auch wenn man die auf dieser Karte nicht sofort erkennen kann.

Hello everyone!
Let's continue with the new stamps by SF Stamps - even if those aren't really visible at first sight on this card.


Im ersten Moment wirkt diese Karte eher traurig. Der kleine Wichtel hinfallen steht alleine, mit traurigem Gesichtsausdruck im Regen... 
Ich habe das Motiv und den Hintergrund mit Copics gemacht und mit weißen Gelmarkern den Regen und weitere Details hinzugefügt.

At first this card looks really sad. This poor gnome is standing there in the rain, allone, with a sad face...
I've colored the image and the background using my Copics and added the rain and details with a white gelly marker.


So konnte die Karte natürlich nicht bleiben!
Zieht man an der Wolke, die oben über der Karte schwebt, dann ist die Welt wieder in Ordnung. Hier hält einer der Wichtel aus dem Wichtel Fußball Stempelset einen fröhlich-gelben Regenschirm über den vorher einsamen Wichtel. Und man sieht, wie sehr er sich freut! Hier kam dann der Wichtel Glücksmomente zum Einsatz.
Und so passt dann auch der Text zur Karte, der ebenfalls im Regenschirm-Set enthalten ist.

Of course I could never give away a card like this!
If you pull the cloud floating at the top of the card the world is back to how it should be. Here a gnome friend is holding a happily yellow umbrella above the previously lonesome gnome. And you can tell how happy he is to have a friend like that! 
And now the saying - I'll never let you down - goes with the design of the card.


Die Motive habe ich alle übereinander maskiert und mit Copics coloriert. 

I've masked the images on top of each other and used Copics to color them.


Und hier noch einmal die Karte "in action". ;)

And here again a video of the card "in action". ;)


Samstag, 27. Juli 2019

Stempeleinmaleins - Ausgabe vom 27. Juli 2019


 Hallo Ihr Lieben!
Bevor das Stempeleinmaleins nächsten Monat in Sommerpause geht, haben wir noch eine Sketch-Inspiration für Euch. Und der Sketch war perfekt, um meine Turner Surprise Stanze von Mama Elephant einzuweihen. 

Hello everyone!
Before we from Stempeleinmaleins start into our summer break for next month we have another sketch inspiration for you. And the sketch was perfect to use my new Turner Surprise die by Mama Elephant.

Ich habe eine weiße Grundkarte mit Designpapier in Dunkeltürkis beklebt, darauf kam ein weiß gemattetes Banner aus orangefarbenem Cardstock.

I've glued some dark turquoise designer's paper onto a white card base, then added a banner cut from orange designer's paper, matted white as well.


Auf das Banner habe ich ein weitere Stück weiß gemattetes Designpapier mit Fleckendruck, das wie ich finde perfekt zum Unterwasserthema meiner Karte passt, geklebt. 
Darauf kam dann die Turner Surprise, die ich natürlich bestempelt habe. Die Fische, Blasen und Wasserpflanzen (ja, für die müsst Ihr genau schauen), sind von MFT, der Text von Mama Elephant. Ich habe zuerst die Fische gestempelt, nach dem Colorieren abgedeckt und den Hintergrund mit Distress Oxide Chipped Sapphire, Broken China und Tumbled Glass gewischt. Die Blasen und die Wasserpflanzen habe ich anschließend aufgestempelt, zuletzt kam der Text, damit der durch die Oxides nicht verdeckt wird.
Unten auf die Karte habe ich ein surprise aus einzelnen Buchstaben, gestanzt aus schwarzem Cardstock mit der Handletter Alphabet Lowercase Stanze von Crafts Emotions und aneinandergeklebt, aufgebracht. Darunter befindet sich eine kleine Koralle. 
Als weitere Deko habe ich noch ein paar Kreise aus Vellum sowie orangefarbene Enamel Accents aufgeklebt.

Onto the banner I've glued another piece of white matted designer's paper with a print that looks like spots. It reminded me of bubbles and so I thought it was perfect for my underwater theme.
Then I've added the Turner Surprise that of course I've stamped onto. The fish, bubbles and water plants (yes, you really have to look close to be able to see them) are by MFT, the saying by Mama Elephant. 
First I've stamped the fish, after coloring them in I've covered them with some masking tape and created the background using Distress Oxide Chipped Sapphire, Broken China and Tumbled Glass. Then I've stamped on the bubbles and water plants and the text was the last thing I've added to avoid the Oxides covering it up.
To the bottom of the card I've added a surprise, cut from black cardstock as individual letters using the Handletter Alphabet Lowercase die by Crafts Emotions and glued together. Underneath there's a little coral.
For more decorations I went with a few circles cut from Vellum and a few orange Enamel Accents.

Vom Turner Surprise Mechanismus habe ich wieder ein Video "in action":

I've taken a video again showing the turner surprise mechanism in action:


Und weil das wohl ein wenig schnell ging, hier noch ein Foto:

And since that might have been a bit fast here's a picture:


Hier habe ich den Fischen einen Luftballon ins Maul bzw. einen Partyhut auf den Kopf gestempelt und den Text durch Birthday Fishes ersetzt.

Here I've put the fish a balloon in the mouth/a party hat on the head and replaced the spin me around saying with one sayine Birthday Fishes.

Das Stempeleinmaleins meldet sich am letzten Samstag im August mit einer weiteren Sketch-Inspiration zurück!

Stempeleinmaleins will be back on the last saturday of august with another sketch inspiration!


Freitag, 26. Juli 2019

Drei Affen


 Hallo Ihr Lieben!
Wie bereits angekündigt, zeige ich Euch heute eine weitere Karte mit den August-Neuheiten von SF Stamps. Diesmal kam das zweite neue Set zum Einsatz - und in dem Set sind die drei berühmten Affen enthalten. 

Hello everyone!
As mentioned earlier this week I am going to share another card with the august new release stamps by SF Stamps. This time I've used the other set that will be new this month - and it's about those three famous monkeys.

Ich wusste sofort, dass ich damit seit langem mal wieder eine Wasserfallkarte machen wollte. Hier ist sie:

I knew immediately that I wanted to use those for a waterfall card - a type of card I haven't done in a long time. This is it:


Aber ich habe auch einzelne Fotos gemacht, denn im Video ist dann doch ein Schatten von den aufklappenden Elementen über den Motiven.

I've also taken individual pictures because there's a shadown from the opening parts on the images.


Ich finde die Affen einfach klasse!

I just love those monkeys!


Für den Hintergrund habe ich den Cardstock mit dem Wort Feiern aus dem Wichtel Coolman Stempelset gefüllt, darauf kam das Wasserfall-Element.

For the background I've taken a piece of green cardstock and filled it with the word "celebrate", then added the waterfall element on top.


Die Texte auf der letzten "Seite" und auch auf dem Pulltab habe ich am PC gedruckt und mit Copics und Airbrush passend zum Grün auf den Motive eingefärbt.

The saying on the last "page" and on the pull tab were printed with my homeprinter, then I've colored the white paper with my Copics Airbrush matching the color behind the images.


Donnerstag, 25. Juli 2019

Fliegen kann so schön sein


Hallo Ihr Lieben!
Ich bin ja nicht so der Gerne-Flieger. Dass man es auch richtig genießen kann, zeigt der kleine Felix auf meiner Karte, die ich heute auf dem Kulricke Blog zeige.

Hello everyone!
I don't really like to fly. That some really enjoy it is something the little penguin on the card I am sharing over at Kulricke Blog today is showing.

Für den Hintergrund habe ich ein Stück weißen Cardstock mit Distress Oxide Abandoned Coral, Carved Pumpkin, Squeezed Lemonade, Cracked Pistacchio, Mermaid Lagoon und Blueprint Sketch eingefärbt. Ich wollte den Hintergrund so richtig fröhlich-bunt haben. Um ihn nicht so eintönig zu haben, habe ich ein paar Wassertropfen aufgespritzt, die für die hellen Flecken sorgen.
Mit der Papierflieger-Stencil und weißer Strukturpaste habe ich dann die Papierflieger aufgetragen. Die Distress Oxide Tinte war noch nicht ganz trocken, so dass die weiße Paste je nach Untergrundfarbe ein wenig verfärbt wurde. Aber das finde ich eigentlich ganz schön, so wirken die Flieger nicht so krass. Nur den, auf dem Felix sitzt, habe ich später noch einmal weiß nachgemalt.

For the background I've used Distress Oxide Abandoned Coral, Carved Pumpkin, Squeezed Lemonade, Cracked Pistacchio, Mermaid Lagoon and Blueprint Sketch to color a piece of white cardstock. I wanted a really  happy and colorful background. To not have it that solid I've added some waterdrops that created the white spots.
Then I've used a stencil and white modelling paste to add the paper planes. The Distress Oxide Ink wasn't completly dry then and so the white paste got a hint of the color underneath. But I like the effect since the planes aren't that hard in contrast. I've only used some white paint to make the one Felilx is sitting on really white.


Der kleine Felix ist der Felix Happy Mini aus dem Stempelset Felix und seine Freunde 2. Er ist mit Copics coloriert, ausgeschnitten und auf den Papierflieger geklebt. Ich weiß, die Perspektive stimmt nicht 100%ig, aber er hat auf jeden Fall seinen Spaß.
Unten auf die Karte habe ich ein Just be Happy, gestanzt aus schwarzem Cardstock, mit 3D Pads aufgeklebt. Nur der Text war mir zu fad, also habe ich noch einen Regenbogen, gemacht mit der Regenbogenstanze, dahinter geklebt.
Den dekorierten Cardstock habe ich dann schwarz gemattet und auf eine weiße Basiskarte geklebt.

The litte Felix is colord with Copics, cut out and glued on top of one of the paper planes. I know, it isn't 100 % right perspectivewise. But he's enjoying his ride.
To the bottom of the card I've glued a die cut "just be happy", cut from black cardstock and glued down using dimensionals. Since just the saying was too plain I've put a die cut rainbow behind it.
Then I've black matted the decorated card panel and glued everything onto a white card base.


Mittwoch, 24. Juli 2019

Ein Hut, ein Stock, ein Regenschirm...


 Hallo Ihr Lieben!
Der Juli neigt sich auch schon seinem Ende hin - aber das Gute daran ist, dass es bald die August-Neuheiten von Scrapbook Forever geben wird. Es ist ein kleiner Release, aber deswegen nicht weniger toll. Und mich hat er zu ganz vielen interaktiven Karten inspiriert, die ich Euch in der nächsten Zeit nach und nach zeigen werde. Heute starten wir mal mit der ersten Karte.

Hello everyone!
July is nearly at its end - but the good thing about it that there will be the august release by Scrapbook Forever soon. It's a smaller release than you might be used to, but it's as cute as always. And it inspired me to make a bunch of interactive cards that I'm going to share with you within the next weeks. Let's start with the first card today.


Es gibt ein Stempelset mit tollen Regenschirmen (Hut und Stock sind nicht dabei, aber der Posttitel kam mir so in den Sinn) - und da liegt eine Beaded Raindrop Card natürlich nahe! Ich wollte keine wirklich bunte Karte. Also habe ich mit der Falling From the Clouds Frame Stanze von MFT das Fenster mit den Wolken aus weißem Cardstock gestanzt. Ich habe hier nur den oberen Teil gestanzt und dann um den Schirm, den ich passend darunter gestempelt habe, herumgeschnitten. Im Hintergrund sind Wolken mit Distress Oxide Hickorey Smoke auf weißen Cardstock gewischt, dazwischen befinden sich die Schnüre mit den aufgefädelten "Regentropfen".

There's one stamp set with great umbrellas - and so a Beaded Raindrop Card was coming to my mind. I didn't want to make a card with lots of colors. So I've die cut the Falling From the Clouds Frame die by MFT from white cardstock. I've only die cut the upper part and then hand cut around the umbrella that I've stamped into the right spot.
In the background I've added some clouds using Distress Oxide Hickorey Smoke onto white cardstock, inbetween there are the strings with the "raindrops" threaded on.


Ich habe unter dem Regenschirm Stopper angebracht, so dass hier die Perlen nicht bis unten durchrutschen können - schließlich soll der Schirm den Regen ja abhalten!

Underneath the umbrella I've put some stoppers so the raindrops can't fall all the way down - it's an umbrellas job to hold off the rain!


Und das ist einer der tollen Schirme. Ich habe ihn mit Copics coloriert und ihm ein paar fröhliche weiße Punkte verpasst. So bringt er Farbe in den grauen Regentag. 
Der Text ist ebenfalls aus dem tollen Set und hier mit türkisfarbener Farbe passend zum Schirm auf den unteren Teil der Karte aufgestempelt. 

And this is one of the wonderful umbrellas. I've colored it in with Copics and added a few white dots. Now it's bringing some color into a cloudy day.
The saying means "I'lll never leave you standing in the rain" - a german saying for saying you won't let someone down - and is stamped onto the lower part of the card using turquoise ink to go with the color of the umbrella.

Und ja, ich habe auch wieder ein Video für Euch:

And yes, of course I've taken a video for you:


Dienstag, 23. Juli 2019

Uralt...


 Hallo Ihr Lieben!
Nein, nicht ich bin uralt - aber Schildkröten können es werden. Und deswege sind sie beliebte Geburtstagskarten-Motive. So auch auf meiner Karte, die ich heute auf dem Stamping-Fairies Blog zeige. 

Hello everyone!
Turtles can get really old - and that's why they are used for birthday cards. That's what I did on my card that I am sharing over at the Stamping-Fairies Blog today.

Für meine Karte kam hauptsächlich das Sending Sweet Celebration Wishes Stempelset von MFT zum Einsatz. Zuerst habe ich die Luftschlangen verteilt auf weißen Cardstock gestempelt, coloriert und dazwischen noch ein paar Punkte verteilt. Dieses Stück Cardstock habe ich dann schwarz gemattet und auf eine weiße Kartenbasis geklebt.

For my card I've mainly used the Sending Sweet Celebration Wishes stamp set by MFT. First I've stamped the streamers onto a piece of white cardstock, colored them in and added a few dots inbetween them. Then I've put this piece of cardstock onto a slightly larger piece of black cardstock and glued everything onto a white card base.


In die Mitte habe ich dann eine der Elegant Rectangle Stax geklebt, gestanzt aus weißem Cardstock und ebenfalls schwarz gemattet.
Mittig auf dieses Label habe ich das Wort OLD? geklebt - gestanzt mit den Impact Alphabet und den Impact Numbers Stanzen. Die Buchstaben sind aus weißem Cardstock gestanzt und dann mit Distress Oxide Tumbled Glass und Broken China von hell nach dunkel eingefärbt. 
Der Text wird ergänzt durch zwei schwarze Banner, auf die ich Texte aus den Stempelsets Bitty Birthday Wishes und Sassy Pants Birthday Greetings 2 (hier nur einen Teil eines der Texte) mit weißem Embossingpulver aufgebracht habe.
Als Deko kamen hier noch ein paar grüne Enamel Accents zum Einsatz.

In the middle I've added one of the Elegant Rectangles, cut from white cardstock and also matted black.
Onto the middle of the label I've glued the word "OLD?" - die cut using the Impact Alphabet and Impact Numbers die sets. The letters were cut from white cardstock and colored from dark to light using Distress Oxide Tumbled Glass and Broken China.
The word is completed by two strips of black cardstock onto which I've white heat embossed two sayings from the stamp sets Bitty Birthday Wishes and Sassy Pants Birthday Greetings 2 (here just part of one of the stamps).
I've also added some green Enamel Accents here.


Star der Karte ist meiner Meinung nach aber die Schildkröte, ebenfalls aus dem Stempelset Sending Sweet Celebration Wishes. Eigentlich ist sie nur mit Partyhut und Tröte ausgestattet, ich habe den Muffin auf ihrem Rücken hinzumaskiert.
Coloriert habe ich in No Lines Technik mit Polychromos und wie fast immer die Highlights mit einem weißen Gelstift hinzugefügt.

Star of this card, in my opinion, is the turtle, also from the Sending Sweet Celebration Wishes stamp set. Originally she just comes with hat and party blower, I've added the cupcake by doing some masking.
The image was colored without visible stamp lines using Polychromos and as usual I've added the highlights using a white gelly marker.


Montag, 22. Juli 2019

Eine Explosionbox zur Mittelalter-Hochzeit


Hallo Ihr Lieben!
Ich wurde gebeten, eine Explosionbox für eine Mittelalter-Hochzeit zu gestalten. Da die Hochzeit  inzwischen stattgefunden hat, kann ich sie Euch hier auch zeigen.
Die Vorgaben haben mich wirklich vor eine Herausforderung gestellt. Das Thema Mittelalter und Hochzeit zu kombinieren ist ja schon nicht einfach (ich habe nicht einen einzigen Stempel zu diesem Thema finden können!), es gab aber noch ein paar weitere Wünsche, die integriert werden sollten. Aber es ist mir gelungen und alle waren zufrieden.

Hello everyone!
I've been asked to make an explosion box as a gift of a wedding with a medieval theme. Since the wedding has taken place now I can share the box with you.
The wishes of what should be included in the box really challenged me. The combination of medieval and wedding isn't easy per se (I wasn't able to find a single stamp with this theme!). But there were more thing asked to be included. But I made it and everyone was happy.

Die Box an sich ist aus weißem Cardstock gewerkelt, die äußere Seiten habe ich mit hellgrauem Cardstock beklebt, in den ich vorher ein Mauermuster geprägt habe. Um das besser hervorzuheben habe ich Distress Oxide Hickory Smoke aufgewischt.

The box itself is made from white cardstock, I've added some light grey cardstock to the outsides. Before glueing it down I've dry embossed the brick pattern onto it and added some Distress Oxide Hickory Smoke for more contrast.


Um den Deckel habe ich ein paar per Hand geschnittene Zinnen geklebt. Da ich die Außenseite schlicht halten wollte, habe ich nur ein rotes Turmdach mit goldener Fahne oben auf die Box geklebt. Und da das dort etwas verloren stand, habe ich nochmal ein paar Zinnen drumherum geklebt.

I've glued some strips with hand cut battlements to the sides of the lid. Since I wanted to keep the outside simple I've only glued a red turret roof with a golden flag onto the lid. Since that stood there looking some kind of lost I've added some more battlements around it.


Hier ist die geöffnete Box.

This is the opened box.


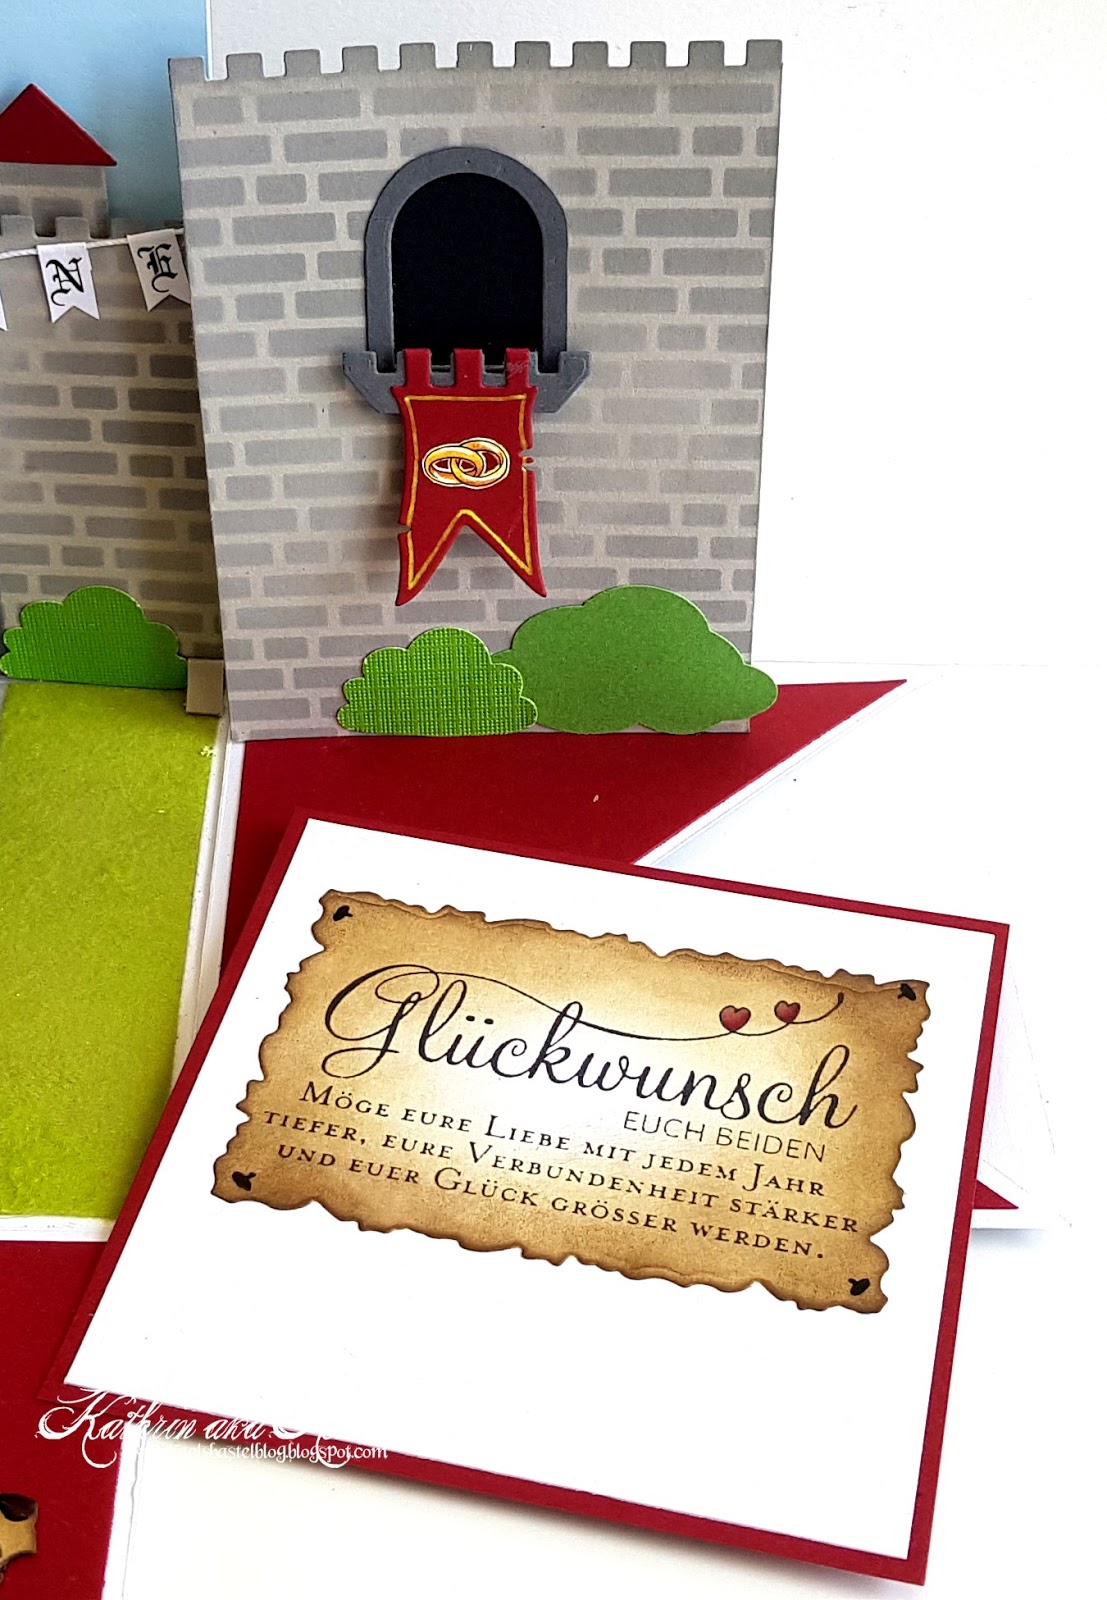
Einer der Wünsche war, dass sich die Box zu einer Burg entwickeln sollte. Äh, ja. Hat mich einiges and Tüftelei gekostet, aber es klappt. Für die Burg habe ich die Castle Stanzen von MFT sowie deren Mauerschablone benutzt. Das Tor ist mit einer Stanze von Magnolia gemacht - eigentlich ein Label, aber das macht ja nichts. Über dem Schlosstor hängt ein Banner mit dem Namen des Brautpaares, aus den Fenster in den "Seitenflügeln" hängen rote Banner mit aufgestickten Eheringen. Beim Öffnen der Box öffnet sich auch die Zugbrücke vor dem Tor.
Am Schloss habe ich noch ein paar Büsche gepflanzt.

One of the wishes was that the box would turn into a castle when it's opened. Well... It took me quite some thinking but it worked. For the castle I've used the Castle die set by MFT and also their brick stencil. The door is made using a label die by Magnolia that works great here. Across the middle part of the caslte there's a banner hanging with the name of bride and groom. The windows of the side parts of the castle are decorated with some banners with golden "stitched on" wedding rings. When the card/box gets opened also the drawbridge in front of the door is coming down.
I've planted some bushes in front of the castle.


Da ich, wie gesagt, keinen Stempel zum Thema Mittelalter-Hochzeit finden konnte, habe ich mich einer Ausmalseite bedient, diese ganz klein ausgedruckt und das Brautpaar ausgeschnitten, coloriert und aufgeklebt.
Den Weg habe ich mit einer Crackling Schablone von  Tim Holtz gemacht, als Gras musste grünes Samtpulver von Martha Stewart herhalten.
Vor dem Brautpaar befindet sich auf alt getrimmtes Banner mit dem Hochzeitsdatum. Fast alle Buchstaben und Texte in der Box sind am PC geschrieben und ausgedruckt.

As mentioned before I wasn't able to find a stamp for a medieval wedding. So I've used a coloring page instead and printed it out really small. Then I've cut out the happy couple, colored it with Copics and glued it onto the middle compartment of the box.
For the path I've used a crackling stencil by Tim Holtz, for the grass on its sides I've used some green flock powder by Martha Stewart.
In front of the banner I've glued an old looking banner with the wedding date printed onto it. Nearly all the letters and texts in this box are computer generated and printed with my homeprinter.


In den Seitenteilen rechts und links sind Taschen eingearbeitet, in denen sich kleine Kärtchen befinden. Eines zum Unterschreiben und eines mit einem aufgeklebten "Plakat" mit aufgestempelten Glückwünschen. Auch das Plakat habe ich mit Distress Ink auf alt getrimmt.

I've included a pocket in eacht the side parts that hold a card each - one to sign and another one with a glued on "poster" with a greeting. Also the poster is turned antique using Distress Ink.


Um das Geldgeschenk in der Box verpacken zu können, wurde auch eine Schatztruhe gewünscht. Die habe ich auf ein kleines Doily geklebt und daneben eine aufgerollte Schriftrolle mit dem Text "zur Hochzeit", Eheringen und etwas Siegelwachs dekoriert.
Neben der Schatztruhe habe ich noch ein paar Blumen aufgeklebt.

To include the gifted money in the box I was also asked to add a treasure chest. I've glued it onto a small doily and put a rolled open letter with a "for your wedding" saying, some wedding rings and some sealing wax next to the chest.
I've also added a few red and white flowers here.


Die Schatztruhe ist aus braunem Cardstock gestanzt und mit Holzmuster bestempelt. Dann habe ich noch aus Goldfolie gestanzte Griffe sowie Metall-Leisten aufgeklebt.
Das Deus Vult war auf der Schatztruhe gewünscht.

The treasure chest was cut from brown cardstock and then I've stamped some wood print onto it. Then I've added the handles and strips both cut from golden mirror cardstock to it.
The banner with printed on "deus vult" was also something I was asked to put on the chest.


Sonntag, 21. Juli 2019

MFT Camp Create Day 5


Hallo Ihr Lieben!
Heute zeige ich Euch meine Karte für Tag 5 des Camp Create von MFT - dem letzten Camptag für Juli. Diesmal steht der Tag unter dem Motto Glitzy Glitter. Was gibt es schöneres als Glitzer? Richtig, Glitzer, bei dem hinterher nicht das ganze Haus aussieht wie ein einziger Weihnachtsbaum. Dazu gibt es im Post-Video ein paar tolle Tips. Die Aufgabe lautet dann, Glitzer auf der Karte unterzubringen.

Hello everyone!ü
Today I am sharing my card made for day 5 of Camp Create by MFT - the last camp day for the month of july. Today's theme is Glitzy Glitter. Is there anything better than glitter? Yes, mess free glitter. I don't want my house to look like one giant christmas tree after making a card. So in today's video they are sharing a few great tips for how to apply glitter mess free. And of course today's challenge is to incorporate glitter on your card.

Ich habe hier eine sommerliche Geburtstagskarte gemacht.
Der Hintergrund besteht aus schwarz gemattetem hellblauem Cardstock, den ich von unten her etwas mit Distress Oxide Broken China eingefärbt habe. So hat man nicht eine einzige platte Fläche. Und in echt sieht die Farbe auch nicht so fleckig aus wie auf dem Foto.
Oben am Himmel habe ich einen Streifen schwarzen Cardstock aufgeklebt, auf den ich mit weißem Embossingpulver einen Text aufembosst habe. 

Here I've made a summer-ish birthday card.
The background is made from light blue cardstock, that I've ink up from the bottom using Distress Oxide Broken China. I didn't like the plain light blue background - and in real life the color isn't as spotty as on the picture. The background was matted black.
To the sky I've added a strip of black cardstock onto which I've heat embossed a text using white embossing powder.


Aus dem blauen Hintergrund habe ich dann die Sonne mit der Sunshine Shaker Stanze ausgestanzt und den ausgestanzten Bereich mit einer Sonne aus leicht glitzerndem hell-goldenen Cardstock wieder gefüllt. 
Damit war das Thema für mich aber noch nicht wirklich umgesetzt. Also habe ich mit den Impact Alphabet Stanzen das Wort Splash aus Glitzercardstock ausgestanzt und mit 3D Pads auf den Hintergrund geklebt. Der Cardstock ist silber mit einem türkis-blauen Touch, was dann perfekt zu den Farben auf meiner Karte passt. Rechts und links habe ich noch Wasserspritzer aus dem Stempelset Rain or Shine aufgeklebt.
Vor die Buchstaben kam eine lange Wellenlinie, für die ich die Stanze aus dem Wiper Card Components Stanzenset benutzt habe. 
Und natürlich dürfen Motive nicht fehlen! Hier habe ich das Nilpferd und das Krokodil aus dem Stempelset Sunshine and Friendship benutzt. Sie sind mit Copics coloriert und ebenfalls mit 3D Pads auf die Karte geklebt. Das Nilpferd schaut so schön entsetzt - sicher, weil es weiß, dass das Krokodil, das gerade ins Wasser springt, es gleich ordentlich nass spritzen wird.
Zum Schluss habe ich noch ein paar klare Glitzerdrops auf der Karte verteilt.

I've die cut the sun from the background using the Sunshine Shaker die and then filled the cut out ares with another sun cut from light golden cardstock with a light shimmer.
But to me that wasn't enough to have the task fullfilled. So I've used the Impact Alphabet dies to cut the word Splash from glitter cardstock and glued the letters onto the background using dimensionals. The cardstock has a silver color with a light turquoise-ish blue touch which goes great with the colors of my card. To both ends of the word I've added two splashes from the Rain or Shine stamp set.
In front of the letters I've glued a die cut wave border made using the die from the Wiper Card Components die set.
And of course my card needed some images. Here I've used the hippo and the crocodile from the Sunshine and Friends stamp set. They were colored in with Copics and attached to the card with dimensionals again. The hippo looks a tad bit horrified - most likely because he knows that the crocodile jumping into the water will splash water allover him in just a second.
In the end I've added a few clear glitter drops to the card.


Und das ist der letzte Badge für Juli. Es wird wohl im August nochmal eine Campwoche geben, und ich hoffe sehr, dass die nicht gerade in unseren Urlaub fällt. Es wäre schade, wenn ich da nicht mitmachen könnte.

And this is the last badge for july. They already announced that there'll be another camp week during august, and I really hope that this won't be held during our vacation. It would be sad if I couldn't attend.


Samstag, 20. Juli 2019

Stempeleinmaleins - Ausgabe vom 20. Juli 2019


Hallo Ihr Lieben!
Heute haben wir beim Stempeleinmaleins eine ganz einfach und doch effektvolle Technik für Euch. Die Direct-to-Paper-Technique. Manchmal ist es das naheliegende so fern: hier werden einfach Stempelkissen direkt auf Cardstock angewendet, um Hintergründe zu gestalten.

Hello everyone!
Over at Stempeleinmaleins we have an easy but so great technique today. It's the direct-to-paper-technique. Sometimes the obvious seems so far away: here you simply use ink pads directly onto your cardstock to create backgrounds.

Ich habe Mini Ink Pads in zwei verschiedenen Türkis- und zwei Grüntönen verwendet und sie bewusst so aufgetragen, dass die Farbe nach rechts ausläuft. So sieht es ein wenig wie Pinselstriche aus. 
Dekoriert habe ich mit dem Stempelset Stempelfreunde von Create a Smile Stamps. Darin ist alles enthalten, was das Bastlerherz erfreut, und fast alles außer einer Schere und den Texten hat es auf meine Karte geschafft. Die Motive habe ich mit Copics coloriert und per Hand ausgeschnitten. Stopp, nicht ganz, für die kleinen Pailetten passte ein kleiner Kreisstanzer perfekt. 

I've used mini ink pads in two different tuquoises and two greens here and put the ink on the paper so it fades out to the right. Now it reminds me of brush strokes. 
I've used the Stamping Friends - I think that's the name of the english version  of the set - by Create a Smile Stamps here. This set contains everything that makes a stamper happy. And beside some scissors and the sayings everything found a place on my card. I've colored the images with Copics and fuzzy cut around them. Well, that's not true, I had a small circle punch that was perfect for the little sequins.


Das Wort "Stempeln" ist aus einzelnen Buchstaben aus den Stanzensets Handlettering Alphabet Lowercase und Alphabet Handlettering Capital Letters, jeweils die größere Variante, von Crafts Emotions gestanzt aus schwarzem Cardstock zusammengesetzt. Mit einem weißen Gelmarker habe ich ein paar Highlights gesetzt. Darunter habe ich ein verbindet, gemacht mit dem Dymo und schwarzem Band, geklebt. 

The big word in the middle means stamping in german. I've die cut the single letter from black cardstock using the Handlettering Alphabet Lowercase and the Alphabet Handlettering Capital Letters die sets, bigger version of each used here. The highlights were made using a white gelly marker. Under the word I've added a "connects" made with my Dymo.


Donnerstag, 18. Juli 2019

MFT Camp Create Tag 4


 Hallo Ihr Lieben!
Tag 4 im Camp Create auf dem MFT Blog ist angebrochen - und der steht unter dem Motto Sensational Sliders. Ja, es geht um Slider Cards. Was ist das Gute daran, wenn man von der Arbeit kommt, der Mann in die Nachmittagsschicht aufbricht und die Kinder beim Ferienjob sind? Richtig - Freie Zeit im Bastelzimmer. Und so habe ich mich gleich an meine Slider Card gesetzt.

Hello everyone!
Day 4 of Camp Create at MFT Blog has arrived - and it's about Sensational Sliders today. Yes, we're talking about Slider Cards here. What's the good thing about coming home from work, hubby has to leave for work shortly after and the girls are out earning some money for trips planned? Right - me time in my craft room! And so I sat down immediately to make my Slider Card.

Ich musste gar nicht lange überlegen, da hatte ich schon die Idee für meine Karte.
Der Hintergrund ist mit den Scene Builder Stempeln und Copics. Die gestempelten Motive habe ich maskiert und mit Distress Oxides Tumbled Glass und Broken China den Himmel gewischt. Darüber habe ich ein Fenster mit Wolke gesetzt. Dafür habe ich die Stanze aus dem Interactive Swing Stanzenset verwendet. Ich habe den Wolkenbereich etwas verkürzt und dafür das Gras unten ein wenig verlängert - Partial Die Cutting sei Dank. 
Mit der Clouds Stencil und Distress Oxide Pumice Stone und Hickory Smoke habe ich die Wolken etwas eingefärbt sowie eine zweite Wolkenreihe hinzugefügt. Darunter habe ich die Bereiche neben und unter dem Fenster passend zu meinem Hintergrund eingefärbt. Für das Gras habe ich Distress Oxide Cracked Pistacchio und Mowed Lawn benutzt.

I didn't have to think long until I got the idea for this card.
The background is stamped using the Scene Builder stamp set and Copics.  I've masked the stamped images and used Distress Oxides Tumbled Glass and Broken China to color the sky. Then I've put the window with the cloud on top of my background. I've used the Interactive Swing die here. Thanks to Partial Die Cutting I've made the cloud area a bit shorter and the grass area larger.
Using the Clouds stencil and Distress Oxide Pumice Stone and Hickory  Smoke I've colored the clouds a bit and added another row of those. I've inked the areas under the clouds matching my background, using Distress Oxide Cracked Pistacchio and Mowed Lawn for the grass.


Die Karte sollte ja eine Slider Card werden - zieht man am Tab, dann kommt hinter den Bäumen eine keine Ente hervorgeflogen, die von der Katze schon sehnsüchtig erwartet wird.


The task was to make a Slider Card - so when you pull the tab a little duck is flying from behind the trees. Seems like it's exactly who the cat's waiting for.

Ich habe ein kleines Video für Euch gemacht:

I've taken a short video for you:


So passt auch der Text aus dem Stempelset Purrfect Friends. Der ist weiß auf schwarzen Cardstock embosst, bannerförmig zugeschnitten und mit 3D Tape auf die Karte geklebt.

Now the saying goes with my card. It's white heat embossed onto a banner cut from black cardstock and then attached to the card with dimensionals.


Und hier habe ich noch ein genaueres Bild der Motive.
Die Katze und die Bäume sind ausgeschnitten und außen auf den Rahmen geklebt. Bevor ich die Katze aufgeklebt habe, habe ich das Gras aus dem Scene Builder Stempelset auf Katze und Hintergrund gestempelt, so dass es so aussieht, als säße die Katze im Gras.
Der Baum mit dem Vogelhaus ist aus dem Picnic Pals Stempelset und mit dem größeren Baum dahinter zusammen maskiert.
Katze, Ente und Schmetterlinge sind aus dem Set Purrfect Friends. Die Schmetterlinge kleben ebenfalls mit 3D Tape auf dem Hintergrund - festgeklebt natürlich erst, nachdem ich sicher gegangen war, dass sie nicht mit der Ente kollidieren.
Die Ente kommt eigentlich aus der anderen Richtung geflogen - damit sie zu meiner Idee passt, musste ich Mirror Stamping machen. Mit einem Stempeltool und dem Mirror Image Stempel klappt das wirklich prima.
Und hier kann man auch erkennen, dass die Ente an einem kleinen Streifen Folie hängt. So konnte ich den Slider Mechanismus unter den Wolken verstecken. Für den habe ich übrigens eine der Stanzen aus dem Set Surf and Turf sowie eines der Slider Elements verwendet. Das sind kleine ovale - oder auch runde - Plastikscheiben, die bereits die perfekte Höhe haben und somit Zeit sparen. Wie genau der Mechanismus hier gemacht ist, ist übrigens im Video des heutigen Camp Create Posts zu sehen.

And here I have a photo of the images.
The cat and trees are cut out and glued to the piece of my card that I've cut the window from. Before glueing down the cat I've stamped the grass from the Scene Builder stamp set onto both the cat and the background so now it looks like the cat is sitting in the grass.
The tree with the birdhouse is from the Picnic Pals stamp set and stamped together with the bigger tree behind it by doing some masking.
Cat, duck and butterflies are from the Purrfect Friends stamp set. I've attached the butterflies to the background using dimensionals - glued down of course after making sure the duck won't collide with them.
The duck originally is flying in the opposite direction - to make it fit my idea I had to do some Mirror Stamping. Using a stamp tool and the Mirror Image stamp that was easy to do.
And here you can see, that the duck is attached to a thin strip of acetate. That gave me the chance to hide the slider mechanism underneath the clouds. To make the slider mechanism I've used one of the slider channels from the Surf and Turf die set and some Slider Elements. Those plastic pieces are perfect in height which saves some time. How this type of card can be made is shown in the video in today's Camp Create post at the MFT Blog.


Und somit habe ich mir auch das 4. Badge verdient.

With this card I've also earned badge #4.