
Hallo Ihr Lieben!
Kennt Ihr diese "was-lange-währt-wird-endlich-gut"-Karten? Diese Karte, die ich heute auf dem Stampcorner Blog zeige, gehört definitiv in diese Kategorie. Aber nachdem sie endlich fertig war, gefiel sie mir richtig gut.
Hello everyone!
Do you know those "sometimes-it-takes-a-bit-longer-to-get-there" kind of cards? This one, that I'm sharing over at the Stampcorner Blog today, definately falls into this category. But once I got it finished I really liked how it turned out.
Auf dieser Karte seht Ihr zwei weitere neue Stempelsets von Stampcorner aus dem April-Release: den Hintergrund und die kleinen Texte. Und an den Stempeln lag es definitiv nicht, dass ich mich hier so schwer getan habe!
Mit Bastelmaterialien ist es ja oft wie mit der Mode - man muss die Sachen nur lange genug aufheben, dann kommen sie wieder in Mode. Ich weiß jetzt nicht, ob Perfect Pearls derzeit "in" sind. Aber die hebe ich seit Jahren auf, ich habe schon öfter überlegt, mich von ihnen zu trennen und es dann doch nicht getan. Und hier war mir dann danach, sie mal wieder zu verwenden. Und da fingen die Probleme an.
Ich habe den tollen Elegant Butterfly von WhimsyStamps mit dem Perfect Pearl Medium Kissen auf weißen Cardstock gestempelt und dann die Perfect Pearls in Pewter, einem irisierenden Grün, einem hellen Türkis und einem hellen Blau aufgetragen. Zum Fixieren habe ich sie mit ein wenig Wasser besprüht und nach dem Trocknen das Motiv deckungsgleich nochmal mit klarem Embossingpulver auf das Perfect Pearl Motiv embosst. Denn eigentlich wollte ich den Cardstock drumherum mit Distress Ink wischen, so dass der Schein der Perfect Pearls perfekt zur Geltung kommt. Also habe ich den weißen Cardstock mit Distress Ink Pumice Stone, Antique Linen, Speckled Egg und Iced Spruce eingefärbt - und es hat mir überhaupt nicht gefallen. Deswegen seht Ihr das hier auch nicht, der Schmetterling wanderte später in den Rundordner unterm Tisch. Durch das Embossingpulver war einfach zu viel des Schimmers verdeckt und das Motiv hat sich nicht mehr vom gewischten Rundherum abgehoben. Zuvor wollte ich das ganze aber noch irgendwie retten. Also habe ich das Motiv noch auf Vellum gestempelt und Perfect Pearls aufgetragen. Nach dem Fixieren mit Wasser, hat sich das Vellum aber so gewellt, dass selbst glattbügeln im Laminator nicht mehr wirklich geholfen hat. Also habe ich nochmal von vorne mit weißem Cardstock angefangen und einfach nur das Motiv mit Perfect Pearls aufgetragen, ohne Farbe drumherum. Und so habe ich es dann gelassen.
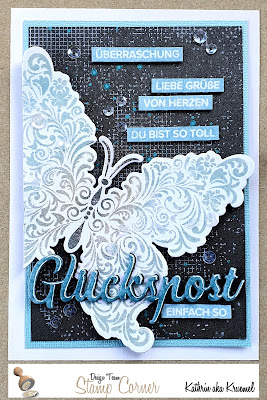
Da ich nun einen hellen Schmetterling hatte, habe ich mich für einen Hintergrund aus schwarzem Schimmer-Cardstock entschieden. Den tollen Hintergrundstempel habe ich mit weißer Stempelfarbe darauf gestempelt und anschließend ein paar türkisfarbene Metallic Watercolor darüber verteilt.
Darauf habe ich dann mit 3D Tape den Schmetterling geklebt. Der ist so groß, dass er nicht komplett auf die Karte gepasst hat. Ich habe ihn rechts und unten ein wenig überstehen lassen, den überstehenden Teil links habe ich bündig mit der Mattung weggeschnitten.
On this card you get a look at the other two new stamp sets from Stampcorner's april release: the background and the tiny texts. And it was definately not due to those stamp sets that I had some trouble with this card!
With some things in our stash it is like fashion - you just have to keep them long enough and they will be trendy again. I have no idea if Perfect Pearls are "in" at the moment, but I have kept mine for such a long time, had thought about selling them quite often but never did it. And now I felt like finally using them again. That's where the problems started.
I used the Perfect Pearls Medium pad to stamp the beautiful Elegant Butterfly image by WhimsyStamps onto white cardstock and then put down the Perfect Pearls in Pewter, an iridescent green, a light turquoise and a light blue. To fix them I lightly misted the image with water and after it had dried, I clear heat embossed the image on top of the one with the Perfect Pearls. Because I had planned to ink up the cardstock with Distress Ink, to really bring out the shine of the Perfect Pearls. So I inked up the white cardstock with Distress Ink Pumice Stone, Antique Linen, Speckled Egg and Iced Spruce - and I really didn't like it. That's also why you don't see this image being used here, I threw it away later. The embossing powder had taken away quite a bit of the shine of the Perfect Pearls and the image wasn't clearly visible on the inked up cardstock. But before throwing it away I had plans to save it. So I did the same Perfect Pearl process on Vellum again, not adding the embossing powder and the ink. But after fixing the Perfect Pearls with water the vellum got so wavy that even running it through my laminator didn't help. So I once again started all over with white cardstock and just added the image and Perfect Pearls, no color, no embossing powder. And that's how I used it.
Since I had ended up with a light butterfly, I decided to go with a background cut from black shimmer cardstock. I used white ink to stamp the great background pattern onto the black cardstock and then spritzed some turquoise metallic watercolor over it.
On top of that I glued the butterfly image, using foam tape. This image is so big, it just didn't fit onto the card completly. I let it overhang a bit on the right and bottom and cut off the overhang on the left side at the edge of the matting.

Hier könnt Ihr den gestempelten Hintergrund und die Farbspritzer besser erkennen. Das Linienmuster ist an mehreren, auch größeren Stellen, unterbrochen, was dem Motiv einen leicht grungigen Touch verleiht.
Bei den kleinen Texten konnte ich mich einfach nicht für einen entscheiden - im Set sind so viele verschiedene! Und genug Platz für mehrere war auf meiner Karte ja auch noch. Ich habe sie mit klarem Embossingpulver - das lag ja eh auf dem Tisch - auf weißen Cardstock embosst und den anschließend mit Distress Ink Speckled Egg eingefärbt.
Die einzelnen Texte habe ich dann ausgeschnitten und mit 3D Tape auf den Hintergrund geklebt.
Here you get a better look at the stamped background and the spritzed on color. The line pattern of this image is broken/missing in several areas of this stamp design, what adds a nice grungy look to it.
I just couldn't decide on just one of those tiny texts - there are so many different ones included in this set. And I had pretty of room left on my card, so I went with "surprise", "greetings", "from the heart" and "you are awesome". I clear heat embossed them onto white cardstock - the clear powder was still sitting on my desk from my attempt of putting embossing powder on top of the butterfly image - and then inked up the cardstock around the embossed texts with Distress Ink Speckled Egg.
I then cut the cardstock into strips and glued those down onto the background, again using foam tape.

Unten auf der Karte war Platz für ein großes gestanztes Wort und einen weiteren kleinen Text.
Das Glückspost habe ich mehrfach aus schwarzem Cardstock gestanzt und diese Teile aufeinander geklebt. Für die oberste Lage habe ich weißen Cardstock mit Speckled Egg eingefärbt, das Wort ausgestanzt und es anschließend mit klarem Embossingpulver überzogen. Die weißen Highlights habe ich mit einem Gelstift auf das geschmolzene Embossingpulver aufgemalt.
Das gestanztes und gestackte Worte habe ich dann auf den Flügel des Schmetterlings geklebt und darunter noch einen weiteren Streifen mit einem "Einfach so" Text aufgeklebt.
At the bottom of the card I had room for a large die cut word and another small text.
The big word means "happy mail", I've die cut it a few times from black cardstock and stacked those. For the top layer I inked up a piece of white cardstock with Speckled Egg, die cut the word from it and then covered it with clear embossing powder. Then I added the highlights with a white gel pen on top of the melted embossing powder.
Then I glued the die cut and stacked word onto the wing of the butterfly and added another small strip with a stamped on "just because" under it.

Und weil der Schimmer der Perfect Pearls schwer einzufangen war, habe ich das hier nochmal schräg gegen das Licht versucht. So sieht man ihn besser, aber immer noch nicht so wunderbar wie in Wirklichkeit.
Den schwarzen Schimmer-Cardstock habe ich dann mit türkisfarbenem, ebenfalls schimmerndem Cardstock gemattet und alles auf einen weißen Kartenrohling geklebt.
Außerdem habe ich noch ein paar klare Pailetten von Simple and Basic auf der Karte verteilt.
And since the shimmer of the Perfect Pearls was once again hard to show on camera I took another picture against the light in an angle. It's visible better here, but still not as bright as in reality.
I matted the black shimmer cardstock with some turuqoise, also shimmery cardstock and glued everything onto a white card base.
I also added some clear sequins by Simple and Basic onto the card.