
In diesem Post möchte ich Euch verschiedene Karte zeigen, die ich mit Stempeln von Scrapbook Forver gemacht habe. Es ist wirklich ein absolut bunter Mix an Themen!
In this post I want to share some cards I made using stamps by Scrapbook Forever - and it's really a wild mix of different themes!

Karte Nr. 1 war eine Geburtstagskarte für einen Mann. Was man mit Silvester-Stempeln nicht alles machen kann.... Auf den schwarzen Cardstock im Hintergrund habe ich mit glitzerndem Embossingpulver explodierende Raketen aufgestempelt. Darauf kam ein Rechteck, auf das ich den Geburtstagshintergrund gestempelt habe.
Card No. 1 was a birthday card for a man. Those New Year's Eve stamps are good for quite a bunch of occasions... Onto the black cardstock I used in the background I've stamped exploding fire works and heat embossed it with glittering embossing powder. Then I've added a rectangle on which I've stamped a birthay texts background.

Die Sektgläser sind mit weißem Pulver auf Vellum embosst. Unter den quasi ausgefüllten Stellen konnte ich gut das 3D Tape verstecken, das ich zum Aufkleben benutzt habe. Quer darüber kam dann noch ein aus silbernem Glitzercardstock ausgestanztes Cheers.
The glasses are heat embossed onto Vellum using white embossing powder. Under those filled in areas I was able to hide the dimensional tape that I used to glue the glasses onto my card. Across I've added a die cut cheers, cut from silver mirror cardstock.

Auch Karte Nr. 2 war eine Geburtstagskarte. Hier habe ich den Hintergrund mit Brushos erstellt und viele kleine Worte, die diverse Wünsche für das neue Lebensjahr darstellen, aufgestempelt.
Also card No. 2 was a birthay card. Here I've used Brushos for the background and added a bunch of different small words that are whishes for the next year to it.

Als Motiv kam die tolle Sonnenblume zum Einsatz Ich habe sie mehrfach abgestempelt, die verschiedenen Blütenblattlagen ausgeschnitten und 3D-mäßig aufeinander gesetzt. So wurde die Blume schön plastisch.
As the image I've used this beautiful sun flower. I've stamped it different times, cut out the different layers of the flower and then used dimensionals to glue it together. That added a wonderful dimension to my card.

Dieses süße Schweinchen zierte Karte Nr. 3. Sofort als ich es sah, wusste ich, dass es in einer Schlammpfütze sitzen muss!
Den Hintergrund habe ich mit Distress Inks und verschiedenen Stanzen kreiert.
This cute piggy is the image I used for card No.3. As soon as I saw it I knew it needed to sit in a puddle!
The background was made using Distress Ink and different dies.

Das Schweinchen ist mit Copics coloriert. Die Flecken habe ich einfach beim Colorieren dazugemalt, die Pfütze ist handgezeichnet.
The pig was colored in with Copics. I've added the spots while coloring it in, the puddle was handdrawn.
Und auch hierzu gibt es ein Video, denn das Schweinchen kann noch mehr:
And also for this card I made a video because this piggy can do more:
Na, wer da nicht mit ihm lachen muss, der ist ein ordentlicher Miesepeter!
Who doesn't have to laugh with this piggy must be in a really bad mood!
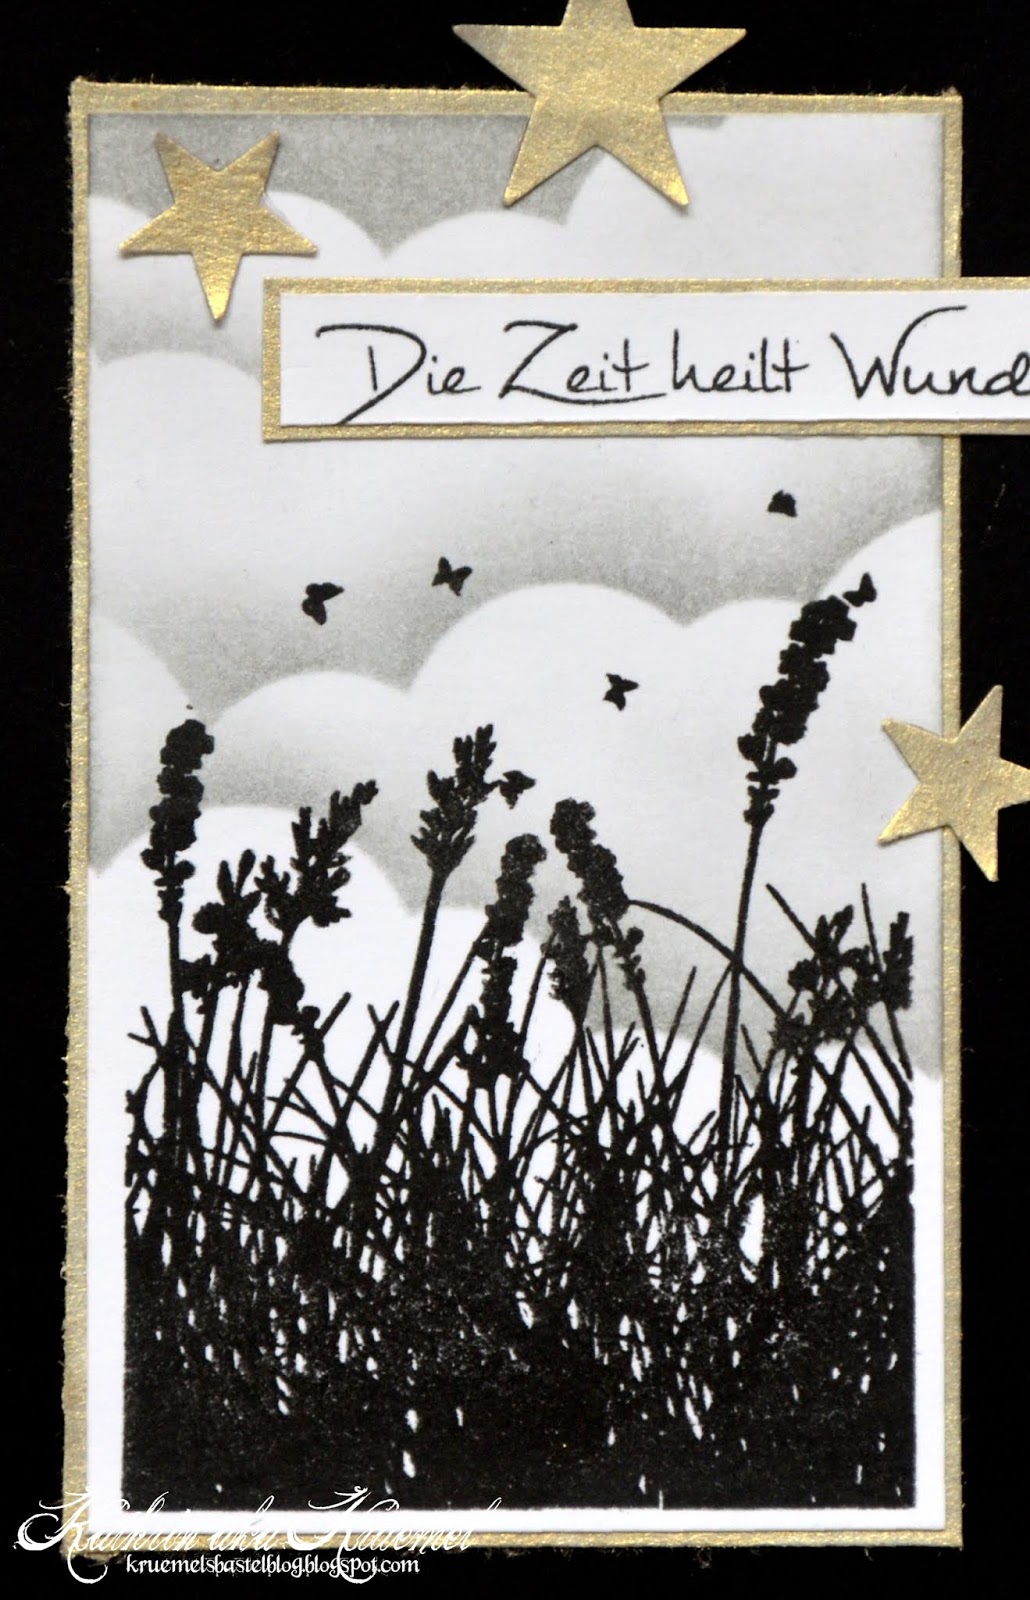
 Karte Nr. 4 war eine Trauerkarte - muss leider auch mal sein. Ich hatte Cardstock mit Enchanted Gold Gilding Polish eingefärbt und zum Matten sowie für die Sterne genommen. Ich finde, die passen da gut hin, wobei da die Meinungen geteilt waren.
Card No.4 was a sympathy card - sadly also those cards are needed from time to time. I've covered cardstock with Enchanted Gold Gilding Polish and used this for the matting and the stars. I think the stars look good here, but not everyone was with me there.

Das Motiv habe ich einfach abgestempelt und im Hintergrund ein paar graue Wolken hinzugefügt.
The image was simply stamped and I've added a few grey clouds to the background.


Das Motiv, das ich auf einen Kreis aus weißem Cardstock geklebt habe, ist mit Copics coloriert. Die Zuckerstreusel habe ich durch Enamel Accents ersetzt und die Schoolade dick mit Glossy Accents überzogen, damit sie lecker glänzt.
The image, glued onto a circle from white cardstock was colored with Copics. I've replaced the sprinkles with Enamel Accents and covered the chocolat with a layer of Glossy Accents to make it shine.

Und hier habe ich versucht, mal den Schimmer des Gilding Polish einzufangen....
Here I've tried to catch the shimmer of those Gilding Polish on photo....

Karte Nr. 6 dreht sich um die Einschulung. Für mich ist das Thema ja eigentlich zum Glück längst durch - da steht nächstes Jahr dann das Abi an. Aber meine kleine Nichte wird dieses Jahr eingeschult, was es für mich dann irgendwie doch wieder aktuell macht.
Ich habe hier ein Klassenzimmer nachgestellt. Irgendwie kann ich mich nur an gelb gestrichene Klassenzimmer erinnern, also ist das auch in "meinem" Klassenzimmer so.
Das Pult der Lehrerin ist schon für den Unterricht bereit. Ich habe hier den Tisch von Magnolia genutzt (leider muss die Lehrerin stehen) und einige der Accessoires-Stempel von Scrapbook-Forever darauf verteilt.
Card No.6 was albout first day of school. Luckily this time has long passed for me - we are having graduation next year. But my little niece will have her very first day of school this year and that makes this theme somehow interesting to me again.
Here I've created a classroom. When I think back I only remember yellow painted walls so that's what I've chosen for this room as well.
The teacher's desk is already set up for the first lessons. I've used a table die by Magnolia here and put different school accessoires by Scrapbook Forever on it. It's a shame that I didn't think of a chair for the teacher.

Auf die Tafel hat die Lehrerin einen Willkommensgruß geschrieben und darüber ein Banner mit den ersten Buchstaben des ABC aufgehängt. Ich weiß noch, dass in der ersten und zweiten Klasse die Buchstaben an den Wänden hinten. Hier hat die Lehrerin Sterne dazwischen gepackt.
The teacher wrote some encouraging words on the board and hung up a banner with the first letters of the alphabet. I remember that we had the letters hanging on the wall during first and second grade. Here the teacher put some stars in between.

Und bei Karte Nr. 7 - und der letzten für heute - wird es maritim. Ich wollte hier den Look von verwittertem Holz nachmachen. Darum habe ich braunen Cardstock erst geprägt un dann mit türkisfarbenem Gilding Polish bestrichen. Mir gefällt das sehr gut! Hinter diese Bretterwand kamen dann weiterer Cardstock, eine ausgestanzte Uferpflanze und etwas Cheesecloth.
And with card No. 7 - the last one for today - we're getting maritime. I wanted to create the look of wood that has been laying on a beach and in the water for quite some time. So I've taken a piece of brown cardstock, dry embossed it with a wooden pattern and then added turquoise Gilding Polish. I really like how this turned out. Behind this wooden wall I've put more cardstock, a die cut plant and some cheesecloth.

Für die Muschen habe ich das selbe türkisfarbene Polish auf weißen Strukturcardstock aufgetragen und dann die Motive mit weißem Pulver darauf embosst. So sind die äußeren Linien gut erkennbar aber nicht zu hart.
For the shells I've covered some white cardstock with a linnen structure with the same turquoise polish. Then I've heat embossed the shells on it using white embossing powder. Now the lines can easily be seen but aren't too extreme.

Den Text habe ich dann mit zart-goldenem Embossingpulver embosst.
Who doesn't have to laugh with this piggy must be in a really bad mood!

Card No.4 was a sympathy card - sadly also those cards are needed from time to time. I've covered cardstock with Enchanted Gold Gilding Polish and used this for the matting and the stars. I think the stars look good here, but not everyone was with me there.
Das Motiv habe ich einfach abgestempelt und im Hintergrund ein paar graue Wolken hinzugefügt.
The image was simply stamped and I've added a few grey clouds to the background.

Karte Nr. 5 war wieder eine Geburtstagskarte. Hier habe ich den Hintergrund erst geprägt und dann die erhabenen Stellen mit Gilding Polish betont. Das schimmert so toll! Auf diesen Hintergrund kam dann wieder ein Rechteck, in dass ich wieder die Glückwünsche gestempelt habe.
Card No.5 was another birthday card. Here I've dry embossed the background and then highlighted the raised areas with Gilding Polish again. The shimmer is just amazing! Then I've added another rectangle on which I've stamped the birthday texts again.

Das Motiv, das ich auf einen Kreis aus weißem Cardstock geklebt habe, ist mit Copics coloriert. Die Zuckerstreusel habe ich durch Enamel Accents ersetzt und die Schoolade dick mit Glossy Accents überzogen, damit sie lecker glänzt.
The image, glued onto a circle from white cardstock was colored with Copics. I've replaced the sprinkles with Enamel Accents and covered the chocolat with a layer of Glossy Accents to make it shine.

Und hier habe ich versucht, mal den Schimmer des Gilding Polish einzufangen....
Here I've tried to catch the shimmer of those Gilding Polish on photo....

Karte Nr. 6 dreht sich um die Einschulung. Für mich ist das Thema ja eigentlich zum Glück längst durch - da steht nächstes Jahr dann das Abi an. Aber meine kleine Nichte wird dieses Jahr eingeschult, was es für mich dann irgendwie doch wieder aktuell macht.
Ich habe hier ein Klassenzimmer nachgestellt. Irgendwie kann ich mich nur an gelb gestrichene Klassenzimmer erinnern, also ist das auch in "meinem" Klassenzimmer so.
Das Pult der Lehrerin ist schon für den Unterricht bereit. Ich habe hier den Tisch von Magnolia genutzt (leider muss die Lehrerin stehen) und einige der Accessoires-Stempel von Scrapbook-Forever darauf verteilt.
Card No.6 was albout first day of school. Luckily this time has long passed for me - we are having graduation next year. But my little niece will have her very first day of school this year and that makes this theme somehow interesting to me again.
Here I've created a classroom. When I think back I only remember yellow painted walls so that's what I've chosen for this room as well.
The teacher's desk is already set up for the first lessons. I've used a table die by Magnolia here and put different school accessoires by Scrapbook Forever on it. It's a shame that I didn't think of a chair for the teacher.

Auf die Tafel hat die Lehrerin einen Willkommensgruß geschrieben und darüber ein Banner mit den ersten Buchstaben des ABC aufgehängt. Ich weiß noch, dass in der ersten und zweiten Klasse die Buchstaben an den Wänden hinten. Hier hat die Lehrerin Sterne dazwischen gepackt.
The teacher wrote some encouraging words on the board and hung up a banner with the first letters of the alphabet. I remember that we had the letters hanging on the wall during first and second grade. Here the teacher put some stars in between.

Und bei Karte Nr. 7 - und der letzten für heute - wird es maritim. Ich wollte hier den Look von verwittertem Holz nachmachen. Darum habe ich braunen Cardstock erst geprägt un dann mit türkisfarbenem Gilding Polish bestrichen. Mir gefällt das sehr gut! Hinter diese Bretterwand kamen dann weiterer Cardstock, eine ausgestanzte Uferpflanze und etwas Cheesecloth.
And with card No. 7 - the last one for today - we're getting maritime. I wanted to create the look of wood that has been laying on a beach and in the water for quite some time. So I've taken a piece of brown cardstock, dry embossed it with a wooden pattern and then added turquoise Gilding Polish. I really like how this turned out. Behind this wooden wall I've put more cardstock, a die cut plant and some cheesecloth.

Für die Muschen habe ich das selbe türkisfarbene Polish auf weißen Strukturcardstock aufgetragen und dann die Motive mit weißem Pulver darauf embosst. So sind die äußeren Linien gut erkennbar aber nicht zu hart.
For the shells I've covered some white cardstock with a linnen structure with the same turquoise polish. Then I've heat embossed the shells on it using white embossing powder. Now the lines can easily be seen but aren't too extreme.

Den Text habe ich dann mit zart-goldenem Embossingpulver embosst.