Hallo Ihr Lieben!
Auf dem MFT Blog ist derzeit Summer School. Fünf Tage, fünf Themen und Videos - und fünf Karten zu machen, zu jedem Thema eine.
Irgendwie kommen die immer mit solchen Aktionen, wenn ich gerade Luft habe. Und so habe ich alle Themen "abgearbeitet" und darf mir nur das Banner holen, dass ich die Summer School abgeschlossen habe:
Sommer School is held right now over at MFT Blog. Five days, five themes and videos - and five cards to make, one for each theme.
Somehow they seem to know when I have enough time to make something for such an event. And so I've made a card for each theme and am allowed to post the Summer School graduation pic here on my blog:
So, und jetzt möchte ich Euch die Karten zeigen, die ich gemacht habe.
Die Themen sind alle ziemlich einfach, aber manchmal braucht man genau das - and die Grundlagen des Kartenmachens erinnert werden.
And now I want to share the cards I've made.
The themes are pretty basic, but sometimes that's exactly what you need - remember for the basics of card making.
Thema Nr. 1 war "white space", also weiße Stellen. Es geht darum, die Karte nicht vollzupacken sondern viel weiß zu lassen, so dass das Motiv wirken kann. Dazu gibt es noch ein paar tolle Tricks - wie zu quasi jedem Thema.
Diese Karte war für mich die schwierigste - so weiße Stellen gibt es bei mir ja eher selten. Und ich bin dann auch nicht 100 % zufrieden. Die Wellen habe ich noch aufgewischt, als der Rest schon zusammengesetzt war. So finde ich sie zumindest etwas besser.
Die Fische und Texte sind aus dem Stempelset Gill Friends, die Ballons von den Adorable Elephants. Ein paar silberne Pailetten habe ich auch noch mit aufgeklebt.
Der Text ist weiß auf schwarzen Cardstock embosst.
Theme No.1 was "white space". It's about leaving the biggest part of your card empty/undecorated. They also have a few great tipps about how to arrange things on your card.
Well, this was the hardest theme for me - I don't have white spaces on my cards very often. And so I am not entirely happy with this card. I've added the waves after everything else was already glued down and like it a tad bit better now.
Fish and saying are from the Gill Friends set, the balloons come with the Adorable Elephants. I also allowed myself to put a few silver sequins onto my card.
The text was heat embossed with white embossing powder onto black cardstock.
Auch Thema Nr. 2 war noch eine Herausforderung für mich - "primary colors", also die Grundfarben blau, rot und gelb. Auch nicht unbedingt eine Kombo, die ich oft verwendet. Aber mit den passenden Motiven geht das dann schon leichter.
Auf die Karte hätte ich außer den Pailetten gerne noch irgendwas gepackt, aber irgedwie passte nichts so richtig. Darum habe ich hier Thema Nr. 1 fast nochmal mit umgesetzt. ;)
Also theme No. 2 was a challenge for me - primary colors. I don't use only blue, yellow and red on one card often. But when you pick the right images.... ;)
I'd have loved to add something to the card base besides the sequins, but somehow nothing really fitted. And so I nearly used theme No. 1 again here.
Und das ist mein Motiv. Im Hintergrund habe ich Wolken direkt auf die Kartenbasis gewischt. Der Rahmen ist mit 3D Tape aufgeklebt. Im Rahmen befindet sich dann eine Strandszene mit Wasserball, Krebs und Sonnenschirm samt darauf sitzender Möwe.
Und ich dachte mir, zu diesem Thema könnte die No Line Technik ganz gut passen. Durch die fehlenden schwarzen Linien stechen die Farben irgendwie noch mehr ins Auge.
And this is my image. In the background I used a stencil to add the clouds directly onto my card base. The frame was added using dimensionals. In the frame I've created a beach scene with a ball, crab and umbrella with a seagull sitting on it.
I think the no lines technique goes great with this theme. Since the black lines are missing the colors get even more attention.
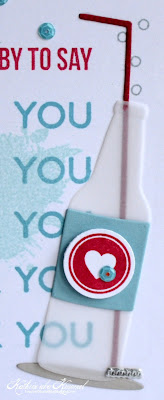
Thema Nr. 3 fand ich wiederum einfach umzusetzen: "repetition", also Wiederholung. Es geht darum, ein Element auf der Karte mehrfach zu wiederholen. Ich habe mich dafür entschieden, das Thank You mehrfach aufzustempeln.
Farblich habe ich mich hier für hellblau und Himbeere entschieden. Damit sich die erste Zeile im Text - der komplett aus Stempeln des Soda Pop Stempelsets gemacht ist - abhebt, habe ich hier himbeerrote Tinte verwendet, das Thank You ist dann in hellblau mehrfach abgestempelt. Darunter habe ich mit noch hellerer blauer Tinte einen der Stempel aus dem Set Distressed Patterns aufgestempelt.
Ein paar blaue Pailetten sind alles, was ich an Embellishments benutzt habe.
Theme No. 3 was pretty easy for me: repetition. It's about repeating an element on your card several times. I've decided to stamp a few Thank Yous on my card.
Colorwise I went with light blue and a raspberry red. To make the first line of the text look different than the other lines at a first look I've used a raspberry red ink here. For the Thank Yous I've used light blue ink. Both lines are from the Soda Pop stamp set. Under the Thank Yous I've added one of the stamps from the Distressed Patterns stamp set, using an even lighter blue ink.
A few blue sequins were everything I needed regarding embellishments.
Aber natürlich darf ein ausgestanztes Motiv nicht fehlen. Ich habe eine der Soda Pop Bottles aus Vellum ausgestanzt. Das Label ist aus blauem Cardstock und mit einem Kreis mit Herz und einer Pailette dekoriert. Unter dem Label kann man gut den Kleber verstecken, der sonst durch das Vellum hindurchscheinen würde.
Der Strohhalm, gestanzt aus rotem Cardstock (ich habe zwei Stück hintereinander geklebt, damit er oben schön weit aus der Flasche schaut und trotzdem bis zum Boden reicht), ist direkt auf die Karte geklebt.
Unten habe ich dann noch einen der Kronkorken aus dem selben Set aufgeklebt und damit die Flasche nicht so in der Luft hängt, habe ich noch einen der Oval Shadows daruntergeklebt.
Of course I needed a die cut image here. I used one of the Soda Pop Bottles and cut it from Vellumm. The label is cut from blue cardstock and decorated with another round label and a sequin. The label is good to hide the glue which you use to glue the bottle onto the card - otherwise it would show through the Vellum.
The paperstraw, cut from red cardstock (acutally I've cut two and let them meet under the label so the straw is a lot more longer than the bottle and still meets its bottom), is glued directly onto the card.
I've also added a bottle cap and one of the Oval Shadows so it doesn't look like the bottle is floating in the air.
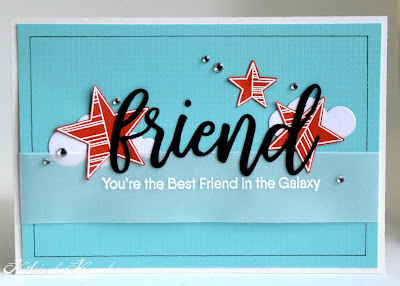
Bei Thema Nr. 4 drehte sich dann wieder alles um Farben - diesmal "complementary colors", Komplementärfarben. Da mir die Basiskombinationen - blau/orange, rot/grün bzw. lila/gelb - nicht so doll gefallen haben, habe ich mir ein Farbrad angeschaut. Türkis und rot-orange sind mir da dann sofort ins Auge gefallen - und die habe ich dann auch benutzt.
Die Sterne aus dem Stars Above Set sind weiß auf rot-orangenen Cardstock embosst. Den Text aus dem Stempelset Anything But Basic Friendship habe ich auf Vellum embosst.
Der Vellumstreifen kam zuerst quer über die türkisfarbene Karte, die Sterne habe ich darauf angeordnet und quer darüber ein aus schwarzem Cardstock gestanztes Friend geklebt. Zwei Puffy Clouds habe ich auch noch mit untergebracht. Und zum Schluss ein paar Glitzersteine auf der Karte verteilt.
Die Karte ist wirklich einfach, aber mir gefällt sie total gut.
Theme No. 4 was about colors again - "complementary colors" this time. Since I didn't like the mentioned basic ones - blue/orange, red/green and purple/yellow - I looked at a color wheel. Turquoise and a reddish orange immediately catched my eye - and these are what I've used.
The stars from the Stars Above set are heat embossed with white embossing powder onto reddish orange cardstock. The saying from the Anything But Basic Friendship set is heat embossed onto Vellum.
First I've put the Vellum across my turquoise card base, then added the stars and on top of these, across my card, a die cut friend. Two of the Puffy Clouds went under the stars and I've added a few little rhinestones.
This card is pretty simple but I really like how it turned out.
Und hier ist noch meine Karte zum 5. und letzten Thema: "symmetrie". Es geht darum, die Elemente der Karte an einer - gedachten - horizontalen oder vertikalen Linie auszurichten.
Ich habe oben und unten jeweils einen Streifen Designpapier unter den weißen Aufleger mit den Motiven geklebt. Auf dem weißen Cardstock habe ich Sonnenstrahlen aufgewischt, so angeordnet, dass die Sonne oben mittig über der Karte stehen muss.
And here is my card for the 5th and last theme: "symmetrie". It's about symmetrically arranging your elements using a - mental - horizontal or vertical line.
I've added a strip of designer's paper to the bottom and top of my white cardstock to which I've added the images. Then I used yellow ink to add the sun rise, arranged so that the sun must be over the top middle of my card.
Der Pilz und die süßen Schnecken aus dem You Gnome Me Stempelset sind ausgeschnitten und direkt auf die Karte geklebt, darüber kam ein Stück grüner Cardstock, den ich mit einer der Grassy Hills Stanzen ausgestanzt habe.
Das Hello ist aus dem Stempelset Label Maker Love, darunter, leicht überlappend, habe ich ein aus rotem Cardstock ausgestanztes Sunshine geklebt. Mit einem weißen Gelmarker habe ich ein paar Highlights hinzugefügt.
Und damit die Motive nicht so pyramidenförmig angeordnet sind, habe ich ganz unten noch ein kleines ausgestanztes Herz mit aufgeklebt.
The mushroom and the cute snails are from the You Gnome Me stamp set. I've cut them out and glued them onto my card. Then I've added a strip of green carstock, cut with one of the Grassy Hills dies.
The Hello is from the Label Maker Love stamp set, underneath, overlapping a bit, I've added a die cut word sunshine, cut from red carstock. I used a white gelly marker to add a few highlights.
And since the images were kind of looking like a pyramide I've added a tiny red heart at the bottom of the images.


