

Hallo Ihr Lieben!
Am Dienstag habe ich Euch ja bereits meine Weihnachtstags von letztem Jahr gezeigt. Nun, ich gebe zu, dass ich in diesem Post nur die halbe Wahrheit gesagt habe. Bei Tags arbeite ich gerne in Batches, mache also den gleichen Schritt immer mehrfach bevor ich zum nächsten übergehe. Schließlich brauche ich davon ja dann doch eine ganze Menge. Trotzdem mache ich nicht immer alle Tags auf einmal, denn dann wird es das absolute Chaos auf meinem Tisch, ich arbeite also immer nur an etwa 6 Tags auf einmal. Bei den hellblauen Tags habe ich dann nach der Fertigstellung des ersten Schwungs festgestellt, dass es für die Anzahl, die ich brauchte, einfach zu aufwändig war. Und so habe ich umgeschwenkt und stattdessen noch drei weitere Tagvarianten gestaltet - darunter auch eine abgewandelte Möhren-Variante. Und diese Tags zeige ich Euch heute.
Hello everyone!
Tuesday I've shown you the tags I made for last christmas. Well, I have to admit that I only told you half the truth in that post. I like to work in batches when making cards, doing the same step several times before moving on to the next. I really need a lot of tags! But if I'd make all of those tags at once the mess on my table would be uncontrollable. So most times I finish about 6 and then start all over. After finishing the first 6 of those light blue tags I realized that they were so time comsuming that I wouldn't be able to finish them in time. And so I changed the design and made 3 more types of tags, including a changed version of the carott one. And these tags I'm sharing with you today.

Ich starte mit der abgewandelten Möhren-Version. Die Basis für alle diese Tags habe ich diesmal aus einem Cardstockstreifen gemacht, den ich am oberen Rand mit einer Stanze in ein Tag verwandelt habe.
Die Möhre habe ich diesmal von meiner Cameo schneiden lassen - die Form gefällt mir einfach besser. Das selbe gilt für die Nikolausmütze. Für das Grün habe ich wieder die Farnstanze von Spellbinders benutzt. Die Möhre ist mit Distress Ink Rusty Hinge gewischt, das Grün mit Peeled Paint.
Das Möhri habe ich mit dem Alphabet and Numbers Stanzenset von MFT aus orange-braunem Spiegelcardstock gestanzt und aufgeklebt.
Auf den Bommel der Nikolausmütze habe ich einen weißen PomPom geklebt, oben am Tag habe ich eine orange-braune Schleife angebracht. Außerdem habe ich den Tag mit einem goldenen Glitzer-Gelpen von Sakura umrandet.
I start with the changed version of the carrot tag. I've made all of these tags from a strip of cardstock and used a punch to turn the top edge into a tag.
This time I used my Cameo to cut the carrot - I like this shape better. I also used my Cameo for the Santa's hat, for the greens I used the same fern die by Spellbinders. I've inked the edges of the carrot with Distress Ink Rusty Hinge, the greens are inked with Peeled Paint.
To die cut the letters for the word möhri I used the Alphabet and Numbers die set by MFT and die cut them from some orange-brown mirror cardstock.
I glued a white pompom on the tip of the hat and added a brown-orange bow to the top of the tag. I also used a golden glitter gel pen by Sakura to add a frame around my tags.
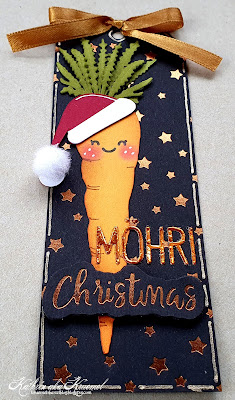
Im Hintergrund habe ich mit der Celestial Stars Hotfoil Plate von Spellbinders Sterne auf den Tag foliert und dafür braun-orange Folie verwendet.
Mit derselben Folie habe ich auch das Christmas auf schwarzen Cardstock foliert. Dafür habe ich die Merry Christmas Hotfoil Plate von Gemini benutzt. In diesem Set ist auch eine Stanze enthalten, die das Wort dann gleich ausstanzt. Das Merry links daneben habe ich nicht mit foliert - ich habe einfach die Folie nur unter das Christmas gelegt - und nach dem Ausstanzen den überstehenden Cardstock per Hand weggeschnitten. Dann habe ich den Text mit 3D Tape auf den Tag geklebt.
In the background I foiled some stars onto the tags, using the Celestial Stars Hotfoil Plate by Spellbinders and some orange-brown foil.
I used the same foil to foil the word christmas onto some black cardstock. I used the Merry Christmas hotfoil plate by Gemini here. There's also die in this set, that cuts out the foiled words. I didn't foil the word merry - I simply only placed foil under the word christmas - and after cutting the word out I cut off the cardstock to the left of the word christmas by hand. Then I glued it down with dimensionals.

Die zweite Tagvariante war mit Rentier und aus weißem Cardstock.
Das süße Rentier habe ich mit der Build a Reindeer Stanze von XCut gestanzt. Auf die zweite Lage des Geweihs und auch die darin aufgehängten Christbaumkugeln habe ich verzichtet.
Für die Nase habe ich eine Kugel aus Watte benutzt. Da hatte ich aber nur weiße im Haus. Also habe ich sie mit roter Alcohol Ink eingefärbt - geht prima, ist aber eine große Sauerei. Nachdem die Kugeln getrocknet waren, habe ich sie auf das Rentier geklebt.
Unter dem Kopf des Rentiers, wofür im Stanzenset ein Schal enthalten ist, habe ich eine kleine Schleife mit Glöckchen aufgeklebt.
Der Text hier besteht aus einem Teil eines Stempels aus dem Set Jingle all the Way von CraftEmotions, das ich mit dem Lobster Stempelkissen von LawnFawn gestempelt habe. Ergänzt habe ich den Text durch ein kleines all the way, das ich mit einem Stempel von StudioG und mit schwarzer Tinte gestempelt habe.
Zum Schluss habe ich den Tag noch mit einem roten Fineliner umrandet.
Tag #2 was made from white cardstock and had a reindeer on it.
I used the Build a Reindeer die set by XCut to die cut the cute reindeer. I didn't use the second layer of the antlers and the baubles, that can be hung into the antlers.
For the nose I used a cotton ball. I only had white ones at home so I colored them with red alcohol ink. Worked great, but really was a huge mess! After the balls had dried I glued them onto the reindeer.
Under the reindeer, where there should be die cut scarf that's also included in the die set, I added a little bow with a tiny bell tied to it.
For the text I used part of a stamp from the Jingle all the Way stamp set by CraftEmotions, that I stamped with the Lobster ink pad by LawnFawn. Then I finished the text with a little all the way by StudioG, stamped with black ink.
In the end I used a red fineliner to draw a frame around my tag.

Und die dritte Variante ist wieder in schwarz und foliert.
Diesmal habe ich den schwarzen Cardstock mit der Diagonal Stripes Hotfoil Plate von PinkFresh und silberner Hologramm-Folie foliert.
Der süße Weihnachtsmann ist mit der Santa Peeking Stanze von Cottage Cutz gemacht, auch hier habe ich wieder einen weißen PomPom als Bommel verwendet.
Aus rotem Cardstock habe ich ein HO³ ausgestanzt und als Text aufgeklebt. Die Buchstaben sind mit dem Impact Alphabet Stanzenset von MFT gemacht, für die kleine 3 habe ich das Confetti Numbers Set benutzt.
And here's my tag version #3 - this one's made from black cardstock again and also foiled.
This time I foiled some stripes with the Diagonal Stripes Hotfoil plate by PinkFresh onto the black cardstock, using some silver holographic foil.
The cute Santa is made with the Santa Peeking die cut by Cottage Cutz, again I used a white pompom at the tip of the hat.
From red cardstock I've die cut a HO³ and glued it down as the text. I've die cut the letters with the Impact Alphabet die set by MFT, for the small 3 I used the Confetti Numbers die set.

Auf diesem Bild könnt Ihr das Holografische der Foilie viel besser sehen.
Zum Schluss habe ich eine große Schleife aus rotem Organza gebunden und oben am Tag aufgeklebt.
On this picture you get a way better look at the holografic foil.
In the end I glued a big bow, tied from red organdy ribbon, to the top edge of my tag.
So, und damit bin ich jetzt aber erstmal wirklich durch mit dem Thema Weihnachten!
And now I'm really done with christmas for a few months!