Samstag, 30. November 2024

Brav gewesen?

 
Hallo Ihr Lieben!
Mit der heutigen Karten machen wir schon mal einen Ausflug Richtung Nikolaus. 

Hello everyone!
With today's card we are making a little trip towards St. Nick's day. 

Im Hintergrund habe ich erst ein Stück weißen Cardstocks mit dem HoHoHo-Folder von Nellie Snellen geprägt. Der ist zwar 15 x 15 cm groß, beim Prägen reicht er aber trotzdem nicht über den kompletten Cardstock und so ist oben und unten ein Streifen ohne Prägung geblieben. Nachschieben und nochmal Prägen ist hier leider auch keine Option und ich hadere noch mit mir, ob ich ihn zerschneiden soll.... Mal sehen, hier aber habe ich aber beschlossen, mit den Streifen leben zu können.
Den Hintergrund habe ich dann mit Distress Oxide Barn Door, Aged Mahogany und Ground Espresso gewischt. Die Mischung aus Aged Mahogany und Ground Espresso ist irgendwie ins Lila gekippt, was aber erst so richtig aufgefallen war, als die Farbe komplett trocken war, und da war ich schon mitten im Dekorieren. 
Auf den Cardstock habe ich noch goldene Metallic Watercolor aufgespritzt.

In the background I dry embossed a piece of white cardstock with the HoHoHo folder by Nellie Snellen. This is 6" x 6" large, but it still isn't enough to emboss a whole card front and so I was left with an unembossed strip at the top and bottom. Moving it in the folder and putting it through the BigShot again wasn't an option either and I still haven't decided, if I want to try and cut it apart... We'll see, but here I decided to accept those strips.
I inked the embossed cardstock with Distress Oxide Barn Door, Aged Mahogany and Ground Espresso. The mix of Aged Mahogany and Ground Espresso turned into purple, but it wasn't noticable until the ink had dried fully. And then I was already in the middel of decorating it.
Onto the cardstock I splattered some gold metallic watercolor.
 

 Auf der Karte befindet sich ein großer Nikolaus-Stiefel, den der Nikolaus schon mit allerhand Leckereien gefüllt hat. Der Stiefel ist mit einem Stanzenset gemacht, das eigentlich einen Shaker stanzt. Ich habe hier nur die hintere Lage benutzt und sie mit Distress Ink Ground Espresso etwas schattiert. Die Sohle und die Falten habe ich dann mit Copics hinzugefügt. Die Schnalle auf dem schwarzen Gurt ist aus goldenem Spiegelcardstock gestanzt.
Rund um den Stiefel liegen ein Apfel, ein Lebkuchen, eine Zuckerstange und einige Nüsse, die ich allle mit verschiedenen Stanzen gemacht und ebenfalls mit Distress Inks schattiert habe. Auf den Lebkuchen habe ich mit weißer Plusterfarbe - ohne sie später aufzupllustern - eine Zuckergusslinie aufgemalt und auch die Nüsse haben einige Details mit einem weißen Gelstift erhalten.
Der Text ist aus dem Brav-Stempelset von Create a Smile. Ich habe ihn mit goldener Metallic-Tinte auf schwarzen Cardstock gestempelt und ausgeschnitten.

There's a large boot on the card, that St. Nick has already filled with all kinds of yummy treats. I made the boot using a die set, that originally creates a bootshaped shaker. I only used the back layer and shaded it with Distress Ink Ground Espresso. I added the sole and the details with Copics. The buckle on the black belt is die cut from gold mirror cardstock.
Around the boot there are an apple, a gingerbread cookie, a candy cane and some nuts, that I made using all kinds of different dies, then also shaded the pieces with Distress Inks. I used a puff pen - without puffing it later -  to draw some icing onto the cookie and also added some details to the nuts with a white gel pen.
The text means "have you been nice?" and is stamped with gold pigment ink onto black cardstock, then I cut it out.


Oben in den Pelzrand am Stiefel habe ich einen Schlitz geschnitten, um den Stiefel so zu füllen. Hier steckt ein Lebkuchenmann, eine weitere Zuckerstange, einige Tannenzweige und natürlich ein Schokoweihnachtsmann. 
Der Weihnachtsmann ist mit der Schoko-Weihnachtsmänner Stanze von Charlie und Paulchen gemacht. Ich habe hier die größere der beiden Stanzen im Set benutzt, sie aus weißem Cardstock gestanzt und mit Copics coloriert. Zuerst wollte ich ihn aus rotem Cardstock stanzen und nur einige Details mit einem weißen Gelstift und Copics nachmalen, das hat aber nicht wirklich geklappt und das rote Gesicht des Nikolauses sah doch sehr eigenwillig aus. Also habe ich mich für weißen Cardstock entschieden.
Die Tannenzweige habe ich jeweils drei Mal aus hell-, mittel- und dunkelgrünem Cardstock gestanzt und aufeinander geklebt, damit sie schön buschig wirken. 
Und die Zuckerstangen haben eigentlich einen Rand - je nachdem, aus welchem Cardstock man die obere Lage stanzt. Das hat mir aber nicht gefallen und ich habe die Streifen ausgeschnitten. Deswegen sehen die Zuckerstangen hier auch unterschiedlich aus - einmal habe ich rote Streifen auf weiß, einmal weiße Streifen auf rot geklebt.

I cut a slit into the fur on the boot's brim to be able to fill it. There's a gingerbread man, another candy cane, some pine branches and of course a chocolat St. Nick.
The chocolat St. Nick is made using the Schoko-Weihnachtsmänner die by Charlie und Paulchen. I used the larger of the two dies in the set here and cut it from white cardstock, then colored it with Copics. I first wanted to cut it from red cardstock and just add some details with Copics and a white gel pen. But I didn't really like that and the bright red face looked really strange. So I changed my mind and went with white cardstock instead.
Each of the pine branches I cut from light, middle and dark green cardstock and layered them to make the branches nice and full.
The candy canes originally have some kind of frame - depending from which color you die cut the top layer. I didn't like that and so I cut out the stripes of that top layer. That's also why my candy canes look different - I did red stripes on white on one of them and white stripes on red on the other one.


Den Stiefel habe ich mit dünnem 3D Tape auf den Hintergrund geklebt, die Deko unten um den Stiefel herum habe ich dann teilweise ebenfalls mit 3D Tape hinterlegt.
Und als Deko habe ich noch ein paar goldene Sternchen aufgeklebt. Das ist eigentlich mehr daraus entstanden, dass ich hinter der Zuckerstange links einen dicken Kleber-Batzer auf der Karte hatte, den ich irgendwie abdecken wollte... ;)
Den dekorierten Cardstock habe ich dann auf einen weißen Kartenrohling geklebt.

I adhered the boot with thin foam tape and also put it behind some of the elements around the bottom of the boot.
And as decoration I added a few gold star confetti. Well, actually it was more a way to cover that big blob of glue I had seeping out from the candy cane on the left... ;)
I adhered the card panel to a white note card.


Und momentan dekoriere ich auch gerne mal die Innenseiten meiner Karten... So auch hier.

And lately, every now and then, I like decoarating the inside of my cards... just like I did here.


Hier habe ich den kleineren der beiden Schoko-Weihnachtsmänner verwendet. Den habe ich allerdings "geköpft" und einen aus braunem Cardstock gestanzten Nikolaus dahinter gesetzt. Dazwischen habe ich ein Stück Schokoverpackung gesetzt und es nach unten gebogen. Und dann habe ich mit einer kleinen Stanze ein Stück aus dem Kopf herausgestanzt. Nun sieht es fast so aus, als hätte der Nikolaus tatsächlich nicht widerstehen können und hätte hier schon mal ein wenig genascht. Oder aber die Frage "brav gewesen?" beantwortet sich im Inneren der Karte...
Ich konnte einfach nicht drumrum, als ein Ooops!, gestanzt aus schwarzem und rotem Cardstock, neben den angebissenen Nikolaus zu kleben. Darunter befindet sich dann noch ein "Gruß vom Nikolaus".

Here I used the smaller of the two chocolate St. Nicks. I "beheaded" him and put one cut from brown cardstock behind him. Inbetween I put a piece of chocolate wrapper, folding it down, and cut a little piece out of the chocolate. Now it looks like St. Nick just couldn't resist and just took a bite out of the chocolate. Or the answer to the question "have you been nice?" gets anwered on the inside...
I just had to place a little Oops!, die cut from black and red cardstock, next to the chocolate. And underneath I stamped "greetings from St. Nick". 
 

 Als Deko habe ich dann auch im Inneren ein paar kleine goldene Sternchen aufgeklebt und außerdem einen Rahmen mit einem goldenen Gelstift aufgemalt. 

I added a few gold star confetti as decoration to the inside and then drew a frame with a gold gel pen.

Freitag, 29. November 2024

Driving home for christmas

 
Hallo Ihr Lieben!
Heute zeige ich Euch eine Weihnachtskarte, die für jemanden entstanden ist, für den sie einfach perfekt passt. Ich kann aber nicht mehr verraten, denn ich bin mir nicht sicher, ob er/sie hier mitliest und so besteht doch noch eine Chance auf eine Überraschung...

Hello everyone!
Today I am sharing a christmas card with you, that is just perfect for someone in my life. I can't say too much because I am not sure if he/she is reading this post and then there is at least a chance for it to be a surprise...

Der Hintergrund besteht aus einem einzigen Stempel: der City Street Backdrop von WhimsyStamps. Ich habe ihn auf weißen Cardstock gestempelt und komplett mit Copics coloriert. Durch das große Motiv geht der tolle Tiefeneffekt des Hintergrunds etwas verloren, aber das Auto soll ja doch immer noch im Mittelpunkt stehen.

The background I made using one single stamp: the City Street Backdrop by WhimsyStamps. I stamped it onto white cardstock and completly colored it with Copics. Due to the large image the amazing depth of the background kind of gets lost, but the car is still meant to be the focus on the card.


Als ich die Vorschau auf das Beach Bound Holiday Add-On Set von HoneyBeeStamps gesehen habe, war ich sofort verliebt. Es enthält verschiedene Elemente, um den Bus aus Beach Bound weihnachtlich zu dekorieren. Blöd, dass ich das Beach Bound Set auch nicht hatte.... ;) Ihr ahnt es, es durfte/musste beides bei mir einziehen!
Ich habe den Bus aus verschiedenen Farben Cardstocks gestanzt und teilweise mit Distress Ink ein wenig schattiert. 
Den oberen Teil der Stoßstange, die Außenspiegel, das Emblem und die Ringe an den Lichtern habe ich aus silberfarbenem Spiegelcardstock gestanzt, die Details auf der Motorhaube habe ich mit einem silbernen Gelstift nachgemalt. 
Die Lichter und Windschutzscheiben habe ich mit Glossy Accents überzogen. Nach dem Trocknen habe ich mit einem weißen Gelstift den Schneematsch auf die Scheiben aufgemalt - und zwar so, als hätte der Scheibenwischer die Sicht freigewischt - und sie mit dem Finger etwas verwischt.
Auf das Dach habe ich einen Weihnachtsbaum und Geschenke geladen. Dem Tannenbaum habe ich mit Copics etwas Struktur verliehen, die Details auf den Geschenken sind mit einem weißen Gelstift gemacht. Die Christbaumkugeln sind wieder aus silbernem Spiegelcardstock gestanzt.
Und die Lichterkette habe ich aus schwarzem Cardstock gestanzt, die Lichter mit einem glitzerenden Gelstift ausgemalt und dann ebenfalls mit Glossy Accents überzogen.
Sowohl auf die Stadt als auch das Auto habe ich mit einem Pinsel Schneepaste aufgetupft um alles mit kleinen Schneehauben zu versehen. Außerdem habe ich auf alles weiße Acrylfarbe aufgespritzt. 
Auf das Nummernschild habe ich noch ein LETITSNO aus dem Car Critters Christmas Add-On Set von LawnFawn aufgestempelt. Aus dem selben Set ist auch das "Jingle Bells", das aus dem Fenster des Autos tönt. 

When I saw a sneak of the Beach Bound Holiday Add-On Set by HoneyBeeStamps I was in love. It contains a lot of elements to give the van from Beach Bound a christmas look. Well, too bad I didn't have the Beach Bound set either.... ;) You guessed it, I just had to order both!
I die cut the bus from different colors of colored cardstock and shaded some of them with a bit of Distress Ink. 
The upper part of the bumper, the mirrors, the logo and the rings inside the lights I die cut from silver mirror cardstock, the details on the hood I re-drew with a silver gel pen.
I covered the lights and windshield with Glossy Accents. After that had dried I used a white gel pen to draw some muddy snow onto the windshield, making it look like the wiper just cleaned it, and dabbed onto the white color with my finger to not have one solid area.
I loaded a christmas tree and gifts onto the roof. I added some details to the tree with my Copics, the details on the presents I made with a white gel pen. The ornaments in the tree I cut again from silver mirror cardstock.
And the string of lights I die cut from black cardstock, covered the light bulbs with a glittery gel pen and then covered them with Glossy Accents, too.
I used a brush to dab snow paste onto the city and the card to give it a nice snowy look. I also splattered white acrylic paint onto everything. 
Onto the number plate I stamped a LETITSNO from the Car Critters Christmas Add-On set by LawnFawn. And from the same set is also the "jingle bells", that you can hear out of the window.


Den Hintergrund habe ich direkt auf einen weißen Kartenrohling geklebt. Und darauf kam dann, bewusst etwas schief, das Auto. Durch all die Ladung auf dem Dach war das nämlicht fast schon zu hoch für die Karte. 
Nun mögt Ihr Euch fragen, warum das Auto extrem weit nach oben steht. Nun.... Hier kommt die Auflösung:

I adhered the background directly to a white note card, on top I put the card - a bit crooked on purpose beacause with all the stuff on the roof it nearly got too tall for it.
Well, you might wonder why the car is so high up on the card. Well.... here's why:


Ich habe hinter den Bus einen Action Wobbler gesetzt. So wackelt er lustig auf der Karte herum, fast so, als würde er auf der matschigen Straße etwas rutschen. Und ich finde, das gibt der Karte noch das I-Tüpfelchen und passt einfach perfekt. 

I put an Action Wobbler behind the van. It's now dangling funnily from left to right, just like he's sliding on the slik and icy road. I really think that adds a special touch to the card and is just perfect.

Donnerstag, 28. November 2024

Eine Tasche im Nikolauslook

 
Hallo Ihr Lieben!
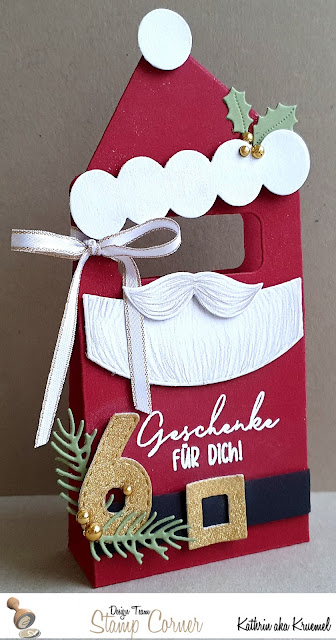
Heute zeige ich auf dem Stampcorner Blog eine Tasche im Nikolauslook. Die kann entweder als kleines Nikolausgeschenk oder aber als "Türchen" #6 eines Adventskalenders dienen, so ganz habe ich mich da selbst noch nicht entschieden. Aber es sind ja noch ein paar Tage...

Hello everyone!
Over on the Stampcorner Blog I am sharing  a little gift bag in a St. Nick look. I can either be used as a little gift for Nikolaus or as "shutter" #6 for an advent calendar. I still haven't decided that myself, but I have a few days left to do so...

Basis war hier natürlich die Geburtstagstaschen-Stanze von Stampcorner. Die macht sich aber auch im weihnachtlichen Look super. 

Of course the base here is made with the Geburtstagstasche die by Stampcorner - the name means "birthday bag". But the christmas look suits it fine as well.


Ich habe die Tasche aus rotem Cardstock gestanzt und dann im Nikolauslook dekoriert. Ich habe dafür Teile der Christmas Crew Santa Stanze von MFT benutzt, aber man kann die Teile auch ganz einfach per Hand schneiden oder Stanzen anderer Firmen kombinieren.

I die cut the bag from red cardstock and then decorated it in a Nikolaus look. I used some of the Christmas Crew Santa die set by MFT here but you can easily cut them by hand or combine dies by other manufacturers, too.


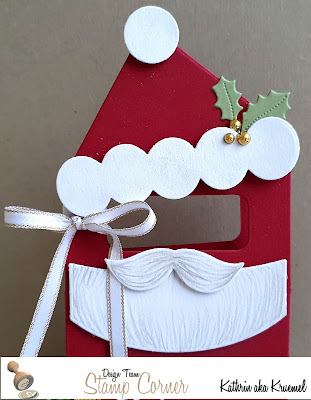
Oben habe ich der Tasche eine Nikolausmütze aufgesetzt, die ich mit Ilexblättern und goldenen Beeren verziert habe. 
Unter dem Griff befinden sich Bart und Schnurrbart des Nikolaus. Ich habe hier graue Polychromos benutzt, um einen "haarigen" Look zu erzeugen.
Und damit sich Bommel und Pelzrand der Mütze noch etwas mehr vom Bart abheben, habe ich sie mit einem Nuvo Aqua Shimmer Pen beglittert.
Damit man auch nicht unartig in die Tüte hineinluschern kann bevor die Zeit dazu gekommen ist, habe ich ein Stück weißes Band mit goldenen Kanten links um das Griffloch gewickelt und zu einer Schleife gebunden.

I added a Nikolaus' hat to the top of the bag and decorated it with some holly leaves and gold berries.
Under the handle there's the beard and mustache. I used grey Polychromos to add some "hairy" details to both pieces.
And to make the pompom and furry brim of the hat look even more different from the beard I used a Nuvo Aqua Shimmer Pen to add glitter to those pieces.
To make sure you can't be naughty and get a peak ahead of time of what's inside the bag I wrapped a piece of white ribbon with gold edges around the left side of the handle and tied it to a bow.


Unten habe ich einen Streifen schwarzen Cardstocks auf die Front der Tasche geklebt und seitlich jeweils ein kleines Stück um die Kante herumgebogen und dort festgeklebt. So wirkt der Gürtel etwas realistischer. Und natürlich durfte eine Schnalle nicht fehlen. Die habe ich aus goldenem Glitter-Cardstock gestanzt.
Ebenfalls aus goldenem Glitter-Cardstock habe ich eine 6 - die natürlich für den 6. Dezember steht - gestanzt und dafür eine Stanze aus dem neuen Zahlen-Stanzenset verwendet. Die Zahl habe ich mit zwei Tannenzweigen und ebenfalls goldenen Beeren verziert.
Beim Aufkleben aller Elemente kam dünnes und dickes 3D Tape zum Einsatz, das wirkt einfach schöner als nur flach aufgeklebt.
Vorne, mittig auf die Tasche, habe ich dann noch "Geschenke für dich" aus dem Set Geschenke mit weißem Embossingpulver aufembosst. Offenbar war der Empfänger in den Augen des Nikolaus im letzten Jahr artig gewesen.... ;)

To the bottom of the bag I glued a strip of black cardstock and folded a small end around the edge of each side, glueing it down there. This makes the belt look more realistic. And of course it needed a buckle, that I cut from gold glitter cardstock.
Also from gold glitter cardstock I die cut a number 6 - of course that repesents december 6th - using one of the dies from the new numbers die set. I decorated the number with two pine branches and more gold berries/pearls.
I used thin and thick foam tape to adhere the different elements. In my opinion this look so much prettier than just adhering them flat.
To the front center of the bag I white heat embossed a "gifts for you" saying. Seems like Santa thinks that the recipient of the bag has been nice this year... ;)

Mittwoch, 27. November 2024

Stampcorner Dezember Release Sneak #2

 
Hallo Ihr Lieben!
Heute zeige ich Euch ein zweites Sneak auf das Dezember-Release von Stampcorner. Und zur Abwechslung all der Karten der letzten Wochen, gibt es heute mal keine Weihnachtskarte von mir.

Hello everyone!
Today I am sharing with you another sneak of the december release by Stampcorner. And with all the christmas cards I've shown you those last weeks I made something different for a change here.

Im Hintergrund befindet sich ein Stück rosa, hell- und dunkelblau sowie weiß gestreiftes Designpapier. Das sieht ein wenig so aus wie die Briefumschläge mit dem gestreiften Rand, die man für Luftpost verwendet. 
Oben auf den gestreiften Cardstock habe ich ein Stück hellgrauen Cardstocks gelegt. Auf den habe ich mit Memento Grey Flanel den City Block Background von MFT aufgestempelt. Damit die Häuser nicht zu dunkel werden, habe ich sie als Second Generation aufgestempelt.

In the background there's a piece of pink, light and dark blue and white striped patterned paper. It reminded me of the envelopes with the striped border that are used for air mail.
On top of the striped cardstock I put a piece of light grey cardstock. I used Memento Grey Flanel to stamp the City Block Background by MFT onto it. To get a more subtle look I did second generation stamping.


Unten rechts in der Ecke seht Ihr einen der Gnome aus einem neuen Set. Der verschickt ganz liebe Post. Ich habe ihn mit Copics coloriert und per Hand ausgeschnitten. 
Der Briefkasten ist aus dem Set Holiday Cheer von Creative Expressions. Ich wollte schon so lange genau so einen Briefkasten als Stempel haben - am liebsten den von LawnFawn, deren Set ist aber retired. Als ich jetzt bei Stampcorner über dieses Set gestolpert bin, konnte ich nicht anders, als es zu kaufen.
Das Paket, auf dem der Gnom steht, ist aus dem selben Stempelset wie der Briefkasten. Der Kerl ist ein wenig zu klein, um an den Einwurfschlitz zu kommen. Hoffentlich ist nichts zerbrechliches in dem Paket! 

In the lower right corner you can see a gnome from one of the new sets. He's sending out some special mail. I colored him with Copics and cut him out by hand.
The mail box is from Holiday Cheer by Creative Expressions. I really wanted a mail box exactly like that since ages - I was always hoping to get the one by LawnFawn one day, but it's retired. So when I came across this one I just had to buy it.
The parcel, that the gnome is standing on, is from the same stamp set as the mail box. The little guy is a bit too short to reach the top of the mail box. I really hope there isn't anything breakable inside this box!


Oben links auf den Hintergrund habe ich eine Briefmarke geklebt. Die ist mit einer der Postage Stitch Stanzen aus weißem Cardstock gemacht. Mit dem Cutter habe ich dann einen hellblauen Aufleger, der etwas kleiner als der gestitchte Rand ist, zugeschnitten. In den habe ich die Buchstaben P, S und T gestanzt und alles mit einem roten Herz als O ergänzt, so dass das Wort Post entsteht. 
Auf die Briefmarke, und teilweise auf den Aufleger weiterführend, habe ich dann Stempel aus dem Postage Collage Stempelset von WaffleFlower gestempelt und so der Briefmarke gleichzeitig einen Wert und eine Entwertung gegeben.
Aus dem Stempelset Post für dich habe ich dann noch die Worte für dich auf ein Stück pinkfarbenen Cardstock gestempelt, in Form eines kleinen Fähnchens ausgeschnitten und neben die Briefmarke geklebt, um den Text zu ergänzen.

In the top left corner of my card I placed a post stamp. I die cut that from white cardstock using one of the Posting Stitch dies. Using my paper cutter I cut a piece of blue cardstock a bit smaller than the stitched lines on the stamp. I die cut the letters P, S and T from it and added a red heart as an O to create the word post.
Onto the stamp, and partly further onto the background, I stamped some images from the Postage Collage stamp set by WaffleFlower.
From the set Post für Dich I stamped a für dich - for you - onto a piece of pink cardstock and cut it into a little banner. Then I glued it next to the postage stamp.
 

Ich habe den Briefkasten und die Briefmarke jeweils mit dünnem 3D Tape aufgeklebt, zum Aufkleben des Textstreifens und des Gnomes samt Paket habe ich dickes 3D Tape benutzt.
Als Deko, und um das Pink nochmal aufzugreifen, habe ich ein paar pink-irisierende Perlen auf der Karte verteilt. Dann habe ich alles auf einen weißen Kartenrohling geklebt.

I used thin foam tape to adhere the mail box and postage stamp, to adhere the gnome with the parcel and the text strip I used thick foam tape.
As decoration, and to pick up the pink again, I added a few pink iridescent pearls, then I attached my card panel to a white note card.

Dienstag, 26. November 2024

Blumige Weihnachtskarte

 
Hallo Ihr Lieben!
Von Concord and 9th gibt es diverse Stanzensets, die einen Hintergrund mit eingeprägten, quasi gestitchten Linien in Blumenform stanzen. Dazu gibt es dann die passenden Blumen, die auf die gestitchten Linien passen. Ich fand die Karten schön, war mir aber nicht sicher, ob diese Sets etwas für mich wären. Nunja, das Festive Blooms Set fand ich dann so toll, dass ich es mir bestellt habe, auch weil ich die Blumen und Zweige auch einzeln verwenden kann. Heute zeige ich Euch meine Karte damit.

Hello everyone!
There are several die sets by Concord and 9th, that cuts background panels with stitched florals cut into. In those sets there are also all the dies to create flowers matching those florals. I loved the cards but wasn't sure if those sets were for me. But I liked the Festive Blooms one so much, that I decided to get it, knowing that I could use the flowers and twigs also in a different way. Today I am sharing my card with this set.

Ich nehme es gleich vorweg - die Karte finde ich toll. Aber irgendwie fehlt mir die Kreativität und die Individualität bei den Karten. Natürlich ist man vollkommen frei bei der Anordnung der Elemente, aber ich gestehe, dass ich faul bin. Wenn die Linien schon vorgegeben sind, dann orientiere ich mich auch daran. Und so sind die Karten, die mit dem Set gemacht sind, dann doch alle recht ähnlich. Trotzdem bereue ich es natürlich nicht, das Set gekauft zu haben. Denn neben den floralen Elementen kann man auch den Hintergrund ohne Blumen super für etwas anderes verwenden, die eingestitchten Blumenmotive machen den dann um einiges interessanter.
Ich habe den Hintergrund aus schwarzem Cardstock gestanzt, eigentlich wollte ich eine eher dramatische Weihnachtskarte. Aber irgendwie kam dann doch alles anders....

I will be honest with you right from the start - I love the card. But I am kind of missing the creativity and individuality of these cards. Of course you can arrange your flowers however you like, but I have to admit, that I am a bit lazy. So since those stitched lines are given I am also going to use them as orientation. And that makes all these cards, that are made with the set, kind of similar. But I also don't regret having bought this set. Not only can I used the floral elements, also the background without flowers is wonderful, the stitched in floral images make it a lot more interesting than just plain cardstock. 
I die cut the background from black cardstock, because I had planned to make a bit of a dramatic christmas card. But then everything came together differently...


Ich habe die Blumen aus cremefarbenem Cardstock gestanzt und in der Mitte ein wenig mit Distress Oxide Pumice Stone gewischt. Die Zweige habe ich auch grau-grünem und olive-grünem Cardstock gestanzt und mit Distress Ink Pumice Stone und Forest Moss gewischt. Die Beeren und Ilexblätter sowie die Blumenmitten sind aus goldenem Schimmer-Cardstock gestanzt. 
Ich habe alle Elemente - grob an den gestitchten Linien orientiert - auf den Hintergrund geklebt und dabei nur jeweils die Mitte bzw. das Ende der Stanzteile, das vom Rand wegzeigt, aufgeklebt. Die anderen Enden stehen alle ein wenig ab. 
Eigentlich wollte ich gar kein Rot auf der Karte einbauen. Aber die etwas leeren Ecken haben mich gestört. Auf meinem Tisch lag noch einen der Ribbon Frames von TheGreetery, den ich aus rotem Cardstock gestanzt und mit der dazugehörigen Stencil mit Distress Oxide Aged Mahogany und etwas Black Soot gewischt hatte. Die gewählten Farben gefielen mir für die Karte, für die der Rahmen eigentlich gedacht war, nicht. Also habe ich den, erstmal nur probehalber, unter und zwischen die Pflanzen gesteckt. Ich habe ihn einmal horizontal geteilt und die Enden unter Stanzteilen versteckt. So passte er dann auch komplett rund um die komplette Karte. Und dann habe ich beschlossen, ihn einfach so wie er war auf dieser Karte zu benutzen. Hier fällt die farblich unschöne Schattierung gar  nicht so auf. Da ich den Rahmen für die andere Karte "aufs Gesicht gelegt" verwenden wollte, ist das auch hier der Fall. Außerdem hatte ich die Enden der Schleife abgeschnitten. Die obere Schleifenlage habe ich etwas versetzt aufgeklebt, um eine doppelte Schleife zu erhalten. 

I die cut the flowers from cream colored carddsdtock and inked the centers with a bit of Distress Oxide Pumice Stone. The branches I cut from grey-ish green and olive green cardstock and inked them with Distress Ink Pumice Stone and Forest Moss. The berries and holly leaves and also the flower centers I die cut from gold shimmer cardstock.
I adhered all elements to the background, loosely using the stitched lines as a guideline. I only put glue behind the flower centers and the ends of the branches, that face the center of the card, away from the edge. So the other ends of the elements stand up lightly. 
Originally I hadn't had plans to add any red to the card. But the kind of empty corners bothered me. I had one of the Ribbon Frames by TheGreetery left on my table, that I had die cut from red cardstock and inked with Distress Oxide Aged Mahogany and some Black Soot. Well, the colors I had chosen didn't go with the card that I had made the frame for. So I simply used it here, just for fun putting it on top of and under the florals. I cut it apart horizontally, hiding the gaps under die cuts, to make it fit all around the card. And that's when I decided, to use it just as it was here on this card. The "not so nice" shading doesn't look that bad on this card. Since I had turned the die cut onto the face for the design of the other card, that's also how I used it here. The top layer of  the bow I glued down a bit offset to create a double bow.


Im Stanzenset ist auch eine Bannerstanze samt extra Banner-Enden enthalten. Ich habe es aus schwarzem Cardstock gestanzt und darauf das "Christmas" mit einem Stempel von CraftEmotions mit weißer Tinter aufgestempelt und das Banner mit einem goldenen Gelstift umrandet. 
Das Merry ist mit einem Stempel von WaffleFlower gemacht, ebenfalls weiß auf schwarzen Cardstock gestempelt.

In the die set there's also a banner die - including banner tails. I die cut it from black cardstock and stamped the word "christmas" with white ink onto it, using a die by CraftEmotions. Then I used a gold gel pen and drew a frame around the banner.
The "merry" is made using a stamp by WaffleFlower, also stamped with white ink onto black cardstock.


Ich habe nur hinter die kleineren Blüten und das Textbanner 3D Tape gesetzt, damit die zwischen all den aufragenden Zweigen nicht untergehen.
Den Schleifenrahmen habe ich mit einem Nuvo Aqua Shimmer Pen beglittert, die Beeren sind mit Glossy Accents überzogen (später habe ich dann mit einem schwarzen GlazePen noch die schwarzen Blütenrest aufgemalt) und die Blumenmitten sind mit Clear Rock Candy Glitter bestreut. Ganz zum Schluss habe ich dann mit dem goldenen Gelstift noch einen Rahmen auf den schwarzen Hintergrund gemalt.

I only put foam tape behind the smaller flowers and the textbanner to keep them from getting lost between all those branches, that stick up a bit.
I used a Nuvo Aqua Shimmer on the ribbon frame, the berries I covered with Glossy Accents (later I used a black glaze pen to add the black dots) and onto the flower centers I put some Clear Rock Candy glitter. As a last step I used the gold gel pen again to draw a frame along the edge of the background.

Montag, 25. November 2024

Buchkarte die Dritte

 
Hallo Ihr Lieben!
Ich bin total verliebt in die Have a Spine Stanzen von TheGreetery. Und deswegen zeige ich Euch heute die dritte Buch-Karte, die ich damit gewerkelt habe. Diesmal habe ich sie als Geburtstagskarte gestaltet.

Hello everyone!
I am totally in love with the Have a Spine die by TheGreetery. And so I am sharing a third book card, that I made with this die set. This time I made a birthday card/book.

Das Buchcover habe ich aus hellblauem, den Buchrücken aus dunkelblauem Cardstock gestanzt. Beides habe ich dann mit farblich passender Tinte ein wenig schattiert. Und auf das Buchcover habe ich - wieder - einen der Bookish Holiday Frames aufgestempelt. Ich hoffe sehr, dass es da noch weitere Motive, weniger weihnachtlich, geben wird. 
Da ich den Rahmen auf dem Cover dezent haben wollte, habe ich ihn mit hellblauer Tinte und Second Generation Stamping aufgestempelt. Außerdem habe ich nur den Stempel nicht komplett, sondern nur am äußerden Rand eingefärbt.

I die cut the book cover from light, the spine from dark blue cardstock, then shaded both pieces with a bit darker ink. And onto the book cover - again - I stamped one of the Bookish Holiday Frames. I really hope, there will be more, not so christmas-sy ones, later.
Since I wanted the frame on the cover to be very subtle I stamped it with light blue ink and did second generation stamping. I also didn't ink the whole stamp but  only the outer edges of the stamp.


Auf das Buchcover habe ich dann den Flourished Phrases Birthday Stencil aufgewischt, allerdings nur den Text und nicht den Rahmen. Die Schattenlage habe ich mit Distress Ink Hickory Smoke aufgewischt, den Text dann mit Distress Oxide Festive Berries, Fired Brick und Aged Mahogany. Das Wort "happy" habe ich beim Auftragen des Wortes "birthday" abgedeckt und dann auf ein extra Stück des hellblauen Cardstocks gewischt.
Nun, irgendwie war mir der Text nicht auffällig genug. Also habe ich durch den Stencil noch Embossingtinte aufgetragen und zwei Lagen klaren Embossingpulvers auf den Text aufgetragen.
Das Wort "happy" habe ich dann ausgeschnitten, dunkelblau gemattet und später - etwas schräg - aufgeklebt.
Um den Text herum habe ich dann den Ribbon Frame gesetzt. Den habe ich aus rotem Cardstock gestanzt und mit Copics schattiert. Die "Schwänzchen" der Schleife habe ich weggeschnitten, da sie zu viel des Textes verdeckt hätten. 

I stenciled the Flourished Phrases Birthday stencil onto the cover, but only the text, leaving out the frame layer. I used Distress Ink Hickory Smoke for the shadow and Distress Oxide Festive Berries, Fired Brick and Aged Mahogany for the text. I covered the word "happy" when stenciling the word "birthday" and stenciled it onto an extra piece of light blue cardstock.
Well, somehow the text was a bit dull. So I put the stencil back on, applied embossing ink and put two layers of clear embossing powder on top.
The word happy I cut out, layered it dark blue and later glued it onto the cover, putting it a bit at an angle.
Around the text I put the Ribbon Frame. I die cut that from red cardstock and shaded it with Copics. I had to cut off the tails of the bow because they would have covered too much of the text.
 

 Den Rahmen und das Wort "happy" habe ich mit 3D Tape aufgeklebt und auch die extra Schleifenlage damit aufgeklebt. Dann habe ich als Deko einige silberne Sternchen auf der Karte verteilt und entlang des Buchrückens eine Linie mit einem silbernen Gelstift aufgemalt.

I adhered the frame and the word "happy" with foam tape and also used it behind the additional bow layer. Then I added a few silver star confetti all over the cover and drew a line along the spine using a silver gel pen.


Und auch die Innenseite Buches ist natürlich dekoriert - schön dezent, damit man noch einen persönlichen Text darüber schreiben kann.
Die Buchinnenseite habe ich, genauso wie die angedeuteten Seiten unten, aus weißem Cardstock gestanzt und die Ränder mit hellblauer Tinte ganz sanft gewischt. Dann habe ich mit der selben Tinte und wieder per Second Generation Stamping den Freude und Jubel Hintergrund von Create a Smile aufgestempelt. Damit der Text nicht ganz an die Ränder der Seite geht, habe ich die vor dem Stempeln jeweils mit einem schmalen Streifen Tape abgeklebt.
Und das "Lesezeichenband" ist hier eine große Luftschlange. Die ist wieder aus rotem Cardstock mit den Curly Q Streamers von TheGreetery gemacht und mit Copics schattiert. Nun, die Luftschlangen aus dem Set sind nicht lang genug, um über die komplette Buchseite und darüber hinaus zu gehen. Also habe ich per Partial Die Cutting zwei der Luftschlangen zusammengestanzt. Wenn man genau hinschaut, sieht man, dass die Luftschlange an einer Stelle etwas dicker ist. Aber wem fällt das schon auf?

And of course I also decorated the inside of the book - very softly to be able to write a personal message onto it.
I die cut the inner book page, and also the page detail at the bottom, from white cardstock and lightly shaded them with light blue ink. Then I used the same ink and second generation stamping again to stamp the text with the Freude und Jubel stamp by Create a Smile onto the page. To not have the text go all the way to the edges I covered those with a bit of tape before stamping the text.
And the "bookmark ribbon" is a large streamer here. I die cut that from red cardstock again using the Curly Q Streamers set by TheGreetery, then shaded it with Copics. Well, the streamers in this sea arent't long enough, to go all over the page and hang over a bit at the bottom. So I did some partial die cutting and used two of the streamer dies from the set to create one longer one. When you look closely you can see, that there is a bit a wider spot. But who does really notice that?


Zum Schluss habe ich dann auch hier ein paar silberne Sternchen aufgeklebt und einen Rahmen mit einem silbernen Gelstift aufgemalt.

At the end I added a few silver stars to the inside as well and drew a frame with a silver gel pen.

Sonntag, 24. November 2024

A very sweet christmas

 
Hallo Ihr Lieben!
Heute wird es zuckersüß - im wahrsten Sinne des Wortes. Denn bei dieser Weihnachtskarte dreht sich alles um Weihnachtsleckereien.

Hello everyone!
It's getting very sweet today - literally. Because this christmas card is all about sweet christmas treats.

Farblich bin ich hier mal einen anderen Weg gegangen, denn nur rot und weiß war mir zu fad. Also habe ich - ganz viel - rosa dazu kombiniert. Ich finde, das passt super zum Süßigkeiten-Look.
Im Hintergrund habe ich die Candy Cane Background Stencils von LawnFawn benutzt. Zuerst habe ich die vollflächigen Zuckerstangen mit roter Tinte auf rosafarbenen Cardstock gewischt, dann die weißen Streifen mit Paste hinzugefügt. Die Paste hat einen leichten Schimmer, was natürlich super zu Weihnachten passt. 
Den Rand des Cardstocks habe ich dann noch mit rosafarbener Tinte und ein wenig Black Soot von außen her gewischt und dann weiße Acrylfarbe aufgespritzt.

Colorwise I went a bit down a different road here, because just red and white seemed boring. So I combined those with - a lot - of pink. I think, it goes great with the candy theme.
On the background I used the Candy Cane Background stencils by LawnFawn. First I inked the solid candy canes with red ink onto pink cardstock, then added the white stripes using paste. The paste has a nice shimmer, that goes great with christmas.
I darkened the edges of the cardstock with some darker pink ink and a bit Black Soot, then splattered white acrylic paint onto it.


Ich wollte unbedingt die Gingerbread Friends Stanzen einweihen, die ich mir unterm Jahr mal bestellt habe. Da war natürlich eher weniger Saison für Lebkuchenmänner. Aber die gestempelten Motive sollten zum Stanzteil passen. Deswegen habe ich das Glas aus dem Set How You Bean? mit Memento Summer Sky, die Plätzchen darin aus dem Set How You Bean? Christmas Cookie Add-On mit Memento Desert Sand gestempelt. Die Peppermints aus dem Set How You Bean? Mint Add-On habe ich mit Love Letter gestempelt, das ich auch für die Verzierung auf den Plätzchen und den Text benutzt habe.
Ich habe alle Motive und auch den Lebkuchenmann mit Copics coloriert. Die Augen des Lebkuchenmannes sind mit einem schwarzen GlazePen gemacht, den Zuckerguss  habe ich einfach aus weißem Cardstock gestanzt und unschattiert gelassen.
Die Zuckerstangen im Glas sind mit den Cute Candy Canes Stanzen gemacht. Ich habe die vollflächigen Zuckerstangen aus weißem Cardstock gestanzt und auch die gestreifte zweite Lage aus dem Set einmal ausgestanzt. Die habe ich dann benutzt, um die Lage der roten Streifen mit einem Bleistift zu markieren. Diese Streifen habe ich dann rot coloriert. 
Da die Zuckerstangen im Glas stecken sollten, habe ich mit dem Cutter Schlitze in das Glas geschnitten, die Zuckerstangen hindurchgewoben und dann die roten Streifen der Zuckerstangen mit einem hellen Marker auch auf das Glas übertragen. 
Und auch eine Schleife hat das Glas bekommen. Die Schleife aus dem Cute Candy Canes Set war mir hier zu groß, sie hätte zu viele der Plätzchen verdeckt. Also habe ich die Schleife aus dem Build-a-Barrel: Apple Set genommen. Ich habe sie aus pinkfarbenem Cardstock gestanzt und leicht schattiert. Für das Band unter der Schleife habe ich die Stanze aus dem Coffee Cup Gift Card Holder Set benutzt, die eigentlich den Schlitz für die Geschenkkarte stanzt. Die passte von der Rundung her perfekt zum Glas, die überstehenden Enden habe ich einfach nach hinten gefaltet und auf der Rückseite des Glases festgeklebt.

I really wanted to use the Gingerbread Friends die set, that I ordered sometime this year, but it wasn't the season for gingerbread men back then. And I wanted the stamped images to match the look of the die cut. So I stamped the jar from How You Bean? with Memento Summer Sky, the cookies in it from How You Bean? Christmas Cookie Add-On with Memento Desert Sand. For the peppermints from How You Bean? Mint Add-On I used Love Letter, that I also used for the decorations on the cookies and the texts.
I colored all images and the gingerbread man with Copics. The eyes of the gingerbread man are made with a black GlazePen, the icing on him I simply cut from white cardstock and left it as is.
The candy canes in the jar are cut with the Cute Candy Canes die set. I die cut the solid candy canes from white cardstock and also cut the striped top layer once. Then I used this striped layer and a pencil to mark the placement of the stripes on the solid candy canes, then colored them red.
Since I wanted my candy canes to stick out of the jar I used a cutter to cut slits into the jar and have woven the canes through them. Then I used a light red marker to draw the red stripes onto the jar as well.
I also put a ribbon with bow around the jar. The bow, that comes in the Cute Candy Canes set, was too large and would have covered too much of those cookies. So I used the bow die from Build-a-Barrel: Apple instead. I die cut it from pink cardstock and shaded it. For the ribbon under the bow I used a the die from Coffee Cup Gift Card Holder, that is meant to cut the slit for the gift card. It had the perfect shape to go with the jar, the ends I simply folded over and glued them to the bac of the jar.


Der Text auf der Karte ist eine Mischung aus gestanzten Buchstaben und gestempelten Texten.
Die Buchstaben für das Wort "sweet" habe ich mit dem Henry's ABCs Set aus weißem und aus dunkelrotem Cardstock gestanzt. Auf die weißen Buchstaben habe ich Highlights mit einem pinkfarbenen GlazePen aufgetragen, dann habe ich die oberen Teile mit Distress Clear Rock Candy Glitter überzuckert. 
Die roten Buchstaben habe ich leicht versetzt hinter die weißen geklebt.
Die gestempelten Texte sind mit Stempeln aus den Sets Offset Sayings Birthdays und Offset Sayings Christmas auf weißen Cardstock gestempelt.
 
The text on my card is a mix of die cut letters and stamped texts. 
I die cut the letters for the word "sweet" from white and dark red cardstock using the Henry's ABCs die set. I drew highlights with a pink GlazePen onto the white letters, then sugar coated them with Distress Clear Rock Candy Glitter.
The red letters I glued behind the white ones a bit offset.
The stamped texts are stamped onto white cardstock using stamps from Offset Sayings Birthdays and Offset Sayings Christmas.
 

 Zum Aufkleben der Elemente kam teilweise 3D Tape zum Einsatz.
Und um das schwarz in den Augen des Lebkuchenmannes nochmal aufzugreifen, habe ich einige schwarze Glitzersteinchen auf der Karte verteilt. Dann habe ich alles auf einen weißen Kartenrohling geklebt.

I partly used foam tape to adhere the elements to the background.
To pick up the black of the gingerbread man's eyes again I added a few black rhinestones, then adhered my card panel to a white note card.

Samstag, 23. November 2024

Stampcorner Dezember Release Sneak #1

 
Hallo Ihr Lieben!
Heute zeige ich Euch ein erstes Sneak auf das Dezember-Release von Stampcorner, das eine bunte Mischung an Themen für Euch bereithält. Ich habe hier einen neuen Stencil verarbeitet um eine Weihnachtskarte zu gestalten. 

Hello everyone!
Today I am sharing with you a first sneak of the december release by Stampcorner, that comes with a wide variety of themes. Here I used a new stencil to create a christmas card.
 
Ich habe hier eine oben gefaltete Karte gemacht - und das hat seinen Grund, den ich Euch gleich zeige. Die Kartenbasis ist aus weißem Cardstock gestaltet, darauf habe ich einen Aufleger gelegt, den ich von einer anderen Karte übrig hatte. Der ist aus schwarzem Cardstock gestanzt und dann mit dem Slimline Poinsettia Embossingfolder von NellieSnellen geprägt.  Anschließend habe ich ein weißes Stempelkissen über die erhabenen Stellen gezogen und das Muster so etwas mehr hervorgehoben.
Aus dem Aufleger und der Kartenfront habe ich jeweils an der selben Stelle einen Kreis ausgestanzt - den Kreis aus dem schwarzen, geprägten Cardstock habe ich später innen in die Karte geklebt. Er ist von außen durch das Fenster hindurch sichtbar.

I created a topfolding card here - and that's for a reason that I share with you soon.
I cut the card base from white cardstock and put some black cardstock on top, that I had left over from another card. It was cut from black cardstock, then I dry embossed it with the Slimline Poinsettia embossing folder by Nellie Snellen. Then I dragged a white ink pad over the cardstock to accents the raised areas.
I cut a circle from the same spot into both the black cardstock and the white cardbase - the black circle I glued inside the card later. It's visible through the window.


Für die Christbaumkugel habe ich dann den neuen Stencil benutzt. Eigentlich kann man damit eine komplette Christbaumkugel samt Kette darüber gestalten, mir gefiel aber diese Variante für meine Karte besser. 
Ich habe einen Kreis in der Größe der Kugel im Stencil aus weißem Cardstock gestanzt und von außen leicht mit Distress Ink London Fog und Hickory Smoke gewischt. Dann habe ich den Stencil aufgelegt und silberne Stencil Paste durch in aufgetragen. In die noch nasse Paste habe ich silbernen Glitter gestreut. 
Da ich ja einen Kreis ausgestanzt hatte, fehlte meiner Christbaumkugel der Aufänger. Also habe ich einen aus silberfarbenem Spiegelcardstock gestanzt und oben an meinen Kreis angeklebt. Durch die Öse habe ich etwas silbernes Twine gezogen und meine Kugel damit aufgehängt. Aus dem selben Twine habe ich eine Schleife am oberen Ende der Kugel angebracht.
Auf der Kugel war Platz für meinen Text. Der ist aus dem Set Kleine Worte 2 und weiß auf schwarzen Cardstock embosst. 

For the christmas ornament I used the new stencil. You can create a whole christmas ornament with it, including a string, but I liked this version better for my card.
I die cut a circle the same size as the ornament in the stencil and inked it lightly with Distress Ink London Fog and Hickory Smoke. Then I put the stencil on top and applied some silver stencil paste through it. I sprinkled it with silver glitter, that stuck to the wet paste.
Since I had cut a circle I wasn't able to stencil the hanger of my ornament. So I simply die cut one from silver mirror cardstock and glued it to the top of my circle. I put some silver twine through the hole in the hanger and added a bow, made from the same twine.
On the ornament I placed my text. It means "merry christmas" and is white heat embossed onto black cardstock.
 

 Den schwarzen Aufleger habe ich mit 3D Tape auf den Kartenrohling geklebt und dazwischen das Twine, das ich durch die Öse in der Christbaumkugel gezogen habe, befestigt.
Auf den oberen Bereich habe ich dann noch ein paar Tannenzweige aufgeklebt, schließlich kann die Kugel nicht so im Nichts schweben. 
Die Äste sind aus hell- und dunkelgrünem Cardstock mit Stanzen aus dem Pine Branch Set von Studio Light gemacht. Ich habe etwas weiße Schneepaste von CraftEmotions aufgetupft und Clear Rock Candy Glitter von Ranger hineingestreut. 
die Zweige habe ebenfalls mit 3D Tape aufgeklebt und dazwischen ein paar große silberne Perlen gesetzt.

I adhered the card black card panel with foam tape to the card base and put the silver twine, that I had put through the hole in my hanger, between those layers.
Onto the upper area of my card I added a few pine branches because that ornament just can not float in the air.
I die cut the branches from light and dark green cardstock using the Pine Branch die set by Studio Light. Then I dabbed some white snow paste by CraftEmotions onto the branches and sprinkled some Clear Rock Candy Glitter by Ranger onto the paste.
Again I used foam tape to adhere the branches to the background and put some large silver pearls between the branches.


Apropos "frei schweben" - meine Kugel schwebt zwar nicht, aber sie hängt bei aufgestellter Karte tatsächlich im runden Fenster und ist beweglich. Das liegt daran, dass sie wirklich nur mit dem silbernen Twine auf der Karte befestigt ist. Ich finde, so sieht die Karte aufgestellt gleich noch toller aus.

Talking about "floatin" - my ornament isn't floating, but it actually hangs inside the window when the card is put up and can move freely. That's because I really only used the silver twine to adhere it to the card. I think, put up like this the card looks even better. 
 

Hier habe ich die stehende Karte noch aus einer anderen Perspektive. Meine Kugel wollte sich immer ein wenig nach rechts drehen, aber das tun die Kugeln am Baum ja irgendwie auch immer. 

Here I have another picture of the standing up card. My ornament always rotated a bit to the right, but well, those real ornaments in the tree tend to do that all the time, too.

Freitag, 22. November 2024

Eine Karte zum Abschied

 
Hallo Ihr Lieben!
Wenn die Putzfrau in Rente geht, dann ist das doch der perfekte Zeitpunkt, um das süße Mädel mit dem Staubsauger mal wieder zum Einsatz kommen zu lassen. 

Hello everyone!
When your cleaning lady at work goes into retirement then that's the perfect moment to use this little girl with the vacuum cleaner again.
 
Für den Hintergrund habe ich ein Stück cremefarbenen Cardstocks erst mit Distress Oxide Scattered Straw, Wild Honey und Gathered Twigs gewischt. Dann habe ich mit dem All Star Burst Embossingfolder von SimonSaysStamp die Strahlen und Sterne hineingeprägt. Auf die Sterne und höchsten Stellen der Strahlen habe ich dann goldenes Gilding Wax aufgetragen. Da ich verschiedene Goldtöne habe, habe ich drei verschiedene benutzt - jeweils in der Helligkeit zur Farbe im Hintergrund passend. Anschließend habe ich noch weiße Acrylfarbe aufgespritzt.
Als Rahmen habe ich den Ribbon Frame von TheGreetery auf die Karte geklebt. Den habe ich horizontal geteilt, damit er auf die deutsche A2 Karte passt. Die "Lücken" habe ich dann hinter dem Text und Motiv versteckt.
Gestanzt habe ich den Rahmen aus gelbem Cardstock und mit Copics Schatten hinzugefügt.

For the background I inked a piece of cream colored cardstock with Distress Oxide Scattered Straw, Wild Honey and Gathered Twigs. Then I used the All Star Burst embossing folder by SimonSaysStamp to emboss the rays and stars into the cardstock. Onto the stars and the hightest point of the rays I dabbed some gold Gilding Wax. Since I have different tones of gold Gilding Wax I used three different ones here, making them match the intensitiy of the color in the background. Then I also added splatters of white acrylic paint.
I used the Ribbon Frame die by TheGreetery to put a frame onto my card. I cut it apart crosswise to make it fit the german standard A2 card size. The "gaps" I've hidden behind the text and image.
I die cut the frame from yellow cardstock and added shadows with my Copics.


Das Motiv ist Belle Vacuuming von Belles 'n' Whistles - und ich bin froh, es nicht aussortiert zu haben. Ich habe es mit Copics coloriert und per Hand ausgeschnitten.

The image is Belle Vacuuming by Belles 'n' Whistles - and I am really happy that I kept it. I colored her with Copics and fuzzy cut her out.


Für den Text habe ich mit dem Wedding Alphabet Stanzenset von XCut die Buchstaben für das Wort Danke einmal aus hellblauem und einmal aus schwarzem Cardstock gestanzt. Die hellblauen Buchstaben habe ich mit Copics schattiert, dann habe ich die schwarzen Buchstaben etwas versetzt als Schattenlage dahinter geklebt.
Der Rest des Textes ist mit Stempeln aus den Reverse-Sets von Kulricke gemacht und einfach schwarz auf hellblauen Cardstock gestempelt.

For the text I used the Wedding Alphabet die set by XCut to cut the letters for the word "danke" - thanks - from light blue and black cardstock. I shaded the blue ones lightly with Copics, then glued the black ones a bit offset behind them as a shadow layer.
The rest of the text means "for everything and all the best for your future" and is simply stamped black onto light blue cardstock.


Den Rahmen habe ich mit dünnem, das Motiv und den Text mit dickem 3D Tape auf den Hintergrund geklebt. Als Deko habe ich einige goldene Perlen auf der Karte verteilt und dann alles auf einem weißen Kartenrohling befestigt.

I adhered the frame with thin, the image and text with thick foam tape. Then I added a few gold pearls as decoration and put my card panel onto a white note card.