Samstag, 30. August 2014

Stempeleinmaleins - Ausgabe vom 30. August 2014


Hallo Ihr Lieben!
Auch das Stempeleinmaleins legt heute nach der Sommerpause wieder los - wie jeden letzten Samstag im Monat gibt es auch heute eine neue Challenge.

Hello everyone!
Also Stempeleinmaleins is re-starting after its sommerbreak today - with a new challenge as every last saturday of a month.

Ich habe unseren neuen Sketch benutzt um einen Hochzeitskarte zu machen, um die mich eine Freundin gebeten hatte. Die Namen sollte unbedint mit drauf - oder die Initialien, aber SM bzw. MS fand ich jetzt beides nicht so passend... ;)

I used our new sketch to make a wedding card that a friends asked me to make for her. She wanted me to include the names - or the initials. I don't know if this makes sense in english, but both, SM and MS are abbreviations for not so "nice" things in german and so these weren't an option for me... ;)

Das Motiv ist ein Digi von Wee Stamps. 
Natürlich mussten Herzen mit auf die Karte - hier in Form des Tags und der kleinen Herzenanhänger, die ich für den edlen Look aus silberfarbenem Glitter-Cardstock gestanzt habe. Ein silberfarbener Schlüssel-Charm passt somit auch - farblich und natürlich zum Thema. Und auch der Schnörkel von Noor!Design gibt, ausgestanzt aus silberfarbenem Cardstock, einen wunderbar edlen Touch.
Die Papiere sind alle von Magnolia, coloriert habe ich mit Copics.

The image is a digi by Wee Stamps.
Of course I had to add a few hearts to a wedding cards - here it's a heart shaped tag and those little hanging hearts, that I cut from silver glitter cardstock for an elegant touch. A silver key charm also fits in here - colorwise and of course to the wedding theme. And also the flourish from Noor!Design adds to an elegant card here, cut from silver glitter cardstock.
All papers are by Magnolia, coloring has been done with Copics.


Noor!Design Challenge - Geschenkkarte


Hallo Ihr Lieben!
Diejenigen von Euch, die das zweite Noor! Design Magazin bereits in den Händen halten, haben wahrscheinlich die tolle Geschenkkarte von Miranda Bouhof gesehen. Und Ihr findet im Magazin auch die Vorlage für diese wunderschöne Karte. Wir möchten Euch auf dem Noor!Design Deutschland Blog mit einer Schritt für Schritt Anleitung zeigen, wie man diese Karte macht.

Hello everyone!
The ones of you that already got a copy of the second Noor!Design Magazin surely noticed the great present card by Miranda Bouhof. And in the magazin you also find the template for this beautiful card. We at the german Noor!Design Blog want to show you in a step-by-step tutorial how to make this type of card.

Außerdem möchten wir Euch zu einer Challenge herausfordern: Zeigt uns Eure Geschenkkarte!
Und das Beste ist, Ihr könnt auch noch etwas gewinnen :)) Ihr habt bis 30. September Zeit, Eure Version der Geschenkkarte auf dem Noor!Design Blog Deutschland hochzuladen. Zu gewinnen gibt es vier Schablonen aus der Happy Holidays Kollektion!

We also want to challenge you: show us your present card!
And there is also a price to be won. :) You have until september 30th to show us your present card by uploading it to the Noor!Design Germany Blog. The great price are 4 dies from the Happy Holidays collection!

Und das ist meine Version der Karte:
And this is my version of the card:


Ich habe sie etwas verkleinert, da mein Motiv sonst etwas verloren gewirkt hätte. Das schränkt zwar die Dekorationsmöglichkeiten etwas ein, aber mir gefällt die Karte trotzdem!

I sized the pattern down a bit because my image was a bit small. That leaves less room for decorations but I still like the result!

Die Karte habe ich im Hintergrund mit dem Stern verziert - der ist so wunderbar filigran und verleiht der Karte einen edlen Touch.
Der Weihnachtsbaum ist mit der Tannenbaum-Shape-Art-Schablone von Dutch Doobadoo geschnitten. 
Die Musiknoten sind ebenfalls eine Stanze von Noor!Design - den unteren Rand habe ich weggeschnitten.

I used the star in the background - it's so wonderful filigran and adds an elegant touch to the card.
The christmas tree has been cut using the christmas tree shape art stencil from Dutch Doobadoo. 
The music notes are a border die by Noor!Design - I cut off the bottom part of it.


Auf den unteren Teil der Karte habe ich zuerst einmal die wunderschöne Randstanze gesetzt. Sie fällt kaum auf, aber ohne die Bordüre sah es leer und fad aus.
Das Banner mit dem Text, das ich mit zwei Brads etwas gebogen angebracht habe, ist aus dem X-Mas Label Art Set von Dutch Doobadoo. So ein fertiger Text ist schon was geniales - vor allem, weil weiß auf braun ohne Embossing doch oft eher schlecht lesbar ist.

To the bottom part of the card I added the border die. It bearly can't be seen but without it the card looked empty and boring.
 The banner with the text, that I bend a bit and fixed it onto the card with two golden brads, is from the X-Mas Label Art set by Dutch Doobadoo. Such a ready printed and cut text is really cool - the more since white text on a brown cardstock is mostly hard to read if you don't heat emboss it.

Ich hoffe, ich konnte  Euch neugierig auf die Kartenform machen. Wenn ja, dann schaut Euch schnell die Anleitung auf dem Noor!Design Deutschland Blog an und macht bei unserer Challenge mit. Viel Glück schon mal!

I hope I made you curious about this type of card. If so, hop over to the Noor!Design Germany blog and join our challenge. Good luck!


Mittwoch, 27. August 2014

Eine Arzttasche für eine baldige Besserung


Hallo Ihr Lieben!
Auf dem Noor!Design Deutschland Blog zeige ich Euch heute eine Arzttasche, die als kleines Geschenk für jemanden gebastelt habe, dem es gerade gesundheitlich nicht so gut geht. Was ist dann schöner als eine kleine Aufmunterung?

Hello everyone!
Today I am sharing this doctor's bag that I made for a friend that isn't feeling well at the moment over at the Noor!Design Germany Blog. Can there be a better thing too cheer someone up than a little present?

Für die Tasche habe ich die Doktorschnecke von LeLo verwendet und dazu die Arzneiflasche und das Pflaster von Betty's Cretions. 
Hinter der Schnecke habe ich ein paar Notizzettel angebracht, deren Rand ich mit der Notebook Stanze von Noor!Design gestaltet habe. Anschließend habe ich die Ecken ein wenig verbogen und eingefärbt. 
Und die Zahnrad-Bordüre passt einfach immer - auch auf eine Arzttasche! Sie ist aus einem Papier aus dem Papierblock Fading Colors geschnitten und hat von der Mitte zu den Rändern hin einen tollen Farbverlauf. Und in diesem Papierblock findet Ihr auch das rot-weiß gepunktete Papier, von dem ein Rest auch mit auf die Tasche gehüpft ist.

For this bag I used the doctor snail by LeLo and the bottle and band aid are by Betty's Creations.
Behind the snail I added two papers which's border I created by using the Notebook border die by Noor!Design. Then I bend the edged up and down a bit and inked them up.
And this gear border just fits on everything - even on a doctor's bag. It was cut using a sheet of paper coming in the Fading Colors Paperbloc and it is turning from light to dark at the edges. In this paperbloc you can also find the dotted paper that I used a scrap piece on this bag as well.

Die Tasche wird mit einem Magnet verschlossen:
The bag is closed with  a magnet:


Aber diese Öffnung ist nur Fake - um an den Inhalt der Tasche zu kommen, muss man die kleine Box die das Grundgerüst der Tasche bildet, aufschieben:

But this is just a fake - to reach the chocolat inside the bag you have to open the little box that was used as the base of this bag:


Ich wünsche Euch allen einen tollen Tag und bleibt gesund!
Have a great day everyone and stay well!

Dienstag, 26. August 2014

Magnolia Down Under Challenge # 243


Hallo Ihr Lieben!
Heute gibt es eine neue Challenge bei Magnolia Down Under. "Dein liebster Magnolia-Stempel" lautet unser Thema.

Hello everyone!
Today the new Magnolia Down Under challenge starts. "Your favourite Magnolia stamp" is our new theme.

Mal ganz ehrlich - natürlich mag ich manche Magnolia-Stempel lieber als andere. Aber einen echten Liebling habe ich nicht. Und so habe ich meinen Favorit aus der neusten Kollektion verwendet - Here I am Tilda.
Die Wand, hinter der sie eigentlich hervorlugt, habe ich mit dem Barn Window abgedeckt, so dass sie uns nun aus ihrem Fenster grüßt. 
Die Form der Karte habe ich mit Hilfe der tollen Shape Art Schablone Rococo von Dutch Doobadoo erstellt. So ist diese Karte mal etwas anderes als das ewig quadratische.
Auch von den wunderbaren Noor!Design Produkten habe ich wieder einige auf meiner Karte verbastelt: den Schmetterlings-Kreis, die Randstanze und die Blätter. 

To be honest - of course I like some of my Magnolia stamps bettern than others. But I don't have the one favourite stamp. And so I used my favourite from the newest collection on this card - Here I Am Tilda.
The wall, that she is originally peaking from behind was covered with the barn window and now she's looking at us out of her window.
The shape of the card has been made using  the great Shape Art Stencil Rococo by Dutch Doobadoo. It's something different than my usual square cards.
And several of the beautiful products by Noor!Design hopped on my card as well: the butterfly circle, the border and the leaves.


Donnerstag, 21. August 2014

Whiff Of Joy Challenge # 184


Hallo Ihr Lieben!
Heute startet die erste Whiff of Joy Challenge nach der Sommerpause - und unser Thema lautet "shaped cards".

Hello everyone!
Today the first Whiff Of Joy challenge after our summer break goes life - and our theme for this fortnight is "shaped cards".

 Ich habe dafür dieses alte, aber wirklich edle Motiv von Elisabeth Bell verwendet und, vom Motiv inspiriert, eine Laternenkarte damit gewerkelt.
Als Glas in der Laterne habe ich etwas Vellum verwendet, das ich mit Hilfe eines Embossingfolders geprägt habe. 

I used this quite old but so elegant stamp by Elisabeth Bell for it and made, inspired by the image, a lantern shaped card.
I used Vellum that I dry embossed as the "glass" of my lantern.

Um die Laterne weihnachtlicher wirken zu lassen, habe ich aus glitzerndem Cardstock die Sternenbordüre gestanzt.
Der Text ist aus dem Stempelset Das ist Dezember.

To make the lantern more christmas-sy I cut the stars border from silver glitter cardstock.
The saying comes in the german text set Das ist Dezember.

Oben am Griff der Laterne habe ich neben Sternen, einem Glöckchen und etwas Spitzenband noch zwei Ilexblätter, geschnitten mit dem Die-Lights Set Stechpalmenzweige, angebracht.

To the handle of the lantern I added a few stars, a little bell, some lace and some holly leaves, cut using the Die-Lights set Holly.


Mittwoch, 20. August 2014

Noor!Design Blog Hop im August 2014

Hallo Ihr Lieben!
Heute haben wir, das deutsche DT von Noor!Design, einen Blog Hop für Euch vorbereitet. Apropos vorbereitet - weil Weihnachten ja immer so plötzlich kommt, sind wir diesmal vorbereitet und geben Euch mit dem Thema "Weihnachten im August" ein paar Anregungen für Eure Weihnachtswerkstatt. Und dabei stehen natürlich die tollen Produkte von Noor!Design im Vordergrund!

Hello everyone!
Today we, the german Noor!Design designteam, have prepared a Blog Hop for you. And talking about preparing - christmas comes so soon every years and so we are prepared for it this year and are giving you some inspirations for your christmas crafts with this blog hop's theme "christmas in august". And of course the amazing products by Noor!Design are in the focus!

Der Hop startet auf dem Noor!Design Deutschland Blog - dort findet Ihr auch eine komplette Liste des Hops, falls Ihr unterwegs den Faden verliert. Und falls Ihr nicht von Angela's Blog gekommen seid, solltet Ihr ganz schnell auf den Noor!Design Deutschland Blog hüpfen um von dort die Tour zu starten. Nicht, dass Ihr etwas verpasst!

The hop starts over at the Noor!Design Germany Blog - and this is also where you can find a complete list of the hop order, just in case you get lost. So, if you didn't come here from Angela's Blog make sure to start the hop over at the Noor!Design Germany Blog to not miss a single step!

Und dies ist die Karte, die ich für diesen Hop gewerkelt habe:
And this is the card I made for this hop:


Mal sehen, vielleicht wird das dieses Jahr mein Wunschzettel für Weihnachten... mit dem tollen Wish-List Stempel von Noor!Design, der wirklich groß ist, würde sich das ja direkt anbieten. Ich habe diesen Stempel als Hauptelement verwendet und die Deko darum angeordnet. Das Motiv ist ein relativ alter Stempel von Sugar Nellie, den ich aber schon immer geliebt habe. Und mit dem Kuvert und dem Stift in der Hand bot sich die Kleine für meine Karte natürlich an.
Sie steht auf der wunderschönen Schneeflocken-Bordüre von Noor!Design, davor habe ich noch eine Feder gesetzt - in der Hoffnung damit zu verdecken, dass die Kleine barfuß ist. LOL Aber die Feder gibt so einen fluffigen Touch, wie frisch gefallener Schnee.
Dahinter habe ich den Zaun von Noor!Design gesetzt - der ist so wunderbar filigran.
Hinter dem Zaun wachsen zwei Tannen und dahinter habe ich den Schneeflocken-Kreis gesetzt. So wird die Form der Karte etwas aufgelockert.
Links am Wunschzettel befindet sich wieder der wunderbare Schnörkel - und oben links in der Ecke fliegt schon mal der Weihnachtsmann in seinem Schlitten samt Rentieren vorbei...

Let's see, maybe I will use this as my christmas wishlist for this year... with the great wishlist stamp by Noor!Design this would be an easy way. I used it as the main element and arranged the decorations around it. The image is an older one by Sugar Nellie that I habe always loved. And with the envelope and the pen in her hand she was the perfect one for this project.
She's standing on the snowflake border by Noor!Design and in front of her I added a white feather - hoping to cover that she's barefoot. LOL But the feather adds a fluffy touch like fresh fallen snow.
Behind her I put the fence by Noor!Design. I love the elegant and filigrane look of it.
Behind the fence there are growing two trees and behind those I put the snowflake circle. With this the shape of the card looks more interesting.
On the left of the wish list I once again put the beautiful flourish - and in the top left corner Santa in its sleigh and his reindeers are flying by...


Ich habe den Schlitten ein wenig gebogen, zwischen den einzelnen Rentieren geht das prima!

I bend the sleigh a bit - between the single reindeers this works great!

Die Designpapiere auf meiner Karte findet Ihr alle im Winter Wishes Papierblock von Noor!Design. Der ist komplett in warmen Braun- und verschiedenen Türkistönen gehalten und ich finde ihn wunderschön.

The designer's papers on my card can all be found in Noor!Design's Winter Wishes Paperbloc. It contains warm browns and different shades of turquoise and I so love it.

Ich hoffe, Euch hat mein Werk gefallen und zu einer eigenen Weihnachtsbastelei inspiriert. Jetzt ist es Zeit, Euch weiter zu schicken. Der nächste Stop auf diesem Blog Hop ist der Blog von Susanne. Ich wünsche Euch noch viel Spaß!

I hope you liked my card and maybe got inspiration for your own christmas project in august. Now it's time to send you to the next stop of the hop which is Susanne's blog. Enjoy the journey!


Montag, 18. August 2014

Eine Winterfee mitten im August


Hallo Ihr Lieben!
Heute gibt es auf dem Noor!Design Deutschland Blog wieder eine Karte von mir zu sehen. Und diesmal ist sehr winterlich ausgefallen...

Hello everyone!
Today I am sharing a new card over at the Noor!Design Germany Blog. And it turned out pretty winter-ish...

Die süße Fee von Sugar Nellie flatterte mir buchstäblich auf den Tisch und durfte dann gleich auf die Karte weiterhüpfen. Und auf einmal bildete sich eine wunderschöne Eisblume hinter ihr. Okay, ich wars, ich habe den tollen Schneekristall/Stern von Noor!Design verwendet. Auch der grandiose Schnörkel musste wieder mit herhalten. Und im Hintergrund, aus Papier mit leichtem Glitzermuster ausgestanzt, könnt Ihr einen Blick auf das Gitter der Hintergrundstanze erhaschen... 

This cute fairy by Sugar Nellie was fluttering around in my room and then I allowed her to sit on my card. And when she did so, a beautiful ice flower appeared behind her... Okay, it was my who put this amazing snowflake/star by Noor!Design behind her. And also the beautiful flourish had to be used again. In the background you can see the mesh from the background die peaking through, cut from a white paper with some silver glitter...


Ein paar Eiskristalle verstärken den frostigen Look der Karte noch. Und das Papier ganz im Hintergrund ist ebenfalls von Noor!Design. Eigentlich aus dem Papierblock Dance to the Music, und es ist fast ein wenig schade, dass die Noten und Notenschlüssel nicht zu sehen sind. Aber rein farblich passte es einfach zu gut, um es nicht zu verwenden.

A few rhinestones make the frosty look of this card perfect.
The designer's paper in the background of the card is also by Noor!Design. It comes in the paperbloc Dance to the Music, and it's a little sad all those notes can't be seen. But colorwise it was just too perfect to not use it on my card.

Schaut doch auf dem Noor!Design Blog vorbei, dort erfahrt Ihr noch mehr über meine Karte.

Hop over to the Noor!Design Blog to read more about my card.


Samstag, 16. August 2014

Back to school...


Hallo Ihr Lieben!
Noch sind zwar Sommerferien, aber der Schulstart rückt näher... Und so habe ich heute eine kleine Verpackung für Euch, die ich nach der Anleitung von Nicole gebastelt habe. Sie enthält ein Pick-Up und am ersten Schultag nach den Ferien mit in die Schultasche gepackt, versüßt sie diesen Tag bestimmt.

Hello everyone!
Our kids are still on vacation but the first day of school is coming closer... And so I made a little box today, that I made following the tutorial by Nicole. It holds a Pick-Up and if you put this into your kids' school bag on the first day of school it sure makes this day a little easier for them.

Die  Box ist nicht allzu groß, aber ideal für den Stempel Pünktlich zur Schule. Der Stempel kommt zusammen mit dem Text, den ich ebenfalls hier verwendet habe. Er ist auf schwarzem Cardstock gestempelt, den ich mit etwas weißer Stempelfarbe gewischt habe, und weiß embosst. Außemrum habe ich dann einen "Tafelrand" gesetzt.

This box isn't very large but perfect in size for the image On Time for School. The stamp also comes with the text, that I used on this box. It is stamped on a piece of black cardstock that I added a hint of white stamping ink to. Then I used white embossing powder on the saying. Around the saying I added a "chalk board frame".

Oben habe ich ein kleines Banner gesetzt und dafür das Die-Light Set Kleine Banner verwendet. In all meinen Cutting Dies konnte ich keinen Stern finden, der klein genug für das Banner war - bis ich auf das Die-Light Set Kleine Weihnachtsanhänger. Der Stern in der Mitte der Schneeflocke war perfekt!

I added a little banner to the box and used the Die-Light set little banner for it. And in all my cutting dies I wasn't able to find a small star until I came across the Die-Light set Christmas Tag. The star in the middle of the snowflake was just perfect in size!

Ein paar kleine Zahlen und ein Stück Washi-Tape zusammen mit etwas Cheesecloth waren dann die Elemente, die ich weiter zum Dekorieren der Box verwendet habe.

A few numbers and a piece of Washi Tape, together with some cheesecloth, were the elements that I used to finish the box.


Auf der Rückseite habe ich mit Brads je zwei Kreise angebracht, zwischen die ich ein Stück Faden geklemmt habe. So wird die Box verschlossen.

I used brads to attach circles to the back of the box and then sealed the box using some twine.


Donnerstag, 14. August 2014

Happy Day mit Whiff Of Joy


Hallo Ihr Lieben!
Heute möchte ich Euch ein weiteres Werk mit den neuen Digistamps von Whiff Of Joy zeigen: ein Tag mit dem süßen Henri grüßt Hummer.

Hello everyone!
Today I want to share  new creation with one of the new digi images by Whiff Of Joy: a tag with Henry greets Lobster.

Ich liebe die Farbkombi aus rot, weiß und blau - die ist so schön sommerlich. Und weil die Kombi auch noch perfekt zum Motiv passt, habe ich sie auch für diesen Tag gewählt. 
Hier mal noch ein Foto ohne die Bänder oben, so kann man den Tag selbst besser sehen:

I love the color combination of red, white and blue - it's so summer-ish. and since this combi also goes perfectly with the image I've chosen it for this tag again.
Here's another picture without the ribbon on top so the tag itself can be seen better:


Hinter Henry habe ich die Sternenbordüre gesetzt. Dadurch, dass die Sterne nicht ausgefüllt sind, ist sie nicht so wuchtig.
Den ausgestanzten Text findet Ihr im Die-Lights Set Pillowbox, zusammen mit einer Stanzform für eine Pillowbox und 3 weiteren Texten.

Behind Henry I put the stars border die-light. Since the stars aren't filled this border is pretty light and not taking all the attention.
The cut out saying can be found in the Die-Light set Pillowbox. It comes with this saying, a pillowbox cutting die and another 3 texts.

Die Ränder der Designpapiere sind wieder mit Crackling Paint überzogen. Und oben an die Schleifenbänder habe ich noch die schöne französische Lilie aus der Box of Charms # 7 gehängt.

The designer's papers have once again been covered with Crackling Paint. And onto the ribbons I hung the beautiful french lily charm from the Box of Charms # 7.


Dienstag, 12. August 2014

Eine Geburtstagskarte


Hallo Ihr Lieben!
Heute möchte ich Euch eine Karte zeigen, die ich für eine kleine Lady gebastelt habe, die demnächst ihren 9. Geburtsta feiert...

Hello everyone!
Today I want to share a card that I made for a little lady that is going to celebrate her 9th birthday soon...

Sie steht total auf pink - also war das natürlich auch die Farbe die meine Karte haben musste.
Ich habe eines der neuen Scrapberries Motive von Sugar Nellie verwendet. So eine Prinzessin sollte doch die richtige Wahl für diesen Anlass sein, oder?
Den großen Stern im Hintergrund habe ich mit einer der Schablonen von Dutch Doobadoo geschnitten. Es ist so einfach, wenn man mit ein paar Schnitten perfekt aufeinander passende Figuren ausschneiden kann.
Ein kleiner Sternentag und ein Sternencharm sind die passende Ergänzung dazu. Eigentlich wollte ich einen Text wie "today you're the star" verwenden, habe mich aber dann umentschlossen. 

This little lady totally loves pink - so this was the color I wanted to use on my card.
I used one of the new Scrappberries images by Sugar Nellie. Such a cute little princess should be the right choice for this card, right?
The big star in the background has been cut using one of Duch Doobadoo's stencils. It's so easy if you just need to make few cuts with your scissors to get perfectly matching shapes.
A little star tag and a star shaped charm match the huge star perfectly. Originally I wanted to use a saying like "today you're the star" on the card, but then I didn't have a stamp like this and changed my mind.


Im Hintergrund könnte Ihr ein Gitter erkennen - ein neues Softboard Art Muster von Dutch Doobadoo. Die sind aus einem Material ähnlich wie Bierdeckel gefertigt, lassen sich leicht schneiden und auf alle möglichen Arten bearbeiten und verzieren. Ich habe es hier mit weißer Acrylfarbe und Stickles überzogen.

In the background you can see a mesh - it's a new Softboard Art shape by Dutch Doobadoo. These are made from a kind of soft chipboard, can easily be cut and can be decorated in many different ways. Here I covered it with white acrylic paint and added Stickles to it.

So, die Karte ist unterwegs und macht der Empfängerin hoffentlich eine Freude... ;)

So, the card is sent out and I hope the little recipient will enjoy it... ;)


Sonntag, 10. August 2014

Eine Fotoapparat-Karte


Hallo Ihr Lieben!
Heute gibt es auf dem Noor!Design Deutschland Blog wieder ein Werk von mir zu sehen.Da ich schon in Urlaubsstimmung bin und zu einem schönen Urlaub ja auch die Fotos gehören, die einen an grauen Wintertagen an die schönen Tage erinnern, habe ich diese Kamera-Karte gemacht. Sie sieht super aufwändig aus, aber mit der genialen Schablone von Dutch Doobadoo war sie wirklich schnell gemacht!

Hello everyone!
Today I am sharing another project over at the Noor!Design Germany Blog. I have already gone on vacation - at least mentally. And since those photos we take are something we all need during grey winter days to remind us of those sunny and warm sommer days I made this camera card. It looks quite complicated but with the great stencil from Dutch Doobadoo this card was made really quick!


Der Umschlag der Karte hat die Form eines Fotoapparates. Den habe ich mit dem einfach wunderschönen Schnörkel verziert, dazu den Filmstreifen und das kleinere Blatt, alles natürlich von Noor!Design, verwendet. Der größere der Filmstreifen ist in der Mitte etwas nach oben gebogen. So erhält die Karte zusätzlich etwas dreidimensionales und der Streifen schaut wirklich echt aus.
Das Motiv ist von Sugar Nellie.

The envelope of the card has a camera shape. I decorated it with the beautiful flourish, also used the filmstrip and the smaller leave, of course all of these cutting dies by Noor!Design. The longer filmstrip is only attached to the card on the left and right side and the middle I bend a little away from the card. So the card gets a 3 dimensional touch and the strip looks so real.
The image is by Sugar Nellie.


Das herausziehbare Kärtchen habe ich mit zwei Polaroids verziert - ebenfalls mit Hilfe von Schablonen von Dutch Doobadoo hergestellt. Hinter dem kleineren Foto versteckt sich ein Stück einer der vielen schönen Randstanzen von Noor!Design.
Zum Beschriften habe ich die Alphabeth-Dies von Whiff Of Joy bzw. meinen Dymo verwendet. Eine Mini-Büroklammer kompletiert das ganze. Und nein, auf dem Tab oben steht NICHT "full", sondern "pull", aber wie das mit dem Dymo manchmal ist, stimmen die Abstände nicht immer. Aber gerade das macht ihn für mich so liebenswert. 

The pull out card is decorated with two Polaroids - also cut using a stencil by Dutch Doobadoo. Behind the smaller one of the photos you can see a piece from one of the many beautiful border dies by Noor!Design.
To decorate the photos I used the Alphabeth Dies from Whiff Of Joy and my Dymo. A mini paperclip makes all this complete. And no, I didn't write "full" on the tab. It reads "pull" but you know how it goes with those old Dymo label writers - sometimes the spaces aren't even. But that's exactly why I love it so much.


Dienstag, 5. August 2014

Tag you're it tuesday auf dem Whiff Of Joy Blog

Hallo Ihr Lieben!
Es ist Zeit für einen neuen Tag You're It Tuesday auf dem Whiff Of Joy Blog. Wie immer sucht ein DT-Mitglied - in diesem Fall ich - sich Inspiration bei einem Werk der Whiff Of Joy Kunden. Ich habe einen Wimpel von Andrea Pulsatilla entdeckt und sofort eine Idee im Kopf gehabt, wie ich das auf einem Tag umsetzen kann.

Hello everyone!
Time for another tag you're it tuesday over at the Whiff Of Joy blog. As always a DT member - this time me - is looking through the Whiff Of Joy customers' creations to find inspiration for a tag. I found a banner by Andrea Pulsatilla and had an idea coming to my mind.

Ich habe wieder die Nested Tags Die-Lights verwendet - einmal habe ich den Tag komplett aus dem gepunkteten Papier gestanzt, einmal nur den oberen Teil aus einem anderen Designpapier. Den Rand habe ich dann noch mit einer Bordüre schöner gestaltet.
Das Motiv ist aus dem Sommer-Stempelkit, dessen Motive Ihr nun auch einzeln als Digi-Stamps kaufen könnt. Hier ist der süße Henri mit Fernglas auf den Tag gehüpft.
Den Text findet Ihr im Stempelset Fun in the Sun und der Charm ist einer der vielen Motive in der Box of Charms # 7.

Again I used the Nested Tags Die-Light Set - once I cut the complete tag from the blue designer's paper, once I cut only the top of it from a different designer's paper. The edge of this has been cut nicer with a border die.
The image is from the summer stamp kit. The images from the kit can now be bought individually as digi stamps. Here I used cute Henry with Telescope.
The saying can be found in the stamp set Fun in the Sun and the charm is one of the many different shapes coming in the Box of Charms # 7.

Montag, 4. August 2014

Das Leben ist ein Abenteuer


Hallo Ihr Lieben!
Heute darf ich auf dem Noor!Design Deutschland Blog eine weitere Karte mit Euch teilen.

Hello everyone!
Today I am sharing a new creation with you over at the Noor!Design Germany Blog.

Ich finde die Zahnrad-Stanzen von Noor!Design einfach genial. Und so habe ich diesmal das Motiv nach den Stanzen, die ich verwenden möchte, ausgewählt. Als ich durch meinen "Schätze" gewühlt habe, ist mir der süße Igel von Sugar Nellie in die Hände gefallen - und der passte genau! Es ist ja nicht so, dass die Zahnräder nur für Männerkarten geeignet sind, aber als ich das Motiv sah, hatte ich sofort eine passende Idee im Kopf. Und so ist diese Karte entstanden.
Den Zahnrad-Kreis habe ich zweimal ausgestanzt, einmal aus hellbraunem und einmal aus blauem Cardstock. Beide schimmern leicht metallisch. Der hellbraune versteckt sich etwas im Hintergrund während ich den blauen bewusst als "Eyecatcher" eingesetzt habe.
Auch die Zahnrad-Bordüre hat den Weg auf die Karte gefunden - und auf der rechten Seite greifen die Zahnräder vom Kreis und von der Bordüre perfekt ineinander.

I love the gear dies by Noor!Design. And so for this card I picked my image after choosing the dies I wanted to use. I went through my stamps and re-discovered this cute hedgehog by Sugar Nellie - and it was exactly what I was looking for! It's not that gears only go with boys' cards but when I saw the image I had the idea for my card popping up in my mind.
The gear circle has been cut twice - once from light brown and once from blue cardstock. The paper has a metallic shimmer. The light brown gear circle is hiding a bit in the background while I used the blue one as an eyecatcher on my card.
Also the gear border found its way on my card. And on the right side of the card the gears from the circle and the border fit together perfectly.

Coloriert habe ich diesmal mit meinen Prismacolor Stiften. Ich hatte mal wieder Lust darauf - aber für das nächste Motiv habe ich dann doch wieder zu meinen Copics gegriffen. ;)
Ein Mini-Bottlecap mit einem kleinen Flugzeug und ein Stück Filmstreifen ergänzen die Karte.

I colored the image in with my Prismacolor Pencils. It was fun to use them again after a long time - but for the next card I went back to my Copics. ;)
A mini bottlecap with an airplane and a piece of filmstrip complete the card.

Dienstag, 29. Juli 2014

Magnolia Down Under Challenge # 241


 Hallo Ihr Lieben!
Heute startet die neue Challenge bei Magnolia Down Under mit dem Thema "anything goes". Also was leichtes, so zum Ferienstart...

Hello everyone!
Today the new challenge at Magnolia Down Under went live and the theme is "anything goes". So it's something easy for the start of school holidays...

Ich habe hier die neue Tilda with summer pants coloriert und sie für eine Danke-Karte verwendet.
Die schöne Spitzenbordüre und der Stern sind, ebenso wie die Blätter, neue Stanzen von Noor!Design. Und wenn Ihr Euch das Magazin von Noor!Design besorgt, findet Ihr darin nicht nur viele tolle Ideen und Inspirationen, sondern auch einen Sketch, den ivh für meine Karte verwendet habe.

I used this new Tilda with summer pants to make a thank you card. 
The beautiful lace border and the star are new dies from Noor!Design, and so are the leaves I put underneath the roses. And if you get yourself a copy of the Noor!Design magazine you will not only find lots of ideas and inspiration but also a sketch in it, that I used for my card.


Montag, 28. Juli 2014

Whiff Of Joy Project of the Month


Und schon wieder ein fröhliches Hallo Euch allen!
Heute möchte ich Euch die Karte zeigen, die ich für unser Monatsprojekt auf dem Whiff Of Joy Blog gemacht habe. Jeden Monat zeigen Euch einige vom Designteam ein Werk zu einem "Thema des Monats". Und diesmal lautet es "summer seaside", also so viel wie Sommer am Meer.

And again a happy hello to all of you!
Today I want to share the card I made for the monthly project over at the Whiff Of Joy Blog. Each month a few of us designteam members share a project made using the theme of the month. For july this is "summer seaside".

Ich habe dieses etwas ältere Motiv aus der Simply Maya Reihe verwendet - und als ich Euch gerade den Link mit einstellen wollte, konnte ich es im Shop nicht finden. Es ist wohl gerade ausverkauft, aber es kommt bestimmt wieder. Da die Urlaubszeit vor der Tür steht, habe ich meine Karte bereits Anfang Juli gemacht. Aber um eine sommerliche Karte zu machen, könnt Ihr ja auch wunderbar die neuen Henri-Digis aus dem Sommer-Stempelkit verwenden, die es seit 20. Juli auch als einzelne Digis zu kaufen gibt.

I used this older image from the Simply Maya range. I wanted to share a link with you but I just can not find this image online at the moment. Seems like it's sold out but I'm sure it will be back in stock soon. Since vacation time is just around the corner I made my card beginning of july. But to make a summer-ish creation you can perfectly use the Henry Digis from the summer stamp kit, that are available as single digi stamps since 20th of july.

Der Sternentag und das Holzschild sind von Magnolia, die Wort-Stanze von Kulricke und der Text von Catslife Press.

The star tag and the wooden sign are by Magnolia, the word die by Kulricke and the saying by Catslife Press.


Sonntag, 27. Juli 2014

Eine Karte für den Noor!Design Blog


Hallo Ihr Lieben!
Heute darf ich auf dem deutschen Noor!Design Blog eine Karte zeigen - und das ist dafür entstanden.

Hello everyone!
Today I am the one sharing a card with you over at the Noor!Design Germany Blog - and this is the card I made for my post.

Ich wollte etwas sommerliches machen - und die Schmetterlingsbordüre  war mal wieder ganz oben auf meiner Liste. Und so habe ich diese süße Tilda von Magnolia dazu ausgewählt und mit Copics coloriert. 
Auch der tolle Gitter-Hintergrund ist von Noor!Design. Ich finde ihn toll - egal ob nur versteckt im Hintergrund oder - so wie hier - ziemlich im Focus auf der Karte. 
 Und auch das Label, das etwas versteckt unter dem Schmetterlings-Charm ist, ist eine Stanze von Noor!Design.

I wanted to make something summer-ish - and the butterfly border was again on top of my list of things to use. And so I colored in that cute Tilda by Magnolia with my Copics to use her on my card.
Also that amazing grid background is by Noor!Design. I love this die - no matter if you use it in the background of the card or - like I did here - quite in the focus. 
And the tag that is hidden a little behind the butterfly charm is cut using a die by Noor!Design.

Schaut doch mal auf dem Noor!Design Deutschland Blog vorbei, dort könnt Ihr noch weitere Details über meine Karte lesen.

Please hop on over to the Noor!Design Deutschland Blog to read more details about my card.


Samstag, 26. Juli 2014

Stempeleinmaleins - Ausgabe vom 26. Juli 2014


Hallo Ihr Lieben!
Heute startet unsere letzte Stempeleinmaleins-Challenge, bevor wir für einen Monat in Sommerpause gehen. 
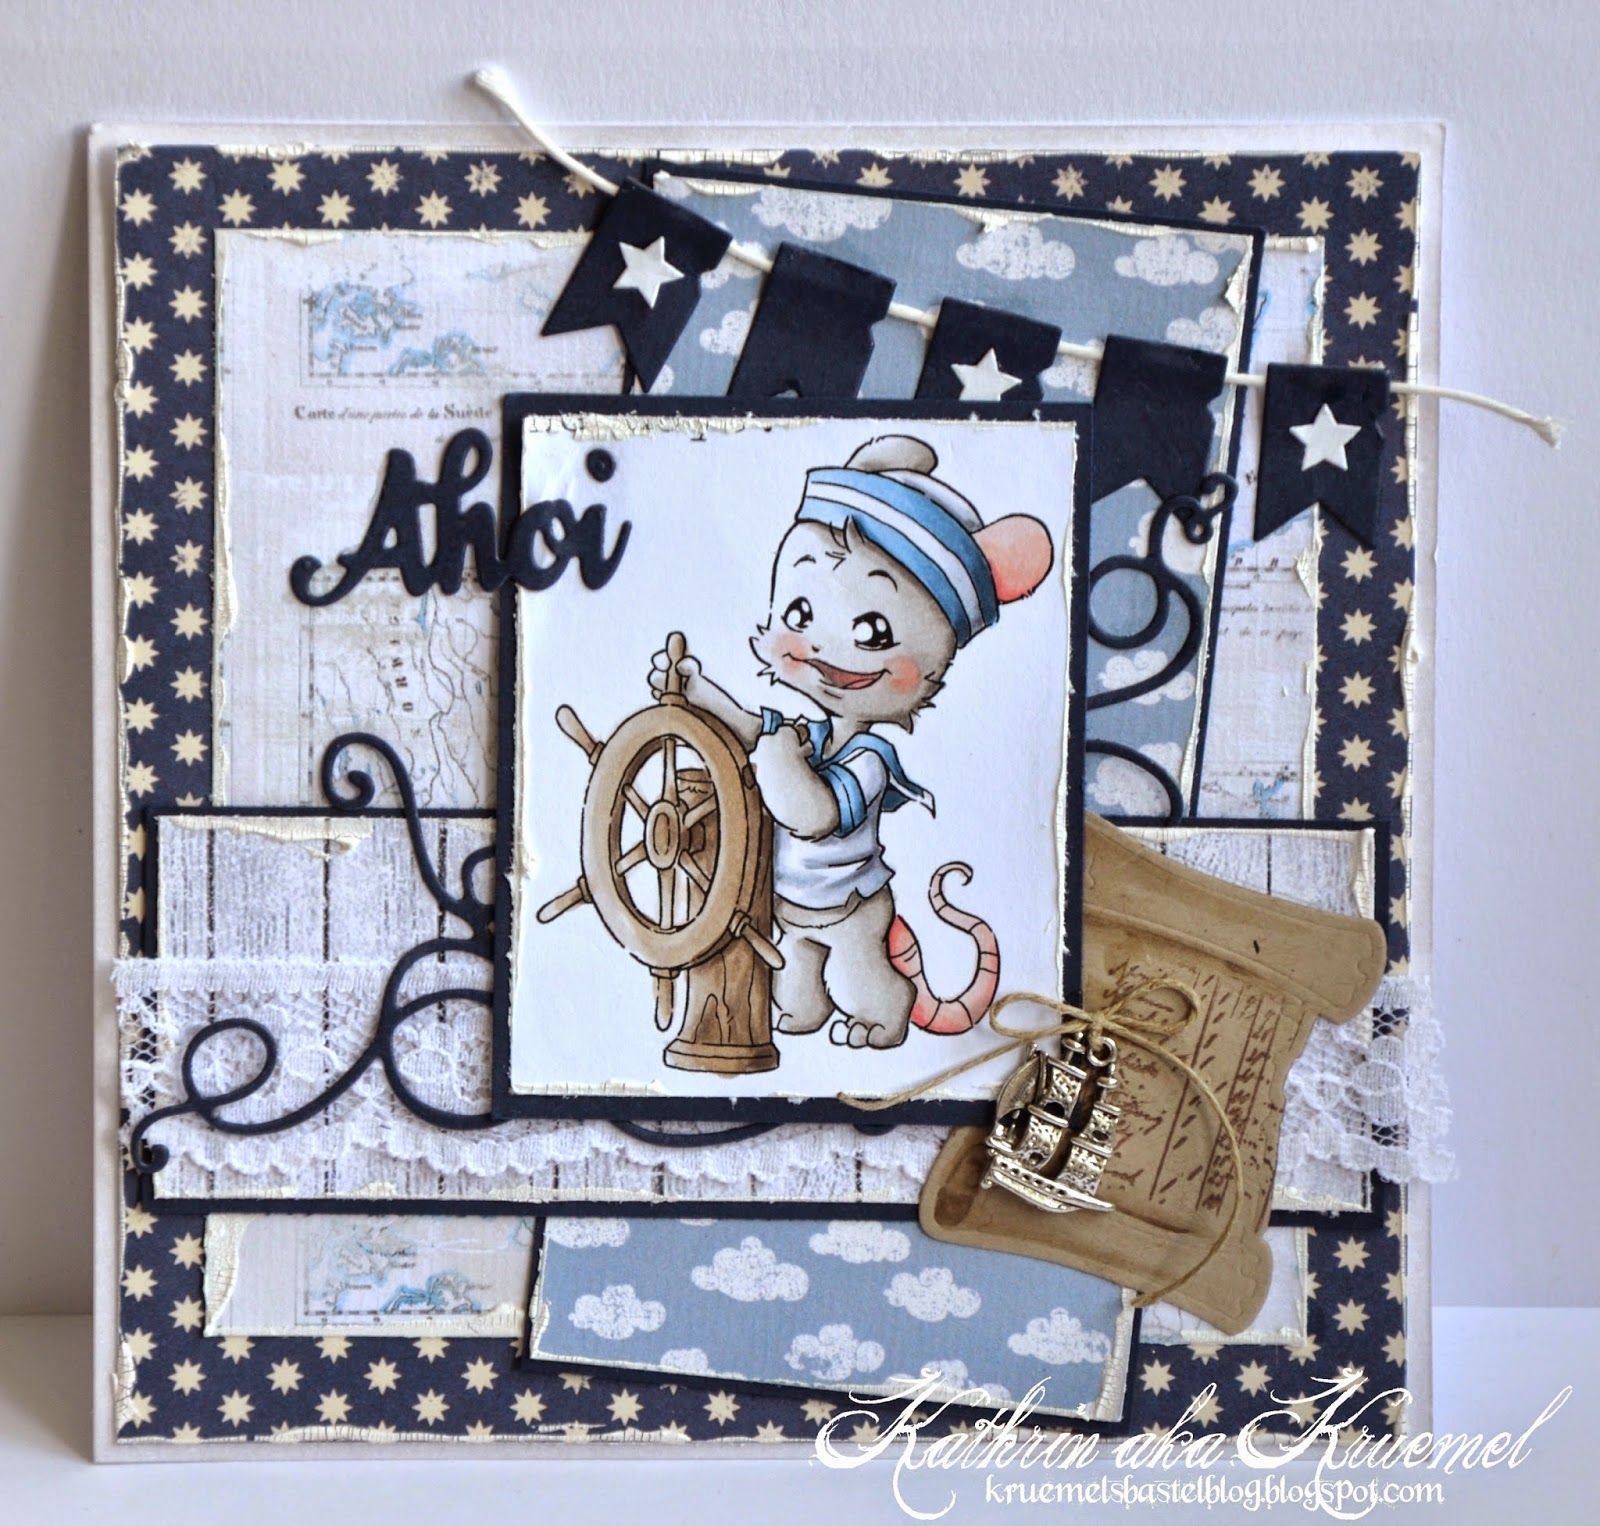
Wie immer gibt es einen Sketch und eine Option - diesmal lautet diese "Wortstanzen". Wir werden diesmal von Kulricke gesponsert und von Ihr ist auch die Ahoi-Stanze. Passt die nicht perfekt zu dem süßen Steuermann-Henri von Whiff Of Joy?

Hello everyone!
Today the last challenge over at Stempeleinmaleins goes life before we take a well-deserved summer break.
As usual there is a sketch and an optional extra - and this time it's "word dies". We are getting sponsored by Kulricke for this challenge and she's also who sells the Ahoi word die. Isn't it the perfect one for this cute Helmsman Henry by Whiff Of Joy?

Henri ist mit Copic coloriert. Oben habe ich quer über die Karte eine Girlande, gestanzt mit dem Kleine Banner Die-Light Set, gespannt.
Die Schriftrolle ist ebenfalls von Whiff Of Joy und heißt "Nachrichten".  Ich habe sie mit einem Text von SU bestempelt.

Henry has been colored with Copics. On top of the card I hung up a garland, cut using the Little Banner Die-Light Set.
The rolled paper is by Whiff Of Joy as well and is called "Messages". I stamped a text by SU on it.

Die Karte ist nicht so sehr verziert, aber ich denke, das muss auch nicht immer sein, oder?

The card isn't decorated so much but it doesn't always have to be, right?


Montag, 21. Juli 2014

Ein Whiff Of Joy Tag


Hallo Ihr Lieben!
Ich weiß, eigentlich ist Hochsommer. Aber bei den Temperaturen wünscht man sich ein wenig Abkühlung. So ein schöner Herbsttag wäre da genau recht. Und so habe ich mich zu diesem Tag inspirieren lassen.

Hello everyone!
I know, it's summer. But the weather outside is so hot at the moment, that I'd wish for a warm - but not hot -, sunny fall day. And that got me inspired to make this fall-ish tag today.

Ich habe dafür das Motiv "Maya's Kätzchen auf einem Kürbis" von Whiff Of Joy verwendet und auf einen Tag, gestanzt mit der größten Stanze aus dem Die-Light Set Nested Tags, gesetzt.
Das Tag, geschnitten aus kraftfarbenem Cardstock, habe ich etwa hälftig embossed und mit Distress Inks eingefärbt. Nur ganz leicht, dass nur die erhabenen Stellen Farbe abbekommen haben. 
Anschließend habe ich ausgestanzte Blätter und Ranken aufgeklebt und einen Text, den ich mit dem Computer geschrieben habe (mein Dymo ist unauffindbar!).
Zu guter letzt habe ich dann noch etwas Spitze und Band angebracht und daran einen Charm aus der Box of Charms # 18 - Blätter - angebunden. 
Jetzt kann der Herbst kommen! ;)

I colored the image "Maya's little kitten on a pumpkin" by Whiff Of Joy and sat her on a tag, cut using the biggest die from the Nested Tags Die-Light set. 
The tag has been cut from craft cardstock and I embossed about half of it. Then I used my Distress Inks to add some color to it, just slightly going over the tag so only the embossed swirls get inked. 
Then I made a border from cut out leaves and twines and a saying that I printed with my computer (for nothing in the world I can find my Dymo since we moved 1,5 years ago!).
At the end I added some lace and ribbon to the tag and put a charm from the Box of Charms # 18 - leaves - on as well.
So, I am ready for fall! ;)


Samstag, 19. Juli 2014

Stempeleinmaleins - Ausgabe vom 19. Juli 2014


Hallo Ihr Lieben!
Heute gibt es wieder eine neue Ausgabe des Stempeleinmaleins. Und passend zum heißen Wetter machen wir heute eine Eishörnchenkarte.

Hello everyone!
Today there is a new issue of Stempeleinmaleins - and matching the hot summer weather we're having here in Germany we make an ice cream card today.

Für meine Karte habe ich nach langem mal wieder einen Elisabeth Bell Stempel coloriert. Dabei mag ich die doch eigentlich so sehr!
Die Eiswaffel ist mit einem Prägefolder von Cuttlebug geprägt und anschließend etwas gewischt worden.
Der große Schmetterling ist von Whiff Of Joy.

For my card I inked up an Elisabeth Bell image - the first one since ages. And that allthough I love them so much!
The ice cream cone has been embossed using an emossing folder by Cuttlebug, then I used Distress Inks on the edges.
The big butterfly is by Whiff Of Joy.

So, bei mir ist heute internationales Basteln mit lieben Freunden angesagt. Habt alle einen schönen Tag!

So, today I have an international stamp meeting at my house. Have a wonderful day everyone!