Montag, 17. Juli 2023

Summer Happiness

 
Hallo Ihr Lieben!
Heute habe ich eine Sommerkarte zu zeigen, die eigentlich ganz anders geplant war. Aber das hat alles nicht so auf die Karte gepasst, also habe ich meine Pläne geändert....

Hello everyone!
Today I have this summer card to share with you. This card was planned completly different, but those elements just didn't fit the card, so I changed my plans...

Als unsere Kinder klein waren, sind wir, wie bestimmt viele, am liebsten nachts in den Urlaub gefahren. Und irgendwie ist das bis heute so geblieben. Und egal, wie lang wir unterwegs waren und wie müde wir bei der Ankunft waren - ohne uns um irgendetwas wie Auto ausladen oder ähnliches zu kümmern, war der erste Gang ans Meer, meist genau passend zum Sonnenaufgang. Ab immer noch setzt ab da bei mir das Urlaubsgefühl ein. Und statt wie geplant ein Strandhaus mit Palmen und Auto an den Strand zu stellen, habe ich stattdessen eine kleine Familie bei eben diesem ersten, frühmorgendlichen Gang ans Meer auf die Karte gesetzt. Nun, wir haben keinen Hund und auch keinen Sohn, stattdessen statt der hier gezeigten zwei Kinder drei Töchter, aber so viel Freiheit habe ich mir genommen.

When our kids were still little, we preferred driving during the night when we went on vacation. That is still my preferred time to travel. And no matter how long it took us to arrive or how tired we were from driving all night - without bothering with stuff like unloading the car the first thing we did after our arrival was go to the beach, most times we just saw the sun rise there. And still, this is the moment the vacation really starts for me. So instead of putting a beach house with palm trees and the car on my beach, I put a little family onto the card, showing just that special moment. Well, we don't have a dog and also no son, we have three daugthers instead of the two kids shown on the card, but that's just how the elements looked best on my card.


Für den Himmel habe ich ein Stück weißen Cardstock mit Distress Oxide Crackling Campfire, Lumberjack Plaid, Wilted Violet, Villanious Potion und ein wenig Black Soot gewischt und dann etwas Wasser aufgespritzt.
Darauf kam der Sunrise Backdrop von LawnFawn - den habe ich etwas nach oben geschoben, so dass die Sonne nicht komplett hinter dem Wasser verschwindet. Ich habe ihn aus gelbem Cardstock gestanzt und mit Distress Oxide Wild Honey, Spiced Marmalade und Crackling Campfire gewischt. Dann habe ich ihn auf den gewischten Himmel geklebt und goldene Metallic Watercolor über beide Lagen gespritzt.

For the sky I inked a piece of white cardstock with Distress Oxide Crackling Campfire, Lumberjack Plaid, Wilted Violet, Villanious Potion and a bit of Black Soot, then flicked a bit of water onto the color for an oxidized look.
Then I die cut the Sunrise Backdrop by LawnFawn from yellow Cardstock and inked it with Distress Oxide Wild Honey, Spiced Marmalade and Crackling Campfire. I glued it onto the inked background, moving the die cut up a bit so the sun won't be hidden completly behind the ocean, then flicked some gold metallic watercolor onto both layers.


Die nächste Lage bildet dann das Meer. Hierfür habe ich die obere Kante eines Stücks weißen Cardstocks mit einer der Stitched Simple Wavy Borders in Wellenlinien gestanzt und es dann mit Distress Oxide Salty Ocean, Prize Ribbon und Chipped Sapphire gewischt. Anschließend habe ich eine der Beach Sunset Stencils aufgelegt und mit weißer Stempeltinte die Reflektionen aufs Wasser gewischt. Anschließend habe ich etwas goldene Stickles aufgetragen. Es war so heiß, dass der Kleber wirklich sofort getrocknet ist, ich hatte nichtmal Zeit, ihn richtig zu verteilen. Deswegen wirkt er ein wenig fleckig.
Den Tropical Backdrop habe ich dann aus braunem Cardstock gestanzt und den unteren Sandbereich mit Distress Oxide Walnut Stain und Ground Espresso gewischt. Das selbe habe ich auch mit dem kleinen Sandhügel, der aus dem Build a House Beach Add-On Stanzenset ist, gemacht. Dann habe ich auch hier goldene Metallic Watercolor und jeweils etwas schwarze und weiße Acrylfarbe aufgespritzt. Die Palmen aus dem selben Set habe ich aus schwarzem Cardstock gestanzt und auf die Palmen, die mit dem Rahmen gestanzt werden, geklebt. 
Und dann kamen natürlich die Motive an die Reihe. Die Familie samt Hund sind alle aus dem Set Tiny Friends. Das Auto ist aus dem Set Car Critters und ich habe es mit Motiven aus dem Car Critters Road Trip Add-On beladen. Dafür habe ich zwei Motive übereinander gestempelt und so auf die Koffer noch den Schwimmring und den Sonnenschirm gestempelt. Das Surfbrett habe ich dabei wegmaskiert. Dann habe ich alle Motive einfach mit einem schwarzen Copic ausgefüllt. Ja, man sieht die Stempellinien hier immer noch ein wenig, in echt ist das aber um einiges dezenter als hier auf dem Bild. Dann habe ich alle Motive ausgeschnitten und bei dem Auto auch den Bereich hinter dem Fenster. Dort habe ich dann ein Stück Folie hinter das Auto geklebt. 
Anschließend habe ich noch gelbe Kreide verwendet und allen schwarzen Teilen an der der Sonne zugewandten Seite einen goldenen Lichtreflex gegeben.

The next layer is the ocean. I used one of the Stitched Simple Wavy Borders to cut the top edge of a piece of white cardstock into a wavy shape, then inked it with Distress Oxide Salty Ocean, Prize Ribbon and Chipped Sapphire. Next I used one of the Beach Sunset Stencils and white pigment ink to add the reflections to the water and added some gold Stickles on top. The weather was so hot here, that the Stickles literally had dried until I finished applying it and I didn't have time to really spread it as much as I had planned, so it looks a bit splotchy.
I die cut the Tropical Backdrop from brown cardstock and inked the lower sand area with Distress Oxide Walnut Stain and Ground Espresso. I did the same to the little sandy hill, that I cut using a die from the Build a House Beach Add-On die set. Then I spritzed some gold metallic watercolor and a bit of white and black acrylic paint onto the cardstock.
The palm trees from the same set I die cut from black cardstock and glued them onto the trees that get cut with the frame.
And then I took care of the images. The family including the dog are all from the Tiny Friends stamp set. The car is from the Car Critters set and I loaded it up with images from the Car Critters Road Trip Add-On set. I stamped two of the images from this Add-On Set on top of the roof and this way loaded the umbrella and the life saver on top of the suitcases. The surfboard, that's originally under the umbrella and life saver, I masked off when I did the stamping. And then I simply used a black Copic to fill in the images. Yes, you still can see the stamped lines a bit, but in real life that's way more subtle than here on those pictures. I cut out all the images and also the area of the car window. Behind it, I put a piece of acetate.
Then I used some yellow chalk to add a golden light reflection to all the black pieces.


Dann habe ich alle Elemente mit dünnem und dickem 3D Tape aufeinander geklebt und als äußeren Abschluss noch einen der Stitched Rectangle Frames, gestanzt aus schwarzem Cardstock, hinzugefügt. Der Text ist mit Stempeln aus dem Set Reveal Wheel Friends and Family Sentiments Set und weiß auf schwarzen Cardstock embosst. Dann habe ich auch ihn mit 3D Tape mittig auf die Karte geklebt und zum Schluss alles auf einem weißen Kartenrohling befestigt.

Then I put together the card, using thin and thick foam tape to adhere the different elements. To bring it all together, I die cut one of the Stitched Rectangle Frames from black cardstock and glued it on top of the Tropical Backdrop.
The text is made using stamps from the Reveal Wheel Friends and Family stamp set and white heat embossed onto black cardstock. Then I used foam tape again to adhere it to the center of the scene. To finish the card, I just attached it to a white note card.

Samstag, 15. Juli 2023

Hallo Lotte!

 
Hallo Ihr Lieben!
Im Familienkreis ist die kleine Lotte geboren worden - und soll natürlich herzlich willkommen geheißen werden. Deswegen habe ich diese Karte gewerkelt.

Hello everyone!
My niece gave birth to a little girl recently - and of course we want to welcom her to the family. So I made this card.

Für den Hintergrund habe ich den Quilted Heart Backdrop von LawnFawn aus weißem Cardstock gestanzt. Damit er auf das deutsche Kartenformat passt, habe ich links und rechts je einen Streifen weggeschnitten, von der Höhe her passt er dann mit Mattung eh perfekt. 
Die Mattung habe ich aus hellrosafarbenem Cardstock geschnitten. Und weil mir das dann irgendwie doch zu viel war, habe ich hinter den weißen Cardstock noch eine Lage Vellum gesetzt, so dass die Herzen in den Löchern etwas softer wirken. Den weißen Cardstock habe ich deswegen auch mit dünnem 3D Tape auf den rosafarenen Cardstock geklebt.

For the background I die cut the Quilted Heart Backdrop by LawnFawn from white cardstock. To make it fit the german card size, I cut off a strip of the left and right. Added a mat it then fits perfectly in height without having to cut off anything.
I cut the mat from light pink cardstock. And since it all looked a bit too busy, I put a layer of vellum behind the white cardstock, so the cut out hearts look a bit softer. That's also why I used thin foam tape to adhere the white cardstock to the pink one.


 Mittig auf die Karte habe ich den Namen der kleinen Lotte aufgeklebt. Dafür habe ich mit dem Tall Skinny Alphabet von Scrapbook.com die Buchstaben jeweils dreimal aus eher dunkel-pinkem Cardstock gestanzt. Als Boden habe ich dann aus dem Rock-a-Bye-Baby Set von HoneyBeeStamps den Teppich aus dem selben Cardstock gestanzt, den ich auch für die Mattung verwendet habe. Aus diesem Set ist auch der kleine Hase. Den habe ich aus weißem Cardstock gestanzt und dann beide Teile mit Copics schattiert. 
Die kleinen Texte auf der Karte sind aus den Sets Kleine Worte und Kleine Worte 2 von Stampcorner. Sie sind jeweils schwarz auf weißen Cardstock gestempelt.

In the center of the card I attached the name of the little girl. I die cut the letters from dark pink cardstock using the Skinny Alphabet dies by Scrapbook.com. I cut each letter three times and stacked them. As a grounding element I die cut the carpet from the Rock-a-Bye-Baby set by HoneybeeStamps from the same cardstock I also used for the mat. From the same die set I also used the bunny and cut it from white cardstock, then shaded both pieces with my Copics.
The small texts on card are stamped black onto white cardstock. They mean baby bliss, hello, welcome and happy you're here. 


Zum Schluss habe ich die Texte mit dünnem 3D Tape auf die Karte geklebt und als Deko einige pink-irisierende Glitzersteine darauf verteilt. Außerdem habe ich die Buchstaben mit einem klaren Nuvo Aqua Shimmer Pen beglittert. 
Ganz zum Schluss kam alles noch auf einen weißen Kartenrohling.

In the end I attached the texts with some thin foam tape and added a few pink iridescent rhinestones. I also used my clear Nuvo Aqua Shimmer Pen to add some shine to the die cut letters.
To finish the card, I adhered everything onto a white note card.

Donnerstag, 13. Juli 2023

Glückspost!

 
Hallo Ihr Lieben!
Für diese Karte, die ich heute auf dem Stampcorner Blog zeige, bin ich mal einen anderen Weg gegangen. Und so kommt sie ohne niedliches Motiv aus. Ich finde, sie wäre perfekt als Hochzeitskarte geeignet. 

Hello everyone!
For this card, that I'm sharing over on the Stampcorner Blog today, I decided to make something a little different. And so there's no cute image on this card. I think, it would make the perfect wedding card.

Für den Hintergrund habe ich ein Stück weißen Cardstocks verwendet. Das habe ich an den Rändern erst ein wenig mit Distress Oxide Speckled Egg gewischt, anschließend habe ich mit Pumice Stone die kleinen Flecken, die Teil des Kleeblatts aus dem Glücksset sind, verteilt aufgestempelt. Die Flecken hatte ich schon vor einiger Zeit vom Kleeblatt abgeschnitten, um beides getrennt verwenden zu können. So war das Aufstempeln der Flecken ganz einfach. 

For the background I started with a piece of white cardstock. I inked the edges with some Distress Oxide Speckled Egg, then stamped the speckles on top with Pumice Stone. Those speckles are part of a clover image from the Glücksset stamp set. I had cut off those quite some time ago to be able to stamp them individually, what made stamping them onto the background super easy.


Als Hauptelemente habe ich mich für zwei Briefmarken entschieden. Dafür habe ich eine der Briefmarken aus dem Juli-Release zweimal aus weißem und zweimal aus schwarzem Cardstock gestanzt. 
Die Mitten der weißen Briefmarken habe ich mit Masking Tape abgedeckt und die Ränder mit Pumice Stone ganz leicht gewischt. Dann habe ich die Ränder abgedeckt, das Innere mit Speckled Egg gewischt und dann das schon erwähnte Kleeblatt auf die Briefmarken gestempelt. Da es nicht ganz auf die Briefmarken passt, habe ich es einmal an den linken und einmal an den rechten Rand gestempelt und dafür Distress Oxide Mowed Lawn sowie an den Rändern noch ein wenig Rustic Wilderness benutzt. Den Farbübergang habe ich - vor dem Stempeln direkt auf dem Stempel - mit einem Blending Brush etwas weicher gestaltet. 
Mit einem grau-braunen Copic Mulitliner habe ich dann Ränder um das mittige Rechteck sowie auch entlang der gezahnten Außenkante aufgemalt.
Die Texte auf den Briefmarken sind ebenfalls aus dem Glücksset. Ich habe sie mit schwarzer Tinte direkt über die Kleeblätter gestempelt.
Dann habe ich die Briefmarken mit den schwarzen Stanzteilen hinterlegt. Ich habe sie diagonal zerschnitten, so dass rundum ein schwarzer Rand sichtbar ist.

As the main elements I went with two postage stamps. I die cut one of the postage stamp rectangles from the July release twice from white and twice from black cardstock. 
I covered the centers of the white postage stamps with masking tape and lightly inked the edges with Pumice Stone. Then I covered the edges with the tape, inked the centers with Speckled Egg and then stamped the already mentioned clover onto them. It doesn't fit entirely onto the stamps so I stamped one to the left and one to the right edge of the two stamps. I used Distress Oxide Mowed Lawn to stamp the clovers and added a bit of Rustic Wilderness to the edges. With a blending brush I softened the edge of the dark ink by dabbing the brush onto the ink on the stamp while it was still in my stamping tool.
With a grey-brown Multiliner by Copics I drew some lines along the inner rectangle and also the outer edge of the stamps.
The texts on the stamps mean "good luck for the two of you". I stamped them with black ink directly onto the clovers.
I used the black die cut stamps as a shadow layer. To make sure some of it is visible all around each stamp, I cut the two black die cuts apart diagonally and put them behind the white stamps, leaving a little gap between the two pieces.


Ganz unten habe ich noch ein ausgestanztes Glückspost quer über die Karte geklebt. Die Schattenlage besteht aus vier schwarzen Stanzteilen, obenauf, leicht versetzt, habe ich ein grünes Stanzteil gesetzt. Sie sind natürlich alle mit der Glückspost-Stanze von Stampcorner gemacht. Und weil die grüne Lage etwas zu hart aussah, habe ich sie mit einem Sanding Block etwas bearbeitet, so dass das Wort einen leichten Grunge/Vintage-Look bekommt.

Along the bottom edge of the cardstock I added a die cut "happy mail". I used four black die cuts for the shadow layer, on top I glued down a green one, offsetting it a bit. And since the green layer looked a bit too hard I used a sanding block on it to give it some kind of vintage/grungy look.


Um die Karte fertigzustellen, habe ich alle Elemente auf dem Hintergrund angebracht - die obere Briefmarke ist dabei mit dünnem 3D Tape aufgeklebt. 
Über die Briefmarken habe ich mit grauer Tinte einige Poststempel gesetzt, außerdem habe ich als Deko noch ein paar weiße Herzen aufgeklebt - eines auf das T von Glückspost, zwei darüber und jeweils eines auf die Kleeblätter. 
Zum Schluss habe ich den Cardstock noch schwarz gemattet und auf einen weißen Kartenrohling geklebt.

To finish the card I adhered all elements to the background - the postage stamp on top is attached with thin foam tape.
With grey ink I stamped some post stamps onto the stamps and added a few white hearts as decorations - one onto the T of the word Glückspost, two above it and one onto each clover.
As a last step I matted the cardstock black and glued everything onto a white note card.

Mittwoch, 12. Juli 2023

Hochprozentige Geburtstagskarte


 Hallo Ihr Lieben!
Eine Freundin und Kollegin hatte Geburtstag - und passend zur Mädelsparty durfte es dann eine Geburtstagskarte mit Cocktail werden.

Hello everyone!
A friend and colleague celebrated her birthday - and matching the girls' night we had I made her a birthday card with a cocktail.

Hier habe ich dann endlich auch mal einige meiner neuen Errungenschaften aus dem neusten LawnFawn-Release eingeweiht. 
Für den Hintergrund habe ich ein Stück weißen Cardstocks mit Distress Oxide Dusty Concord, Wilted Violet, Villainous Potion und Black Soot gewischt und anschließend etwas Wasser sowie weiße Acrylfarbe darüber gespritzt. 
Da man es nur auf diesem Bild so richtig sieht, greife ich mal ein wenig vor: der Rahmen ist mit der Let's Celebrate Backdrop Stanze gemacht. Ich habe sie aus hell-lilafarbenem Cardstock gestanzt, vom Rand her mit Black Soot gewischt und auf die Sternkonfetti kleine sternförmige Pailetten aufgeklebt. Dann habe ich noch einen Rahmen, gestanzt aus schwarzem Cardstock, obenauf geklebt.

And here I also finally used some of the things I bought from LawnFawn's newest release.
For the background I inked up a piece of white cardstock with Distress Oxide Dusty Concord, Wilted Violet, Villainous Potion and Black Soot, then flicked some water and some white acrylic paint onto the cardstock.
Since you can really only see it on this picture, I am telling you something about the frame now, even if I added it later: I die cut the Let's Celebrate Backdrop from light purple cardstock and inked the edges with some Black Soot. Then I glued little star shaped sequins onto the star confetti included in the frame. And then I die cut a frame from black cardstock and glued that on top.


Auf den lila-schwarz gewischten Cardstock habe ich dann drei explodierende Raketen foliert. Ich habe Aura-Folie - eine hell-goldene Folie, die in Regenbogenfarben changiert - und die Fireworks Hotfoil Plates von LawnFawn benutzt. In die Mitte der Feuerwerke habe ich dann jeweils ebenfalls einen der goldenen Sterne geklebt.

Onto the purple and black inked background I foiled three fireworks. I used Aura foil - a light gold foil with a holographic shine - and the Fireworks hotfoil plates by LawnFawn. In the center of each firework I glued another of the gold star confetti.


Der Cocktail samt Deko ist mit den Stanzensets Build a Drink und Build a Drink Add-On gemacht. Ich habe das Glas aus goldenem Metallic Cardstock gestanzt, die Füllung besteht aus lilafarbenem, rotem und pinkem Vellum, das ich jeweils geschwungen ausgestanzt und dann aufeinander gelegt habe - rosa als komplette Lage oben, rot dahinter und ganz hinten dann lila. Das kann man als solches gar nicht mehr erkennen, aber der Cocktail sieht lecker geschichtet aus. Und weil später, als ich das Glas auf den Hintergrund gelegt habe, die Farben quasi gar nicht mehr erkennbar waren, habe ich noch eine Lage aus weißem Cardstock nur hinter das Vellum gesetzt. Zwischen das Glas und die Füllung habe ich noch eine Lage aus Acetate geklebt.
Dekoriert ist der Drink dann mit zwei Erdbeeren, Eiswürfeln - gestanzt aus Vellum -, zwei schwarz-weiß gestreiften Strohhalmen und einem lila-glitzernden Cocktail-Schirmchen. Die Erdbeeren habe ich mit Copics etwas schattiert.
Den Text der Karte habe ich mit Stempeln aus den Sets Itty Bitty Birthday und Itty Bitty Celebrations von MFT gemacht. Sie sind gold auf zwei Streifen schwarzen Cardstocks embosst, dann habe ich sie mit schwarz-weißem Twine an den Stiel des Glases gebunden. 
Und weil das irgendwie diese Lücke hinter dem Text war, habe ich aus grünem Cardstock noch zwei Blätter/Zweige gestanzt, ebenfalls mit Copics schattiert und hinter dem Text auf die Karte geklebt. 

The cocktail and its decorations is made with the Build a Drink and Build a Drink Add-On die sets. I die cut the glass from gold metallic cardstock, the liquid is made from purple, red and pink vellum. I die cut the tops with the wavy die included in one of the sets and then layered them. I used a complete layer cut from pink, a smaller cut from red and an even smaller one cut from purple vellum. You can't even tell that I used purple here, but the cocktail looks yummy and layered. And since the colors were hard to see once I put the glass onto the background I added a layer cut from white cardstock only behind the liquid. Between the glass and the liquid I added a layer cut from acetate.
I decorated the cocktail with two strawberries, ice cubes - cut from vellum -, two black and white striped straws and a glittery purple umbrella. I used my Copics to add a bit of shading to the strawberries.
The text is made with stamps from the sets Itty Bitty Birthday and Itty Bitty Celebrations by MFT. I gold heat embossed them onto two strips of black cardstock and tied those to the stem of the glass with some black and white twine.
And then there was this empty space behind the text. So I die cut two leaves from green cardstock, again used my Copics to shade them and then attached them behind the text to the card.


Hier könnt Ihr den Glanz der verschiedenen Metallic-Elemente nochmal gut sehen. Ich finde, er gibt der Karte nochmal einen besonderen Effekt.
Da das Glas ja schon aus einigen Lagen besteht, habe ich nur hinter den Dekoelementen wie  den Strohhalmen und dem Schirmchen etwas dünnes 3D Tape angebracht, das Glas an sich ist direkt auf den Hintergrund geklebt.
Zum Aufkleben des Rahmens habe ich dann dickeres 3D Tape verwendet. 
Zum Schluss habe ich dann noch alles auf einen lilafarbenen Kartenrohling geklebt. Ich habe ein paar im amerikanischen Format hier, auf die der Rahmen genau passt. So sieht man den lilafarbenen Cardstock der Karte nicht, aber da sie ja eh den schwarzen Rahmen hat, macht das nichts, finde ich.

Here you can see the shine of the different metallic elements pretty good. I think, it gives the card a special look.
Since the glass is already made from several layers, I used thin foam tape only behind the decorations like the straws and the umbrella, the glass I attached directly to the background.
To adhere the frame I used some thick foam tape.
As a last step I glued everything onto a purple note card. I have a few in the american size here, the frame fits these perfectly. Due to the fact that they are the same size, there's not mat visible but since there is the black frame around the scene I don't think the card is missing something.

Montag, 10. Juli 2023

Es ist wieder Hochzeits-Zeit!

 
Hallo Ihr Lieben!
Es ist wieder Hochzeits-Hochzeit - und natürlich muss da dann auch die ein oder andere Geschenkbox gemacht werden. Diese hier kann ich Euch heute zeigen.

Hello everyone!
Summer is wedding season here in Germany - and of course that means, I have to make some boxes as gifts. This one I am sharing with you today.

Hier habe ich die Box mal aus weinrotem Cardstock gewerkelt - mal was anderes, dafür konnte ich dann weiß für die Aufleger nutzen. Aus denen habe ich zuvor die Hängenden Herzen von CreativeDepot gestanzt und zwar so, dass der anfang der gestitchten Schnüre unter dem Deckel versteckt ist. Neben den Herzen habe ich dann noch kleine silberne Perlen aufgeklebt.

This time I used some wine red cardstock for the base of my box - something a little different and it also meant, that I was able to use white for the cardstock on top. Before glueing them down I die cut the Hängende Herzen - hanging hearts - by Creative Depot from the white pieces, making sure that the beginning of the stitched lines are hidden under the lid. Then I put some small silver pearls next to a few of the hearts.


Die Seitenteile sind alle identisch dekoriert. 
Um den Deckel habe ich etwas rotes Organzaband gewickelt und vorne zur Schleife gebunden.

The sides are all decorated identically.
Around the lid I wrapped some red organdy ribbon and tied it to a bow at the front.


Auf den Deckel habe ich zuerst weißen, dann silber-grau schimmernden Cardstock geklebt.
Aufrecht stehend habe ich die Initialen des Brautpaares mit einem Und-Zeichen, gestanzt aus matt silbernem Metallic Cardstock, geklebt. Dahinter befiinden sich zwei Herzen - weiß für die Braut und schwarz für den Bräutigem.

The lid I covered with white and then a piece of silver-grey shimmering cardstock.
Standing upright I adhered the initaials of the wedding couple with an ampersand, cut from matte silver metallic cardstock, between the letters. Behind them I placed two hearts - a white one for the bride and a black one for the groom.


Unter den Anfangsbuchstaben für die Braut habe ich etwas Tüll geklebt - quasi als Schleier - und dann die Box mit verschiedenen roten und weißen Blumen beklebt.
Aus schwarzem Cardstock habe ich noch ein 3D Banner gestanzt und darauf weiß den Text zur Hochzeit aufembosst. Dann habe ich auch hier einige silberne Perlen verteilt.

Under the initial of the bride I put some white tulle - like a veil - and then decorated the box with different red and white flowers.
From black cardstock I've cut a 3D Banner and white heat embossed the text "for your wedding" onto it. Then I added some silver pearls to the lid as well.


Und so sieht die Box dann offen aus. Die Bilder sind teilweise etwas dunkel - die Box musste am nächsten Tag weitergegeben werden und das Licht war nicht mehr das beste...

And this is the opened Box. The pictures are a bit dark - I had to give the box to a co-worker the next day and the light wasn't the best anymore.


Ich habe erst alle Seitenteile mit weißem Cardstock beklebt. Dann habe ich auf das Mittelteil ein kleines Podest gesetzt. Auf dem Podest sitzt der Hochzeitspavillon. Er ist mit Schleifen und herabhängenden Herzen geschmückt. Darunter stehen zwei mit roten Schleifen verzierte Stühle, die auf das Brautpaar warten.

First I put white cardstock onto all the sides. Then I built a little podium in the center. On that I placed a gazebo, that's decorated with white bows and little hearts, that dangle from the corners. Under the gazebo there are two chairs, decorated with red bows, waiting for the couple.


Den Weg zum Pavillon habe ich wieder mit dem silber-grauen Schimmer-Cardstock ausgelegt. 
Aus schwarzem Cardstock habe ich mehrmals das Wort Ja gestanzt, die Worte aufeinander- und dann auf den Weg geklebt. Darunter befindet sich ein rotes Banner, auf das ich das Hochzeitsdatum weiß aufembosst habe. Und anstatt Blütenblättern habe ich schwarze und silberne Herzkonfetti auf den Teppich "gestreut". 

I put a strip from the same silver-grey shimmery cardstock onto one of the sides, that's leading to the gazebo, kind of like a red carpet. 
From black cardstock I die cut "I do" several times, stacked the pieces and then glued the word onto the walk way. Under it I added a red banner, onto which I white heat embossed the date of the wedding. And instead of flowers or petals I spread some black and silver heart confetti over it.


Hier seht Ihr den Pavillon mit den Stühlen nochmal von der Seite.

Here you get a side view of the gazebo and chairs.


Und so sieht die geöffnete Box von oben aus. 
Auf das Seitenteil hinter dem Pavillon habe ich einen Text aufgebracht. Er ist weiß auf schwarzen Cardstock embosst, den Cardstock habe ich so zugeschnitten, dass ein breiterer weißer Rand dahinter zu sehen ist. Dann habe ich zwei der Ecken mit weiteren Blumen und silbernen Perlen dekoriert.
Die beiden anderen Seitenteile sind als kleine Taschen gearbeitet. In einem befindet sich ein Kärtchen für einen persönlichen Text, in das andere kann das Geldgeschenk oder auch ein Gutschein gesteckt werden. Dekoriert sind die beiden Seiten mit je einem schwarzen Label, auf das ich jeweils zwei Blumen und eine weiße Schleife geklebt und drumherum ein paar weitere Perlen verteilt habe.

And this is the top view of the opened box.
Onto the side behind the gazebo I placed a greeting. I white heat embossed it onto a piece of black cardstock, that I cut smaller, so more of a white border is visible around it. Then I decorated two corners with more flowers and silver pearls.
The two other sides are little pockets. There's a little card for a personal greeting tucked into one of them, the other one leaves room for some money or even a gift card. I decorated those two sides each with a black label, that I put two more flowers and a white bow onto and added more silver pearls around it.

Samstag, 8. Juli 2023

LawnFawnatics Challenge #153 - Fun with Food

 
Hallo Ihr Lieben!
Das Thema der LawnFawnatics Challenge #152 ist Fun with Food - es dreht sich also alles im Weitesten Sinne ums Essen. Und das ist meine Karte dazu.
 
Hello everyone!
The theme of the LawnFawnatics Challenge #152 is Fun with Food - so it's all about cards that inclue some type of food. And this is the card I came up with.
 
 Nun, ich bin mir nicht sicher, ob ein Milch-Shake wirklich Essen ist, aber es sind ja auch ein paar Kirschen auf meiner Karte zu sehen. Also denke ich, das passt.
Ich habe hier für den Hintergrund ein Stück weißen Cardstocks mit Distress Oxide Kitsch Flamingo, Picked Raspberry, Lumberjack Plaid und Aged Mahogany gewischt. Dann habe ich einen Strahlenstencil aufgelegt und weiße Stempeltinte dadurch aufgetragen. Anschließend habe ich noch silberne Metallic Watercolor sowie etwas Pixie Dust aufgespritzt.
Für den Rahmen habe ich den Tropical Leaves Backdrop verwendet. Den habe ich einmal aus weißem und einmal aus dunkelgrünem Cardstock gestanzt. Den weißen Rahmen habe ich dann mit Distress Oxide Cracked Pistacchio, Mowed Lawn und Rustic Wilderness gewischt und mit etwas Wasser sowie dunkelgrüner Metallic Watercolor bespritzt.
Außerdem habe ich einen der Stitched Rectangle Frames aus hellgrünem Cardstock sowie die kleinste der Puffy Cloud Frames aus weißem Cardstock gestanzt.
Und weil ich dachte, dass ein paar Blümchen schön auf der Karte aussehen würden, habe ich aus hellrosafarbenem Cardstock noch ein paar der kleinen Blümchen, die mit dem Tropical Leaves Backdrop kommen, gestanzt und mit Copics ein wenig schattiert.

Well, I am not sure if a milk shake counts as food, but there are also a few cherries on this card. So I think, I am fine.
For the background I inked a piece of white cardstock with Distress Oxide Kitsch Flamingo, Picked Raspberry, Lumberjack Plaid and Aged Mahognay. Then I put a rays stencil on top and added some white pigment ink through it. Then I flicked some silver metallic watercolor and a bit of Pixie Dust onto the cardstock.
For the frame I die cut the Tropical Leaves Backdrop once from white and once from dark green cardstock. I inked the white frame with Distress Oxide Cracked Pistacchio, Mowed Lawn and Rustic Wilderness and spritzed some water and some dark green metallic watercolor on top. 
I also die cut one of the Stitched Rectangle Frames from light green cardstock and the smallest of the Puffy Cloud Fames from white cardstock.
And since I thought, a few flowers would look nice on the card, I also die cut the flower, that comes in the Tropical Leaves Backdrop set, several times from light pink cardstock and shaded them with my Copics. 


Für den Milk-Shake habe ich die Stanzensets Build a Drink und Build a Drink Cockatil Add-On verwendet. Ich habe den Rahmen des Glases aus irisierendem Vellum gestanzt, die Füllung aus hell pinkem Cardstock. Diesen habe ich dann mit Copics schattiert und mit ganz hellrosafarbener und dunkelpinker Metallic Watercolor bespritzt. Zwischen den beiden Lagenbefindet sich noch eine Lage aus klarer Folie.
Als Deko habe ich zwei Strohhalme, gestanzt aus rot-weiß gestreiftem Designpapier, eine Sahnehaube, ein Cocktailschirmchen und eine Kirsche verwendet. Auch bei der Deko habe ich einige Teile mit Copics schattiert, die Strohhalme und das Schirmchen habe ich außerdem mit Stickles beglittert.

For the milk shake I used the die sets Build a Drink and Build a Drink Cocktail Add-On. I die cut the frame from iridescent vellum, the liquid from link pink cardstock. I shaded that wit my Copics, then flicked some very light pink and dark pink metallic watercolor onto it. Between those two layers I put another one, cut from acetate.
To decorate my drink I added two straws, cut from red and white striped patterned paper, a cream puff, an umbrella and a cherry. Again I used my Copics to add some shading to a few of those pieces, onto the straws and the umbrella I added a bit of Stickles.


Und ich wollte unbedingt ein paar Mäuse mit auf der Karte verwenden - die haben gerade den Milk-Shake zubereitet und freuen sich nun darauf, ihn in der Sommerhitze zu genießen.
Die Maus links ist aus dem Stempelset Sew Very Mice, die Maus rechts daneben aus dem Set Just Plane Awesome und die Maus auf der Leiter ist aus dem Set Really High Five. Bei ihr habe ich die inneren Linien wegmaskiert und dafür den Schwanz etwas nach oben verlängert. So sieht es aus, als würde man die Maus von hinten sehen. 
Die Leiter ist mit der Leiter aus dem Set Apple-Solutely Awesome gemacht. Nun, die ist eigentlich kürzer - also habe ich sie zweimal überlappend gestempelt und dabei den unteren Teil in zwei Schritten gestempelt - so konnte ich die Seiten fortlaufend stempeln und gleichzeitig die Holme unten verlängern. So ist eine komplette, größere Leiter entstanden.
Alle Motive sind mit Copics coloriert. Dann habe ich sie per Hand ausgeschnitten. 
Die beiden Mäuse links tragen je eine Kirsche und auch hinter dem Shake liegen zwei Kirschen. Die sind wieder aus einem der Gläser-Stanzensets. 
Für den Text habe ich das Stempelset Pool Party verwendet. Have a und Summer sind jeweils Stempel, die so im Set enthalten sind. Für das Wort Yummy habe ich das umm aus dem Wort Summer abgestempelt und dann an den Anfang und das Ende jeweils noch ein Y eines anderen Stempels aus dem Set angestempelt. Die Texte sind weiß auf schwarzen Cardstock embosst. 
Zum Schlus habe ich noch eine Grasbordüre aus grünem Cardstock gestanzt und sie mit Rustic Wilderness etwas gewischt.

And I really wanted to include a few mice on this card. They just finished this large milk shaka and are now looking forward to enjoy it in the summer heat.
The mouse on the left is from the stamp set Sew Very Mice, the mouse next to it from the Just Plane Awesome set and mouse on the ladder is from the Really High Five set. I masked off the inner lines on this one and instead used a black fineliner to draw the tail a bit more up on the body. Now it looks like you're looking at the back of this mouse.
The ladder is from the Apple-Solutely Awesome stamp set. Well, originally it's smaller - so I stamped it twice and did the bottom in two steps. This way I was able to stamp the sides continueing and at the same time connect the middle pieces to create a complete but larger ladder.
I colored all images with Copics, then cut them out by hand.
The two mice on the left are carrying a cherry and also behind the shake there are two more cherries. Those I die cut again with a die from one of the glass die sets.
For the text I used the Pool Party stamp set. Have a and Summer are words, that are included in the set. For the word yummy I stamped the umm of the word summer and then added a y to the beginning and end of these letters from a different stamp from this set, to write the word yummy. I white heat embossed all texts onto black cardstock.
As a last element I die cut a grass border from green cardstock and inked it with a bit of Rustic Wilderness.


Ganz zum Schluss habe ich die Karte zusammengestzt. Ganz unten befindet sich natürlich der Hintergrund und direkt darauf der dunkelgrüne Blätterrahmen. Darauf habe ich den gewischten Blätterrahmen, um 180 Grad im Vergleich zum dunkelgrünen gedreht, sowie der Shake, die Texte und natürlich die Mäuse. Alle Diese Teile habe ich mit dickem 3D Tape aufgeklebt.
Als letzte Lage habe ich dann den hellgrünen Rahmen samt der Grasbordüre aufgeklebt, die Blümchen auf den helleren Blättern verteilt und alles auf einem weißen Kartenrohling befestigt.

Then I put the scene together. There's the background as the base - of course - and then I glued the dark green leaves frame directly onto it. On top I put the inked frame, turning it 180 degrees compared to the dark green one, and the shake, the text and of course the mice. To adhere all these pieces I used thick foam tape.
As the last layer I glued the light green frame including the grass border down, added the flowers to the lighter leaves and attached everything onto a white note card.

Donnerstag, 6. Juli 2023

Mal drücken?

 
Hallo Ihr Lieben!
Heute zeige ich auf dem Stampcorner Blog eine Karte mit den süßen Bären, die sich so doll lieb haben. Und weil ich bei dem Motiv irgenwie sofort an Vatertag denken musste, ist meine Karte eher männertauglich ausgefallen. Und sie geht natürlich auch zu anderen Anlässen!

Hello everyone!
Over on the Stampcorner Blog I am sharing this card with the cute bears, that love each other so much. When I saw the image I immediately thought "father's day", so I made a masculine card, that of course can also be used for another occasion, too.

Für den Hintergrund habe ich Milchkaffee-farbenen Cardstock verwendet und mit Distress Oxide Gathered Twigs den Grunge Hintergrund von Stampcorner aufgestempelt. Anschließend habe ich die Ränder des Cardstocks mit derselben Farbe ein wenig gewischt.

For the background I used some milk coffee colored cardstock and stamped the Grunge background by Stampcorner with Distress Oxide Gathered Twigs onto it. Then I used the same ink to darken the edges of the cardstock a bit.


 Die süßen Bären habe ich erst mit nur wenig Schattierung mit Copics coloriert, dann habe ich das Fell mit Polychromos darüber gemalt. Die Highlights sind mit einem weißen Gelstift gemacht. 
Jetzt konnten die Bären natürlich nicht einfach so im Nichts stehen. Deswegen habe ich erst aus Vellum die Tannenbaumreihe von Sizzix gestanzt und hinter die Motive gesetzt. Als Boden habe ich ein Oval, gestanzt aus schwarzem Cardstock, an die Füße der Bären gesetzt. Und dann hatte ich noch jede Menge kleine Sechsecke, die von einer anderen Karte übriggeblieben waren. Dafür hatte ich weißen Cardstock mit Distress Oxide Wild Honey und Spiced Marmalade gewischt, mit goldener Metallic Watercolor und einigen Wassertropfen bespritzt und dann den Honeycomb Background von LawnFawn ausgestanzt. Ich dachte mir, Honig und Bären passen immer zusammen. 
Und weil mir das irgendwie immer noch nicht so recht gefiel, habe ich noch einen Rahmen hinter die ganze Szene gesetzt. Dafür habe ich aus craftfarbenem Cardstock eines der Briefmarken-Rechtecke aus dem Juli-Release gestanzt und ebenfalls mit Gathered Twigs ein wenig gewischt. Aus der Mitte habe ich mit dem Cutter ein Rechteck ausgeschnitten und zwar so, dass man den tollen gestitchten Rand noch sehen kann. 

I used my Copics to color those cute bears - just a very simple coloring without taking too much care of shading. Then I used my Polychromos to add the fur. For the highlights I used a white gel pen.
Of course those bears could not just stand there somewhere in the air. So I first cut the fir border by Sizzix from vellum and put it behind the images. As the ground I used an oval, cut from black cardstock. And then I had a lot of those little hexagons left over from a previously made card. I had inked some white cardstock with Distress Oxide Spiced Marmalade and Wild Honey, then flicked some gold metallic watercolor and a bit of water onto the cardstock. After it had dried I cut the Honeycomb Background by LawnFawn from the paper. I think, bears and honey always go together perfectly.
And since the card still didn't look right to me, I decided to put a frame behind the scene. I die cut one of the new postage rectangle dies from the July release from kraft colored cardstock and again used Gathered Twigs to ink the edges. Then I used my paper cutter to cut a rectangle from the center, making sure the beautiful stitched frame was still visible. 


Zuerst habe ich den Rahmen auf den hellbraunen Cardstock geklebt, dann mit dickem und dünnem 3D Tape die verschiedenen Elemente an den unteren Rand der Briefmarke geklebt. So blieb oben, immer noch innerhalb des Rahmens, Platz für einen Text. Auch der ist aus dem Stempelset mit den Bären und mit weißem Embossingpulver auf den Hintergrund embosst.  Darunter war dann noch Platz für zwei kleine rote Herzen, die einen kleinen Farbtupfer auf der Karte bilden.
Zum Schluss habe ich alles schwarz gemattet und auf einen weißen Kartenrohling geklebt.

First I attached the frame to the light brown background, then added the different elements to its bottom edge, using thinn and thick foam tape. This way there was still room for a text, still within the frame. It means "wanna cuddle?" and is white heat embossed directly onto the background. Under it there was still space to add two small red hearts.
To finish the card, I matted the cardstock black and attached everything to a white note card.

Mittwoch, 5. Juli 2023

Create a Smile Juni Sketch Challenge Reminder

 
Hallo Ihr Lieben!
Bestimmt habt Ihr es schon mitbekommen - die Juni Sketch Challenge wird die letzte Challenge auf dem Create a Smile Blog sein. Und somit endet auch meine DT-Mitgliedschaft für die Challenges. Aber ich habe es mir trotzdem nicht nehmen lassen, auch für diese allerletzte Challenge einen Reminder zu machen.

Hello everyone!
Most likey you've already read about it - the june sketch challenge will be the very last challenge over on the Create a Smile Blog. And that means, that also my DT term comes to an end. But that didn't stopp me from making a reminder card also for this very last challenge. 

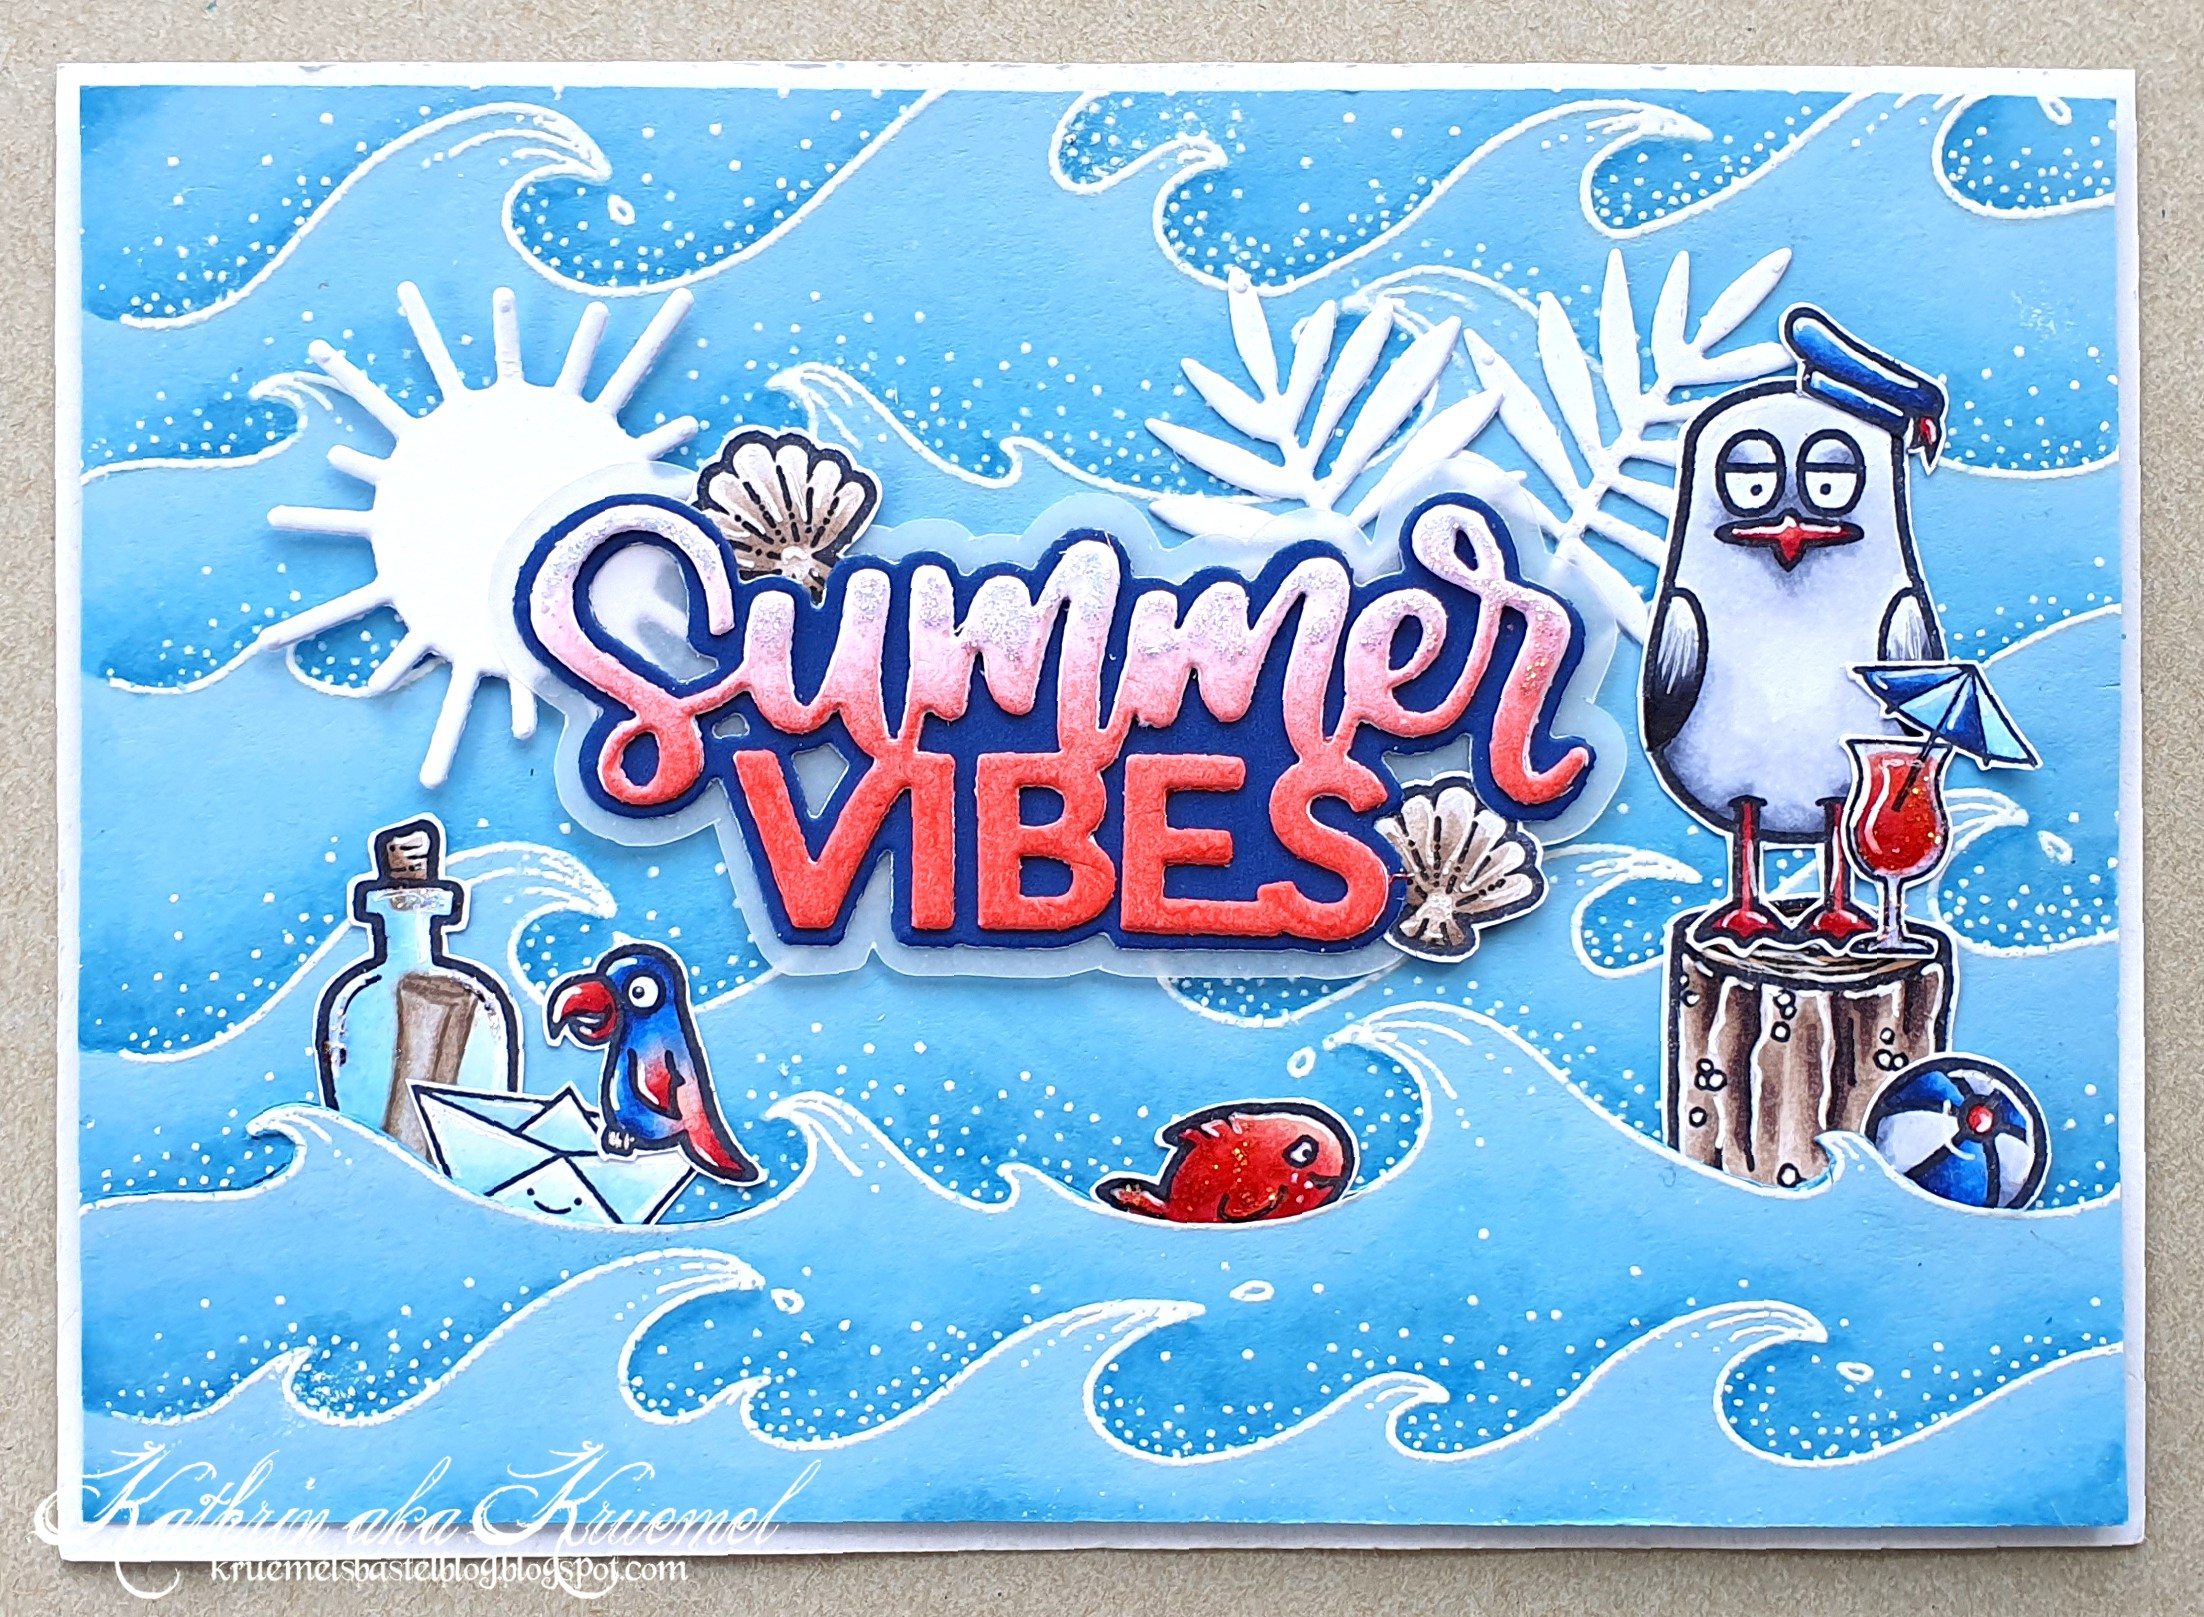
Ihr seht, meine Karte ist absolut sommerlich ausgefallen - und es ist einiges los darauf. War das so geplant? Nein! Mag ich das Ergebnis? Ja! 
Den Rahmen habe ich als allerletztes Element, quasi last minute, auf die Karte geklebt. Sie wirkte so leer, und der Rahmen hält irgendwie alles zusammen. Er ist einer der Stitched Rectangles aus dunkelblauem Cardstock gestanzt. Nun, die Entscheidung für den Rahmen fiel so last minute, dass ich sogar schon ein Foto ohne ihn gemacht hatte. Das zeige ich Euch - vielleicht könnt Ihr mich dann verstehen. 

As you can see, my card turned out very summer-ish. And there's lots going on on it. Did I plan it that way? No! Do I like it? Yes!
I added the frame as my very last element in a very last minute decision. The card looked so flat without it, and the frame just keeps it all together. I cut it from dark blue cardstock using one of the Stitched Rectangle Frames. Well, I made the decision for it so very last minute, that I even had already taken a picture without it. I share that with you, maybe you can understand my decision.


Da fehlte was, finde ich - auch wenn der Rahmen einige der Wellen überdeckt.
Die Wellen sind mit dem Ocean Waves Stempel gemacht. Ich habe da tatsächlich noch den sehr alten Cling Stamp, so dass ich die Reihen selbst übereinander stempeln musste. Inzwischen gibt es ja eine neuere Version in A5-Größe. Aber so ging es auch super.
Ich habe die Wellen erst mit heller Tinte auf hellblauen Cardstock embosst und dann die Schattierung mit Copics dazugemalt. Dann habe ich die Wellen nocheinmal an die selben Stellen weiß embosst. So laufe ich nicht Gefahr, dass ich die weißen Embossinglinien aus Versehen mit den Copics blau einfärbe. 

I really think, the frame adds a lot to the card, even if it covers some of the waves. 
I used the Ocean Waves stamp for the waves. I actually have the very old and retired Cling Stamp version of it, so I had to stamp them twice to cover my cardstock. Some time ago a lnewer and larger version of it was released. But it worked great for me this way also.
First I stamped the waves with a very light ink onto light blue cardstock, then used my Copics to add the shadows. Directly on top of the previously stamped waves I white heat embossed them onto the cardstock. This way I avoid accidently coloring the white embossed lines with my Copics.


Und dann kam meine Deko obenauf. Eigentlich hatte ich nur die Möwe, die Flaschenpost und natürlich den Text geplant. Aber dann kam einfach noch mehr dazu und ich finde, so kommt das sommerliche Gefühl viel mehr rüber. 
Zum Text erzähle ich gleich noch mehr - davon habe ich extra Foto für Euch. Hinter den Text habe ich eine Sonne, gestanzt mit den Weather Stanzen aus weißem Cardstock, und auch zwei ebenfalls weiße, tropische Blätter geklebt. Bei den Blättern bin ich tatsächlich fremd gegangen, die sind von MFT.
Den Text samt Deko habe ich mittig auf der Karte angebracht. Direkt darunter schwimmt der kleine Fisch aus dem Möwengang Stempelset. Er sah aber so traurig aus, dass ich seine Mundwinkel mit einem schwarzen Fineliner nach oben gemalt habe. 
Rechts vom Fisch schwimmt eine Flaschenpost in den Wellen. Und der kleine Papagei hat sich mutig in ein Papierboot gesetzt, um die Flasche samt Botschaft einzufangen. Wer weiß, vielleicht ist eine Schatzkarte darin? 
Die Flasche ist aus dem Stempelset Tränke - die beiden Flaschen daneben habe ich ebenso wie die Füllung wegmaskiert. Stattdessen habe ich per Hand den gerollten Zettel hineingemalt. Das Papierboot ist aus dem Set Sommer-Minis, der Papagei aus dem Set Alle Mann an Bord. Alle Motive auf der Karte sind mit Copics coloriert. 

And then I put my images onto the wavy background. Originally I had planned to only use the sea gull, the bottle with the message inside and the text. But then I kept adding more and more and I really think, all those different images add to a very summer-ish design.
I will tell more about the text a little later - I took a separate image of it. Behind the text I put a sun, cut from white cardstock with the Weather dies, and two also white tropical leaves. I have to admit, for those I used a die by MFT.
I adhered the text including the decoration behind it to the center of my card, directly under it the little fish from the Gull Gang stamp set is swimming around. He looks so sad or angry that I couldn't resist and turn his expression into a smile with a black fineliner. 
To the right of the fish there's a message in a bottle floating in the waves. And the little parrot used all his strength to use his selfmade paper boat and try to catch that bottle. Who knows, maybe there's a treasure map inside it?
The bottle is from the Potions stamp set - I masked off the two bottles next to it and also the liquid in it and added the rolled paper instead, simply drawing it by hand. The paper boat is from the Sommer Minis stamp set, the parrot from the Alle Mann an Bord set. All images on this card are colored with Copics.


Bleiben wir doch gleich bei den Motiven. Rechts vom Text ist die Möwe, die es sich mit einem Cocktail auf dem Poller gemütlich gemacht hat. Auch die Möwe ist, ebenso wie der Poller, aus dem Set Möwengang. Der Matrosenhut, den sie trägt, gehört eigentlich einer anderen Möwe. Die gab es vor einigen Jahren, als Create a Smile das allererste Mal als Aussteller auf dem Stempelmekka war, als Dankeschön zu einem Kauf. Ich konnte nicht anders, als ihr den Hut aufzusetzen. 
Der Cocktail ist wieder aus dem Sommer-Minis Set, der Wasserball aus dem Saumäßig.

Let's stick with the images first. To the right side of the text there's this gull, that is chilling on this bollard and even brought a cocktail. The bollard and the gull are from the Gull Gang set again. The hat he's wearing is actually "borrowed" from a different gull, that was a thank you freebie some years ago, when Create a Smile came to Stempelmekka as a vendor for the very first time. I just couldn't resist using the hat here.
The cocktail is again from the Sommer-Minis set, the ball from the set Pig Out.


Der Text ist mit der Summer Vibes Stanze aus dem Juni-Release gemacht. Ich habe die Schattenlage aus dunkelblauem Cardstock, das Wort aus weißem Cardstock gestanzt. Den weißen Cardstock habe ich dann von unten her mit Distress Oxide Abandoned Coral gewischt. Dann habe ich per Hand noch eine weitere Schattenlage aus Vellum geschnitten und die anderen Worte obenauf geklebt. Als Deko kamen noch zwei Muscheln aus dem Set Saumäßig hinzu. 
Den Text habe ich dann mit dünnem 3D Tape auf die Karte geklebt und ganz zum Schluss an den oberen Rand der Buchstaben des Wortes Summer, auf die Muscheln, auf die Flaschenpost, den Fisch und den Cocktail jeweils ein bisschen Stickles aufgetragen.

The text is made using the Summer Vibes die from the june release. I die cut the shadow layer from dark blue cardstock, the text from white cardstock. Then I used Distress Oxide Abandoned Coral to color the white words a bit. I cut another shadow layer from vellum by hand and glued the words on top. As decoration I added two sea shells, again from the Pig Out set.
I used thin foam tape to attach the text to the background and then added just a bit of Stickles to the top of the letters of the word summer, the shells, the bottle, the fish and the cocktail.

Montag, 3. Juli 2023

Eine Karte zum 80. Geburtstag

 
Hallo Ihr Lieben!
Ein 80. Geburtstag stand an, und ich durfte die Karte machen. Nun finde ich Männerkarten ja generell am schönsten, wenn sie eher schlicht sind. Wenn sie dann aber auch noch für einen 80. Geburtstag sind, finde ich das umso passender. Viele ältere Menschen sind mit überfrachteten Karten eher überfordert.

Hello everyone!
There was an 80th birthday, and I was asked to make the card. Well, in general I like man cards better, when they are more CAS. But when they are made for an 80th birthday, I think CAS is even better. Many elderly people seem to be overwhelmed by those cards with too much stuff on them.

Also habe ich hier ein Stück weißen Cardstock als Basis genommen und mit einem goldenen Gelstift einen feinen Rahmen aufgemalt.

So I used a piece of white cardstock here and drew a thin frame with a gold gel pen.


Für die Deko habe ich einen Pinselstrich-Hintergrund von Marianne Design mit dunkelblauer Tinte aufgestempelt. Darauf kam dann als erste Layer dieses Stanzteil aus verwobenen Sternen, das ich aus goldenem Spiegelcardstock gestanzt habe. Die Zahlen sind mit einem Stempelset von SU und hellblauer Tinte gemacht. Ich habe sie ausgeschnitten und mit dünnem 3D Tape auf die Sterne geklebt. Davor kam dann noch ein Banner aus craft farbenem Cardstock. Es ist mit einer Stanze von Magnolia gestanzt und mit dickem 3D Tape aufgeklebt. Zuvor habe ich noch den Namen Michael aufgestempelt. Ich habe dafür Teile verschiedener Stempel kombiniert - und leider nicht ganz die Mitte des Banners getroffen. Also habe ich rechts daneben noch einen der Sterne, der beim Hintergrund übriggeblieben war, mit auf das Banner geklebt.
Zum Schluss habe ich mit dunkelblauer Tinte noch Geburtstagsglückwünsche unten auf den Cardstock gestempelt. 

For the decoration I first stamped those brush strokes by MarianneDesign with dark blue ink onto the cardstock. Then I put these connected stars, cut from gold mirror cardstock, on top. The numbers are made with a stamp set by SU and light blue ink. I cut them out and adhered them onto the stars with some thin foam tape. Under the numbers I added a banner cut from kraft cardstock. I used a die by Magnolia for it and adhered it with thick foam tape. Before I attached it I stamped the name Michael onto it. I combined different parts of words for it - and didn't manage to really center it on the banner. So I used one of the stars that gets cut out from the connected stars die cut and attached that to the right of the name onto the banner as well.
As a last step I stamped a birthday greeting to the bottom of the cardstock, using dark blue ink again.


Zum Schluss habe ich noch einige kleinere goldene Pailetten-Sterne auf der Karte verteilt, den weißen Cardstock craft farben gemattet und alles auf einen weißen Kartenrohling geklebt.

To finish the card I added a few gold star shaped confetti, matted the white cardstock with a piece of kraft colored cardstock and adhered everthing to a white note card.