Samstag, 16. Juli 2022

Stempeleinmaleins - Ausgabe vom 16. Juli 2022

 
Hallo Ihr Lieben!
In der heutigen Ausgabe des Stempeleinmaleins zeigen wir Euch die Triangle Corner Pop-Up Card - eine Karte, die erstmal total langweilig wirkt, im Inneren ist dafür aber um so mehr los. Und weil mein Schwiegervater vor kurzem Geburtstag hatte, seht Ihr hier die Geburtstagskarte, die ich für ihn gemacht habe.

Hello everyone!
In today's issue of Stempeleinmaleins we are sharing the tutorial for the Triangle Corner Pop-Up Card today - a type of card, that looks kind of boring on the outside, but once it's popped up there's lots going on in the inside. And since my father in law just celebrated his birthday, you get to see the birhtday card I made for him here.


Das hier ist die eher einfache Außenseite. Ich habe das Grundgerüst für meine Triangle Corner Pop-Up Card aus weißem Cardstock gemacht. Alle Seiten sind dann erst mit mittelblauem Cardstock beklebt, darauf kam jeweils ein Stück hellblauen Cardstocks. Auf den habe ich - hier fast nicht zu erkennen - mit Tinte, die nur einen Hauch dunkler ist als der Cardstock, den Freude und Jubel Hintergrundstempel von Create a Smile gestempelt. So ist der Cardstock im Hintergrund nicht nur einfach blank, trotzdem stiehlt er den Motiven nicht die Show. 
Auf der Vorderseite habe ich dann mit den Layering Streamers Stencils von HoneyBeeStamps die Luftschlangen und Konfetti aufgewischt. Ich habe dafür Distress Oxides Mowed Lawn, Rustic Wilderness, Mermaid Lagoon, Salty Ocean, Stormy Sky, Blueprint Sketch und Wild Honey verwendet. Ich liebe die Tiefe, die diese Stencil kreirt.
Der Text ist Teile eines Stempels von SU - weiß auf ein kleines Stück schwarzen Cardstocks embosst - und einem gestanzten Geburtstag. Eigentlich lautete das Wort Geburtstagspost - ich habe einfach den hinteren Teil weggeschnitten. Von dem Geburtstag habe ich vier Stück, alle aus schwarzem Cardstock gestanzt, aufeinander geklebt, der kleine embosste Text ist mit 3D Tape aufgeklebt.
Also Deko habe ich dann noch einige goldene Konfetti aufgeklebt und mit einem schwarzen Fineliner einen Rahmen per Hand aufgemalt.

This is the quite simple card front. I made the card itself from white cardstock, then glued pieces of a middle blue colored cardstock onto each side. On top of those I glued pieces of light blue cardstock. Onto those I had stamped a birthday text background stamp by Create a Smile Stamps, using ink that's just a tad bit darker than the cardstock. That's why it's really hard to see on the picture. But this way the cardsdtock in the background isn't just plain, but also doesn't distract from any of the other elements that are glued to the card.
Onto the card front I stenciled those streamers and confetti, using the Layering Streamers stencil set by HoneyBeeStamps and Distress Oxide Mowed Lawn, Rustic Wilderness, Mermaid Lagoon, Salty Ocean, Stormy Sky, Blueprint Sketch and Wild Honey. 
The text means "it's your birthday". I've written it with a combination of a text stamp, white heat embossed onto a piece of black cardstock, and a die cut word. I stacked four of the die cut words, the cardstock with the heat embossed text is glued down with foam tape.
For decorations I added a few golden sequins and drew a frame with a black fine liner.


So sieht die komplett geöffnete Karte aus. Auf dem Quadrate links unten ist Platz für persönliche Grüße, beim Aufstellen der Karte verschwindet dieser Teil dann unter dem Bodenteil mit der aufgeklebten Deko.

This is the card completly folded open. On the square at the bottom left there's room for a personal message. Once the card is popped up this part is hidden under the bottom square with the glued on decorations.


Und das ist die komplett aufgestellte Karte dann in voller Pracht. 
Die kleinen Dreiecke im Hintergrund sind wieder mit dem Text von Create a Smile Stamps bestempelt. Bei den Cardstockstücken auf den Böden habe ich mir diesen Schritt gespart. Dann habe ich dort einige Partygirlanden aufgehängt. Die sind aus grünem, blauem und gelbem Cardstock gestanzt und von unten her mit Distress Oxide ein wenig abgedunkelt. Dafür habe ich jeweils die dunkleren der Töne benutzt, die ich zuvor auch für die Luftschlangen auf der Kartenvorderseite benutzt habe. 
Die lange Girlande, die über beide Seitenteile der Karte geht, habe ich auf Höhe des Falzes dahinter zerschnitten. So lässt sich die Karte flach zusammenlegen - sobald sie wieder aufgestellt ist, sieht man kaum noch, dass die Girlande geteilt ist.
Außerdem habe ich hier noch einige weitere goldene Pailetten als Konfetti aufgeklebt.

And here's the card completly put up.
Again I stamped the text background by Create a Smile onto all the triangle pieces. I skipped that step on the squares that are glued to both bottom pieces. Then I'v hung up a few party banners. I've die cut those from green, blue and yellow cardstock and darkened the bottom areas with Distress Oxides, using the darker shades of the colors I had already used for the streamers on the card front.
The long banner, that is glued to both side pieces of the card, is cut apart at about the place where there's the fold in the back. This way the card can still be put flat together - once the card is put up you can barely see that it isn't whole anymore.
I also glued down a few more golden sequins as confetti here.


Und hier ist die Dekoration im Inneren der Karte - die natürlich die Hauptattraktion ist. Im Prinzip ist es eine kleine Easel Card - flach zusammenlegbar um die Karte zu schließen und für den besonderen Effekt aufstellbar.
Ich habe hier eine der neuen "Panorama"-Stanzen von Action benutzt. Ich bin echt froh, die ergattert zu haben. Ich habe sie aus weißem Cardstock gestanzt und mit Copics coloriert. Um all die kleinen Element aufkleben zu können, habe ich einen Kreis aus Folie hinter den Ring mit der Deko geklebt. So können auch die Konfetti in der Luft schweben. 
Da mir das ganze noch ein wenig zu unfestlich war, habe ich noch drei Luftballons, gemacht mit der Outline Stanze passend zum Balloon Bouquet Stempelset von MFT, mit in die Szene mit Torte integriert. Auch sie sind aus weißem Cardstock gestanzt und mit Copics coloriert. 
Die Texte sind alle von SU und mit weißem Embossingpulver auf den mittelblauen Cardstock embosst, den ich zum Matten der Cardstockstücke verwendet habe.

And here's the decoration inside the card - which of course is the main attraction here. It's a tiny small easel card - can be put down to fold the card together and put up it makes the inside extra special.
Here I used one of the "Panorama" die sets by Action - I am so happy to have been able to get my hands at these. I've die cut all the parts from white cardstock and colored them with Copics. To be able to add all the small pieces I've put a circle, cut from acetate, behind the ring with the images. That's also how the confetti can float in the air.
Since it still didn't look festive enough to me, I also added three balloons, made using the outline die of the Balloon Bouquet stamp set by MFT. Again those were cut from white cardstock and colored with Copics.
The text means "congratulations - pop the champagne, it's time to celebrate". I've white heat embossed those onto strips of the same cardstdock, that I also used to mat the cardstock pieces that went onto the card sides.

Donnerstag, 14. Juli 2022

Zu spät!

 
Hallo Ihr Lieben!
Mit dem Stempelset Hallo Sommer aus dem Juli-Release von Stampcorner habe ich ja jetzt schon drei Karten gezeigt. Deswegen habe ich heute mal das zweite neue Set Möwen Pups benutzt und diese Karte gewerkelt, die ich heute auf dem Stampcorner Blog zeige.

Hello everyone!
I've already shared three cards using the stamp set with the seals from Stampcorner's july release. So today I used the second new stamp set to create this card, that I'm sharing over at the Stampcorner Blog today. 

Ich denke, in jeder Familie oder jedem Freundeskreis gibt es diese eine Person, auf die man immer warten muss, weil sie nie rechtzeitig da oder fertig ist. Daran musste ich denken, als ich diese Karte gemacht habe. Da sitzen alle Möwen pünktlich auf ihren Pollern, um dem Geburtstagskind ein Ständchen zu singen, aber eine Möwe kommt wieder zu spät. Das reiben ihr die anderen hier ordentlich unter die Nase, natürlich in Möwen-Manier....
Für den Hintergrund habe ich ein Stück weißen Cardstocks mit Distress Oxide Stormy Sky, Faded Jeans und Prize Ribbon gewischt und einige Wassertropfen darauf verteilt. Dann habe ich ein weiteres Stück weißen Cardstock mit Speckled Egg, Iced Spruce und Weathered Wood gewischt und die obere Kante mit einer Wellenstanze ausgestanzt. Das gibt ein tolles stürmisches Meer - das Wasser ist eben nicht überall tropisch-türkis. Und bei Möwen muss ich immer an die Nordsee denken...
Mit einem weißen Gelstift habe ich einige Lichtakzente oder auch Schaum auf der Wasseroberfläche verteilt und dann mit einer kleinen Wellenstanze von LawnFawn vier wellenförmige Schlitze hineingestanzt. Das Wasser habe ich mit 3D Tape auf den Himmel geklebt.

I think, we all have that one person in our family or amongst our friends, the one that you always have to wait for because he/she is always later or never ready in time. I had to think of that when I made that card. All seagulls sat down on  a bollard, right in time to sing happy birthday to the recipient of the card. But one of them is late. Of course the others are reminding him of that, in the way seagulls do...
For the background I've inked up a piece of white cardstock with Distress Oxide Stormy Sky, Faded Jeans and Prize Ribbon and put some drops of water onto the ink. Then I inked up another piece of white cardstock with Speckled Egg, Iced Spruce and Weathered Wood and used a wave die to cut the top edge into a wavy shape. This color combo makes a nice stormy sea - the ocean isn't tropical turquoise everywhere and I always have to think of the North Sea when I see sea gulls.
I used a white gel pen to add some light reflections or foam onto the water, then die cut four wavy slits into it, using a small wave die by LawnFawn. Then I glued the water onto the sky with foam tape.


Und hier sind die genialen Möwen. Im Set sind noch viele mehr enthalten, für mich passten aber diese beiden hier am besten auf meine Karte.
Am Himmel ist der Übeltäter schon im Anflug. Aber das hindert die anderen Möwen nicht daran, lauthals "spät" zu schreien. Ich habe drei kleine Sprechblasen aus weißem Cardstock gestanzt und darauf dann nur das Wort spät mit einem der Stempel aus dem Adventskalender 2020 mit schwarzer Tinte aufgestempelt. Dabei musste ich den Abstrich des P ein wenig kürzen - also mit Tape abdecken - damit der Text auch in die Sprechblase passt.
Für die Poller habe ich eine Stanze von CraftEmotions verwendet. Ich habe sie viermal aus weißem Cardstock gestanzt und mit Copics eingefärbt. Auf die Stelle, an der sich jeweils das Seil befindet, habe ich kleine Stücke Garn aufgeklebt. Dann habe ich die Poller durch die Schlitze im Wasser gesteckt und festgeklebt.
Die drei Möwen sind, ebenso wie die gerade anfliegende, mit Copics coloriert. Ich habe sie ausgeschnitten und jeweils auf einen Poller geklebt und dabei einen Poller frei gelassen. 
Die Sprechblasen und die Möwe im Anflug sind wieder mit 3D Tape aufgeklebt.

Here are the great sea gulls. There are more included in the set, but for my card just those two images were perfect.
In the sky the one sea gull being late is already flying in. But that doesn't keep the others from screaming "late". I've die cut three small speech bubbles from white cardstock and stamped the word late onto them with black ink.
For the bollards I used a die by CraftEmotions. I've die cut them from white cardstock and then used my Copics to add the wooden structure. I also glued some small pieces of yarn onto the area where the rope should be. Then I've put the bollards through the slits in the water and glued them down.
The three sea gulls, and of course also the one just flying in, are colored with Copics. I've cut them out and glued them onto the bollards, leaving one of the four empty.
The speech bubbles and the flying sea gull are glued down with foam tape again.
 

 Natürlich musste dann ein "nachträglich herzlichen Glückwunsch" Text auf die Karte. Dafür habe ich das Herzlichen Glückwunsch aus dem Set Kleine Worte und das nachträglich aus dem Set Träume jeweils mit schwarzer Tinte auf weißen Cardstock gestempelt und ebenfalls mit 3D Tape unten auf meine Karte geklebt.

Of course I had to add a "happy belated birthday wishes" text to my card. I stamped the two texts with black ink onto white cardstock and glued the banners to the bottom of my card, again using foam tape.

Mittwoch, 13. Juli 2022

Create a Smile Juli-Moodboard Challenge

 
Hallo Ihr Lieben!
Heute startet die aktuelle Challenge bei Create a Smile. Ich finde die Moodboards ja immer wahnsinnig inspirierend, aber das Juli-Moodboard ist ja mal so 100 Prozent meins. Und so war die Idee für meine Karte innerhalb Minuten im da.

Hello everyone!
Today the new challenge by Create a Smile goes life. I just love their moodboards and always find them extremly inspiring, but the july moodboard is completly my style. And so the idea for this card was in my head within minutes.


Na, wie findet Ihr es? Ich liebe türkis und weiß - und die grauen und grünlichen Farben passen so wunderbar dazu. Da ich das Moodboard doch sehr elegant findet, ist diese blumige Karte entstanden:

What do you think about it? I love turquoise and white, and the grey and green bits of color go wonderfully with those other two. Since I think this moodboard is quite elegant I created this flower card for the challenge:


Fragt mich jetzt nicht, warum die Karte hier etwas grauer wirkt, im oberen Bild etwas grünlicher. Ich habe die Fotos direkt nacheinander geschossen, gleiche Kameraeinstellungen. Manchmal habe ich das Gefühl, der Hintergrund verändert die Farben etwas.
Ich habe hier türkisgrauen Cardstock genommen und mit der Cloud Pattern Stencil und Distress Oxide Iced Spruce die Wolken aufgewischt. Ich habe ein paar kleine Wolken in die Zwischenräume geschummelt, da genau die nach dem Auflegendes Motivs sichtbar waren. Dann habe ich türkisfarbene Metallic-Watercolor über den Cardstock gespritzt, alles dunkeltürkis gemattet und auf einen weißen Kartenrohling geklebt.

Don't ask my why the card looks more grey-ish on this and more green-ish on the above pic. I took both directly after each other, same camera settings. Sometimes I think different backgrounds change the colors a bit.
Here I used some turquoise-grey cardstock and added clouds with the Cloud Pattern stencil and Distress Oxide Iced Spruce. I added a few of the small clouds because after I put the images on top the empty spaces were what was left visible. Then I spritzed some turquoise metallic watercolor onto the cardstock, matted it dark turquoise and glued it onto a white note card.


Als Motiv habe ich - passend zu einem der Bilder im Moodboard - Eukalyphuszweige gewählt. Die sind aus dem Set Einatmen Ausatmen und ich habe sie mit Fade-Out Ink von InkOn3 auf Watercolor Cardstock gestempelt und dann mit ZIG Markern und Polychromos in No-Line Coloring coloriert. Dann habe ich sie per Hand ausgeschnitten.
Zwischen die Eukalypthuszweige habe ich dann noch zwei Blumensilhouetten aus dem Set Wildflowers gesteckt. Die sind einfach mit schwarzer Tinte auf weißen Cardstock gestempelt und ebenfalls ausgeschnitten. Die Stiele habe ich per Hand verlängert, so dass sie schön weit oben zwischen den Zweigen sitzen. 
Die Pflanzen habe ich mit 3D Tape aufeinander geklebt und darunter noch einige Kreise, gemacht mit dem Stitched Circle Frames Set aus weißem Cardstock, darunter gesetzt. Sie sorgen für mehr Kontrast zwischen dem Hintergrund und den Motiven. 

For the images I picked some eucalyptus branches - just like on one of the pics on the moodboard. They are from the Breathe In Breathe Out stamp set and stamped with Fade-Out ink by InkOn3 onto watercolor cardstock. Then I colored them in with a mix of ZIG marker and Polychromos doing the no-lines technique and cut the images out by hand.
Beetween the branches I've put some more plants from the Wildflowers stamp set. They are simply stamped onto white cardstock with black ink and also cut out by hand. I used a black fineliner to make the stems longer so these plants sit niceley and high up in the eucalypus branches.
I used foam tape to glue the different plants on top of each other and put some circles, cut from white cardstock using the Stitched Circle Frames die set, under the branches. That adds some more contrast between the background and the images.


Jetzt brauchte meine Karte noch einen Text. Eukalyphus steht ja für Stärke und Wohlergehen - da passt ein "die besten Wünsche" doch perfekt.
Ich habe eines der Useful Banners aus grün-grauem Cardstock gestanzt und dann den Text aus dem Set Wunschkonzert weiß darauf embosst. Dabei habe ich die einzelnen Worte ein wenig gebogen, so dass sie sich der Form des Banners anpassen. 
Unter das Banner habe ich dann noch ein weiteres aus dunkel-türkis farbenem Cardstock gelegt und durch beide ein kleines Loch gestanzt. Durch das habe ich etwas weißes Twine gezogen, zur Schleife gebunden und dann denTag ans untere Ende der Zweige geklebt.
Als Deko kamen dann noch ein paar mattsilberne Perlen zum Einsatz.

Now my card needed a text. Eucalyptus is the flower that stands for strength - so a "best wishes" seemed the perfect sentiment.
I've die cut one of the Useful Banners from grey-green cardstock and then white heat embossed the text onto it. To make the text follow the shape of the banner I've bent the stamps slightly before stamping them. 
I glued another banner cut from dark turquoise cardstock under the one with the text, then punched a small hole through both of them, put some white twine through the hole and tied it to bow. Then I glued the banners to the bottom of the flower stems.
To embellish my card I added a few matte silver pearls.

Montag, 11. Juli 2022

Sending you a smile

 
Hallo Ihr Lieben!
Bereits vor zwei Tagen habe ich Euch ja schon eine Karte mit dem Lush Garden Kit von Altenew gezeigt. Diesmal war das Silk Art Kit dran. Und Schuld ist Jennifer McGuire. Die hat vor kurzem in einem Video gezeigt, wie man Stencils, Stanzen etc kreativ miteinander kombinieren kann. Die Techniken wollte ich ungedingt probieren - aber einen großen, fast vollflächigen Motivstempelt hatte ich nicht. Also habe ich mich auf die Suche begeben, und dann das Kit gekauft, denn genau den Stempel hat sie in ihrem Video ebenfalls benutzt. Und das Kit ist klasse! Allerdings wollte ich mal wieder alles auf einmal, so dass das Ergebnis eventuell nicht ganz so klar ist, aber mir gefällt es trotzdem super.

Hello everyone!
Two days ago I've shared a card with you using the Lush Garden Kit by Altenew. This time I've used the Silk Art kit. And it's all Jennifer McGuires fault! She shared a video a little ago showing how to combine stamps and stencils creatively. I really had to try these techniques - but I didn't have a large, nearly solid image. I searched different shops and then ended up buying this kit, because it's exactly the stamp Jennifer used in her video. I love this kit! But it seems like I wanted too much on one card again so my result may not be as crisp as hers - I still love it.

Für den Hintergrund habe ich die Diagonal Stripes Hotfoil Plate von PinkFresh auf weißen Cardstock foliert. Ich hatte nicht erwartet, dass das Muster so stark rauskommt - die Folie, die ich verwendet habe, war nämlich recht transparent. Und als ich vor einiger Zeit das rosafarbene Pendant - allerdings damals auf rotem Cardstock - verwendet hatte, war das Muster kaum und eher perlmuttartig zu erkennen. Vielleicht liegt es am weißen Cardstock, aber die Streifen sind doch recht stark türkis geworden. Es passt trotzdem, finde ich. Aber um später zum Motiv etwas Kontrast zu sorgen, habe ich noch eines der Nested Hexagons von PinkFresh mit goldfarbener Folie auf weißen Cardstock foliert und ausgeschnitten. Dabei habe ich auch das innere Teil herausgeschnitten, so dass ich einen sechseckigen Rahmen erhalten habe. Den habe ich mit dünnem 3D Tape auf den gestreiften Hintergrund geklebt.

For the background I've foiled the Diagonal Stripes Hotfoil Plate by PinkFresh onto white cardstock. I didn't expect the stripes to be such a bright turquoise - the foil I've used was kind of a transparent turquoise. When I used the pink foil of the same style a little ago - on red cardstock then - the pattern was barely visible and had some kind of a mother-of-pearl look. Maybe it's the white cardstock underneath this time, but the stripes turned out pretty bright. I think it still looks wonderful on the card. But to add some contrast to the image I decided to golden foil one of the Nested Hexagons by PinkFresh onto white cardstock. I've cut out the center and around the outside of the hexagon to end up with a frame. I glued this down onto the background with some thin foam tape.


Hier könnt Ihr einen Ausschnitt des tollen Blumenmotivs besser sehen. 
Nun, im Kit sind ein 3D Embossingfolder, zwei Stencils - einmal layering für die Blumen und einmal solid zum Maskieren -, ein Stanzensets und ein Stempelset enthalten. In ihrem Video stempelt Jennifer das Motiv in Regenbogenverlauf und trägt dann durch einen gestreiften Stencil Farbe auf den Stempel auf, so dass die Blumen zudem ein Muster in Regenbogenverlauf erhalten. Ist jetzt ein wenig blöd auf die Schnelle zu erklären. Aber ich wollte die Blumen eher lebensecht und zusätzlich mit Muster. Also habe ich den Stempel in mein Misti geklebt, die verschiedenen Layering Stencil auf den Stempel gelegt und so die einzelnen Bereiche mit Distress Ink eingefärbt, die Blätter jeweils zweifarbig. Dann habe ich über den Stencil, der auf dem Stempel liegt, einen Stencil mit Spinnennetzmuster gelegt und so die Farbe auf die einzelnen Bereiche aufgetragen. Es war ein wenig kompliziert, so dann auch noch zu stempeln, denn die Stencils hatte ich mit einem Streifen Tape in den Deckel des Misti geklebt, so dass sie jedesmal auf derselben Stelle liegen. Also musste ich einen zur Seite, einen nach oben klappen und so dann das Misti schließen. Auch das Auftragen der Farbe durch zwei Stencil ging offenbar nicht ganz so super, denn die Linien sind nicht so klar wie bei Jennifer. Da man aber so nicht so gut erkennen kann, dass ich einen Spinnennetz-Stencil benutzt habe, finde ich das gar nicht so schlecht.
Für die Blumen habe ich Distress Ink Squeezed Lemonade - für die Blütenmitten -, Twisted Citron und Mowed Lawn für die Blätter und Broken China sowie das neue Uncharted Mariner benutzt. 
Als alles gestempelt war, habe ich die Blumen mit der dazugehörigen Outlinestanze ausgestanzt und dann im 3D Folder geprägt. Das Blumenarrangement sieht so einfach klasse aus und erhält durch die Prägung noch mehr Tiefe.
Die Blütenmitten in hellgelb hat man dann nicht mehr so toll gesehen. Deswegen habe ich hier ein wenig Tacky-when-Dry Medium aufgetragen und nach dem Trocknen einen Rest goldener Folie darauf abgedrückt. So passen die Blumenmitten zum Sechseck-Rahmen.
Ich habe die Blumen mit dickerem 3D Tape auf den Hintergrund geklebt, die überstehenden Teile weggeschnitten und dann an zwei Stellen der Karte direkt auf den Hintergrund - und unter den sechseckigen Rahmen - geklebt, um ein paar freie Stellen abzudecken. 

Here you get a close up of a part of the flower image.
Well, the kit contains a 3D Embossingfolder, two stencils - one layering and one solid for masking -, a die set and a stamp set. In her video Jennifer stamps the image with a rainbow pattern and then puts ink onto the stamp through a stencil so she ends up with a pattern in a rainbow on top of the image. It's kind of hard to explain in just a few words. Well - I wanted the flowers in kind of realistic colors AND a pattern on top. So I stuck the image in the door of my Misti, put the different layering stencils on top and inked up the different areas, the leaves even with some shading. Then I put another stencil with a spider web patttern on top of the one that was laying on the stamp and added more color to the different areas through both stencils. It was a bit tricky to stamp that way because I had used tape to stick both stencil to my Misti. So I had to lift one to the side, the other one to the top, then close the door with both stencils attached to stamp the image. Also putting ink through two stencils didn't give such crisp results as Jennifer ended up with. Well, since that means you can't really tell that I used a spiderweb stencil I'm not even sad about it.
For the flowers I used Distress Ink Squeezed Lemonade for the flower centers, Twisted Citron and Mowed Lawn for the leaves and Broken China as well as the new Uncharted Mariner for the flower petals.
After I had stamped everything I used the matching die to cut the flower bouquet out and dry embossed it with the 3D embossing folder. I just love the look of it, the image gets so much depth from the combination of ink and embossing.
After the dry embossing the light yellow flower centers weren't as visible as I would have loved. So I put some Tacky-when-Dry medium onto these areas and pressed a leftover piece of golden foil onto it after the medium had dried. Now the flower centers match the hexagon frame.
I used thicker foam tape to glue the flowers onto the background, cut off the excess and used them to fill in two empty spots on my background, here putting the images directly onto the background and under the frame.


Ich wusste bereits beim Werkeln der Karte, dass sie für eine Freundin in den USA ist, die in den letzten Monaten eine schwere Zeit durchgemacht hat. Mit der Karte will ich sie ein wenig aufmuntern. 
Also habe ich mich für "sending you a smile to lift your day" als Text entschieden. Dabei habe ich das Wort Smile mit einer der Shadow Script #2 Stanzen von Sizzix - die Schattenlage habe ich hier weggelassen - aus schwarzem Cardstock gestanzt. Eigentlich viermal, denn ich habe die Teile wieder aufeinander und dann quer über dem Motiv auf die Karte geklebt. Für den Rest des Textes habe ich einen Stempel aus dem Set Be Happy Laugh Lines von ArtImpressions weiß auf schwarzen Cardstock embosst, das smile herausgeschnitten und dann die Cardstockstreifen ober- und unterhalb des gestanzten Wortes aufgeklebt. 
Als Ersatz für den I-Punkt habe ich ein ebenfalls gestacktes Herz verwendet.

When I made this card I already knew that I wanted to send it to a friend in the US that went through a rough time the last months, so I want to lift her up a bit. A "sending you a smile to lift your day" sentiment was the perfect pick. 
I've die cut the word smile from black cardstock using one of the dies from the Shadow Script #2 die set by Sizzix - I left out the shadow here. Well, actually I've die cut it four times because I stacked the die cuts once again, then glued the word on top of my image across the card. For the rest of the text I used a stamp from the Be Happy Laugh Lines stamp set by ArtImpressions and white heat embossed it onto black cardstock. I've cut the smile out of the sentiment and glued the rest above and under the word smile onto my card.
I also decided to replace the dot on top of the i with a little heart, again 4 of them stacked on top of each other.


Als Deko habe ich dann noch ein paar goldene Perlenauf der Karte verteilt, alles schwarz gemattet und auf einen weißen Kartenrohling geklebt. 
Ist der Glanz auf der Karte nicht einfach wunderbar?

As embellishments I've added a few golden pearls to the card, then matted the panel with black cardstock and glued it onto a white note card.
Isn't the shine on this card just beautiful?

Samstag, 9. Juli 2022

Sending love

 
Hallo Ihr Lieben!
Momentan bin ich ja absolut den großen Blumenstempeln verfallen. Da war es nur eine Frage der Zeit, bis ein paar der grandiosen Altenew Stempel bei mir einziehen werden. Aber ich habe hier zum ersten Mal auch Kits gekauft - mit Stempel, Stanzen, Stencils und Embossingfolder, die jeweils perfekt zusammenpassen. Und das Kit Lush Garden kam hier zum Einsatz.

Hello everyone!
At the moment I love to use those large flower stamps. So it was just a question of time until I had to get a few of the great stamps by Altenew. But I also got my first kits - with matching stamps, dies, stencils and embossing folders. Here I used the Lush Garden kit.

Nun muss ich gestehen, dass ich fast ein wenig überforder war. Lieber Stencil oder doch das Layering Stempelset verwenden? Mit Embossingfolder? Am liebsten hätte ich alles benutzt Und so kam es dann auch...
Im Hintergrund habe ich den Embossingfolder verwendet. Ich habe damit ein Stück schwarzen Cardstocks geprägt. Anschließend habe ich die kleineren Blüten mit Distress Oxide Faded Jeans und Prize Ribbon unter Verwendung der Layering Stencil ein wenig eingefärbt. Für die Blätter habe ich Iced Spruce benutzt. Dann habe ich mit einem Brayer weiße Stempeltinte auf die erhabenen Stellen aufgerollt und außerdem weiße Farbe über den Cardstock gespritzt.

I have to admit that I was a bit overwhelmed with the kit. Should I use the stencils or the layering stamps? Use the embossing folder? I wanted to use everything on just one card - and well, that's what happened....
In the background I used the embossing folder. I've dry embossed a piece of black cardstock with it. Then I inked up the smaller flowers with Distress Oxide Faded Jeans and Prize Ribbon, using the layering stencils to do it. For the leaves I used Iced Spruce. Then I added a coat of white ink onto the raised areas using a brayer and also spritzed some white acrlic paint onto the cardstock.


Hier könnt Ihr eine der embossten Stellen besser erkennen. Auf die Blütenmitten habe ich mit einem silbernen Gelstift kleine silberne Punkte aufgetupft.

Here you get a better look at a  part of the embossed areas. I used a silver gel pen to add some silver to the flower centers.


Die beiden großen Blumen im Blumenstrauß sowie die beiden Blätter habe ich erst aus weißem Cardstock gestanzt und dann mit dem Layering Stempelset die Blüten aufgestempelt. 
Ich war mir erst nicht sicher, ob ich die Outlines auch stempeln wollte, habe sie dann aber doch mit silbernem Embossingpulver aufembosst. Die Linien sind nicht ganz perfekt, da die blaue Tinte noch nicht ganz trocken war und ich somit zu viel Pulver auf den Blüten hatte - trotz Embossingbuddy. Also habe ich mit einem Pinsel das Zuviel an Pulver weggewischt und dabei auch die Linien an einigen Stellen wieder entfernt. Aber das finde ich gar nicht schlimm.
Anschließend habe ich die Motive in den Embossingfolder gelegt und ebenfalls geprägt. Die Blüten im Stempelset sind etwas größer als die des Embossingfolders, so dass die Prägelinien nicht bis an den Rand der Blüten gehen, aber den Effekt finde ich echt klasse! 
Wieder habe ich weiße Stempeltinte über die erhabenen Stellen gerollt - und dabei natürlich auch die Farben der Blüten und Blätter etwas weniger klar gemacht. Und dann habe ich sogar noch mit einem Nuvo Aqua Shimmer Stift ein wenig Glitzer auf die Blüten aufgetragen. Zum Glück ist der doch eher dezent. 
Ich habe die Blätter direkt, die Blüten mit unterschiedlich dickem 3D Tape auf den embossten Hintergrund geklebt und dabei einen Ring aus silbernem Spiegelcardstock mit unter die Motive gelegt. Den Ring habe ich mit einer der Stitched Circle Frames Stanzen von Create a Smile gemacht.
Das love ist mit der Swirled Love Stanze von Poppystamps ebenfalls aus silberfarbenem Spiegelcardstock gestanzt. Glaubt es oder nicht, es lag seit Monaten so auf meinem Tisch, da ich es eigentlich für die Karte, die ich Euch am Dienstag gezeigt habe, vorgesehen hatte, es mir da aber einfach nicht gefiel. Hier passte es wunderbar. Unter dem silberfarbenen Spiegelcardstock befinden sich 4 Lagen, die ich aus schwarzem Cardstock gestanzt habe. 
Ergänzt habe ich den Text mit einem weiß auf schwarzen Cardstock embossten Sending aus dem Stempelset Bountiful Bouquet von Altenew. 

The two large flowers in the bouquet and the two leaves are die cut from white cardstock, then I used the layering stamp set to add the color.
First I wasn't sure if I wanted to use the outline stamp as well, but then I silver heat embossed the lines onto the colore flowers. The lines aren't perfect here since the blue ink hadn't dried completly and I ended up with too much powder on the flowers - even with using an embossing buddy. So I used a brush to remove the excess powder and while doing that I also removed some of the lines. But it really doesn't bother me here.
Then I put the images into the embossing folder and dry embossed those as well. The flowers from the stamp/die set are slightly larger than the ones on the embossing folder, so the embossed lines don't go all the way to the edges of the flowers, but I really like that look!
Again I used a brayer to put some white ink onto the raised area of the flowers and leaves - and of course that diluted the colors of my flowers a bit. And since it wasn't enough yet I also used a Nuvo Aqua Shimmer Pen to add some glitter onto the flowers. Lucky for me that is a quite subtle and clear glitter. 
I glued the leaves directly onto the dry embossed background, for the flowers I used foam tape in different thicknesses, and glued a ring cut from silver mirror cardstock under the flowers. I've die cut that with a die from the Stitched Circle Frames dies by Create a Smile.
The word love is die cut with the Swirled Love die by Poppystamps. Believe it or not, it was laying like this on my desk for months since I had originally made it for the card I shared with you last tuesday. But I just didn't like it on that other image - here it was just perfect. Under the layer of silver cardstock there are four die cuts cut from black cardstock.
I finished the text with a sending from the Bountiful Bouquet stamp set by Altenew, white heat embossed onto black cardstock.


Hier könnt Ihr den Glitzer auf den Blüten und auch den Schimmer des Spiegelcardstocks noch ein wenig besser sehen.
Als Deko habe ich noch einige silberfarbene Perlen aufgeklebt und dann alles auf einen weißen Kartenrohling geklebt.

Here you get to see the glitter on the flower and also the shine of the mirror cardstock better.
As embellishments I used a few silver pearls, then glued my cardstock onto a white note card.

Freitag, 8. Juli 2022

LawnFawnatics Challenge #128

 
Hallo Ihr Lieben!
Christmas in July ist das Thema für die LawnFawnatics Challenge #128. Ich glaube, ich habe hier schon mal erwähnt, dass ich mich mit Karten, die absolut außerhalb ihrer Saison liegen, echt schwer tu. Deswegen bewundere ich auch Stempler, die das ganze Jahr über Weihnachtskarten werkeln, um dann an Weihnachten aufgestellt zu sein. Nun, ich habe meine weihnachtliche Szene einfach an den Strand verlegt, so passt es zur Jahreszeit - und auch der Text weist ausdrücklich auf den Sommer hin.

Hello everyone!
Christmas in July is the theme of the LawnFawnatics Challenge #128. I think I have mentioned several times that I really have a hard time making cards out of their season. That's also why I really adore all those card makers, that make christmas cards all year long to have enough to send our for the season. Well, I simply moved my christmas scene to the beach, matching the current time of year - and also the text adds a touch of summer.

Ich habe hier zuerst den Sunburst Backdrop von LawnFawn aus weißem Cardstock gestanzt. Eigentlich war der Plan, meine Szene bei Tag stattfinden zu lassen. Aber dann wollte ich unbedingt das neue Distress Ink Uncharted Mariner benutzen. Also habe ich den Himmel damit und mit Mermaid Lagoon gewischt - und irgendwie wirkte er damit eher nächtlich. Also habe ich noch ein paar Wassesrtropfen sowie silberne Metallic Watercolor darüber gespritzt.
Davor kam eine Lage Wellen, gemacht mit einer der Stitched Waves Borders aus türkisfarbenem Cardstock.
Davor kamen dann wellige Lagen Sand, jeweils aus hell kraft farbenem Cardstock gestanzt.
Um die Lagen aufeinander zu kleben habe ich mal wieder 3D Tape benutzt.

First I've die cut the Sunburst Backdrop by LawnFawn from white cardstock. Originally I had planned to make a daylight scene. But then I really wanted to include the new Distress Ink Uncharted Mariner. So I've inked up the background with this and Mermaid Lagoon and suddenly it looked more like a nightime sky. So I spritzed some droplets of water and some silver metallic watercolor on top.
On top of that I've glued down a ray of waves, made with one of the Stitched Waves Borders from turquoise cardstock.
And on top of that I added two wavy layers of sand, cut from a light craft cardstock. 
To glue the layer together I used once again foam tape.


Als Hauptelement habe ich ein weihnachtlich dekoriertes Strandhaus auf die Szene geklebt. Dafür habe ich erst die Build a House Stanze zweimal aus türkisfarbenem Cardstock gestanzt und mit hellgrauer Tinte den Woodgrain Backdrop quer aufgestempelt. Dann habe ich eines der Häuser in 1/4" breite Streifen geschnitten und jeden zweiten Streifen auf das andere Haus geklebt. So bekommt es eine tolle Holzfassade.
Die übrigen Teile des Hauses sind aus dem Build a Barn und dem Build a House Stanzenset. Die Markise habe ich einmal aus weißem, einmal aus türkisfarbenem Cardstock gestanzt und die türkisfarbenen Teile jeweils auf jeden zweiten Streifen aufgeklebt. Dann habe ich alle Teile mit Copics schattiert. 
Für die weihnachtliche Deko kamen Teile aus dem Build a House Gingerbread Add-On Stanzenset zum Einsatz. Die Lampen der Lichterkette sind mit Glossy Accents überzogen. Für die Zuckerstangen, die in den Sand gesteckt sind habe ich mich für eine grün-weiß Kombi entschieden. 
Hinter dem Haus stehen drei Palmen, gemacht mit Stanzen aus den Sets Tropical Backdrop und Hammock and Trees. Sie sind alle aus weißem Cardstock gestanzt und mit Copics coloriert. 

As the main element I created a christmas-sy decorated beach house. I've die cut the Build a House die twice from turquoise cardstock and then used light grey ink to stamp the Woodgrain Backdrop onto them. I've cut one of the houses into 1/4" wide strips and then glued every second of these strips onto the other house die cut. This way the cottage gets a beautiful wood front.
For the other parts of the house I used dies from the Build a Barn and the Build a House die set. I've die cut the awning once from white and once from turquoise cardstock, then cut the turquoise one into its sections and glued every other one onto the white awning. Then I shaded all the pieces with Copics.
For the christmas decorations I used dies from the Build a House Christmas Add-On. The string of lights is covered with Glossy Accents. For the candy canes, that are stuck into the sand, I went with a green and white color combo.
Behind the house I've planted three palm trees, made with dies from the Tropical Backdrop and the Hammock and Trees die sets. I've cut them from white cardstock and colored them with Copics.


Da im Sommer am Strand natürlich kein Schnee liegt, haben die Bewohner des Hauses statt eines Schneemanns einen Sandmann gebaut. Der ist aus dem Stempelset Ready, Set, Snow und auf den hell kraftfarbenen Cardstock gestempelt. Dafür habe ich helle Tinte verwendet, so dass man später die gestempelten Linien nicht sieht. Ich habe ihn in Sandlook coloriert. Der Hut - den ich durch einen Hut aus dem Tea-Riffic Day Stempelset ersetzt habe, und der Schal sind auf weißen Cardstock gestempelt, coloriert und auf das sandfarbene Motiv aufgeklebt. Außerdem trägt der Schneemann eine Sonnenbrille aus dem Pool Party Stempelset. Die Karottennase habe ich durch ein Stück Kohle, einfach mit einem schwarzen Fineliner gemalt, ersetzt.
In den Sand habe ich Weihnachten-im-Juli-Grüße geschrieben. Das Wort merry ist Teil eines der Stempel aus dem Set Winter Big Scripty Words. Für den kleinen Text darunter habe ich Stempel aus dem Set Plan on It Holidays verwendet. Für das in habe ich einfach einen Teil des Wortes Valentine's Day benutzt. Christmas und July waren im Set enthalten - danke für 4th of July!
Ich habe auch das Wort merry mit heller Tinte gestempelt und dann mit vielen kleinen Copics-Punkten in verschiedenen Brauntönen sowie einem weißen Gelpen nachgemalt. So habe ich auch dem Rest des Sandes ein wenig Struktur verliehen. Für den Sandmann habe ich noch einen Schlitz mit einer der Beach Accents Stanzen in den braunen Cardstock gestanzt, hinter den ich ihn zum Teil stecken konnte. 

Of course there's no snow at the beach during summer. So the people living in this house created a sandman instead of a snowman. It's from the Ready, Set, Snow stamp set and stamped onto the same light craft cardstock. I used light ink to stamp it so you don't see the stamped lines later and colored him in a sandy look. The heat - that I replaced with one from the Tea-Riffic stamp set - and the scarf are stamped onto white cardstock, colored in and then glued onto the sandy image. The snowman is also wearing sunglasses from the Pool Party stamp set. And I replaced his carrott nose with a piece of cole, simply drawn by hand with a black fineliner.
Into the sand I wrote a merry christmas in july greeting. The word merry is part of one of the stamps from the Winter Big Scripty Words stamp set. For the subtext I used stamps from the Plan On It Holidays set. I used part of the Valentine's Day stamp to stamp the ink, the other words are included in the set - thanks to 4th of july!
Again I used light ink to stamp the word merry, then made lots of dots with brown copics and a white gel pen to re-write it. That's also how I added structure to the rest of the sand. With one of the Beach Accents die set I've cut a slit into the sand to tuck the sandman behind.

Donnerstag, 7. Juli 2022

Stay Cool

 
Hallo Ihr Lieben!
Das Juli-Release von Stampcorner ist da! Und ich zeige heute auf dem Stampcorner Blog eine weitere Karte mit den süßen Robben aus dem Set Hallo Sommer. Die sind einfach zu goldig und so wunderbar chillig! 

Hello everyone!
Stampcorner's july release is here! Today I am sharing another card with the cute seals over at the Stampcorner Blog. I just love them, they are so cute and chilly!

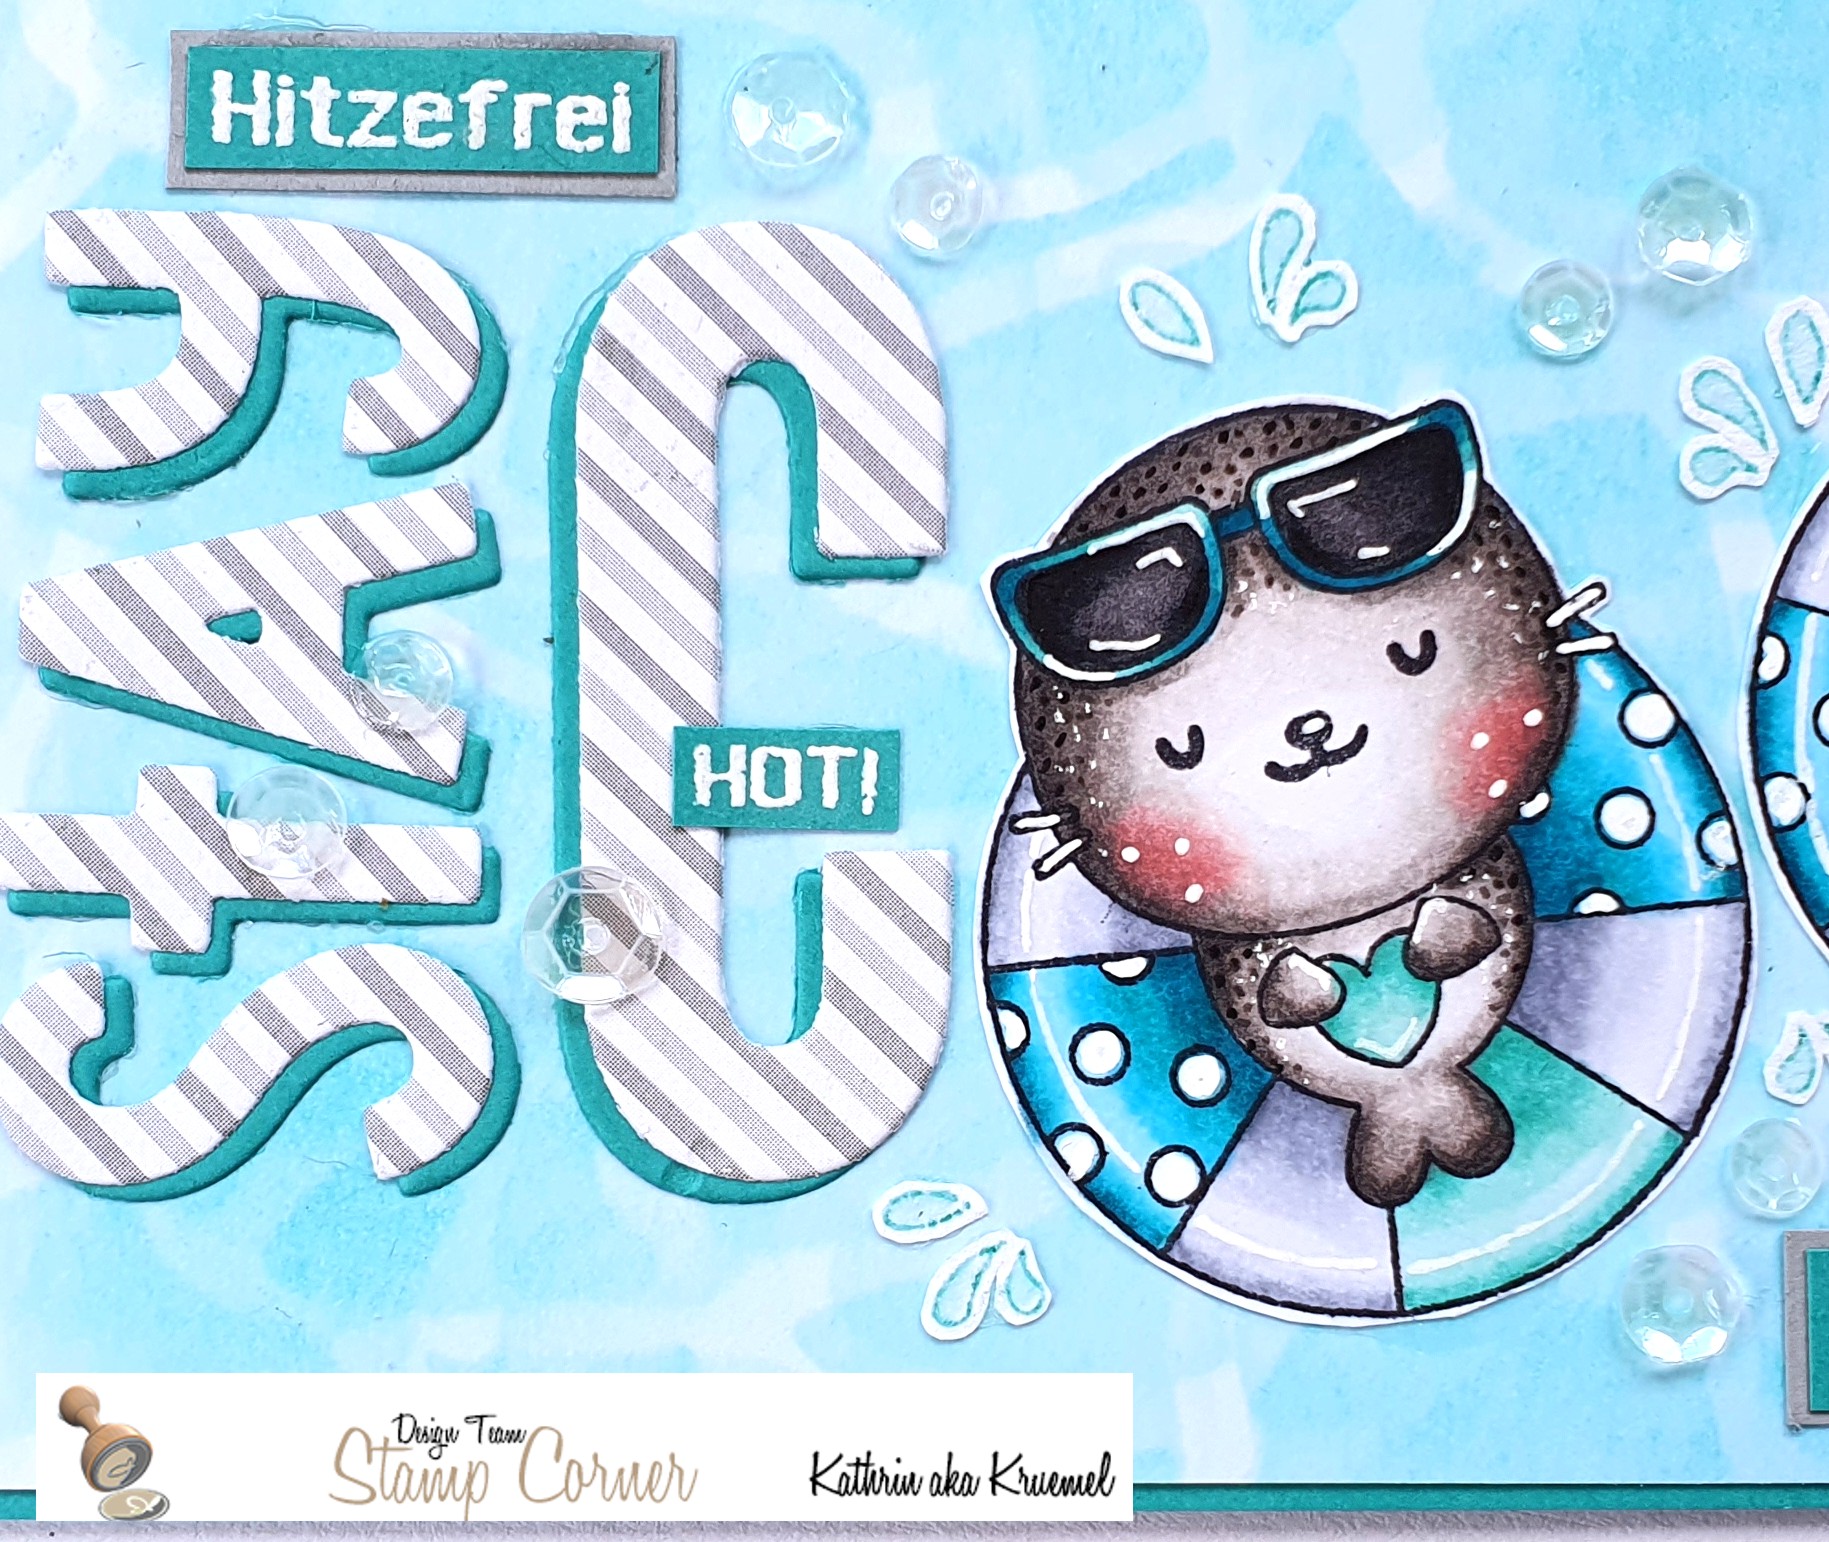
Zur Abwechslung habe ich hier mal eine Mini-Slimline Card gemacht.
Für den Hintergrund habe ich einen weiteren neuen Stencil benutzt. Damit kann man eine tolle Steinstruktur gestalten - man kann ihn aber auch nutzen, um eine wunderbare Wasseroberfläche mit Lichtreflektionen zu machen. Dafür habe ich ein Stück weißen Cardstock ganz leicht mit Distress Ink Salvaged Patina eingefärbt - wirklich nur einen Hauch Farbe. Dann habe ich den Stencil aufgelegt und eine dünne Schicht Tinte aufgetragen. Anschließend habe ich den Stencil gedreht und wieder eine dünne Schicht Tinte aufgewischt. Das ganze habe ich dann ein drittes Mal wiederholt. Für diese Technik eignen sich Distress Ink besser als die Oxides, denn die sind deckend und man sieht das Muster unter der oberen Farbschicht nicht. 
Den Cardstock habe ich dann mit türkisfarbenem Cardstock gemattet und auf einen Mini-Slimline Kartenrohling aus weißem Cardstock geklebt.

As a change I've made a mini slimline card here.
For the background I've used another one of the new stencils. This one is great to create cobble stone walls and paths, but you can also use it to make water with nice light reflections on the surface. I very lightly inked up a piece of white cardstock with Distress Ink Salvaged Patina - really only putting down a hint of ink. Then I put the stencil onto the cardstock and added a very thin layer of ink through it. I turned the stencil and added another thin layer of ink. I repeated this step one more time. For this technique the Distress Ink pads are better than the Oxide pads, because those are opaque so you can't see the layer under the ink you've just put down.
I matted the background with some turquoise cardstock and glued it onto a white mini slimline sized card base.


Die beiden Robben habe ich mit Copics coloriert und einige Details mit einem weißen Gelstift hinzugefügt. Die Sonnenbrillen sind außerdem mit Glossy Accents überzogen. Dann habe ich sie ausgeschnitten und so auf den Hintergrund geklebt, dass sie die beiden O des Wortes Cool bilden. 
Die Wassertropfen sind eigentlich neben einem Text aus demselben Stempelset angebracht. Ich habe sie mit Distress Ink Peacock Feathers auf Watercolor Cardstock gestempelt und dann nur mit einem feuchten Pinsel die Farbe vom Rand nach innen gezogen. Dadurch erhalten die Wassertropfen einen tollen transparenten Look.
Für das Wort Cool habe ich mit dem Impact Alphabet von MFT die Buchstaben C und L einmal aus einem grau gestreiften Papier aus dem Flower Market Paperpad von LawnFawn und einmal aus türkisfarbenem Cardstock gestanzt. Dann habe ich die Buchstaben ebenfalls auf den Hintergrund geklebt. 
Aus dem Stempelset Hitzefrei sind die kleinen Texte auf meiner Karte. Ja, die sind wirklich klein, aber für meine Karte perfekt. So konnte ich noch einige Sommerworte auf der Karte unterbringen. Das endlich Sommer ist aus dem Set Matrosen Freunde 1. Alle Texte sind mit weißem Embossingpulver auf türkisfarbenen Cardstock embosst. Das endlich Sommer habe ich dann noch grau gemattet. 

I've colored those seals with Copics and added the white details with a white gel pen. The sunglasses are covered with a layer of Glossy Accents. Then I've cut the images out and glued them onto the background so they create the Os of the word cool. 
The droplets of water are part of a text stamp from the same stamp set. I stamped those with Distress Ink Peacock Feathers and then used a brush, just dampened a bit with water, to pull the ink towards the center. This gives the water drops a beautiful transparent look.
For the word cool I've used the Impact Alplhabet die set by MFT to die cut the letters C and L from a grey striped sheet from the Flower Market paper pad by LawnFawn and once from turquoise cardstock. Then I glued them onto the background as well.
The smaller words on my card are all summer related. Yes, those are tiny stamps but they are perfect for my card. The slighly larger text means "finally summer". All texts are white heat embossed onto turquoise cardstock, I used some grey cardstock to mat the finally summer text.


Auf der linken Seite habe ich den Beginn meines Haupttextes angebracht: ein stay, ebenfalls aus dem gestreiften Designpapier sowie türkisfarbenem Cardstock gestanzt. Das ist mit der dem Stay Cool Stanzenset von MFT gemacht - und war eigentlich das, was mich zu der Karte inspiriert hat. 
Auch hier habe ich noch zwei weitere kleine Worte aus dem Set Hitzefrei unterbracht.
Zum Schluss habe ich als Deko einige transparente Pailetten auf der Karte verteilt.

On the left side of the card I glued down the beginning of my large text: a stay, also die cut from the striped patterned paper and some turquoise colored cardstock. I used the the Stay Cool die set by MFT here - and actually this was, what gave me the idea for this card. 
Again I added two small summer-related words.
In the end I decorated my card with a few clear sequins.

Dienstag, 5. Juli 2022

Was lange währt.....

 
Hallo Ihr Lieben!
Diese Karte hat mich Nerven gekostet - aber was lange währt, wird endlich gut, sagt man ja. Und in diesem Fall stimmt es.

Hello everyone!
This card really took a long time and many attempts, that I was all unhappy with. But here we say "what takes a long time is getting good in the end". And in this case the saying is right.

Ich hatte mich auf Anhieb in das Chrsysanthemum Stempelset von PinkFresh verliebt - und es ist schon vor Monaten bei mir eingezogen. Ich hatte mich auch sofort an die Coloration der wunderschönen Blume gemacht - No-Line mit Polychromos auf Vellum. Bei der Größe des Motivs hat mich das zwei Tage gekostet, aber ich war so happy mit dem Ergebnis. Und dann wusste ich nicht, wie weiter. Ich habe viel ausprobiert, aber nichts hat mir gefallen. Entweder hat es das Motiv zu sehr abgetönt oder es war zu unruhig. Und so lag das colorierte Motiv einige Monate auf meinem Schreibtisch und hat mich vorwurfsvoll angeschaut. Jetzt aber war mir danach, es endlich in eine Karte zu verwandeln - und diesmal ging alles ganz einfach. Und so ist nun diese Karte entstanden.
Für den Hintergrund habe ich meinen einzigen Slimline-Embossingfolder verwendet: das Broken Web von WhimsyStamps. Merkt man gar nicht so sehr, dass es ein Spinnennetz ist, oder? Ich habe ein Stück hellgrauen Cardstock damit embosst, der zwischen meinen Cardstocks steckte - und zufälligerweise schon den nach innen gewellten Rand hatte. Den habe ich kurzerhand stehen lassen. Nach dem Embossen habe ich ein weißes Stempelkissen über die erhabenen Stellen gezogen, um sie etwas mehr herauszubringen, und dann einige Spritzer schwarze Farbe darüber verteilt. 

I fell in love immediately with the Chrysanthemum stamp set by PinkFresh - and bought it months ago. I even started coloring this beautiful image right away - no-line coloring with Polychromos on vellum. Since the image is that large it took me two days to finish. And I was so happy with how it turned out. And then I was at a loss. I tried a lot but nothing felt right. Either the image got toned down too much or the entire card was too busy. And so the colored image was laying on my desk for all those months, looking at me sadly all the time. And now, all of a sudden, I felt like finally turning it into a card - and this time it all came together so easily. So I ended up with this card.
For the background I used the only slimline embossing folder I have in my stash: the Broken Web by WhimsyStamps. I think you don't really see that it's a spider web in the background. I dry embossed a piece of light grey cardstock with it. I found the piece in my stash, already with the scalloped edge cut from it. I decided to keep those borders. After the dry embossing I used a white ink pad and dragged it over the raised areas to bring them out a bit more, then I spritzed some black color over the grey cardstock.


Hier bekommt Ihr einen besseren Eindruck von der Coloration. Die Farben kommen auf dem Vellum so wunderbar leuchtend heraus - ich werde das definitiv wieder machen! 
Auch den Hintergrund sieht man hier besser. Das Motiv brauchte für mein Dafürhalten ein klein wenig Struktur als Unterlage.
Über das Vellum mit dem fertig colorierten Motiv habe ich dann noch weiße Acrylfarbe gespritzt.

Here you get a better look at the coloring. I love how the colors turned out so brilliant and vibrant on the vellum - and will definately do this again!
Also the background is better visible here. To me it just felt like the image needed some structure behind it.
Over the vellum with the finished coloring I spritzed some white acrylic paint.


Für den Text habe ich die Circled Greetings Hugs von Altenew viermal aus weißem Cardstock gestanzt, die Stanzteile aufeinander geklebt und dann den Kreis, der eigentlich um das Wort herum gestanzt wird, weggeschnitten. 
Für den Rest des Textes habe ich zwei Stempel aus dem Bountiful Bouquet Stempelset von Altenew mit weißem Embossingpulver auf schwarzen Cardstock embosst und die Texte rund um das gestanzte Hugs aufgeklebt.
Als Deko habe ich noch einige irisierende weiße Perlen auf der Karte verteilt und anschließend alles auf eine weiße Slimline Karte geklebt.

For the text I've die cut the Circled Greetings Hugs by Altenew four times from white cardstock, stacked the die cuts and then cut off the circle that is originally cut around the word.
For the rest of the text I used two stamps from the Bountiful Bouquet stamp set by Altenew and white heat embossed them onto black cardstock, then placed them around the die cut word.
To embellish the card I added a few white iridescent pearls, then glued everything onto a white slimline card.

Samstag, 2. Juli 2022

Stempeleinmaleins - Ausgabe vom 2. Juli 2022

 
Hallo Ihr Lieben!
Geburtstagsblumen sind immer noch etwas, das man gerne verschenkt - und bekommt! Manchmal geht es aber nicht, einen Blumenstrauß persönlich zu übergeben. Und Blumenlieferdienste mag ich  nicht - ich bin da old school und möchte die Blumen gerne selbst im Laden aussuchen. Mit der Pop-Up Vasen-Karte, die wir Euch heute beim Stempeleinmaleins zeigen, ist dieses Problem gelöst. Ihr könnt die Blumen selbt aussuchen und samt Vase in einer Karte verschicken!

Hello everyone!
Flowers are still something we love to give - and recieve - for a birthday. But sometimes it's not possible to personally deliver a bouquet of flowers. And I don't like those flower delivery services - in that case I am old school and want to pick the flowers myself in the shop. With this Pop-Up Flower Vase Card, that we're sharing over at Stempeleinmaleins today, that problem is solved. You can pick the flowers yourself and send them - including the vase - inside a card.


Für die Front meiner Karte habe ich mit dem Build a Flower Snapdragon Stempelset von Altenew ganz viele Löwenmäulchen in gelb, blau, lila und rosa gestempelt, mit der passenden Stanze ausgeschnitten und dann auf ein Stück hellblauen Cardstock geklebt. Damit das Blumenbeet schön viel Tiefe erhält, habe ich die Lagen mit 3D Tape aufeinander geklebt.
Über die Blumen habe ich dann weiße Acrylfarbe gespritzt.
Der Text ist aus dem Stempelset Heute wird Gut von Create a Smile und weiß auf dunkelblauen Cardstock embosst. Den Streifen habe ich dann unten links quer über die Blumen geklebt.
Als Deko reichten hier ein paar dunkelblaue Glitzersteine.

For the card front I stamped a bunch of snapdragon flowers in yellows, blues, purples and pinks, using the Build a Flower Snapdragon stamp set by Altenew. Then I cut those out with the matching die and glued them onto a piece of light blue cardstock. To add some depth to this flower bed I used foam tape to glue the flowers on top of each other.
Then I spritzed some white acrylic paint over the whole piece of cardstock.
The text means "hello sunshine" and is white heat embossed onto some dark blue cardstock. I then glued this cardstock strip to the bottom left of my card across the flowers.
To decorate the front just a few dark blue rhinestones were enough.


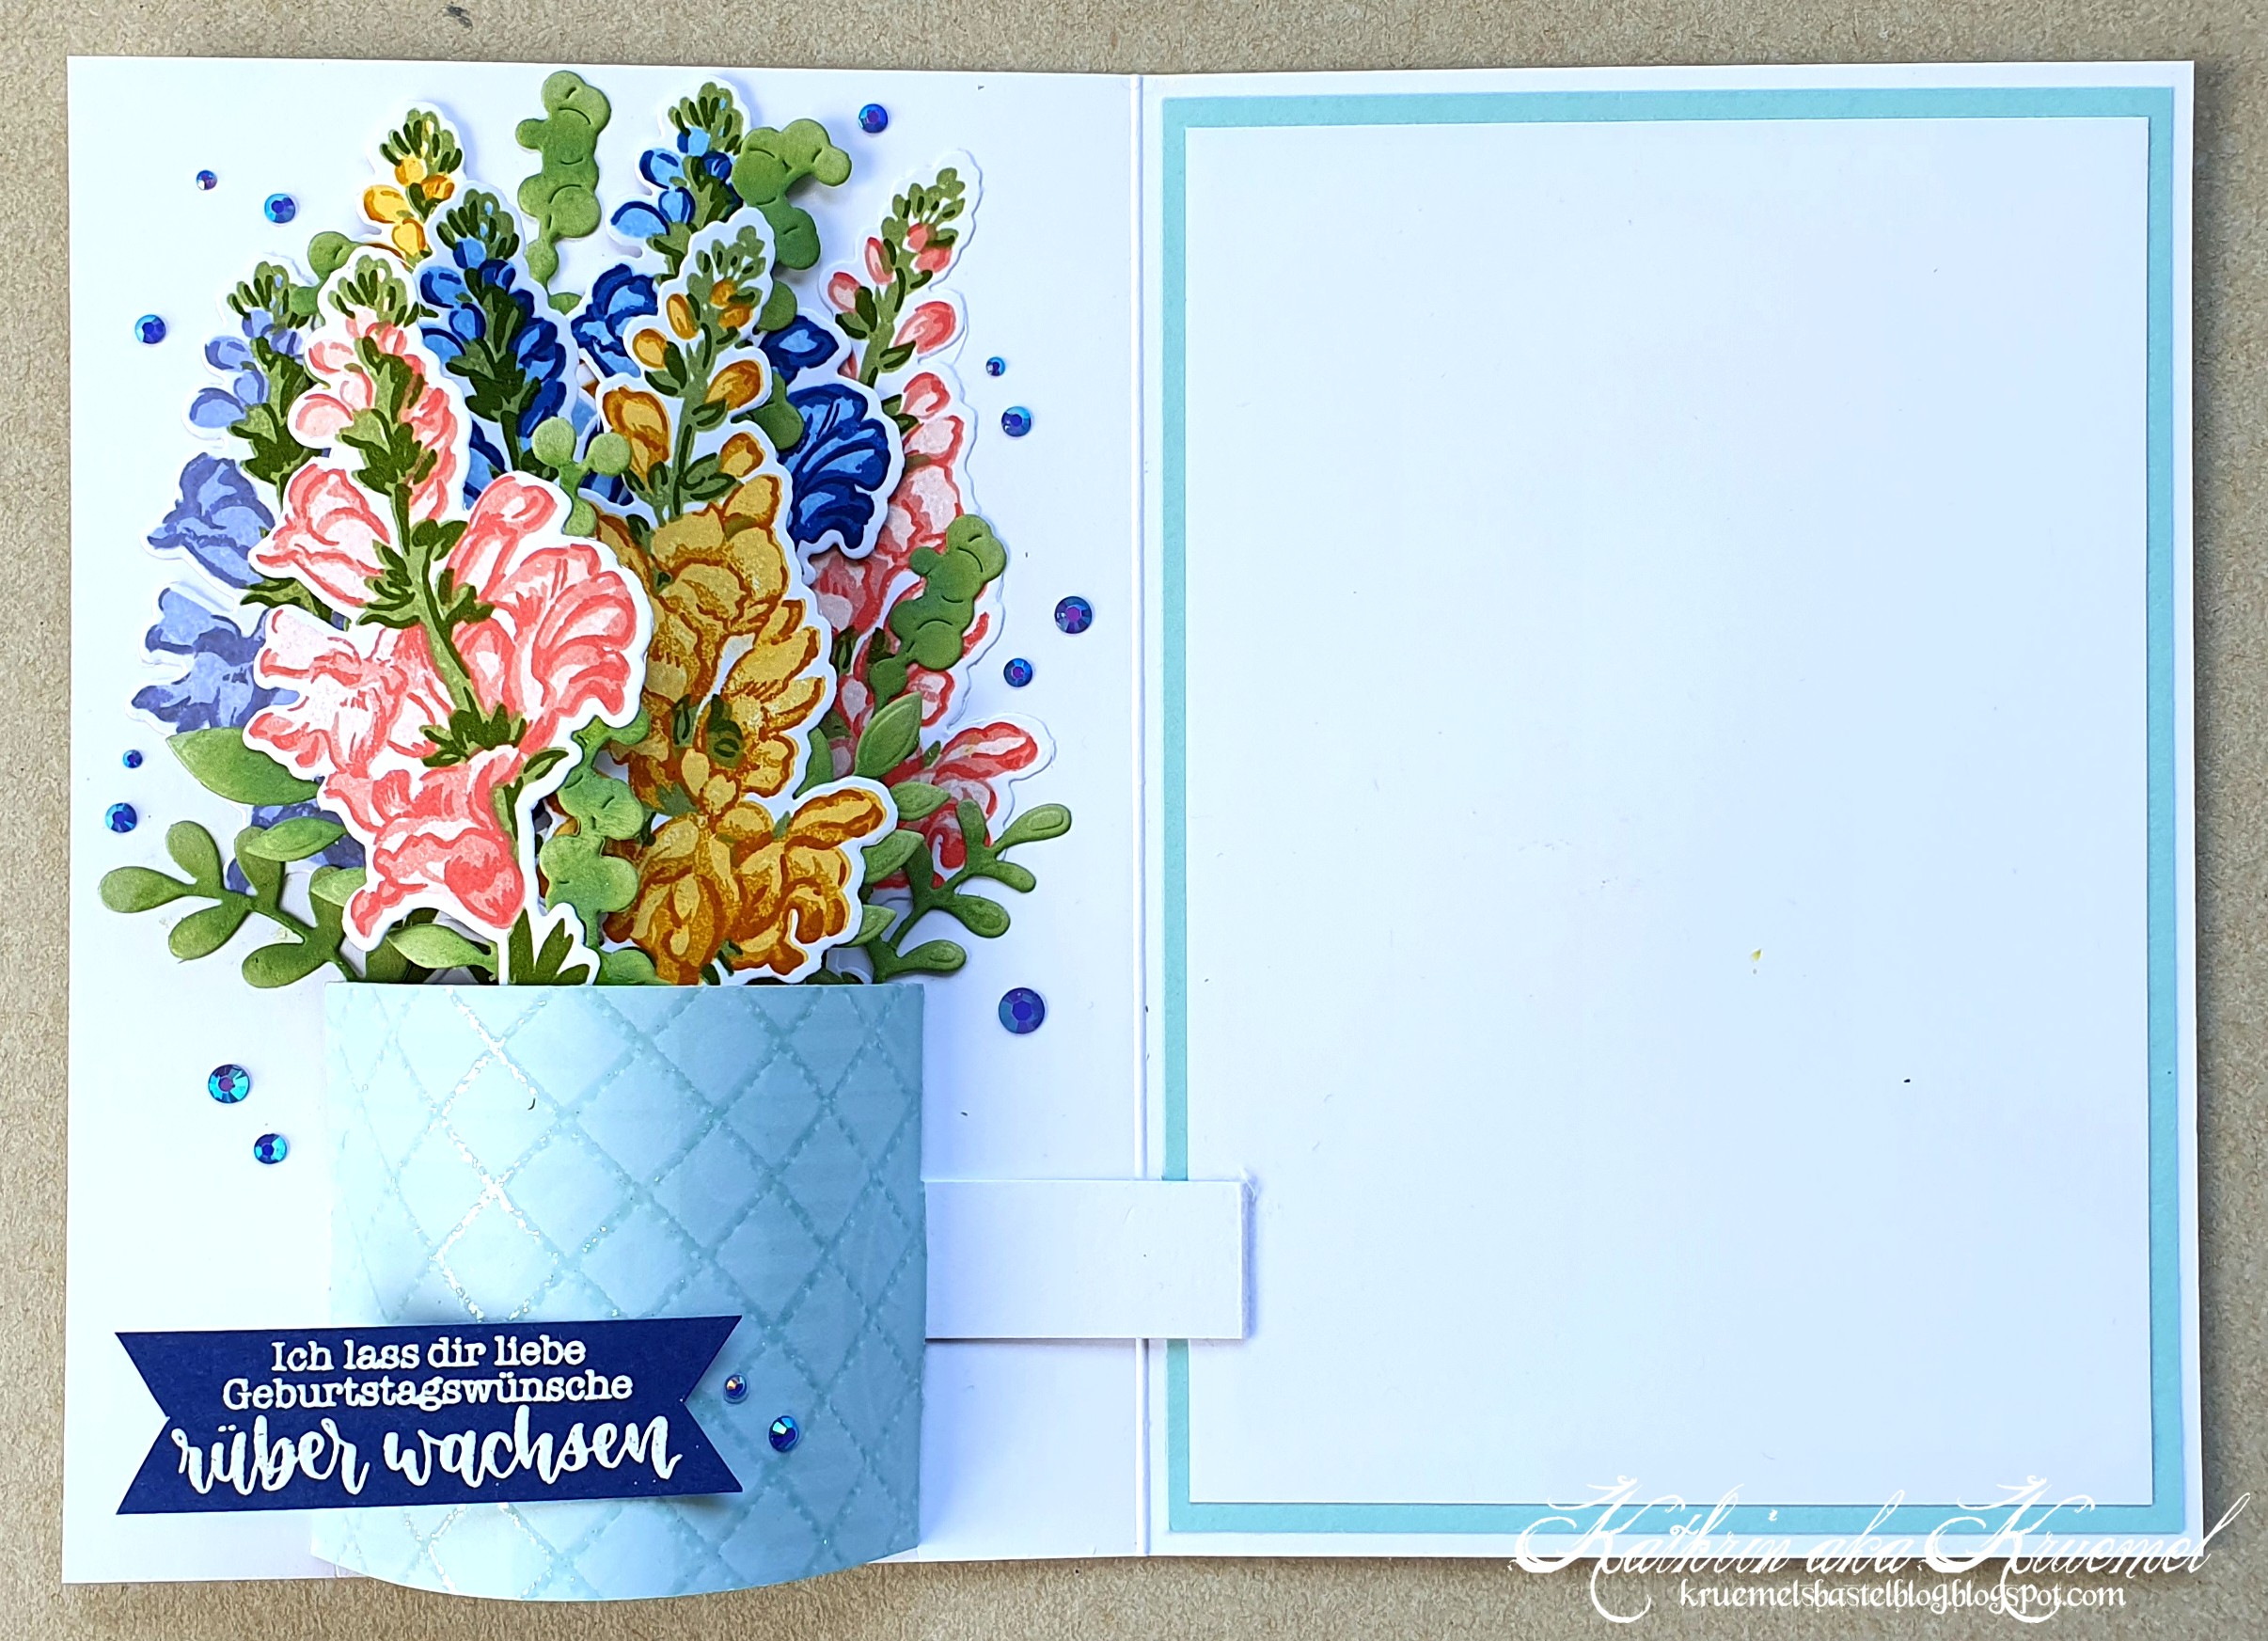
Öffnet man die Karte, bildet sich auf der linken Innenseite eine Blumenvase, gefüllt mit einem bunten Blumenstrauß.

When you open the card, a flower vase, filled with colorful flowers, pops up.


Ich habe meine Blumenvase aus hellblauem Cardstock mit dezentem Glitzermuster gestaltet. 
Für den Blumenstrauß habe ich weitere Löwenmäulchen gestempelt und getanzt und die Vase damit gefüllt. Dazwischen habe ich einige Blätter und Zweige gesetzt, gestanzt aus grünem Cardstock und mit Distress Oxide Mowed Lawn ein wenig schattiert.
Auf der Vase habe ich dann einen weiteren Text, ebenfalls weiß auf dunkelblauen Cardstock embosst, festgeklebt. Der Text passt hier einfach perfekt - er ist aus dem Aus meinem Garten und ebenfalls von Create a Smile.
Als Deko habe ich hier wieder einige blaue Glitzersteine verteilt.

I created my flower vase from some light blue patterned paper with a soft and glittery pattern.
For the flower bouquet I stamped and die cut more of those beautiful snapdragons and filled the vase with them. Inbetween them I've put a few leaves and branches, die cut from green cardstock and shaded with Distress Oxide Mowed Lawn.
I added another text on top of the vase, again white heat embossed onto dark blue cardstock. Here in Germany we say "let something grow over" if we're handing something over to someone or ask someone to hand us something over. So, literally the text here means "I'm letting some birthday wishes grow over to you", actually meaning sending someone birthday wishes. But the text of letting something grow just goes perfectly with the flower images!
For decorations I used some dark blue rhinestones again.