Montag, 15. April 2024

Christine's Wochenend-Aufgabe

 
Hallo Ihr Lieben!
Immer wieder mal gibt es in der FB-Gruppe von Create a Smile eine Wochenend-Mitmachaktion. Jetzt war es wieder soweit und diesmal gab es die Farbkombi "gold-gelb, kraft und aqua" als Aufgabe. Das ist meine Idee dazu.

Hello everyone!
Every now and then in the Create a Smile FB group they are doing some kind of a challenge over the weekend. Now was the time again, and the theme was the color combo of "golden yellow, kraft and aqua". This is what I came up with.

Der Frühling ist ja nun endlich da und so habe ich diese Geburtstagskarte mit Frühlingsblumen-Strauß gewerkelt.
Der Hintergrund besteht aus einem Stück kraft farbenen Cardstock, auf den ich mit Versamark Strahlen aufgewischt habe. Auf die nasse Tinte habe ich dann goldenes Perfect Pearls aufgetupft. Über die Strahlen habe ich mit weißer Stempelfarbe den Freude und Jubel Hintergrund gestempelt und anschließend noch hell- und dunkeltürkis farbene Spritzer mit Metallic Watercolor aufgetragen.

Spring is finally here and so I made this birthday card with a spring flower bouquet.
The background I made from a piece of kraft colored cardstock, that I inked some rays onto with Versamark ink. Onto the wet ink I dabbed some gold Perfect Pearls. Onto the rays I stamped the Freude und Jubel text background with white pigment ink and then added splatters with light and dark aqua metallic watercolor.


Mein Blumenstrauß besteht aus kraftfarenen Cosmeen, Goldmohn, helltürkisen Gänseblümchen und etwas dunkler türkisen Blüten. Ich habe Stempel aus den Sets Blatt und Blüte, Pure Poppies, Cosmea und Heute wird Gut verwendet.
Alle sind mit Copics in NoLine Coloring Technik coloriert. Die Details wie die Strahlen in den Mohnblüten habe ich mit Polychromos aufgemalt und außerdem Highlights mit einem weißen Gelstift gemacht.
In der oberen rechten Ecke befindet sich ein Teil meines Textes. Ich habe ihn mit brauner Tinte auf gelben Cardstock gestempelt und den Cardstock mit Copics passend zu den Goldmohnblüten schattiert.

My bouque is made from kraft colored cosmeas, gold poppies, light aqua daisies and some darker aqua flowers. I used stamps from the sets Blatt und Blüte, Pure Poppies, Cosmea und Heute wird Gut.
I did all flowers with Copics in a noline coloring technique. The details like the centers of the poppies I drew in with Polychromos and also added some Highlights with a white gel pen.
In the top right corner I placed part of my text, it means "birthday flowers". I stamped it with brown ink onto yellow cardstock and then used Copics to shade the cardstock to match the poppies.


Hier seht Ihr die restlichen Blüten. Ich habe sie alle mit der Schere ausgeschnitten und zu einem Blumenstrauß zusammen gesetzt. Dafür habe ich einige zusätzliche Stiele hinzugefügt.
Und an die Stiele habe ich dann den zweiten Teil meines Textes angebracht. Er ist genauso wie der Text oben auf der Karte aus dem Set Heute wird Gut und ebenso auf gelben und dann schattierten Cardstock gestempelt. Dann habe ich ihn mit einem der Banner aus dem Useful Bannners Set ausgestanzt, der mich von der Form her an ein Tag erinnert hat. Ich habe es durch Partial Die Cutting etwas gekürzt und ein kleines Loch hineingestanzt. Dort habe ich dann eine Schleife aus weißem Twine angebunden und alles auf die Stiele geklebt, so dass es so aussieht, als wäre der Tag dort angebunden.

Here you see the rest of the flowers. I cut all of them out with my scissors and created a bouquet with them. I added a few extra stems at the bottom.
To the stems I added the rest of my text - it means "for you". Just like the text on the top of the card it is from the Heute wird Gut stamp set and again I stamped it onto yellow and then shaded cardstock. I used one of the banners from the Useful Banners die set, that reminded me of a tag, to cut the text out and did some partial die cutting to make it a bit shorter. I punched a little hole in the tag and tied a bow from white twine through it. Then I adhered it on top of the stems, making it look like it's tied to them.


Irgendwie passte mein Strauß noch nicht so recht zum Hintergrund. Also habe ich ein wenig des Perfect Pearls Pulvers mit Wasser verrührt und über die Blumen gespritzt.
Den Strauß habe ich dann mit 3D Tape auf den Hintergrund geklebt, der übrigens absichtlich so geschnitten ist, dass mehr vom weißen Karterohling sichtbar ist und einige der Blumen darüber hinausstehen. Die beiden Texte sind mit dünnem 3D Tape hinterlegt.
Zum Schluss habe ich alles noch auf dem weißen Kartenrohling befestigt.

Somehow my bouquet didn't go with the background enough. So I mixed a bit of the Perfect Pearls powder with water and splattered it onto the flowers.
I used foam tape to adhere the bouquet to the background. This, btw, is cut in a size so more of the white card base is visible and some flowers hang over it on purpose. Behind the two texts I put some thin foam tape.
Then I just put everything onto the note card.

Samstag, 13. April 2024

Eine Karte zum bestandenen Führerschein


 Hallo Ihr Lieben!
Ich wurde gebeten, eine Karte zum bestandenen Führerschein zu machen. Und es durfte gerne lustig sein. Na, da fällt mir doch was ein. Was, zeige ich Euch heute mit dieser Karte.

Hello everyone!
I was asked to make a card for a girl that just got her driving license. And a funny card was welcome. Well, of course I had an idea for that! And this is the card I came up with.

Irgendwie ganz von selbst hat die Karte einen ziemlichen Comic-Touch bekommen.
Ich habe den Comic Burst von WhimsyStamps aus rotem Cardstockst gestanzt, dann das aus der Mitte herausgestanzte Teil auf ein Stück schwarzen Cardstocks gelegt, nachgefahren und per Hand ausgeschnitten. So war zwar das Fenster ausgeschnitten, die kleinen Elemente drumherum aber nicht. Das rote Stanzteil habe ich mit Distress Ink Aged Mahogany und Black Soot entlang der äußeren Kanten abgedunkelt und dann die beiden Teile leicht versetzt aufeinander geklebt.
Da der Comic Burst ja ein amerikanisches Format hat, habe ich noch den Slimline Film Strip aus schwarzem Cardstock ausgeschnitten, längs halbiert und je einen Streifen später links und rechts entlang meines Kartenrohlings aufgeklebt. Durch ein weiteres Element am unteren Ende der Karte konnte ich den Comic Burst Hintergrund etwas nach oben schieben und so passte alles dann auch auf eine Din-formatige Karte.

While I was putting all my elements together, the card got a heavy comic touch.
I die cut the Comic Burst by WhimsyStamps from red cardstock, then put the cut out center onto a piece of black cardstock, traced it and cut it out. This way I had the window cut out, but not the smaller elements around it. I used Distress Ink Aged Mahogany and Black Soot to ink the edges of the red die cut, then glued both pieces together a bit offset.
Since the Comic Burst is an american sized die I die cut the Slimline Flim Strip from black cardstock, cut it in half and later added one strip along the edges of my card base. Due to another element at the bottom of the card I was able to move the Comic Burst background up a bit and this way everything fit a Din sized card.


In das Fenster habe ich dann eine Stadt gebaut. Die Häuser sind mit der City Block Stanze von MFT gemacht - ich habe sie in drei Teile geschnitten und etwas enger zusammengerückt wieder zusammengeklebt. Dabei habe ich die Häuser rechts auf den Kopf gelegt, so passte es besser. Die Fenster habe ich mit weißem Cardstock hinterlegt. 
Als Himmel habe ich ein Stück weißen Cardstocks erst mit Distress Ink Mustard Seed gewischt und dann mit Wild Honey Strahlen darauf gewischt. 

Behind the window I built a city. The skyline is made using the City Block die by MFT - I cut it into three pieces and put it together again, moving the elements a bit closer together. The houses on the right I also flipped to the other side, they just looked better like this. Behind the windows I glued some white cardstock. 
For the sky I inked a piece o white cardstock with Distress Ink Mustard Seed, then added rays with Wild Honey.


Vor das Fenster habe ich erst eine Straße gesetzt. Die ist mit der On the Road Stanze von LawnFawn aus schwarzem Cardstock gestanzt, den Mittelstreifen habe ich weiß hinterlegt. Und das untere Ende der Straße verdeckt den unteren Rand des roten Cardstocks, so dass gar nicht auffällt, dass der kürzer ist. 
Und auf der Straße ist natürlich mein Motiv unterwegs. Ich habe dieses Digi "Jill Driving" von Mo Manning vor einigen Jahren, als unsere Mädels den Führerschein gemacht haben, gekauft und jetzt kam er wieder zum Einsatz. Ich habe ihn in der passenden Größe ausgedruckt und mit Copics coloriert. Hinten ins Auto habe ich noch ein Fenster geschnitten, durch das man die Stadt dahinter nochmal sehen kann. Auf das Nummernschild habe ich später noch den Namen geschrieben.
Und ein paar Verkehrszeichen durften auch nicht fehlen. Die Ampel und das Stoppschild sind aus dem Across the Miles Stempelset von PrettyPinkPosh, das Vorfahrt Achten aus dem Kanga-Riffic Set von LawnFawn. An die Ampel und das Stoppschild habe ich die Stanze des Zeichens von LawnFawn gestempelt, damit alle schön zusammenpassen.
Unter unter dem Auto war dann noch Platz für einen Text. Den habe ich am PC geschrieben und ausgedruckt, weil ich tatsächlich keinen passenden Stempel habe....

In front of the window I first glued a road. I die cut it from black cardstock using the On the Road die by LawnFawn, behind the middle line I put some white cardstock. And the bottom covers the bottom edge of the red cardstock so no one will see that it is actually shorter.
And on the road I placed the image. I bought this "Jill Driving" digi by MoManning a few years ago when our daughters got their license and now I finally was able to use it again. I printed it in the size I needed it and colored it with Copics. In the back of the car I cut a window so you can see the city behind it through it. Later I also added the name to the license plate.
And I also needed a few street signs. The traffic lights and stopp sign are from the Across the Miles stamp set by PrettyPinkPosh, the other sign is from the Kanga-Riffic set by LawnFawn. I stamped the post of the sign by LawnFawn under the stopp sign and traffic light to make them all match.
And under the car there was room for my text. It means "save travels everytime" and I wrote it on my PC and printed it out because I actually didn't have a stamp saying it.


Oben an den rechten Rand des Fensters im roten Cardstock habe ich noch eine "Zackenblase" mit einem Hurra darin angebracht. Die Blase habe ich mit einer Stanze aus dem Comic Speech Bubbles Set von WhimsyStamps aus weißem und aus schwarzem Cardstock gestanzt und versetzt aufeinander geklebt. Das Hurra darauf ist mit dem Bubble Alpha Set von CCDesigns gemacht. Auch hier habe ich die Buchstaben aus schwarzem und weißem Cardstock gestanzt und versetzt aufeinander geklebt. Auf die weißen Buchstaben habe ich dann noch mit schwarzer Tinte und dem Itsy Bitsy Polka Dots Stempel von MFT Punkte aufgestempelt und außerdem gelbe Linien aufgemalt. Als Deko habe ich noch drei Sternchen, die ich mit der Comic Burst Stanze aus gelbem Cardstock gestanzt habe, aufgeklebt.

To the top right edge of the window cut into the red cardstock I added a "spiky bubble" with a hooray in it. I cut the bubble from white and black cardstock using a die from the Comic Speech Bubbles set by WhimsyStamps and put them together a bit off. The hooray on top is made with the Bubble Alpha set by CCDesings. Again I cut the letters from white and black cardstock and stacked them a bit offset. Onto the white letters I stamped some dots with black ink and the Itsy Bitsy Polka Dots stamp by MFT and drew some lines with a yellow marker. As decoration I added three yellow stars, cut simply using the Comic Burst background die again.


Zum Zusammensetzen der Karte habe ich 3D Tape benutzt - und die Karte ist ordentlich hoch geworden. Das war aber absichtlich so gemacht - ich wollte unbedingt, dass der Rahmen erhöht auf dem Hintergrund ist und die Straße nochmal einen Tacken höher. Na und wenn schon, denn schon, habe ich dann auch den Text und die Zackenblase nochmal mit 3D Tape aufgeklebt....

To put the card together I used foam tape - and it ended up quite thick. But that was on purpose - I really wanted the frame to have some distance to the background and the road be even higher. Oh well, and while I was at it I put foam tape also behind the text and the spiky bubble.


Und hier ist der Grund, warum die Karte so hoch ausfallen sollte: ich habe einen Action Wobbler hinter das Auto geklebt. Die finde ich so toll, aber ich finde es immer etwas doof, wenn das Motiv so viel höher als alle anderen Elemente ist. Ich habe den Wobbler hinten auf die Stadt geklebt - die Straße habe ich oben ein wenig gekürzt - und so ist das Auto zwar immer noch das höchste Element auf der Karte, es ist aber nur minimal höher als der Text darunter. 

And here's the reason why I wanted my card to be that high: I put an Action Wobbler behind the car. I love them, but I always find ich kind of strange when the image is so much higher than all the other elements on the card. I put the Action Wobbler onto the houses in the background - I cut off the top of the road to make it fit - and this way the car is still the highest element on the card, but it's only a little bit higher than the text under it.

Donnerstag, 11. April 2024

Eine Karte mit Kamel

 
Hallo Ihr Lieben!
Heute zeige ich auf dem Stampcorner Blog eine weitere Karte mit einem Motiv aus dem Stempelset Guckst Du! aus dem April-Release. Und das war sogar das erste Motiv aus dem Set, das ich coloriert habe. Dann aber fehlte mir die zündende Idee. Zum Glück kam mir die dann doch noch und das Ergebnis seht Ihr hier.

Hello everyone!
Today over on the Stampcorner Blog I am sharing another card with an image from the Guckst Du! stamp set from the april release. Actually, this was the first image from the set I colored. But then I didn't know what to do with it. Luckily the right idea came a bit later, and you can see here what that idea was.
 
 Mir war von vornherein klar, dass dieses Kamel irgendwo in der Wüste stehen musste. Aber nur Sanddünen und Himmel, das war mir zu fad. Dann aber fiel mir das Little Town of Bethlehem Stanzenset von MFT ein, und das war doch perfekt!
Zuerst aber habe ich den Hintergrund gewischt. Die untere Hälfte habe ich mit Distress Oxide Antique Linen und Ground Espresso gewischt und etwas von dem Ground Espresso, mit ein wenig Wasser vermischt, dort aufgespritzt.
Für die obere Hälfte habe ich erst einen 1" Kreis aus Masking Tape gestanzt und auf den Cardstock geklebt. Den Bereich drumherum habe ich mit Dried Marigold, Spiced Marmalade, Crackling Campfire und Festive Berries gewischt. Dann habe ich das Masking Tape abgenommen und die Sonne mit Scattered Straw ausgefüllt. 
Über den kompletten Cardstock habe ich dann noch etwas weiße Acrylfarbe aufgespritzt. 

I knew from the beginning that I wanted to place this camel somewhere in the dessert. But just some dunes and a sky sounded too boring. Then I remembered the Little Town of Bethlehem die set by MFT and that was perfect!
But first I created the background. I inked the lower half with Distress Oxide Antique Linen and Ground Espresso and then splattered some of the Ground Espresso, mixed with a bit of water, onto the sand. 
For the upper half I first die cut a 1" circle from masking tape and glued it onto the cardstock. Then I inked the area around it with Dried Marigold, Spiced Marmalade, Crackling Campfire and Festive Berries. I removed the masking tape and filled the sun with Scattered Straw.
Onto the whole cardstock I added splatters with white acrylic paint.


Die orientalische Wüstenstadt ist dann mit dem schon erwähnten Little Town of Bethlehem Stanzenset von MFT gemacht. Ich habe die Teile aus weißem Cardstock gestanzt und mit Distress Oxide Antique Linen, Rusty Hinge und Gathered Twigs gewischt. Auch hier habe ich wieder ein wenig Ground Espresso und weiße Acrylfarbe für ein wenig Textur aufgespritzt.
Hinter die Fenster habe ich schwarzen Cardstock geklebt. Und damit die Stadt etwas interessanter wirkt, habe ich Palmen davor und zwischen den Häuserreihen verteilt. Die hier sind mit den Palm Tree Border Stanzen von LawnFawn aus schwarzem Cardstock gemacht. Die hatte ich einfach da und sie passten von der Größe her gut. Auf die Palmen habe ich mit einem goldenen Gelstift einige Lichtreflexe gemalt.
Dann habe ich die verschiedenen Lagen der Stadt auf den Hintergrund geklebt.

The oriental town in the city I made with said Little Town of Bethlehem die by MFT. I die cut the pieces from white cardstock and inked them with Distress Oxide Antique Linen, Rusty Hinge and Gathered Twigs. Again I added splatters with Ground Espresso and white acrylic paint to give the town some texture. 
Behind the windows I put black cardstock. And to make the town look a bit more interesting I put palm trees in front of it and between the rows of houses. I used the Palm Tree Border die by LawnFawn here to cut the trees from black cardstock. I had them at hand and they were prefect in size. I drew some light reflections onto the palm trees with a gold gel pen.
Then I glued the different layers of the town onto the background.


Im Vordergrund der Karte, unter einer großen Palme, ist dann endlich das Kamel von OmaPlott zu sehen. Ich habe es mit Copics coloriert und Highlights mit einem weißen Gelstift aufgemalt. 
Die große Palme hinter dem Kamel ist wieder aus schwarzem Cardstock gestanzt, diesmal habe ich eine Stanze aus dem Beach Scene Builder Set von MFT verwendet. 
Und dann fehlte noch ein Text. Ich fand den "du bist lustig - und ich pass durchs Nadelöhr" Text so genial. Aber womit kombinieren? Da fiel mir das Wort Urlaub? von einem der anderen Textstempel aus dem Set ins Auge. Na, das passt doch... Da ich keine passende Sprechblasenstanze hatte, in die alle Texte passen, habe ich sie auf zwei Blasen verteilt und die zusammengeklebt. Außerdem habe ich sie mit schwarzem Cardstock hinterlegt. Die Spitze, die zum Mund führt, ist ein Extrastück, das ich von hinten angeklebt habe.
Die Texte habe ich ganz einfach mit Versafine Clair Nocturne auf weißen Cardstock gestempelt.

And in the foreground, under a large palm tree, there's the camel by OmaPlott. I colored it with Copics and added highlights with a white gel pen.
The large palm tree behind the camel is again die cut from black cardstock, this time I used a die from the Beach Scene Builder set by MFT. 
And then my card needed a text. I loved this one - you're funny and I go through the eye of a needle - but what should I combine it with. Then I saw another text from the set that started with Vacation?. That should work! Since I didn't have a speech bubble die that had room for all the texts I simply cut two speech bubbles and put them together. I put some black speech bubbles behind them and added the tip that faces towards the camel's mouth.
I simpyl stamped the texts with Versafine Clair Nocturne ink onto white cardstock.


Da die Häuser im Hintergrund durch die vielen Lagen bereits erhöht sind, habe ich die Palme im Vordergrund mit dünnem und das Kamel mit dickem 3D Tape aufgeklebt.
Dann habe ich den dekorierten Cardstock schwarz gemattet und auf einen weißen Kartenrohling geklebt.

Since the houses in the background are already quite high due to all the layers I've attached the palm in the foreground with thin, the camel with thick foam tape.
Then I matted the card panel black and adhered it to a white note card.

Mittwoch, 10. April 2024

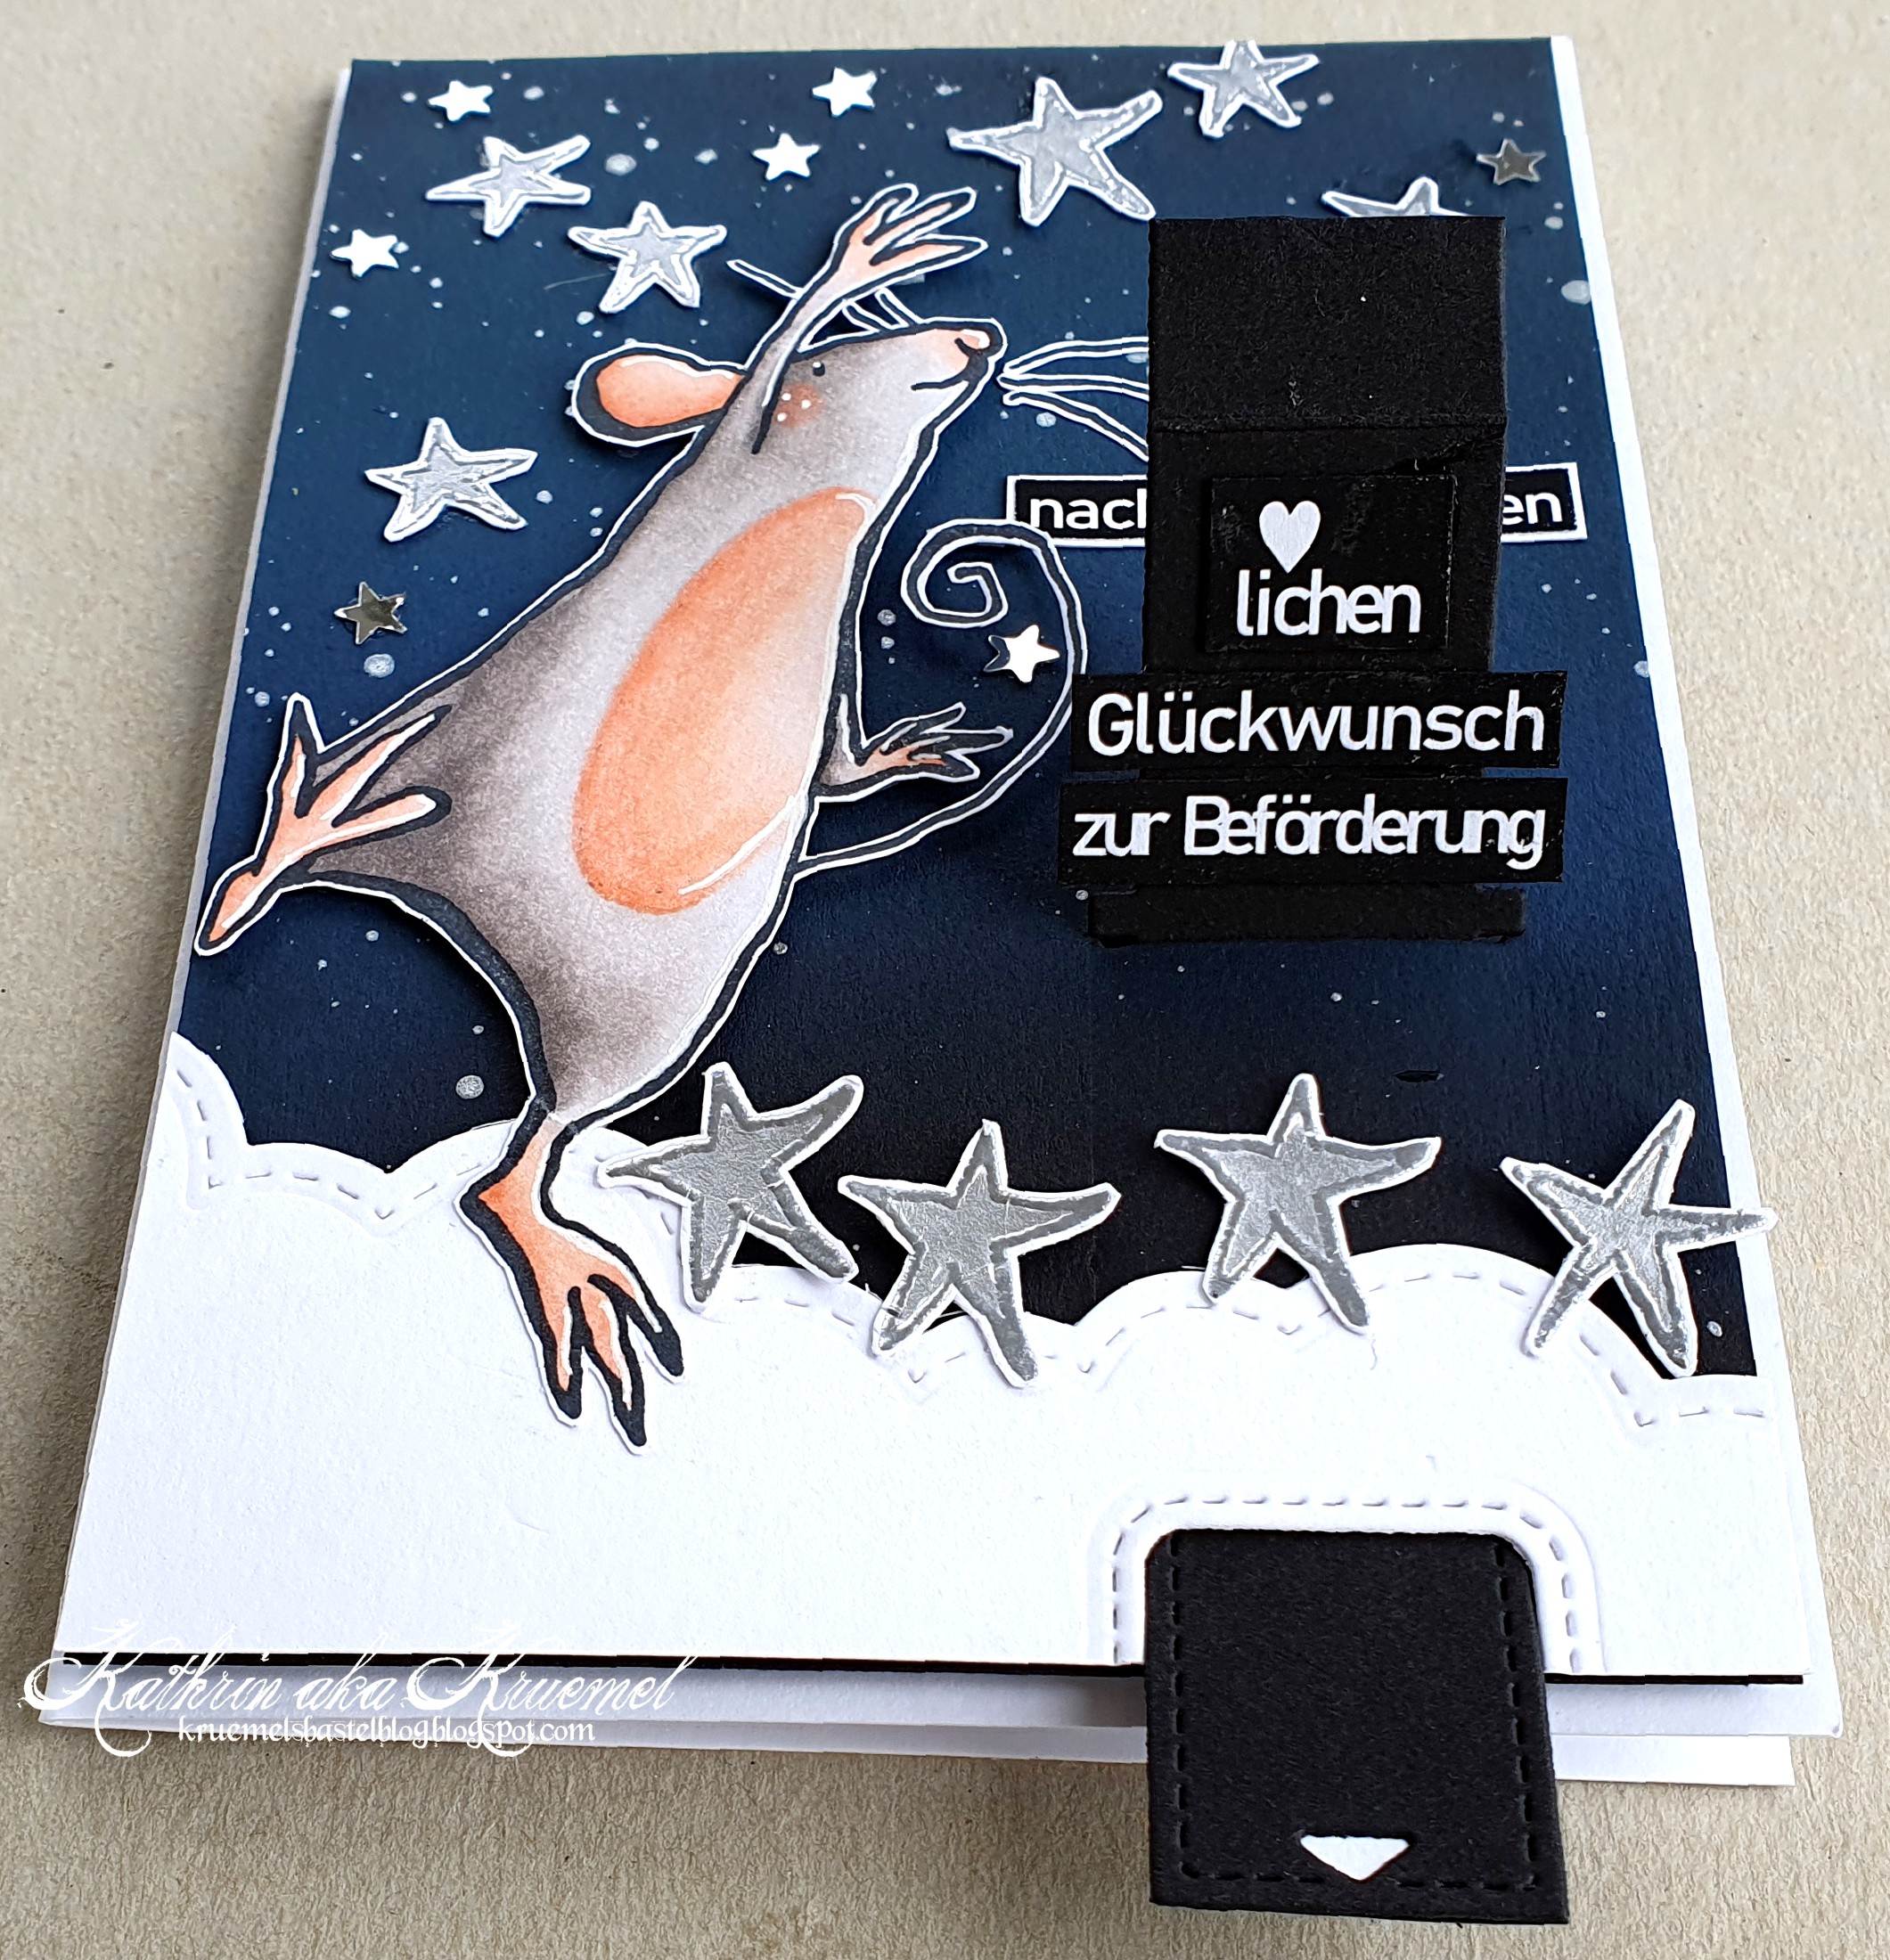
Eine Karte zur Beförderung

 
Hallo Ihr Lieben!
Ich probiere ja immer, einen Bezug zu meinem Job hier auf meinem Blog zu vermeiden. Aber ich denke, heute oute ich mich doch irgendwie. Das ist eine Karte für einen Kollegen, der befördert wurde. Und das wird natürlich gefeiert.

Hello everyone!
I always try to keep job related things away from my blog. But I guess today everyone will know what I do for a living. This is a card for a co-worker, who was promoted and of course we're celebrating that.

Ich wollte unbedingt eine interaktive Karte machen. Ob der Pull 'n Pop Mechanismus von LawnFawn die glücklichste Lösung war, weiß ich nicht genau, denn der Mechanismus liegt oben auf der Karte auf. Meine andere Idee wäre eine Slider Card gewesen, dann hätte man aber die Form des Sterns gesehen und ich hätte keinen Platz für den versteckten Text, den Ihr später noch seht, gehabt. Also ist es so, wie es jetzt ist, gut und wahrscheinlich bin ich nur einfach mal wieder viel zu selbstkritisch.
Der Hintergrund besteht aus einem Stück schwarzen Cardstocks, den ich von oben her mit Distress Oxide Tumbled Glass, Salty Ocean und Prize Ribbon gewischt habe. Dann habe ich silberne Metallic Watercolor aufgespritzt. So rein farbtechnisch hätte mir ja Gold viel besser gefallen, aber wir wollen ja bei der Realität bleiben.... ;)
Unten auf der Karte habe ich ein Stück weißen Cardstocks aufgeklebt, das ich mit einer Wolken-Bordürenstanze gestanzt habe. Die Maus - bzw. der Mäuserich - konnte ja nicht einfach am Himmel schweben.

I really wanted to make an interactive card. I'm not sure, if this Pull 'n Pop mechanism by LawnFawn was the best option because it lays on top of the card. My other idea was a slider card, but then you'd have seen the shape of the fourth star and I wouldn't have had room for the hidden text, that you'll see a bit later. So I am okay with how the card turned out - and I guess once again I am just way too self-critical.
The background is made from a piece of black cardstock, that I inked from the top with Distress Oxide Tumbled Glass, Salty Ocean and Prize Ribbon. Then I added spatters with silver metallic watercolor. Just as a color combination I would have preferred gold with the blue, but let's keep this card  realistic...! ;)
To the bottom of the card I added a piece of white cardstock that I had cut with a cloud border die. The mouse had to have something to stand on up there in the sky.


Das Motiv ist natürlich unverkennbar von Colorado Craft - und zwar aus dem Stempelset A Star is Born. Ich habe es mit Copics coloriert und ausgeschnitten. Außerdem habe ich Sterne aus diesem Set und aus dem Set Falling Star mit silbernem Embossingpulver auf weißen Cardstock embosst und einfach mit einem silbernen Gelstift ausgemalt, damit sie schön schimmern. 

This image is unmistakable by Colorado Craft - from their A Star is Born set. I colored it with Copics and cut it out. I also heat embossed the stars from this set and the Falling Star set with silver embossing powder onto white cardstock and simply filled them with a silver gel pen to give them a nice shimmer.


Die Maus habe ich auf den Hintergrund geklebt und dann die Sterne am Himmel verteilt. Dazwischen habe ich einige silberne Stern-Konfetti gesetzt. 
Den Text habe ich am PC geschrieben. Ich hatte zwar einen passenden Stempel, der war aber winzig. Also habe ich den Text weiß auf schwarz gedruckt, ausgeschnitten, weiß gemattet und ebenfalls auf den Himmel geklebt.

I adhered the mouse to the background and then added the stars to the sky. Between them I glued down a few silver star confetti.
The text means "reach for the stars". I wanted to have the texts on this card written in german and had it as a stamp, but it was tiny. So I printed it white onto black, cut it out, matted it white and attached it to the sky as well.


Zieht man am Tab unten, klappt der Mechanismus auf und zeigt den zweiten Text auf der Karte. Außerdem ist hier der vierte Stern zu sehen. Rein technisch war es nicht möglich, den letzten Stern in der Reihe zu verstecken - so hätte der Mechanismus nicht funktioniert bzw. ich hätte die Schlitze nicht so nah an den Rand stanzen können. Also ist eben der dritte Stern verdeckt - das Ergebnis zählt schließlich. 
Auch diesen Text habe ich am PC geschrieben, schwarz hinterlegt (damit man in eingeklapptem Cardstock die weiße Rückseite des Papieres nicht sieht) und ihn auf die Klappe geklebt. 
Damit der Mechanismus gut funktioniert, braucht er etwas Platz unter der Karte. Deswegen habe ich den Kartenaufleger mit 3D Tape auf den weißen Kartenrohling geklebt und außerdem die Wolkenbordüre (und somit auch die Maus) mit dünnem 3D Tape befestigt. 

When you pull the tab at the bottom edge of the card it shows the second text on this card, that means "congrats for getting promoted". When the tab is pulled it also reveals the fourth star. Just technically it wasn't able to cover the last star in the row - the mechanism wouldn't have worked/I wouldn't have been able to cut the slits this close to the edge of the card panel. So it's the third star that gets covers - but it's the result, that counts, right?
Also this second text I printed with my computer, glued it onto some black cardstock (to cover the white copy paper so you don't see it when the flap isn't pulled) and attached it to the flap.
To give this mechanism enough room to move, it needs a bit of extra space on the backside. So I used foam tape to adhere the card panel to the white card base. I also used thin foam tape to attach the cloud border and the mouse.

Montag, 8. April 2024

Rooting for You


 Hallo Ihr Lieben!
Heute habe ich wieder eine Karte mit Produkten aus dem letzten Release von LawnFawn - und nein, ich habe noch nicht alle Neuheiten eingeweiht.... Wobei ich gestehen muss, dass diese Karte bereits Anfang März entstanden ist. Ich bin nur momentan so produktiv, so viele Tage hat kein Monat. Und ich finde, jede Karte verdient ihren eigenen Tag hier auf dem Blog....

Hello everyone!
Today I have another card using products form the latest release by LawnFawn - and no, I still haven't used all the products yet. But I have to admit, that I made this card back beginning of march. It's just that I am making so many cards lately, that I had to plan a lot of posts ahead because I think, each card deserves its own day on my blog....

Nun, ich hatte einen dieser Tage, an dem nichts klappen wollte. Also habe ich einfach alles liegen lassen und bin im Garten arbeiten gegangen. Als ich dann abends noch den Saustall in meinem Zimmer aufräumen wollte - für mich muss das Zimmer abends sauber sein (außer natürlich ich habe ein Werk am Tag nicht fertig gebracht), denn es gibt nichts schlimmeres, als wenn ich basteln möchte und es liegt noch das Zeug vom Vortag rum - fiel mir das Stitched Root Veggies Stanzenset in die Hände. Und zack, da war die Idee, die ich den ganzen Tag gesucht hatte. Die wurde dann am nächsten Tag sofort umgesetzt! 
Auf dieser Karte habe ich einiges umgesetzt, das ich sonst eher selten mache: Ink Smooshing und Watercoloring. Begonnen hatte alles mit den gestanzten Roten Beten, die ich mit Distress Ink eingefärbt hatte. Naja, und dann sollte der Rest dazupassen.
Den Himmel habe ich mit Distress Ink Salty Ocean auf Watercolor gestaltet - erst stark verdünnt mit dem Pinsel aufgetragen, nach dem Trocknen noch zwei Lagen Ink Smooshing. 
Dann habe ich den Stitched Wavy Backdrop Landscape ebenfalls aus Watercolor Cardstock gestanzt und mit Distress Ink Gathered Twigs auf die selbe Art wie den Himmel gestaltet. Zum Schluss habe ich etwas Scorched Timber dazu gemischt, damit es dunklere Stellen auf dem Hintergrund gibt. Davon habe ich dann auch etwas pur mit Wasser vermischt und aufgespritzt. Dazu kamen dann noch Spritzer mit weißer Acrylfarbe, die ich auch auf den Himmel aufgebracht habe.
Von dem gestanzten Hintergrund habe ich den oberen Teil weggeschnitten und ihn dann auf den Himmel geklebt. 

Well, it was one of these days when nothing I tried worked out. So I left everything on my desk and went to do some yard work. In the evening I returned to clean the mess in my craftroom - I just have to every evening (except I didn't get to finish a project) because there's nothing worse than wanting to make a card and there's all that stuff still laying around - I came across the Stitched Root Veggies die set. And voilà, there was the idea I was looking for all day. And I turned it into this card just the next day.
On this card I did some things I hardly ever do: ink smooshing and watercoloring. Everything started with those beet roots, that I watercolored with Distress Ink. And of course the rest of the card should match the look. 
The sky I did with Distress Ink Salty Ocean on watercolor paper - first with a lot of water mixed into the color and applied with a brush, after drying the layer I did two layers of ink smooshing on top.
Then I die cut the Stitched Wavy Backdrop Landscape, again from watercolor paper, and colored it with Distress Ink Gathered Twigs just the way I had done the sky. For the last layer I mixed a bit of Scorched Timber into the Gathered Twigs to have a view dark areas. I mixed just the Scorched Timber with a bit of water and added splatters with it. Then I also did some splattering with white acrylic paint, not only on the soil but also the sky.
I cut off the top of the die cut background and glued it onto the sky.


Auch die Roten Beeten sind aus Watercolor Cardstock gemacht und diesmal mit Seedless Preserves und Peeled Paint sowie einem Pinsel bewusst fleckig coloriert. Die Highlights habe ich mit einem weißen Gelstift gemacht.
Und ich liebe die Mäuse von LawnFawn so sehr, die mussten einfach wieder auf meine Karte. Diese hier sind aus den Sets Just Plane Awesome, Sew Very Mice und You Autumn Know. Alle Motive habe ich mit meinen ZIG Markern coloriert. Watercoloring ist nicht unbedingt meine stärkste Disziplin - ich brauche dafür immer wahnsinnig lange. Was macht man in so einem Fall also? Richtig, man macht es sich noch schwerer und coloriert die Motive in NoLine Technik. Macht Sinn, oder? Aber ich finde, so passen sie viel besser zu den gestanzten und mit Distress Ink coloriertem Gemüse. Ich habe die Motive mit dem NoLine Ink von InkOn3 gestempelt. Die Augen, Münder und Schwänzchen habe ich dann später mit Fineliner hinzugefügt. 
Eigentlich war der Plan, die beiden Mäuse links die Rote Beete zusammen tragen zu lassen. Aber dann dachte ich, die Maus ganz links schafft das auch alleine und habe der anderen ein Schild in die Hand gegeben. Das ist aus dem Set Carrot 'bout You. Darauf habe ich dann einen Text aus dem Veggie Happy Add-On Set gestempelt, das super zu der roten Beete und natürlich dem Haupttext passt. 
Die Schubkarre ist aus dem Set Oh Gnome. Später habe ich zur Szene noch Schmetterlinge aus den Sets Kanga-rrific, Kanga-rrific Add-On und Butterfly Kisses sowie kleine Erdhaufen aus dem Set Veggie Happy hinzugefügt. Außerdem steht hinter den Motiven ein weißer Zaun. Der ist mit der Farm Fence Border aus weißem Cardstock gestanzt. 

Also the beetroots I made from watercolor cardstock and this time colored the pieces with Seedless Preserves and Peeled Paint, applying the ink with a brush and keeping it kind of splotchy on purpose. The highlights I made with a white gel pen.
And I love the mice by LawnFawn so much, they just had to go on this card. These are from the sets Just Plane Awesome, Sew Very Mice and You Autumn Know. I colored all images with my ZIG markers. Watercoloring isn't my strong suit - it takes me forever. So what do you do in this case? Right, you make it even harder for yoursel and color the images in NoLine Technique. Makes sense, right? But I think, like this they go so much better with the die cut and with Distress Ink colored veggies. I stamped the images with NoLine Ink by InkOn3. The eyes, mouths and tails I re-drew with a fineliner later.
My original plan was, to let the two mice on the left carry the beetroot together. But then I thought, the mouse on the left can manage that alone and gave the other one a sign to hold. It's from the Carrot 'bout You stamp set. I stamped a text from the Veggie Happy Add-On set onto it, that goes perfectly with the beetroots and of course my main text. 
The wheelbarrow is from the Oh Gnome set. Later I added butterflies from the Kanga-rrific, Kanga-rrific Add-On and Butterfly Kisses sets and some little piles of soil from the Veggie Happy set to my scene. I also put up a fence behind the images. It's made from white cardstock using the Fram Fence Border die. 


Mein Text sollte unbedingt zu den Rote Beeten passen. Also habe ich die Buchstaben für das Wort Rooting, wieder aus Watercolor Cardstock, mit dem Oliver's Stitched ABCs Stanzenset ausgestanzt. Da die Buchstaben leicht überlappend  hätten stehen müssen, habe ich das komplett runde O durch zwei etwas ovalere 0en aus dem Oliver's Stitched 123s Set ersetzt. So passte alles besser. Dann habe ich die Buchstaben wieder mit Seedless Preserves und genau wie die Roten Beeten eingefärbt und hinter die unterste Wellenkante im Hintergrund gesteckt. 
Die beiden Os sollten ein wenig wie Rote Beeten aussehen. Deswegen habe ich das Grün des Gemüses aus dem Garden Before 'n Afters Set grün coloriert und von hinten gegen die beiden Buchstaben geklebt. 
Den Text ergänzt ein weiß auf schwarzen Cardstock embosstes "for you" aus dem Set You Autumn Know. Das habe ich rechts unter den gestanzten Text geklebt.
Und weil die Karte ganz unten noch etwas langweilig aussah, habe ich hier Grasbüschel aus dem Kanga-rrific Add-On Set, einen Erdhaufen mit gerade austreibender Pflanze aus dem Veggie Happy Set und einen kleinen Wurm aus dem Veggie Happy Add-On Set verteilt. Auch hier sind die Motive natürlich NoLine und mit ZIGs coloriert. 

I really wanted my text to match the beetroots. So I die cut the letters for the word "rooting" from watercolor carstock using the Oliver's Stitched ABCs set. Since the letters would have had to overlap sligthly I decided to replace the round Os with two 0s from the Oliver's Stitched 123s set. This way everything fit better. Then I used Seedless Preserves again and colored the letters exactly the way I did the beetroots and tucked them behind the wavy cut line at the bottom of the background.
I wanted to look the two Os a bit like actual beetroots. So I colored the greens of the veggies from the Garden Before 'n Afters set and glued it behind the top of the Os. 
I completed the text with a "for you" from the You Autumn Know set. I white heat embossed it onto black cardstock and glued it on the right side under the die cut letters. 
And since the card looked a bit plain at the bottom I added some grass from the Kanga-rrific Add-On set, a pile of soil with a sprouting plant from the Veggie Happy Set and a little worm from the Veggie Happy Add-On set. Of course I did NoLine Coloring with my ZIGs here, too. 


Und noch etwas, das ich eher selten tue, habe ich bei dieser Karte gemacht: ich habe alle Elemente direkt, also ohne 3D Tape, zusammengeklebt. Ab und zu kommt das mal vor...
Zum Schluss habe ich dann noch alles auf einen weißen Kartenrohling geklebt.

And on this card I did another thing I rarely do: I adhered all elements directly onto each other without using any foam tape. Well, it happens every now and then...
As the last step I just glued my decorated card panel to a white note card.

Samstag, 6. April 2024

LawnFawnatics Challenge #170

 
Hallo Ihr Lieben!
Heute zeige ich Euch meine Karte für die LawnFawnatics Challenge #170. Das Thema lautet Patterned Paper. Mich hat hier definitiv die Frühlingssonne inspiriert, die durchs Fenster in mein Zimmer geschienen hat.

Hello everyone!
Today I am sharing with you the card I made for the LawnFawnatics Challenge #170. The theme is "patterned paper". I definately got inspired by the spring sun that was shining into my craft room.

Früher gab es von mir ja keine Karte, auf der kein Designpapier verwendet wurde. Inzwischen nutze ich es nur noch selten. Das bedeutet jetzt nicht, dass ich keins mehr habe, und auch nicht, dass ich keines mehr kaufe.... Aber weil es hier das Thema war, habe ich auch gleich in die Vollen gegriffen.
Der Hintergrund besteht aus einem Stück Designpapier aus dem Stripes 'n Sprinkles Pad. Ich habe es etwas kleiner als meinen Kartenrohling zugeschnitten und mit den Simple Puffy Cloud Frames und Simple Puffy Clouds daraus Wolken gestanzt. Dann habe ich den Rand des Papiers mit Distress Ink Speckled Egg gewischt und mit einem Stück Designpapier mit Wolkendesign aus dem Into the Woods Pad hinterlegt. Das habe ich so zugeschnitten, dass es auch außen am Rand des gepunkteten Papiers ein wenig übersteht. 

Some time ago I made nearly no card without patterned paper. But nowadays I hardly ever use it. Which doesn't mean that I don't have a ton and don't buy more.... Here it was the theme, so I used quite a few different ones.
The background is made from a piece of paper from the Stripes 'n Sprinkles pad. I cut it a bit smaller than my card base and die cut clouds from it using the Simple Puffy Cloud Frames and the Simple Puffy Clouds die sets. I inked the edge of the paper with Distress Ink Speckled Egg and backed it with a piece of patterned paper with a cloud pattern from the Into the Woods pad behind it. I cut it slightly larger than the dotted one so it can be seen also along the edges.


Die große Sonne ist mit dem Outside In Stitched Sun Set gemacht - einmal komplett aus hellgelbem Papier und der Kreis in der Mitte nochmal aus dunkelgelbem Papier aus dem Dandy Day Paper Pad. Den Kreis habe ich mit Distress Ink Mustard Seed gewischt, die Strahlen von der Mitte her mit Scattered Straw. 
Dann habe ich noch ein Gesicht aufgeklebt. Es ist aus dem Magic Iris Sunflower Add-On Set. Augen und Mund habe ich aus schwarzem Cardstock, die Backen aus einem Stück rosafarbenen Papier aus dem Dandy Day Set gestanzt.
Neben der Sonne fliegt die süße Maus aus dem Set All my Heart an einem Luftballon. Den Ballon und auch die Ohren und den Bauch der Maus - bzw. beider Mäuse, denn da ist ja noch eine - habe ich mit Paper Piecing eingesetzt. Für den Ballon habe ich ein Papier aus dem Flower Market Pad verwendet, das Papier für Bauch und Ohren ist wieder aus dem Dandy Day Pad. Die Mäuse habe ich mit Copics coloriert und sie auch verwendet, um die Teile aus Designpapier etwas zu schattieren.

The large sun is made with the Outside In Stitched Sun set - I cut it completly from a light yellow paper and just the center again from dark yellow paper from the Dandy Day paper pad. I inked the circle with Mustard Seed and the rays, starting in the center, with Scattered Straw.
Then I added a face from the Magic Iris Sunflower Add-On set. I cut the eyes and mouth from black cardstock, the cheeks I cut from a piece of pink paper from the Dandy Day pad. 
Next to the sun the cute mouse from the All my Heart set is floating by, hanging from a balloon. I did some Paper Piecing on the balloon and the belly and inner ears of the mouse - or mice because there's another one. I used paper from the Flower Market set for the balloon and another sheet from the Dandy Day pad for the belly and ears. I colored the mice with Copics and used them also to lightly shade the paper pieced parts.


Die zweite Maus, sie ist aus dem Super Star Stempelset, sitzt unten auf einer der Wolken. 
Im unteren Tei der Karte befindet sich dann der Text. Ich habe mit rosafarbener Tinte das Love aus dem Scripty Bubbles Sentiments Set auf ein hellrosafarbenes Papier aus dem Dandy Day Set gestempelt und ausgeschnitten. 
Mit weißem Embossingpulver habe ich ein sending aus dem Scripty Bubbles Sentiments Set und ein "have an uplifting day" aus dem Really High Five Set auf schwarzen Cardstock embosst und ausgeschniten.

The second mouse, it's from the Super Star stamp set, is sitting on one o the clouds at the bottom edge of the card.
In the lower half of the card I placed my sentiment. I stamped the word love from the Scripty Bubbles Sentiments set onto a light pink sheet from the Dandy Day paper pad and cut it out.
Using white embossing powder I heat embossed a "sending" from the Scripty Bubbles Sentiments set and a "have an uplifting day" from the Really High Five set onto black cardstock and cut it out.


Ich habe ein paar der ausgestanzten Wolken versetzt wieder auf den Himmel geklebt und dann Elemente darauf befestigt. Teilweise habe ich 3D Tape verwendet und damit auch das gepunktete Designpapier auf dem Wolkenpapier befestigt.
Den Luftballon und das Wort love habe ich ein wenig mit Stickles beglittert und als Deko einige pinkfarbene Herzen auf der Karte verteilt. Zum Schluss habe ich alles auf einem weißen Kartenrohling befestigt.

I glued some of the cut out clouds back onto the sky, moving them a bit to the side next to their cut outs. Then I added all the other elements and partly used foam tape to adhere them. I also used foam tape to attach the dotted paper to the cloud patterned one.
I added  a bit of Stickles to the word love and the balloon and glued some pink hearts onto the card. Then I attached everything to a white card base.

Donnerstag, 4. April 2024

Du coole Socke


Hallo Ihr Lieben!
Auf dem Stampcorner Blog zeige ich heute eine Karte mit dem Stempelset Coole Socke, das letztes Jahr Teil des Adventskalenders war, das ich aber bisher tatsächlich noch nicht benutzt hatte. 
 
Hello everyone!
Over on the Stampcorner Blog I am sharing a card today with the Coole Socke stamp set, that was part of last year's advent calendar and that I haven't used yet.
 
Das Motiv legt es ja nahe, und so habe ich eine Jungskarte gemacht.
Erst habe ich ein Stück weißen Cardstocks ganz leicht von etwas unterhalb der Mitte aus mit Distress Ink Salty Ocean gewischt. Dann habe ich einen Strahlenstencil aufgelegt und mit der selben Farbe die Strahlen gewischt, diesmal aber intensiver. So entsteht ein Ton-in-Ton Hintergrund, der trotzdem nicht langweilig aussieht.
Anschließend habe ich noch ein paar Spritzer goldener Metallic Watercolor aufgetragen. 
 
The image kind of indicates it so I made a boy's card here.
First I lightly inked a piece of white cardstock with Distress Ink Salty Ocean, starting a bit under the center of my cardstock and making this area the darkest. Then I put a rays stencil onto it and inked the rays with the same color, just a lot more intense this time. This way I get a tone in tone background that still doesn't look boring.
Then I splattered some gold metallic waterolor onto the cardstock.


Dort, wo der Cardstock am dunkelsten eingefärbt ist, habe ich dann einen Kreis aus dem Hintergrund gestanzt, der ein Fenster für mein Motiv bildet. Der Hase sieht ja doch so aus, als würde er lässig aus einem Fenster schauen, und das wollte ich ausnutzen. 
Ich habe den Hasen mit Copics coloriert und anschließend ausgeschnitten. Den Körper und Arm des Hasen habe ich mit meiner Coloration ein klein wenig nach unten verlängert, so dass er nicht so weit unten im Rahmen hängt. Die Nase habe ich außerdem mit Glossy Accents überzogen.
Ich habe den Hasen hinter den Rahmen geklebt und dabei die eine Pfote über den Rand des Kreises nach oben geklebt.
Die Texte sind ebenfalls mit Stempeln aus dem Set Coole Socke gemacht. Einmal habe ich das "Sei frech, wild und wunderbar" mit weißem Embossingpulver auf schwarzen Cardstock embosst und in drei Teile geschnitten. Da die Texte recht nah beieinander gestempelt werden, habe ich zwei Texte embosst und konnte so jede Zeile ganz gut ausschneiden. Diese Cardstockstücke habe ich in das Fenster hineinragend links neben dem Motiv aufgeklebt. 
Den zweiten Text "Du coole Socke" habe ich mit Versafine Clair Nocturne direkt auf den Hintergrund geklebt. Durch die Form des Textes passt die Hand des Hasens genau über das Wort cool. 
Dann habe ich noch viele Sterne gestempelt und dafür den Stern auf dem Halstuch des Hasens sowie die Sterne aus dem Bärli-Set - auch den auf dem Pulli des Bärchens - abgestempelt und coloriert. Nach dem Ausschneiden habe ich sie auf dem Hintergrund verteilt.

Where I inked the cardstock the darkest I die cut a circle from the cardstock to create a window for my image. The bunny looks like he's leaning out of a window and I wanted to use the way the bunny is drawn. 
I colored the bunny with Copics and then cut him out. I colored a bit further down the belly and arm so the poor guy won't have to be all the way at the bottom of the circle. I also covered his nose with some Glossy Accents.
I glued him behind the frame and let one of his paws overlap the edge of the circle.
The texts mean "be sassy, wild and wonderful" and "you're such a cool guy". I white heat embossed one of them onto black cardstock and cut it into three parts. Those I adhered to the left of the circle, letting it reach into the window. The other one I stamped with Versafine Nocturne Ink directly onto the background. The shape of the text leaves a perfect spot to put the bunny's paw into.
Then I stamped a bunch of different sized stars, colored them and scattered them over my background after cutting them out.


Ich habe den ausgestanzten Kreis direkt auf einen weißen Kartenrohling geklebt und dann den Hintergrund so mit 3D Tape drumherum gesetzt, dass die Strahlen fortlaufend sind. 

I attached the circle I cut from background onto a white card base and then used foam tape to glue the background down, making sure the rays are continous. 

Dienstag, 2. April 2024

Have a very kanga-rrific time

 
Hallo Ihr Lieben!
Eine meiner Töchter ist gerade für ein halbes Jahr Auslandssemester in Australien. Und also ob LawnFawn das gewusst hätte, gabe es im letzten Release zwei Sets mit Flora und Fauna aus Australien. Klar, dass ich die haben musste. Und hier ist meine erste Karte damit.

Hello everyone!
One of my daughters is currently in Australia as an exchange student for six months. And just as if they'd known about it, LawnFawn had two Australia related sets in their latest release. Of course I had to have them. And this is the first card I used them on.
 
Vor kurzem habe ich mit meiner Tochter telefoniert. Sie liebt das Land, die Leute, das tägliche Surfen. Aber was sie absolut abschreckt, ist das Autofahren. Die Vorstellung, auf der "falschen" Seite zu fahren, die Schaltung funktioniert "falsch herum" und Regeln, die es bei uns offenbar nicht gibt, sind doch etwas erschreckend. Da aber eine Freundin, die zur Zeit auch in Australien ist, demnächst für ein paar Tage vorbeikommen und die beiden dann einen Road Trip planen, muss sie sich damit dann doch auseinander setzen. Naja, und diesen Road Trip habe ich hier auf der Karte verewigt. Von Zebrastreifen für Kängurus hat sie zwar nichts erzählt, aber sicher ist sicher... ;)
Der Hintergrund besteht aus mehreren Lagen Cardstock - ganz hinten einfach ein Stück weißen Cardstocks, den ich mit Distress Oxide Mermaid Lagoon gewischt habe. Davor befindet sich eine Reihe Berge. Die habe ich aus rot-braunem Cardstock mit einer der Stitched Mountain Borders gestanzt, von unten her etwas mit Distress Oxide Fired Brick gewischt und dann rostrote Metallic Watercolor aufgespritzt. 
Den Boden der Landschaft habe ich ebenfalls aus weißem Cardstock gemacht. Der ist mit Distress Oxide Antique Linen, Frayed Burlap und etwas Scorched Timber gewischt. Dann habe ich - genauso wie auf den Himmel - Wasser aufgespritzt. Auf den Boden habe ich dann noch weiße Acrylfarbe gespritzt und die Reste davon, die noch im Pinsel waren, auf den Bergen verteilt.
Und mittig auf den Boden kam dann eine Straße, gemacht aus schwarzem Cardstock mit der On the Road Stanze. Damit die Straße etwas Sturktur erhält, habe ich hier dunkelgraue und schwarze Metallic Watercolor sowie etwas weiße Acrylfarbe aufgespritzt. Den Mittelstreifen habe ich weiß hinterlegt, rechts und links habe ich einen Strich mit einem weißen Gelstift gezogen.
Und dann habe ich noch einen Zebrastreifen ganz unten auf die Straße geklebt. Der besteht einfach aus einigen Streifen weißen Cardstocks, die ich aufgeklebt habe.

I talked to my daughter on the phone a little ago. She loves the country, the people, being able to surf nearly daily. But what totally freaks her out is driving a car. Just imagining to drive "on the wrong side", the autoshift works the other way around and there are quite some rules, that don't exist here in Germany, freaks her out. But since a friend, that's currently in Australia as well, is going to visit for a few days and they plan a little road trip, so she has to face those fears. And this road trip is what I tried to show on this card. She didn't mention kangaroos using the crosswalks, but every woman wants her kids to be safe and I think, this momma roo is no different.... ;)
The background is made from a few layers of cardstock - there's simply a piece of white cardstock in the background, that I inked with Distress Oxide Mermaid Lagoon. On top of it there's a row of mountains. I die cut those from reddish-brown cardstock using one of the Stitched Mountain Borders, inked them with a bit of Distress Oxide Fired Brick and then splattered rusty red metallic watercolor on top. 
The ground/landscape is also made from a piece of white cardstock. I inked it with Distress Oxide Antique Linen, Frayed Burlap and a bit of Scorched Timber. Then I flicked some fine droplet of water onto it - and also onto the sky - and added some splatters of white acrylic paint. What I had left on my brush I splattered onto the mountains.
And in the center of the ground I put a road, made from black cardstock with the On the Road die. To add some structure to the road I flicked dark grey and black metallic watercolor onto it and also some white acrylic paint. I put some white cardstock behind the middle strip and used a white gel pen to draw a line on each side of the road.
And at the very bottom I added a crosswalk to the road. I simply made that from strips of white carstock that I glued down. 


Hier könnt Ihr die Szene nochmal genauer sehen - ich habe nicht wirklich viel Ahnung von der Tierwelt in Australien. Also habe ich gegoogelt und versucht, sie zumindest ansatzweise realistisch zu colorieren - wo das nicht der Fall ist, berufe ich mich auf künstlerische Freiheit. 
Ich habe einige Bäume, Felsen, Schmetterlinge, Grasbüschel und gelbe Blumen auf meiner Szene verteilt. Die meisten Motive auf der Karte sind aus den Sets Kanga-rrific und Kanga-rrific Add-On.
Und weil hier so viel los ist, habe ich zwei Detailbilder für Euch.

Here you get a better look at the scene - I don't know much about the animals in Australia. So I goggled some and tried, to color my anmials as realistic as possible. If that didn't work out with every one of them I refer to my artistic freedom.
Iused some trees, rocks, butterflies, grass and yellow flowers for my scene. Most of the images on this card are from the sets Kanga-rrific and Kanga-rrific Add-On.
And since there is so much going on here I took two detail pictures.


Auf der rechten Seite der Karte sitzen zwei Bären in ihrem Auto. Hier habe ich das Stempelset Car Critters benutzt, die Ladung auf dem Dach bestehend aus Surfboard, Schwimmring und Sonnenschirm ist aus dem Car Critters Roadtrip Add-On Set. Natürlich befindet sich das Lenkrad rechts im Auto und es fährt auch auf der linken Seite der Straße. Zuerst hatte ich das Auto hellblau coloriert, das hat dann aber irgendwie doch nicht so recht in die Szene gepasst und ich habe graugrün darüber coloriert. Alle Motive sind mit Copics coloriert und per Hand ausgeschnitten.
Neben der Straße steht ein Straßenschild, von dem man hier natürlich nur die Rückseite sieht. 
Auf einem der Felsen sitzt eine Echse und eine weitere überquert ebenfalls den Zebrastreifen. 

On the right side of the card there are two bears in their car. I used the Car Critters stamp set here, the surfboard, swimring and umbrella on the car roof are from the Car Critters Road Trip Add-On. Of course the steering wheel is on the right side in the car and the bears are driving on the left side of the road. I first had colored the car a light blue, but that didn't fit my scene so I went over it with some grey-ish greens. All images are colored with Copics and cut out with scissors.
Next to the street there's a road sign, that you of course can only see the bak here.
On a rock a lizard is sitting in the sun, another one is just walking over the crosswalk.


Auf der linken Seite der Szene sieht man die Känguru-Mama mit ihren beiden Kindern, die über den Zebrastreifen hüpfen. Ich hatte kurz überlegt, hier einen Slider einzubauen und die drei wirklich über die Straße hüpfen zu lassen, die Idee dann aber verworfen, da die Karte ja doch schon recht voll geworden ist. Da es ja verschiedene Känguru-Arten gibt, habe ich beschlossen, das Große grau-braun, die beiden kleinen hellbraun zu colorieren. 
Hier sieht man dann auch, wovor das Verkehrsschild warnt: die Straße überquerende Kängurus. Auf dem Schild sitzt ein Kookaburra. 

On the left side of the scene you can see momma roo with her two kids, that are just starting to hop onto the crosswalk. When I started making this card I had the idea of including a slider element here to let those three actually hop over the street, but then decided against it since there is already a lot happening on this card. Since there are different kinds of kangaroos I decided to color the large one a grey-ish brown, the two small ones a light brown. 
And here you can also see what the road sign says: it's warning you of kangaroos crossing the street. On top of the sign a kookaburra has taken seat.


Zum Glück war oben am Himmel noch ein wenig Platz, sonst hätte die Karte ohne Text auskommen müssen. Hier habe ich Stempel aus den Sets Pick of the Patch und Kanga-rrific kombiniert und weiß auf schwarzen Cardstock embosst.

Luckily there was some room left on the sky or this card would have had to stay without a text. I combined stamps from the sets Pick of the Patch and Kangarrific and white heat embossed them onto black cardstock.


Zum Zusasmmensetzen der Szene habe ich dann zu dünnem und dickem 3D Tape gegriffen, damit die Szene nicht so flach wirkt. Das Schild links ist sogar mit beiden Tape-Arten hinterlegt. 
Zum Schluss habe ich alles auf einem weißen Kartenrohling angebracht.

To put my card together I used thin and thick foam tape so the scene doesn't look so flat. On the back of the sign on the left side I even used both kinds of tape.
Then I just mounted the card panel onto a white note card.