Hallo Ihr Lieben!
Es ist wieder Zeit für eine Spotlightwoche in der FB-Ideengruppe von Stamping-Fairies. Diesmal zeigen wir Euch einige Verwendungsmöglichkeiten für die Distress Oxide.
Ich mag die inzwischen fast lieber als die "normalen" Distress Kissen - einfach, weil sie sich viel schöner verblenden lassen. Trotzdem möchte ich natürlich auch die anderen nicht missen.
Hello everyone!
It's time for another spotlight week over at the FB ideas group of Stamping-Fairies. This time we've some ideas for Distress Oxides.
I love them just a tad bit more than the "regular" Distress Inks - just because they blend so much better/easier. But of course I don't want to miss those other ones.
Heute habe ich einen antiken Plattenspieler "gebaut". So einen, der aussieht, wie eine Holztruhe und erst beim Aufklappen zeigt sich der Plattenspieler.
Today I've "built" an antique turntable - one of those that look like a wooden crate and only reveal the turntable once you open it.
So sieht meine Kiste von außen aus. Ich habe eine rechteckige Pizzabox geschnitten und vor dem Zusammenkleben alle Teile mit Distress Oxide Vintage Photo und Gathered Twigs eingefärbt. Dann habe ich ein paar Wassertropfen darauf gegeben, um den schönen Oxide-Effekt zu bekommen. Nach dem Trocknen habe ich noch mit Vintage Photo die Holzmaserung aufgestempelt.
Für das Schild habe ich erst weißen Cardstock mit Distress Oxide Fossilized Amber, Spiced Marmelade und Festive Berries gewischt. Nach dem Trockenföhnen - wichtig, damit das Embossinpulver wirklich nur auf dem frisch aufgestempelten Text haftet - habe ich dann erst die eine Hälfte des Happy Birthday Blend Stempels von MFT mit klarem Embossingpulver, anschließend den anderen Teil mit schwarzem Pulver auf den bunten Hintergrund embosst. Anschließend habe ich alles mit Vintage Photo überwischt, wieder Wasser und Holzmaserung aufgestempelt und ein paar schwarze Enamel Accents aufgeklebt. Vom den embossten Bereichen, kann man die Distress Oxide Farbe ganz einfach wieder abwischen. Durch das klare Embossingpulver sieht man den bunten Hintergrund.
Dann habe ich das Schild zugeschnitten - es war leider einen kleinen Tick zu breit um gerade auf der Box sitzen zu können -, es schwarz gemattet und auf die Box geklebt. Darunter habe ich noch einen der tollen Sterne aus dem Stars Above Stempelset von MFT geschoben. Auch der schwarz auf Cardstock embosst, den ich mit den selben Farben, die ich unter dem Text verwendet habe, gewischt habe.
This is the outside of my box. I've made a rectangle pizza box and before glueing it together I've covered it with Distress Oxide Vintage Photo and Gathered Twigs. Then I've added a few drops of water to get the great oxide effect. After letting those dry I've used Vintage Photo to stamp the wooden background onto it.
For the square with the text I've used Distress Oxide Fossilized Amber, Spiced Marmelade and Festive Berries to color it in. After drying it completly - which is really important to avoid the embossing powder sticking to any other area than the just stamped one - I've clear heat embossed one part of the Happy Birthday Blend stamp by MFT onto it, then added the other part using black embossing powder. Then I've covered everything with Distress Oxide Vintage Photos, added water and wooden lines again and also a few black Enamel Accents. Once you've covered everything you can easily wipe off the color off the embossed areas. The colored background can be seen through the clear embossing powder.
Then I've matted the rectangle with black cardstock and glued it onto the box. It turned out a tad bit too large to be glued onto the box straight. Underneath the rectangle I've added one of the stars from the Stars Above stamp set by MFT which was also black embossed onto a sheet of cardstock that was colored in with the same colors I've used for underneath the text.
Die Innenseiten der Box sind übrigens ebenso gewischt und bestempelt - schließlich soll der Plattenspieler auch innen gut aussehen!
Im Deckel habe ich drei weitere Sterne, mehr Enamel Accents und einen der Texte aus dem For the Record Stempelset aufgeklebt.
The inside of the box was treated the same way as the outside - of course it needs to look good inside as well!
To the inside of the lid I've added three more stars, a few more Enamel Accents and one of the sayings from the For the Record stamp set.
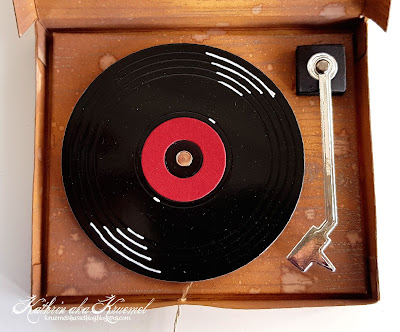
In der Box an sich sitzt ein kleines Podest, das den Plattenspieler darstellt. Hier habe ich die Turntable Stanzen von MFT benutzt. Der Plattenarm ist aus silbernem Spiegelcardstock, die Platte aus schwarzem Glossy Photopapier gestanzt. An zwei gegenüberliegenden Seiten habe ich die Rillen mit einem weißen Gelmarker betont - schließlich haben Platten doch immer so schön geglänzt! Und weil einige schon gefragt haben, wo denn die special effects auf meinen letzten Karten waren - hier sind sie:
Inside the box there's a small podest that creates the turntable. Here I've used the Turntable dies by MFT. The arm is cut from silver mirror cardstock, the LP from glossy black photo paper. I've used a white gelly marker to highlight the grooves on to opposite sides - wasn't the shinyness the great thing about those LPs? And since a few've already asked where the special effects were hidden on my latest cards - here they are:


