Samstag, 12. Oktober 2024

Get Excited!

 
Hallo Ihr Lieben!
Einige von uns fiebern Halloween ja schon aufgeregt entgegen. Aber glaubt mir, diese Aufregung ist nichts im Vergleich der Vorfreude, die Hexen und Co gerade empfinden. Und das hat mich zu dieser Karte inspiriert.

Hello everyone!
Some of us are can't wait for Haloween to arrive. But believe me, this excitement is nothing compared to what witches and Co are feeling. And that's what inspired me to make this card.

Hier hat eine Hexe bereits angefangen, das ein oder andere Utensil für Halloween vor dem Haus bereit zu legen. 
Der Hintergrund besteht aus einem Stück weißen Cardstocks, in den ich zuerst mit einem Mauer-3D-Folder ein Backsteinmuster gewischt habe. Dann habe ich den Cardstock leicht mit Distress Ink Hickory Smoke und Black Soot gewischt und anschließend weiße Acrylfarbe und schwarze Metallic Watercolor aufgespritzt. 

Here in front of her house a witch has already started to collect some of the necessary things she'll need on Halloween eve. 
The background I made from a piece of white cardstock, that I dry embossed the brick pattern into using a 3D embossing folder. Then I lightly brushed some Distress Ink Hickory Smoke and Black Soot onto the cardstock and added splatters of white acrylic paint and black metallic watercolor. 


Für die Deko kamen hauptsächlich Stanzen von HoneyBeeStamps zum Einsatz. Der Hexenschuh - von dem ich vielleicht sogar zwei Stück leicht versetzt hätte aufkleben sollen - und die Blumen, Blätter und Weizenähren sind alle aus dem Lovely Layers Set Small Fall Floarls. Der Hexenbesen ist aus Toil and Trouble und der Rabe aus dem Set A Little Spooky. Nur der Kürbis im Hintergrund ist aus dem Stitched Pumpkins Set von LawnFawn. 
Ich habe alle Teile aus farbigem Cardstock gestanzt und dann mit Distress Ink Wild Honey, Rusty Hinge, Fired Brick, Wilted Violet, Dusty Concord, Villainous Potion, Hickory Smoke und Black Soot schattiert. Die eingestanzten Detail-Linien habe ich teilweise mit farblich passenden Polychromos nochmal nachgemalt und außerdem auf den Raben, die Blumenmitten und natürlich den Stiefel noch glitzerndes Gilding Wax in silber, dunklem Lila und schwarz aufgetragen. 
 
For my decorations I mainly used dies by HoneyBeeStamps. The boot - and now that the card is done I think two of them a little set off would have looked even better - and the flowers, leaves and  wheat are all from the Lovely Layers set Small Fall Florals. The broom is from Toil and Trouble and the crow from A Little Spooky. Only the pumpkin behind the boot is from Stitched Pumpkins by LawnFawn.
I die cut all pieces from colored cardstock and then shaded them with Ink Wild Honey, Rusty Hinge, Fired Brick, Wilted Violet, Dusty Concord, Villainous Potion, Hickory Smoke and Black Soot. Some of the details, that get cut into the die cuts I, I traced with color matching Polychromos. Onto the crow, the flower centers and of course the boot I dabbed some silver, dark purple and black glittery Gilding Wax.


Da der Stiefel etwas zu sehr mit dem Hintergrund verschmolzen ist, habe ich ihn dann noch mit Glossy Accents in einen Lack-Stiefel verwandelt. Und um den Besen habe ich ein Stück weißes Twine gewickelt und zur Schleife gebunden. 
 
Since the boot seemed to fade to much into the background I used Glossy Accents to turn it into a patent leather boots.  And around the broom I wrapped a piece of white twine and tied it to a bow.


Bevor ich die Dekoelemente auf den Hintergrund geklebt habe, habe ich dort erst noch ein Spinnennetz aus dem Spiders and Webs Set von Whimsystamps, gestanzt aus Vellum, sowie einige schwarze Efeuranken aufgeklebt. Die Elemente habe ich ein wenig ineinander verwoben.
Und hier im oberen Bereich der Karte war dann auch noch Platz für meinen Text. Und hier ist die Aufforderung an alle anderen Hexen: Freut Euch! Der Text ist aus einem Stempelset von SU und weiß auf lilafarbenen Cardstock embosst.
 
Before adhering my elements to the background I glued down a spider web from the Spiders and Webs set by WhimsyStamps, die cut from Vellum, and some ivy, die cut from black cardstock, onto the brick wall. And I kind of wove those elements together a bit.
And here in the top half of my card there was also room for my text. This one is from an old set by SU, white heat embossed onto purple cardstock, and it's a reminder to all the other witches: get excited, Halloween is close!


Da alle anderen Elemente durch die vielen Lagen recht dreidimensional sind, habe ich den Text mit dünnem 3D Tape hinterlegt, um ihn ebenfalls ein wenig nach oben zu bringen. Und hier könnte Ihr auch den Schimmer des Gilding Waxes mal noch gut erkennen.
Zum Schluss habe ich den dekorierten Cardstock noch auf einen weißen Kartenrohling geklebt.

Since all the elements are kind of dimensional due to the layers I put some thin foam tape behind the text to bring it up a notch as well. And here you can also see the shimmer of the gilding wax pretty good. 
As the last step I adhered my card panel to a white note card.

Donnerstag, 10. Oktober 2024

Tasche im Mumien-Look

 
Hallo Ihr Lieben!
Auch für meinen Beitrag auf dem Stampcorner-Blog heute habe ich etwas Halloween-iges gebastelt: eine Geschenktasche, die mit Süßigkeiten gefüllt das perfekte Mitbringsel zur Halloweenparty ist.

Hello everyone!
Also for the project, that I'm sharing over on the Stampcorner Blog today, I made something Halloween-y: a little gift bag, that's the perfect gift to bring to a Halloween party.

Basis für die Tasche war hier die Geburtstags-Taschen Stanze aus dem Oktober-Release. Die hat eine tolle Größe sowohl für Deko, also auch um Kleinigkeiten darin zu verpacken. 

I used the Geburtstagstasche die from the october release to create the base here. It has a great size - there's room for decorations and also for some nice treats to put inside.


Die Tasche  habe ich aus weißem Cardstock gestanzt. Um den Mumienlook zu erzeugen, habe ich etwa 1 cm breite Streifen weißen Cardstocks zugeschnitten und an den Rändern etwas eingefärbt, schließlich liegt so eine Mumie jahrtausendelang in ihrem Sarkophag. Ich habe Distress Ink Lost Shadow sowie Memento Toffee Crunch benutzt und beide Kissen einfach direkt an die Ränder bzw. teilweise auch oben auf die Streifen gedrückt. Dann habe ich die Streifen kreuz und quer über die Tasche geklebt. Den Bereich des Griffes habe ich mit der Schere wieder freigeschnitten. Die Deko habe ich übrigens nur auf der Vorderseite der Tasche gemacht.
Mit einem schwarzen Stempelkissen habe ich dann noch die Spinne aus dem Set Süßes oder Saures einigeMale auf die Tasche gestempelt.

I die cut the bag from white cardstock. To create the mummy look I cut about 1 cm wide strips of white cardstock and inked the edges, because a mummy lies thousands of years in a sarcophagus. I used Distress Ink Lost Shadow and Memento Toffee Crunch and pressed the ink pads directly to the edges and - partly - also on top of the strips. Then I glued them across the bag, overlapping and a bit crooked. I used my scissors to cut out the handle again. And I only did the decorations on the front of the bag.
Using a black ink pad I stamped the spider from the Süßes oder Saures set several times onto the cardstock strips.


Für die Deko - und gleichzeitig Text - auf der Tasche habe ich mich mal nicht für ein Motiv entschieden. Stattdessen halten zwei Hände ein Schild mit einem großen BOO darauf in die Luft.
Die Hände habe ich mit den Sign of the Times Stanzen von MFT gemacht. Ich habe sie aus hellem hautfarbenem Cardstock gestanzt und mit Copics schattiert, die Highlights sind mit einem weißen Gelstift gemacht. Dabei habe ich Fignernägel aufgemalt, die natürlich schön dreckig sein mussten. Die Arme habe ich außerdem ebenfalls mit kleinen Reststücken der weißen Mumien-Streifen beklebt. Dann habe ich sie hinter die unteren Streifen auf der Tasche geklebt. 
Das Schild besteht aus einem Stück braunen Cardstocks, auf das ich das BOO aufgeklebt habe. Das ist mit dem ebenfalls neuen Stanzenset Alphabet und schwarzem Cardstock gemacht. Aus grünem Cardstock habe ich noch dreimal den herablaufenden Glibber aus dem Build a Cauldron Set von LawnFawn gestanzt, ebenfalls mit Copics schattiert und oben auf die Buchstaben geklebt. Die Überstände habe ich dann weggeschnitten. Außerdem habe ich den Glibber etwas beglittert.

For the decoration - and at the same time text - on my bag I didn't go with an image here. Instead there are two hands holding a sign with a large BOO written on it. 
I made the hands using the Sign of the Times dies by MFT. I die cut them from light skin colored cardstock and shaded them with Copics, the highlights I added with a white gel pen. And I just had to add some fingernails, that of course had to be pretty dirty. I used little left over pieces of the mummy strips to cover the arms as well, then tucked them behind the lower strips on the bag.
The sign I made from a piece of brown cardstock, onto that I glued the BOO. I made that using the also new alphabet die set and black cardstock. From green cardstock I also die cut the dripping goo from the Build a Cauldron set by LawnFawn three times, again shaded it with copics and adhered it onto the letters. I cut off the overhang and also added some glitter to the goo.


Das Schild habe ich an den Händen befestigt, oben steht es ein wenig ab. Hinter das Schild habe ich dann ein Stück Cheesecloth geschoben und davon auch einen Streifen benutzt, um die Tasche oben mit einem Knoten zu verschließen. 
Die Tasche habe ich mit verschiedenen Leckereien gefüllt und dann obenauf noch einige schwarze Papierstreifen eingefüllt, die überall schön überstehen.

The sign I attached to the hands, at the top it stands up a bit. I put a piece of cheesecloth behind the sign and also used a strip of it to close the bag, tying it to a knot.
I filled the bag with different treats and then put some black paper strips on top, that are now standing out in all directions.

Dienstag, 8. Oktober 2024

Hope your day is spooktacular

 
Hallo Ihr Lieben!
Die  Saison für Halloweenkarten ist immer so kurz, eigentlich viel zu kurz für die vielen Halloween-Stempel und -Stanzen, die ich habe. Deswegen zeige ich Euch heute gleich eine weitere "spooktakuläre" Karte. 

Hello everyone!
The time slot to make Halloween cards is so short, honestly, way too short for me to use all those Halloween related stamps and dies I own. So I am trying to use this time well and am sharing another "spooktacular" card with you today.

Hier bekommt Ihr einen kleinen Blick in den Wald, in dem sich zu dieser Jahreszeit lauter kleine Geister tummeln.
Der Hintergrund hier besteht aus einem Stück weißen Cardstocks, den ich mit Distress Oxide Pumice Stone, Tattered Rose, Abandoned Coral, Fired Brick und Black Soot gewischt habe. Dann habe ich endlich mal diesen Halloween-Stencil von Tim Holtz benutzt. Irgendwie vergesse ich meine Stencil viel zu oft. Ich wollte das Muster nicht aufwischen, sondern eher dezent im Hintergrund haben. Zuerst wollte ich matte durchsichtige Paste nehmen, dann aber fiel mein Blick auf das Tacky When Dry Gel. Und mit dem kann man ja auch folieren. Also habe ich die Paste durch den Stencil aufgetragen und nach dem Trocknen die Opal Folie von Spellbinders, die eher silbrig-durchsichtig ist, aufgebracht. Die Folie ist nicht überall perfekt aufgetragen, aber gerade das gefällt mir hier. Da der Stencil schmaler als die Karte ist, habe ich ihn einfach um 90 Grad gedreht und hochkant an der linken Seite noch zwei Wörter hinzugefügt, um den kompletten Hintergrund zu füllen. 
Anschließend habe ich schwarze Distress Ink Black Soot aufgespritzt.

Here you get a sneak into the woods, where there are many ghosts this time of year.
The background I made from a piece of white cardstock, that I inked with Distress Oxide Pumice Stone, Tattered Rose, Abandoned Coral, Fired Brick and Black Soot. Then I finally used this Halloween stencil by Tim Holtz, somehow I don't think of my stencils often enough. I didn't want to use ink and had planned to use a matte transparent paste to add the pattern, but then I saw my Tacky When Dry Gel. And that can be used for foiling as well. So I applied the gel through the stencil and after the gel had dried, I applied some Opal foil by Spellbinderes - a kind of silvery half transparent foil. The foil didn't transfer perfectly in every place, but I really like that look here. Since the stencil is more of a slimline size I simply turned it 90 degrees and added two more words on the left side to fill the whole background.
Then I splattered some Black Soot Distress Ink onto the cardstock.


Auf den Hintergrund habe ich dann erst eines der Spinnennetze aus dem Spiders and Webs Set von WhimsyStamps aufgeklebt - das hatte ich noch von einer meiner letzten Karte übrig. Darauf kamen dann verschiedene Farne, die ich aus hell- und dunkelgrünem Cardstock gestanzt habe. Die Stanzen sind von CraftEmotions und HeroArts. Ich habe sie ein wenig mit Distress Spritz Peeled Paint und Distress Mica Stain Specimen und Tree Lot besprüht, das sorgt gleichzeit für etwas Struktur und Schimmer. 

Onto the background I first glued down one of the spiderwebs from the Spiders and Webs die by WhimsyStamps. I had that left from one of my last cards. On top I added different ferns, that I die cut from light and dark green cardstock. The dies are by CraftEmotions and HeroArts. I sprayed them with a bit of Distress Spritz Peeled Paint and Distress Mica Stain Specimen and Tree Lot, those add some structure and shimmer.


Die beiden Gespenster, die da so neugierig zwischen den Farnen hervorschauen, sind aus dem Halloween Wonder Set von Spellbinders. Ich habe sie aus Vellum gestanzt, etwas mit Polychromos schattiert und dann die Augen, gestanzt aus schwarzem Cardstock, eingeklebt. Die Bäckchen habe ich aus ein paar kleinen, rosa eingefärbten Punkten gemacht. Und einer der Geister trägt einen Kürbishut aus dem selben Set. Den und auch die weiteren Elemente auf der Karte, habe ich aus weißem Cardstock gestanzt und mit Copics coloriert. 

The two ghosts, that are peaking so curiously from behind those ferns, are from the Halloween Wonder set by Spellbinders. I die cut them from vellum, shaded them with Polychromos and then glued in the eyes, cut from black cardstock. I created some cheaks from soft pink colored cardstock and gave one of the ghosts a pumpkin hat from the same set. This, and the other elements on the card, I die cut from white cardstock and colored them with Copics.


Unten quer habe ich ein Stück schwarzen Cardstock, den ich mit einer Grasstanze von Magnolia gestanzt habe, aufgeklebt. Dahinter wachsen einige Pilz, für die ich Stanzen von Gummiapan sowie aus dem Mushrooms and Ferns Set von HeroArts benutzt habe.
Unten auf dem schwarzen Cardstock war dann Platz für meinen Text. Der ist aus dem Itty Bitty Boos Set von MFT und weiß auf grünen Cardstock embosst. Und darüber war dann noch Platz für ein paar Candy Corns, ebenfalls aus dem Set von Spellbinders. Die gehören zu Halloween doch einfach dazu!

Across the bottom of the card I adhered a piece of black cardstock, that I cut with a grass border die by Magnolia. Behind it there are some mushrooms growing - I made those using dies by Gummiapan and from the Mushrooms and Ferns set by HeroArts.
Onto the black cardstock I added my text. It's from the Itty Bitty Boos set by MFT and white heat embossed onto green cardstock. And above it I added a few candycorns, again from the die set by Spellbinders. There just have to be some candy corns on Halloween!


Wenn man schräg auf die Karte schaut, sieht man den Schimmer der Folie - von oben ist sie kaum sichtbar. Ich finde den Effekt super - und das Negativ habe ich aufgehoben und werde es mit der Solid Plate auf ein weiteres Stück Cardstock folieren....
Die Elemente der Karte sind, bis auf den Grasstreifen und den Text, alle direkt auf den Hintergrund geklebt. Dann habe ich alles auf einen weißen Kartenrohling geklebt.

When you look at the card from an angle you can see the shimmer of the foil - looked at the card from above it's hardly visible. I love the effect - and I kept the negative and will foil it with the Solid plate onto a different piece of cardstock.
Except for the grass border and the text I adhered all elements directly onto the background. Then I glued the card panel onto a white note card.

Sonntag, 6. Oktober 2024

Ja ist denn schon Weihnachten?

 
Hallo Ihr Lieben!
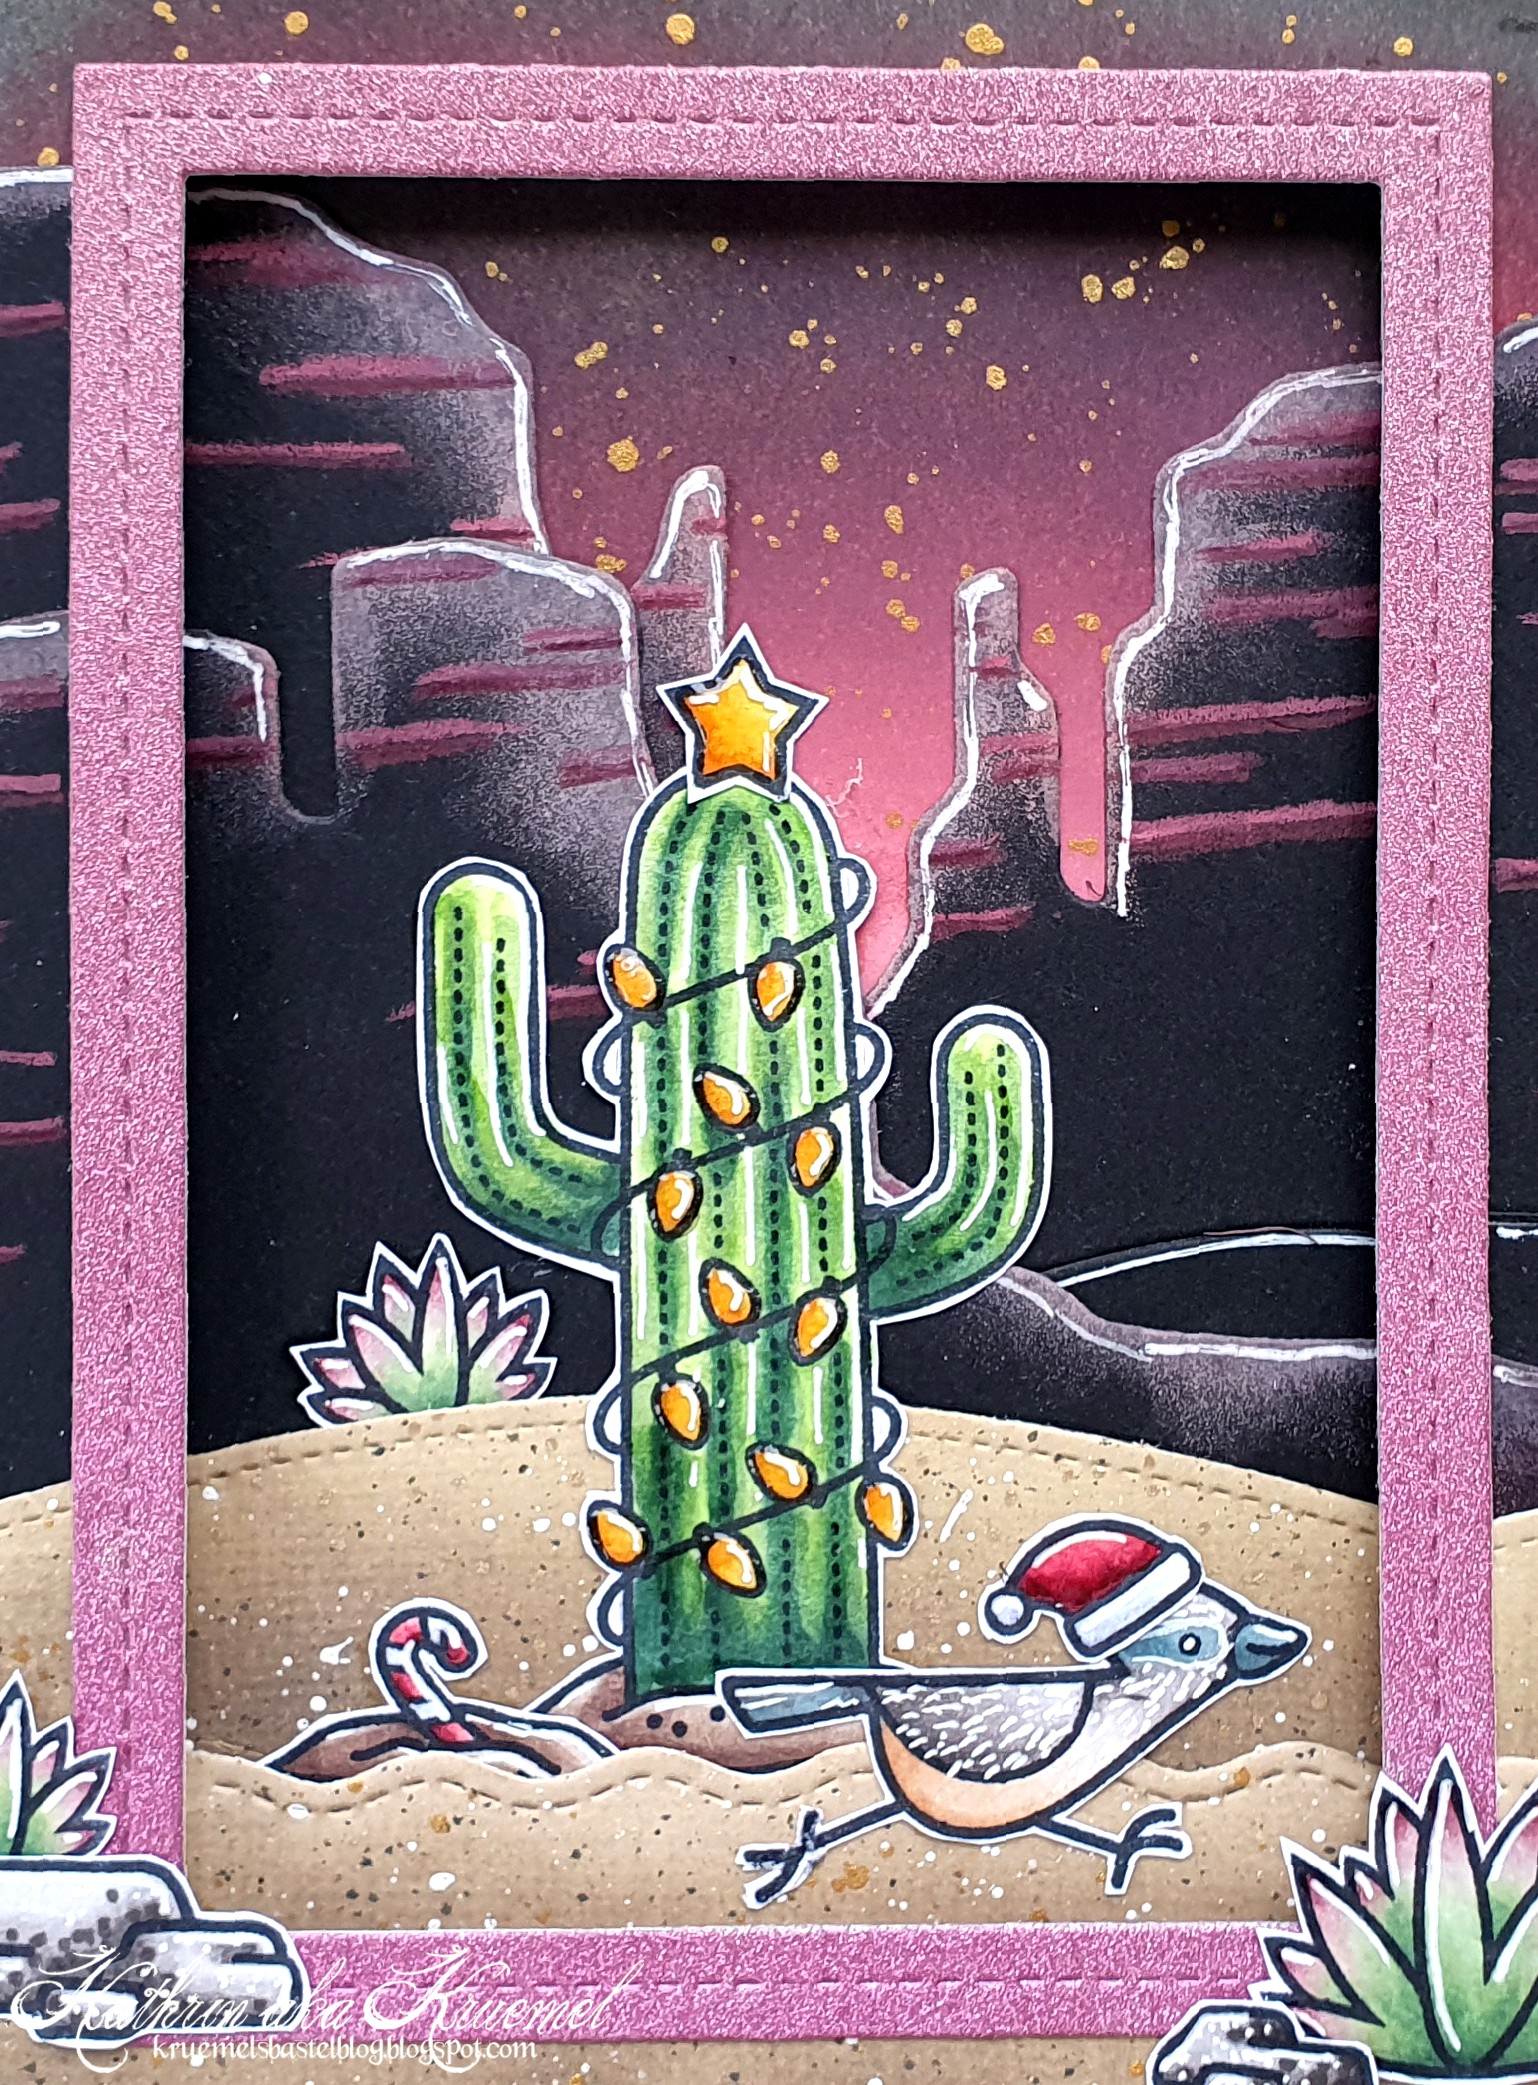
Eigentlich wollte ich ja mit der ersten Weihnachtskarte so lange wie möglich warten, sonst ist die Weihnachtssaison gar so lang. Eigentlich. Und dann kam mein Stamptember Set von LawnFawn/Simon Says Stamp bei mir an und seitdem ich das Set gesehen hatte, spukte diese Kartenidee in meinem Kopf herum. Jetzt konnte ich sie endlich umsetzen und starte damit die Weihnachtssaison hier auf meinem Blog. 

Hello everyone!
I really wanted to wait as long as possible until I start posting christmas cards, christmas season will be pretty long otherwise. Well, that was the plan. And then I recieved my Stamptember Set by LawnFawn/Simon Says Stamp and since I first saw it I had that idea in my head. Now I was finally able to turn it into a card and with it, I am starting christmas season here on my blog.

Ich weiß nicht, ob Ihr das Set gesehen habt. Es heißt Christmas in the Desert und ist ähnlich wie das Critters in the Desert Set, nur eben weihnachtlich. Und natürlich lassen sich die beiden Sets perfekt kombinieren.
Für den Hintergrund habe ich den Desert Canyon Backdrop aus schwarzem Cardstock gestanzt und mittig zerschnitten. Die Berge - plus einen weiteren, den ich aus dem umgedrehten Zwischenraum gemacht habe - habe ich am Rand mit etwas Distress Oxide Abandoned Coral gewischt und außerdem mit einem hell- und einem dunkelroten Polychromo etwas Struktur aufgemalt.
Den Himmel zwischen den Bergen habe ich mit Distress Oxide Victorian Velvet, Lumberjack Plaid und Black Soot gewischt und goldene Metallic Watercolor als Sterne aufgespritzt.
Unten befindet sich dann noch etwas Sand. Der ist aus hellbraunem Cardstock gestanzt - mit einer der Stitched Hills und einer der Stitched Waves (heißen die so?) Stanzen. Die Cardstockstücke habe ich mit Distress Oxide Scorched Timber bespritzt und dann mit Black Soot, weißer Acrylfarbe und ebenfalls goldener Metallic Watercolor bespritzt.

I don't know if you've seenthe set. It's named Christmas in the Desert and is much like the Critters in the Desert Set, just with a christmas touch. And of course those two can be combined perfectly.
For the background I die cut the Desert Canyon Backdrop from black cardstock. The mountains - and for the additional one that I created from the piece cut from between the mountains turned upside down - I inked with a bit of Distress Oxide Abandoned Coral and also used a light and a dark red Polychromo to add some structure.
The sky between the mountains I inked with Distress Oxide Victorian Velvet, Lumberjack Plaid and Black Soot, then added splatters of gold metallic watercolor.
At the bottom I added some sand. I die cut it from light brown cardstock - using one of the Stitched Hills and one of the Stitched Waves (is this the name?) dies. I inked the pieces with Distress Oxide Scorched Timber and splattered some Black Soot, white acrylic paint and again gold metallic watercolor onto them.


Und hier kommt der kleine Roadrunner, bewaffnet mit Weihnachtsmütze, Zuckerstange, Lichterkette und Stern. Die Motive auf der Karte sind alle aus den Sets Critters in the Desert , Christmas in the Desert und die kleine Zuckerstange aus dem Set Christmas Dreams und sind mit Copics coloriert. Die Lichterkette und den Stern habe ich mit Glossy Accents überzogen.
In den Wüstensand habe ich noch eine rot-grüne Pflanze sowie einen Kaktus gepflanzt. 
Mittig auf den Hintergrund habe ich einen Rahmen, gemacht aus rosarotem Glittercardstock mit einem der Stitched Rectangle Frames, geklebt.

And here's the little road runner, running through the desert, carrying a Santa hat, a candy cane, some christmas lights and a star. The images on this card are all from the sets Critters in the Desert, Christmas in the Desert and the little candy cane from the set Christmas Dreams, all are colored with Copics. The light bulbs and the star I covered with Glossy Accents.
In the sand I planted a red and green plant and a cactus.
Onto/around the center of my background I glued a frame, cut from pinkish-red glitter cardstock using one of the Stitched Rectangle Frames.


An den unteren Rand des Rahmens habe ich zwei weitere Pflanzen und ein paar Felsen geklebt.
Und darunter war dann Platz für meinen Text. Der ist mit weißem Embossingpulver auf schwarzen Cardstock embosst.
 
To the bottom of the frame I glued two more plants and a few rocks.
Under the frame there was room for my text. I white heat embossed it onto black cardstock.
 

 Meine eigentliche Idee aber seht Ihr hier. Ich wollte unbedingt, dass sich die Szene von mit Deko beladenem Roadrunner zu einem jetzt unbeladenen ändert, der gerade den Kaktus in der Wüste als Weihnachtsbaum dekoriert hat. Nun, ich dachte, ich würde einfach einen Magic Picture Changer machen, aber die Motive waren zu groß und Breite und Höhe per Partial Diecutting zu vergrößern war mir dann doch zu aufwändig. Also habe ich mich für eine Slider Card entschieden.

What you see here is the idea I had. I really wanted the scene to change from a road runner loaded with christmas decorations to an empty handed one, who just turned a cactus into a christmas tree. Well, I had planned to make a Magic Picture Changer, but the images were too large and changing both length and width by doing partial diecutting seemed too much of a pain. So I went with a slider card.


Den Hintergrund innerhalb des Rahmens habe ich zweimal genau identisch gestaltet und nur die Motive verändert. Ja, der Kaktus ist während des Dekorierens etwas gewachsen, aber das stört mich nicht. Bei dieser Szene habe ich dann Stern und Lichter auch in strahlendem Gelb coloriert. 
Und ich finde, mit dieser Geschichte auf der Karte macht dann der Text gleich noch mehr Sinn, denn für die sand-sationellen Weihnachten hat der Roadrunner soeben gesorgt.

I created two identical background for inside the frame, just changing the images. Yes, the cactus grew quite a bit while it got decorated, but I don't mind. On the second scene I picked a bright yellow to color the star and lights.
I think, with this story on the card the text makes even more sense - the road runner just made this christmas sand-sational. 


Die Szene mit dem dekorierten Kaktus ist direkt auf einen weißen Kartenrohling geklebt, die erste Szene befindet sich auf einem Stück Cardstock, den ich in ein Slider Panel verwandelt habe. Über allem befindet sich dann ein weiteres Stück Cardstock mit mittig ausgeschnittenem Fenster und dem Rahmen drumherum. Auf diesem Cardstock habe ich den Himmel, die Berge und den Sand fortgeführt.

The scene with the decorated cactus is glued onto a white note card, the first scene I put onto another pieece of cardstock that I turned into a slider panel. On top of everything I placed another piece of cardstock with a window cut from the center and the frame around it. On this cardstock piece I continued the sky, the mountains and the sand.

Freitag, 4. Oktober 2024

A Halloween Hello

 
Hallo Ihr Lieben!
Nach der doch sehr bunten Karte von gestern habe ich heute eine eher dezente Karte. Die Idee für die Farbkombi kam mir, als mir in den Sozialen Medien Werbung für ein Shirt gezeigt wurde. Und ich finde, auch so sieht Halloween toll aus!

Hello everyone!
After yesterday's very colorful creation I am sharing an a lot more decent card with you today. I got the idea for the color combo when I was shown a shopping link to a shirt in social media. And I really like this combo for Halloween!

Der Hintergrund besteht aus einem Stück sehr hellem braunen Cardstocks. Der ist von Bazzil und hat kleine eingeprägte Punkte. Das hat dann zwar das Aufstempeln des Ghoulish Greetings Background von MFT mit weißer Pigment Tinte etwas schwerer gemacht und dann ist mir auch noch der Cardstock verrutscht, so dass ich im unteren Bereich einen doppelt gestempelten Text habe, aber auf einer Halloweenkarte stört mich das gar nicht. 
Anschließend habe ich noch schwarze Metallic Watercolor aufgespritzt und habe ihn von unten links ein wenig mit Distress Ink Black Soot gewischt.

The background is made from some very light brown cardstock. It's by Bazzil and has little polka dots embossed into it. That made stamping the Ghoulish Greetings Background by MFT on top with white pigment ink a bit harder and then I also slightly moved my cardstock in my Misti and got some double stamping at the bottom of the cardstock, but that doesn't bother me at all on a Halloween card. 
Then I added splatters of black metallic watercolor and inked the left/bottom with a bit of Distress Ink Black Soot.


Die Karte ist wieder mal sehr stanzenlastig und ich habe mich hier bei allen möglichen Firmen bedient. Alle Teile sind aus farbigem Cardstock gestanzt, einige habe ich mit Copics ein wenig schattiert bzw. mit Details versehen und Highlights mit einem weißen Gelstift aufgemalt.
Ganz hinten auf den Cardstock habe ich eines der Spinnennetze aus dem Set Spiders and Webs von WhimsyStamps aufgeklebt.
Der Blumentopf ist aus dem Set Little Flowers von LawnFawn, der Baum darin mit einer Stanze von Magnolia gemacht. Hinter den Baum habe ich orangefarbenen Cardstock gesetzt und dann dünnes silbernes Metallic-Garn um den Baum gewickelt.
Der Besen und der Kürbis sind aus dem Vault Wicked Set von Sizzix. Das untere Teil des Besens habe ich zweimal gestanzt und dann gegengleich aufeinander geklebt. Der Schnörkel am Kürbis ist von LawnFawn. Ich habe außerdem einige winzige Ovale als Gesicht aufgeklebt. Auch von LawnFawn, nämlich aus dem Acorn House Set, sind auch die kleinen Blätter, die ich rund um die größeren Motive verteilt habe. Unter alles habe ich dann noch Schatten, gemacht mit den Oval Shadows von MFT, geklebt.

This is once again a die cut heavy card and I used dies by all kind of brands for it. I die cut the pieces from colored cardstock, shaded/added details to some of them with Copics and added highlights with a white gel pen.
Onto the background I first adhered one of the spiderwebs from the Spiders and Webs set by WhimsyStamps.
The flower pot is from the Little Flowers set by LawnFawn, the tree in it made with a die by Magnolia. I put some orange cardstock behind the tree and then wrapped some thin silver metallic thread around it. 
The broom and pumpkin are from the Vault Wicked die set by Sizzix. I cut the bottom of the broom twice, then glued them together back to back. The flourish o the pumpkin is by LawnFawn. I also added some tiny ovals as a face. Also by LawnFawn, from their Acorn House set, are the small leaves I placed at the bottom of the larger images. Then I put shadows, made with the Oval Shadows set by MFT, under everything.


Oben an den Himmel habe ich noch drei Fledermäuse, gemacht mit einer Stanze aus dem Bat Reveal Set von WhimsyStamps, aufgeklebt.
Für den Text habe ich mit den Buchstabenstanzen aus dem Vault Coffin Box Set von Sizzix das Wort BOO gestanzt. Es besteht aus einer dunkelorangefarbenen und mit Copics schattierten Lage, die ich mit drei Lagen schwarzen Cardstocks leicht versetzt hinterlegt habe. Dann habe ich sie noch mit Glossy Accents überzogen.
Der kleine gestempelte Text darunter ist aus dem Itty Bitty Boos Set von MFT und schwarz auf weißen  Cardstock gestempelt.

I glued three bats, made with a die from the Bat Reveal Set by WhimsyStamps, to the sky.
For the text I used the letter dies from the Vault Coffin Box set by Sizzix to cut the word BOO. It's made from one orange layer, shaded with Copics, backed slightly off with three layers cut from black cardstock. Then I covered the letters with Glossy Accents.
The small stamped subtext is from the Itty Bitty Boos set by MFT and stamped black onto white cardstock. 


Als Deko habe ich noch ein paar silberne Sternkonfetti auf der Karte verteilt.
Dann habe ich alles schwarz gemattet und auf einen weißen Kartenrohling geklebt.

I glued a few silver star confetti onto the card.
Then I matted the card panel black and glued it onto a white note card.

Donnerstag, 3. Oktober 2024

Herbstzauber

 
Hallo Ihr Lieben!
Auf dem Stampcorner Blog zeige ich Euch heute diese doch recht bunte Herbstkarte. Und ich bin mir bis jetzt nicht sicher, ob es so eine gute Idee war, das Pink mit hineinzubringen, denn so sieht die Karte doch ein wenig sommerlich aus. Auf jeden Fall ist sie fröhlich und kräftig!

Hello everyone!
On the  Stampcorner Blog I am sharing this quite colorful fall card today. And I still am not sure if it was idea to bring in the pink, because it adds a quite summer-ish feel. Well, at least it's a bright an happy card!

 Auf dieser Karte habe ich dann auch endlich den tollen Blätterstencil und die Birkenstanze, in die ich total verliebt bin, aus dem September-Release verwendet. 
Zuerst habe ich die Mitte eines Stücks weißen Cardstocks mit Distress Oxide Speckled Egg gewischt. Dann habe ich rundum an den Rand die Blätter gewischt. Da auch die Negative im Stencilset enthalten sind, konnte ich sie prima übereinander legen. Für die grünen Blätter habe ich Distress Oxide Squeezed Lemonade, Crushed Olive und Peeled Paint, für die orange-braunen Blätter Spiced Marmalade, Crackling Campfire und Gathered Twigs und für die pinken Picked Raspberry, Seedless Preserves und Lumberjack Plaid benutzt. Dann habe ich einige Wassertropfen und weiße Acrylfarbe aufgespritzt. 
Mit einem dunkeltürkisfarbenen Polychromo habe ich dann eine Art Schatten um die Blätter gemalt und auf die Blätter einige Highlights mit einem goldenen Gelstift gesetzt.
Aus goldenem Schimmer-Cardstock habe ich dann mit den Deckle Edge Stanzen noch einen Rahmen gestanzt.
Die Birken habe ich aus Vellum gestanzt und auf der Rückseite mit einem dunkelgrauen und einem weißen Polychromo etwas Struktur aufgemalt.
 
On this card I finally used the great leaves stencil and the birch tree die, that I am absolutly in love with, from the september release.
First I inked the center of a piece of white cardstock with Distress Oxide Speckled Egg. Then I added the leaves all around along the edge. Since the negatives are included in the stencil set I was easily able to put them above each other. For the green leaves I used Distress Oxide Squeezed Lemonade, Crushed Olive and Peeled Paint, for the orange-brown ones Spiced Marmalade, Crackling Campfire and Gathered Twigs and for the pink ones Picked Raspberry, Seedless Preserves and Lumberjack Plaid. I flicked some water droplets and also white acrylic paint onto the cardstock.
Using a dark turquoise Polychromo I drew some kind of cast shadow around the leaves, then used a gold gel pen to add some highlights to the leaves.
Using the Deckle Edge die set I cut a frame from gold shimmer cardstock.
The birch trees I die cut from vellum and used a dark grey and white Polychromo to add some details to the back of the trees.
 

 Da der Hintergrund schon so unruhig ist, wollte ich nicht auch noch ein Motiv aufkleben. Also habe ich mich für einen großen Text entschieden.
Das Wort Herbst habe ich mit Buchstaben aus dem Lined Letters Stempelset von MFT gemacht. Sie sind weiß auf goldenen Cardstock embosst, dann habe ich sie ausgeschnitten.
Das Wort zauber darunter ist Teil der Winterzauber-Stanze und ebenfalls aus dem goldenen Schimmer-Cardstock gestanzt. Hier habe ich vier Lagen übereinander geklebt.
Und dann habe ich doch noch zwei Eicheln und zwei Blätter aus dem Set Herbsttiere abgestempelt, mit Copics coloriert und aufgeklebt.

Since the background is already very busy I didn't want to add an image. So I went with a large text instead.
The word Herbst - fall - I created with letters from the Lined Letters stamp set by MFT. I white heat embossed them onto gold cardstock and cut them out.
The word zauber - magic - is part of the Winterzauber die and again die cut from the gold shimmer cardstock. Here I stacked four die cuts for some dimension.
And then I stamped two acorns and two leaves from the Herbsttiere stamp set, colored them with Copics and glued them down.
 

 Den Rahmen und die großen Buchstaben sowie die kleinen Motive habe ich jeweils mit dünnem 3D Tape hinterlegt. Als Deko habe ich noch einige goldene Perlen auf der Karte verteilt.
Zum Schluss habe ich alles auf einen weißen Kartenrohling geklebt.

The frame, the large letters and the small images I backed with thin foam tape. Then I also added a few gold pearls as decoration.
As the last step I mounted the card panel to a white note card.
 

Dienstag, 1. Oktober 2024

No tricks, just treats

 
Hallo Ihr Lieben!
Nachdem ich die letzte Woche mit Renovieren beschäftigt war, habe ich es endlich wieder in mein Bastelzimmer geschafft und dort einige weitere Produkte aus dem letzten LawnFawn Release eingeweiht. Damit ist diese Halloweenkarte entstanden.

Hello everyone!
After one week of renovations I finally made it back into my craftroom. And there I used some more of the products from the latest release by LawnFawn to create this Halloween card.

Irgendjemand - ich habe mir leider den Namen nicht gemerkt - hatte die geniale Idee, den Spiderweb Backdrop als Kartenfront zu benutzen. Das fand ich so genial, dass ich es auch ausprobieren wollte. Ich habe zwei davon aufeinander geklebt und dazwischen Acetate gefasst, so ist die Front nicht zu filigran. Den Spiderweb Backdrop habe ich dabei natürlich aus weißem Cardstock gestanzt.

Someone - sorry, I don't remember her name - had the amazing idea of using the Spiderweb Backdrop as a card front. I loved this idea so much that I just had to try it myself. I glued two of those together, putting some acetate in between so the card isn't too flimsy. Of course I die cut the Spiderweb Backdrop from white cardstock.


Vom oberen Rand der Karte seilt sich eine Spinne mit einer Tüte Sour Patch Flies ab. Die war wohl offen und alle Fliegen konnten fliehen. Nun kleben sie überall im Spinnennetz. Alle Motive auf der Karte sind aus den Stempelsets Sweet Spiders, Sweet Spiders Add-On, Purr-fectly Wicked und Purr-fectly Wicked Add-On und mit Copics coloriert. 
An der Spinne hier habe ich ein Stück weißes Twine angeklebt und oben eine Schleife angebunden.

From the top edge of the card a spider holding a bag of Sour Patch Flies is dangling down. Seems like the bag was open and all the flies escaped. Now they are stuck all over the web. All images on this card are from the sets Sweet Spiders, Sweet Spiders Add-On, Purr-feclty Wicked and Purr-fectly Wicked Add-On and are colored with Copics.
I adhered a piece of white twine to the spider and glued the other end to the frame, adding a little bow there. 


Im unteren Teil des Netztes laufen zwei weitere Spinnen über das Netz, ein wenig überfordert, welche der Fliegen sie denn nun zuerst einfangen sollen. Diese beiden Spinnen können sich jeweils rechts und links auf ihrem Spinnenfaden über die Karte bewegen. Dafür habe ich hinter den Spinnen einen kleinen Kreis zwischen Folie und Spinnenfaden geschoben und dort nur ganz oben und unten die Spinnen angeklebt. So lassen sie sich verschieben.
Außerdem hängen hier unten im Netz noch eine Tüte Gummiwürmer und eine Tafel Schokolade.

In the lower half of the net two more spiders are running over the net, a bit overwhelmed with which fly to catch first. Those spiders can move left and right on their "string". I slid a small circle between the web and the acetate and adhered the spiders to its very top and bottom. Now they can be moved with your fingers.
There's also a bag of gummy bugs and a chocolate stuck the spiderweb here.


Hier sieht man die Folie zwischen den Spinnennetzen nochmal besser. Zum Ankleben an die Kartenrückseite habe ich an ihre einfach einen gefalteten Streifen Cardstock angefügt, den ich dann zwischen den Spinnennetzten versteckt habe. 
Die Flügel der Fliegen sind außerdem mit Stickles beglittert.

Here you can see the foil between the spiderwebs. To attach the back of card to the spiderweb front I simply added a scored strip of cardstock to the back of the card and have hidden it between the two spiderweb frames. 
The flies' wings I covered with Stickles.


Öffnet man die Karte, sieht man die Szene im Inneren, die man natürlich durch das Spinnennetz hindurch schon etwas sehen konnte. 

When you open the card you see the scene, that of course was already visible through the spiderweb, at least partly.


Damit man die Rückseiten der colorierten Motive nicht durch die Folie sieht - Copics bluten ja immer durch und das mag ich dann in so einem Fall nicht so gerne - habe ich die Motive alle nochmal coloriert, ausgeschnitten und innen hinter die Motive der Vorderseite geklebt. Zum Glück waren sie alle quasi symmetrisch bzw. die krabbelnden Spinnen gegengleich. 
Dann habe ich auch hier ein Stück Twine an die herabhängenden Spinne geklebt. Dass die Motive bei geöffneter Karte alle auf dem Kopf stehen, macht mir nichts.

To avoid that you can see the back of the colored images - Copics always bleed through the paper and I really didn't like that here - I colored and cut out all images again and glued them behind the ones on the card front. Luckily they were all kind of symmetrical or - in the case of the crawling spiders - opposite. 
Again I added a piece of twine behind the dangling spider. That all the images are upside down when the card is opened doesn't bother me too much.


Für die Szene im Inneren der Karte habe ich ein Stück weißen Cardstocks mit Distress Oxide Twisted Citron, Bundled Sage, Mermaid Lagoon, Uncharted Mariner und Black Soot gewischt. Außerdem habe ich einen Hügel aus weißem Cardstock gestanzt und mit Uncharted Mariner und Black Soot gewischt. Auf beides habe etwas Wasser gespritzt.
Aus weißem Cardstock habe ich vier der Birch Trees gestanzt und jeweils von einer Seite mit einem Pinsel Black Soot quer über den Baumstamm gewischt. Ich habe einfach die Farbe, die noch im Pinsel war, genutzt und mit wenig Druck gearbeitet. So entsteht ganz von selbst die quer gestreifte Optik von Birken. 

For the scene on the inside of the card I inked a piece of white cardstock with Distress Oxide Twisted Citron, Bundled Sage, Mermaid Lagoon, Uncharted Mariner and Black Soot. I also die cut a hill from whtie cardstock and inked it with Uncharted Mariner and Black Soot. Then I flicked some water onto both cardstock pieces. 
From white cardstock I die cut four of the Birch Trees and used a brush to ink each of them from one side with Black Soot, applying the ink across the tree trunk, working in the same direction all the time. I simply used what color was left on my brush and worked with very little pressure. This way I ended up kind of automatically with the striped look of  birch trees.
 

 Unten auf dem Hügel steht ein brodelnder Hexenkessel, in dem die kleinen Spinnen alle möglichen Leckereien produzieren. Dabei darf das Rezeptbuch der Süßigkeiten-Hexe natürlich nicht fehlen. 
Der Kessel ist mit dem Build a Cauldron Set gemacht. Den Kessel selbst habe ich aus schwarzem Cardstock gestanzt und mit dunkeltürkisfarbenem, schwarzem und silbernem Gilding Wax betupft. Den Glibber darin habe ich aus weißem Cardstock gestanzt und mit Copics coloriert. Auf diese Art sind auch die Süßigkeiten aus dem selben Set entstanden. 
Und neben den Spinnen sind hier auch noch ein paar neugierige kleine Würmer unterwegs, die wohl hoffen, dass evtl. etwas von den Süßigkeiten für sie abfällt.

At the bottom of the card, on top of the hill, there's a bubbling cauldron, in which those little spiders are cooking up all kind of sweet treats. Of course the recipe book of the candy spider was used to make sure those candies turn out good. 
I cut the cauldron from black cardstock using the Build a Cauldron die set, then dabbed dark turquoise, black and silver Gilding Wax onto it. The bubbling mass I die cut from white cardstock and colored it with Copics. The candies, that come in the same die set, are made the same way.
And besides the spiders there are also some nosey little worms out there in the woods, that seem to hope some of the candy is for them.


Natürlich blubbert so ein Kessel ganz orderntlich. Neben ein paar gestanzten Blasen, habe ich auf den Hintergrund noch weitere auffoliert. Ich habe dafür die Bokeh Circles Hotfoil Plates und grüne Folie verwendet. 
Außerdem hängt auch hier eine Spinne vom oberen Rand der Karte herab - genau an derselben Stelle wie die auf der Kartenfront. So kann man zumindest die nicht schon vorher sehen. Bei den Spinnen unten auf der Karte habe ich zu spät daran gedacht, dass sie ja bei geschlossener Karte sichtbar sind, und musste mich außerdem an den Linien des Spinnennetzes orientieren.

Of course such a cauldron creates lots of bubbles. Besides a few die cut ones I also foiled some onto the background. I used the Bokeh Circles hotfoil plates and green foil here.
And again a spider is dangling from the top edge of the card - exactly in the same spot as the one on the card front, so at least this one isn't visible when the card is closed. With the spiders at the bottom of the card I thought of it too late and also had to use the lines of the spiderweb to adhere the ones on the front.


Die Süßigkeiten und Blasen habe ich wieder mit Stickles beglittert. 
Als Text habe ich mich für ein einfaches No Tricks, just Treats entschieden. Er ist weiß auf schwarzen Cardstock embosst, in zwei Teile geschnitten und aufgeklebt. 

The candies and bubbles I covered with Stickles again.
As the text I went with a simple No Tricks, just Treats. It's white heat embossed onto black cardstock, cut into two parts and glued down.

Montag, 30. September 2024

Autumn Blessings


 Hallo Ihr Lieben!
Heute habe ich eine weitere herbstliche Karte für Euch. Und im ersten Moment mag sie vielleicht sogar ein wenig wie das letzte Aufbäumen des Sommers aussehen. Aber an sonnigen und warmen Herbsttagen flattern doch hin und wieder noch ein paar Libellen zwischen all den farbenfrohen Herbstblumen herum. Und das hat mich dann zu dieser Karte inspiriert.

Hello everyone!
Today I have another fall card to share with you. At first sight it might even look like the last moments of summer. But every now and then, on sunny and warm fall days, you can still see some dragonflies flutter around all those colorful fall flowers. That's what inspired me to make this card.

Für die Karte habe ich das Motiv aus dem Chrysanthemum Slimline Set von PinkFresh mit klarem Embossingpuler mit silbernen Glitzerpartikeln auf ein Stück Watercolor embosst und dann mit Distress Ink coloriert. So war der Farbverlauf von rot nach gelb ganz einfach.

For the card I heat embossed the image from the Chrysanthemum Slimline set by PinkFresh onto a piece of watercolor cardstock using some clear embossing powder with silver glitter, then colored it with Distress Inks. That made it really easy to get the color change from red to yellow.


Hier sieht Ihr die Blume genauer. Da das Motiv eigentlich eine Slimline Card ist, es also nicht komplett auf meine Karte passte, ergab sich rechts zwischen den Blütenblättern eine Art Loch. Dorthinein habe ich einfach das Blatt, das sich eigentlich unter der Blume befindet, abgestempelt und das Blütenblatt darüber einfach wegmaskiert, deswegen hat es eine etwas lustige Form.
Zum Colorieren habe ich Scattered Straw, Crackling Campfire, Aged Mahogany, Shabby Shutters und Peeled Paint verwendet. Dann habe ich den Hintergrund mit Broken China coloriert und über alles weiße Acrylfarbe und goldene Metallic-Watercolor aufgespritzt.

Here you get a better look at the flower. Since the image is made to fit a slimline card, it didn't fit my card size and I ended up with some kind of hole between the petals on the right. Into that spot I simply stamped the leaf, that's under the flower on the whole image, masking off the flower petal over it, hence the kind of funny shape.
To color the image I used Scattered Straw, Crackling Campfire, Aged Mahogany, Shabby Shutters and Peeled Paint. Then I also colored the background with Broken China and splatttered white acrylic paint and gold metallic watercolor over the whole cardstock piece.


Oben auf die Karte habe ich dann die Libelle gesetzt. Den Körper habe ich wieder aus Watercolor Cardstock gestanzt und mit Scorched Timber coloriert. Die Flügel sind aus Pearlescent Vellum von LawnFawn gestanzt.

Onto the top of the card I added my dragonfly. I die cut the body from watercolor cardstock again, then colored it with Scorched Timber. The wings I've die cut from Pearlescent Vellum by LawnFawn.


Der Text ist aus dem Autumn Blessings Stempelset von MFT. Ich habe Teile von zwei verschiedenen Stempeln aus dem Set benutzt und sie mit goldener Metallic-Pigment-Tinte auf weißen Cardstock gestempelt. Dann habe ich sie ausgeschnitten.

The text is from the Autumn Blessings stamp set by MFT. I combined parts of two stamps from the set and stamped them with gold metallic pigment ink onto white cardstock. Then I cut them out with my scissors.


Die Libelle und den schmalen Textstreifen habe ich mit dünnem, das Wort Autumn mit dickem 3D Tape hinterlegt. Die Flügel habe ich leicht nach oben gebogen, so wirkt die Libelle echter.
Als Deko habe ich noch ein paar goldene Perlen auf der Karte verteilt und dann alles auf einen weißen Kartenrohling aufgeklebt.

I used thin foam tape behind the dragonfly and the small text strip, the word autumn I backed with some thick foam tape. The wings of the dragonfly I bended slightly up, that makes it look more realistic. 
I added a few gold pearls as decoration, then adhered the card panel to a white note card.