Montag, 19. September 2022

Altenew September 2022 Inspiration Challenge

 
Hallo Ihr Lieben!
Die September Inspiration Challenge von Altenew ist in vollem Gange - und auch ich habe wieder eine Karte dafür gemacht. Es gibt ein herbstlich angehauchtes Bild als Inspiration - lasst Euch von den Farben oder dem Bild an sich inspieren:

Hello everyone!
The September Inspiartion Challenge by Altenew is running all month - and I managed to make a card for it again. There's an inspiration picture with a fall touch - get inspired by either the picture or the colors:


Mir haben es vor allem das leuchtende Pink und die grünen Blätter mit den pinkfarbenen Spitzen auf dem Bild angetan. Und so habe ich die auf meine Karte transportiert.
Für den Hintergrund habe ich drei verschiedene Dye Ink Grüntöne - gelblich, leuchtend Grün und Dunkelgrün - erst auf ein Stück Folie aufgetragen, mit Wasser besprüht und dann auf ein Stück weißen Cardstock gedrückt. Das habe ich mehrere Male wiederholt, um einen Hintergrund ähnlich dem Foto zu erhalten, die einzelnen Lagen habe ich jeweils mit dem Embossingfön getrocknet. Nun, später haben sich die Blätter meines Motives davon nicht mehr so toll abgehoben. Deswegen habe ich mit der Dotted Tiles Cover Stanze von Altenew ein Stück Vellum ausgestanzt und das über den Hintergrund gelegt, um ihn etwas runteruzufahren. Durch das eingeprägte Muster wirkt er nicht zu fad, und den Hintergrund kann man immer noch recht gut sehen. Auf das Vellum - und später auch über das Motiv - habe ich lila-silbern farbene Metallic Watercolor gespritzt, die passte perfekt zur Farbe des Maschendrahtzaunes auf dem Foto.
Für das Motiv habe ich die Stanze, den Embossingfolder und die Layering Stencils aus dem Silk Art Card Kit verwendet. Erst habe ich die Form des Motivs aus weißem Cardstock ausgestanzt und mit dem Embossingfolder geprägt. Anschließend habe ich die Stencils verwendet, um das Motiv zu colorieren. 

I really liked the bright pink and the green leaves with the pink tips on the picture, so I tried to bring those onto my card.
For the background I picked three different tones of green dye ink - yellow-ish green, bright greena and dark green - and put them of it onto some acetate first. Then I sprayed some water onto it and pressed a piece of white cardstock into the weg ink. I did this several times, drying the layers inbetween, to end up with a background close to the one in the picture. Well, later the leaves of my image didn't have enough contrast to the background, so I've cut the Dotted Tiles Cover die by Altenew from vellum and put that over the background to tone it down. With the pattern cut into the vellum it doesn't look too plain, and you can still see the background through it pretty well. Onto the vellum - and later also onto the image - I've splattered some silver-purple metallic watercolor, the color goes perfectly with the color of the chain link fence in the photo.
For the image I used the die, embossing folder and layering stencils from the Silk Art Card Kit. First I've cut the outline/shape of the image from white cardstock, then dry embossed it with the embossing folder. And then I used the stencils to color the image.


Durch die Layering Stencil habe ich erst die Blätter in grün und pink gewischt, dann habe ich helleres und leuchtendes Pink sowie ein dunkles Rosarot verwendet, um die einzelnen Lagen der Blüten aufzuwischen. Dann habe ich meine Polychromos benutzt, um den einzelnen Motivteilen noch etwas mehr Tiefe zu geben. Außerdem habe ich grünes Enamel Accents auf die Blütenmitten gegeben.
Der Text meiner Karte ist aus dem Set Dragon Flower. Ich habe ihn weiß auf schwarzen Cardstock embosst und an die Stelle auf der Karte geklebt, an der sich auf dem Foto das "September 2022" befindet. Irgendwie passte es dort perfekt.

I used the layering stencil to first color the leaves in green and pink, then used a lighter and a bright pink as well as a dark reddish pink to color the petals of the flowers. Then I brought in my Polychromos to add some more depth to the different parts of the image, and added some green Enamel Accents to the flower centers.
The text on my card is from the Dragon Flower set. I white heat embossed it onto black cardstock and then glued it onto my card, right in the place where the "september 2022" banner is placed in the inspiration picture. It just was the perfect spot.


Auf diesem Bild sieht man recht gut, wie das Vellum auf dem Hintergrund aufliegt.
Ich habe das Motiv mit 3D Tape auf das Vellum geklebt und ebenfalls 3D Tape verwendet, um den Text auf das Motiv zu kleben. 
Rund um das Motiv habe ich einige matt-silberne Pailetten verteilt, außerdem habe ich mit einem schwarzen Fineliner einen Rahmen auf das Vellum gemalt.
Zum Schluss habe ich eine Lage Moosgummi hinter den Cardstock mit dem Hintergrund und alles auf eine weiße Kartenbasis geklebt.

On this picture you can see pretty well, how the vellum covers the background.
I used foam tape to glue the image onto the vellum and then more foam tape to attach  the text banners onto the image.
Around the image I added a few matte silver sequins, and I also drew a frame onto the vellum using a black fineliner.
To finish the card I put a layer of foam tape behind the background cardstock and attached everything onto a white note card.

Samstag, 17. September 2022

Stempeleinmaleins - Ausgabe vom 17. September 2022

 
Hallo Ihr Lieben!
Heute zeigen wir Euch beim Stempeleinmaleins eine Anleitung für eine Entspann-Mal-Box. Das ist meine Variante. Und ich gebe gleich zu, dass meine Box wohl eher Feier-Mal-Box heißen sollte, denn ich bin thematisch abgewichen. 

Hello everyone!
Over at Stempeleinmaleins we are sharing a tutorial for a relax box today. This is my version. And I have to admit it right away, my box would better be called a birthday or party box, because I did a few small changes, especially with the theme.


Ich habe meine Box aus weißem Cardstock gewerkelt und alle Teile sind mit dunkelgrünem Cardstock und dann grünem Designpapier mit weißen, dunkelgrünen und pinkfarbenen Punkten überzogen. 
Auf der Front der Karte habe ich ein ebenfalls dunkelgrün gemattetes Banner aufgeklebt. Dafür habe ich eines der Fishtail Banner Stitch von Stampcorner verwendet und es durch Partial Die Cutting so gekürzt, dass oben auch der gestitchte Rand gestanzt wird. 
Auf das Banner habe ich den Nur für Dich Stempel von Create a Smile in dunkelgrün aufgestempelt. Als Deko kam eine gelayerte Blume, gemacht mit dem Blatt und Blüte Stempelset von Create a Smile, zum Einsatz. Die lag schon fertig auf meinem Schreibtisch, denn ich hatte einige Tage zuvor mit den Brusho-Pulvern gespielt und wusste dann nicht so recht, was ich mit der Blüte anfangen sollte. Ich habe sie mehrfach mit weißem Embossingpulver auf Watercolor Cardstock embosst, mit Wasser besprüht und Pulver in Rosarot und Orangegelb sowie die Blütenmitte in Braun bestreut. Dann habe ich die Farben trocknen lassen, die Blume in verschiedenen Lagen ausgeschnitten und aufeinander geklebt. Naja, für mich als Kontrollfreak wird das wohl nie die Lieblingstechnik werden, aber zur Abwechslung hat es mal wieder Spaß gemacht. 
Das Banner und die Blüte sind nur in der unteren Hälfte mit 3D Tape auf die Box geklebt - so kann man den Deckel hinter das Banner stecken und die Box bleibt geschlossen.

I've made my box from white cardstock and glued green patterned paper with white, dark green and pink dots, matted with dark green cardstock, onto all the parts. 
Onto the front of the card I glued a banner, that I also matted dark green. I've cut one of the Fishtail Banner Stitch dies by Stampcorner and did some partial die cutting to make the banner smaller but still get the stitched details on the top edge.
Onto the banner I stamped a "just for you" text by Create a Smile, using dark green ink.
To decorate the front of the box I used a layered flower from the Blatt und Blüte stamp set by Create a Smile. I had this already on my desk because a few days earlier I've decided to bring out my Brusho powders and then didn't know what to make with this finished flower. I had white heat embossed the image a few times onto watercolor cardstock, sprayed it with water and then put some of the powders in pink and yellow and some brown for the flower center on top. After the color had dried I've cut the flowers out cutting the petals to create different layers and glued them on top of each other. Well, for my inner control freak this will never be the favorite way of coloring, but it was fun to do it this way for a  change. 
The banner and the flower are glued to the front of the box, putting foam tape only onto the bottom halfs. This way the lid of the box can be tucked behind the banner and the box stays closed.


Und so sieht die geöffnete Box aus. Eigentlich ist sie mit einem Kuchenstecker und einem Teebeutel gefüllt. Da ich aber keinen Tee trinke, verschenke ich ihn auch nicht gerne. Und da sich in der Box auch noch ein kleines Törtchen versteckt, fand ich einen Beutel Konfetti und eine Kerze absolut passend und habe so aus der Entspann-Mal- eine Feier-Mal-Box gemacht.

And this is the opened box. In our tutorial this box is filled with a bag of tea and a small cake topper. Since I don't drink tea, I also don't like to give it away. And since there's also a little cake hidden in the box, I though a candle and a bag of confetti would be perfect to turn this into a birthday/party box.


Auch im Inneren der Box habe ich das gepunktete Designpapier verwendet und es ebenfalls grün gemattet. So passt alles zusammen.
Hier seht Ihr auch die kleine Schublade, in die eines dieser rechteckigen Törtchen passt. Meine Schublade ist auf dem Bild leer, denn ich hatte kein Törtchen da und muss es vor dem Verschenken erst besorgen.

I used the same patterned paper with the dots on the inside and matted all pieces with dark green cardstock again. This way the inside and outside go together perfectly.
Here you can also see that there's a little drawer. In this drawer you can put one of those little cake bars. Well, my drawer is still empty because I didn't have such a cake at home and will buy it right before giving the box away.


In den Schlitz für den Teebeutel habe ich, wie schon gesagt, Konfetti gesteckt. Die habe ich einfach in einen kleinen Beutel, in dem Stempelsets verpackt sind, gefüllt und den oberen Teil des Tütchens weggeschnitten. Dann habe ich einen "heute soll es Konfetti für Dich regnen" Text aus dem Konfetti-Stempelset von Create a Smile in schwarz und pink abgestempelt, ausgeschnitten und auf das Tütchen geklebt.
Und statt des Kuchensteckers habe ich eine giftgrüne Geburtstagskerze daneben in der Box platziert, auf der ich einen "Dein Glückslicht" Text von Kulricke, ebenfalls in Pink gestempelt, aufgeklebt habe. Diese Kerze ist übrigens schuld an der Farbwahl. Ich habe diese giftgrüne Kerze in meiner Schublade gefunden und fand die Farbe klasse. Der Teil mit der Schublade is dann auch noch aus farblich passendem Cardstock entstanden. Aber dann konnte ich partout kein passendes Designpapier finden - und musste zu etwas gedeckteren Farben als eigentlich geplant greifen. 
An die Vorderseite des Innenteils habe ich einen rund ausgestanzten "Geburtstagskuchenbausatz" Text oben leicht überstehend aufgeklebt. Und darunter kam ein Text aus dem Bitty Birthday Wishes von MFT, den ich pink abgestempelt habe. Eigentlich mische ich englische und deutsche Texte nicht gerne auf einem Werk, aber hier hat es sich einfach so ergeben. Und ich denke, diese Zeile versteht - fast - jeder. Beide Texte sind wieder dunkelgrün gemattet.

Into the slit that originally holds the tea bag I've put a bag filled with confetti. I simply put them into one of those bags that small stamp sets come in and cut off the top of the bag. Then I stamped a "may it rain confetti onto you today" text from the confetti stamp set by Create a Smile with black and pink ink, cut it out and glued it onto the bag.
And instead of the decorated cake topper I put this bright green birthday candle besides the confetti into the box. I stamped a text with pink ink onto white cardstock and glued that onto the candle. I don't think there's a english word for the german ones here, but "make a wish" would have fit and meant about the same. Oh, and this candle is actually the reason for the colors I used here. I found it in my drawer and loved the color. The box piece with the drawer is also made from matching cardstock - but then I wasn't able to find some patterned paper that went with it - and had to switch to some more muted colors than I had in mind.
To the front of the inner part I glued a circle, onto that I had stamped a "birthday cake kit" text, making it hang over the edge of the inner part about half way. Underneath I added a text from the Bitty Birthday Wishes stamp set by MFT, again stamped in pink. I don't like to mix english and german texts on one project, but here that's just how it went. And I think, nearly everyone will understand this one line. Both texts are again matted dark green.


Da ich die Oberseite des Innenteils und auch die Seiten der Schublade nicht mit Designpapier beklebt hatte, habe ich hier zumindest einen weißen Rahmen mit einem Gelstift aufgemalt.

Since I hadn't put patterned paper onto the top of the inner piece and also the sides of the drawer, I used a white gel pen to at least draw a frame onto those parts.


Auf die vordere Klappe kam dann noch die Anleitung für den Geburtstagskuchenbausatz. Und ein Geburtstagsgruß wollte auch noch untergebracht werden. Dafür habe ich das Happy, Happy, Happy Stempelset von MFT benutzt. Das dreifache Happy habe ich schwarz auf das Designpapier gestempelt. Darüber habe ich dann mit hellrosa farbenem Embossingpulver das Wort birthday aufembosst. Leider hatte ich die Blüte auf der Vorderseite bereits aufgeklebt, so dass ich zum Stempeln einen Acrylblock benutzen und auf dem uneben Untergrund stempeln musste. Das sieht man leider am Embossing, aber so passt der Text zum leicht distressten Look des Designpapieres.
Ganz zum Schluss habe ich dann noch einige pinkfarbene Enamel Dots auf verschiedenen Teilen der Box verteilt.

Onto the front flap I've glued the guideline for how to use the birthday cake kit. The text means "unpack the birthday cake kit, put the candle in the cake, light the candle, then blow it out and make a wish. Remove the candle, enjoy the cake, smile and be happy". 
And then my box also needed a birthday greeting. I used the Happy, Happy, Happy stamp set by MFT here and stamped the triple happy with black ink directly onto the patterned paper. Then I used light pink embossing powder to heat emboss the word birthday on top. I had already glued the flower onto the outside of the box and so I had to use an acrylic block and stamp onto an uneven surface. Sadly this is really visible with the embossing, but I think, the word goes great with the lightly distressed look of the patterned paper.
In the end I glued a few pink Enamel Dots to different areas of the box.

Donnerstag, 15. September 2022

Herbstliche Mini-Slimline Card

 
Hallo Ihr Lieben!
Für meinen heutigen Post auf dem Stampcorner Blog kehre ich zurück zum Thema Herbst - und dem neuen herbstlichen Stempelset. Denn so einige Motive daraus habe ich noch gar nicht gezeigt. Diesmal habe ich zwei von ihnen auf einer Mini-Slimline Karte untergebracht. 

Hello everyone!
For today's post over at the Stampcorner Blog I am back to the autumn theme - and to the new fall-ish stamp set. Because there are quite a few images included in it, that I haven't use yet. This time there are two on this mini slimline card.

Ich habe hier keine besonderen Mini Slimline Stanzen verwendet, sondern größere Stanzen angepasst. Zuerst habe ich zwei der Slimline Deckle Edge Stanzen von Stampcorner verwendet und einen Rahmen aus weißem Cardstock gestanzt. Damit der unebene Rand fortlaufend ist, habe ich Partial Die Cutting angewendet. Durch den uneben Rand fällt das gar nicht auf. 
Dann habe ich Watercolor Paper mit Distress Inks eingefärbt: für den Hintergrund mit Salvaged Patina, Peacock Feathers, Twisted Citron und Mowed Lawn, für den Blätterrahmen mit Fossilized Amber, Festive Berries, Rusty Hinge und Spiced Marmalade. Auf den Hintergrund in Orangetönen habe ich nach dem Trocknen noch goldene Metallic Watercolor aufgespritzt.
Aus dem Cardstock für den Hintergrund habe ich mit der Snow Drift Cover-Up Stanze die "Wellen" ausgestanzt, für den Blätterrahmen habe ich die Lots of Leaves Stanze, beide von MFT, benutzt. Die Wellen habe ich auf das Stück weißen Cardstock geklebt, das ich aus der Mitte meines Rahmens ausgestanzt habe. Dann habe ich den Blätterrahmen mit 3D Tape darauf- und oben auf den weißen Mini Slimline Rahmen geklebt.
Für den Text habe ich das Hallo aus dem Stempelset Kleine Worte weiß auf schwarzen Cardstock embosst und ausgeschnitten. Das Wort Herbst ist mit dem Kleinbuchstaben-Alphabet Stanzenset von CraftEmotions aus türkisfarbenem Cardstock gestanzt. Sowohl der gestanzte als auch der gestempelte Text sind mit 3D Tape auf den Hintergrund geklebt, nur das H und T von Herbst sind direkt auf den Rahmen bzw. den Blätterrand geklebt, da die ja bereits mit 3D Tape befestigt waren..

Here I didn't use a special mini slimline die but made larger dies fit the size of my card.
First I used two of the Slimline Deckle Edge dies by Stampcorner to die cut a frame from white cardstock. To keep the wonky edge all around my frame I did some partial die cutting - and due to that wonky edge you don't see that.
Then I colored two pieces of watercolor with Distress Inks: I used Salvaged Patina, Peacock Feathers, Twisted Citron and Mowed Lawn for the background and Fossilized Amber, Festive Berries, Rusty Hinge and Spiced Marmalade for the leaf frame. Onto the orange background I splattered some golden metallic watercolor after the ink had dried. 
From the cardstock I made for the background I've die cut the Snow Drift Cover-Up die to get the wavy pieces, for the leaf frame I used the Lots of Leaves die, both by MFT. I glued the wavy pieces onto the piece of white cardstock I had cut out from the inside of my white frame. Then I used foam tape to glue the leaf frame and then my white mini slimline frame on top.
For the text I white heat embossed the word hello onto black cardstock and cut it out. The word Herbst - which means fall in german - I used an alphabet die set by CraftEmotions and die cut the letters from dark turquoise cardstock. I glued both the stamped and the die cut text down with foam tape, only the h and t are attached to the leaves and the mini slimline frame, since I already used foam tape on those. 


Der Fuchs und der Igel freuen sich so sehr über das schöne Herbstwetter und die bunt gefärbten Blätter! Ich habe beide mit Copics coloriert, Highlights mit einem weißen Gelstift gesetzt und anschließend beide Motive ausgeschnitten. Auch die Eicheln und die kleinen Blätter sind aus diesem Stempelset. Ich habe jetzt schon ein paar Mal Herbstblätter in türkis coloriert gesehen und finde den Farbklecks echt toll. Deswegen habe ich das hier auch mal probiert. 
Ich habe die Blätter und Eicheln am Rand meiner Karte verteilt aufgeklebt.

The fox and hedgehog are so happy about the nice fall weather and the colorful leaves!
I colored both images with Copics, added some highlights with a white gel pen and cut the images out. The acorns and small leaves are from the same stamp set. I have seen several fall cards with turquoise colored leaves now and really like that touch of color. So I tried it myself on this card.
I glued the leaves and the acorns between the leaves of the die cut frame.


Zum Schluss habe ich meine Szene auf ein Stück Designpapier aus dem neuen Paper Pad und dann alles auf einen weißen Mini Slimline Kartenrohling geklebt.
Und weil es bei mir einfach nicht ohne geht, habe ich dann noch einige goldene Pailetten und kleine braune Herzen auf der Karte verteilt.

In the end I glued my scene onto a piece of patterned paper from the new paper pad and then mounted everything onto a white mini slimline card.
And since I don't seem to be able to craft without, I added a few golden sequins and tiny brown hearts to my card.

Samstag, 10. September 2022

Meine Mekka-Swaps 2019 - äh 2020 - äh 2021 - äh 2022


 Hallo Ihr Lieben!
Ja, der Post-Titel ist ein wenig verwirrend. Eigentlich hatte ich diese Swaps für das Mekka 2019 gemacht. Damals musste ich meine Pläne ganz kurzfristig ändern und konnte nicht zum Mekka fahren. Naja, und dann kam Corona und die Messen 2020 und 2021 fielen leider ins Wasser. Meinen Blogpost hatte ich bereits 2019 vorbereitet - und so habe ich nur jedes Jahr den Titel und den ersten Absatz geändert, und jedes Jahr gehofft, dass nicht noch ein äh gefolgt von einer Jahreszahl hinzukommen würde. Jetzt war es endlich wieder soweit - und ich war wieder nicht dort. Das Mekka fand nämlich genau während unseres Urlaubs statt. Wie gut, dass Papier geduldig ist und die Blöcke nicht schlecht werden. Aber bevor ich den Post jetzt noch einige Jahre  schiebe, teile ich meine Werke mit Euch. Und wer weiß, vielleicht verschicke ich sie einfach an ein paar liebe Stempel-Freunde.

Hello everyone!
Well, I know. The title of this post is pretty confusing. I had made these swaps back in 2019 for Stempelmekka - Germany's largest and oldest stamp fair. Then I had to change my plans on a short notice and wasn't able to go there in 2019. It's a 7 hour drive one way from where I live, I always stay from friday to sunday and that just didn't happen in 2019 due to other plans that interfered with my visit there. And then Corona hit and both fairs 2020 and 2021 were canceled. I had already planned this blog post back in 2019 - and so I only changed the title year after year, hoping to not have to add another year to it (oh, and this first part of the post). Now it finally was time to go again - and again I wasn't able to attent. It was held during our vacation! Luckily paper has no expiration date! But before I move this post a few more years I've decided, to share it with you. And maybe I will just send them to a few crafty friends instead.

Auf dem Bild oben seht Ihr schon, dass es kleine Blöcke geworden sind. Leider habe ich beim Fotografieren nicht aufgepasst, so dass Ihr eigentlich erst das rechte, dann das linke Bild ansehen müsst. Aber ich habe natürlich noch Nahaufnahmen... ;)
Außerdem könnt Ihr hier sehen, dass ich eine türkisfarbene und eine taupefarbene Variante gemacht habe. Weggegangen sind beide.

On the picture above you can already see that I've made some decorated note pads this year. Unforunatly I've not taken care when taking the picture and now you'd have to look at the right one first, then at the left one. But of course I've taken some close ups as well... ;)
You can also see that I've made a turquoise and a taupe version - all of both found new homes.


Ich habe hier die Magical Picture Changer Stanze von LawnFawn benutzt. Eigentlich wollte ich auf die erste Lage Einkaufstaschen und "shop hard" stempeln, auf die zweite dann einen Stempel und "stamp harder". Als aber dann das Stempelset Stempelfreunde von Create A Smile Stamps bei mir eingezogen war, habe ich mich umentschieden. Auch, weil ich die Texte für die erste Idee jeweils aus einzelnen Buchstaben hätte zusammenstempeln müssen. Bei 20 Stück dann doch etwas aufwändig. Also kam auf die erste Lage eben ein "Stempeln wird überbewertet" sowie eine kleine Pailette.
Dekoriert habe ich die Front mit etwas Washi, Pailetten sowie weiteren Stempeln aus dem Stempelset Stempelfreunde.

Here I've used the Magical Picture Changer die by LawnFawn. Originally I wanted to stamp bags on the first layer, combined with a "shop hard" saying, then put the image of a stamp and a "stamp harder" on the second layer. But when I bought the Stamping Friends stamp set by Create A Smile Stamps I've changed my mind. Also because I would have had to stamp the words for my first idea all of single letters - maybe a bit too much when you're making 20 of these. So instead I've used a "stamping is overrated" saying on the first layer and added a sequin here.
To decorate my note pad I've used some Washi and more stamps from the same stamp set.


Und bevor Ihr mich alle für verrückt erklärt - sobald man am Tab zieht und die zweite Lage sichtbar wird, korrigiere ich meine Aussage natürlich! Denn hier ist der ursprünglich schon geplante Stempel abgebildet und darunter ein großes NICHT. ;)

And before you think I'm crazy - once you pull the tab and get a look at the second layer I'm correcting what I've said/stamped before. Here's an image of a stamp like I had also planned for my original idea and under it a big Not. ;)


Donnerstag, 8. September 2022

Meerglück

 
Hallo Ihr Lieben!
Eigentlich hatte ich ja die Herbst-Bastelsaison bereits eröffnet. Und das bedeutet für mich als Bayer, dass maritim bis nächsten Sommer auf Eis gelegt wird. Aber man hält sich ja nicht immer an seine eigenen Regeln. Und für diesen süßen Bären macht man doch gerne eine Ausnahme! Und so zeige ich heute auf dem Stampcorner Blog meine definitiv letzte maritime Karte dieses Jahr.

Hello everyone!
I had already started fall craft season. And for me as a bavarian that means, that maritime cards will be made again next summer. Well, we don't always stick to our own rules. And it's not too hard to make an exception from this rule for this cute little bear. So, today over at the Stampcorner Blog I am sharing my truly last maritime card of the year.

Falls Euch der Hintergrund ein wenig bekannt vorkommt - er ist dem meiner anderen Karte, für die ich Motive aus dem selben Stempelset verwendet habe, sehr ähnlich. Und eigentlich war er sogar für diese andere Karte mit dem süßen Entchen gedacht! Aber dafür war er mir zu dunkel geraten. Wegwerfen wollte ich ihn dann aber auch nicht. Und so darf er nun als Hintergrund für den süßen Bären dienen. Da passt er viel besser. 
Ich habe hier ein Stück Watercolor Cardstock mit Distress Ink Stormy Sky in Aquarelltechnik in mehreren Lagen eingefärbt, nach dem Trocknen habe ich fast pure Tinte aufgespritzt. 
Auf dieser Karte kamen auch drei Bögen aus dem neuen Paper Pad zum Einsatz. Ich habe aus zweien mit den beiden kleinsten der Fishtail Banner Stitch Stanzen kleine Fähnchen ausgestanzt und sie übereinander an den oberen linken Rand der Karte geklebt. Das dritte hier verwendete Design habe ich zum Matten meines Cardstocks benutzt. 

If you thinks that this background looks familiar - it's pretty similar to the card I made with another image from the same stamp set. And originally I had planned to use this background on the other card with the cute duck. But it just turned out too dark. Of course I didn't want to throw it away. And so it's now the background for the cute bear, it fits so much better here.
I had watercolored a piece of watercolor paper with Distress Ink Stormy Sky, then spritzed some nearly pure ink onto the cardstock.
On this card I also used three designs of new paper pad. I used the two smallest from the Fishtail Banner Stitch dies to cut two little banners from two of the designs, then glued those to the top left edge of my background. The third design was used as the matting of my cardstock.


Hier ist der süße Bär in Nahaufnahme. Ich habe ihn in E70er Tönen von Copic coloriert. Eigentlich nicht unbedingt meine erste Wahl für einen Bären, aber die Farbe passt perefkt zum Ton des Designpapieres, das ich nicht nur für das Fähnchen oben am Kartenrand, sondern auch für den Sand unter seinen Füßen verwendet habe. Dafür habe ich eine der Grounding Elements Stanzen von MFT benutzt. 
Hinter dem Bären befindet sich eine Lage Vellum, deren oberen Rand ich mit einer der Slimline Nature Borders Stanzen von SunnyStudio in Wellenform gestanzt habe. Ich wollte unbedingt ein paar Wellen mit auf der Karte haben, gleichzeitig aber nicht zu viel vom Hintergrund überdecken. Vellum war da die perfekte Lösung. Die Klebestellen habe ich hinter den Motiven versteckt und außerdem den Rand des Vellums umgeknickt und auf der Rückseite des Hintergrunds angeklebt.
Den Text, aus dem selben Stempelset wie das Motiv, habe ich weiß direkt auf das Vellum embosst. 
Und am Himmel habe ich noch zwei kleine Wolken, gemacht mit den Cloudy Stanzen von MFT aus weißem Cardstock, aufgeklebt.

Here's a close up of the cute bear. I used E70s by Copics to color him in. Usually not my the colors I would pick to color a bear, but they went perfectly with the patterned paper, that I did not only use for one of the banners at the top edge of the card, but also as the sand under the bear's feet. I used one of the Grounding Elements dies by MFT to cut the sand.
Behind the bear I added a layer of vellum, the top edge is cut into a wavy shape using one of the dies from the Slimline Nature Borders die set by SunnyStudio. I really wanted to include some waves on this card, but didn't want to cover too much of the background. So vellum was the perfect choice. I've hidden the glue behind the images and also folded the overhang of the vellum over and attached it to the back of my cardstock. 
The text is white heat embossed directly onto the vellum. I can't really translate it, it is a combination of the words sea and bliss. 
To the sky I attached a few white clouds, made with the Cloudy dies by MFT and white cardstock.


Wieder mal kam 3D Tape zum Einsatz, um die verschiedenen Elemente auf den Hintergrund zu kleben. Als Deko habe ich noch ein paar silberfarbene Pailettensterne auf der Karte verteilt.

Once again I used foam tape to attach the different elements onto the background. Then I added a few silver star shaped sequins as decorations.

Mittwoch, 7. September 2022

Create a Smile September Moodboard Challenge

 
Hallo Ihr Lieben!
Heute startet die September-Moodboard Challenge bei Create a Smile. Und das neue Moodboard hat einen tollen herbstlichen Charme:

Hello everyone!
Today starts the september moodboard challenge by Create a Smile. And the new moodboard is pretty fall-ish already:


Nun, ich liebe Kürbis - auf jede Art: Deko, Essen und natürlich Stempel. Als ich den großen Kürbis auf dem Bild gesehen habe, wollte ich unbedingt eine Herbstkarte mit Kürbis machen! Aber von Create a Smile gab es zu diesem Zeitpunkt keinen. Ich konnte ja nicht wissen, dass Chrstine im August Release welche versteckt hatte, und meine Karte entstand noch vor dem neusten Release. Ich wusste mir aber zu helfen:

Well, I love pumpkins in every way: decorations, food and of course stamps. And when I spotted the large pumpkin in the moodboard I knew I wanted to make a fall card with a pumpkin. But there was no pumpkin image by Create a Smile at that time. I couldn't know that Christine had included some in the august release, and my card was made before the release. Well, I found a way:


Na, wer erkennt ihn? Richtig, mein Kürbis ist Mr. Paparika aus dem Stempelset Paparika! Gut, wenn man es weiß, mag es auffallen, aber so geht er doch perfekt als Kürbis durch, oder?
Für den Hintergrund habe ich mich von einem weiteren Bild auf dem Moodboard inspirieren lassen. Mir gefiel das Bild mit dem orangefarbenen Stoff und dem grau-braunen, an der Kante gerissenen Papier darauf. Das habe ich hier gleich mal nachgemacht. Da mein grau-brauner Cardstock keinen weißen Kern hat, der orangefarbene aber sehr wohl, habe ich den orangefarbenen Cardstock gerissen und die übrigen Kanten ein wenig mit einem Sanding Block bearbeitet. Das passte besser. Dann habe ich den orangefarbenen Cardstock auf das Rechteck aus grau-braunem Cardstock geklebt.

Did you recognize him? Right, my pumpkin is Mr. Pepperrific from the Pepperrific stamp set! Well, when you know it, it might be obvious. But I really think he makes a great pumpkin!
For the background I got inspiration from another picture on the moodboard. I really like the picture with the orange fabric and the grey-ish brown, torn paper on top. So I copied that look for my card. Since my grey-ish brown cardstock didn't have a white core, but my orange cardstock did, I've torn the edge of the orange one and then used a sanding block on the other edges. That just looked better. Then I glued the orange piece on top of the grey-ish brown rectangle.


So, und hier seht Ihr meinen Kürbis samt Deko in Großaufnahme. Damit die Motive etwas zarter wirken, habe ich braune statt schwarzer Stempelfarbe für die Outlines verwendet. Dann habe ich die Motive mit Copics coloriert. Die Eicheln sind aus dem Set Pulliwetter, der Zweig mit den Beeren aus dem Set Floral Decorations. Die Beeren habe ich noch dick mit Glossy Accents überzogen.
Die beiden anderen Zweige sowie die Pflanze rechts sind aus dem Set Wildflowers. Da es sich hier um vollflächige Stempel handelt, habe ich die Motive mit jeweils drei verschiedenen Stempelfarben im Ombre-Look gestempelt - gelb und zwei Brauntöne für die Zweige mit den Blättern, gelbgrün bis dunkel-olivgrün für die Pflanze rechts oben. 
Ich habe alle Motive ausgeschnitten und, teilweise mit 3D Tape, aufeinander geklebt.
Bevor ich die Motive auf die Karte geklebt habe, wollte ich noch den "goldenen Herbst" mit auf der Karte integrieren. Deswegen habe ich durch den Focal Point Stencil Versamark Stempelfarbe aufgetragen und dann das Muster mit gold-glitzerndem Embossingpulver aufembosst. Darauf habe ich dann die Motive aufgeklebt.

And here is my pumpkin with all the decorations as a close-up. To make the images look a bit softer I used dark brown ink instead of black ink to stamp the outlines. Then I colored the images in with Copics. The acorns are from the stamp set Sweater Weather, the branch with the berries rom the set Floarl Decorations. I covered the berries with a thick layer of Glossy Accents.
The two other branches and the plant on the right are from the Wildflowers stamp set. Since those are solid stamps, I used three different tones of ink to stamp the images with an ombre look - yellow and brown for the two branches and yellow-ish green to dark olive green for the plant on the top right.
I've cut all images out and glued them together, using foam tape for some of them.
Before glueing the images onto the card I wanted to bring some of the "golden autum" onto my card. So I put Versamark ink through the Focal Point stencil onto my card and then heat embossed it with some golden glittering embossing powder. On top of that I then attached the images.


EinenText brauchte meine Karte natürlich auch. 
Mit dem Lemon Alphas Stanzenset habe ich die Buchstaben für das Wort Herbst gestanzt - die Buchstaben selbst aus goldenem Glittercardstock, den Schatten aus demselben orangefarbenen Cardstock, den ich auch für den Hintergrund benutzt habe.
Der Rest des Textes ist mit dunkelbrauner Tinte direkt auf den grau-braunen Cardstock gestempelt. Dafür habe ich einen Stempel aus dem Set Mein handgemachter Adventskalender verwendet. Den habe ich in einer Stempel-Operation in drei Teile zerschnitten - keine Angst, natürlich unter Vollnarkose! - und dann neu angeordnet. So passte er einfach besser auf meine Karte.

Of course my card needed a text.
I used the Lemon Alphas die set to die cut the letters for the word autumn - the letters themselves from golden glitter cardstock, the shadow layer from the same orange cardstock that I also used on my background.
The rest of the text means "can contain traces of joy". I've stamped it directly onto the grey-ish brown cardstock using dark brown ink.


Mit einem orangebraunen Fineliner habe ich dann einen Rahmen auf meine Karte aufgemalt. Außerdem habe ich golden glitzernde Enamel Dots auf der Karte verteilt, den dekorierten Cardstock mit goldenem Glittercardstock gemattet und alles auf einen weißen Kartenrohling geklebt.

I used a orange-brown fineliner to draw a frame onto my card. I also added some golden glittery Enamel Dots, matted the decorated cardstock with some golden glitter cardstock and glued everything onto a white note card.

Montag, 5. September 2022

Mädchen-Babykarte

 
Hallo Ihr Lieben!
Am 29. August habe ich Euch ja die See Through Easel Card zur Geburt eines kleinen Jungen gezeigt und bereits angekündigt, dass eine Mädchenvariante folgen wird. Nun, hier ist sie!
Die genaue Beschreibung der Karte findet Ihr im Post der ersten Karte hier - bei der Mädchenvariante gehe ich nicht so ins Detail.

Hello everyone!
On august 29th I've shared a See Through Easel baby boy card and already mentioned, that I will have a girl's version soon. Well, here it is! 
The details about the card can be found in my first post here - I am not going that much into detail with today's post.


Diesmal habe ich weißen und hell- sowie dunkelrosafarbenen Cardstock verwendet. 
Der Aufleger ist mit der Quilted Hearts Backdrop Stanze von LawnFawn gemacht - die Herzchen passen einfach super zu einem Mächen.
Der Babybody ist diesmal mit einem Herz dekoriert, statt des Elefanten habe ich hier einen kleinen Schmetterling mit zwischen die Baby-Accessoires geklebt. Die sind natürlich auch in rosa und weiß coloriert.
Und für den Namen habe ich eine etwas geschwungenere Schreibschrift-Stanze von CraftEmotions verwendet.

This time I went with white, light and dark pink cardstock.
The background is made with the Quilted Hearts Backdrop die by LawnFawn - those little hearts are perfect for a baby girl.
The onesie is decorated with a heart instead of a bow here, and instead of the little elephant I put a butterfly between the baby accessoires. And of course I colored those in white and pink.
For the name I used a more scripty letter die by CraftEmotions.


Natürlich lässt sich auch diese Karte aufstellen und hat ein Fenster, in dem der Babybody hängt und durch das man hindurchsehen kann.

Of course also this card can be propped up, and it has a window, in which the onesie is hanging and through which you can see.


Klappt man die obere Lage auf, befindet sich auf der Lage darunter ein kleiner Kreis, wieder mit einem "schön, dass Du da bist" Text darauf, der dafür sorgt, dass der Easel sicher steht. Daneben habe ich zwei weiße Kreise aufgeklebt, auf denen sich kleine ausgestanzte Herzen befinden. Diese Kreise sind bei geschlossener Karte wieder links und rechts neben dem Body sichtbar.

When you open the first layer, there's a little circle, again with a "so happy, you're here" text stamped onto it, that makes sure that the easel stands up securely. I put two small white circles with tiny pink hearts on top next to the circle, that are again visible to the left and right of the onesie when the card is closed.


Und weil ich es Euch bei der Jungsvariante, glaube ich, nicht gezeigt habe, hier noch ein Bild der komplett geöffneten Karte. Der rosafarbene Cardstock im Inneren der Karte ist nämlich eine weitere Karte, in die man seinen persönlichen Text schreiben kann, der dann aber bei aufgestelltem Easel nicht sichtbar ist.

And since I believe I didn't share that with you in the post about the boy's card, here's a piture of the completly opened card. The pink cardstock inside is another top folding card. Here you can write your personal message, but it will be hidden when easel is propped up.

Samstag, 3. September 2022

Stempeleinmaleins - Ausgabe vom 3. September 2022

 
Hallo Ihr Lieben!
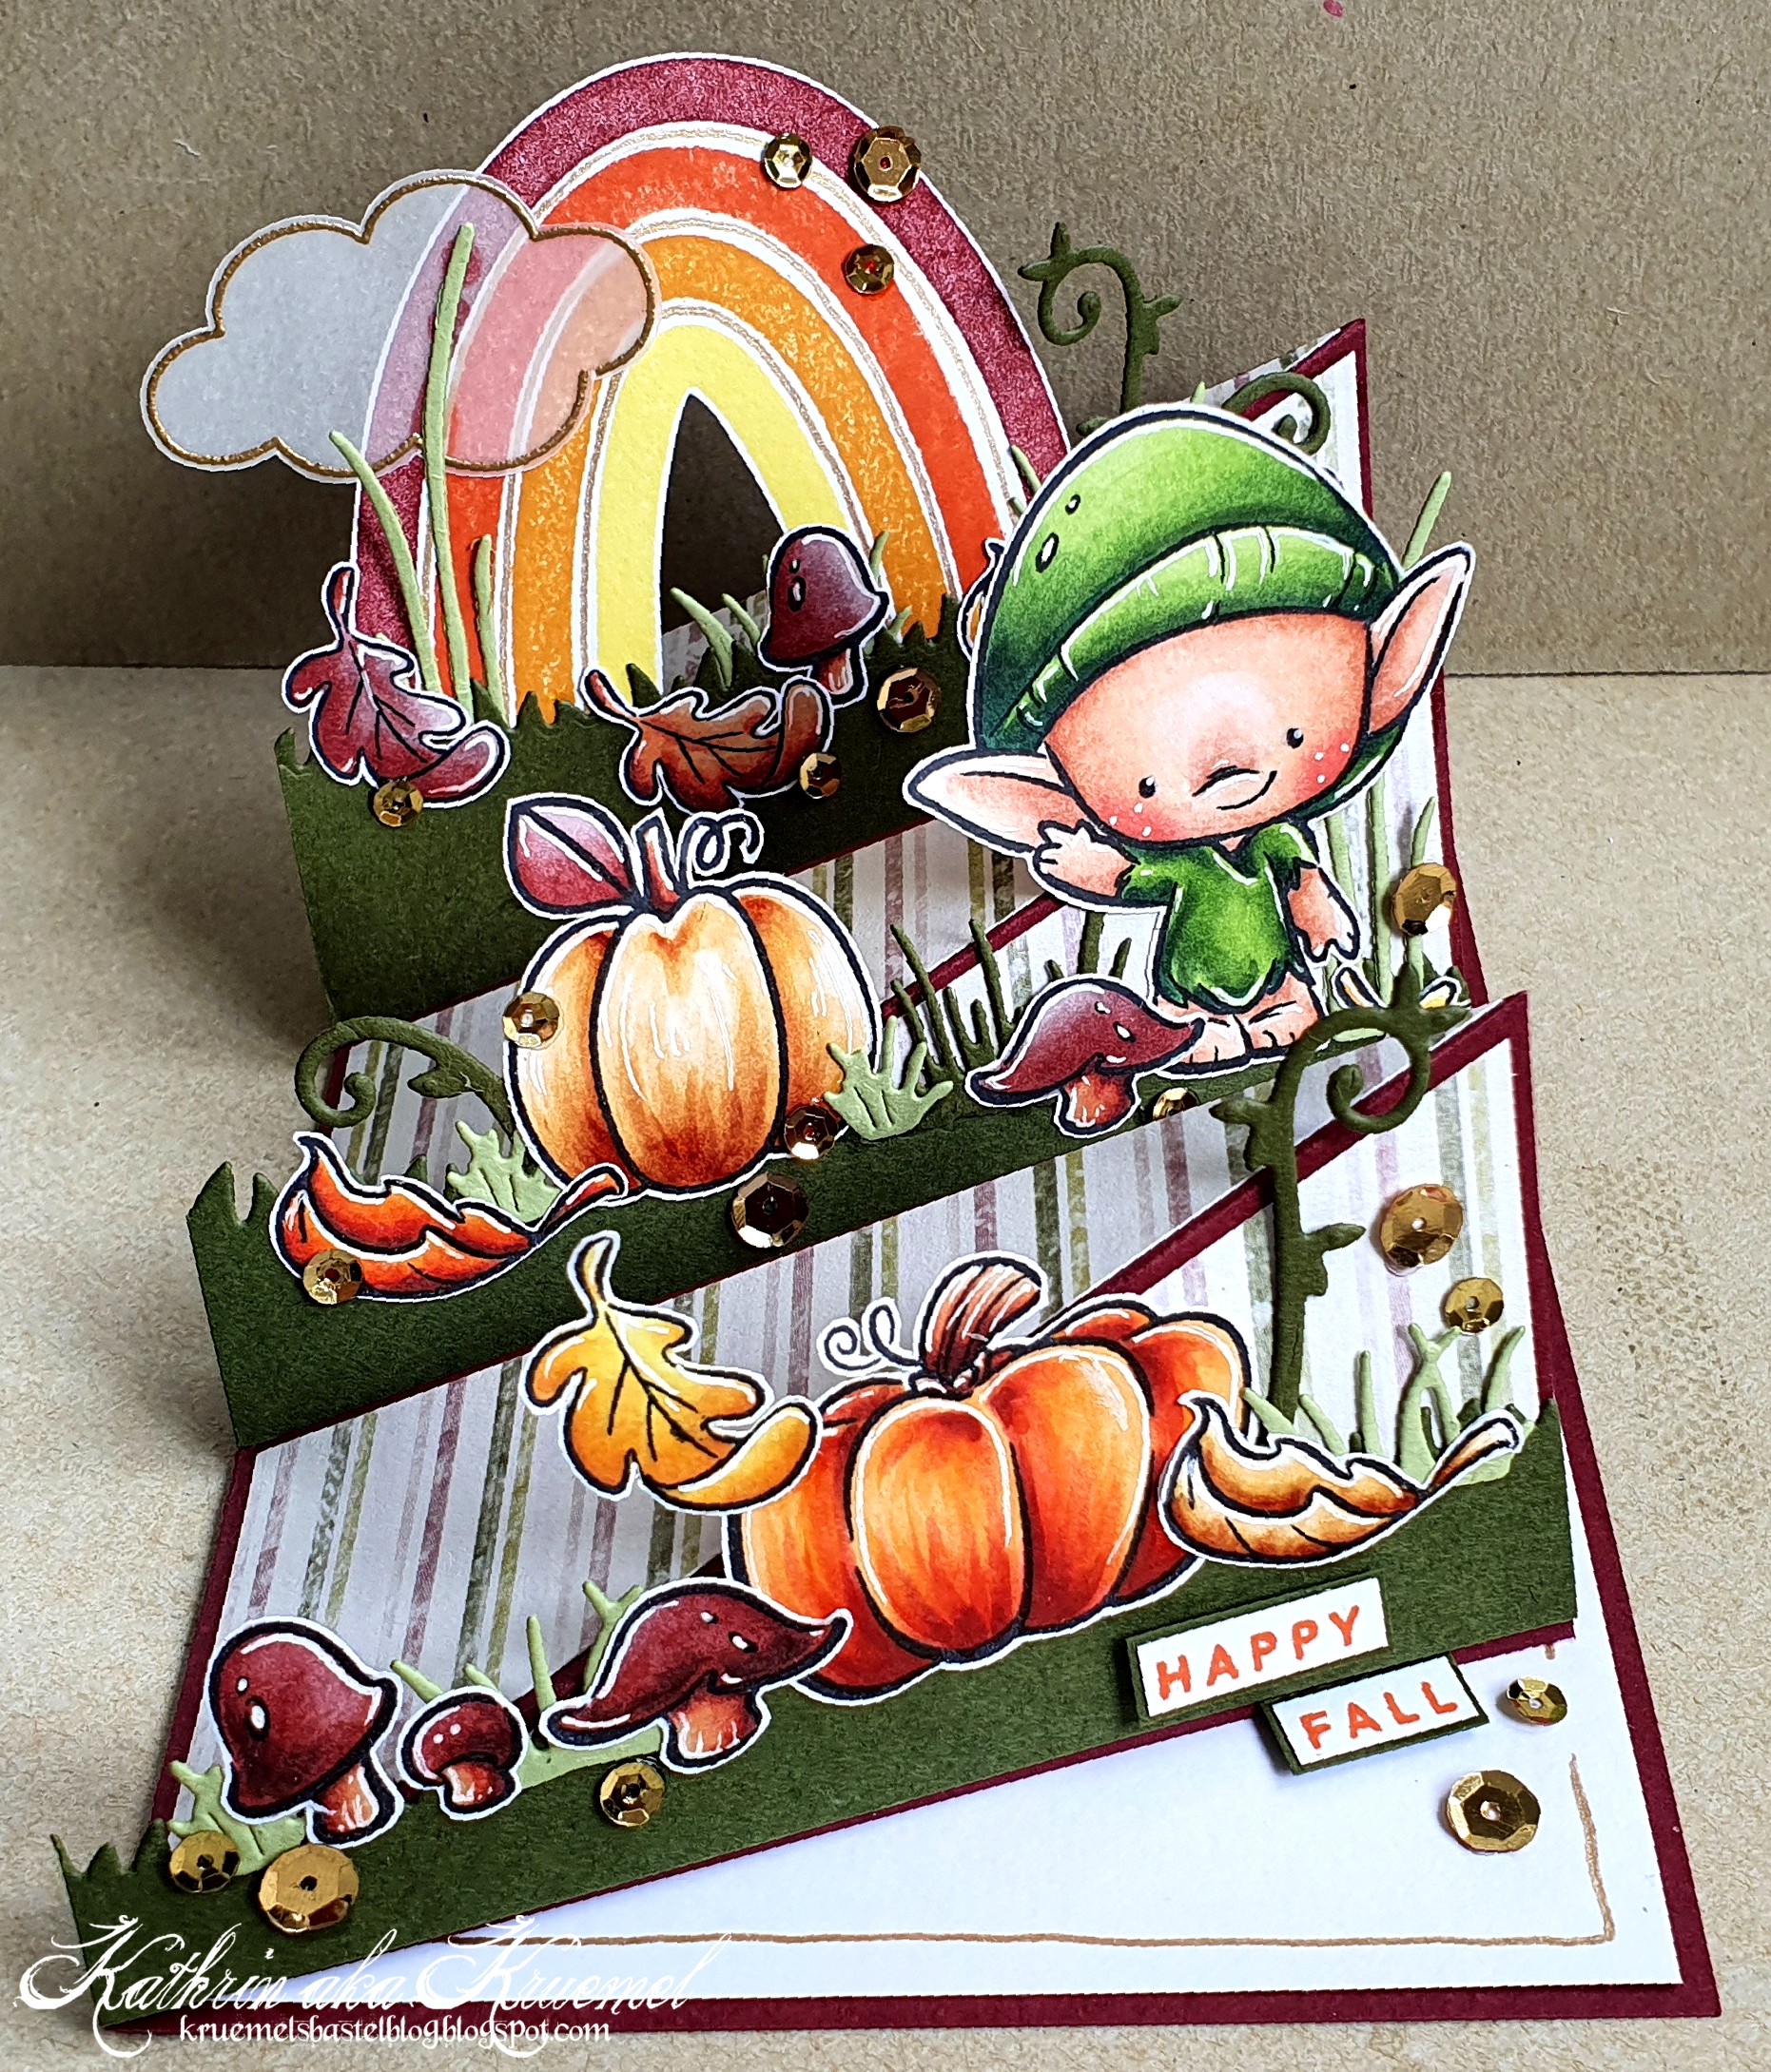
Heute haben wir beim Stempeleinmaleins die Anleitung für eine Triple Twisted Easel Card. Und da der September begonnen hat, ist bei mir auch offiziell die Herbst-Saison eingeläutet. Deswegen ist meine Karte herbstlich ausgefallen.

Hello everyone!
Today we have a tutorial for this Triple Twisted Easel Card for you over at Stempeleinmaleins. And since september has started, for me it's officially fall season. And so I decorated my card fall-ish.


Wie Ihr auf dem ersten Bild schon gesehen habt, besteht die Kartenfront aus drei Easel Elementen. Die kann man zum Verschicken natürlich flach zusammenlegen. Und das sieht dann so aus. 
Ich weiß, die Deko auf meinem obersten Element ist zu hoch, so dass die Karte nicht mehr in einen normalen Umschlag passt. Aber in ein DinLang Kuvert passt sie locker. Und ich wollte einfach verschieden hohe Deko verwenden, so dass sich bei aufgestellten Easels eine komplette Szene ergibt.

As you've already seen on the first picture, the card front is made from three easel elements. Of course those can be put flat to mail the card. And this is what it looks like put flat.
I know, the elements on the top easel on my card are too tall, so the card doesn't fit a regular envelope anymore. But I can use a slimline envelope - and I really wanted to use images that get taller towards the top so when the card is put up you end up with a complete scene.


Ich habe meine Karte aus dunkelrotem Cardstock gemacht und dann die einzelnen Elemente vor dem Dekorieren mit grün, bordeaux und weiß gestreiftem Designpapier beklebt. Das sieht man noch auf denoberen Stücken der einzelnen Easels.

I've made my card from dark red cardstock and then glued some green, burgundy and white striped patterned paper. You can see this on the top pieces of the individual easels, even when the card is put up standing.


Als Deko für meine Karte habe ich die Stempelsets Autumn Blessings von MFT, das Set All About Rainbows von Concord and 9th sowie das Set Enchanted Forest von Impronte d'Autore verwendet. Die einzelnen Motive habe ich bunt durcheinander kombiniert und alle mit Copics in Herbstfarben coloriert. Hinter die Motive habe ich jeweils eine aus grünem Cardstock gestanzte Graslage gesetzt und zwischen die Motive einige Ranken und Gräser, gestanzt aus hellem und dunklem grünen Cardstock, gesetzt. 
Den Regenbogen habe ich mit Distress Ink Squeezed Lemonade, Wild Honey, Crackling Campfire und Aged Mahogany gestempelt und daran eine golden auf Vellum embosste Wolke angeklebt. Da mir die weißen Linien zwischen den einzelnen Bögen zu dick waren, habe ich hier jeweils eine Linie mit einem goldenen Gelstift aufgemalt.

To decorate my card I've combined the stamp sets Autumn Blessings by MFT, All About Rainbows by Concord and 9th and the Enchated Forest by Impronte d'Autore. I combined a lot of different images from all sets and colored them in fall-ish colors using my Copics. 
Behind the images I glued a layer of grass, die cut from dark green cardstock and added some vines and more, smaller grass die cuts, die cut from light and dark green cardstock, between the images. 
I stamped the rainbow on the back easel with Distress Ink Squeezed Lemonade, Wild Honey, Crackling Campfire and Aged Mahogany and glued a cloud, golden heat embossed onto vellum, to it. Since the white lines between the individual arches were a bit too wide for my taste, I used a golden gel pen to draw a line onto those areas.


Um den goldenen Herbst auf die Karte zu bringen habe ich goldene Pailetten als Deko zwischen den Motiven verteilt. Und goldene Pailetten habe ich auch aufgeklebt, um die hinteren beiden Easels stehend zu fixieren. Beim vordersten Easel habe ich hier ein Stück Cardstock mit einem Teil des - zugegeben sehr kleinen - Textes mit 3D Tape aufgeklebt und dort als Deko zwei weitere Pailetten aufgeklebt.

To bring the "golden autumn" onto my card I put golden sequins between the images. And I used golden sequins to keep the second and third easel standing. For the front easel I used a piece of cardstock with a part of the - really tiny - text on my card to keep it up standing, glued down with foam tape, and added two more sequins for decorations beside the cardstock.


Und hier der Vollständigkeit halber noch ein Bild der aufgeklappten Karte. Innen befindet sich ein Rechteck aus weißem Cardstock, auf dem sich die "Stopper" befinden. Hier habe ich mit einem goldenen Gelstift einen Rahmen aufgemalt.

And to show the complete card I have a picture of the opened card. I glued a piece of white cardstock onto the inside, onto which I've glued the "stopper" sequins. I used a golden gel pen to draw a frame onto it.

Donnerstag, 1. September 2022

Der Herbst ist da!


 Hallo Ihr Lieben!
Heute ist - zumindest meteorologischer - Herbstanfang. Und bei mir beginnt im September auch die Herbst-Bastelsaison. Und ich freue mich auf all die warmen Farben, damit werkel ich einfach so gerne.
Und so starte ich mit dieser Karte, die ich heute auf dem Stampcorner Blog zeige, in den Bastelherbst.

Hello everyone!
Today is the start of fall - well, at least meteorologically. And the start of september for me also means the start of fall craft season. I am looking forward to use all those warm fall colors, I love to work with those! So I am starting into fall craft season with this card, that I'm sharing over at the Stampcorner Blog today. 

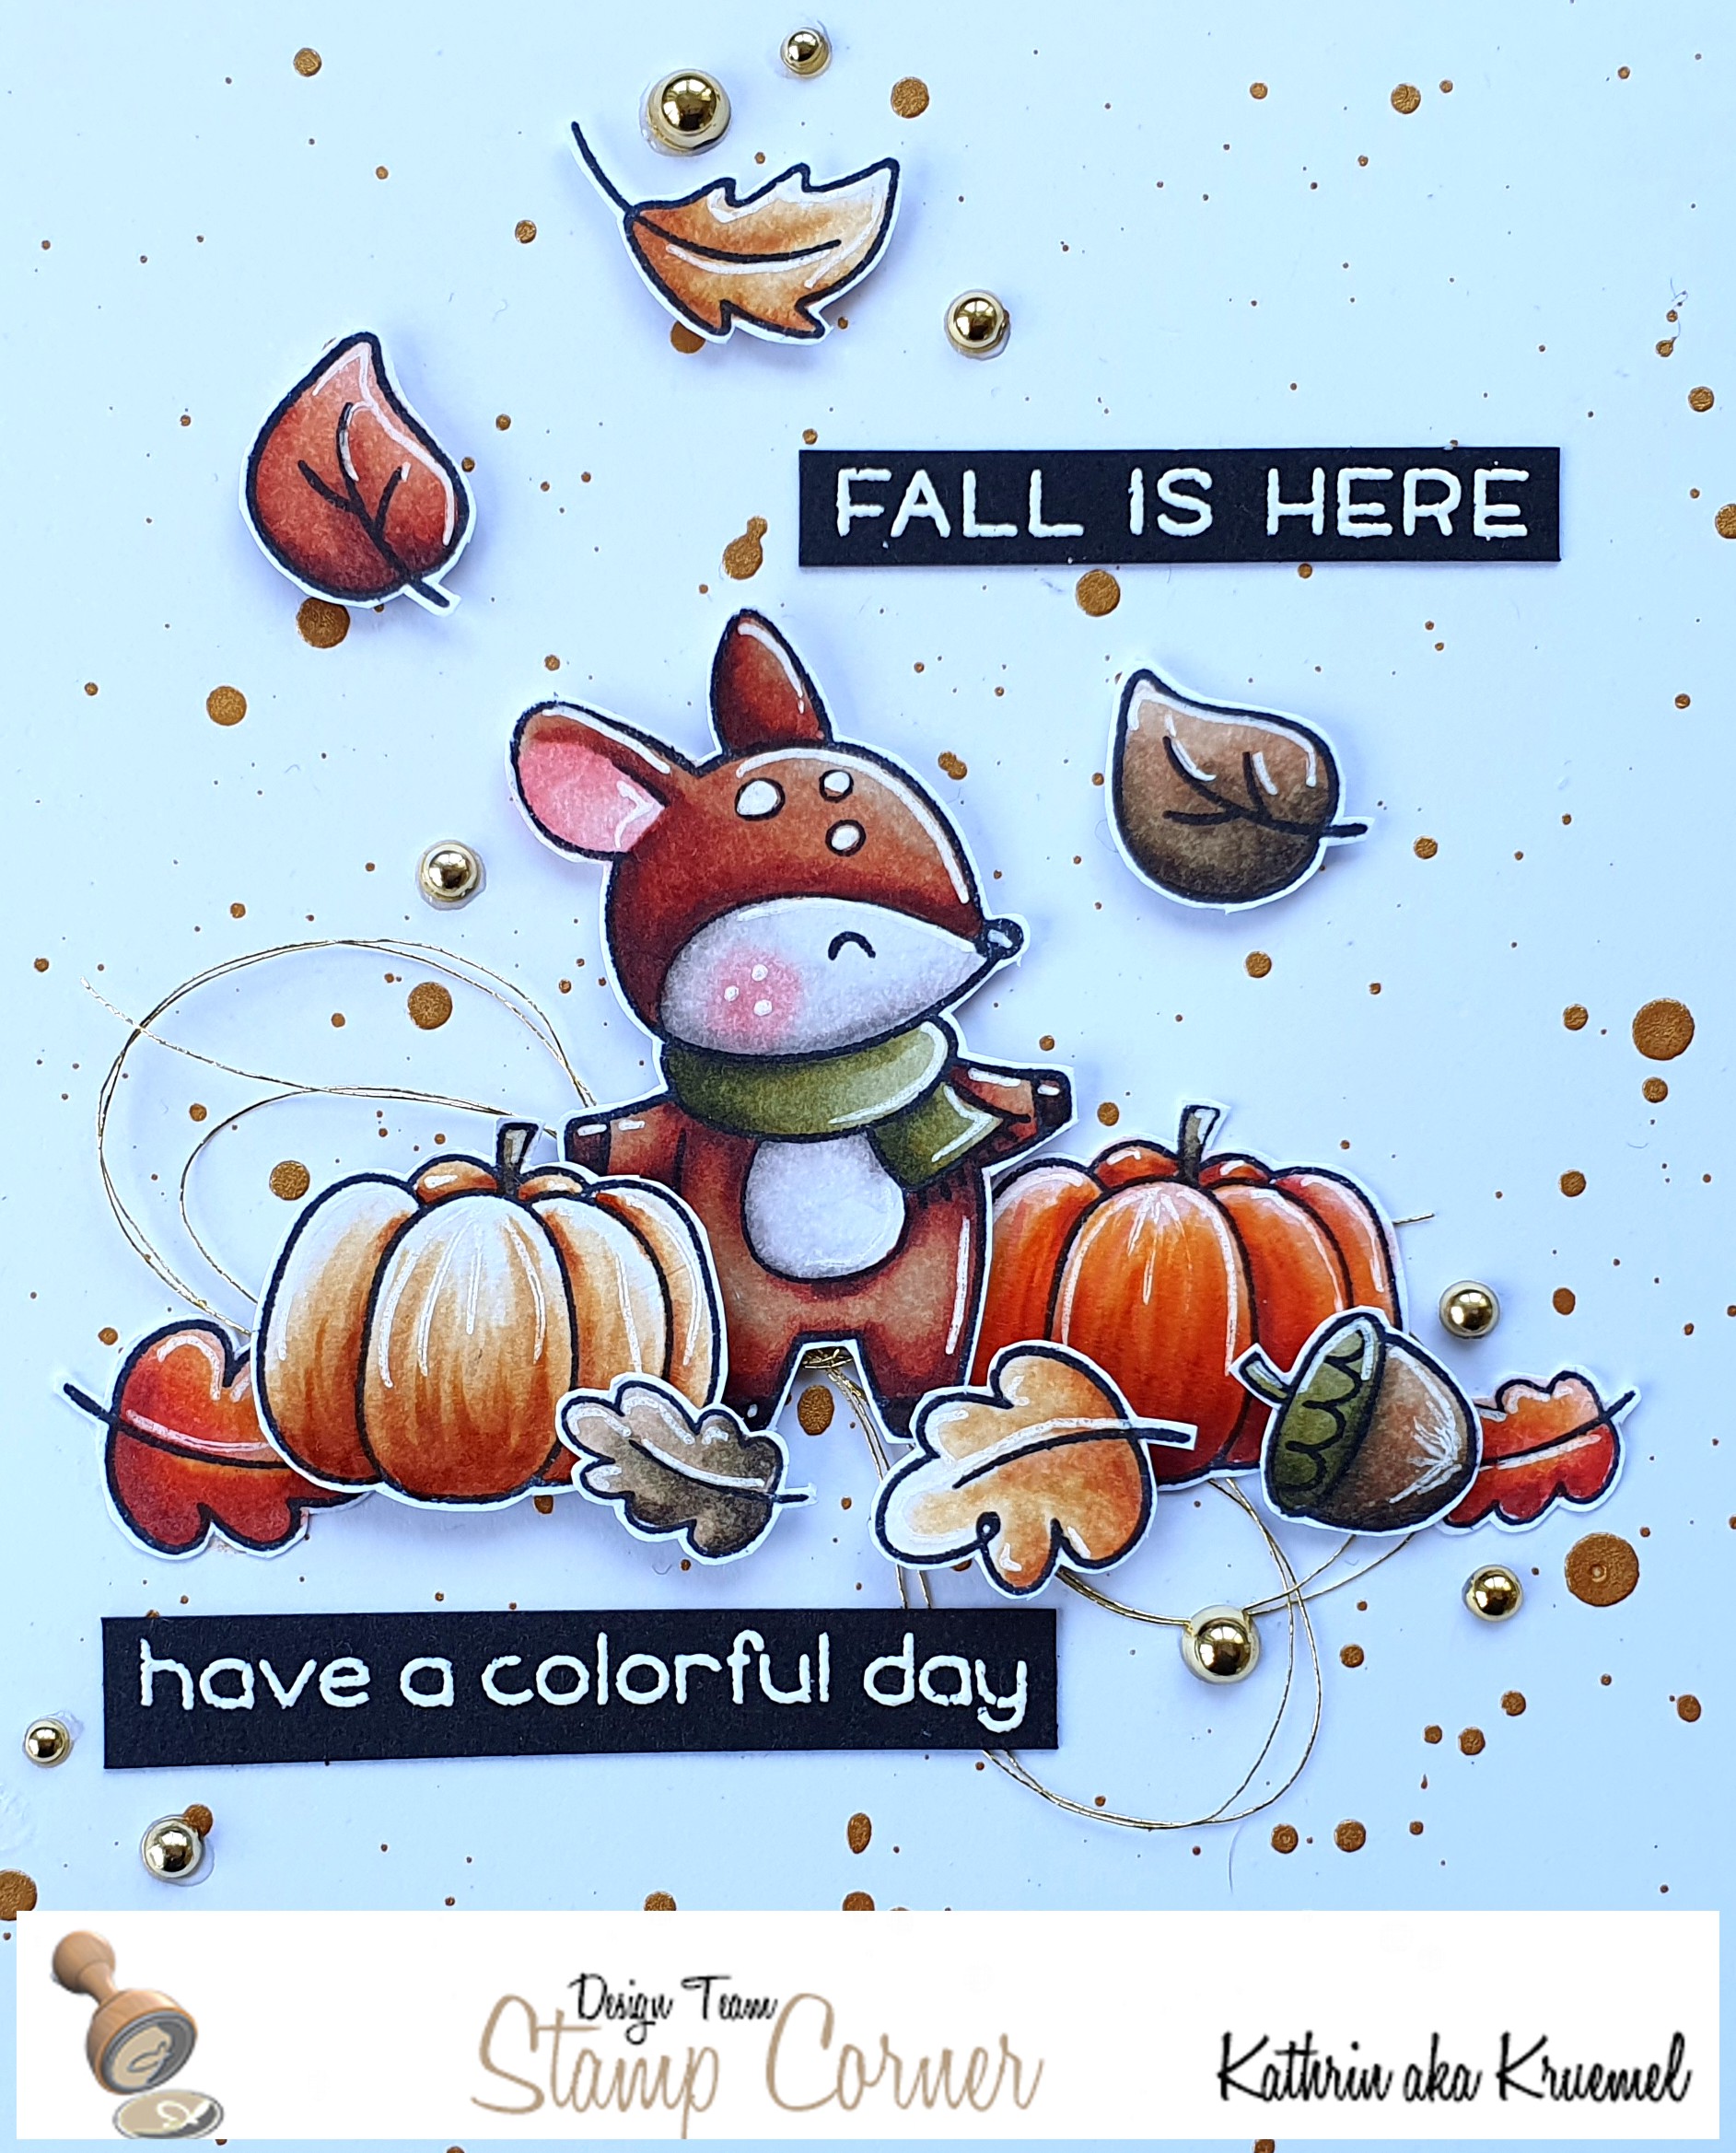
Auf dieser Karte ist doch recht viel weiß sichtbar geblieben - bei mir eher selten, aber hier sah es einfach so toll aus, weil es die warmen Farben der Motive noch mehr zur Geltung bringt. Damit der Hintergrund nicht nur weiß ist, habe ich goldene Metallic Watercolor darüber gespritzt.
An der unteren Kante habe ich mit einer Wellenstanze einen Teil des weißen Cardstocks entfernt und ein Stück goldenen Glittercardstock, der etwas kleiner als mein Kartenrohling zugeschnitten ist, als Mattung verwendet. So dekorative Kanten verwende ich irgendwie viel zu selten, dabei schaut es so toll aus. 

On this card I kept lots of the white background visible - I rarely do that, but here I really liked the look since it brings out the warm colors of the images even more. To not have a just plain white background I splattered some golden metallic watercolor over the cardstock.
At the bottom edge I used a scallop border die cut to off a piece of the white cardstock, then put some golden glitter cardstock, cut slightly smaller than my white note card, as a matting behind the white cardstock. I really should use my border dies this way more often, it adds such a nice touch.


Die Motive sind alle aus dem neuen Herbst-Stempelset von Stampcorner, das es seit heute im Shop gibt. Ich habe sie mit Copics coloriert, Highlights mit einem weißen Gelstift hinzugefügt und alles per Hand ausgeschnitten. 
Zum Aufklebenauf die Karte habe ich 3D Tape benutzt. Hinter die Motive habe ich noch etwas dünne goldene Schnur gelegt.
Die Texte auf der Karte sind von LawnFawn - aus den Stempelsets Easter before and After und Jump for Joy. Sie sind mit weißem Embossingpulver auf schwarzen Cardstock embosst.

All the images used here are from the new fall stamp set, that is available at the Stampcorner shop since this morning. I colored them with Copics, added some highlights with a white gel pen and then fuzzy cut them out.
To attach the images onto the card I used foam tape. Behind them I added a few loops of thin golden thread.
The texts on this card are by LawnFawn - from the stamp sets Easter before and After and Jump for Joy. I've white heat embossed them onto black cardstock.


Als Deko habe ich dann noch einpaar goldene Perlen zwischen den Motiven aufgeklebt und alles auf einen weißen Kartenrohling geklebt.

To embellish the card I glued a few golden pearls between the images, then mounted everything onto a white note card.

Mittwoch, 31. August 2022

Geburtstagskarte für den Tochter-Freund

 
Hallo Ihr Lieben!
Der Freund meiner Tochter hatte Geburtstag, und da wollte ich natürlich auch eine Karte zum Geschenk machen. Männerkarten.... Diesmal war ich aber total inspiriert von einer Karte, die Ashley Tucker für den MFT YouTube Kanal gemacht hat. Allerdings habe ich das Design natürlich passend abgewandelt, auch, weil ich einige der benutzten Produkte nicht habe.

Hello everyone!
The boyfriend of one of my daughter's celebrated his birthday, and of course I wanted to give him a card with his gift. Male cards.... But this time I was highly inspired by a card, Ashley Tucker made for the MFT YouTube channel. Of course I changed the design, also because I didn't have some of the products she used.

Die Kartenbasis ist weiß, darauf befindet sich ein etwas kleineres Stück schwarzen Cardstocks.
Wiederum darauf ist ein Stück dunkelgrauen Cardstocks, auf den ich Brushstrokes klar aufembosst habe. Dafür habe ich Stempel von MarianneDesign sowie welche aus dem Abstract Art Stempelset von MFT kombiniert. Außerdem habe ich silberfarbene Spritzer mit Metallic Watercolor aufgespritzt.
Und darauf kamen dann die tollen Kerzen aus dem Wish Big Stanzenset von MFT. Die habe ich aus Cardstock in hellgrün, dunkelgrün, hellem türkis, hellblau und dunkelblau gestanzt. Die Flammen sind aus silberfarbenem Spiegelcardstock. 

The card base is white, on top is a slightly smaller piece of black cardstock. 
On top of that black cardstock there's an even smaller rectangle cut from dark grey cardstock. I clear heat embossed brush strokes onto it, combining stamps by MarianneDesign and from the Abstract Art stamp set by MFT. I also spritzed some silver metallic watercolor over the embossing.
And then I attached those amazing candles from the Wish Big die set by MFT onto the background. I've die cut the candles from light green, dark green, light turquoise, light blue and dark blue cardstock, the flames are cut from silver mirror cardstock.


Quer über die Kerzen habe ich den Text meiner Karte aufgeklebt.
Das birthday ist aus dem Big Scripty Word Set von LawnFawn. Ich habe es weiß auf schwarzen Cardstock embosst und mit der dazugehörigen Stanze ausgestanzt. Außerdem habe ich es mit vier Stanzteilen aus schwarzem Cardstock hinterlegt.
Der übrige Text ist mit Stempeln aus dem All About You Stempelset von MFT gemacht. Die habe ich einfach schwarz auf weißen Cardstock gestempelt.
Und da der Freund meiner Tochter Hühner liebt, musste ich unbedingt das Partyhuhn aus einem der Stempel aus dem Happy Birthday Herd Set von MFT mit unterbringen. Ich habe es abgestempelt, ganz dezent mit Copics schattiert - coloriert kann man hier fast nicht sagen - aus der Szene drumherum ausgeschnitten und oben auf den Cardstock mit dem aufgestempelten Happy aufgesetzt. 
Als Deko habe ich einige Enamel Dots, passend zu den Farben der Kerzen, verwendet. 
Und für etwas Kontrast auf der Karte habe ich mit einem weißen Gelstift einen gestitchten Rand auf den grauen Cardstock gemalt.

Across the candles I added my text.
The birthday is from the Big Scripty Words set by LawnFawn. I've white heat embossed it onto black cardstock, then cut it out with the matching die. I also put four more black die cuts behind the word.
The rest of the text is made using stamps from the All About You stamp set by MFT. I simply stamped those black onto white cardstock.
And since my daughter's boyfriend loves chickens I just had to include the little party chick from one of the stamps from the Happy Birthday Herd stamp set by MFT. I stamped it, lightly shaded it with Copics - you really can't call that coloring here -, cut it out of the scene and then sat it on top of the cardstock strip with the stamped on happy.
I used a few Enamel Dots, chosen to match the colors of my candles, as embellishments.
And then I drew a stitched edge onto the grey cardstock, using a white gel pen.


Hier kann man den Glanz der Flammen und der silbernen Spritzer besser sehen. 
Zum Schluss habe ich dann nur noch den grauen Cardstock mit der Deko mit 3D Tape auf die Karte geklebt.

Here you can see the shine of the flames and the silver splatters a bit better.
In the end I attached the grey cardstock with the decorations onto the card, using foam tape for some dimension.