Samstag, 22. Oktober 2022

Stempeleinmaleins - Ausgabe vom 22. Oktober 2022

 
Hallo Ihr Lieben!
Im heutigen Tutorial auf dem Stempeleinmaleins-Blog zeigen wir Euch eine hohe Sechseckbox. Die ist wirklich fix gemacht und lässt sich passend zu jeder Gelegenheit dekorieren.

Hello everyone!
In today's tutorial over at Stempeleinmaleins we are sharing this tall hexagon box. It's done really quickly and can be decorated to fit any occasion.

Ich weiß nicht so ganz, was mich hier geritten hat - ich denke, ich war nur zu sehr im Halloween-Modus. Das ist ja so ziemlich die einzige Zeit im Jahr, zu der ich Lila verwende. Auf jeden Fall habe ich für meine Box zu zart-lilafarbenem Designpapier gegriffen. Aber es passt auf jeden Fall zur Empfängerin der Box.
Das Papier hat unregelmäßige Punkte in creme und einem gold-grau aufgedruckt, die mich an Konfetti erinnert habe. Deswegen fand ich es super für eine Box zum Geburtstag.

I think I've made too many Halloween cards lately - about the only occasion I use purple on my projects. But I actually picked a light purple patterned paper for my box. Well, at least it really fits the friend I made this box for.
The paper has some wonky dots in cream and a greyish-gold printed on, that reminded me of confetti. So I thought it's the perfect paper for a birthday box.


Für die Deko habe ich die Farben lila, gold und creme wieder aufgegriffen und ein wenig mit schwarz kombiniert. Deswegen habe ich auch schwarzes Organzaband verwendet, um die Box oben zu verschließen.

For the decorations I used purple, gold and cream colors again and added a bit of black. That's why I used black organdy ribbon to close the box at the top.


Für die Deko habe ich eine kleine Rosette aus cremefarbenem Cardstock gemacht, in die Mitte habe ich einen gewellten Kreis aus matt-goldenem Metallic-Cardstock geklebt.
Die Kerze ist aus cremefarbenem und lilafarbenem Cardstock gestanzt, für die Flamme habe ich wieder den goldenen Cardstock verwendet. Die obere, lilafarbene Lage habe ich ein wenig mit Copics schattiert. 
Die Kerze habe ich zusammen mit einem schwarzen Banner, auf das ich weiß happy birthday aufembosst habe, auf die Rosette geklebt.
Als Deko habe ich noch zwei goldene Luftschlangen sowie einige goldene Stern-Pailetten aufgeklebt.

To decorate the box I've made a little paper rosette from cream cardstock and glued a small scalloped circle, that I've cut from matte golden metallic cardstock, onto the center.
The candle is die cut from cream and light purple cardstock, for the flame I used the golden cardstock again. I used my Copics to add a bit of shading to the top layer of the candle.
I glued the candle and a little black banner, onto which I've white heat embossed a happy birthday text, onto the rosette.
Then I added two golden streamers and a few golden star shaped sequins.

Freitag, 21. Oktober 2022

Oktober-Challenge bei Stampcorner

 
Hallo Ihr Lieben!
Gestern ist die Oktober-Challenge bei Stampcorner gestartet - und diesmal haben wir uns für das Thema "Stencils" entschieden. Ich denke, das ist ein wunderbar freies Thema, zu dem sicher jeder eine Idee - und einen Stencil - hat. Ich habe eine sonnig-herbstliche Karte als Inspiration gewerkelt.

Hello everyone!
Yesterday the october challenge by Stampcorner went live - and this time we picked "stencils" as our theme. In my opinion, this is a wonderfully open theme, and everyone of us should have an idea - and a stencil - for it. I made this sunny fall-ish card as inspiration.

Für den Hintergrund habe ich auf ein Stück weißen Cardstock erst die Sonne mit einem Kreisstencil und Distress Oxide Mustard Seed aufgewischt. Dann habe ich rundherum Tumbled Glass für den Himmel aufgetragen. Und dann kamen die Sonnenstrahlen. Die sollten schön glitzern. Also habe ich durch einen Strahlenstempel Versamark aufgetragen und dann Distress Glaze Mustard Seed aufgetragen. Das ist ein wenig transparent, so dass das Gelb durch das Blau dahinter etwas abgedunkelt wird. Aber das macht nichts. Um die Strahlen zum Glitzern zu bringen, habe ich dann ganz feinen gelb-irisierenden Glitzer oben auf die den Cardstock gestreut und den dann von unten erhitzt. Das Embossing Glaze schmilzt nochmal und der Glitzer wird dadurch fixiert. Vom Rest des Hintergrundes konnte ich ihn dann ganz einfach abklopfen und nur die Strahlen glitzern.
Anschließend habe ich mit den Cloudy Sky Scenes Stanzen von HeroArts die beiden großen Wolken ausgestanzt und mit 3D Tape so aufgeklebt, dass die Sonne hinter den Wolken hervorscheint.

For the background I first inked the sun onto a piece of white cardstock, using Distress Oxide Mustard Seed and a circle stencil. Then I inked up the sky around it with Tumbled Glass. And then I added the sunrays. I wanted them to be glittery. So first I used a sunray stencil and put Versamark through it onto the paper, then covered them with Distress Glaze Mustard Seed. The Glazes are a bit translucent, so the yellow gets toned down a bit, but I don't mind. To make the rays glittery I put some very fine yellow-iridescent glitter on top of my cardstock, then heated it up from the back. The glitter gets trapped in the Glaze, that gets melted again. Later I could easily brush off the left over glitter off the top of my cardstock and only the rays are glittery.
Next I cut two layers of those big clouds from white cardstock, using the Cloudy Sky Scenes dies by HeroArts and glued them down onto my background with foam tape, so the sun is shining from behind them.
 

 Die Sonnenblume ist ein Motiv von Crealies. Ich habe sie schwarz auf weißen Cardstock gestempelt und dann mit Copics coloriert. Beim Ausschneiden habe ich ausnahmsweise mal genau an der gestempelten Linie geschnitten - der weiße Rand, den ich normalerweise gerne um meine Motive habe, hat mich hier gestört. Auch die Sonnenblumen habe ich dann mit 3D Tape aufgeklebt. 

The sun flowers are an image by Crealies. I stamped them black onto white cardstock and then colored them with my Copics. And when I cut them out, I cut exactly along the stamped outlines. The white frame around them, that I usually like a lot, did bother me here. Then I glued them down, again using foam tape.


Die obere linke Ecke der Wolken habe ich dann ganz leicht mit Distress Oxide Cloudy Sky gewischt, um auch dort ein wenig Farbe auf die Karte zu bekommen. Dann habe ich den Text aus dem Window Scene Spring Stempelset von LawnFawn schwarz dort aufgestempelt.
Zum Schluss habe ich einige gelbe Perlen auf der Karte verteilt und weil mich das viele Weiß am Rand der Karte irgendwie gestört hat, habe ich dort mit einem goldenen Gelstift noch einen ganz feinen Rahmen aufgemalt.
Ich habe meine Szene schwarz gemattet und auf einen weißen Kartenrohling geklebt.

I inked up the top left corner of my card lightly with Distress Oxide Cloudy Sky, just to add a touch of color to the top of my card. Then I stamped the text from the Window Scene Spring stamp set by LawnFawn onto that corner.
In the end I added a few yellow pearls to the card and also drew a thin frame with a golden gel pen, because all the white around the edge somehow looked boring. 
I matted my scene with black cardstock and glued it onto a white note card.
 

Donnerstag, 20. Oktober 2022

Eine Sektflasche zum Geburtstag

 
Hallo Ihr Lieben!
Seit dem 15. Oktober gibt es ein weiteres neues Stempelset von Stampcorner. Und das habe ich für meine Geburtstagskarte, die ich heute auf dem Stampcorner Blog zeige, verwendet.

Hello everyone!
Stampcorner released another new stamp set on the 15th of october. And I used it on this birthday card, that I'm sharing over at the Stampcorner Blog today. 

Der Bär mit dem Sektglas ist sicherlich perfekt für eine Neujahrskarte! Aber soweit bin ich dann doch noch nicht. Aber auch auf einer Geburtstagskarte macht er sich super, oder? Mir fiel ein, dass wir beim Stempeleinmaleins mal eine Karte in Sektflaschenform hatten. Die war hier doch perfekt! Die Vorlage findet Ihr nach wie vor auf dem Blog - als ich sie mir runtergeladen habe, ist mir aufgefallen, dass wir die Karte am 5.1.2013 gezeigt haben. Das ist ja fast 10 Jahre her!
Ich habe die Sektflasche aus türkisfarbenem Cardstock - der auf dem Bild irgendwie blau wirkt - geschnitten. Den oberen Teil des Flaschenhalses habe ich außerdem aus goldenem Glittercardstock geschnitten und ein klein wenig mit Copics schattiert.

The bear with the champagne glass would be perfect for a New Year's Card! But there's still some time till the end of the year. So I used him on a birthday card instead. I remembered, that we had a champagne bottle shaped card a long time ago over at Stempeleinmaleins and thought it was perfect for this image. You can still download the pattern over there. When I did that, I realized that we posted it on 01/05/2013 - that's nearly 10 years ago! OMG. 
I've cut the bottle card from turquoise cardstock - that somehow looks blue in the pictures. I also cut the top area of the bottle again from golden glitter cardstock and shaded it a bit with  my Copics.


Auch das süße Bärchen ist mit Copics coloriert. Das Glas habe ich außerdem mit einer Lage Glossy Accents überzogen. Der Bär ist mit 3D Tape auf die Flasche geklebt.
Für das Label auf der Flasche habe ich Stempel aus den beiden Stempelsets Kleine Worte kombiniert und dazwischen ein paar goldene Sternchen geklebt. Die Ränder des Labels habe ich mit Distress Oxide Hickory Smoke gewischt, außerdem habe ich mit einem goldenen Gelstift einen Rahmen aufgemalt. 

I used my Copics to color the cute bear in. The glass is covered with some Glossy Accents. I used foam tape to glue the bear to the bottle.
For the label I combined stamps from both Kleine Worte stamp sets and glued some golden stars inbetween the words. I inked the edges of the label with Distress Oxide Hickory Smoke and used a gold gel pen to draw a frame onto the label.


Oben auf die Flasche habe ich ein großes Hurra geklebt. Ich habe das Wort mit der Hurra Stanze von Stampcorner aus weißem Cardstock und goldenem Glittercardstock gestanzt, aufeinander- und auf die Flasche geklebt. 
Darunter befindet sich noch ein weiterer Text aus einem der Kleine Worte Stempelsets, diesmal auf ein kleines Banner gestempelt, das ich schwarz gemattet habe.
Zum Schluss habe ich noch türkisfarbenes Band unter dem Korken um den Flaschenhals gewickelt und vorne zur Schleife gebunden. 

I glued a large die cut hooray to the top of the bottle. I've die cut it from white cardstock and gold glitter cardstock, stacked the die cuts and then glued the word onto the bottle.
Under it I added a little "let's celebrate you" sub-text, that I stamped onto a little banner that I matted black.
To finish my card I've wrapped some turquoise ribbon around the top of the bottle, right under where the cork ends, and tied it to a bow.

Mittwoch, 19. Oktober 2022

Create a Smile Oktober Sketch Challenge

 
Hallo Ihr Lieben!
Heute gibt es wieder eine neue Challenge bei Create a Smile - und nach dem Moodboard vor zwei Wochen, ist diesmal wieder ein neuer Sketch das Thema:

Hello everyone!
Today a new Create a Smile Challenge is starting - and after the moodboard from last challenge we have a new sketch for you for this fortnight:


Es ist schon fast Ende Oktober - und somit rückt Halloween immer näher. Wir feiern das jetzt, wo die Kinder außer Haus sind, nicht mehr wirklich, aber basteltechnisch liebe ich das Thema nach wie vor. Und weil es im August-Release von Create a Smile so toll zu Halloween passende Motive gab, habe ich die Chance ergriffen, und noch eine Halloweenkarte gewerkelt.

It's nearly end of october - and that means, Halloween is just around the corner. We don't celebrate it anymore now, that the girls have all moved out. But when it comes to crafting I absolutly love this holiday. And since there were such great stamp sets with images that are perfect for Halloween in Create a Smile's august release, I just had to make another Halloween card.


Für den Hintergrund habe ich ein Stück weißen Cardstocks mit Distress Oxides gewischt. Dafür habe ich erst in der Mitte Twisted Citron aufgetragen und ein wenig mit Salvaged Patina verwischt. Dann habe ich den Webs Stencil aufgelegt und mich mit Uncharted Mariner und Black Soot weiter nach außen gearbeitet. Auf diese Weise habe ich die Spinnennetze nur außen und nicht in der Mitte des Cardstocks. Da mir die Spinnennetze rein weiß doch ein wenig zu hart waren, habe ich den Stencil abgenommen und bin mit den Blending Brushes nochmal ganz zart über die jeweiligen Farben, um das Muster abzuschwächen.
Auf den fertig gewischen Hintergrund habe ich ein wenig Wasser und schwarze Acrylfarbe aufgespritzt.

For the background I inked up a piece of white cardstock with Distress Oxides. I first put down Twisted Citron to the center of my cardstock, blending it out with a bit of Salvaged Patina. Then I put the Webs stencil on top and worked on with Uncharted Mariner and Black Soot. This way I only got the webs pattern on the edge, but not in the center of my background. Since the spider webs looked a bit too hard in the pure white, I took off the stencil and then lightly brushed over each color again to just tone the pattern down a bit.
Onto the finished background I spritzed some wanter and some black acrylic paint.


Die beiden Kreise im Sketch habe mit den Stitched Circle Frames aus Vellum gestanzt - sie bilden den Hintergrund für meine Motive, die sonst nicht so toll zu sehen gewesen wären.
Der tolle Hexenkessel ist aus dem Set Hex Hex. Ich habe ihn - wie alle Motive - mit Copics coloriert. Die schwarzen Outlines der Blasen habe ich mit einem goldenen Gelstift nachgemalt und auf die Blasen sowie den herunterlaufenden Zaubertrank außerdem Glossy Accents aufgetragen. Dadurch scheint alles toll zu schimmern.
Hinter den Kessel habe ich zwei Pilze aus dem Set Sei kein Frosch geklebt.
Auf dem kleineren Kreis befinden sich zwei der Flaschen aus dem Set Tränke - die dritte Flasche habe ich einfach weggeschnitten. Und weil die süße Hexe aus dem Set Hex Hex einfach zu groß for meine Idee gewesen ist, habe ich kurzerhand den Zauberer aus dem Winter Minis Set mit auf die Karte gepackt. Ja, auch ein kleiner Zauberer kann Großes zaubern!
Den Text aus dem Set Hex Hex habe ich weiß auf schwarzen Cardstock embosst und quer über die beiden Kreise geklebt.

I've die cut two circles from Vellum with the Stitched Circle Frames die set to bring the circles in the sketch onto my card. Those went behind my images, they wouldn't have been this clearly visible on the dark background otherwise.
The great cauldron is from the set Hocus Pocus. I colored it with Copics - as I did all the images on this card -, then used a gold gel pen to re-draw the black outlines on the bubbles. I also covered those and the dripping down potion with Glossy Accents. Now they all shine wonderfully.
Behind the cauldron I've added two mushrooms from the Unfrogettable stamp set. 
Onto the smaller circle I glued down two of the bottles from the Potions stamp set - I simply cut off the third bottle. And since the cute little witch from the Hocus Pocus set was just too big for what I had in mind, I simply used the little magician from the Winter Minis set. Yes, even a small magician can do real magic!
The text means "you're magical". I white heat embossed it onto a strip of black cardstock and glued that across both circles.


Oben über den beiden Kreisen fliegt noch eine schwarze Katze auf dem Zauberbuch fröhlich ihre Runden. Die Katze ist ebenfalls aus dem Set Hex Hex, das Buch ist aus dem Set Books. Und für die glitzernde Flugbbahn habe ich den kleinen Glitzerstempel aus dem Set Hex Hex ganz oft nebeneinander in der Form der Flugbahn weiß auf den Hintergrund embosst und die Zwischenräume mit kleinen Punkten eines weißen Gelstifts gefüllt. 

And over the two circles a black cat is flying in circles on a magical book. The cat is also from the Set Hocus Pocus, the book is from the Books set. And for the glittery trail I white heat embossed the little glitter image from the Hocus Pocus set in the shape of the trail, then used a white gel pen to fill in the spaces between them.


Zum Aufkleben der Motive auf den Hintergrund habe ich wieder 3D Tape benutzt. Dann habe ich alles schwarz gemattet und auf einen weißen Kartenrohling geklebt.

To glue the images onto the background I used foam tape. Then I added a black mat and glued everything onto a white note card.

Montag, 17. Oktober 2022

Eine Halloween-Karte mal anders

 
Hallo Ihr Lieben!
Vor einiger Zeit habe ich ein Video gesehen - ich glaube, es war von Mindy Eggen -, in dem eine Halloweenkarte mit einer ausgestanzten Blume gemacht wurde. Die Blume war lilafarben mit schwarzen Blättern, aber die Idee mit der Blume an sich fand ich so toll, dass ich das auch mal probieren wollte. Allerdings ist meine Karte dann doch komplett anders ausgefallen.

Hello everyone!
Some time ago I came across a video - I think it was by Mindy Eggen -, where she made a halloween card with a die cut flower. She used a purple flower with black leaves, but I really liked that idea and wanted to try it myself. But my card turned out completly different. 

Für den Hintergrund habe ich die Wave Form Cover Stanze von Altenew benutzt und aus gelbem, orangefarbenem und rotem Cardstock ausgestanzt. Ich habe alle Teile auf einer Mattierung aus schwarzem Cardstock wieder zusammengeklebt, die Ränder mit Distress Oxide Black Soot gewischt und außerdem schwarze Metallic Watercolor aufgespritzt. 

For the background I die cut the Wave Form Cover die by Altenew from yellow, orange and red cardstock. I glued the pieces together on a black  mat, inked up the edges with Distress Oxide Black Soot and then flicked some black metallic watercolor over it.


Für die Blumen auf meiner Karte habe ich die Stanzensets Lovely Layers Coneflower, die Lovely Layers Sunflower und die Lovely Layers Anemone (Blätter) Stanzen von HoneybeeStamps. Ich habe alle Teile aus weißem Cardstock gestanzt und mit Distress Oxide eingefärbt. Für die Blütenblätter habe ich Salvaged Patina, Peacock Feathers und Uncharted Mariner benutzt, die Blätter und Blütenmitten sind mit Peeled Paint, Rustic Wilderness und black Soot gewischt. Auf die Blütenblätter habe ich nah an der Blütenmitte kleine Punkte mit türkisfarbenen Copcis aufgebracht, die Blütenmitten sind mit einem weißen und dunkelgrünen Gelstift dekoriert. 
Ich hoffe doch sehr, es sind keine Arachnophobiker hier auf meinem Blog unterwegs! Falls doch, dann entschuldige ich mich gleich mal. Aber ich musste diese schwarze, super realistische und gruselige Spinne einfach verwenden! Ich habe sie mit einer Stanze aus dem Set Spiders and Webs von WhimsyStamps gestanzt - einmal aus schwarzem Glossy-Cardstock, dann den Körper nochmal extra aus schwarzem Glittercardstock. Die Teile habe ich aufeinander geklebt, den Körper dick mit Glossy Accents überzogen und später mit einem silbernen Gelstift das Kreuz aufgemalt. Dann habe ich sie auf die Blüten geklebt.
Und wo eine Spinne ist, darf ein Spinnennetz natürlich nicht fehlen. Es ist aus dem selben Stanzenset und aus Vellum gestanzt. Nach dem Aufkleben habe ich mit Glossy Accents einige Tautropfen auf das Netz gesetzt.

For the flowers on this card I used the die sets Lovely Layers Coneflower, Lovely Layers Sunflower and Lovely Layers Anemone (for the leaves) by HoneybeeStamps. I've die cut all pieces from white cardstock and then inked them with Distress Oxide. I used Salvaged Patina, Peacock Feathers and Uncharted Mariner for the petals, the flower centers and leaves are inked with Peeled Paint, Rustic Wilderness and Black Soot. I used some turquoise Copic markers to add some dots to the petals and a white and a dark green gel pen to add some details to the flower centers.
I really hope, there are no arachnophobics visiting my blog. If so, I really apologize. But I really had to include this black, super realistic and creepy spider on this card! I've made with the Spiders and Webs die set by WhimsyStamps. I've cut the spider once from black glossy cardstock, then only cut the body from black glitter cardstock. I glued both pieces on top of each other, covered the body with some Glossy Accents and added the cross with a silver gel pen later. Then I glued it onto the flowers.
And of course there has to be a spider web when there's a spider involved. I've die cut it from Vellum, using a die from the same die set, and added some dew drops, made from Glossy Accents, to it.


Nun brauchte meine Karte zumindest noch einen kleinen Text. Ich habe Stempel von MFT weiß auf schwarzen Cardstock embosst und mit 3D Tape oben links auf die Karte geklebt. Ich fand das Happy Haunting so schön doppeldeutig, ist es doch ein klassischer Halloweengruß, kann aber natürlich auch auf die Jagd nach der Spinne bezogen werden....

Now my card needed at least a small text. I've white on black cardstock heat embossed the texts using stamps by MFT and glued them down with foam tape. I love the double meaning of the happy haunting here - as the typical Halloween greetings, but it can also mean the haunt after this spider here...


Und hier habe ich noch ein Bild, auf dem man die Tiefe der Motive besser sehen kann. Ich habe die Blumen jeweils nur an den Blütenmitten aufeinander geklebt und die Blütenblätter leicht nach oben gebogen. Die "Sonnenblume" rechts ist direkt auf den Hintergrund geklebt, für die "Kornblume" in der Mitte habe ich 3D Tape benutzt. 

And here I have a picture where you can see the dimensions of this card better. I only glued the flowers together at the flower centers and slightly bent the petals up. The "sunflower" on the right is glued directly onto the background, to attach the "cornflower" I used foam tape again.

Samstag, 15. Oktober 2022

Stempeleinmaleins - Ausgabe vom 15. Oktober 2022


 Hallo Ihr Lieben!
Beim Stempeleinmaleins zeigen wir Euch heute eine weitere Kartenart, die nach einem Video von Jennifer McGuire entstanden ist. Es gibt einfach viele Bastler, die einfach kein Englisch können. Und auch wenn man in Videos viel sehen kann - wenn man die Anweisungen oder Tipps und Tricks nicht versteht, ist das natürlich doof. Deswegen gibt es von uns dann die passende deutsche Anleitung. Heute geht es um die Stamped Window Card, und die ist so vielseitig, dass ich gleich zwei Karten gemacht habe.

Hello everyone!
Over at Stempeleinmaleins we are sharing a type of card that we've seen in a video by Jennifer McGuire. Quite a few crafter don't speak english. And even if you can see lots in a video, it's always hard when you don't understand the explanations or tipps and tricks. So we make a german tutorial for all of these crafters. Today it's about the Stamped Window Card, and it's so versatile, that I just had to make two cards.


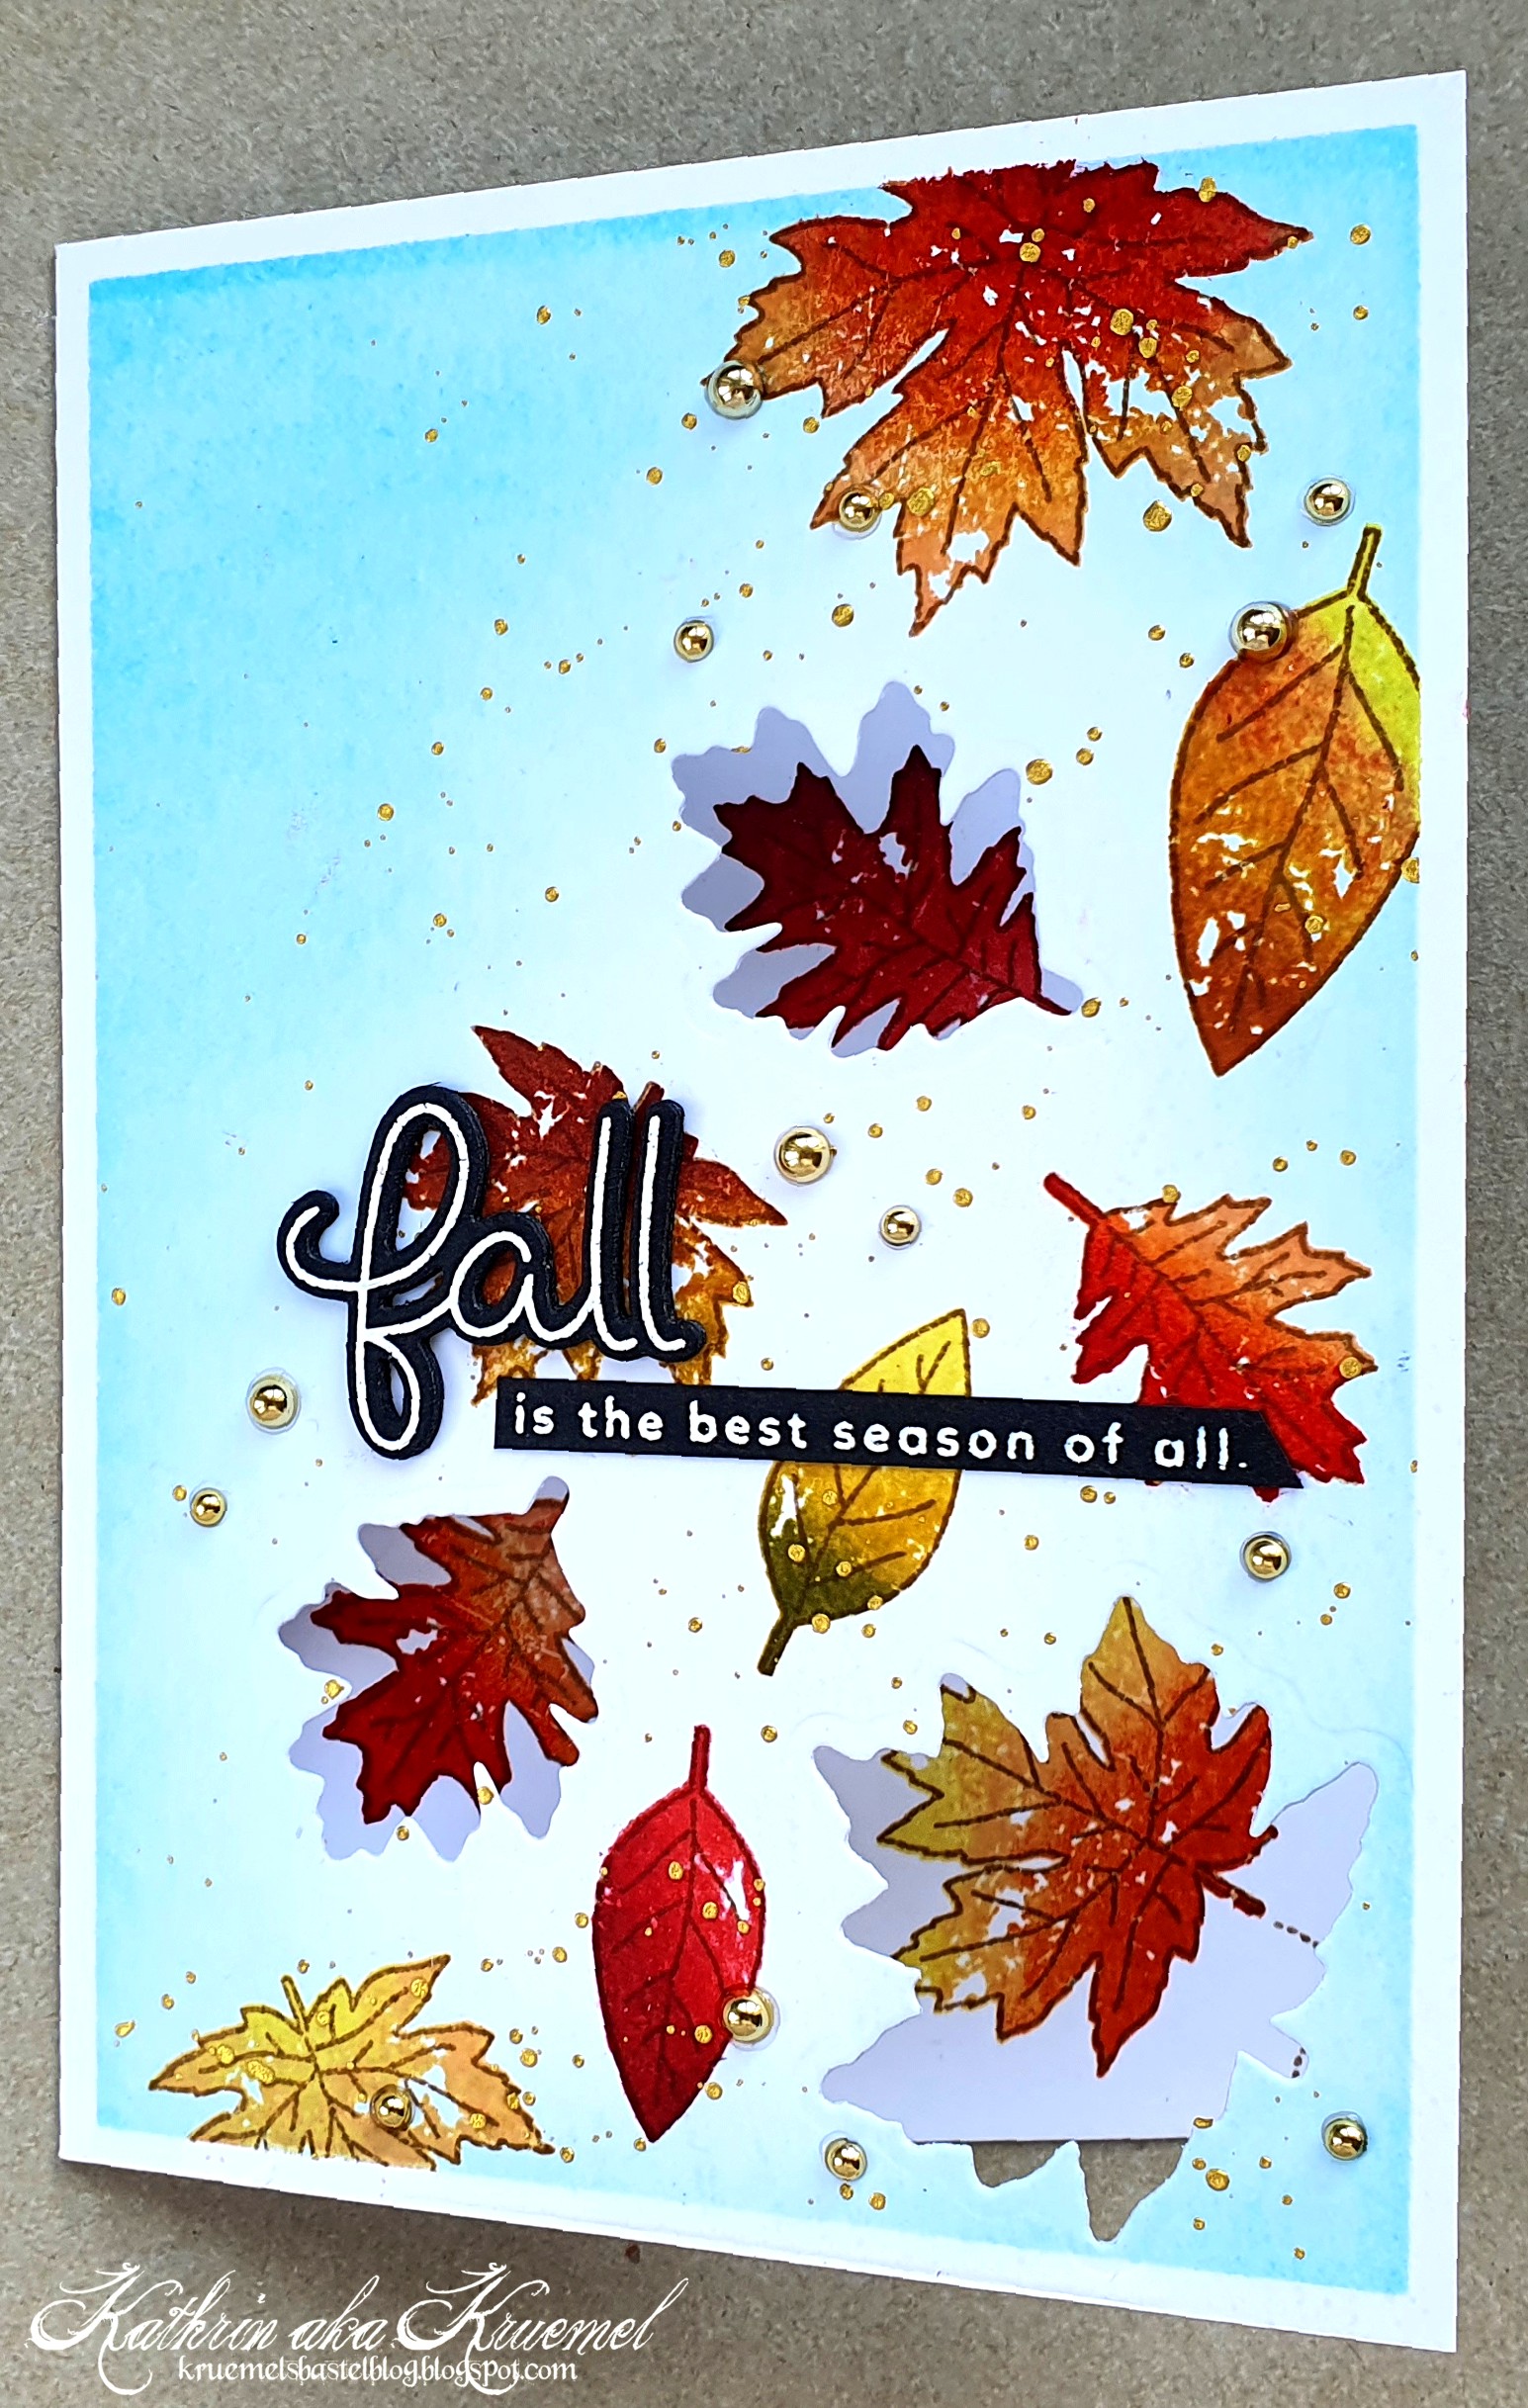
Wie Ihr auf dem oberen Bild schon sehen könnt, befinden sich in der Karte Ausstanzungen, durch die Motive zu sehen sind, die sich im Inneren der Karte befinden. Bei geschlossener Karte ist das aber fast nicht erkennbar, so dass es eine schöne Überraschung beim Öffnen der Karte ist.
Ich habe hier meinen weißen Kartenrohling ein wenig mit Distress Ink Salvaged Patina eingefärbt. 
Darauf habe ich dann meine fröhlich-bunten Herbstblätter gestempelt. Ich habe ein Stempelset von Clearly Besotted verwendet. Ich glaube, das gibt es schon gar nicht mehr. Aber es war einfach perfekt. Für die Blätter habe ich jeweils drei verschiedene Distress Ink Farben benutzt, damit sie nicht einfach einfarbig sind - und dabei jede Menge Rot-, Gelb- und Orangetöne verwendet. Ich glaube, jedes Blatt besteht aus einer anderen Farbkombi. Bei einem hat sich auch noch ein wenig Grün mit eingeschlichen. Ich habe die Blätter jeweils zuert mit der hellsten Farbe abgestempelt, dann den Stempel etwas zu zwei Dritteln mit dem mittleren Farton eingefärbt und abgestempelt und dann noch mit der dunkelsten Farbe etwa ein Drittel des Motivs gestempelt. Um softe Farbübergänge zu erhalten und scharfe Kanten zu vermeiden, habe ich die dunkleren Farben jeweils auf den Stempel aufgestragen und die Farbkante auf dem Stempel mit einem trockenen Tuch ein wenig abgetupft. So werden die Farbübergänge schön sanft und fließend.
Zum Schluss habe ich noch die Outlines und Blattadern mit brauner Tinte aufgestempelt - bei dem von mir verwendeten Stempelset ist das jeweils ein extra Stempel.
Für den Text habe ich das Wort fall aus dem Scripty Autumn Sentimets Stempelset von LawnFawn weiß auf schwarzen Cardstock embosst und mit der passenden Stanze ausgestanzt. Dann habe ich es mit drei weiteren der Outline Stanzen hinterlegt und auf die Karte geklebt. 
Der kleinere Text ist aus dem Set Autumn Blessing von MFT und ebenfalls weiß embosst.
Als Deko habe ich goldene Metallic Watercolor aufgespritzt und einige goldene Perlen auf der Karte verteilt.

As you can see in the picture on the top of this post, there are cut outs in the card front, through which you can see images, that are stamped on the inside of the card. But when the card is closed, you barely see those windows so it's a nice surprise when you open the card.
Here I inked up my white card base with some Distress Ink Salvaged Patina. 
On top I've stamped my fall colored leaves. I used a stamp set by Clearly Besotted here - I don't think it's available anymore, but it was just perfect for what I had in mind.
I used three different colors of Distress Ink to stamp each leaf so they are not just one plain color. I use lots of reds, yellows and oranges here and on one leaf I even added a bit of green. I think,  each leaf is made from its own combination of colors. 
First I stamped the whole leaf with the lightest color, then inked up about two thirds of it with the middle tone, stamped it and last stamped about one third of the leaf with the darkes tone. To avoid harsh lines between the colors I put the ink onto the stamp and then used a dry cloth to lightly dab over the edge to soften it. This makes the color changes wonderfully soft.
Last I stamped the outlines and venes of my leaves with brown ink - these are individual stamps in the set I've used.
For the text I've white heat embossed the word fall from the Scripty Autumn Sentiments by LawnFawn onto black cardstock and cut it out with the matching die. I put three more of the die cuts under the one with the text stamped onto it and glue it onto the card.
The smaller text is from the Autumn Blessings stamp set by MFT and also white heat embossed.
To embellish the front of my card I spritzed some golden metallic watercolor over it and added a few golden pearls.
 

 Hier sieht man das Innere der Karte mit den ausgestanzten Fenster in der Kartenfront links.

Here you see the inside of the card with the cut out windows in the card front on the left.


Im Inneren der Karte habe ich einen weiteren Text - wieder aus dem Scripty Autumn Sentiments Set - zwischen die Blätter gestempelt und außerdem noch einige "trails" mit brauner Tinte an die Blattenden gestempelt.

On the inside of the card I added another text - again from the Scripty Autumn Sentiments stamp set - between the leaves and also used brown ink to stamp some trails to the ends of the leaves.


Und ich habe ja schon angekündigt, dass ich noch eine weitere dieser Karten gemacht habe. Ich wollte ausprobieren, ob es nicht auch ohne Stempel mit passenden Outline Dies, sondern nur mit Stanzen funktioniert. Tut es!

And I've already mentioned, that I made another one of these cards. I really wanted to see if you have to use stamps and matching dies or if it will work with just some dies. It does!


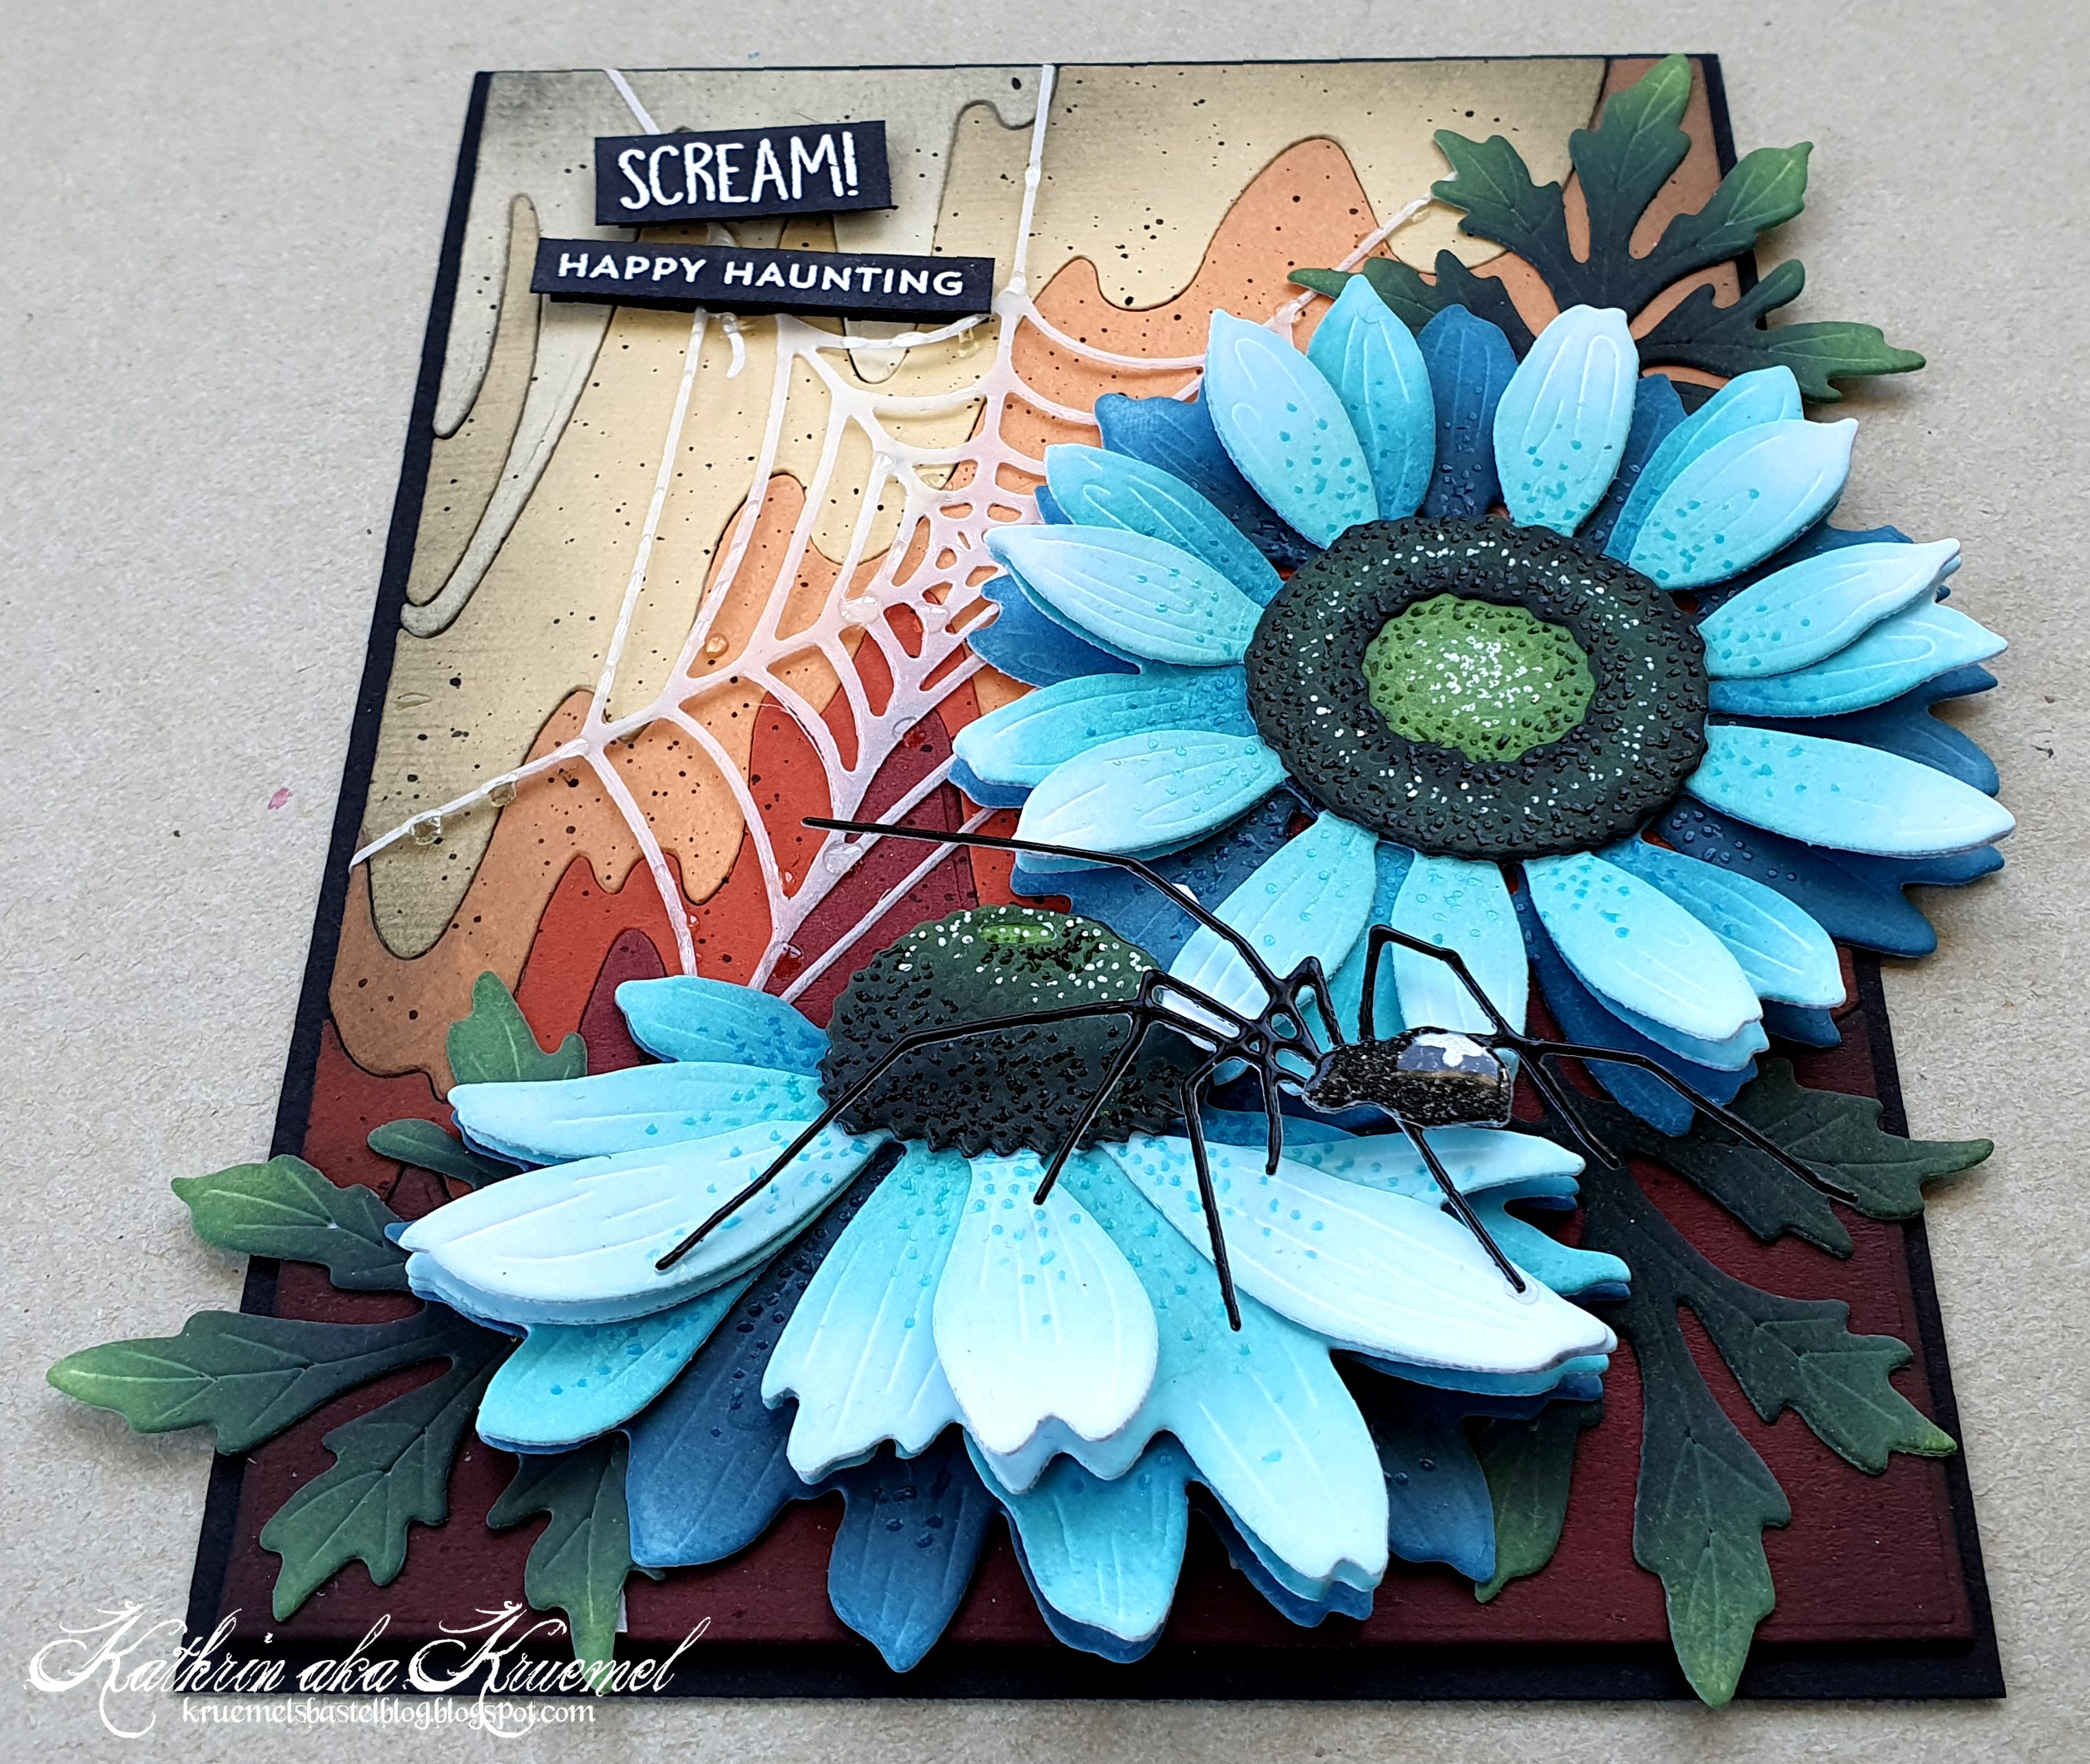
Hier habe ich eine Halloweenkarte gemacht. 
Diesmal habe ich meinen Kartenrohling aus schwarzem Cardstock gemacht und auf die Front mit Distress Oxide Seedless Preserves und Milled Lavender sowie einer Wolkenstencil die Wolken aufgewicht. Dann habe ich silbrig-weiße Metallic Watercolor darüber gespritzt.

Here I made a Halloween card.
This time I've made my card base from black cardstock, then used Distress Oxide Seedless Preserves and Milled Laveneder and a cloud stencil to ink the clouds onto the black card front. Then I spritzed some silver-white metallic watercolor onto the cardstock.


Für die Deko - und Fenster - habe ich hier kleine Gespenster, gemacht mit der Mini Ghosts Stanze von Impression Obsession, verwendet. Ich habe sie aus weißem Cardstock gestanzt, dann mit Glow in the Dark Embossingpulver überzogen und auf der Karte verteilt. Einige der Geister habe ich außerdem mit drei weiteren Stanzteilen hinterlegt, damit sie ewas höher sind.
Der Text ist eine Kombi aus embossten Stempeln und gestanzten Buchstsaben. 
Bei dem here for the musste ich ein wenig tricksen - ich habe Teile von drei Stempeln aus dem Inside Snarky Birthday Sentiments Stempelset von HoneyBeeStamps weiß auf lilafarbenen Cardstock embosst und dann ausgeschnitten. Ich weiß, schief, aber zu einer Halloweenkarte passt das ja irgendwie. 
Das Wort Boos habe ich mit dem Tall Skinny Laphabet Upper and Lower von Scrapbook.com gemacht - die Buchstaben sind viermal aus schwarzem Cardstock und einmal aus lilafarbenem Glittercardstock gestanzt, aufeinander geklebt und auf der Karte angebracht.
Als Deko habe ich noch einige kupferfarbene und lilafarbene Sternchen auf der Karte verteilt.
 
For the images - and windows - I used little ghosts here, made with the Mini Ghosts die set by Impression Obsession. I've die cut them from white cardstock, then covered them with Glow in the Dark embossing powder and glued them onto the card. I put three more layers behind a few of the ghosts to add some dimension.
The text is a combination from heat embossed stamps and die cut letters.
I had to combine three different stamps from the Inside Snarky Birthday Sentiments Stempelset by HoneyBeeStamps to get the "here for the" text. I've white heat embossed the words onto some purple cardstock and cut it out. I know, that's a quite wonky top edge, but I think it is okay on a Halloween card.
The word boos is made from letters, die cut with the Tall Skinny Laphabet Upper and Lower die set by Scrapbook.com. I've cut them four times from black cardstock and once from purple glitter cardstock for the top layer, then put the letters onto the card.
As embellishments I added a few copper and purple shaped star sequins.


Und so sieht das Innere meiner Halloweenkarte aus. Auch hier habe ich eine Wolkenlinie - wieder mit Distress Oxide Milled Lavender und Seedless Preserves - aufgewischt und einige Spritzer Metallic Watercolor darauf verteilt.

And this is the inside of my Halloween card. Again I inked a cloud line - using Distress Oxide Milled Lavender and Seedless Preserves again - onto the inside and then spritzed some metallic watercolor on top.


Diesmal habe ich das Wort happy aus gestanzten Buchstaben geschrieben und darunter ein weiß auf lilafarbenen Cardstock embosstes Halloween aus dem Spooktacular Stempelset von LawnFawn aufgeklebt.
Die drei Geister, die man durch die Fenster auch bei geschlossener Karte sieht, bilden den Rahmen um den Text. Rundum habe ich wieder einige Sternen-Pailetten in lila und kupfer aufgeklebt.

This time I've written the word happy with die cut letters and glued a white onto purple cardstock embossed Halloween from the Spooktacular stamp set by LawnFawn under it.
The three ghosts, that can be seen through the windows when the card is closed, create some kind of frame around the text. And I added more purple and copper star shaped sequins.

Freitag, 14. Oktober 2022

Sneak mit Schnee


 Hallo Ihr Lieben!
Ich kann einfach nicht anders - ich möchte Euch noch unbedingt eines der süßen Motive aus dem Stempelset von StuffDeluxe, das es ab morgen bei Stampcorner gibt, zeigen. 

Hello everyone!
I just couldn't resist - and so I'm sharing another one of the cute images by Stampcorner, that will be available tomorrow. 

Diese Karte ist so eine, die eigentlich ganz anders geplant war, sich dann aber verselbständigt hat. 
Für den Hintergrund habe ich mit brauner Tinte ein Holzmuster auf ein Stück hellbraunen Cardstock gestempelt und die Ränder dann mit dem selben Braun etwas dunkler gewischt. Dann habe ich braune und weiße Metallic Watercolor darüber gespritzt. 

This is one of those cards, that looked totally different in my mind but while making it I did quite a few changes to my originnal idea. 
For the background I've stamped a woodgrain pattern with brown ink onto a piece of light brown cardstock, then inked up the edges with the same brown I used to stamp the pattern. Next I splattered some brown and white metallic watercolor on top.


Ich weiß nicht, ob Ihr es auf dem Bild gut erkennen könnt - aber ich habe hier ein Acetate Overlay über dem Motiv angebracht. Das habe ich mit einer der A6 Wave Stanzen ausgestanzt und dann - mit einem kleinen freien Rand - Schneeflocken weiß darauf embosst. 
Das Acetate habe ich dann mit einem Tacker auf dem Holzhintergrund befestigt und dabei  ein Stück weißes Organzaband mit festgetackert, das ich dann zur Schleife gebunden habe.
Unten auf dem Acetate habe ich dann noch den Text meiner Karte angebracht. Der ist mit der Let it Snow Border Stanze von LawnFawn viermal aus weißem Cardstock gestanzt. Die Stanzeteile habe ich aufeinander und dann auf das Acetate beklebt. Den I-Punkt habe ich durch ein kleines weißes Herz ersetzt. 

I don't know if you can see it on the picture - but I put an acetate overlay on top of the image. I've cut that with one of the A6 Wave dies and then - leaving a bit of a frame blank - white heat embossed some snowflakes onto it.
I used  a stapler to attach the acetate to the woodgrain background, also attaching a piece  of white organdy ribbon, that I then tied to a bow.
To the bottom of the acetate I've attached the text of my card. I used the Let it Snow Border die by LawnFawn to die cut the text four times from white cardstock, stacked those die cuts and glued  them to the acetate. Instead of the tittle of the i I used a small white heart.


Da das Acetate nur oben festgetackert  ist, kann man es nach oben klappen/biegen - und schon ist die Sicht auf den süßen Bären frei. Ich finde den einfach zu knuffig und kann ihn mir auch super auf Weihnachtskarten vorstellen. Aber soweit bin ich noch nicht. 
Mit einer der Deckle Edge Stanzen habe ich ein Stück weißen Cardstocks gestanzt und dann mit Distress Oxide Salvaged Patina, Broken China und Uncharted Mariner gewischt und ein wenig Wasser darüber  gespritzt. 
Diese Designpapierstücke lagen noch auf meinem Tisch - Reste von einer anderen Karte - und eigentlich wollte ich die ganz anders und auf einem Watercolor-Hintergrund anordnen - aber wie gesagt, manchmal  ändert sich der Plan beim Werkeln. Also habe ich zwei davon - es waren insgesamt 3 Papierstücke - auf meinen gewischten Hintergrund geklebt. Und dann habe ich noch drei Birkenstämme aufgeklebt, so dass der  arme Bär da nicht allein auf freiem Feld steht.
Der Bär ist wieder mit Copics coloriert und als oberste Lage auf  den Hintergrund geklebt.

Since the acetate is only attached at the top, you can bend/fold it open - and then you have free sight onto the cute bear. I just think he's really adorable and can picture him on a christmas card as well. But those cards will have to wait a little longer.
I used one of the Deckle Edge dies to cut a piece  of white cardstock and inked that up with Distress Oxide Salvaged Patina, Broken China and Uncharted Mariner, then spritzed some water on top.
Those pieces of patterend paper were left overs from a different card - and I had planned to arrange the three pieces I had left in a totally different way onto a watercolored background. But as said before, some plans change in the process of making. So I only used two of them and glued them onto my inked up background. Then I added three birch trees, so the little bear isn't standing there lonely in a big blue nothing.
The bear is colored  with Copics and glued down as the top layer on the background.

Donnerstag, 13. Oktober 2022

Ein winterlicher Shaker-Tag


 Hallo Ihr Lieben!
Für meinen heutigen Post auf dem Stampcorner Blog habe ich nochmal das süße neue Stempelset mit den Wintertieren von StuffDeluxe verwendet  - und habe damit einen Shaker Gift Tag gemacht. 

Hello everyone!
For today's post over at the Stampcorner Blog I used the cute new stamp set with the winter animals by StuffDeluxe again - and made a shaker gift tag with one of them.

Auch die neuen Wellenkreis-Stanzen kamen wieder zum Einsatz. Und - ich traue mich kaum, es zu sagen - ich habe schon wieder "nur" Ringe damit gemacht! Ich verspreche Euch, demnächst mal die kompletten Kreise zu benutzen. Aber mit dem gewellten Rand geben die Kreise einen so tollen Rahmen für Shaker ab. 

I also used the new scalloped circle dies again. And - I barely dare to say it - again I "only" used them to create some rings. I promise to use the full circles soon. But with the scalloped edge those circles just make beautiful frames for shakers.


Ich bin mir nicht ganz sicher, ob das Tierchen hier ein Krokodil oder Dino ist. Grün sind beide. Und weil mein Enkelsohn momentan Krokodile liebt, habe ich mich entschlossen, ihn als solches zu colorieren. Dafür habe ich wie meistens Copics verwendet. 
Für den Shaker habe ich einen kompletten Kreis für den Hintergrund - ich habe hier die zweitgrößte Stanze aus dem Set verwendet - sowie den obersten Rahmen aus türkisfarbenem Cardstock, die Zwischenlagen sind aus weißem Cardstock gemacht. Auf den Hintergrund habe ich einige der Schneeflocken aus dem selben Stempelsten mit weißem Embossingpulver aufembosst und dann den Kreis von außen her ein wenig mit Distress Oxide Peacock Feathers gewischt. 
Auch auf die Folienschicht, die den Shaker verschließt, habe ich einige der Schneeflocken weiß aufembosst. Wenn man den Fön gut vorheizt und ihn nie länger an die selbe Stelle hält, geht das, ohne dass die Folie schmilzt. 
Auf der hintersten Lage sowie oben auf dem Ring habe ich jeweils eine Schneelage aufgeklebt. Die sind mit den Stanzen aus dem Snow Globe Set von MFT aus weißem Cardstock gestanzt. 

I am not entirely sure if this cutie is a crocodile or a dinosaur. Guess it doesn't matter, they both can be green. But since my grandson loves crocodiles, I decided to color it like that. As most of the times I used my Copics for that.
For the shaker I've die cut a whole scalloped circle for the background - I used the second largest die from the set here  - and one frame for the top layer from turquoise cardstock, the layers inbetween are cut from white cardstock. I white heat embossed a few of the snowflakes from the same set onto the background, then inked up the circle from the outside in with Distress Oxide Peacock Feathers.
I also white heat embossed a few snowflakes onto the acetate, that is used to close the shaker. When the heat gun is heat up very well and you move it constantly, embossing on acetate works without warping it. 
Onto the background and the top layer I added some snowbanks, cut from white cardstock using one of the dies from the Snow Globe die set by MFT. 


Den Shaker habe ich mit kleinen silber-weißen Kügelchen, Mica Flakes von Ranger sowie Rock Candy Glitter, ebenfalls von Ranger, gefüllt. Das Füllmaterial habe ich hier mal für Euch im Shaker verteilt, damit Ihr es sehen könnt.
Auch der Text auf meinem Tag ist aus dem Stempelset mit den Wintertieren. Er ist weiß auf hell grau-blauen Cardstock embosst, schwarz gemattet und auf die Folie geklebt. Das O in Snow habe ich durch ein kleines rosafarbenes Herz ersetzt. 
Und dann fiel mir auf, dass mein Tag noch einen Aufhänger braucht. Wie gut, dass die Crop-a-Dile mühelos durch viele Lagen Cardstock stanzt. Durch das Loch habe ich dünnes Organzaband als Aufhänger gezogen und vorne noch eine große Schleife aus grünem Satinband angebunden. 

I filled the shaker with tiny silver-white beads, Mica Flakes by Ranger and Rock Candy Glitter, also by Ranger. I've shaked the tag for this picture so you can see the filling.
Also the text on my tag is from the stamp set with the winter animals. I've white heat embossed it onto some light grey-ish blue cardstock, matted it black and glued it onto the foil. I used a small pink heart to replace the O in the word snow.
And then I realized that my tag needed a hanger. Luckily, the Crop-a-Dile cuts easily through lots of layers of cardstock at once. I've put some thin organdy ribbon through the hole and tied a bow from green satin ribbon to the front string of the hanger.

Mittwoch, 12. Oktober 2022

Ein besonderes Buch zu einem besonderen Geburtstag

 
Hallo Ihr Lieben!
Ein besonderer Mensch hatte gerade seinen 50. Geburtstag - da sollte auch ein besonders verpacktes Geschenk her. Und weil sie eine kleine Leseratte ist, hat es sich angeboten, ein Buch zu basteln. 
 
Hello everyone!
A special person just turned 50 - and so I wanted a special box to put my gift in. Since she's a real bookworm, it seemed right, to make a book shaped box.
 
Das Äußere meines Buchs ist aus rotem Cardstock, den ich an den Ecken mit Distress Ink Aged Mahogany gewischt habe, so dass es ein wenig alt aussieht.
 
The outside of the book is made from red cardstock. I've inked up the edges with Distress Ink Aged Mahogany to give it an antique look.


Auf die Vorderseite habe ich einen rechteckigen Rahmen - von MFT - sowie diesen tollen Text von Spellbinders mit goldener Folie auffoliert. Der Text hatte genau die richtige Größe, um als  Buchtitel durchzugehen.
An den Ecken habe ich alt-goldene Buchecken angebracht.

I foiled a rectangle frame - by MFT - and this great text by Spellbinders onto the book cover, using gold foil. The text had just the right size to look like a book title.
I also added some bronze-golden embellishments to the book corners.


Unten links auf das Cover habe ich dieses lesende Mädchen umgeben von Büchern sowie einige goldene Pailetten angebracht. Das Motiv gab es damals von Whiff of Joy - es ist also schon sehr alt. Eigentlich ist es ein Engel, ich habe ihm aber die Flügel weggeschnitten. Die Bücher hinter und um das Motiv sind aus dem Bookworm Stempelset von MamaElephant. Alle Motive sind mit Copics coloriert, ausgeschnitten und aufgeklebt.

To the bottom left corner I've glued this reading girl image, surrounded by  more books, and also a few golden sequins. This image is/was by Whiff of Joy - so it's a really, really old stamp. And actually it's an angel, I just cut off the wings. The books behind and around the girl are from the Bookworm stamp set by MamaElephant. All images are colored with Copics, cut out and glued down.


Auch den Buchrücken habe ich golden foliert. Für die Streifen habe ich Teile des rechteckigen Rahmens auffoliert, das Celebrate ist eine Hotfoil Plate von Ultimate Crafts. Darunter wird eigentlich ein Partybanner foliert, das wollte ich dort nicht haben. Aber beim Folieren hat sich das Muster so in den Cardstock gedrückt, dass ich kurzerhand kleine Cardstock-Dreicke und ein Stück Twine verwendet habe, um dort ein Banner aufzukleben. Auußerdem habe ich ein "just for you" und ein "limited edition" weiß aufembosst.

I also added some foiling to the spine. For the strips I simply used parts of the rectangle plate, that I used on the front. The celebrate is made with a plate by Ultimate Crafts. It foils a party banner under the word, that I didn't want to have there. But when I did the foiling, the plate debossed it so deeply into the cardstock, that I simply cut a few small triangles from patterned papers and added some twine to re-build the banner. I also white heat embossed "just for you" and "limited edition" onto the spine.


Der Box-Teil des Buches besteht aus zwei Teilen, so dass das Buch mittig geöffnet werden kann. Diese Boxen habe ich aus cremefarbenem Cardstock gemacht und mit Distress Ink Old Paper und Gathered Twigs gewischt. Auf die Seiten habe ich zudem mit brauner Tinte einen Stempel mit dünnen Streifen aufgestempelt, so dass die Seiten ein wenig mehr wie ein Buch aussehen.
Um die Box geschlossen zu halten, habe ich etwas rotes Organzaband zwischen die Buchdeckel und die Boxen geklebt und vorne zur Schleife gebunden.

The box part of the book is made from two pieces, so the book can be opened in the middle of the book. I've made those boxes from cream colored cardstock and inked them with Distress Ink Old Paper and Gathered Twigs. I used a stamp that stamps lots of very thin lines, and some brown ink on the sides of those boxes, to make them look a bit more like a real book.
To keep the box closed I put some red organdy ribbon between the book covers and the boxes and tied them to a bow at the right side.


Öffnet man das Buch, dann spielt es zum einen eine "happy birthday" Melodie, zum anderen dreht sich das Innenleben auf. Ich hatte eigentlich ein Video gedreht, aber da fehlte der Ton. Das habe ich erst bemerkt, als das Buch bereits unterwegs zur Empfängerin war, deswegen müsst Ihr Euch das leider vorstellen. Ich hoffe sehr, das mit der Musik klappt dann auch - die Technik hat nämlich ein wenig gezickt.
Für die Musik sorgt ein Musikelement, das ich aus einer fertig gekauften Grußkarte herausgeschnitten und hier eingeklebt habe. Das Problem war, glaube ich, dass sich links ja eine Box befindet, in der der Lautsprecher und die Technik versteckt sind. Dadurch musste ich aber die Technikteile schräg nach oben stehend einkleben, so dass sich das Buch auch noch schließen ließ. Irgendwannn hat es bei mir dann problemlos funktioniert - ich hoffe, die Post hat das Paket nicht so herumgeworfen, dass irgendetwas verrutscht ist.
Im Inneren habe ich den Happy Birthday Text Background von MFT mit hellgrauer Tinte auf die Oberseiten der Boxen gestempelt. Außerdem habe ich auch hier die Buchseiten mit Distress Ink auf alt gewischt und außerdem goldene und graue Tinte aufgespritzt.
Das, was Ihr hier übrigens oben aus dem Buch spitzen seht, ist ein Giftcard Holder. Der kann am Band herausgezogen werden. Die andere Seite des Buches lässt sich oben öffnen, darin war Schokolade und eine "Schriftrolle" mit den persönlichen Grüßen verpackt. 

When you open the book, it plays a "happy birthday" song and the innner greeting folds up. I had made a video, but it was missing the audio. I realized it after I had brought the box to the post office, and so you have to imagine that. I really hope, the music worked when the recipient opened the book - the technique nearly drove me crazy.
For this music part I used the technique from a store bought card, that I had cut out and included in my book. I think, the problem was, that there is a box on the left side, that I used to hide the speaker and the electronical parts. But to be able to open and close the book, I had to glue this technical part down at an angle, which somehow seemed to shift things a bit and so the music was either playing even when the book was closed - or not at all. It worked after some trying and a few tricks - and I really hope, the postal service didn't throw the package around too much, so nothing can have moved.
Onto the inner pages of the book I stamped the Happy Birthday Text Background by MFT, using light grey ink. I also inked up the paper to make it look a bit weathhered and added some golden and grey splatters.
The ribbon, that you can see peaking out of the top of the book, is attached to a gift card holder and can be pulled out at the top. The other half of the book is a box, that can be opened at the top, and that held some chocolate and a letter with some personal words.


Für die Technik, die das Innenleben aufdrehen lässt, habe ich die Photo Collage Pop-Up Stanze von Karen Burniston verwendet, dabei aber nur zwei der Polaroidrahmen aufgeklebt. Der Rest der Deko besteht aus Luftballonen, Sternen, einem lets's party Text, einer Sektflasche mit Gläsern und einem Partybanner, alles in schwarz, weiß, rot und gold gehalten. Eine goldene 50 durfte natürlich auf einem der Polaroids nicht fehlen, auf dem anderen habe ich ein Happy Birthday aufgebracht. Verziert habe ich alles - wie auch die Buchseiten - mit goldenen Pailetten.

For the technique, that makes the inner decoration pop up, I used the Photo Collage Pop-Up die by Karen Burniston. I only added two of the polaroid frames, the rest of them I replaced with party themed die cuts. There are some balloons, stars, a let's party text, a bottle of champagne with glasses and a party banner, all cut from red, black, white and gold cardstock. Of course I had to attach a golden 50 to one of the polaroids, onto the other one I added a happy birthday. And I added a few more sequins - also to the book pages - as embellishments.