Samstag, 10. Oktober 2020

Stempeleinmaleins - Ausgabe vom 10. Oktober 2020


Hallo Ihr Lieben!

Es ist wieder Zeit fürs Stempeleinmaleins - diesmal zeigen wir Euch eine Box mit Pop-Up Würfel. 

Hello everyone!

It's time for another issue of Stempeleinmaleins - this week we are sharing a tutorial for a box with a pop up cube.

Hier seht Ihr meine Box. Ich habe den äußeren Teil aus schwarzem Cardstock gewerkelt und mit lilafarbenem Designpapier mit lustigen Fledermäusen beklebt. Darauf kam etwas Cheesecloth und ein Oval aus Vellum. 

Als Deko habe ich Trick or Treat oben aufgeklebt und dabei die beiden T aus orangefarbenem Designpapier gestanzt und schwarz gemattet. Für die übrigen Buchstabenhabe ich kleinere Buchstabenstanzen verwendet und sie aus schwarzem Cardstock gestanzt. Zwischen den Buchstaben tummeln sich eine Mumie, ein Geist und ein Kürbis, alle von Mama Elephant. Oh, und ein paar kleine Glitzersteine haben sich hier auch noch versteckt.

Here's my box. I've made the sleeve from black cardstock and covered it with purple designer's paper with a funny bat print. Then I've put some cheesecloth and an oval, die cut from vellum, on top.

For decorations I've written Trick or Treat on top of the box. Both of the T are die cut from orange designer's paper and matted black. For the other letters I've used some smaller letter dies and cut those from black cardstock. Between the words there are a mummy, a ghost and a pumpkin on my box, all by Mama Elephant. Oh, and there are also a few clear rhinestones.


Die Schublade ist aus lilafarbenem Cardstock gemacht. Die Front ist mit orangefarbenem Designpapier beklebt. Außerdem habe ich hier ein quadratisches schwarzes Eyelet gesetzt, durch das ich ein Stück schwarzes Band zum Öffnen der Box gezogen habe.

The drawer is made from purple cardstock, the front covered with orange designer's paper. I've added a square black eyelet to my front and put the black ribbon, that helps to open the drawer, through it.


Öffnet man die Box, sieht es erst so aus, als wäre eine Karte darin. Aber die entpuppt sich als explosive Überraschung.

When you open the drawer it first looks like there's a card inside. But this "card" turns out to be an explosive surprise.


Denn wenn man die Box weiter öffnet, springt die "Karte" heraus und wird zum Würfel! In meinem Fall ist dann etwas Süßes darunter versteckt. Man kann aber auch problemlos drei dieser Würfel in einer Box verstecken, dann ist die Überraschung noch größer. Ich wollte einfach noch ein "treat" in meiner Box unterbringen - nach dem "trick" sozusagen.

Because when you open the drawer farther, the "card" explodes and turns into a cube. In my case there are some candies under the cube. But you could also put three of those cubes into one box to make the surprise even bigger. I just wanted to have a treat inside my box after that trick with the cube.


Ich habe die Seiten meines Würfels passend zur Hülle der Box dekoriert. Auf drei Seiten habe ich ein BOO geschrieben und dafür die genialen neuen Alphanumeric Shadow Stanzen von Sizzix verwendet. Auf der vierten Box befindet sich eine kleine Szene mit Mond und einem Halloweengruß. Zum Dekorieren habe ich wieder die Little Mummy Agenda und Little Ghost Agenda Stempel von Mama Elephant benutzt. Der Zaun auf der letzen Seite ist von MFT.

I've decorated the sides of my cube matching the sleeve of my box. On three sides I've added letters to write the word BOO, using the great new Alphanumeric Shadow dies by Sizzix. On the 4th side I've created a little scene with a moon and a Halloween greeting. Again I've used the Little Mummy Agenda and Little Ghost Agenda stamp sets by Mama Elephant, the fence on the 4th side is by MFT.


Donnerstag, 8. Oktober 2020

Freundschaft


Hallo Ihr Lieben!
Heute habe ich eine weitere Karte mit einem neuen Stempelset von Stampcorner zu zeigen. Es heißt "mein kleiner Kapitän", und neben dem hier verwendeten Motiv sind noch mehr in der Art dabei. Mein erstes Enkelkind kommt im November - und es wird ein Junge. Da passen die Motive perfekt!

Hello everyone!
Today I have another card made with a new stamp set by Stampcorner for you. It's called "my little captain", and beside the image I've used here there are more like this included. My first grandchild will be born in november - and it's a boy. So these images are perfect!
 
Ich habe hier ein Stück weißen Cardstock mit Distress Oxide Wilted Violet, Blueprint Sketch und Black Soot eingefärbt. Dann habe ich ein wenig des Liquid Pixie Dust von Ink On 3 sowie etwas Wasser mit einem Pinsel darüber gespritzt. Und weil das zwar schön schimmert, aber eben doch eher subtil ist, habe ich noch silberne Kleckse mit glitzernder Aquarellfarbe aufgespritzt. 
Dieses Stück Cardstock habe ich dann auf eine weiße Kartenbasis geklebt. 
Darüber kam ein etwas kleineres Stück schwarzen Cardstocks. Ich habe es so geschnitten, dass außenherum der eingefärbte Cardstock nochmals gut zu sehen ist. Aus dem schwarzen Cardstock habe ich eine der Stitched Dens Stanzen von LawnFawn ausgestanzt. Dann habe ich das Teil mit 3D Tape auf den Hintergrund geklebt.
Unten auf dem schwarzen Cardstock habe ich etwas mehr Platz gelassen, so dass dort noch ein Streifen mit Text untergebracht werden konnte. Ich habe einen der Texte aus dem Stempelset Freunde mit silbernem Embossingpulver auf lilafarbenen Cardstock embosst, ausgeschnitten und aufgeklebt. Und ja, hier habe ich mal wieder einen Stempel zerschnitten um den Text einzeilig aufstempeln zu können. Außerdem habe ich noch ein paar klare Glitzersteine mit untergebracht.
 
Here I've used Distress Oxide Wilted Violet, Blueprint Sketch and Black Soot to color a piece of white cardstock. Then I've spritzed some water and some of the Liquid Pixie Dust by Ink On 3 onto it. And since the Pixie Dust adds a nice shimmer but is still pretty subtle I've also flicked some silver shimmer watercolor onto the background.
Then I've glued this piece of cardstock onto a white note card.
On top I've glued a piece of black cardstock, cut small enough to leave some of the colored background visible around the edges. From this black cardstock I've die cut one of the Stitched Dens  dies by LawnFawn and then glued the cardstock down with dimensionals.
When cutting the Stitched Den out of the black cardstock I've left a bit more room on the bottom for a saying. I've silver heat embossed one meaning "friendship doesn't have to be perfect, just honest" onto some violet cardstock, cut it out and glued it under the cut out. Then I've also added a few clear rhinestones.


Jetzt aber zu dem süßen Motiv! Ich liebe den kleinen Matrosen, der auf dem Wal zu schlafen scheint. Und ich hatte sofort die Idee, den Wal auf Wolken "schwimmen" zu lassen. 
Das Motiv ist mit Copics coloriert. Und ich habe mich an den Farben des Hintergrunds orientiert. Deswegen gibt es einen lilafarbenen Wal. 
Auf den Hintergrund habe ich einige der Petit Clouds von MFT, gestanzt aus silbernem Glitzercardstock, aufgeklebt, darauf kam das Motiv, das ich mit dünnerem 3D Tape als das, das ich für den schwarzen Cardstock verwendet habe, aufgeklebt habe. Eine der Wolken befindet sich auf dem Wal, zwei weitere habe ich von hintengegen den schwarzen Cardstock geklebt. So gibt es verschiedene Ebenen auf der Karte.

But now let's talk about this cute image! I love this little guy that seems to be sleeping on the whale. And I immediately had the idea of letting the whale "swim" on some clouds.
The image is colored with Copics and I sticked to the colors of the background. So we have a purple whale here.
Onto the background I've glued some of the Petit Clouds by MFT, die cut from silver glitter cardstock. Then I've glued down the image with dimensionals, that aren't as thick as the ones I've used to glue the black cardstock down. One of the clouds is glued on top of the whale, two others are glued to the back of the black cardstock. Due to the different layers the card gets some depth.


Mittwoch, 7. Oktober 2020

Eine weihnachtliche Box


Hallo Ihr Lieben!

Heute zeige ich Euch eine der neuen Boxen-Stanzen von JM-Creation: die Dreiecksbox. Und ja, es hat sich da noch die ein oder andere Oktober-Neuheit mit ins Projekt geschlichen.

Hello everyone!

Today I am sharing with you a project made with one of the new box dies by JM Creation: the triangle box die. And yes, a few more items from the october release also sneaked into the project.


Ich habe die Box an sich aus kraftfarbenem Cardstock gestanzt. Ich liebe Boxen aus diesem Material, vor allem in Kombination mit weihnachtlichen Farben wie rot, grün und gold. 

Der weiße "Zettel", den ich für meine Deko benutzt habe, kommt mit der ebenfalls neuen Umschlagstanze. Ich habe ihn hier einfach als Aufleger für meine Box verwendet. Vor dem Aufkleben habe ich die Zahl 24 mit den Adventskalenderzahlen aus dem September-Release ausgestanzt und dann die ausgestanzten Zahlen durch welche ersetzt, die ich aus rotem Glitzercardstock gestanzt habe. 

Der Mistelzweig ist ebenfalls aus einem der neuen Stempelsets. Ich habe ihn zweimal abgestempelt, mit Copics coloriert, jeweils ausgeschnitten und überlappend auf den Aufleger geklebt. Verziert habe ich ihn mit einem kleinen goldenen Glöckchen und einer roten Schleife. 

Das frohe Weihnachten ist die untere Zeile eines Textes aus dem Stempelset Weihnachtsgrüße 1, der eigentlich "wir wünschen frohe Weihnachten" heißt. Das war mir aber zu wuchtig. Also habe ich nur das "frohe Weihnachten" weiß auf roten Cardstock embosst und unter der Zahl sowohl über den Aufleger als auch direkt auf die Box geklebt. 

Zum Schluss kamen noch ein paar kleine Sterne aus Holz auf die Box.

I've die cut the box from craft colored cardstock. I love boxes made out of this color, especially in combination with christmassy colors like red, green and gold.

The white "paper" that I've used for my decorations comes with another new die that makes a small envelope. Here I've just used it for decorations. Before glueing it down I've die cut a 24 from it and replaced the cut out numbers with some that were die cut from red glitter cardstock. 

The mistletoe is also a new stamp. I've stamped, colored and cut it out twice, then glued them on top of each other, just one tilted a bit, onto the white piece of cardstock. Then I've decorated it with a golden mini bell and a red bow. 

The text means "merry christmas". It's actually just the second line of a stamp that says "we wish you a merry christmas". Since that would have been too big for this box I've white heat embossed just the second line of that stamp onto a strip of red cardstock and glued it onto both the white cardstock and the box. 

In the end I've added a few small wooden stars.


Die Box kann an beiden Seiten geöffnet werden - und es passt tatsächlich viel mehr hinein, als ich im ersten Moment gedacht hatte.

The box can be opened on both sides - and there's actually a lot more room in it than I thought initially. 


Und hier habe ich noch ein Bild der Box von oben für Euch. Darauf könnt Ihr sehen, dass ich vor dem Aufkleben der Deko einen Streifen rot und craft gestreiftes Designpapier einmal um die Box herumgewickelt und am Boden festgeklebt habe. So sehen auch die anderen beiden Seiten nicht so nackt aus.

And here I've taken a picture of this box from above. You can see that I've wrapped a strip of red and craft striped designer's paper around the box before glueing the decorations down. Now the other two sides don't look too plain, either.


Dienstag, 6. Oktober 2020

Besser heute als morgen!


Hallo Ihr Lieben!

Weiter geht es mit meiner Rubrik "jeden Monat ein alter Stempel/eine alte Stanze". Diesmal habe ich die Wine Service Stanze von MFT verwendet. Die gibt es leider nicht mehr, aber sie passte so perfekt zum genialen Textstempel von Stamping-Fairies, dass ich sie einfach verwenden musste. Dafür kamen einige andere aktuelle oder auch ältere Dinge ebenfalls auf der Karte zum Einsatz. Und die zeige ich heute auf dem Stamping-Fairies Blog.

Hello everyone!

This is another one of my "use each month at least one old stamp/die" cards. This time I went with the Wine Service dies by MFT. Sadly it's discontinued but it went so perfectly with this amazing text stamp by Stamping-Fairies, that I had to use it. But I've also used a few other newer and older things on this card, that I'm sharing over at the Stamping-Fairies Blog today.

  Basis war ein weißer Kartenrohling. Auf den kam ein kleineres Stück schwarzer Cardstock und wiederum darauf ein weiteres kleineres Stück weißer Cardstock, den ich dann dekoriert habe.

Base here was a white note card. I've glued a slightly smaller piece of black cardstock on top, then added another piece of white cardstock, again cut a bit smaller, which I've decorated.


Im Hintergrund habe ich mit der Rectangle Trio Stencil und Distress Ink Aged Mahogany vier Streifen aufgewischt und zwar so, dass sie nach obenhin immer heller werden.

Alle Weinflaschen und -gläser sind aus weißem Cardstock gestanzt und anschließend mit Copics coloriert. Den Korken in einer der Flaschen habe ich frei Hand gemalt. Und die Label habe ich mit einem Teil eines uralten Vintage-Stempels, den ich in meinem Schrank gefunden habe, bestempelt. So sieht man, dass sich ein edles französisches Tröpfchen in den Flaschen befindet. Naja, eine ist ja offenbar schon geleert worden. ;)

Auch die Stanze, mit der ich das Good Times gestanzt habe, ist aus einem recht alten Set von MFT: Accent it - Celebrate. Das könnt Ihr aber noch ergattern. Ich habe den Text aus schwarzem Cardstock gestanzt, in zwei Teile geschnittenund an den Streifen im Hintergrund orientiert aufgeklebt. Darauf kamen dann mit 3D Tape die Flaschen und Gläser.

In the background I've added some stripes to the white cardstock. I've used the Rectangle Trio stencil by MFT and Distress Ink Aged Mahogany and applied the ink so it is dark on the bottom strip and gets lighter towards the top.

All wine bottles and glasses are cut from white cardstock and then colored with Copics. The cork in one of the bottles is hand drawn. For the labels I've used part of an old vintage stamp I've found in my stash. Now you know that there's an old and very fine wine in these bottles. Well, seems like one of them was already emptied. ;)

Also the die that I've die cut the good times text with is a quite old one by MFT: Celebrate. I've die cut the text from black cardstock, cut it into two pieces and glued this down onto the card using the red strips as a guideline. Then I've glued the bottles and glasses on top with dimensionals.


Und hier ist der bereits erwähnte Textstempel, der mich zu dieser Karte inspiriert hat. Ich finde den einfach super - und weiß schon genau, zu wem diese Karte wie die Faust aufs Auge passt. Ich habe ihn schwarz auf weißen Cardstock gestempelt, schwarz gemattet und unter die Streifen auf meiner Karte geklebt. Ein Weinglas scheint darauf zu stehen.

Zum Schluss habe ich noch ein paar klare Glitzersteine auf der Karte verteilt.

And this is said text stamp. In Germany we have a saying that means, you should do all things right away or most likely won't get done. It goes like "don't postpone to tomorrow what could be done today". Well, here on this stamps it says "don't postpone to tomorrow what could be uncorked today". Well, I have no idea if that makes any sense in english, but I wanted at least try to explain it to you. The text was stamped with black ink onto white cardstock, matted black and glued under the strips on my card. One of the glasses seems to stand on that panel.

In the end I've added a few clear rhinestones to the card.


Montag, 5. Oktober 2020

Eine Karte zum Ruhestand


Hallo Ihr Lieben!
Eine Karte zum Ruhestand musste her, die gleichzeitig als Verpackung für einen Gutschein dienen sollte. Und das ist von meinem Tisch gehüpft.

Hello everyone!
One of my collegues at work retired - so we needed a card that also fit a gift voucher in. And this is what I came up with.

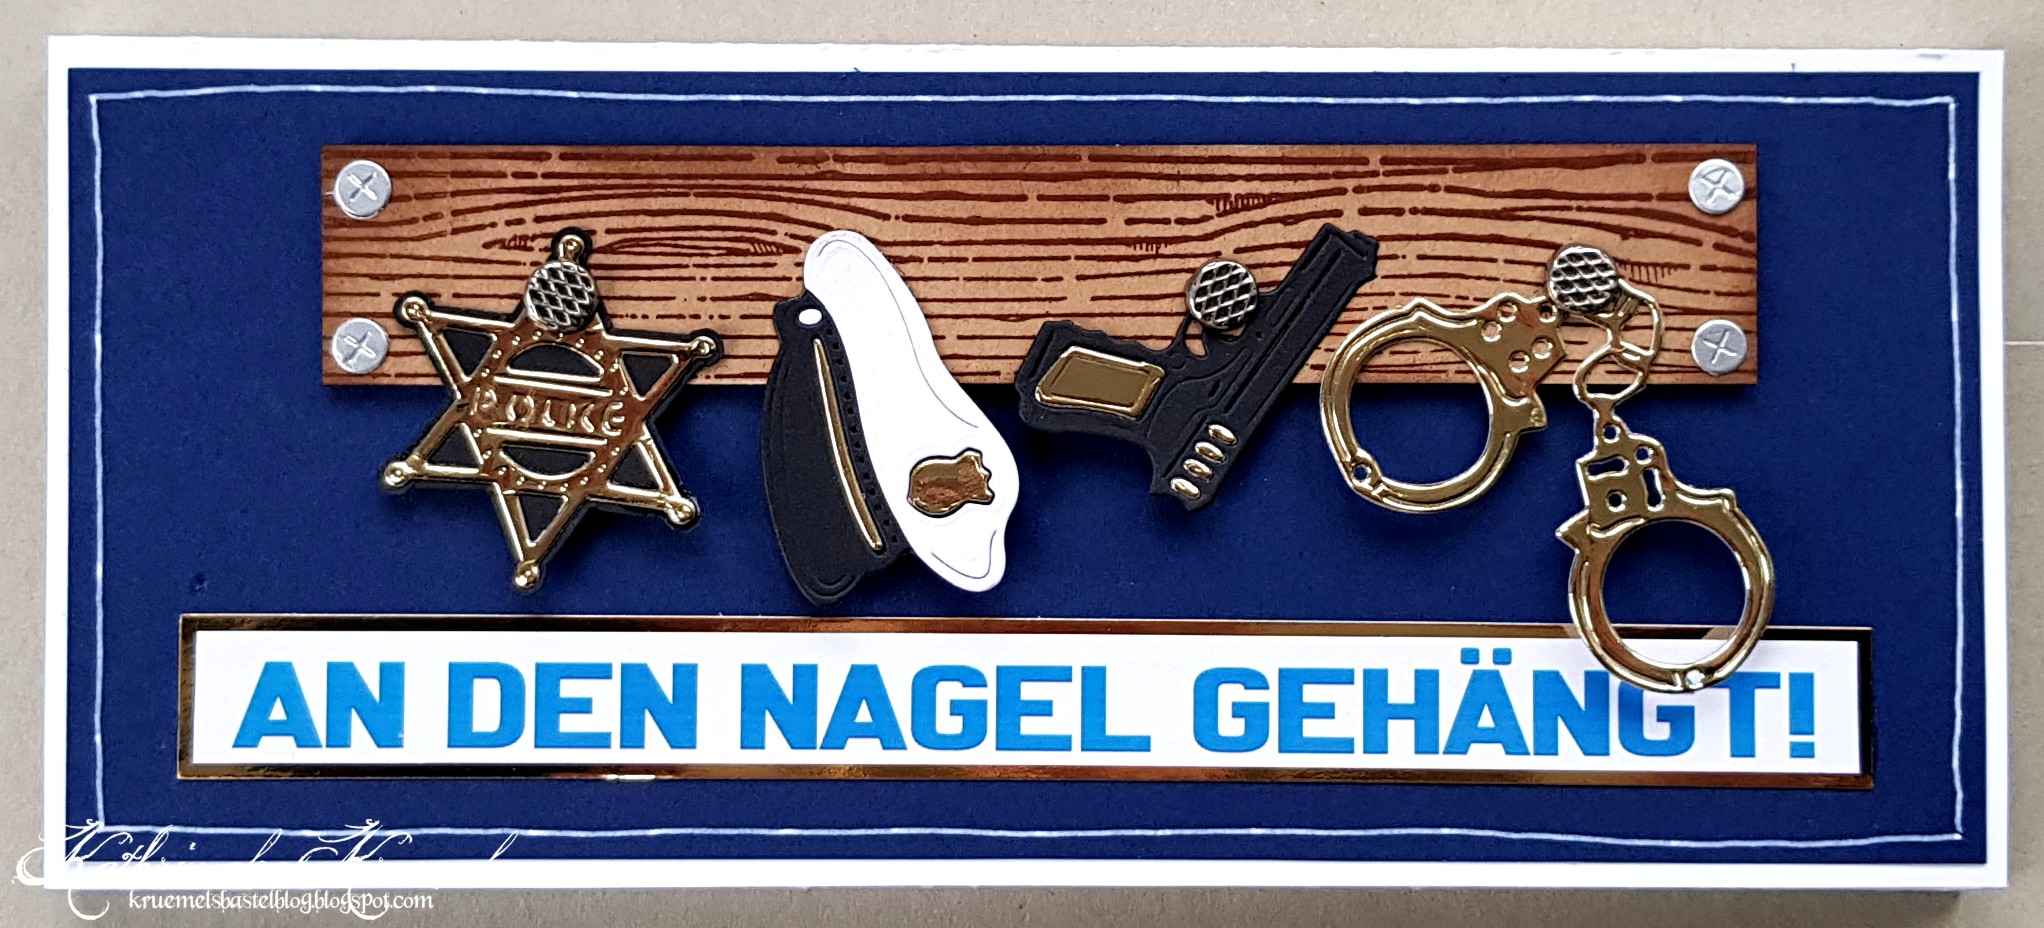
Auf der Vorderseite der Karte habe ich die Arbeitsutensilien mit Nagel-Brads an einem Stück Holz befestigt. Für das Holz habe ich einen Holzhintergrund mit brauner Tinte auf hellbraunen Cardstock gestempelt und die Ränder noch mit Distress Ink Ground Espresso gewischt. An den vier Ecken habe ich noch je eine kleine Schraube geklebt. Dann habe ich das Holzbrett mit 3D Tape auf die mit blauem Cardstock beklebte Karte geklebt. 
Das Arbeitsmaterial ist aus weißem und schwarzem Cardstock sowie goldenem Spiegel-Cardstock gestanzt. Die Stanzen habe ich vor Ewigkeiten mal irgendwo erstanden und kann bei bestem Willen nicht mehr sagen, von wem sie sind.
Den Text "an den Nagel gehängt" habe ich am PC gedruckt, golden gemattet und aufgeklebt.

On the front I've attached his work stuff to a piece of wood with nail shaped brads. For the wooden board I've stamped the wood pattern with dark brown ink onto a piece of light brown cardstock, then added some Distress Ink Ground Espresso to the edges. To each of the corners I've also glued a small die cut screw and then glued the board onto the card front that I've put some dark blue cardstock onto. 
All the work stuff is die cut from black and white cardstock and some golden mirror cardstock. I've bought those dies a very long time ago and have no idea anymore what brand they are.
The saying means "hung onto a nail" and is used as a phrase to say that someone gave up on/ends something. I've printed it with my home printer, matted it golden and glued it to the card front as well.

 
So sieht die Karte aus, wenn man sie einmal aufklappt.
 
This is the card opened for the first time - there's another layer added to this card.
 

 Im unteren Teil habe ich das Wort Pension aufgeklebt. Es ist mit dem Impact Alphabet von MFT aus goldenem Spiegelcardstock gestanzt, das O habe ich durch den Dienststern ersetzt. 
Außerdem habe ich hier noch den tollen "Alt genug..." Text von Stampcorner verwendet. Ich habe ihn in zwei Teile geklebt und ober- sowie unterhalb des Wortes Pension aufgeklebt.

In the lower part of the card I've written the word reitrement across the panel, die cut from golden mirror cardstock with the Impact Alphabet die set by MFT. I've replaced the O with a police star.
I've also added a great retirement text by Stampcorner here. It means "old enough to leave, young enough to enjoy the time after". I've cut it into two parts and glued them over and under the die cut word.


Ihr seht schon, die einzelnen Bereiche sind alle ähnlich gestaltet.
Im oberen Bereich der Karte habe ich wieder das Impact Alphabet sowie goldenen Spiegelcardstock benutzt, um das Wort Abschied zu schreiben. Das kleine zum ist von SU.
Und dann durfte ein Streifenwagen nicht fehlen. Der ist aus dem selben Stanzenset wie auch die Teile auf der Vorderseite und ebenalls aus weißem und schwarzem Cardstock sowie goldenem Spiegelcardstock gestanzt und zusammengesetzt.

As you can see, all areas of the card are decorated matching each other.
In the upper area I've used the Impact Alphabet dies and golden mirror cardstock again to write the word "farewell". 
And then I needed a police car. It's again from the same die set that I've also used on the front of the card. And also here I've used black and white cardstock and golden mirror cardstock and put the pieces together.


Und so ein echter Streifenwagen braucht natürlich ein Blaulicht! Ich hatte eine halbrunde LED in blau da und die passte von der Form her perfekt. Hinter dem blauen Cardstock befindet sich der übliche Aufbau einer LED Karte.

And a real police car needs some head lights! I had one of those round LED lights in blue at home and it was perfect in size and shape. Behind the blue cardstock I've hidden the electronics, done like on any LED card.

 
Und so sieht die Karte dann komplett geöffnet aus. Im mittleren Bereich war Platz für persönliche Worte, im Bereich darunter habe ich unter dem blauen Cardstock blaues Schleifenband angeklebt, mit dem der Gutschein in der Karte festgebunden werden konnte.
 
And this is completly opened card. In the middle area there was room for a personal message, in the area at the bottom I've put some blue ribbon under the cardstock. This was used to hold the gift voucher in place.


Sonntag, 4. Oktober 2020

Jingle Bells...


Hallo Ihr Lieben!
Das ist ein Bild meines Autos letzten Dezember. Mein Mann hatte mir das Dekoset als Überraschung bestellt nachdem ich ein so dekoriertes Auto auf einem Parkplatz gesehen hatte und nicht mehr aufhören konnte zu lachen. Gut, wirkt auf dem großen Auto ein wenig verloren, aber ich liebe es. Es gibt sogar ein Schwänzchen zum Einklemmen über der hinteren Stoßstange! 
Als ich dann das Car Critters Christmas Add-On Stempelset von LawnFawn gesehen habe, war klar, was ich damit als erstes machen würde...

Hello everyone!
This is my car last december. My husband got me this car decoration set as a surprise after I saw a car decorated like this on a parking lot and just couldn't stop laughing. Well, it looks a bit lost on this big car, but I just love it. There's even a tail that can be put on the back bumper!
So when I saw the Car Critters Christmas Add-On stamp set by LawnFawn I knew what I wanted to do with it first....
 

Mit dieser Karte eröffne ich hier auf meinem Blog offiziell die Weihnachtskartensaison... 
Na, sieht das meinem Auto nicht zum Verwechseln ähnlich?
Die beiden Bären haben nicht nur ihr Auto dekoriert, sondern auch die Bärenhöhle ist weihnachtlich geschmückt. Und Lichterketten dürfen an Weihnachten natürlich auch nicht fehlen. Genausowenig wie im Radio gespielte Weihnachtslieder!
Wieder kamen viele verschiedene Stempel- und Stanzensets zum Einsatz. 
Im Hintergrund habe ich Distress Ink Speckled Egg, Weathered Wood und Stormy Sky auf weißen Cardstock gewischt, um den Winterabendhimmel zu gestalten. Darauf habe ich dann mit Wasser verdünnte Acrylfarbe aufgespritzt.

With this card I am officially starting christmas card season here on my blog...
Well, doesn't this look pretty much like my car?
The two bears did not only decorate their car but also the bear cave. Of course some strings of lights had to be put up. And what would christmas be without the good old christmas songs played in the radio?
Again I've combined a lot of different stamp and die sets.
For the background I've blended Distress Ink Speckled Egg, Weathered Wood and Stormy Sky onto a piece of white cardstock to create the winter evening sky. Then I've spritzed some white acrylic paint, mixed with water, onto the background.


Das kleine Eichhörnchen, das in dem alten Baum lebt, ist ebenfalls in Weihnachtsstimmung und wollte gerade in den selbstgebackenen Lebkuchenmann beißen, als es Jingle Bells hörte. Und weil es ein wenig neugierig ist, muss es doch gleich mal nachsehen, wer da so fröhlich mitsingt. 
 
The little squirrel living in the big old tree is in a christmas cheer as well and was about to take a bite of its homebaked gingerbread man when it heared Jingle Bells being played. Well, it's a noisy little squirrel and so it takes a look at who's so happily singing along...
 

 Hier habe ich die Szene nochmal für Euch ein wenig zugeschnitten...

Here I've taken a close up of the whole scene....


Das Auto und der am Steuer sitzende Bär sind aus dem Car Critters Stempelset. Das habe ich dann mit dem Car Critters Christmas Add-On kombiniert. Aus diesem Set ist der Bär mit dem Geschenk auf dem Schoß, der Schnee und die Geschenke auf dem Dach, der Text im Nummernschild, der Jingle Bells Text mitsamt den Noten - und natürlich die Autodekoration bestehend aus Rentiergeweih und roter Nase. Die Nase ist mit dem Glitterstift von LawnFawn beglittert, auf die Autolichter habe ich Glossy Accents aufgetragen. 
Um das Rückfenster im Auto zu gestalten habe ich einfach den Stempel an sich auf das gestempelte Motiv gelegt. Dort befindet sich ein rechteckiger Ausschnitt, dessen Kante ich mit einem schwarzen Fineliner nachgefahren und dann als Fenster coloriert habe.
An der "Haustür" des Eichhörnchens habe ich einen Weihnachtskranz, ebenfalls aus diesem Stempelset, aufgehängt. 

The car and the bear on the wheel are from the Car Critters stamp set. And those I've combined with the Car Critters Christmas Add-On. From this set are the bear holding the gift, the snow and the presents on the roof of the car, the text on the number plate, the Jingle Bells text including the music notes - and of course the car decoration: antlers and a red nose. I've covered the nose with the glitter pen by LawnFawn and put Glossy Accents on the car lights. 
To create the rear window in the car I've simply put the stamp itself onto the stamped image. In this stamp there is a rectangle cut out exactly in the right spot. I've traced the lines of this cut out with a black fineliner and then colored this area like a window. 
I've also hung up a christmas wreath on the squirrel's door that also comes in this stamp set. 


Der Baum ist mit der Lift the Flap Tree Backdrop Stanze gemacht - die anderen beiden habe ich einfach entlang des Rahmen weggeschnitten. Ich habe ihn aus hellbraunem Cardstock gestanzt und mit Copics eine Baumrinde aufgemalt. Das geht hier ganz einfach, da man sich an den gestrichelten, eingestanzten Linien super orientieren kann. 
Das Eichhörnchen ist aus dem Stempelset Let's Go Nuts, die Weihnachtsmannmütze hat es dem Weihnachtsmann aus dem Stempelset Tiny Christmas geklaut. Und der Lebkuchenmann ist aus dem Set A Creature was Stirring. Das muss ich auch noch so richtig einweihen... 
Hinter das Loch im Baum habe ich braunen Cardstock geklebt, den ich ein wenig schattiert habe.

The tree is made with the Lift the Flap Tree Backdrop - I've simply cut off the other two trees along the inner frame line. I've die cut it from light brown cardstock and then used my Copics to add a tree bark. That's really easy here since the die cuts some curvy stitched lines into the tree that can easily be used as a guide for the bark.
The squirrel is from the Let's Go Nuts stamp set, the Santa hat is borrowed from Santa from the Tiny Christmas stamp set. And the gingerbread man comes in the A Creature was Stirring set. I still have to really use this one...
I've glued some brown cardstock behind the flap and added some shading. 


Die Bärenhöhle ist mit den beiden kleinsten der Stitched Dens Stanzen gemacht. Der Fels ist aus hellgrauem Cardstock gestanzt, aus dem ich mittig auch die kleinere Form ausgestanzt habe. Darein habe ich dann eine weitere Form gestanzt aus dunkelgrauem Cardstock gesetzt. Beide Teile habe ich dann mit kleinen Punkten ein wenig felsartig coloriert. Oben auf die Höhle habe ich wieder Schnee aufgeklebt und dafür einfach nochmal den Schnee vom Autodach verwendet.
Der geschmückte Tannenbaum ist aus dem Snow Globe Scenes Stempelset, auch hier sind die Christbaumkugeln mit dem Glitzerstift von LawnFawn überzogen.
Vor der Höhle steht der Zaun der Bären. Ich habe hier den Spooky Fence von LawnFawn benutzt, ihn aus braunem Cardstock gestanzt und ebenfalls wieder ein wenig mit Copics schattiert. Außerdem habe ich weiße Strukturpaste als Schnee darauf aufgetragen. 
Und die Bären haben den Zaun mit einer Lichterkette geschmückt. Die ist aus dem Build a House Christmas Add-On Stanzenset und ebenfalls mit Copics coloriert. Die Lichter habe ich außerdem ebenfalls mit Glossy Accents überzogen. 
Vor den Zaun und dann weitere vorne vor das Auto kam jeweils eine dicke Lage Schnee. Den habe ich aus weißem Cardstock gestanzt und mit Distress Oxide Tumbled Glass ein wenig eingefärbt. 

The bears' cave is made with the two smaller ones of the Stitched Dens dies. The outer part is die cut from light grey cardstock and I've cut the smaller one from it middle. Then I've put a small one die cut from dark grey cardstock into the opening. With my Copics I've added some grey dots to add some structure and shading. On top of the cave I've put another layer of snow, simply using the snow from the car roof again.
The decorated tree is from the Snow Globe Scenes stamp set, also here I've covered the baubles with the LawnFawn glitter pen. 
In front of the cave the bears have built a fence. I've die cut the Spooky Fence by LawnFawn here from brown cardstock and added some shading again. I've also put some white grid paste onto the fence for snow. 
And the bears also decorated their fence with some christmas lights. This is from the Built a House Christmas Add-On die set, also colored with Copics and I've added some Glossy Accents to the light bulbs.
In front of the fence and also a bit lower I've added two layers of snow. I've die cut this from white cardstock and added a bit of Distress Oxide Tumbled Glass to it.


Zusammengeklebt habe ich die ganze Szene dann mit 3D Tape, was für mehr Tiefe sorgt. 
Wie Ihr seht, verläuft der Zaun auch hinter dem Baum. In den Baum habe ich eine weitere Lichterkette gehängt. 
Für den Rahmen habe ich den Lift the Flap Tree Background nochmal aus dunkelblauem Cardstock gestanzt und diesmal alle Bäume herausgeschnitten. Dann habe ich ihn auf den braunen Rahmen, den ich mit Copics etwas dunkler gemalt habe da er sonst unter dem blauen Rahmen zu auffällig gewesen wäre, aufgeklebt. 
Über die komplette Szene habe ich dann nochmal weiße, mit Wasser verdünnte Acrylfarbe aufgespritzt. Das hätte ich besser vor dem Aufkleben des blauen Rahmens gemacht, so hat auch der ein paar weiße Spritzer abbekommen. Dafür habe ich den Höhleneingang abgedeckt, damit kein Schnee in die Höhle kommt. 
Alle Motive auf der Karte sind mit Copics coloriert. 
Und ganz zum Schluss habe ich noch einen Text aufgeklebt. Dafür habe ich mal wieder Stempel zerschnitten und habe "driving by to say" mit "I'll be home for" kombiniert, um "driving home for" zu erhalten und dann noch ein christmas dazugestempelt. Der Text ist weiß auf schwarzen Cardstock embosst und dann ebenfalls mit 3D Tape auf den Himmel aufgeklebt.

I've glued the whole scene together with dimensionals to add even more depth.
As you can see the fence continues behind and to the left of the tree. Into the branches of the tree I've hung another string of lights.
For the frame I've die cut the Lift the Flap Tree Background once again from dark blue cardstock and cut out all the trees this time. Then I've glued it onto the brown frame which I've darkened a bit with a Copic marker since it was visible due to the dimensionals.
Across the whole scene I've once again spritzed some white acrylic paint mixed with water. Well, I should have done this before glueing down the blue frame. Now this has a few white dots on it, too. But I've covered the cave entry to avoid snow inside the cave.
All images are colored with Copics.
And in the very end I've added a text ot my card. Once again I've cut some stamps apart here and combined a "driving by to day" with a "I'll be home for" to end up with "driving home for". Then I've added the word christmas. The text is white heat embossed onto black cardstock and glued onto the sky with dimensionals, too. 

Samstag, 3. Oktober 2020

Stempeleinmaleins - Ausgabe vom 03. Oktober 2020


Hallo Ihr Lieben!
Heute zeigen wir Euch beim Stempeleinmaleins mal wieder eine interaktive Karte: eine Drehkarte. In einem kleinen Bereich der Karte kann ein Motiv oder Text verändert werden. Bei mir ist es das Gesicht der großen Sonnenblume in der Mitte. Es gibt extra Stanzen für diese Kartenart, es geht aber auch ohne sie.

Hello everyone!
Over at Stempeleinmaleins we are sharing a tutorial for an interactive card today: in a small are an image or text can change. On my card it's the face of the big sunflower in the middle. There are dies for this kind of card but you can make it with the basic ones you have at home.


Ich habe hier eine Herbstszene mit vielen Stempeln von LawnFawn gestaltet. Hauptakteur ist natürlich die große Sonnenblume mit dem Wechselgesicht. 
Im Hintergrund habe ich weißen Cardstock mit Distress Oxide Speckled Egg, Broken China und Salty Ocean eingefärbt. Darauf kamen die Motive. 
Für den Boden habe ich mit einer gestitchten Stanze aus grünem Cardstock ein Stück ausgestanzt und von unten mit Distress Oxide Mowed Lawn eingefärbt. Darauf habe ich dann den Text happy Harvest aus dem Stempelset Happy Harvest von LawnFawn gestempelt.
Auch von LawnFawn gibt es eine Reveal Wheel Stanze für diese Kartenart. Die stanzt auch den kompletten Kartenaufleger mit Ausschnitt für das Motiv. Der ist aber im US-Kartenformat, ich brauchte ein Din-Format. Also habe ich hier nur die Stanze für den Kreisausschnitt und das Drehrad im Hintergrund benutzt. Wenn ich sie schon habe, dann kann ich mir die Arbeit natürlich ein wenig erleichtern, oder? Den Ausschnitt im oberen Bereich der Karte, durch den man das Drehrad erreicht, habe ich mit einer Kreisstanze ausgestanzt.

I've created a fall scene with lots of stamps by LawnFawn. Mein character, of course, is the big sunflower with the changing face.
For the background I've inked up some white cardstock with Distress Oxide Speckled Egg, Broken China and Salty Ocean, then glued the images on top.
For the ground I've used a stitched die to cut the edge of a piece of green cardstock, then added some Distress Oxide Mowed Lawn. Onto that green cardstock I've stamped the happy harvest text from the Happy Harvest stamp set by LawnFawn.
Also LawnFawn has a die for this kind of card: the Reveal Wheel die set(s). This also cuts the whole card topper. But it's a US size and I needed a german DIN size. So here I've only used the die for the round cut out in the background and the wheel behind the top layer. Well, since I own them why not use them and make life a bit easier, right? The half circle cut from the top edge of the card, that makes reaching the wheel easier, is made with a circle die.


Okay, und nun zu den vielen Motiven, die ich hier kombiniert habe. Die große Sonnenblume, genauso wie die Stiele und Blätter der aller Sonnenblumen, ist aus dem Stempelset Our Friendship Grows. Ich habe den mittleren Bereich mit den Kernen ausgeschnitten und dahinter das Drehrad gesetzt. Auf dem Drehrad habe ich jeweils einen Kreis in Brauntönen für das mittlere der Sonnenblume coloriert und dann vier verschiedene Gesichter aus dem Stempelset Big Acorn weiß aufembosst. Die Bäckchen sind in einem hellen rosa embosst. 
Die beiden anderen Sonneblumenblüten sowie der Rabe, die Vogelscheuche und der kleine Kürbis im Handwagen sind aus dem Set Happy Harvest. 
Auf dem Arm der Vogelscheuche sitzt das süße Eichhörnchen aus dem Set Let's go Nuts. Dieses eine Eichhörnchen hat sogar einen eigenen Namen. Yay-Squirrel. Zu süß, oder? Auch die anderen beiden Eichhörnchen sowie die Blätter und der Handwagen sind aus diesem Set. Die finde ich einfach zu knuffig!
Vor der Vogelscheuche liegt noch ein großer Haufen Herbstlaub aus dem Stempelset Jump for Joy. Und ganz zum Schluss habe ich noch ein paar weiße Wattewolken aus dem Set Village Heros am Himmel verteilt. 
Alle Motive sind mit Copics coloriert, per Hand ausgeschnitten und mit 3D Tape so aufeinander geklebt, dass drei Ebenen entstehen: der Himmel mit den Sonnenblumen und Wolken, darauf die Lage mit Vogelscheuche, Rabe, Herbstlaub und dem Yay-Squirrel und ganz vorne dann das Gras sowie die beiden anderen Eichhörnchen mit dem Wagen.

Now on to all the images I've combined on this card. The big sunflower is from the Our Friendship Grows stamp set, as are the stems and leaves of all the sunflowers. I've cut out the middle part with the seeds from the big sunflower and put the wheel behind it. On the wheel I've re-drawn the seed areas and then white heat embossed four different faces from the Big Acorn stamp set onto it. The cheeks are made with light pink embossing powder.
The other sunflower blooms as well as the crow, scarecrow and the little pumpkin inside the waggon are from the Happy Harvest stamp set.
On the arm of the scarcrow I've placed this cute squirrel from the Let's go Nuts stamp set. And this little squirrel even has its own name: yay-squirrel. Isn't it the cutest? Also the other two squirrels, the leaves and the waggon are from this set. I just love this one so much!
I've glued a pile of fallen leaves to the bottom of the scarecrow from the Jump for Joy stamp set. And in the end I've glued a few fluffy clouds from the Village Heros stamp set onto the sky.
All images are colored with Copics, cut out by hand and glued on top of each other with dimensionals so in the end the card has three layers: the sky with the clouds and sunflowers, on top a layer made from the scarecrow, crow, pile of leaves and the yay-squirrel and then on top of the the top layer with the grass, the other squirrels and the waggon.

Freitag, 2. Oktober 2020

Interaktive Eichhörnchenkarte


Hallo Ihr Lieben!
Im großen Herbst-/Winter-Release von LawnFawn war auch eine Stanze "Waving Pull Tab Starter Set". Es war hier vor allem auf ein bestimmtes Stempelset im Release ausgelegt, aber Starter Set bedeutet ja, dass es da bestimmt noch mehr geben wird, das mit dieser Stanze verwendet werden kann. Aber so lange wollte ich nicht warten. Schon länger spukte mir diese Idee im Kopf herum und nun habe ich sie umgesetzt. Die Karte an sich ist eher einfach gehalten, mir ging es darum, ob der Mechanismus so funktioniert, wie ich es mir vorgestellt habe.
 
Hello everyone!
In the big fall and winter release by LawnFawn there was a "Waving Pull Tab Starter Set". This die set was made to work with one stamp set from this release especially, but starter set already indicates, that more stamp sets will follow, that will work with this set. But I didn't want to wait that long. I had an idea in mind for quite some time and now I've turned it into a card. It's a pretty simple design, my focus was on finding out if the mechanism works the way I thought it would.
 
 
Ich habe hier wieder viele verschiedene Stempelsets kombiniert. 
Im Hintergrund habe ich mit Distress Oxide Forrest Moss und Speckled Egg Farbe aufgewischt und dann gold- und kupferfarbene Glitzer-Aquarellfarbe darübergespritzt. 
Darauf kam das Wort Autumn, das ich mit dem Oliver's Stitched ABCs Stanzenset aus einem der mit Goldfolie besprenkeltem Designpapier aus dem Let it Shine Designpapier gestanzt habe. Da mir der Kontrast zum Hintergrund nicht wirklich gefallen hat, habe ich von unten her ein wenig Distress Oxide Dried Marigold aufgewischt.
Die Motive sind aus den Stempelsets Let's Go Nuts, So Owlsome, Jump for Joy, Happy Harvest und Tree Before 'n' After. Die Sonnenblume habe ich diesmal in rot-orange coloriert. Die Coloration ist wie meist mit Copics gemacht. Mit 3D Tape habe ich die Motive außerdem in verschiedenen Lagen aufgeklebt. 

Again I've combined a lot of different stamp sets.
In the background I've used Distress Oxide Forrest Moss and Speckled Egg, then spritzed some gold and copper colored glitter watercolor over it.
Then I've put the word Autum, die cut with the Oliver's Stitched ABCs dies from a sheet with the great gold foil dots from the Let's Shine paper pad,  onto the background. Since I didn't like the contrast with the background quite yet I've added some Distress Oxide Dried Marigold to the bottom of the letters. 
The images are from the stamp sets Let's Go Nuts, So Owlsome, Jump for Joy, Happy Harvest and Tree Before 'n' After. I've decided to color the sunflower in a red and orange color combo here. Like most times I've used my Copics to color the images. I've also used dimensionals to create different layers on my card.

Und hier seht Ihr das interaktive Element, wegen dem die Karte entstanden ist. Das Stempelset, für das das Waving Pull Tab Starter Set erstmal rausgebracht wurde, ist das Set Snow much Fun, bei dem man einen Bären einen Schnee-Engel machen lassen kann. Ich wollte aber unbedingt das Eichhörnchen mit dem Schwanz wackeln lassen. Und es hat geklappt!

And here you see the interactive element - the one why I made this card. The stamp set Snow Much Fun contains a bear that can make a snow angel if he's combined with the Waving Pull Tab Starter die set. But I so badly wanted this squirrel to wiggle its tail. And it worked!
 
 
Ich habe das vorgenannte Starter Set benutzt und eine Stanzen, die im Stanzenset der zum Stempelset Snow Much Fun passenden Stanzen enthalten ist. Die schneidet zwei von der Größe für die Bärenarme passende Schlitze. Ich habe per Partial Die-Cutting nur einen der Schlitze gestanzt. Da der Körper des Eichhörnchens ihn nicht komplett abgedeckt hätte, ist ein Teil davon unter dem ersten U in Autumn versteckt. Außerdem war der Bewegungsradius für den Eichhörnchenschwan zu groß, also habe ich dort noch einen Stopper zusätzlich eingebaut. War ein wenig mit rumprobieren verbunden, aber für das nächste Motiv weiß ich ja, wie ich es am besten mache. Ich habe da nämlich schon so einige weitere Ideen im Kopf... ;)

I've used said starter die set and one of the dies from the machting die set for the Snow Much Fun stamps. This die cuts two slits into the card that have the perfect size for the arms of the bear. I've used partial die-cutting to only cut one slit. Since the body of the squirrel didn't cover it completly I've hidden the rest under the first U of the word autumn. Also, the radius of movement was too wide for the squirrel's tail so I've also added a stopper to the mechanism. It took some trying to make it work the way I wanted it to but for the next time I know what to do. Because I already have a few other ideas in mind.... ;)
 

Donnerstag, 1. Oktober 2020

Flyin' by


Hallo Ihr Lieben!
Diese Karte, die ich heute auf dem Stampcorner Blog zeige, ist von der Kartenart her eine Changing Scene Card - und die geniale Idee stammt, mal wieder, von Jennifer McGuire. Diese Frau ist einfach ein Quell an kreativen Ideen. Und die meisten sind auch noch ganz einfach und mit dem, was man zur Hand hat, umsetzbar. Bei dieser Karte habe ich trotzdem ein wenig improvisieren müssen. Aber dazu später mehr.

Hello everyone!
This card, that I'm sharing over at the Stampcorner Blog today, is called a Changing Scene Card - and this great idea is, once again, by Jennifer McGuire. This lady is so amazingly full of creative ideas. And most of them can easily be done and with the stuff you have at hand. Well, I still had to improvise a bit here, but more about that later.

Hier seht Ihr eines der neuen Oktober-Motive von Stampcorner. Ist der kleine Pilot nicht zu süß? Er kommt noch mit einigen anderen "befahrzeugten" Freunden und ich werde Euch die bestimmt später diesen Monat auch noch zeigen. 
Ich habe den weißen Kartenrohling ein wenig mit Distress Oxide Salty Ocean gewischt und dann ein paar Wolken aus dem Stempelset Village Heros von LawnFawn gestempelt, ganz zart mit Copics coloriert, ausgeschnitten und aufgeklebt. Außerdem sind sie mit klarem Nuvo Aqua Shimmer überzogen. 
Die "Abgas"-Wolken hinter dem Flugzeug sind aus dem Stempelset Plane and Simple, ebenfalls von LawnFawn. Keine Angst, die tun der Umwelt nicht weh, aber ich fand sie einfach zu passend. 
Und auch der Text ist von LawnFawn: aus dem Stempelset Really High Five. 

Here you get to see one of images from one of the october release stamp set by Stampcorner. Isn't this little pilot the cutest? He comes in a set with friends that are also coming in vehicles and I'm sure I will share some more cards with them later this month.
I've used Distress Oxide Salty Ocean to add some light blue color to a white card base. Then I've stamped,  lightly colored with Copics, cut out and glued down a few clouds from the Village Heros stamp set by LawnFawn. They are also covered with some clear Nuvo Aqua Shimmer.
The small "emission" clouds behind the plane are from the Plane and Simple stamp set, also by LawnFawn. And don't worry, they are harmless for the environment but I thought they were too perfect to go with this image to now add them.
And also the saying is by LawnFawn: from the Really High Five stamp set.


Und hier seht Ihr das besondere an der Kartenart: Das Hauptmotiv befindet sich auf der Innenseite der Karte, die Szene drumherum ändert sich. Und hier kommt auch der Punkt, an dem ich improvisieren musste. Der Ausschnitt aus dem Kartendeckel, durch den man das Motiv bei geschlossener Karte sehen kann, wird mit einer zum Motiv passenden Stanze gemacht. Die gibt es hier aber nicht. Also habe ich das auf die Vorderseite der Karte gestempelte Motiv mit etwas Abstand zu den Stempellinien per Hand ausgeschnitten. Naja, es ist ein wenig unsauber, was wohl daran liegt, dass mein Kartenrohling aus 320g/m2 Cardstock gemacht ist. Und da ist so feines Ausschneiden eher schwierig. Aber es hat trotzdem funktioniert.

And here you see the special effect of this card: the main image is on the inside of the card, the scene around it changes. And here's also the point where I had to improvise: The cut out in the front of the card, that you see the image through, gets made with a matching die. Well, there isn't one for this image. So I've cut out the image on front of the card by hand, leaving a bit of space between where I'd cut and the stamped lines. Well, it turned out a bit messy. But that might be because my card base is made from a piece of 320g/m2 cardstock and cutting this precisely is quite hard. But it still worked.


Und hier seht Ihr die geänderte Szene genauer. Auch die Innenseite der Karte ist mit Salty Ocean ein wenig eingefärbt. Ich habe hier an das Flugzeug ein Banner mit dem Wort thanks, das den Text auf der Vorderseite der Karte ergänzt, angehängt. Banner und Wort sind wieder aus dem Plane and Simple Stempelset von LawnFawn. Außerdem fliegt mit dem kleinen Piloten hier noch ein Vögelchen, das aus dem Sky High Stempelset von MFT ist. Die Wolken sind exakt an derselben Stelle angebracht wie auf der Vorderseite.
Alle Motive sind, wie fast immer, mit Copics coloriert.

And here you get a closer look at the changed scene. Again I've added some Salty Ocean to the white card base. Then I've added a banner with the word thanks, that finishes the saying on the front of the card,  to the back of the plane. Banner and word are again from the Plane and Simple stamp set by LawnFawn. And there's also a little birdie joining the pilot. This one is from the Sky High stamp set by MFT. All the clouds are glued onto exactly the same spot as on the front of the card.
All images are, as most times, colored with Copics.