Posts mit dem Label retirement werden angezeigt. Alle Posts anzeigen

Samstag, 18. März 2023

Für eine Kollegin zum Abschied

 
 Hallo Ihr Lieben!
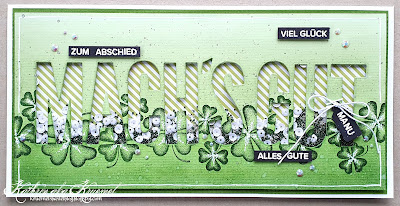
 Ich wurde um eine Karte zum Abschied einer Arbeitskollegin - also nicht einer meiner Kolleginnen - gebeten. Einzige Vorgabe: verschiedene Grüntöne sowie der Name Manu. Das sollte doch hinzukriegen sein. Und so ist diese Slimline Shaker Card entstanden.

Hello everyone!
I was asked to make a card as a goodbye for a co-worker - none of mine, a friend asked for the card. I only had to include different tones of greens and the name Manu. Well, I can do that. And I ended up with this slimline shaker card.

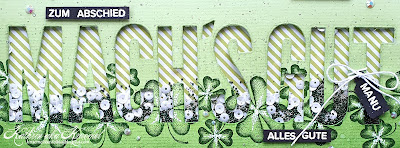
Für den Hintergrund habe ich ein Stück ganz hellgrünem Cardstock zugeschnitten und daraus die Buchstaben für die Worte Mach's Gut mit dem Impact Aphabet Stanzenset von MFT ausgestanzt. Dann habe ich den Cardstock von unten her mit Distress Ink Rustic Wilderness, Mowed Lawn und Bundled Sage gewischt, so dass nur an der oberen Kante die originale Farbe des Cardstocks noch sichtbar war. Dann habe ich einige Wassertropfen sowie Metallic Watercolor in einer Art Salbei-Ton über den Cardstock gespritzt.

For the background I used a piece of very light green cardstock and die cut the letters for the word "goodbye" from it using the Impact Alphabet die set by MFT. Then I inked up the cardstock - from bottom to top - with Distress Ink Rustic Wilderness, Mowed Lawn and Bundled Sage. The original color of the cardstock is now only visible at the top edge of the cardstock piece. I then flicked some water and also metallic watercolor in a sage color onto it.


Weil man es später nicht mehr so gut sieht: als Hintergrund für die Buchstaben, hinter denen sich der Shaker befindet, habe ich grün-weiß gestreiftes Designpapier benutzt.

Because it isn't visible that good on the following pictures I want to mention right away, that I used some green and white striped pattnered paper behind the cut out letters and the shaker.


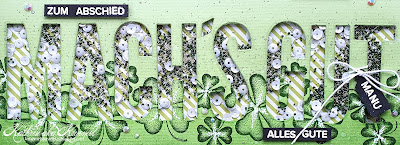
Den Shaker habe ich später mit weißen Pailetten sowie kleinen dunkelgrünen und silbernen Kügelchen gefüllt und hier mal für Euch ordentlich geschüttelt.

Later I filled the shaker with some white sequins and dark green and silver micro beads - and shaked it up quite good for you here.


Bevor ich die Karte zusammengebaut habe, habe ich mit dunkelgrüner Tinte eine Reihe Kleeblätter an das untere Ende der Buchstaben und quer über die Karte gestempelt. In die Mitte der einzelnen Kleeblätter habe ich mit einem weißen Gelstift noch einige Punkte mit einem weißen Gelstift gesetzt, um sie noch plastischer zu machen.
Dann habe ich von hinten Folie gegen den Cardstock geklebt.

Before I put the shaker together, I stamped some clovers with dark ink all across the cardstock at the bottom of the cut out letters. Then I used a white gel pen to add some tiny dots to the center of each clover, just to make them even more dimensional.
Then I adhered a layer of acetate behind the cardstock. 


Auf der Karte habe ich dann mit 3D Tape einige kleine Texte aufgebracjht - alle weiß auf schwarzen Cardstock embosst. Ich habe dafür die Stempelsets Kleine Worte und Kleine Worte 2 von Stampcorner verwendet. Einige der Texte waren so in den Sets enthalten - für andere habe ich verschiedene Stempelteile kombiniert. So, wie bei dem Wort Abschied, das ich zusammen mit einem "zum" abgestempelt und oberhalb des Wortes "mach's" aufgeklebt habe.

I then added several small texts - all white heat embossed onto black cardstock - with foam tape to the card. For some of the texts I had to combine parts of different stamps to get the texts I wanted - just like this "as a farewell" text, that I attached above the first die cut word.


Ober- und unterhalb des Wortes "gut" habe ich noch ein "viel Glück" und ein "alles Gute" untergebracht.
Und dann fehlte noch der Name. Den habe ich - wieder aus Wortteilen zusammengesetzt, um die Schriftart und -größe beizubehalten - auf einen kleinen Tag embosst, den ich dann mit weißem Twine angebunden habe. Das Twine habe ich zwischen dem u und dem t um den hellgrünen Cardstock gewickelt.

Above and under the second die cut word I added a "good luck" and a "all the best" text.
And then I needed to add the name. Again I combined parts of different stamps to stamp it in the same size and font to stamp it onto a small tag, that I tied to the card with some white twine. I wrapped the twine around the light green cardstock between the letters u and t.


Nachdem ich den Shaker gefüllt und verschlossen hatte, habe ich alles mit grünem Cardstock gemattet und auf eine weiße Slimline Card geklebt.
Ganz zum Schluss habe ich zur Deko noch ein paar weiß-irisierende Glitzersteine auf der Karte verteilt und mit einem weißen Gelstift einen Rahmen auf den grünen Cardstock gemalt.

After I had filled and closed the shaker, I matted it with green cardstock and attached it to a white slimline card base.
To finish the card, I then adhered a few white iridescent gems to the card and used a white gel pen to draw a frame onto the green cardstock. 

Samstag, 5. November 2022

Eine Explosionbox zum Ruhestand

 
Hallo Ihr Lieben!
Heute habe ich eine weitere Explosionbox zu zeigen - diesmal zum Ruhestand.

Hello everyone! 
Today I have another explosion box to share with you - this time as a retirement gift.

Die Box ist aus schwarzem Cardstock gewerkelt. Die Seitenteile habe ich mit dunkelblauem Designpapier mit einem Holzmuster beklebt, das ich vorher weiß gemattet habe.

The box is made from black cardstock. I covered the sides with some blue patterned paper with a wooden pattern, that I had matted white.


Den Deckel habe ich mit hellblauem Cardstock beklebt, den ich ebenfalls weiß gemattet habe.
Als Deko habe ich dort eine halbe Rosette aus schwarzem Cardstock stehend aufgeklebt. Die bildet den Hintergrund für meinen Text. Dafür habe ich das Hurra von Stampcorner aus silberfarbenem Glittercardstock gestanzt und mit einigen weißen Stanzteilen hinterlegt, die ich etwas versetzt aufgeklebt habe. Hinter dem Text befindet sich ein Halbkreis aus dem dunkelblauen Holzmusterpapier, außerdem habe ich hier einige silberne Sterne und silberne Glitter-Pailetten aufgeklebt.
Und irgendwie war mir das zu wenig. Also habe ich noch eine hellblaue und eine weiße Girlande, gemacht mit Stanzen von TheGreetery, hinter der Rosette angebracht. Und ein paar Luftballons haben dort auch noch Platz gefunden. Ich habe sie mit einer Stanze von MFT einige Male aus schwarzem Cardstock gestanzt und als mittlere Lage hellblaues Vellum eingefügt. So passen sie farblich zur Box, sind nicht nur leere Ringe und außerdem schön stabil, so dass sie gut stehen.

I covered the lid with some light blue patterned paper, that I also matted white.
To decorate the lid I made half a paper rosette from black cardstock and glued that down standing upright. It makes the background for my text. I die cut the Hurra word from silver glitter cardstock and put a few white die cuts behind it, glueing those down a bit off. Behind the text I blued half a circle cut from the dark blue patterned paper with the wooden print and also added a few silver stars and glittery silver sequins.
Well, somehow that looked boring. So I added a light blue and a white party garland, made with a die by TheGreetery, behind the rosette. And there was also room for a few balloons. I die cut those several from black cardstock using a die by MFT and added some light blue vellum as a middle layer. Now they fit the colors of the box, aren't just empty rings and also are sturdy enough to stand up.


Vor die Deko habe ich zwei Banner mit dem Text "endlich Ruhestand" aufgeklebt und drumherum ein paar weitere Glitzer-Pailetten verteilt.

In front of the decoration I glued down two banners with a "finaly retirement" text stamped onto them and then added a few more glitter sequins around them.


Und so sieht die Box geöffnet aus.

And this is what the opened box looks like.


Die Dame, die die Box bekommen wird, reist gerne und geht gerne shoppen. Dafür soll sie einen Zuschuss bekommen. Na, das lässt sich doch verwenden!
Ich habe die beiden Rückseiten der Box mit hellbauem Designpapier, das ein wenig wie Himmel mit Schleierwolken aussieht, beklebt. Davor kamen dann drei Lagen von Großstadt-Skylines, die ich aus hell-, mittel- und dunkelgrauem Cardstock gestanzt habe. Oben am Himmel fliegen noch zwei Flugzeuge. 

The lady, that will get this box, loves to travel and to shop and will get some money for that. Well, that's something I can work with!
I covered the two back sides of the box with light blue patterned paper, that looks like a sky with some thin white clouds. Then I glued three layers of city skylines, that I had cut from light, middle and dark grey cardstock, into the box. I also added two planes to the sky.


Zwischen die Häuserreihen habe ich Schilder mit Städtenamen verteilt.
Im Vordergrund steht ein grauer Koffer, der das Thema Reise nochmal aufgreift. Und um das Thema Shopping einzubauen, habe ich kleine Boutiquetüten aus verschiedenfarbigem Cardstock und Designpapier gewerkelt, die mit Griffen aus Twine versehen und mit kleinen Stücken farbigem Papier gefüllt sind.

Between the rows of houses I added signs with some city names on them.
In front of the skylines I glued down a suitcase to pick up the travel theme again. And to include the shopping theme I created little shopping bags from different colors of cardstock and patterned paper, that I added a handle from twine to and filled them with little pieces of patterned paper.


In einer der beiden aufklappenden Seitenteile befindet sich eine Tasche, die ich mit einer Umschlagklappe versehen habe, die mit Magneten geschlossen gehalten wird.
Dort befindet sich auch der erste Teil eines Textes zum Thema Ruhestand. Der ist mit einem Stempel von Stampcorner gemacht.

In one of the opening sides there's a pocket, that I created an envelope flap for. It holds closed with two little magnets.
There I also glued down the first part of a text with a retirement theme - it means "old enough to leave work forever".
 

 In der Tasche des letzten Seitenteils befindet sich eine kleine Karte für einen persönlichen Gruß - äh, die fehlte auf dem Foto noch. Auf die Tasche habe ich den zweiten Teil des Textes geklebt.

The pocket on the last side holds a little note card for some personal words - well, it was still missing when I took the picture. And I glued the rest of the retirement text down here - it means "young enough to enjoy it". 

Donnerstag, 23. Juni 2022

Und noch mal zum Ruhestand

 
Hallo Ihr Lieben!
Ja, heute habe ich schon wieder eine Karte zum Ruhestand auf dem Stampcorner Blog zu zeigen! Von denen benötige ich momentan die ein oder andere. Außerdem war da ja noch dieser Textstempel aus dem Stempelset Rente, den ich eigentlich schon auf der bayrischen Karte mit Bierkrug verwenden wollte, auf die er aber einfach nicht gepasst hat. Aber weil ich den so genial finde, habe ich mir etwas anderes einfallen lassen. 

Hello everyone!
Yes, I have another retirement card, that I'm sharing over at the Stampcorner Blog today. I need quite a few of these at the moment. And there was also this text stamp, that I had planned to use on the bavarian style card with the beer mug and that it just didn't fit onto But I just love this one so much that I came up with a different idea to use it for.

Ich habe überlegt, welches Motiv zum Text passen würde - und kam auf den genialen Dino aus dem Stempelset WOW. Der war perfekt - auch wenn ich ihn hier ein wenig ergänzt habe. Und schon war die Idee zu dieser Karte geboren.
Für den Hintergrund habe ich mit der Tropical Leaves Background Stencil von LawnFawn und Distress Oxide Peeled Paint und Forest Moss die tropischen Blätter auf ein Stück kraftfarbenen Cardstock gewischt. Anschließend habe ich weiße Stempelfarbe, gemischt mit ein wenig Wasser, darüber gespritzt. Die weiße Stempelfarbe ist nicht so krass und ich wollte eher dezente Farbspritzer. 
Um den schmalen Rahmen zu stanzen, habe ich zwei der Deckle Frames Stanzen verwendet. Dabei habe ich sie bewusst gedreht, so dass die Ränder innen und außen nicht identisch gestanzt werden. Ich wollte für diese Karte einen etwas "gröberen" Look. Ich habe den Rahmen aus schwarzem Cardstock gestanzt und auf den inzwischen getrockneten Hintergrund geklebt.
Dann habe ich den Hintergrund schwarz gemattet und auf einen weißen Kartenrohling geklebt.
Als Boden habe ich die Slimline Tropical Leaves Border von LawnFawn und eine Grasstanze jeweils aus schwarzem Cardstock gestanzt. Mit einem weißen Gelstift habe ich einige Highlights auf die Blätterbordüre gemalt und sie auf den Hintergrund geklebt. Davor kam dann die Grasreihe. Die habe ich im oberen Bereich mit Distress Oxide Peeled Paint ein wenig gewischt. Außerdem habe ich hier einen "wir werden dich vermissen" Text aus dem Stempelset Eule mit weißem Embossingpulver aufembosst.

I thought about which image would go with this text, that means "retirment - a legend leaves the field" - and came across the great dinosaur from the WOW stamp set. I completed him a bit gor my design, but the idea for this card was born.
For the background I inked some tropical leaves with the Tropical Leaves Background stencils by LawnFawn and Distress Oxide Peeled Paint and Forest Moss onto a piece of craft colored cardstock. Then I spritzed some white ink, mixed with water, onto it. The white ink isn't that bright and I was after some more subtle speckles here.
To create the thin frame, I used two of the Deckle Frames dies. I turned them on purpose so the edges on the inside and outside aren't identical here because I wanted a more rustic look for this card. I've cut the frame from black cardstock and glued it onto the dried background.
Then I matted the background black and glued it onto a white note card.
As a ground I've die cut the Slimline Tropical Leaves Border die by LawnFawn and a grass border die both from black cardstock. I used a white gel pen for a few highlights on the leaves border and glued it onto the background. On top of it I've glued down the grass border. I have inked up its top edge with Distress Oxide Peeled Paint. I also white heat embossed a "we're going to miss you" text onto the strip of grass.


Und hier ist der geniale Text in Nahaufnahme. Ich wollte, dass es so aussieht, als hätte ihn jemand in eine Steintafel gemeißelt. Deswegen habe ich ihn mit Versafine Clair Morning Mist auf hellgrauen Cardstock gestempelt, per Hand ein unebenes Rechteck ausgeschnitten und darauf dann mit Copics einige Punkte als Struktur aufgetupft. Außerdem habe ich mit einem schwarzen Fineliner einige Risse in die Tafel gemalt.
Der Dino aus dem Set WOW sollte die Tafel halten. Äh ja, da ist aber nur der Kopf im Set.... Deswegen habe ich ein wenig getrickst. Den Rahmen um den Kopf habe ich weggeschnitten. Stattdessen habe ich ein schmales Dreieck als Hals hinter den Dino gesetzt. Der Schwanz ist der Schwanz sowie Rücken des Dino mit Kaffee - der passte perfekt! Und für die Hände - und Füße, die man hinter dem Gras aber nicht mehr sehen kann - habe ich die Hände/Flügelspitzen eines der Vögel aus dem Old Buzzard Stempelset von WhimsyStamps verwendet. Ich habe alle Teile mit Copics coloriert und an die "Finger" frei Hand ein paar Krallen gemalt - schon hatte der Dino Hände! Ich habe alle Teile hinter die Tafel und dann alles auf meine Karte geklebt. 
Als Deko durften dann noch ein paar grüne Pailetten auf die Karte hüpfen. 

And here's the great text in all its amazingness. I wanted it to look like someone chiseled it into a flat stone. So I stamped it onto some light grey ink with Versafine Clair Morning Mist, cut it out in a wonky rectangle and added some dots with Copics to give the stone some texture. I also added some cracks to it with a white fineliner.
The dinosaur from the WOW stamp set was asigned to hold the stone. Ah, but, there's only the head included in this set.... So I had to think a bit outside the box. I've cut off the frame around the dino image and put a tall triangle behind the head as the neck instead. For the tail I used the tail and back of the Dino mit Kaffee image - it was just the perfect fit! And for hands - and feet, but those aren't visible anymore behind the grass - I used the hands/tips of wings from one of the buzzard from the Old Buzzard stamp set by WhimisyStamps. I colored all pieces with Copics and drew some claws to the "fingers" - and the dino had some hands! I glued all dino pieces behind the stone and then onto the background.
To decorate the card I glued a few green sequins onto the card.

Montag, 13. Juni 2022

Wenn der Chef in Pension geht....

 
Hallo Ihr Lieben!
Wenn der Chef in Pension geht, dann mag so mancher froh darüber sein. Wenn der Chef aber auch ein Freund ist, dann gönnt man ihm die Pension natürlich, ist aber auch ein wenig traurig darüber. Wobei gleich gesagt werden darf, dass der "Neue" dem "Alten" in nichts nach steht. Aber eine besondere Karte darf es dann doch sein. Und die zeige ich Euch heute.

Hello everyone!
When the boss retires some might be glad about it. But when said boss is also a good friend, then of course you're happy for him but also sad to see him leave. But I can say that the new boss is as good as the old one. Well, of course this needed a special card. And that I'm sharing with you today.
 
Ich habe hier eine Trifold Slimline Card gemacht. Sie ist aus weißem Cardstock gewerkelt und mit dunkelblauem Cardstock beklebt. 
Für die aus weißem und matt silbernem Cardstock gestanzten Buchstaben habe ich das Impact Alphabet Stanzenset von MFT benutzt, der auf weißen Cardstock gestempelte Text ist von SU. Rund um das Wort habe ich kleine silberne Sternchen geklebt und außerdem einen Rahmen mit einem weißen Gelstift aufgemalt. 
Und im unteren Bereich geht es mit dem Dienstfahrzeug ganz schnell in den Ruhestand. 
 
I made a trifold slimline card here. Its base is made from white cardstock and I glued some dark blue cardstock on top.
For the letters, die cut from white and matte silver metallic cardstock, I used the  Impact Alphabet die set by MFT, the rest of text stamped onto white cardstock is by SU. The text means "as a farewell". I glued some small silver star shaped sequins around the text and also added a frame with a white gel pen around the whole front.
And on the bottom of the card the chef is heading as fast as possible into retirement.


Das Auto lässt sich natürlich mit einem Slider Mechanismus über die Karte ziehen. In den Slider habe ich außerdem einen Stromkreis eingebaut, der das Blaulicht auf dem Dach des Autos blinken lässt.

Of course the car can be moved across the card with a slider mechanism. I also added a circuit to the slider to make the light on top of the car blink.


Öffnet man die erste Lage der Karte, dann sind zwei dekorierte Panele zu sehen.

When you open the top layer of the card you get to see two decorated panels.


Um ein einheitliches Bild zu kreieren, habe ich alle Lagen mit blauem Cardstock beklebt. Außerdem finden sich überall die sternchenförmigen Pailetten und der weiße Rahmen.
Hier auf dem obersten habe ich dann den Namen des Chefs, dekoriert mit dem ehemaligen Arbeitsmaterial. Der Text aus dem Stempelset Rente von Stampcorner passte hier einfach perfekt. Ich habe ihn auf ein Banner aus weißem Cardstock gestempelt und unter dem D festgeklebt. Für den Namen, der doch recht kurz ist, habe ich ein Alphabetset von SU verwendet, das war größer und füllte somit mehr der Karte aus. 
Außerdem habe ich kleine Comic-Blasen mit den Worten Chef, Kollege und Freund in blau bestempelt und die mit auf dem Cardstock verteilt.

To get a uniform look I covered all layers on the card with blue cardstock. I also added the star shaped sequins and the white frames to all the layers.
Hier on the top layer I glued down the letters for the boss' name and put some of the work material around it. Next to the D I glued down a bannner, cut from white cardstock, onto that I had stamped a "a real legend is leaving" text, stamped with blue ink. Since the name is really short I used a alphabet die set by SU to cut the letters. Those are larger and fill up more of the card panel.
I also stamped the words boss, colleague and friend with blue ink onto some comic bubbles and glued those around the name.


Die hier untere Lage ist die, die bei komplett geöffneter Karte nicht sichtbar ist. 
Hier habe ich wieder mit dem Impact Alphabet Stanzenset die Buchstaben für das Wort Pension gestanzt und dabei das O durch einen gestanzten Polizeistern ersetzt. 
Auch hier ist der Text aus dem Stempelset Rente von Stampcorner. Ich habe ihn wieder mit blauer Tinte abgestempelt und dabei die eigentlich vier-zeilige Anordnung in zwei-zeilig abgeändert. Die beiden Cardstockstreifen habe ich dann ober- und unterhalb des gestanzten Wortes aufgeklebt.

This now bottom layer is the one that won't be visible when the card is opened completly.
I used the Impact Alphabet die set again to die cut the word retirement and used a die cut police badge as an O here.
The stamped text here means "old enough to leave, young enough to enjoy the free time". I used blue ink again to stamp the text onto two strips of white cardstock and then glued those above and under the die cut word.


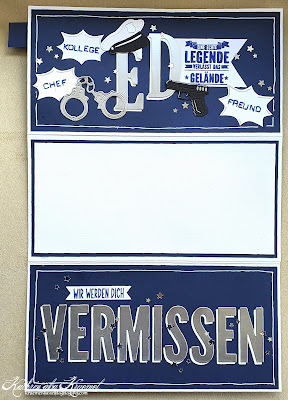
Und so sieht dann die komplett geöffnete Karte aus. Im mittleren weißen Bereich ist Platz für persönliche Worte und Unterschriften.

And this is the completly opened card. In the white middle section there's room for a personal message and the signatures.


Auf der untersten Lage habe ich dann noch ein "wir werden Dich vermissen" untergebracht, wieder aus einer Kombi aus Stempeln - hier aus dem Stempelset Eule von Stampcorner - und gestanzten Buchstaben gemacht.

Onto the bottom layer I've written a "we're going to miss you" text, again made with a combination of stamps and die cut letters.

Donnerstag, 9. Juni 2022

Karte zum Ruhestand


 Hallo Ihr Lieben!
Heute habe ich noch eine Karte zum Ruhestand zu zeigen - momentan brauche ich da einige von. Tja, was macht man da? Motivtechnisch tue ich mich da oft echt schwer. Aber dann kam das Stempelset Nur kein Stress von Stampcorner zwischen die Finger. Und so ist die Idee zu dieser Karte entstanden, die ich heute auf dem Stampcorner Blog zeige.

Hello everyone!
Today I have another retirement card to share - I need quite a few of these in the coming weeks. Well, what to make? Sometimes I find it really hard to decide on an image or design. But then I came across as stamp set by Stampcorner and the idea for this card, that I'm sharing over at the Stampcorner Blog today, was born. 

Hier habe ich ein Stück weißen Cardstocks schwarz gemattet und auf einen weißen Kartenrohling geklebt. 
Im oberen Bereich habe ich mit einem Blending Brush etwas Distress Oxide Tumbled Glass aufgewischt und dann das Opaque White von Copic mit einem Pinsel darüber gespritzt. Den unteren Teil der Karte habe ich weiß gelassen.

Here I matted a piece of white cardstock black and glued it onto a white note card.
I used a blending brush and Distress Oxide Tumbled Glass to lightly ink the upper part of my card blue, then flicked some of the Opaque White by Copic onto it with a small brush.
 

 Die süße Schildkröte aus dem Stempelset Nur kein Stress... ist mit Copics coloriert. Die hat so einen tollen gelangweilten Gesichtsausdruck! Um sie noch chilliger zu machen, habe ich ihr außerdem ein aus dem Mund hängendes Gänseblümchen verpasst. Coloriert habe ich mit Copics in verschiedenen Grüntönen und die Schildkröte anschließend ausgeschnitten.
Als Rahmen für die Schildkröte habe ich die Magic Iris Tropical Leaves Add-On Stanze von LawnFawn aus grünem Cardstock gestanzt und dann von innen her mit Distress Oxide Peeled Paint und Forest Moss schattiert. Die weißen Details auf der Schildkröte und dem Blätterkreis sind mit einem weißen Gelstift gemacht.
Hinter die Schilkröte habe ich dann noch das Schild aus dem neuen Stempelset Rente von Stampcorner gesetzt. Da das Schild eigentlich in die andere Richtung zeigt, habe ich es zweimal gestempelt, einmal nur den Pfahl und einmal das Schild ausgeschnitten und das Schild dann auf den Kopf gedreht wieder auf den Pfahl geklebt. Darauf habe ich dann das Wort Ruhestand gestempelt und auch das Schild mit Copics coloriert. Und so läuft die Schildkröte dann auch in die richtige Richtung.

This cute turtle is from the Nur kein Stress... stamp set and colored with Copics. I love the bored look on her face! To make her look even more chilled I also added a little flower, hanging from her mouth, to the image. I did the coloring with Copics in different shades of greens and then cut the turtle out.
As the frame for my turtle I've die cut the Magic Iris Tropical Leaves Add-On by LawnFawn from green cardstock and then shaded it from the center with Distress Oxide Peeled Paint and Forest Moss. For the white details on the turtle and the leaves I used a white gel pen. 
Behind the turtle I've added a sign saying "retirement". The sign oringally shows in the opposite direction. So I stamped the image twice. used the stem from one and the sign from the other one. I cut both out and glued the sign upside down onto the stem. I stamped the word retirement onto it and then colored the sign with Copics. Now the turtle is moving into the right direction.


Da ich das Chill-Kröten Wortspiel so toll fand, habe ich es auf meiner Karte integriert. Ich habe die Buchstaben für das Wort Chill mit dem Handletter Uppercase Alphabet von CraftEmotions aus schwarzem Cardstock und einem Bogen Designpapier ausgestanzt und beide jeweils leicht versetzt aufeinander geklebt. Diese Buchstaben habe ich dann unterhalb des Blätterkranzes auf die Karte geklebt. Da die Blätterspitzen unter den Buchstaben gestört haben, habe ich sie im unteren Bereich des Kranzes gerade weggeschnitten.
Unterhalb des Wortes Chill habe ich ein Kröte direkt auf die Karte gestempelt. Dafür habe ich den hinteren Teil des eigentlichen Chillkröte-Stempels aus dem Set Nur kein Stress.... verwendet.
Und darunter kam ein weiterer Stempel aus dem Set Rente zum Einsatz. Der enthält eigentlich noch zwei weitere Zeilen, mir haben aber nur diese beiden zur Schildkröte besser gefallen. Deshalb habe ich nur diese beiden abgestempelt und dann die schwarze Linie darunter einzeln wieder dazugestempelt, so dass der Text auch einen passenden Abschluss hat.

I just loved the Chillkröte pun so I included it in my design. We call a turtle Schildkröte in german, which sounds pretty similar to chillkröte. I've die cut the letters for the word chill with the Handletter Uppercase Alphabet die set by CraftEmotions from both black cardstock and some patterned paper. Then glued the black letters behind the ones cut from patterned paper as a shadow and glued them under the leaves frame onto the card. Since the tips of the leaves were kind of disturbing under the letters I cut the bottom of the leaves circle straight.
Under the word Chill I stamped the word kröte directly onto the white cardstock. And to finish my text on this card I stamped a "old enough to leave" text onto the bottom of the white cardstock.

Montag, 30. Mai 2022

Wenn ein Bayer in Rente geht...


Hallo Ihr Lieben!
 Tja, wenn ein Bayer in Rente geht, dann darf man auch mal mit Klischees spielen, oder? Und so ist diese "echt bayrische" Karte entstanden, auf der ich Euch auch gleich einen weiteren Sneak auf ein neues Stempelset aus dem Juni-Release von Stampcorner gebe.

Hello everyone!
Well, when a bavarian goes into retirement I guess it's apropriate, to make something really clichè. And so I made this "truly bavarian" card, on which I'm also giving another sneak at a new stamp set from Stampcorner's june release.

Für den Hintergrund habe ich hier einen Bogen aus dem Paper Pack 01 verwendet. Das habe ich zu einem Rechteck geschnitten, gelb gemattet und auf einen weißen Kartenrohling geklebt.
Der Text ist aus dem neuen Stempelset Rente. Eigentlich sind die Zeilen natürlich übereinander angeordnet, aber mir gefiel es so aufgeteilt auf meiner Karte besser. Eigentlich wollte ich einen ganz anderen Text des Sets verwenden, aber das ging sich designtechnisch so überhaupt nicht aus.... Also habe ich mich für diesen entschieden, ihn mit Versafine Clair Paradise auf weißen Cardstock gestempelt und per Hand ausgeschnitten. Dann habe ich die beiden Teile oben bzw. etwas später auch unten mit 3D Tape auf die Karte geklebt.

For the background I've cut a rectangle from one of the papers from the Paper Pack 01, matted it yellow and glued it onto a white note card.
The text means "all the best for your retirement" and is the already mentioned sneak. I had planned to use a different text from this set but no matter what I tried, it just didn't fit the card/image. So I picked this one and stamped it with Versafine Clair Paradise onto white cardstock and cut it out by hand. Then I glued the parts to the top and - a little later - bottom of my card using dimensionals.


Bier geht hier in Bayern natürlich immer! Also habe ich die Teile des Frothy Mugs von MFT aus weißem Cardstock gestanzt und mit Copics coloriert. Und damit der Bierkrug ein wenig wie der Pensionist aussieht, habe ich die Brille aus dem Stanzenset Stay Cool sowie einen der Schnurrbärte aus dem Mustache Trio Stanzenset, beide ebenfalls von MFT, auch aus weißem Cardstock gestanzt, mit Copics coloriert und auf den Bierkrug geklebt. In die Brille habe ich Gläser aus Folie eingesetzt, auf die ich dann die Highlights mit einem weißen Gelstift aufgemalt habe. Ich finde, der Bierschaum sieht hier beinahe aus wie eine schicke Frisur! 
Da das Bier nicht in der Luft schweben kann, habe ich aus dem dunkelbraunen Woodgrain Cardstock von LawnFawn einen Streifen geschnitten, mit einem weißen Inkpad die Struktur besser herausgebracht und diesen Streifen als Tisch verwendet.
Nun fehlte noch ein passender Hintergrund für das Motiv. Ich habe mit einer Rautenstencil und Distress Oxide Salty Ocean die Bayrische Flaggge auf weißen Cardstock gewischt, das Cardstockstück ebenfalls weiß gemattet und auf das Designpapier im Hintergrund geklebt. Darauf kam dann der Tisch und das Bier, jeweils mit unterschiedlich dickem 3D Tape aufgeklebt.
Als Deko habe ich dann noch ein paar gelb-braun irisierende Pailetten auf der Karte verteilt.

You can never go wrong with beer here in Bavaria! So I've die cut the pieces from the Frothy Mug die set by MFT from white cardstock and colored the pieces with Copics. To make the mug look a bit like the retiring person, I've die cut the glasses from the Stay Cool die set and one of the mustaches from the Mustache Trio die set, both also by MFT, from white cardstock again and used my Copics to color these as well. I've put some acetate behind the glasses and drew some reflections onto them using a white gel pen. I think, the froth looks kind of like some hair!
Since the beer couldn't float in the air, I've cut a strip from the dark brown Woodgrain Cardstock by LawnFawn, brought out the structure a bit more with a white ink pad and used this strip as some kind of desk.
Now I needed a background for the beer that fit my bavarian theme. I used a diamond stencil and Distress Oxide Salty Ocean to ink the bavarian flag onto a piece of white cardstock, then matted this piece of cardstock yellow again and glued it onto the background. On top I've attached the desk and beer mug using foam tape in two different thicknesses.
For decorations I added some yellow-brown iridescent sequins to my card.

Montag, 16. November 2020

Eine Box zur Pensionierung

 
Hallo Ihr Lieben!
Die nächste Pensionierung im Kollegenkreis steht an - diesmal habe ich eine Explosionbox zum Abschied gemacht.

Hello everyone!
Another of my co-workers is retiring - this time I've made an explosion box as a farewell gift.
 
Die Box selbst ist aus weißem Cardstock gewerkelt, die Seiten habe ich mit erst mit schwarzem, dann mit grünem Cardstock beklebt.
 
The box is made from white cardstock. To the sides I've glued some black cardstock and then some green cardstock on top.


Auch der Deckel ist schwarz beklebt. Den grünen Aufleger habe ich diesmal mit der Sun Burst Stanze von AveryElle gestanzt, die Strahlen füllen die Fläche so schön.
In die Mitte habe ich eine Rosette aus weißem Cardstock, gemacht mit der Rosette 3/8 Stanze von MFT, geklebt, darauf kamen ein schwarzer und ein grüner Kreis. 
Auf den habe ich ein langes Banner aus weißem Cardstock geklebt und darauf das Wort "Abschied". Das habe ich einzelnen Buchstaben, mit der Handletter Aphabet Stanze Lowercase und Uppcase von CraftEmotions einmal aus goldenem Spiegelcardstock, einmal aus schwarzem Cardstock gestanzt, zusammengesetzt und die beiden Worte leicht versetzt übereinander geklebt, so dass ein schwarzer Schatten hinter der goldenen Schrift bleibt. Über dem langen Banner habe ich dann noch ein kleines mit dem Wort "zum", ganz einfach am PC gedruckt" aufgeklebt.

Also the lid is covered with black cardstock, the green layer on top is die cut with the Sun Burst die by AveryElle. I like how the rays fill the blank areas towards the corners.
To the middle I've glued a white paper rosette, made with the Rosette 3/8 die by MFT, then glued a black and a green circle on top.
Onto the circles I've blued a long white banner from white cardstock and then glued the word "farewell" onto it. The word is put together from individual letters, die cut with the Handletter Alphabet Lowercase and Uppercase die sets by CraftEmotions. I've die cut them once from golden mirror cardstock, once from black cardstock, put the words together and glued them on top of each other just a tad bit off so there's a black shadow behind the golden word.
Over the long banner I've added a small one with a "for you" printed onto it.


Und so sieht die geöffnete Box aus. Ich habe sie so gestaltet, dass nur eines der Seitenteile stehen bleibt. Links und rechts der Mittelfläche befindet sich je eine Einstecktasche. In die eine habe ich eine Karte für uns alle zum Unterschreiben gesteckt, in der zweiten findet noch ein Gutschein Platz.

And this is the opened box. I've made it in a way that just one of the sides keep standing when the lid is taken off. 
On the left and right side of the middle part I've added two pockets. In one there's a card for all of us to sign, the other one will be filled with a giftcard.


Auf der vorderen Lasche habe ich einen Text untergebracht. Hier habe ich das Wort Pension, wieder mit den Alphabet Stanzensets von CraftEmotions gestanzt, aufgeklebt. Diesmal habe ich weißen Cardstock sowie goldenen Spiegelkarton benutzt. 
Den Spruch darunter habe ich wieder am PC geschrieben und ausgedruckt.

Onto the front flap I've added a text. Here I've glued down the word retirement, again die cut using the alphabet die sets by CraftEmotions, this time cutting it from white cardstock and golden mirror cardstock. 
The text underneath means "finally the time to do whatever you want, whenever you want". I've again written it on my laptop and printed it out.


Die Rückseite wurde wie ein Wald dekoriert. Ich habe hier verschiedene ausgestanzte Bäume übereinander- und auf die Rückwand geklebt. 
 
The back is decorated like a wood. I've die cut different trees here and glued them on top of each other and onto the back side.
 

Das Auto ist mit einem Cutting File von SVG Cuts gemacht. Ich habe die Box Card, die dieses Auto eigentlich ist, ordentlich verkleinert, was allerdings das Zusammenkleben nicht einfacher gemacht hat. Außerdem habe ich zusätzlich einen Boden eingefügt, sonst hätte man von oben das Gras durch das Auto hindurch gesehen. 
Für das Gewehr habe ich ein JPG aus dem WWW in eine Schneiddatei umgewandelt und geschnitten. Es ist 3 cm hoch...
Und weil der Hund hier genau so aussieht, wie der meines Kollegen, habe ich auf diesen Hund von Playmobil zurückgegriffen und ihm nur ein paar weiße Haare rechts und links der Schnauze aufgemalt.

The car is made using a cutting file by SVG Cuts. I've downsized the box card, what that card acutally is, quite a lot - which didn't make putting it together any easier. I've also added a bottom to it or you would have seen the grass through the car when looking at it from above. 
For the rifle I've changed a free JPG into a cutting file and cut it with my Cameo. It's just 1 1/4 inch in height.
And since the dog looks exactly like the one my co-worker owns I've used this dog by Playmobil for my card. I've only added a few white hairs next to his nose.
 

 Hier seht Ihr das Auto von vorne. Für die Scheinwerfer und Blinker habe ich Glitzersteine benutzt. Und hier sieht man auch, dass sich hinten am Waldrand noch ein Bienenkorb befindet. Ich habe versucht, mehr als nur ein Hobby unterzubringen.

And here you see the front of the car. For the lights and indicators I've used clear and orange rhinestones. And you can also see that there's a bee hive at the edge of the woods. I've tried to include more than just one of his hobbies in this card.


Auch für die Rücklichter habe ich - hier quadratische - Glitzersteine benutzt.

Also for the rear lights I've used rhinestones - square ones in this case.


Montag, 5. Oktober 2020

Eine Karte zum Ruhestand


Hallo Ihr Lieben!
Eine Karte zum Ruhestand musste her, die gleichzeitig als Verpackung für einen Gutschein dienen sollte. Und das ist von meinem Tisch gehüpft.

Hello everyone!
One of my collegues at work retired - so we needed a card that also fit a gift voucher in. And this is what I came up with.

Auf der Vorderseite der Karte habe ich die Arbeitsutensilien mit Nagel-Brads an einem Stück Holz befestigt. Für das Holz habe ich einen Holzhintergrund mit brauner Tinte auf hellbraunen Cardstock gestempelt und die Ränder noch mit Distress Ink Ground Espresso gewischt. An den vier Ecken habe ich noch je eine kleine Schraube geklebt. Dann habe ich das Holzbrett mit 3D Tape auf die mit blauem Cardstock beklebte Karte geklebt. 
Das Arbeitsmaterial ist aus weißem und schwarzem Cardstock sowie goldenem Spiegel-Cardstock gestanzt. Die Stanzen habe ich vor Ewigkeiten mal irgendwo erstanden und kann bei bestem Willen nicht mehr sagen, von wem sie sind.
Den Text "an den Nagel gehängt" habe ich am PC gedruckt, golden gemattet und aufgeklebt.

On the front I've attached his work stuff to a piece of wood with nail shaped brads. For the wooden board I've stamped the wood pattern with dark brown ink onto a piece of light brown cardstock, then added some Distress Ink Ground Espresso to the edges. To each of the corners I've also glued a small die cut screw and then glued the board onto the card front that I've put some dark blue cardstock onto. 
All the work stuff is die cut from black and white cardstock and some golden mirror cardstock. I've bought those dies a very long time ago and have no idea anymore what brand they are.
The saying means "hung onto a nail" and is used as a phrase to say that someone gave up on/ends something. I've printed it with my home printer, matted it golden and glued it to the card front as well.

 
So sieht die Karte aus, wenn man sie einmal aufklappt.
 
This is the card opened for the first time - there's another layer added to this card.
 

 Im unteren Teil habe ich das Wort Pension aufgeklebt. Es ist mit dem Impact Alphabet von MFT aus goldenem Spiegelcardstock gestanzt, das O habe ich durch den Dienststern ersetzt. 
Außerdem habe ich hier noch den tollen "Alt genug..." Text von Stampcorner verwendet. Ich habe ihn in zwei Teile geklebt und ober- sowie unterhalb des Wortes Pension aufgeklebt.

In the lower part of the card I've written the word reitrement across the panel, die cut from golden mirror cardstock with the Impact Alphabet die set by MFT. I've replaced the O with a police star.
I've also added a great retirement text by Stampcorner here. It means "old enough to leave, young enough to enjoy the time after". I've cut it into two parts and glued them over and under the die cut word.


Ihr seht schon, die einzelnen Bereiche sind alle ähnlich gestaltet.
Im oberen Bereich der Karte habe ich wieder das Impact Alphabet sowie goldenen Spiegelcardstock benutzt, um das Wort Abschied zu schreiben. Das kleine zum ist von SU.
Und dann durfte ein Streifenwagen nicht fehlen. Der ist aus dem selben Stanzenset wie auch die Teile auf der Vorderseite und ebenalls aus weißem und schwarzem Cardstock sowie goldenem Spiegelcardstock gestanzt und zusammengesetzt.

As you can see, all areas of the card are decorated matching each other.
In the upper area I've used the Impact Alphabet dies and golden mirror cardstock again to write the word "farewell". 
And then I needed a police car. It's again from the same die set that I've also used on the front of the card. And also here I've used black and white cardstock and golden mirror cardstock and put the pieces together.


Und so ein echter Streifenwagen braucht natürlich ein Blaulicht! Ich hatte eine halbrunde LED in blau da und die passte von der Form her perfekt. Hinter dem blauen Cardstock befindet sich der übliche Aufbau einer LED Karte.

And a real police car needs some head lights! I had one of those round LED lights in blue at home and it was perfect in size and shape. Behind the blue cardstock I've hidden the electronics, done like on any LED card.

 
Und so sieht die Karte dann komplett geöffnet aus. Im mittleren Bereich war Platz für persönliche Worte, im Bereich darunter habe ich unter dem blauen Cardstock blaues Schleifenband angeklebt, mit dem der Gutschein in der Karte festgebunden werden konnte.
 
And this is completly opened card. In the middle area there was room for a personal message, in the area at the bottom I've put some blue ribbon under the cardstock. This was used to hold the gift voucher in place.