Samstag, 11. Februar 2023

Paint your world happy

 
Hallo Ihr Lieben!
Momentan ist mir nach bunten Karten in Regenbogenfarben. Liegt wohl am grauen Winterwetter, das jetzt doch schon einige Zeit herrscht. Also habe ich meine Stanzen und Stempel auf der Suche nach Inspiration durchsucht und bin auf das Artful Brush von Spellbinders gestoßen. Das wollte ich, als es rauskam, unbedingt haben, habe es bisher aber noch nicht benutzt. Und es war perfekt. Und so ist diese Karte entstanden.

Hello everyone!
At the moment I feel like making colorful cards in rainbow colors. Guess it's because of the grey winter wetter we're having since quite some time. So I went through my dies and stamps, looking for inspiration, and came across the Artful Brush die set by Spellbinders. I wanted this so badly when it was released, but haven't used it yet. And it was perfect! So I made this card.

Für den Hintergrund habe ich den Cloudy Day Stempel von Create a Smile mit weißer Stempeltinte auf hellblauen Cardstock gestempelt. Links von und unterhalb der Wolken habe ich mit einem etwas dunkleren Aqua-Ton als der Cardstock Schatten gemalt, außerdem habe ich die Wolken selbst ganz leicht ebenfalls links und unten mit einem weißen Polychromo gefüllt. Anschließend habe ich aqua farbene Metallic Watercolor über den Cardstock gespritzt.

For the background I stamped the Cloudy Day stamp by Create a Smile with white ink onto light blue cardstock. On the left and under each cloud I drew shadows with a Copic, that's just a bit darker in tone than the cardstock. I also filled the clouds on the left and bottom very lightly with a white Polychromo. Then I also spritzed some light aqua metallic watercolor over the cardstock.


Ich wollte einen Regenbogen vom Pinsel ausgehen lassen, so als ob er damit gemalt worden wäre. Also habe ich mit der Happy Swish Stanze von MFT die Regenbogenteile aus rotem, gelbem, grünem, blauem und lilafarbenem Cardstock gestanzt und zusammengeklebt. Außerdem habe ich aus den selben Cardstocktönen gleich noch einige winzige Blüten und kleine Schmetterlinge, jeweils mit Stanzen von Magnolia, gestanzt. Die und auch den Regenbogen habe ich mit Copics etwas schattiert und die kleinen Teile dann auf dem Regenbogen angeordnet. 
Das Ende des Regenbogens habe ich noch mit der Schere unregelmäßig abgeschnitten, schließlich hinterlässt ein Pinsel keine harte Kante.
 
I wanted a rainbow at the tips of my brush, like it was just painted with it. So I used the Happy Swish die by MFT to die cut the rainbow pieces from red, yellow, green, blue and purple cardstock and glued them together. I also die cut some tiny flowers and small butterflies, using dies by Magnolia for both, from the same cardstock colors. I used my Copics to shade the small decoration pieces and also the rainbow, then attached the flowers and butterflies onto the rainbow. 
With my scissors I cut the end of the rainbow in a uneven line, a brush will not leave a harsh edge here.
 

 Um die Borsten des Pinsels auszustanzen, habe ich wieder die selben Cardstockfarben wie für den Regenbogen verwendet. 
Den Griff des Pinsels habe ich dreimal aus craft farbenem Cardstock gestanzt, mit Distress Ink Walnut Stain ein wenig gewischt um das tolle Holzmuster darauf besser zur Geltung zu bringen, und dann an einem der Griffe erst die Pinselborsten überlappend angeklebt, anschließend obenauf zwei weitere Pinselgriffe. Das Metallteil ist aus mattem silberfarbenem Metalliccardstock gestanzt.
Auch auf und zwischen die Pinselborsten habe ich einige kleine Blüten geklebt. 
Der Text ist aus dem Stempelset Builder Bears von MFT. Eigentlich lautet der "you paint my world happy". Ich habe nur das "paint" und "world happy" weiß auf schwarzen Cardstock embosst und anschließend das Wort "your" mit einem anderen Stempel aus dem selben Set dazwischen gestempelt.

To die cut the bristles of the brush I used the same cardstock colors like I did for the rainbow.
I die cut the brush handle three times from kraft cardstock, inked them up a bit with Distress Ink Walnut Stain to bring out the beautiful wooden pattern a bit better, then attached the bristles to one of the handles, overlapping them to make all five colors fit the width of the brush, and glued the other two handles on top. To die cut the metal part I used matte silver metallic cardstock.
I glued a few more of the small flowers onto and between the bristles.
The text on the card is from the Builder Bears stamp set by MFT. Originally it reads "you paint my worl happy". I only stamped and white heat embossed the "paint" and "world happy" parts onto a strip of black cardstock, then stamped the word "your" between them, using another stamp from the same set.
 

 Aus weißem Cardstock habe ich einen der Single Stitched Rectangle Frames von MFT gestanzt und mit 3D Tape auf dem Hintergrund befestigt. Darauf habe ich dann den Pinsel, den Regenbogen und den Text geklebt. 
Zum Schluss habe ich noch einige sechseckige Mini-Pailetten aufgeklebt und alles auf einem weißen Kartenrohling befestigt.

From white cardstock I die cut one of the Single Stitched Rectangle Frames by MFT and attached it with foam tape to the background. Then I glued the brush, the rainbow and the text on top.
To finish the card I added a few tiny hexagon shaped confetti and attached everything onto a white note card.

Freitag, 10. Februar 2023

LawnFawnatics Challenge #142

 
Hallo Ihr Lieben!
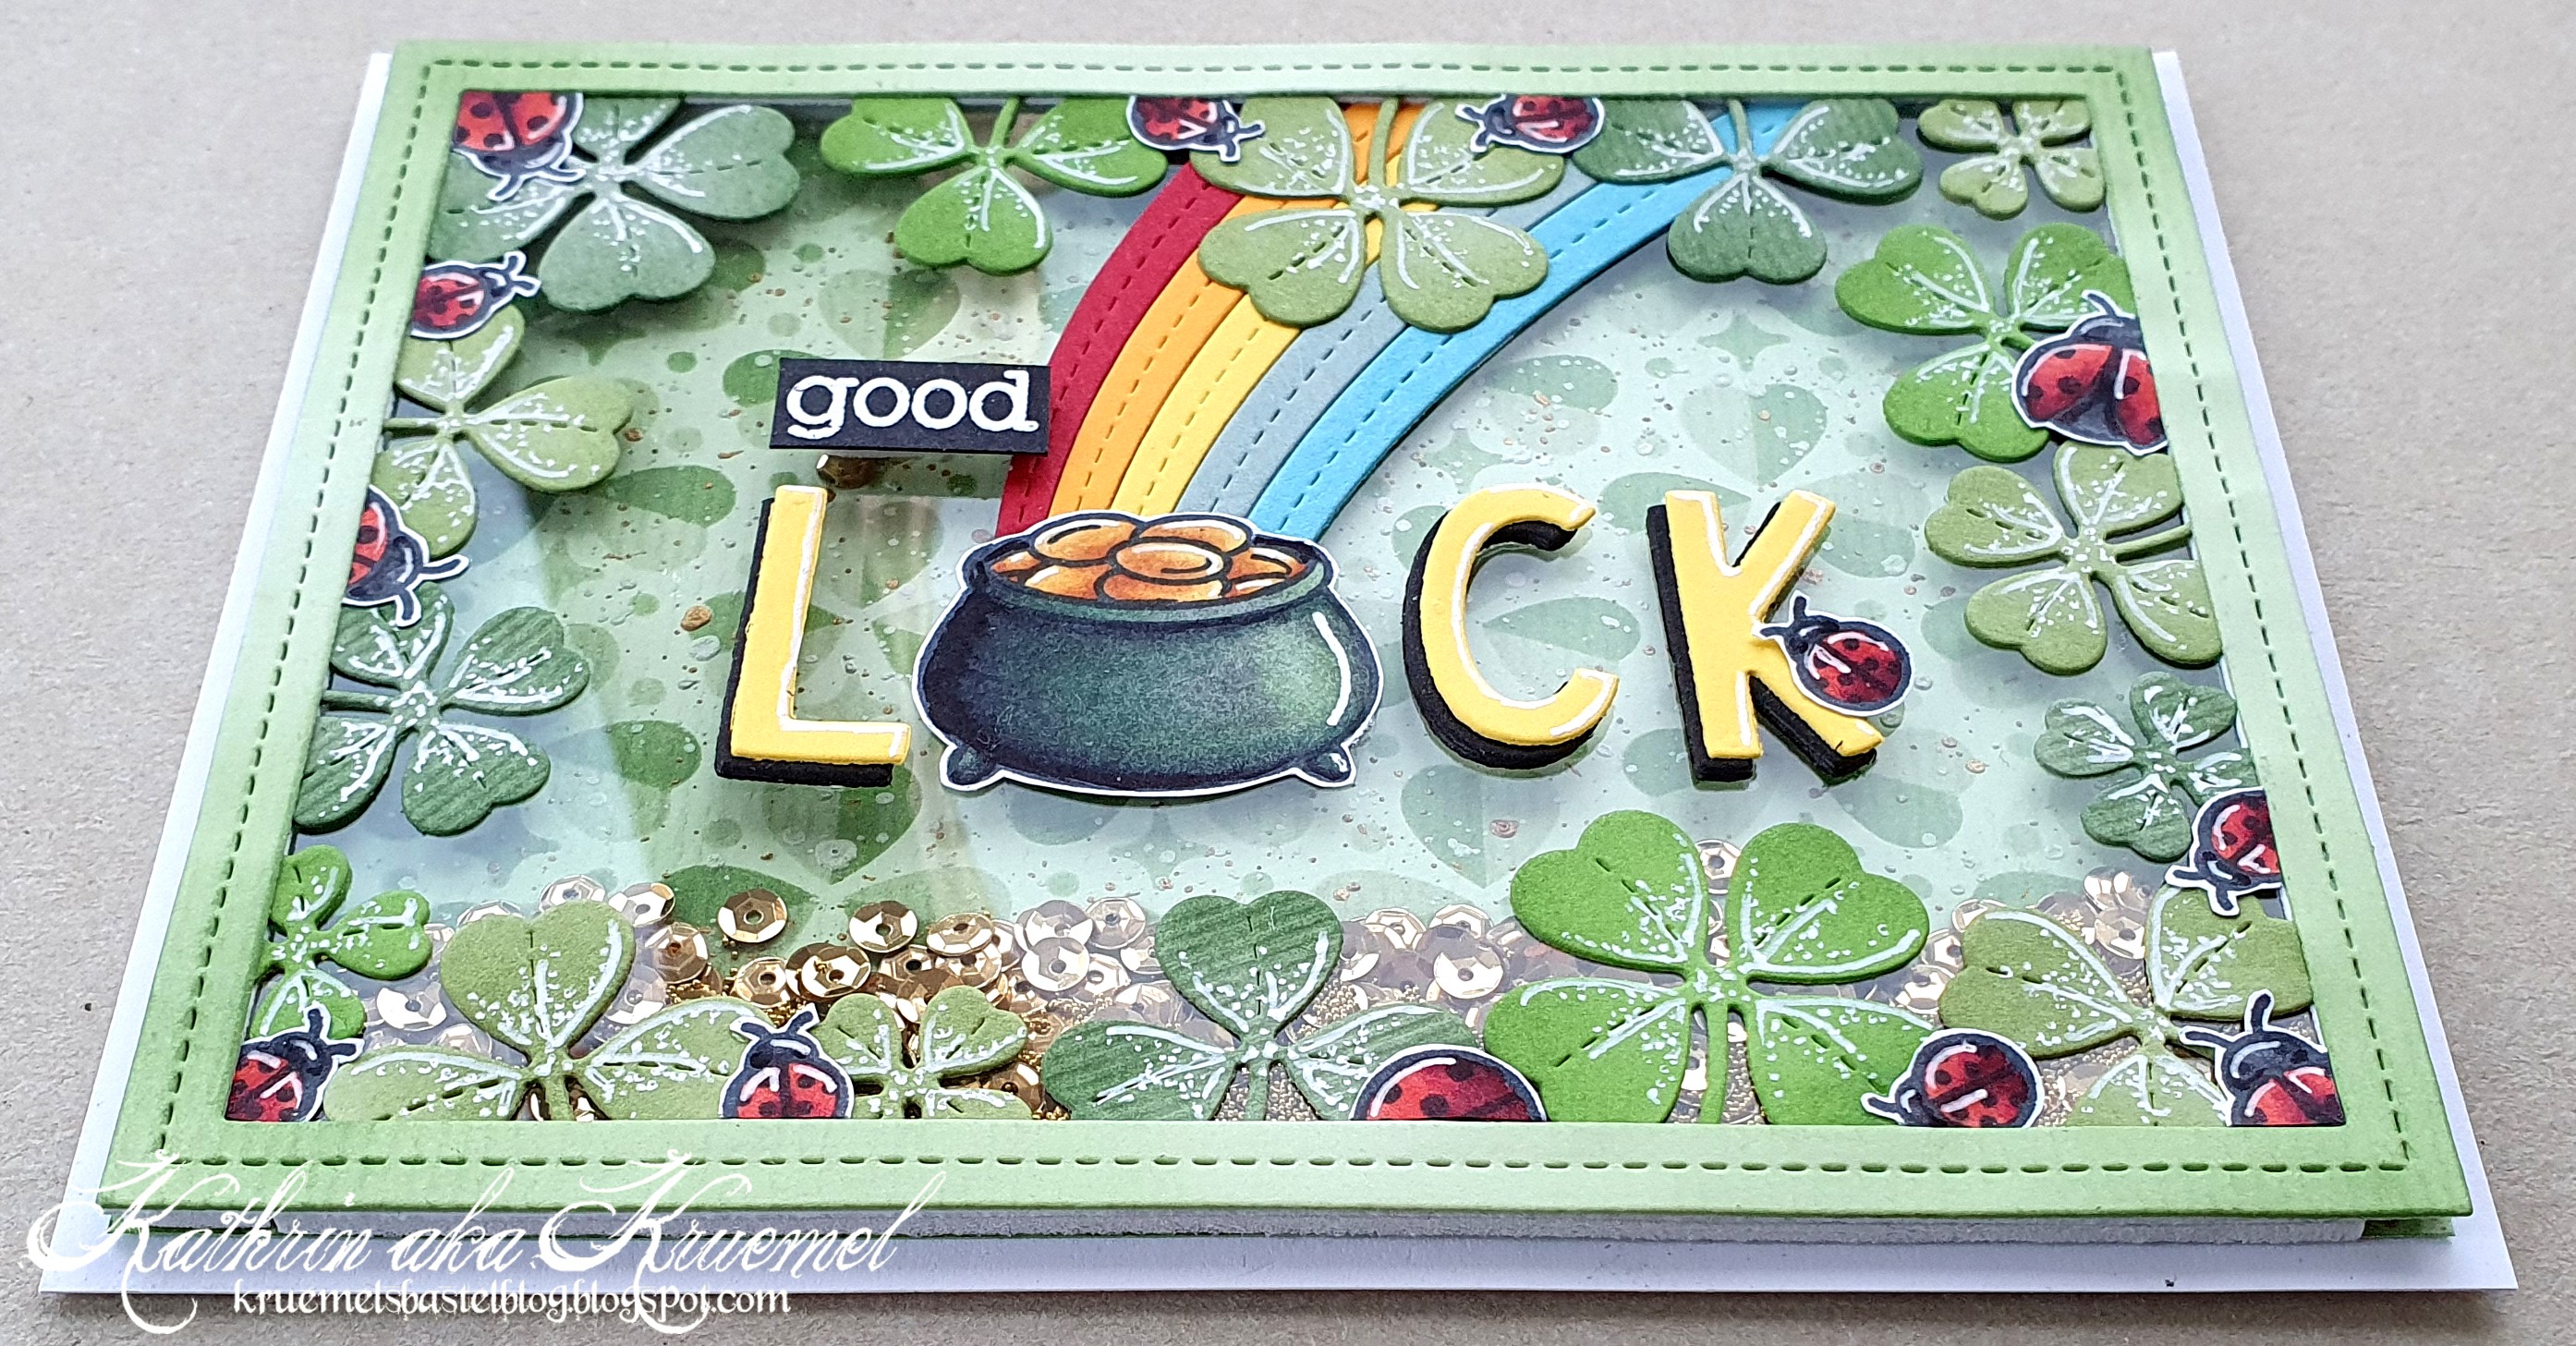
Interactive Card - das ist das Thema der LawnFawnatics Challenge #142. Ich habe eine Shaker Card gemacht. Vielleicht nicht unbedingt die innoviativste interaktive Karte, aber irgendwie kam mir diese Idee und da bot sich ein Shaker an.

Hello everyone!
Interactive card - that's the theme of LawnFawnatics Challenge #142. I made a shaker card. That's maybe not the most innovative interactive card type, but I had that idea in mind and a shaker worked best with it.

Für den Hintergrund habe ich ein Stück hellgrünen Cardstocks mit dem Clover Background Stencil Set sowie Distress Ink Bundled Sage und Mowed Lawn die Kleeblätter aufgewischt. Dann habe ich weiße und goldene Metallic Watercolor aufgespritzt und von der Rändern her noch etwas Distress Ink Rustic Wilderness aufgetragen.

For the background I inked the clovers onto a piece of light green cardstock using the Clover Background stencil set and Distress  Ink Bundled Sage and Mowed Lawn. Then I spritzed white and gold metallic watercolor onto the cardstock and also darkened up the edges a bit with Distress Ink Rustic Wilderness.


Es gibt ja einige tolle Rahmen von LawnFawn, an denen außen Blumen oder Blätter oder Schneeflocken etc. angebracht sind. Ich habe mir einen mit Kleeblättern gebastelt. Dafür habe ich mit einer der Stitched Rectangle Frames Stanzen wieder aus dem hellgrünen Cardstock einen Rahmen gestanzt und ihn an den Ecken wieder mit Rustic Wilderness ein wenig gewischt. Von hinten habe ich dann Kleeblätter am inneren Rand entlang aufgeklebt. Die habe ich mit den Lucky Clover Stanzen aus Cardstock in drei verschiedenen Grüntönen gestanzt, jeweils an den Rändern ebenfalls ein wenig gewischt und mit einem weißen Gelstift einige Details aufgemalt. 
Zwischen die Kleeblätter habe ich dann viele Marienkäfer aus dem Set Hey, Lady verteilt.

LawnFawn has a few great frame dies, where there are little flowers or leaves or snowflakes cut at the inner edge of the frame. I created one with clovers myself. I die cut one of the Stitched Rectangle Frames from the light green cardstock again and again inked up the corners a bit with Rustic Wilderness. Then I glued lots of clovers along the inner edge of the frame, attaching them to the back of the frame. I had die cut the clovers from three different shades of green cardstock using the Lucky Clovers dies, then darkened the edges again just a bit and added a few white details using a white gel pen.
Between the clovers I attached quite a few ladybugs from the Hey Lady stamp set.


Der Text auf meiner Karte ist gleichzeitig auch die Deko. 
Zuerst habe ich den Hexenkessel aus dem Purrfectly Wicked Stempelset abgestempelt und die Goldmünzen aus der Schatztruhe aus dem Set Ahoy Matey hineingestempelt. Dann habe ich ihn, ebenso wie die Marienkäfer, mit Copics coloriert und ausgeschnitten.
Mit Stanzen aus dem Set Finley's ABC habe ich dann die Buchstaben L, C und K dreimal aus schwarzem und einmal aus gelbem Cardstock ausgestanzt und aufeinander geklebt. Die gelbe Lage habe ich dabei ein wenig nach oben rechts versetzt, so dass ein schmaler Schatten darunter sichtbar bleibt. Mit dem Hexenkessel als U konnte ich so das Wort Luck schreiben. 
Mit weißem Embossingpulver habe ich dann das good aus dem Set My Lucky Charm auf schwarzen Cardstock embosst und ausgeschnitten. 
Für den Regenbogen, der aus dem Goldtopf kommen sollte, musste ich "fremdgehen". Von LawnFawn gibt es nur einen normal gebogenen Regenbogen, ich wollte aber unbedingt einen, der Richtung Kartenrand - und darüber hinaus - geht. Also habe ich eine Stanze von MFT benutzt. Die war ein wenig zu breit für den Hexenkessel, so dass ich statt der 6 nur 5 Bögen benutzt habe. Da auf der Karte schon genug grün vorhanden ist, habe ich diese Farbe ausgelassen und stattdessen zwischen gelb und blau einen grün-grau-blauen Bogen gesetzt. 
Ich habe alle Dekoelemente auf ein Stück Acetate geklebt - das Wort good ist mit 3D Tape befestigt - und das Acetate dann von hinten gegen den Kleeblatt-Rahmen geklebt. Am K habe ich dann noch einen weiteren kleinen Marienkäfer befestigt. 

The text on this card is also the decoration.
I first stamped the cauldron from the Purrfectly Wicked stamp set and stamped the coins of the treasure chest from the Ahoy Matey stamp set "into" it. Then I colored it with Copics, just like I did the ladybugs before, and cut everything out.
Using dies from the Finley's ABC die set I cut the letters L, C and K three times from black and once from yellow cardstock and stacked them. I moved the yellow layer a bit to the top right to have a thin black shadow behind it. Using the cauldron as the U I was now able to write the word luck.
Using white embossing powder I heat embossed the word good from the My Lucky Charm stamp set onto black cardstock and cut it out.
For the rainbow that I wanted to come out of the cauldron I had to use a die by MFT. There's only a "normal" shaped one y LawnFawn, but I really wanted mine to reach the edge of the card, making it look like it continues outside the card. This die I used was a bit too wide for behind my cauldron so I only used 5 of the 6 arches. Since there is already lots of green on my card, I left out this color from my rainbow and used a kind of green-grey-blue arch between the yellow and the blue one.
I attached all decorative elements to a piece of acetate - I used foam tape behind the word good - and then adhered the acetate to the back of my clover frame. Then I added one more little ladybug to the K.


Zum Schluss habe ich den Rahmen mit goldenen Pailetten und winzig-kleinen goldenen Kügelchen gefüllt und mit 3D Tape auf den Hintergrund geklebt.

To finish the card I filled the frame with gold sequins and gold micro beads and attached it to the background using foam tape.

Donnerstag, 9. Februar 2023

Glückspost

 
Hallo Ihr Lieben!
Eigentlich wollte ich für meinen heutigen Post auf dem Stampcorner Blog eine rein schwarz-weiße Karte machen, aber irgendwie war mir das dann doch ein wenig zu farblos. Also habe ich kräftiges Grün dazu kombiniert. Und so ist diese Karte entstanden, die ich besonders für Männer absolut perfekt finde.

Hello everyone!
For today's post over at the Stampcorner Blog I had planned to make a black and white only card. But that seemed a bit too little color for my taste. So I threw in a bit of a bright green. And so I ended up with this card, that, in my opinion, is perfect especially for men.

Für den Hintergrund habe ich den Simple Stripes Diagonal Background von LawnFawn einmal aus weißem und einmal aus schwarzem Cardstock gestanzt und dann die Streifen abwechselnd angeordnet und von hinten mit zwei Streifen Cardstock fixiert. Das tolle ist, man bekommt so gleich zwei fertige Hintergründe! Stellt Euch also schonmal auf eine weitere Karte damit in naher Zukunft ein.... Anschließend habe ich silberfarbene Metallic Watercolor bespritzt.

For the background I cut the Simple Stripes Diagonal background by LawnFawn once from white and once from black cardstock, then interchanged the colors of the strips and connected them by glueing them onto two strips of cardstock. The great thing ist, that you end up with two backgrounds - so be prepared for another card with it in the near future.... Then I flicked some silver metallic watercolor onto the cardstock.


Für mein Hauptmotiv habe ich mal wieder etwas in den älteren Stempelsets gegraben und bin dabei auf das süße Monster aus dem Set Stay Crazy gestoßen. Ich habe es mit grauer Tinte gestempelt und mit Copics coloriert. Dann habe ich ihm das Kleeblatt in die Hand gegeben. Das habe ich mit einer der Stanzen aus dem Set Glückssymbole von CraftEmotions aus grünem Cardstock gestanzt und mit Copics ein wenig schattiert. Die weißen Linien und Punkte sind überall wieder mit einem weißen Gelstift gemacht. 
Auch das Wort Glückspost ist, mit der gleichnamigen Stanze von Stampcorner, aus grünem Cardstock gestanzt und mit Copics schattiert. 
Als Hintergrund für das Monster habe ich einen der Scallop Circle von Stampcorner aus silberfarbenem Glittercardstock gestanzt und darauf dann einen etwas kleineren Kreis, gestanzt aus schwarzem Glittercardstock, aufgeklebt. 
Das Monster habe ich dann mit dünnem 3D Tape auf dem Kreis befestigt. Darunter kam das Wort Glückspost - die Beine des Monsterchens passten genau zwischen das L und K, so dass der Text halb auf den Kreis geklebt ist. 
Die kleineren Texte sind aus dem Stempelset Kleine Worte. Ich habe sie mit weißem Embossingpulver auf schwarzen Cardstock embosst, ausgeschnitten und grün gemattet. 

For my main image I went through some older stamp sets and came across this cute monster from the Stay Crazy stamp set. I stamped it with grey ink and colored it with Copics. Then I let him hold the clover. I die cut it with a die from CraftEmotions from green cardstock and shaded it with my Copics. The white lines and dots are, as always, made with a white gelpen.
Also the word Glückspost - happy mail in german - is die cut from green cardstock and shaded with Copics.
As a backdrop for the monster I cut a scalloped circle by Stampcorner from silver glitter cardstock and glued a smaller circle, cut from black glitter cardstock, on top.
I used thin foam tape to attache the monster to the circle. Underneath I glued down the die cut word - the monster's legs fit exactly between the letters L and K, so I was able to attach part of the word onto the circle. 
The smaller texts are white heat embossed onto black cardstock, cut out and matted green.


Zum Schluss habe ich auch den Kreis mit dem Motiv mit dünnem 3D Tape auf den Hintergrund geklebt und noch einige grüne Pailetten als Deko auf der Karte verteilt.

In the end I used thin foam tape again to attach the circle with the image onto the background and added a few green sequins for decorations.

Mittwoch, 8. Februar 2023

Create a Smile Februar Sketch Challenge

 
Hallo Ihr Lieben!
Mit einem neuen Sketch startet heute eine weitere Create a Smile Challenge. Und mich hat der Sketch zu einer Valentinstags-Karte inspiriert. Allerdings ist sie farblich - und evtl. auch vom Motiv her - nicht ganz so klassisch ausgefallen. Hier ist der neue Sketch:

Hello everyone!
With a new sketch we are starting the next Create a Smile Challenge today. It inspired me to make a valentine's card - it may just not be traditional color- and imagewise. This is the sketch:


Ich weiß nicht, ob es das Herz im Sketch war, das mich so beeinflusst hat, oder ob es später der Frosch und die dazugehörigen Texte waren, denn eigentlich wollte ich gar keine Valentinstagskarte mehr machen. Aber ich finde, die kann man zur Not auch später noch verwenden.

I am not sure if it was the heart in the sketch, that pushed me towards a Valentine's card, or if it was the frog and its sentiments later. I definately hadn't planned to make any more Valentine's cards this year. But I think, I still can give that away later this year.


Ich habe mit einem Stück ziemlich kräftig-grünem Cardstock gestartet. Von unten her habe ich den Cardstock mit Distress Ink Mowed Lawn und Twisted Citron ein wenig schattiert. Dann habe ich den Confetti Hearts Stencil aufgelegt und die Herzen ebenfalls in grün aufgewischt. Im unteren, dunkleren Bereich habe ich dafür Rustic Wilderness, weiter oben dann wieder Mowed Lawn benutzt.

I started with a piece of quite bright green cardstock. I used Distress Ink Mowed Lawn and Twisted Citron to give the cardstock a bit of a gradiant. Then I put the Confetti Hearts stencil on top and added the tiny green hearts. In the lower, darker area of the cardstock I used Rustic Wilderness, then I switched to Mowed Lawn again for the hearts in the upper area.


Als ich den Sketch das erste Mal sah, wusste ich, dass ich die Window Pocket Stanze für die Deko verwenden wollte. Ich habe sie aus zart grünem Cardstock gestanzt und einfach einen Teil davon abgeschnitten, damit die Tasche später besser auf die Karte passt. Und weil im Sketch der Kreis ein wenig weiter links ist, bei der Stanze aber weiter rechts, habe ich zum Zukleben meiner Tasche die größere Lasche verwendet. Da die Tasche aufgeklebt ist, sieht man das gar nicht.
In die Tasche habe ich ein Stück weißen Cardstock geschoben, auf das ich mit hellroas farbener Tinte und dem Cloudy Day Stempel die kleinen Wolken aufgestempelt habe. Leider gibt es den Stempel nicht mehr, aber ich wollte ihn unbedingt verwenden. Rechts am Cardstock  habe ich dann ein Stück eines der Useful Banners, gestanzt aus pinkfarbenem Cardstock, aufgeklebt. An dem kann man die Karte aus der Tasche ziehen - ich werde später noch eine Geschenkkarte an der Rückseite befestigen. Die steht dann zwar etwas weiter aus der Tasche heraus, das stört mich aber nicht.
Der süße Frosch ist natürlich aus dem Stempelset Sei kein Frosch - genauso wie die Texte. Die Texte habe ich schwarz auf gelben Cardstock gestempelt und dann mit 3D Tape auf dem Umschlag/der Tasche angeklebt.
Aus dem Stempelset Steiler Zahn habe ich noch die Rohrkolben und die Libelle abgestempelt und dann alle Motive mit Copics coloriert, ausgeschnitten und auf der Tasche befestigt. Zum Aufkleben des Froschs habe ich wieder 3D Tape benutzt.
Und weil ich das Pink - eigentlich abgeleitet von den Backen des Froschs - nochmal aufgreifen wollte, habe ich noch einige Herzen mit der Hearts Stanze ausgestanzt und über dem Frosch aufgeklebt.

The first time I saw the sketch, I knew, that I wanted to use the Window Pocket die for my decorations. I die cut it from soft green cardstock and then cut off a part of it to make it fit onto the card. And since the circle in the sketch is moved a bit to the left, the die cuts it more to the right, I simply used the wider flap to glue the pocket closed. Since I glued it to the cardstock no one with know.
I cut a piece of white cardstock to put into the pocket and stamped some clouds onto it using some light pink ink and the Cloudy Day stamp. Sadly this isn't available anymore, but I really wanted to use it here. I attached a piece of one of the Useful Banners, cut from pink cardstock, to the right edge of the cardstock piece, which can be used to pull the little card out of the pocket. I plan to attach a gift card to its back later. It won't fit fully into the pocket anymore after I cut that down but I don't mind it being visible.
The cute frog is from the Unfrogettable stamp set - as are the texts. I stamped the texts black onto yellow cardstock and then attached the strips with foam tape to the pocket only.
From the Oh Dam stamp set I stamped the cattails and the dragonfly image and colored all the images with my Copics. Then I cut them out and attached them to the pocket, using foam tape behind the frog again.
And since I wanted to pick up the pink again - which I originally added because of the frog's pink cheeks - I die cut some hearts with the Hearts die set and arranged those above the frog.


Zum Schluss habe ich die Tasche samt Motiven wieder mit 3D Tape auf dem Hintergrund befestigt - das macht das Herausziehen der kleinen Karte einfacher -, habe alles auf einen weißen Kartenrohling geklebt und für ein wenig Bling noch ein paar gelb-pink irisierende Glitzersteine aufgeklebt.

To finish the card, I attached the pocket with foam tape to the background - that makes pulling the tab easier -, adhered everthing to a white note card and added a few yellow-pink iridescent rhinestones for a bit of bling.

Dienstag, 7. Februar 2023

Eine schwere Geburt...

 
Hallo Ihr Lieben!
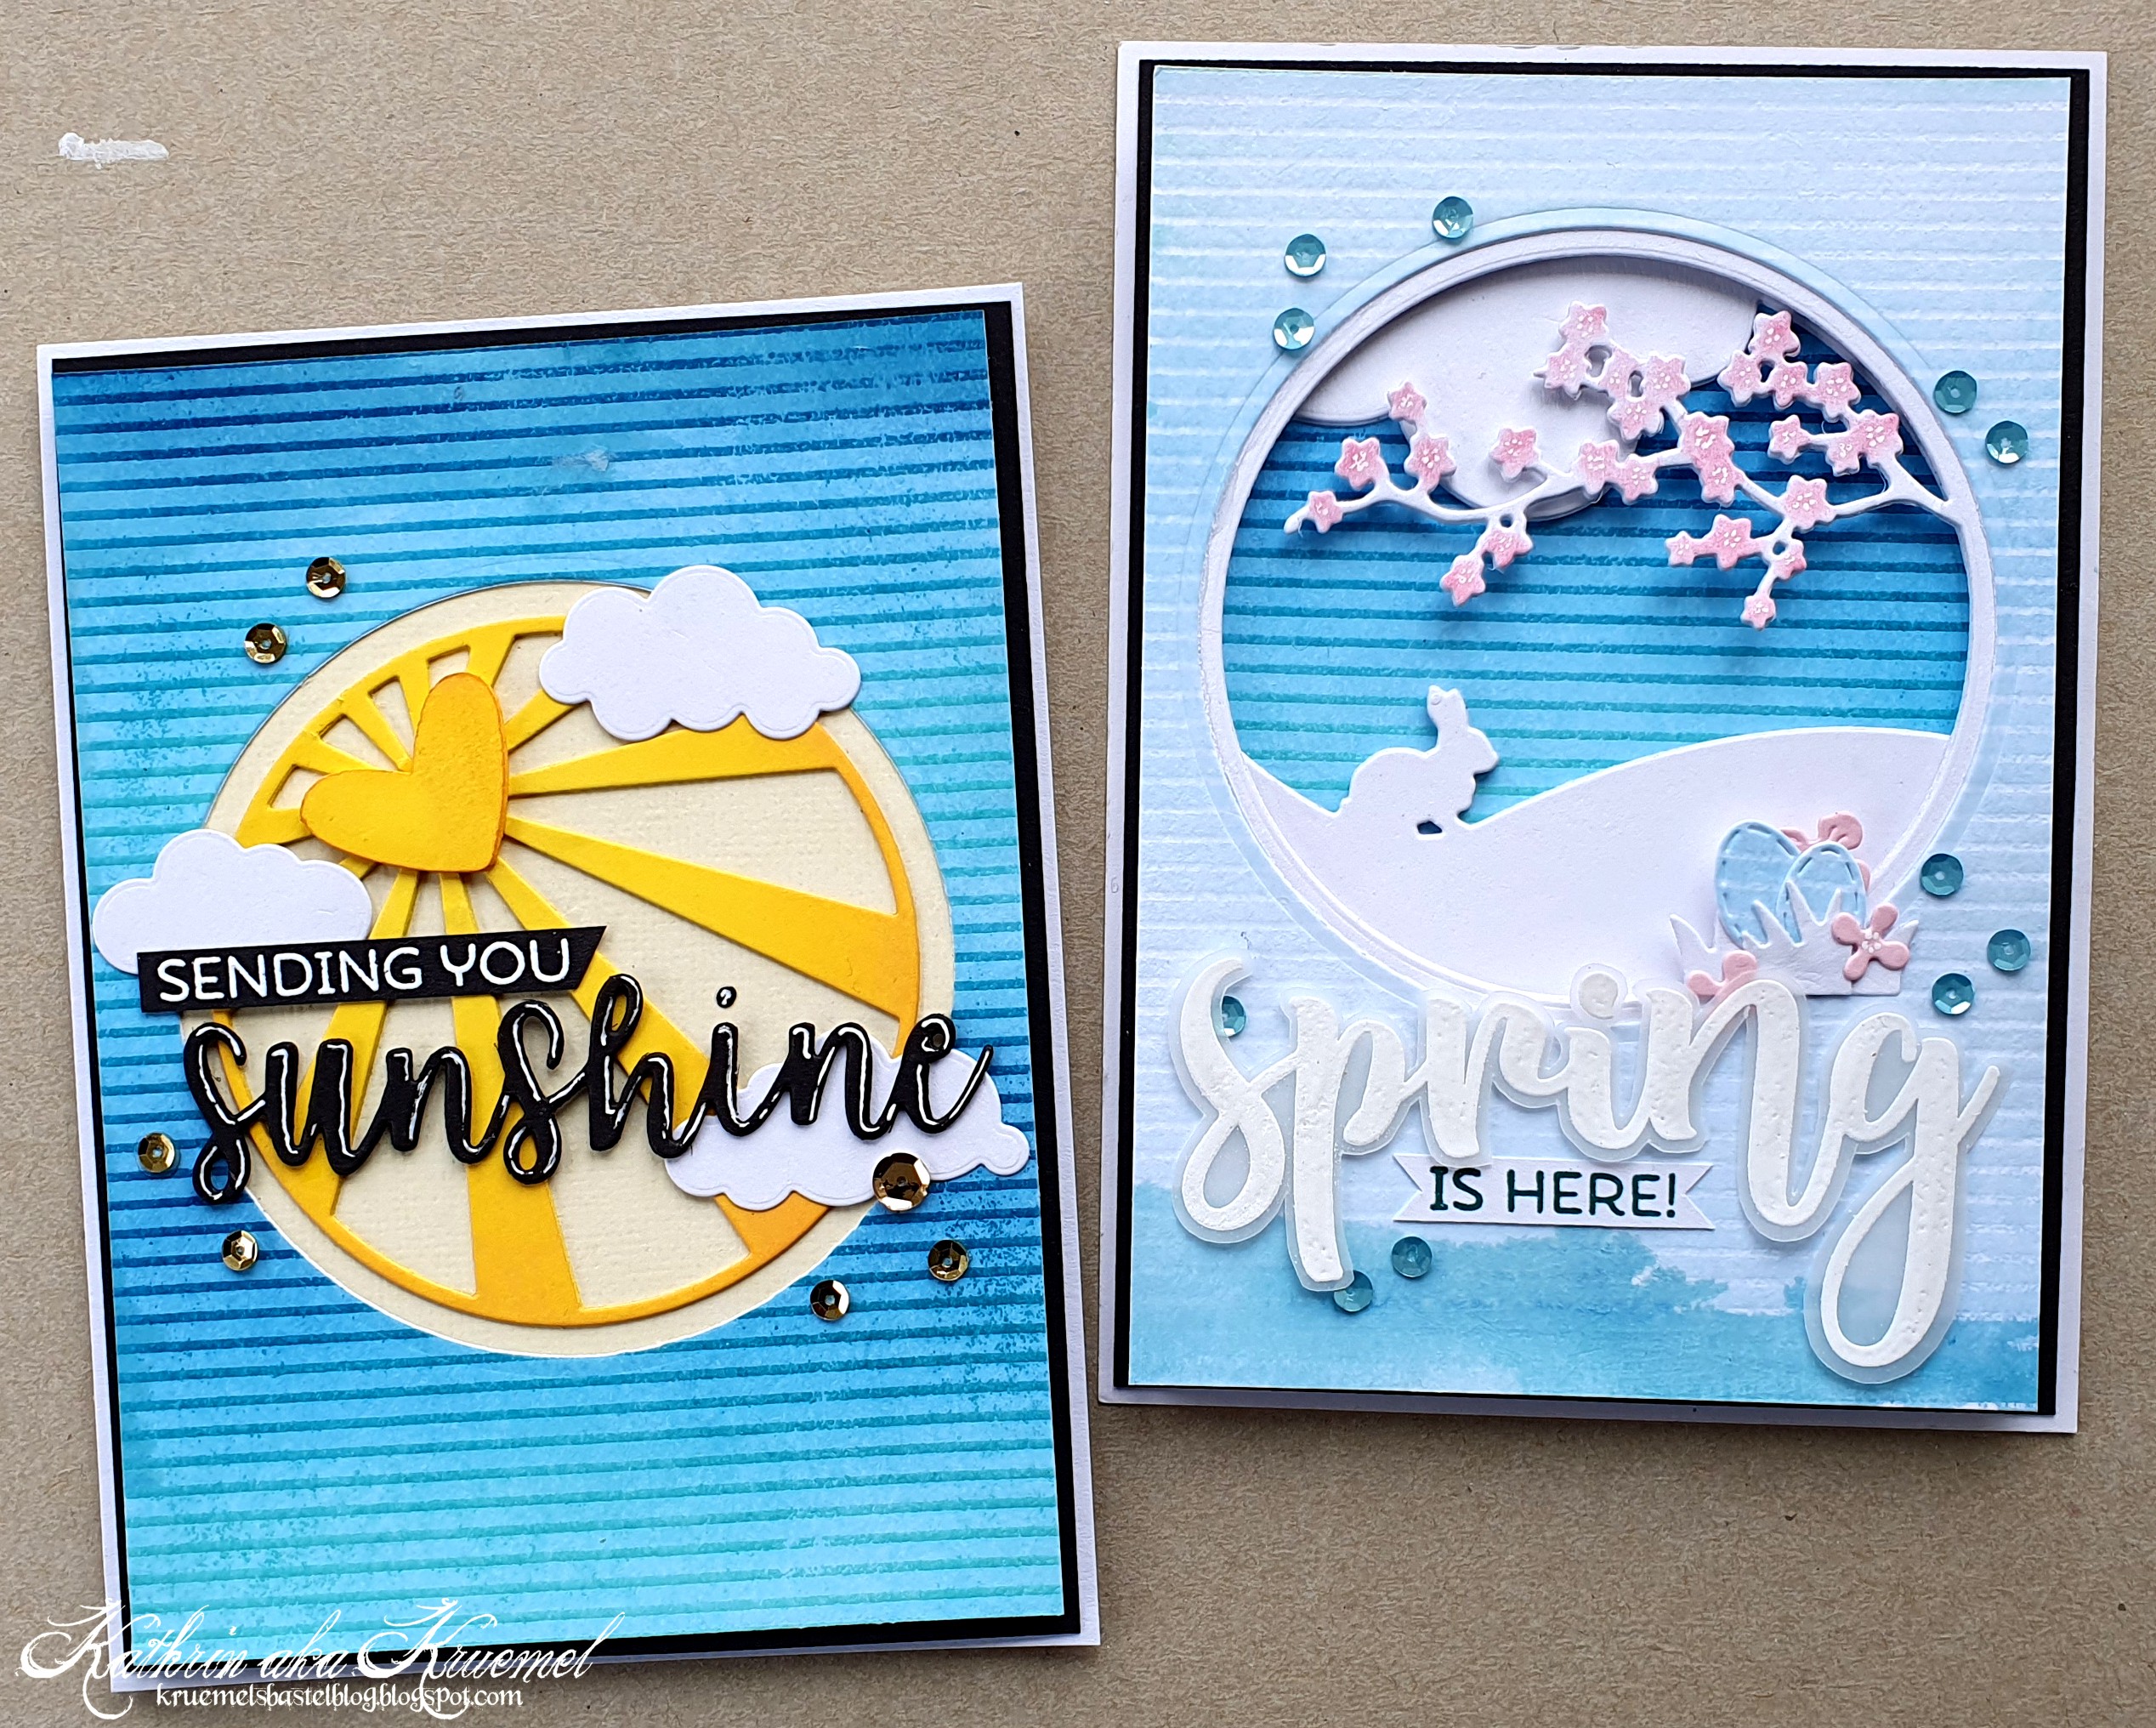
Kennt Ihr diese Tage, an denen Ihr unbedingt kreativ sein wollt, Euch erst nichts einfallen will, dann bei der Gestaltung alles schief geht und am Ende habt Ihr eine Karte, mit der Ihr so gar nicht zufrieden seid? So ging es mir hier - und es sind sogar zwei Karten entstanden.... Aber ich dachte, ich zeige sie Euch trotzdem.
 
Hello everyone!
Do you know those days, when you really want to make a card, but have no idea, then when you start everything goes wrong and you end up with a card that you don't like? That's what happened to me here - and I ended up with two cards I am not entirely happy with.... But I thought I'd share them anyway. 

Ich muss ein wenig ausholen. Eigentlich wartete ich auf eine Stempellieferung, da hat die Post aber nicht mitgespielt. Und mir geht es oft so, dass ich, wenn ich eine bestimmte Idee im Kopf habe, die erst rauslassen muss, bevor der Kopf wieder frei für neues ist. Aber es war Wochenende, und das wollte ich nicht komplett unkreativ verstreichen lassen. Da es für den Februar eine neue Technique Throwback Thursday Challenge gibt, habe ich mir das dazugehörige Video angeschaut und entschieden, dafür eine Karte zu machen. Es ging einfach alles schief - und statt gleich zu Beginn abzubrechen, habe ich weitergemacht. Bis an den Punkt, wo aufgeben keine Option mehr war, denn ich hatte bereits zu viel Zeit und Material in die Karte gesteckt. Eigentlich sogar Karten, denn bei der Technik erhält man "in einem Aufwasch" gleich zwei Hintergründe....
Begonnen hat alles damit, dass ich Distress Ink Tumbled Glass, Broken China und Uncharted Mariner verwenden wollte, um meinen Hintergrund in Streifen damit zu wischen. Das habe ich auch - allerdings erst während des Wischens festgestellt, dass ich zwar die passenden Schwämmchen gewählt, dann aber aus Versehen die Oxides verwendet habe. Also erstmal Schwämmchen waschen. Und der Hintergrund wurde auch nicht so kräftig, wie geplant. 
Dann habe ich mit einem Streifen-Hintergrundstempel von MFT und klarem Embossingpulver das Muster auf den Cardstock gebracht. Anschließend wird für die Technik der Cardstock mit -viel- Wasser besprüht, mit einem weiteren Stück weißen Cardstocks abgedeckt und alles durch die Stanzmaschine gekurbelt um die Farbe zu übertragen. Ich hatte offenbar zu viel Wasser erwischt, denn die Farbe wurde seitlich am Cardstock rausgedrückt (daher auch der unschöne Rand unten). Also erstmal die Big Shot Platten sauber machen. Dann klebten meine Cardstockstücke auch noch zusammen, so dass beim Auseinanderziehen etwas von der oberen Schicht abgelöst wurde. 
Statt hier jetzt abzubrechen, habe ich eine Kreisstanze genommen und aus der Mitte jedes der beiden Cardstockstücke einen Kreis gestanzt.

I have to tell you the story. Originally I was waiting for a stamp order, but the post was pretty slow and the order didn't arrive. And often when I have a special idea in mind, I have to make that card to have room for new ideas. Well, it was the weekend and I didn't want to not create so I checked the new Technique Throwback Thursday chalenge, watched the video and decided, to give it a try. What could go wrong, went wrong - and instead of stopping right after the first mistake and moving on to something else, I kept going. Until the point where stopping wasn't an option anymore because I had already invested too much time and material in my card. I should say cards, because with this technique you end up with two backgrounds...
It all started with me wanting to use Distress Ink Tumbled Glass, Broken China and Uncharted Mariner to ink up a piece of white cardstock in stripes. I did - but only realized when I was nearly done with the inking, that I had pulled out the right blending foams, but then accidently brought out the Oxides instead of the Ink pads. So, I staretd with washing my blending foams - and the background didn't turn out as dark as I had planned.
Then I used a stripes background stamp by MFT and clear embossing powder to add the pattern to the cardstock. With this technique, the cardstock then gets misted with - lots - of water, you put another piece of white cardstock on top and run it through the die cutting machine to transfer the ink.  Seems like I had used too much of water, because the ink oozed out of the cardstock (that's also why I ended up with this not so nice area on the bottom). So I started with cleaning my Big Shot plates. And then my cardstock pieces kind of stuck together. When pulling them apart the top layer of the paper tore in a few areas. 
Instead of calling it a day, I kept going and die cut a cricle from the center of each cardstock piece.


Für die erste Karte - und die gefällt mir noch wenig als die zweite - habe ich dann mit den Panorama-Stanzen Wolke, Frühlingszweig und Hase von Charlie und Paulchen die Szene aus weißem Cardstock zusammengesetzt. Dabei habe ich zwei Wolkenlagen, drei Hasenlagen und mit etwas Abstandsklebeband dazwischen nochmal drei Zweig-Lagen aufeinander gesetzt. Die Karte ist also zum Schluss dementsprechend hoch.... Hinter die Szenen habe ich den Kreis, den ich aus dem dunkleren Hintergrund gestanzt habe, geklebt und obenauf den helleren Hintergrund.

For the first card - and I like this one even less than the second one - I die cut the scene from white cardstock using Panorama cloud, spring branch and bunny by Charlie und Paulchen. I stacked two cloud layers, three bunny layers and with some foam tape inbetween three of the branch layers. So the card is pretty thick in the end. Behind the scenes I glued the circle I had cut from the carker background, then put the lighter one on top.


Um den Zweig ein wenig mehr hervorzuheben, habe ich die Blüten mit rosafarbener Kreide eingefärbt. Außerdem habe ich unten links an den Kreis noch zwei hellblaue Ostereier - gestanzt aus dem übriggebliebenen Kreis, den ich aus dem helleren Hintergrund gestanzt hatte - mit etwas Gras und ein paar hellrosafarbenen Blüten aufgeklebt.

To bring out the branch a bit more, I put some pink chalk on top of the blossoms.
I also added two light blue easter eggs - die cut from the left over circle I had cut from the lighter background - with some grass and a few light pink blossoms.
 

 Für den Text habe ich das Wort Spring aus dem Spring Stempelset von HoneybeeStamps weiß auf Vellum embosst, ausgeschnitten und mit dünnem 3D Tape auf die Karte geklebt. Den Rest des Textes habe ich mit einem Stempel aus dem selben Stempelset und dunkeltürkisfarbener Tinte auf weißen Cardstock gestempelt und unter dem Wort Spring aufgeklebt.

For the text I white heat embossed the word spring from the Spring stamp set by HoneybeeStamps onto vellum, cut it out and attached it with thin foam tape. The rest of the text I stamped with another stamp from the same stamp set and dark turquoise ink onto white cardstock and adhered it under the word spring.


Zum Schluss habe ich einige kleine hellblaue Pailetten als Deko aufgeklebt, den Cardstock schwarz gemattet und alles auf einen weißen Kartenrohling geklebt. Und hier kann man die Tiefe - und Dimension - der Karte ganz gut sehen.

To finish this card, I added a few small light blue sequins, matted the cardstock black and attached it to a white note card. And here you can get a better idea of the depth - and dimension - of the finished card.


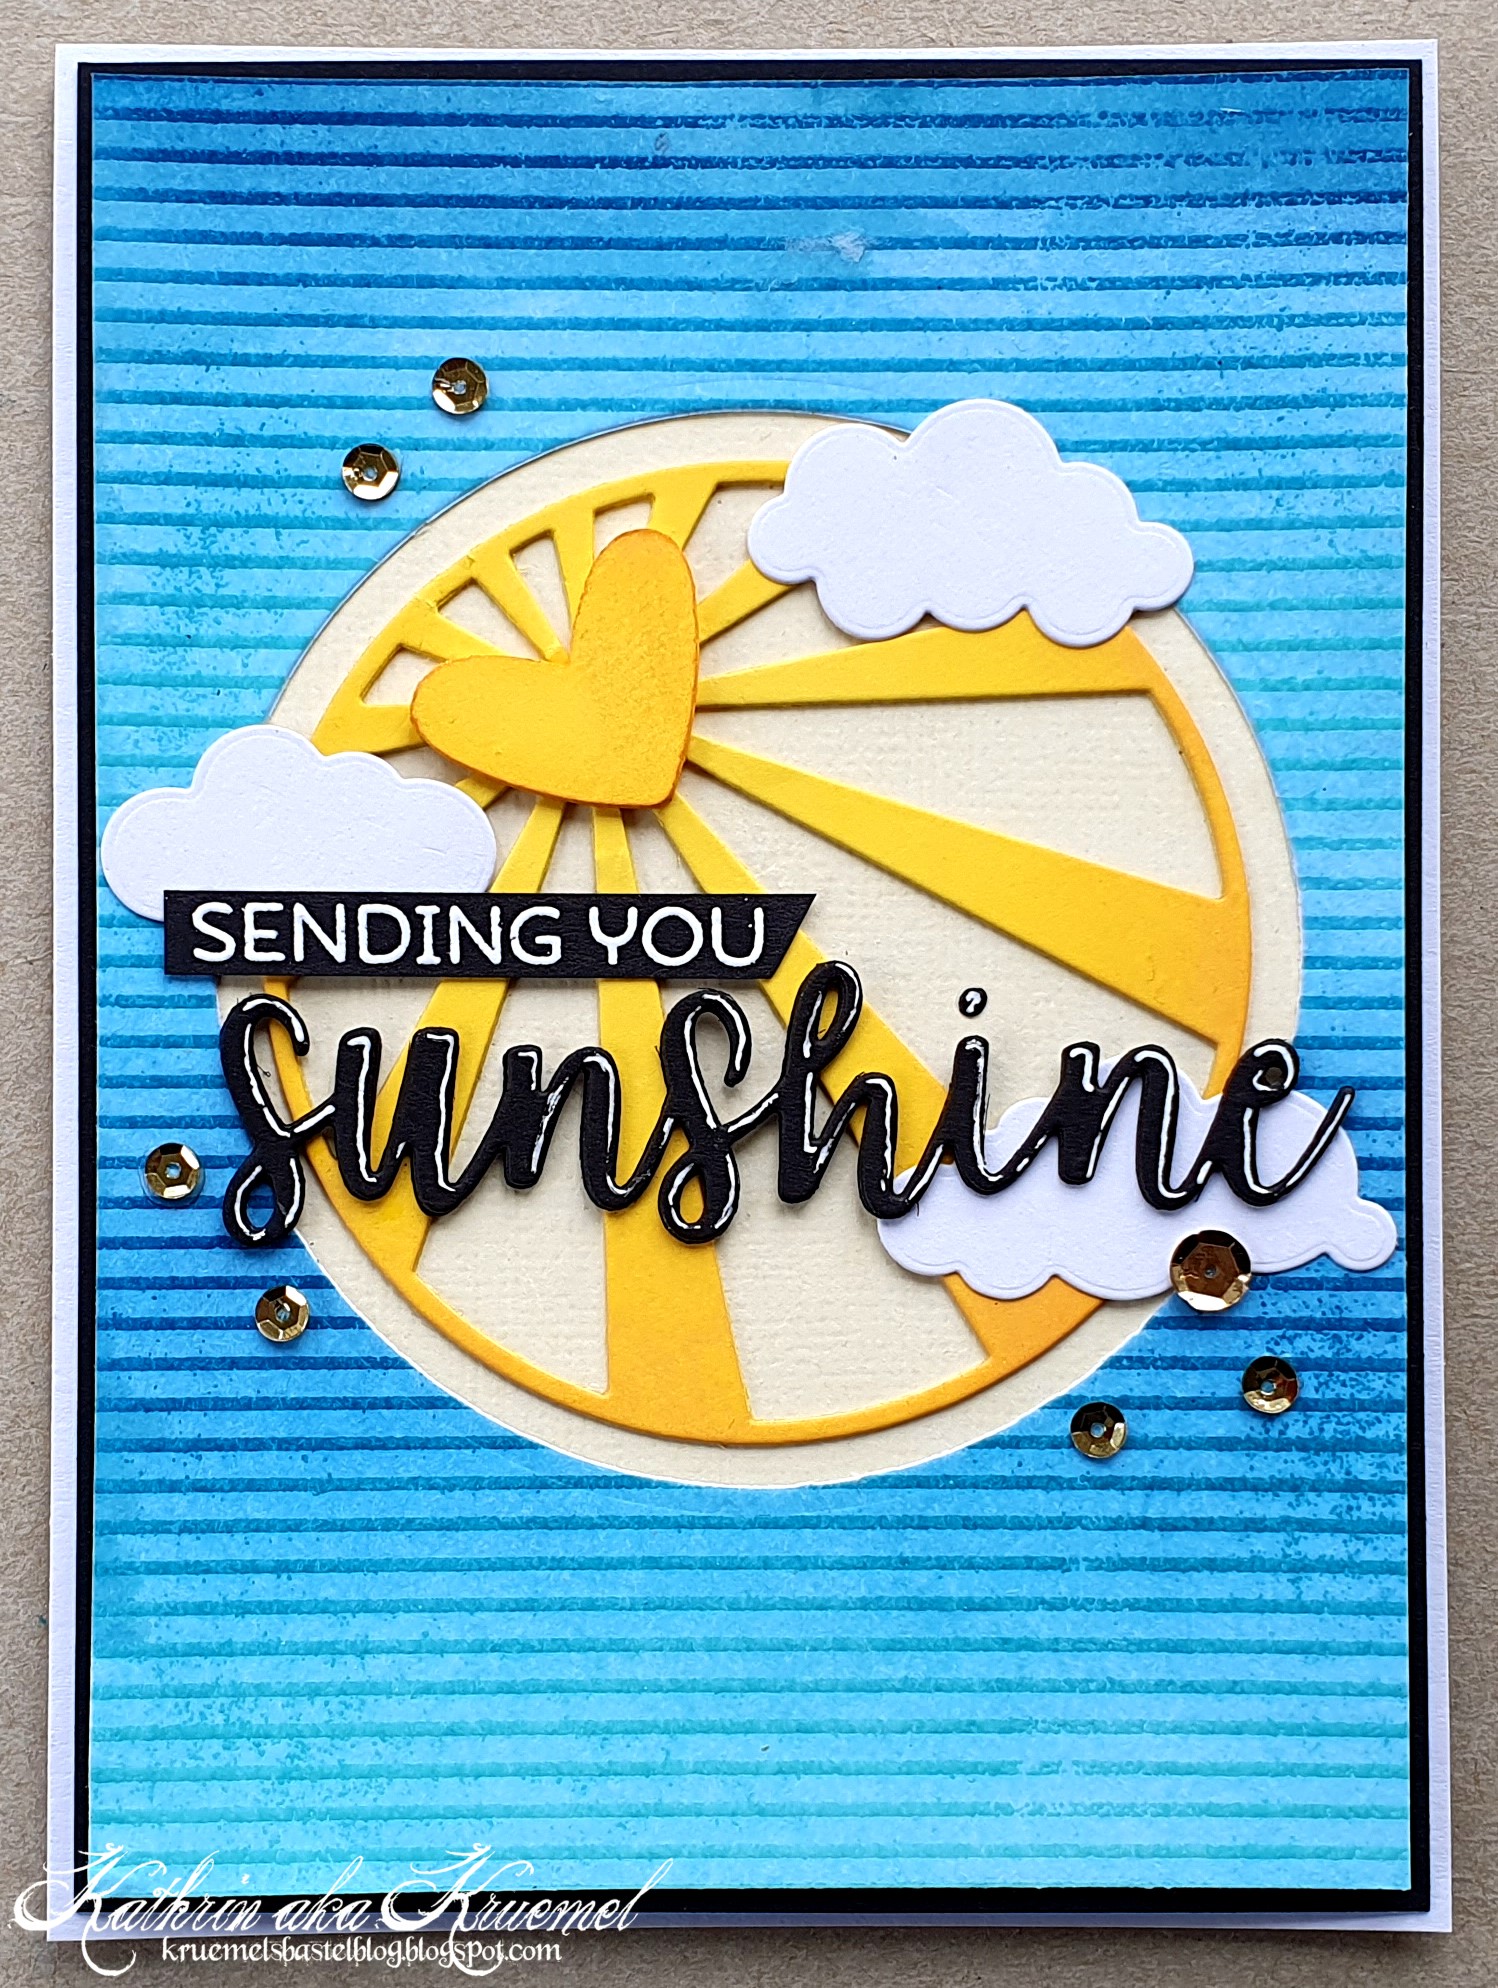
Für die zweite Karte habe ich dann den kräftigeren Hintergrund benutzt - und fand gelb eine gute Kombi dazu. 
Man merkt es vielleicht, die Karte ist relativ einfach geworden. Irgendwie hatte mich da die Lust wohl schon verlassen...
 
For the second card I used the darker background - and though, yellow would be a good color to go with it. 
Maybe you can tell from looking at the card and it simple style, that I kind of didn't want to go on...
 

 Den runden Ausschnitt im Hintergrund habe ich diesmal mit hellgelbem Cardstock hinterlegt. Darauf kam dann einStanzteil mit Sonnenstrahlen, gemacht mit einer weiteren Panorama-Stanze von Charlie und Paulchen. Die habe ich zweimal aus kräftig-gelbem Cardstock gestanzt, die obere Lage mit Distress Ink Wild Honey gewischt und beide Lagen auf den hellgelben Cardstock geklebt. Auf die Sonne habe ich dann noch vier aufeinander geklebte und ebenfalls leicht mit Wild Honey gewischten Herzen geklebt.
Rund um die Sonne habe ich drei Wolken, gemacht mit den Puffy Clouds Stanzen von MFT, aufgeklebt.
Für den Text habe ich das "sending you", ebenfalls aus dem Set Spring von HoneybeeStamps, denn das lag noch auf meinem Tisch, weiß auf schwarzen Cardstock embosst und links auf den Strahlenhintergrund geklebt. Darunter habe ich ein sunshine aufgeklebt. Das habe ich dreimal mit der Sunshine Stanze von MFT aus schwarzem Cardstock gestanzt, die Teile aufeinander und dann auf die Karte geklebt. 

I glued a piece of light yellow cardstock behind the circle cut out, then put the sunray frame, made using another panorama die by Charlie und Paulchen, on top. I've die cut it twice from bright yellow cardstock, inked the top layer with Distress Ink Wild Honey, stacked both layers and attached them to the ligth yellow cardstock. Then I cut four hearts from the same yellow cardstock, inked them up a bit as well, and glued them on top of the sun.
Then I added three white clouds, made with the Puffy Clouds dies by MFT, around the sun.
For the text I white heat embossed a "sending you", again from the Spring stamp set by HoneybeeStamps because it was still on my table, onto a strip of black cardstock and glued it onto the left side of the rays circle. Under it I adhere a die cut "sunshine", cut three times from black cardstock with the sunshine die by MFT, and stacked on top of each other.


Um diese Karte fertigzustellen, habe ich dann noch einige goldene Pailetten als Deko aufgeklebt, alles schwarz gemattet und auf einen weißen Kartenrohling geklebt.

To finish this card, I added a few gold sequins, matted everything black and attached the cardstock to a white note card.

Montag, 6. Februar 2023

Stempeleinmaleins Januar-Sketch die Zweite

 
Hallo Ihr Lieben!
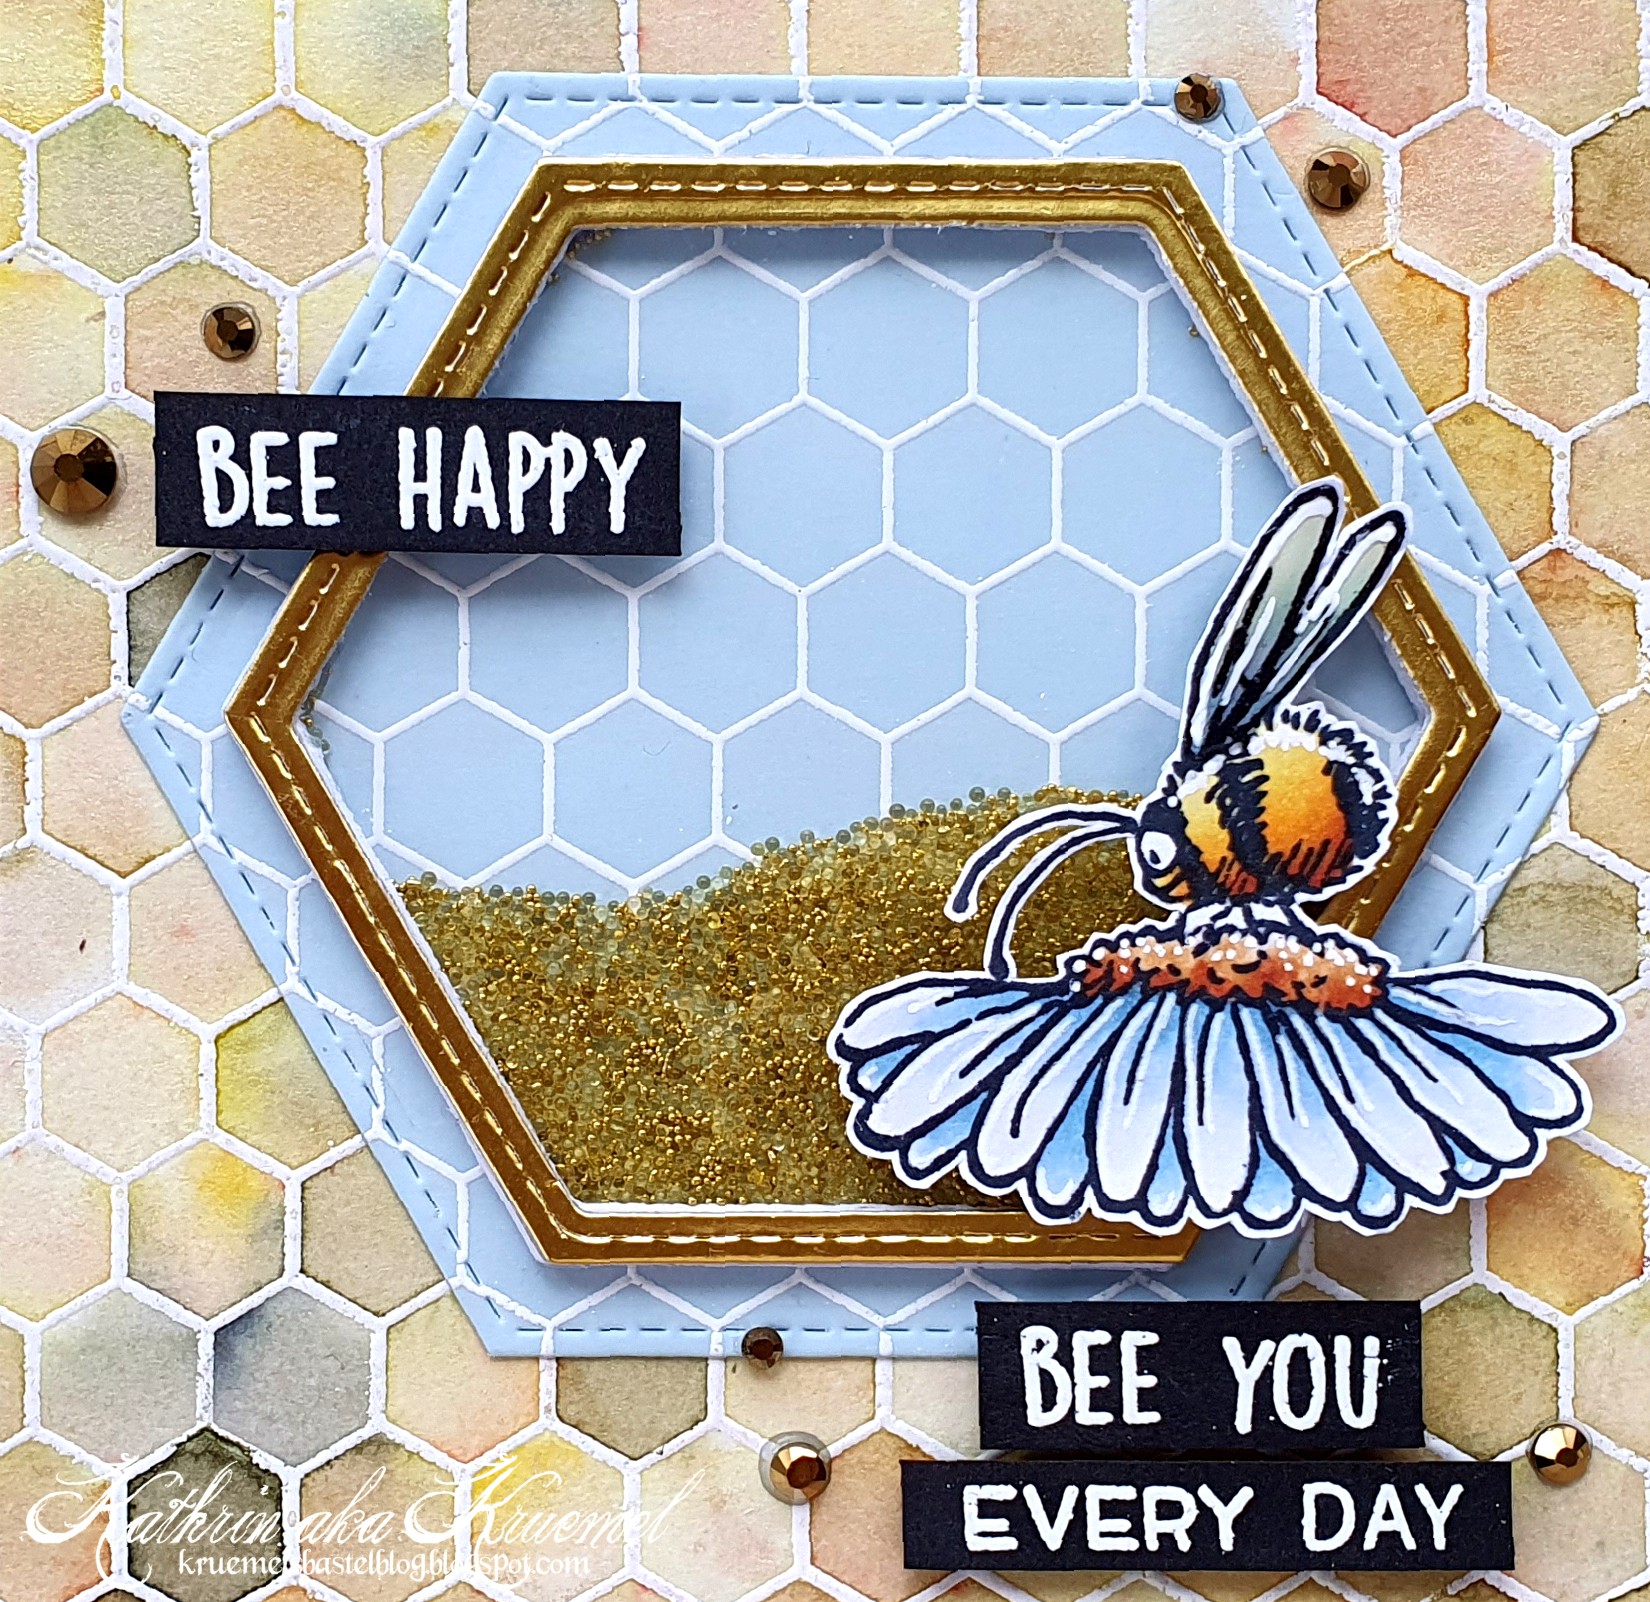
Ich habe es ja bereits angekündigt - nach dem Januar-Sketch von Stempeleinmaleins sind gleich mehrere Karten entstanden. Karte #2 zeige ich Euch heute.

Hello everyone!
I already announced it - I made several cards using the january sketch by Stempeleinmaleins. Today I am sharing card #2 with you.

Für den Hintergrund habe ich diesmal den Honeycomb Background von MFT verwendet und ihn wieder weiß auf Watercolor Cardstock embosst. Dann habe ich die Nuvo Shimmer Powders Ivory Willow, Solar Flare und Golden Sparkler zum Einfärben benutzt. Das Golden Sparkler hat einige sehr dunkle Farbpigmente, da ich die Farben nur mit Wasser besprüht, sie aber nicht mit einem Pinsel vermalt habe, sind so ein paar fast schwarz-blaue Honigwaben entstanden. Aber das gefällt mir eigentlich ganz gut. 

For the background I used the Honeycomb Background by MFT and white heat embossed it onto some watercolor cardstock. Then I went with the Nuvo Shimmer Powders Ivory Willow, Solar Flare and Golden Sparkler to ink the watercolor cardstock. The Golden Sparkler has some really dark pigments, and since I only sprayed the powders with water but didn't use a brush to mix them, I ended up with a few nearly black-blue honeycombs. But I kind of like that.


Als Deko für meine Karte habe ich erst ein Sechseck aus hellblauem Cardstock gestanzt und darauf ebenfalls die Honigwaben weiß aufembosst - und zwar so, dass die Linien später mit denen auf dem mit Shimmer Powder eingefärbten Cardstock fortlaufend sind. 
Obenauf kam dann ein Rahmen aus goldenem Spiegelcardstock, gemacht mit zwei kleineren Sechseck-Stanzen. Darunter habe ich einige Lagen gestanzt aus weißem Cardstock gesetzt, um so einen sechseckigen Shaker zu erhalten.
Als Motiv kam passend eine kleine Biene mit Blume zum Einsatz - es ist aus dem Bee You Stempelset von ColoradoCraft und mit Copics coloriert. Die Flügel habe ich außerdem mit Glossy Accents überzogen. 
Die Texte sind aus den Stempelsets Hive Five sowie Reveal Wheel Circle Sentiments (day) und Some Bunny (every) von LawnFawn. Für die beiden größeren Texte habe ich jeweils verschiedene Stempelteile kombiniert, um den Text so zu stempeln, wie ich ihn haben wollte. Alle Texte sind weiß auf schwarzen Cardstock embosst. 

To decorate my card I first die cut a hexagon from light blue cardstock and then white heat embossed the honeycombs onto it, too - making sure the lines will later match the ones on the background cardstock. 
On top I attached a hexagon frame, die cut from golden mirror cardstock using two smaller hexagon dies. I put a few layers of white hexagon frames under it to create a shaker.
As the image I picked this little bee on a flower - it's from the Bee You stamp set by ColoradoCraft and colored with Copics. I also covered the wings with Glossy Accents.
The texts are from the stamp sets Hive Five, Reveal Wheel Circle Sentiments (day) and Some Bunny (ever) by LawnFawn. For the two larger texts I re-arranged the words to end up with the texts I wanted on my card. All texts are white heat embossed onto black cardstock.


Den Shaker habe ich mit winzig kleinen Kügelchen in gold und hellem gelb gefüllt.

I filled the shaker with tiny beads in gold and light yellow.


Zum Aufkleben der kleineren Elemente habe ich 3D Tape benutzt. Als Deko habe ich noch einige goldene Glitzersteine auf der Karte verteilt.
Den Hintergrund - dessen Schimmer man hier ziemlich gut erkennen kann - habe ich dann schwarz gemattet und alles auf einen weißen Kartenrohling geklebt. 

To attach the smaller elements I used foam tape. To decorate my card I added a few gold rhinestones.
Last I matted the background - of which you can see the shimmer pretty good on this picture - black and adhered it to a white note card.

Sonntag, 5. Februar 2023

Happy birthday from all of us

 
Hallo Ihr Lieben!
Heute habe ich eine Geburtstagskarte zu zeigen - mit Glückwünschen von ganz vielen kleinen Partytieren.

Hello everyone!
Today I have a birthday card to share - with greetings from a whole bunch of cute little party critters.
 
Da ich hin und wieder mal eine flache Karte brauche, habe ich hier komplett ohne 3D Tape gearbeitet - schockierend, ich weiß.
Für den Hintergrund habe ich ein Blatt aus dem Watercolor Wishes Rainbow Paper Pad von LawnFawn mit kleinen Punkten in Regenbogenfarben benutzt. Das sah so schön nach Konfetti aus, und die passen zum Geburtstag natürlich perfekt. 
Der Rahmen ist mit der Heart Garland Backdrop Landscape Stanze gemacht. Den habe ich aus schwarzem Cardstock gestanzt.
 
Since I need a flat card every now and then I worked completly without foam tape here - shocking, I know.
For the background I used a sheet rom the Watercolor Wishes Rainbow paper pad by LawnFawn with lots of tiny dots in rainbow color. Those reminded me of confetti, and confetti and birthdays go together perfectly. 
For the frame I used the Heart Garland Backdrop Landscape die and cut it from black cardstock. 
 

 Mit der Giant Happy Birthday To You Stanze habe ich den Text ausgestanzt - einmal aus schwarzem Cardstock, einmal aus einem weiteren Bogen des oben genannten Designpapierblocks. Ich habe das to you, das noch unter dem Birthday gestanzt wird, weggeschnitten und beide Lagen leicht versetzt aufeinander geklebt. Dann habe ich es auf den Hintergrund geklebt und dabei unter die Herzgirlanden geschoben. 
Ich wollte nicht, dass meine Karte zu sehr nach Valentinstag aussieht - was trotz des Textes durch die Herzgirlanden recht leicht passieren kann. Deswegen habe ich bewusst auf Rot- und Pink verzichtet und die kleinen Herzen, die oben auf die Herzen der Girlande geklebt werden, aus blauem, gelbem und hell-orangefarbenem Papier gestanzt und dafür wieder Blätter aus dem Watercolor Wishes Rainbow Paper Pad benutzt. Dann habe ich sie auf die schwarzen Herzen geklebt.

I used the Giant Happy Birthday to You die to die cut the text - once from black cardstock and once from another sheet from the already mentioned paper pad. I cut off the to you the die cuts under the birthday and stacked both layers a bit off. Then I adhered it to the background, tucking it under the heart garlands.
I didn't want to look my card valentine-y - what could easily happen due to the heart garlands, even with the birthday text. So I decided to not add any red or pink and die cut the little hearts, that go on top of the hearts of the garland, from blue, yellow and light orange papers, using more sheets from the Watercolor Wishes Rainbow paper pad. Then I adhered them onto the hearts on the garland.


Auf einer Geburtstagskarte dürfen natürlich Gratulanten und Partyaccessoires nicht fehlen! 
Ich habe hier das Stempelset Simply Celebrate Critters verwendet. Eigentlich enthält das Set mehrere Reihen mit je einer Art Tiere. Da sie aber jeweils durch eine Linie verbunden sind, war es ganz einfach, die Tiere bunt zu mischen und anhand der Linie sauber in einer Reihe zu stempeln. Das habe ich hier getan. Dann habe ich einigen der Tieren Partyhüte aus diversen Stempelsets aufgesetzt. Alle Motive sind mit Copics coloriert.
Auch drei Luftballons haben es auf die Karte geschafft. Ich habe sie mit Distress Glaze Antique Linen, Fossilized Amber und Twisted Citron auf cremefarbenes, gelbes und grünes Vellum gestempelt, die Ballons ausgeschnitten und die Schnüre später mit einem weißen Gelstift übermalt. Dann habe ich sie durch meine Xyron gedreht und konnte sie so unsichtbar auf die Karte kleben. Ich habe mich für Vellum entschieden, weil man durch es hindurch noch den gestanzten Text sehen kann.
Um den Text zu vervollständigen, habe ich noch drei Sprechblasen mit Distress Glaze Speckled Egg auf "normales" Vellum embosst und darauf verteilt noch "from all of us" aus dem Stempelset Be Hap-Pea weiß in die Sprechblasen embosst. Auch die habe ich mit der Xyron mit Kleber versehen und aufgeklebt. 
Zum Schluss ist mir dann aufgefallen, dass der Hase hier wohl der "Party Pooper" ist - er hat keinen Hut auf, hält keinen Ballon und am "from all of us" ist er auch nicht beteiligt. Aber er schaut zumindest schön fröhlich drein.
Für die Partyhüte, Sprechblasen und Luftballons habe ich jede Menge verschiedene Sets benutzt, hauptsächlich Really High Five, Be Hap-Pea und Party Animal. Es kann aber sein, dass sich noch ein kleines Motiv aus einem anderen Set eingeschlichen hat....

Of course there have to be some party people - or critters - and party accessoires on a birthday card!
I used the Simply Celebrate Critters stamp set here. I contains several rows of animals - one kind per row. Since they are all connected with a line under their hands/paws/wings it was very easy to line up the stamps using that line and mix the animals to have all kinds in one row. That's what I did here. Then I gave some of them party hats from different stamp sets. All images are colored with Copics.
There are also three balloons on the card. I used Distress Glaze Antique Linen, Fossilized Amber and Twisted Citron to stamp them onto cream, yellow and green vellum, cut the balloons out and used a white gel pen to re-draw the strings. Then I ran them through my Xyron to be able to attach them to the card invisibly. I went with vellum for the balloons because you can still see the die cut text through them.
To finish the text I embossed three speach bubbles with Distress Glaze Speckled Egg onto "regular" vellum and then white heat embossed a "from all of us" from the Be Hap-Pea stamp set divided up into the those bubbles. Again I used my Xyron to cover them with an even layer of glue and adhered them to the card.
Later I realized that the bunny in the center seems to be the "party pooper" - it doesn't wear a hat, isn't holding a balloon and also isn't saying any part of the "from all of us". But at least he's wearing a happy smile.
For the hats, speech bubbles and balloons I mixed all kinds of different sets, mainly Really High Five, Be Hap-Pea and Party Animal. But it's possible that a small image from another set sneaked in here....

Samstag, 4. Februar 2023

Verzaubert!

 
Hallo Ihr Lieben!
Letztes Jahr kamen viele Produkte hier in Deutschland erst so viel später als gewohnt auf den Markt - manchmal so spät, dass der eigentliche Anlass bereits vorüber war. Einige Stempel und Stanzen habe ich mir deswegen gar nicht erst gekauft, aber an manchen konnte ich nicht vorbei. So wie diese Halloween-Stanzenset von HoneyBeeStamps. Und dann kam mir die Idee, ich könnte sie einfach zweckentfremden - und so ist diese "zauberhafte" Valentinstagskarte entstanden....

Hello everyone!
Last year so many products took much longer than usual to make it to the shops in Germany/Europe - sometimes so late, that the occcasion it was designed for had already passed. That's why I decided not to buy some stamps/dies, but there were a few that I couldn't resist. Like these Halloween die sets by HoneyBeeStamps. Now I had the idea to simply use it for a different holiday - and that's how this Valentine's card came to life.
 
Im Hintergrund habe ich mal wieder die Faux Dip Dye Technik angewandt. Dafür habe ich Watercolor Cardstock und Distress Ink Refills in Candied Apple, Lumberjack Plaid und Black Soot benutzt. Er ist ein wenig dunkler geworden, als ich geplant hatte, aber er passt trotzdem super. Nach dem Trocknen habe ich noch goldene Metallic Watercolor über den Cardstock gespritzt.
 
For the background I did the Faux Dip Dye Technique again. I used Watercolor cardstock and Distress Ink Refill Candied Apple, Lumberjack Plaid and Black Soot. It turned out a bit darker than I had planned, but I still like it a lot. After the ink had dried completly, I flicked some gold metallic watercolor onto the cardstock. 
 
 
Die Elemente, die ich für die Deko benutzt habe, sind aus den Stanzensets Toil and Trouble und A Little Spooky. Ich habe die Teile aus Watercolor Cardstock gestanzt und mit ZIG Markern coloriert. Damit die Zauberkugel schön schimmert, habe ich den Kreis zusätzlich aus Hologramm-Vellum von LawnFawn gestanzt und auf den Kreis aus Watercolor Cardstock geklebt, bei ich zuvor die Schlieren grau coloriert hatte. Aus dem selben Vellum habe ich auch den Nebel/Rauch im Hintergrund gestanzt.  Der Ständer für die Kugel und der Kerzenständer sind aus goldenem Spiegelcardstock gestanzt, den Kerzenständer habe ich dann mit einem Sanding Block ein wenig auf alt getrimmt. Und bevor ich den Bücherstapel gestanzt habe, habe ich ganz sacht ein Versamark Kissen auf die Stanze gedrückt, so dass die später geprägten Teile des Motivs mit der Tinte überzogen sind. Darauf habe ich dann goldenes Embossingpulver gestreut und embosst. 
In den Stanzensets gab es kein Flaschenmotiv, und ich wollte doch so gerne einen Liebestrank mit verwenden. Meine Stanzen anderer Marken passten von der Größe her nicht. Also habe ich eine der Flaschen aus dem Stempelset Tränke von Create a Smile mit No-Line Coloring Ink gestempelt, ebenfalls mit ZIG Markern coloriert, ausgeschnitten und auf den Buchstapel geklebt.

The elements I used to decorate my card are from the Toil and Trouble and A Little Spooky die sets. I die cut them from watercolor cardstock and colored them with my ZIG markers. To make the crystal ball shine mystically, I also die cut the ball from holografic vellum by LawnFawn and adhered to the one I cut from watercolor. Before I had colored the streaks on the watercolor ball grey. I used the same vellum to cut the fog/smoke in the background.
The stand for the crystal ball and the chandelier are cut from gold mirror cardstock, I used a sanding block to give the chandelier a bit of a antique look. And before I die cut the stacked books I pressed my Versamark ink pad lightly onto the die to transfer the ink in the later debossed areas. I sprinkled gold embossing powder onto it to make the details show.
There's no potion bottle included in any off those two die sets, and I really wanted to include a love potion to my mix of magical things. The dies I had from other brands didn't fit in size, so I stamped one of the bottles from the Potions stamp set by Create a Smile with No-Line Fade Out Ink, colored it with my ZIGs, cut it out and attached it to the book on top of the stack.

 
Auch beim Text musste ich ein wenig tricksen - ich hatte genau drei passende "I'm under your spell", "you're spell-cial to me" und "You and Me spells friendship". Aber ich war mit allen dreien nicht glücklich. Also habe ich einfach das Bitty Birthday Wishes Stempelset von MFT genommen, darin warin zumindest die passenden Worte oder -teile - und habe die weiß auf schwarzen Cardstock embosst. 
Für das Wort Spell habe ich das Spell Anything Alphabet von MFT benutzt und die Buchstaben aus dunkelrotem Cardstock gestanzt. Dann habe ich sie mit einem Nuvo Aqua Shimmer Pen beglittert und weiße Highlights aufgemalt. 

I also had to do some thinking outside the box with my text - I had three that would have worked: "I'm under your spell", "your're spell-cial to me" and "you and me spells friendship". But I wasn't too happy with any of them. So I brought out the Bitty Birthday Wishes stamp set by MFT, it had at least all the words/parts in it - and white heat embossed what I needed onto black cardstock.
For the word spell I used the Spell Anything Aphabet by MFT and die cut the letters from dark red cardstock. Then I made it shiny by putting some Nuvo Aqua Shimmer on top and added a few white highlights.


Um meine Karte zusammenzusetzen, habe ich die gestanzten Dekoteile aufeinander- und dann mit dünnem 3D Tape auf den Hintergrund geklebt. 
Die gestanzten Buchstaben und die kleinen Cardstockstücke mit den embossten Worten sind mit dickerem 3D Tape aufgeklebt.
Zum Schluss habe ich noch ein paar rote Clay Hearts oben auf der Karte verteilt und alles auf einen weißen Kartenrohling geklebt.

To put my card together, I attached the die cut decorations to each other and then adhered them to the background with some thin foam tape.
The die cut letters and the little cardstock pieces with the embossed words are attached with some thicker foam tape.
As a finishing touch I put some small red clay hearts around the elements on my card and then glued everything onto a white note card.

Donnerstag, 2. Februar 2023

Best FISHES to you

 
Hallo Ihr Lieben!
Heute zeige ich Euch auf dem Stampcorner Blog eine weitere Karte mit dem süßen Stempelset aus dem Februar-Release. Die Karte kam irgendwie ganz von selbst zustande - sowas liebe ich!

Hello everyone!
Today over on the Stampcorner Blog I am sharing another card using an image from the cute stamp set from Stampcorner's february release. This card came together so easy - I love when this happens!

 Ich habe hier mit der Swiss Dots Stanze von WhimsyStamps den Löcher-Hintergrund aus einem der Papiere aus dem Paper Pack 06 von Stampcorner ausgestanzt - die Fische auf dem Papier passen einfach perfekt zum Motiv. Dann habe ich den Hintergrund mit Designpapier aus dem Paper Pack 01 hinterlegt. Die blau-weißen Linien erinnern mich an Wellen. Zum Aufeinanderkleben der beiden Papiere habe ich 3D Tape benutzt. 

Here I die cut the Swiss Dots Background by WhimsyStamps from one of the papers of Stampcorner's Paper Pack 06 - the fish on the paper just go perfectly with the image. Then I put a piece of patterned paper from the Paper Pack 01 behind it, attaching the layers with foam tape. The blue and white zig zag lines reminded me of waves. 


Die süße Katze aus der Feder von GroWi Design habe ich mit Copics in Grautönen coloriert. Für die Fische habe ich ein helles blau gewählt. Die gleiche Farbe habe ich für die einzelnen Fische aus dem selben Stempelset gewählt, dann habe ich alle Motive ausgeschnitten.
Die einzelnen Fische habe ich mit dünnem 3D Tape in einige der Löcher geklebt. Außerdem habe ich aus grauem Cardstock die Rohrkolben von CraftEmotions ausgestanzt. Die Rohrkolbenoberteile habe ich schwarz überklebt und das Stanzteil dann etwa mittig auseinander geschnitten, so dass später links und rechts des Motivs etwas davon zu sehen war. 
Die Rohrkolben habe ich dann direkt auf den Fische-Hintergrund geklebt, die Katze ist wieder mit 3D Tape aufgeklebt.
Für den Text habe ich einen Stempel aus dem Beary Happy Holidays Stempelset von LawnFawn benutzt - das Wortspiel fand ich einfach klasse. Und ich versuche derzeit, meinen Vorrat an Karten etwas aufzufüllen. Da ist es gut, eher neutrale Texte zu verwenden. Ich habe den Text mit weißem Embossingpulver auf schwarzen Cardstock embosst und den Streifen dann ebenfalls mit 3D Tape direkt unter der Katze auf den Hintergrund geklebt.

The cute cat, drawn by GroWi Design, is colored in greys with my Copics. For the fish I went with a light blue and used the same color to color in a few individual fish, that come in the same stamp set. Then I cut all the images out.
I used thin foam tape to glue the individual fish inside the holes in the background. Then I also die cut the cattails by CraftEmotions from grey cardstock and covered the upper areas with black cardstock. I cut the die cut apart - about in the center - so later there would be some of it visible on the left and the right of the image. 
I attached the cattails directly to the swiss dots background, then used foam tape again to glue the cat on top.
The text comes from the Beary Happy Holidays stamp set by LawnFawn - I just really liked it with the image. And since I'm trying to re-stock on cards I like to use some more neutral texts, that can be used for different occasions. I white heat embossed the text onto black cardstock and then attached the cardstock strip directly under the cat with foam tape.


In einige der Löcher im Hintergrund habe ich dann noch hellblau-irisierende Perlen geklebt, die ein wenig wie Blubberblasen aussehen. Dann habe ich alles auf einen weißen Kartenrohling geklebt.

I glued a few light blue iridescent pearls into some of the holes in the background, they look like little bubbles. Then I attached everything onto a white note card.