Hallo Ihr Lieben!
Mit einem neuen Sketch startet heute eine weitere Create a Smile Challenge. Und mich hat der Sketch zu einer Valentinstags-Karte inspiriert. Allerdings ist sie farblich - und evtl. auch vom Motiv her - nicht ganz so klassisch ausgefallen. Hier ist der neue Sketch:
Hello everyone!
With a new sketch we are starting the next Create a Smile Challenge today. It inspired me to make a valentine's card - it may just not be traditional color- and imagewise. This is the sketch:
Ich weiß nicht, ob es das Herz im Sketch war, das mich so beeinflusst hat, oder ob es später der Frosch und die dazugehörigen Texte waren, denn eigentlich wollte ich gar keine Valentinstagskarte mehr machen. Aber ich finde, die kann man zur Not auch später noch verwenden.
I am not sure if it was the heart in the sketch, that pushed me towards a Valentine's card, or if it was the frog and its sentiments later. I definately hadn't planned to make any more Valentine's cards this year. But I think, I still can give that away later this year.
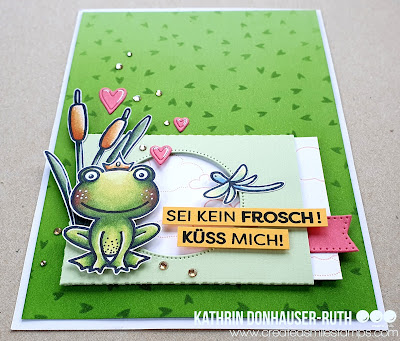
Ich habe mit einem Stück ziemlich kräftig-grünem Cardstock gestartet. Von unten her habe ich den Cardstock mit Distress Ink Mowed Lawn und Twisted Citron ein wenig schattiert. Dann habe ich den Confetti Hearts Stencil aufgelegt und die Herzen ebenfalls in grün aufgewischt. Im unteren, dunkleren Bereich habe ich dafür Rustic Wilderness, weiter oben dann wieder Mowed Lawn benutzt.
I started with a piece of quite bright green cardstock. I used Distress Ink Mowed Lawn and Twisted Citron to give the cardstock a bit of a gradiant. Then I put the Confetti Hearts stencil on top and added the tiny green hearts. In the lower, darker area of the cardstock I used Rustic Wilderness, then I switched to Mowed Lawn again for the hearts in the upper area.
Als ich den Sketch das erste Mal sah, wusste ich, dass ich die Window Pocket Stanze für die Deko verwenden wollte. Ich habe sie aus zart grünem Cardstock gestanzt und einfach einen Teil davon abgeschnitten, damit die Tasche später besser auf die Karte passt. Und weil im Sketch der Kreis ein wenig weiter links ist, bei der Stanze aber weiter rechts, habe ich zum Zukleben meiner Tasche die größere Lasche verwendet. Da die Tasche aufgeklebt ist, sieht man das gar nicht.
In die Tasche habe ich ein Stück weißen Cardstock geschoben, auf das ich mit hellroas farbener Tinte und dem Cloudy Day Stempel die kleinen Wolken aufgestempelt habe. Leider gibt es den Stempel nicht mehr, aber ich wollte ihn unbedingt verwenden. Rechts am Cardstock habe ich dann ein Stück eines der Useful Banners, gestanzt aus pinkfarbenem Cardstock, aufgeklebt. An dem kann man die Karte aus der Tasche ziehen - ich werde später noch eine Geschenkkarte an der Rückseite befestigen. Die steht dann zwar etwas weiter aus der Tasche heraus, das stört mich aber nicht.
Der süße Frosch ist natürlich aus dem Stempelset Sei kein Frosch - genauso wie die Texte. Die Texte habe ich schwarz auf gelben Cardstock gestempelt und dann mit 3D Tape auf dem Umschlag/der Tasche angeklebt.
Aus dem Stempelset Steiler Zahn habe ich noch die Rohrkolben und die Libelle abgestempelt und dann alle Motive mit Copics coloriert, ausgeschnitten und auf der Tasche befestigt. Zum Aufkleben des Froschs habe ich wieder 3D Tape benutzt.
Und weil ich das Pink - eigentlich abgeleitet von den Backen des Froschs - nochmal aufgreifen wollte, habe ich noch einige Herzen mit der Hearts Stanze ausgestanzt und über dem Frosch aufgeklebt.
The first time I saw the sketch, I knew, that I wanted to use the Window Pocket die for my decorations. I die cut it from soft green cardstock and then cut off a part of it to make it fit onto the card. And since the circle in the sketch is moved a bit to the left, the die cuts it more to the right, I simply used the wider flap to glue the pocket closed. Since I glued it to the cardstock no one with know.
I cut a piece of white cardstock to put into the pocket and stamped some clouds onto it using some light pink ink and the Cloudy Day stamp. Sadly this isn't available anymore, but I really wanted to use it here. I attached a piece of one of the Useful Banners, cut from pink cardstock, to the right edge of the cardstock piece, which can be used to pull the little card out of the pocket. I plan to attach a gift card to its back later. It won't fit fully into the pocket anymore after I cut that down but I don't mind it being visible.
The cute frog is from the Unfrogettable stamp set - as are the texts. I stamped the texts black onto yellow cardstock and then attached the strips with foam tape to the pocket only.
From the Oh Dam stamp set I stamped the cattails and the dragonfly image and colored all the images with my Copics. Then I cut them out and attached them to the pocket, using foam tape behind the frog again.
And since I wanted to pick up the pink again - which I originally added because of the frog's pink cheeks - I die cut some hearts with the Hearts die set and arranged those above the frog.
Zum Schluss habe ich die Tasche samt Motiven wieder mit 3D Tape auf dem Hintergrund befestigt - das macht das Herausziehen der kleinen Karte einfacher -, habe alles auf einen weißen Kartenrohling geklebt und für ein wenig Bling noch ein paar gelb-pink irisierende Glitzersteine aufgeklebt.
To finish the card, I attached the pocket with foam tape to the background - that makes pulling the tab easier -, adhered everthing to a white note card and added a few yellow-pink iridescent rhinestones for a bit of bling.


.jpg)
